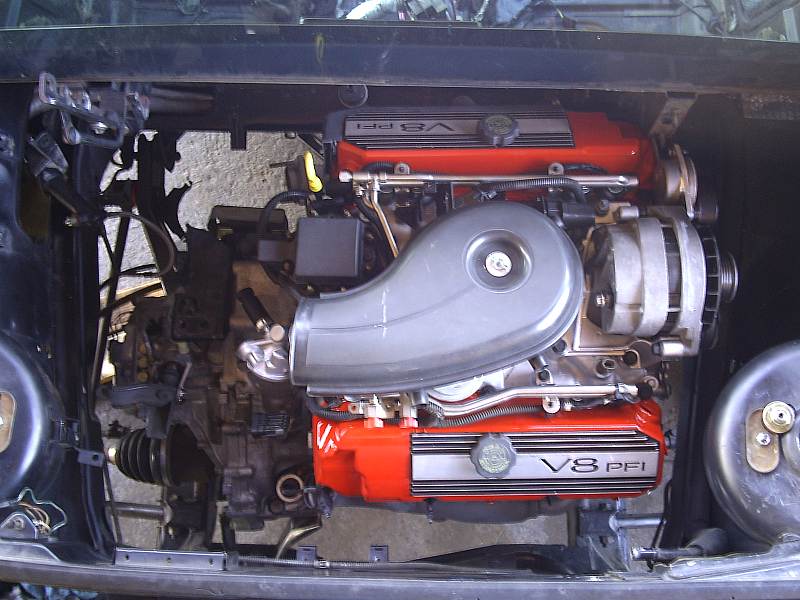
Just look at the other side, youll see it looks identical to that side now.... so no you wont need anything there. I really have been wanting to do that on my swaps, It makes for a cool custom look among fiero guys.
Thats exactly what I was thinking before I cut it off. I guess I wont know how it will be on this car til I get a chance to drive it. Thanks Here is the only pic of how it looks so far.
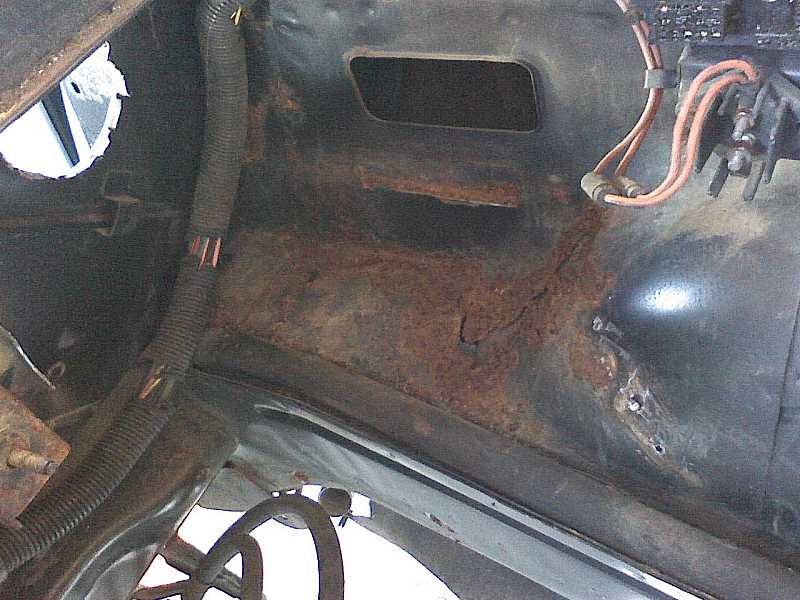
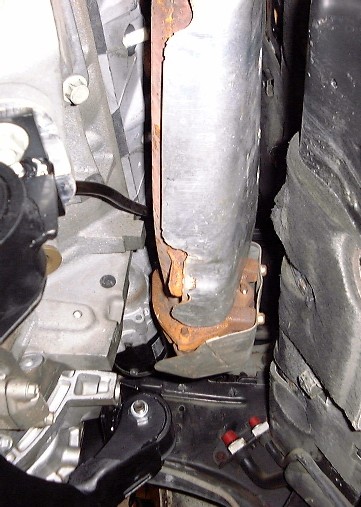
I also did the same repair for under the battery tray but mine was much worse. I had to cut out a big portion of the panel. Notice the chisel made holes in the firewall? Had to fix those too. Before
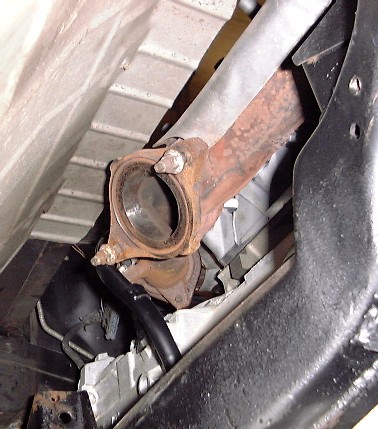
After. I'm still not sure why the camera picked up those spots and made it look like there was still rust. It looks much better in person.
[This message has been edited by Fieroseverywhere (edited 10-05-2007).]
Is removing the DB bracket going to solve the issue with the Alt clearance? From what I have seen, its going to have to be mounted low in the area that it is on the 3800 install. The install is looking good and all the pictures take the leg work out of my install. Thanks for providing all the pictures and the details about the swap.
Unfortunately, no. The alternator, as-mounted from the factory on the LS4, would have it's pulley well into the strut tower by the time you bolted it up. I have done some mock-ups of where to relocate the alternator on this engine and it looks like the only place it has a chance to fit is above the right side CV joint -- but it is very tight there because of the location of the stock rear exhaust manifold. But it looks like it will fit; it will just be very tight. Of course I will post pics of my low-mount alternator solution when I get to that point.
Have you considered a smaller alternator with appropriate output?
This thing is pretty small already being a Denso unit; and the size of the alternator wouldn't matter with respect to the factory mounting location (if that's what you're asking) because of where the belt runs and it's relationship to the strut tower. If coil overs were going to be used on the rear of this car, I suppose you could modify the strut tower to clear the alternator; but then there would be the issue of how high the alternator sits on the factory bracket and if that would clear the deck lid or not. It should be noted that the alternator in this application is under full computer control and there is actually a battery current sensor that goes around the battery cable (inductive pickup) so the BCM can monitor battery health and charge/load status.
I want to thank everyone for their advice and recommendations on brake upgrade options. I've investigated everything from leaving my current setup as is (Fiero Store Grand Am brakes on front and OEM on rear), to Grand Am brakes all around, to the Lebaron 11.25 rotor upgrade, to the big brake kits offered by V8 Archie, West Coast Fiero, and RCC. At the end of the day, I wanted vastly improved stopping power than I currently have, great asthetic appeal, and at an affordable price (seeing that I'm not being as thrifty as I thought I'd be with all the "extras" I'm doing with this swap!!).
I've decided to go with one of the recommedations you guys made, and went with Fiero Addiction's 12" Corvette Rotor Brake Upgrade with drilled/slotted/zinc plated rotors.
The kit has everything I need (ahem...Ryan needs) to upgrade my 87' Fiero short of the front and rear calipers, and a longer brake line to keep my emergency brake functional. Now, the only task now is to find 88' front and rear calipers, which this kit requires to work with my OEM master cylinder (though I think I might need to go bigger if the force to push the pedal is drastically increased). Not at all an easy, nor inexpensive task...as I'm quickly finding out.
I had found a pair of NEW front 88 calipers on ebay for $90...but I lost the bid in the final seconds to someone who bid $135.55!! The Fiero Store has a set of fronts for $160, but I was hoping to do better. Finally, I found a NEW set on calipersonline.com for $125 w/ no core charge...so I quickly snatched those up yesterday.
So now I just need to find 88 rear calipers. Same place above has them for $350!! Yeah, I know! I thought it was a misprint...but The Fiero Store is selling them for $340!! These must be in serious short supply! But I'm going to keep searching, hoping I can either get lucky and find some cheaper, or at least salvage some from a junk yard and either have them reconditioned myself or use these as cores to get the $350 price down. I did find out that the All Wheel Drive 88-90 Pontiac 6000 shared the same rear calipers as the 88 Fiero, so I'm going to try searching under that description as well. Too bad I can't use my 87 rears as a core!
Then again....anyone interested in buying a Grand Am front brake set for an 87' Fiero!!
[This message has been edited by blkcofy (edited 10-10-2007).]
Junkyard is your best bet, as I said before I just got mine for $25 each!
www.car-part.com, search 88 fiero rear calipers, call up the junkyard that has the best deal, and order 2. You most likely will be able to get fiero brakes off there, there were plenty to pick from when I went.
Unfortunately, no. The alternator, as-mounted from the factory on the LS4, would have it's pulley well into the strut tower by the time you bolted it up. I have done some mock-ups of where to relocate the alternator on this engine and it looks like the only place it has a chance to fit is above the right side CV joint -- but it is very tight there because of the location of the stock rear exhaust manifold. But it looks like it will fit; it will just be very tight. Of course I will post pics of my low-mount alternator solution when I get to that point.
I don't remember the A/C mounting, but on the Northstar both the A/C compressor and alternator mount low on the forward side of the engine. Is that workable in this case?
I have a guy up the street that is parting out a couple of 88 coupes. I will ask him is he still has the calipers. He usually want 35 a piece for them (cause that is what the Fiero Store gives as credit). If your interested let me know and I will find out if he has them for sure. I can ship them to you with a discount on shipping. Should be ~10-20 dollars.
EDIT: I just spoke to the guy and he sold them yesterday. I will keep my eyes open for a set and let you know if I find anything. I got mine in the mall for a good price. FYI, the rear 88 fiero calipers are also available on a 88-90 pontiac 6000 AWD. This will give you a few more options for where to find them or at the least a few more years that they were made. The fronts are unique to the fiero so the mall is probably the best choice for those.
[This message has been edited by Fieroseverywhere (edited 10-11-2007).]
I don't remember the A/C mounting, but on the Northstar both the A/C compressor and alternator mount low on the forward side of the engine. Is that workable in this case?
Nope, water pump mounts directly above the A/C compressor leaving no room on the front of the engine for the alternator....
Thats a question. Are you going to re-enforce this area? I just did this myself and am still trying to decide whether I need to or not. You will be pushing more power then me but the same should apply.
No dog bone for quite a wile, and no problems. No stress cracks in the paint or under the paint.
I plan to do my 4.9 swap the same way, no dog bone and more than the stock three mounts down low. At least 5 under the engine. More power needs a stronger mounting system.
All this 88 Fiero caliper sourcing from an AWD 6000 cracks me up.
There were roughly as many AWD 6000s built as there were Indy Fieros, and I've owned two myself, as well as my brother owning one, and I've parted a couple out in junkyards and seen a few on the road. Good luck finding a far-less-common than 88 Fiero AWD car to source from I believe the numbers were: 88 124 AWDs produced 89 1700 some 90 200 red, 200 blue.
Originally posted by Fieroseverywhere: EDIT: I just spoke to the guy and he sold them yesterday. I will keep my eyes open for a set and let you know if I find anything. I got mine in the mall for a good price. FYI, the rear 88 fiero calipers are also available on a 88-90 pontiac 6000 AWD. This will give you a few more options for where to find them or at the least a few more years that they were made. The fronts are unique to the fiero so the mall is probably the best choice for those.
FYI, there were at most 2500 AWD 6000's made (I have a '90), so that's less than 1/10 as many '88 Fieros made.
Edit: Kurt beat me to it.
On the plus side I can use a 12" Corvette brake kit for an '88 Fiero on the rear of my AWD...
[This message has been edited by Will (edited 10-12-2007).]
Nope, water pump mounts directly above the A/C compressor leaving no room on the front of the engine for the alternator....
Oh yeah... the Northstar puts the w/p on the back of the engine and doesn't have to deal with it in front... bummer. Chance to mount it top & center for easy maintenance like a 4.9? Since it's an alternator, it doesn't matter which way you spin it (the rectifier determines output polarity), so you could turn it around and mount it where the battery used to be.
Oh yeah... the Northstar puts the w/p on the back of the engine and doesn't have to deal with it in front... bummer. Chance to mount it top & center for easy maintenance like a 4.9? Since it's an alternator, it doesn't matter which way you spin it (the rectifier determines output polarity), so you could turn it around and mount it where the battery used to be.
Oh yeah... the Northstar puts the w/p on the back of the engine and doesn't have to deal with it in front... bummer. Chance to mount it top & center for easy maintenance like a 4.9? Since it's an alternator, it doesn't matter which way you spin it (the rectifier determines output polarity), so you could turn it around and mount it where the battery used to be.
That thought had crossed my mind as well until I looked inside the alternator and noticed which way the fan blades were bent. If I tried to spin it backwards, the cooling fans wouldn't work properly. BUT, it should be noted that on the Supercharged Ecotec the alternator is spun backwards according to the pictures I have seen.
No dog bone for quite a wile, and no problems. No stress cracks in the paint or under the paint. I plan to do my 4.9 swap the same way, no dog bone and more than the stock three mounts down low. At least 5 under the engine. More power needs a stronger mounting system.
You don't need a dog bone as long as the powertrain is supported in all 4 corners. The only reason why the Fiero had one stock was because of the 3-point mounting system.
Having said that I have been doing some thinking about using a dog bone on future LS4/4T65-E swaps. The reason was discussed earlier; GM didn't cast in enough beef in the left rear corner of the transmission case for a standard 3-bolt mount in that area. I had to make a bracket that bolts both to 3 of the side cover to case bolts as well as the available 3 rear case bolt holes (6 bolts total); but this was very labor intensive (and time consuming) to make. I am going to see how much work it is going to take to build a custom strut tower brace that has provisions for dog-bone mounting so I can use a dog-bone on the left side of the engine. The strut tower brace would be a complete bolt-on with no welding required to the chassis as I have envisioned it. But that idea has been put on the back burner until the next LS4 swap I have scheduled.
[This message has been edited by Darth Fiero (edited 10-12-2007).]
I did something simular to that in the past. Other then loosing the decklid springs, it was really effective. This was on a two point like the 87-88 4 cyl automatic Fiero's sit on, but with a 3.1 Aluminum headed engine and a 4T60. It did not function as a strut tower brace however, but I easily see how it could have, draw inspiration as needed.
I did something simular to that in the past. Other then loosing the decklid springs, it was really effective. This was on a two point like the 87-88 4 cyl automatic Fiero's sit on, but with a 3.1 Aluminum headed engine and a 4T60. It did not function as a strut tower brace however, but I easily see how it could have, draw inspiration as needed.
Hmm, what you didn't would probably work but I was thinking of just running the strut tower brace and dog bone mount along the back firewall. That way the brace could be shorter/smaller than what you did.
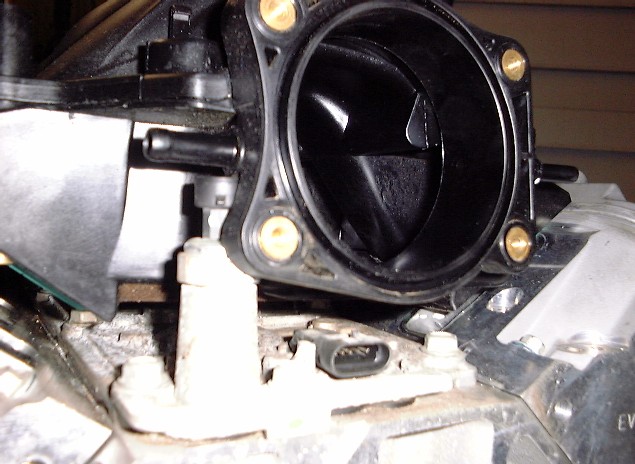
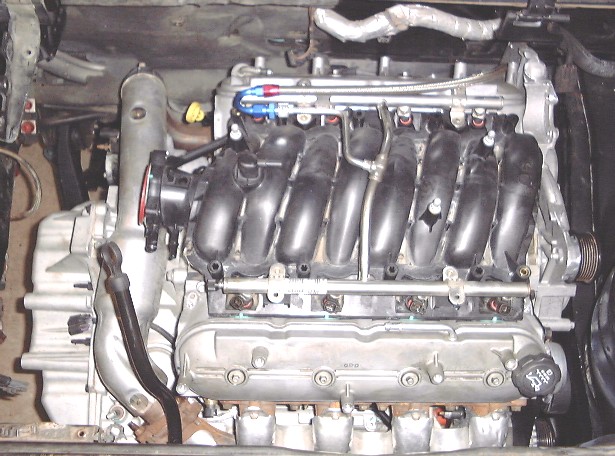
Sorry for the delay but I had to install a new shop heater this week since the weather has started to go downhill. But I was able to borrow an LS2 intake from Lingenfelter and here is what I found...
The LS2 intake's throttle body inlet is molded too low and won't clear the oil pressure sending unit; but even if that were removed and the boss for it machined down, measurements indicate the intake will still not clear the DoD electrical plug.
So I turned the LS2 intake around to see if it would fit the other way and yes it will -- at least bolt right down on the heads and clear the oil pressure sender and DoD plug... BUT...
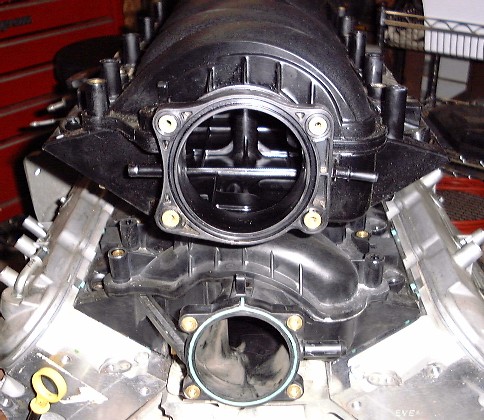
Once the water pump housing is installed it won't clear a critical part of the housing -- one of the coolant passages. Here is a comparison picture between the LS2 and LS4 intake...
As you can see the LS2 intake has a much larger throttle body opening than the LS4. However, it's unclear at this time if the LS4 needs this large of a throttle body. I'm sure the LS4 would benefit from a larger throttle body and throttle body opening but exactly what size is optimal is still unknown. Also, the factory LS4 throttle body and fuel rails will not work with the LS2 intake.
Based on the test fits I have performed, I have determined that it might be possible to modify an AFTERMARKET cast-aluminum LSx intake to work on this engine and still have the throttle body facing the correct way. But prices for such intakes range from $500 and up, plus the factory LS4's fuel rails or throttle body may not be compatible. So extra costs will be associated with the upgrade.
That aside, I was able to finish the engine and transmission mounts so I will get pictures of those as soon as the paint dries. I am working on modifying the water pump housing as well as building my alternator relocation brackets and will get pictures posted of those when I am done.
No dog bone for quite a wile, and no problems. No stress cracks in the paint or under the paint.
I plan to do my 4.9 swap the same way, no dog bone and more than the stock three mounts down low. At least 5 under the engine. More power needs a stronger mounting system.
I've actually got 4 poly mounts for my 4.9 and tranny. Maybe I wont even bother with the dogbone. I'll have to wait til its running to find out for sure though. Thanks for the info.
quote
Originally posted by KurtAKX:
All this 88 Fiero caliper sourcing from an AWD 6000 cracks me up.
There were roughly as many AWD 6000s built as there were Indy Fieros, and I've owned two myself, as well as my brother owning one, and I've parted a couple out in junkyards and seen a few on the road. Good luck finding a far-less-common than 88 Fiero AWD car to source from I believe the numbers were: 88 124 AWDs produced 89 1700 some 90 200 red, 200 blue.
Wow. I had no idea they were that rare. There are two of them in my neighborhood. That sucks. I guess this forum is still the best place to find used 88 calipers. Kickhill.com has them for $50 bucks a peice if you cant find them here. Thanks guys
Darth: Funny you should mention the strut tower brace with provisions for the dogbone. That is what I have been working on for the last couple weeks. I swiped the tower brace out of the 93 deville my 4.96 camer out of. Its basically 1" square stock (steel) with bolt on end brackets. I figured on re-making the brackets with provisions for the engine grates. Just an idea.
[This message has been edited by Fieroseverywhere (edited 10-20-2007).]
Sorry for the delay but I had to install a new shop heater this week since the weather has started to go downhill. But I was able to borrow an LS2 intake from Lingenfelter and here is what I found...
The LS2 intake's throttle body inlet is molded too low and won't clear the oil pressure sending unit; but even if that were removed and the boss for it machined down, measurements indicate the intake will still not clear the DoD electrical plug.
So I turned the LS2 intake around to see if it would fit the other way and yes it will -- at least bolt right down on the heads and clear the oil pressure sender and DoD plug... BUT...
Once the water pump housing is installed it won't clear a critical part of the housing -- one of the coolant passages. Here is a comparison picture between the LS2 and LS4 intake...
As you can see the LS2 intake has a much larger throttle body opening than the LS4. However, it's unclear at this time if the LS4 needs this large of a throttle body. I'm sure the LS4 would benefit from a larger throttle body and throttle body opening but exactly what size is optimal is still unknown. Also, the factory LS4 throttle body and fuel rails will not work with the LS2 intake.
Based on the test fits I have performed, I have determined that it might be possible to modify an AFTERMARKET cast-aluminum LSx intake to work on this engine and still have the throttle body facing the correct way. But prices for such intakes range from $500 and up, plus the factory LS4's fuel rails or throttle body may not be compatible. So extra costs will be associated with the upgrade.
That aside, I was able to finish the engine and transmission mounts so I will get pictures of those as soon as the paint dries. I am working on modifying the water pump housing as well as building my alternator relocation brackets and will get pictures posted of those when I am done.
Hey Darth Edelbrock makes a victor manifold that has injector bosses pre drilled. I'm sure you could make a TB adapter easily and mount it to the top facing up. Then you would just need an elbow for the TB inlet. The only problem with this is making the engine to tall to fit under the stock decklid.
The fuel rails are pn EDL-3638 from summit . List for 77.95
Thats just a tic over 400 bucks not to shabby , I bet you could make it work. Granted you'll neeed to fab a TB adapter and fab some fuel lines but thats nothing to difficult.
Shiny red Koni Shocks and Struts...check! Shiny blue Performance Springs and Coil Overs from WCF...check! But I'm still trying to find a company that can make good on the purple Intrax Front and Rear Sway Bars. I've bought them twice, only to be told they are on so long on back order, that both companies gave me my money back! Has ANYONE been successful at getting these bars? I'm still holding out for Intrax, but will start looking for other options very soon. The front bar won't be a problem, but I need to get a rear bar to Darth soon, so he can make sure it fits with the LS4.
Speaking of the LS4, I was very interested in the LS2 Intake option, as logic should support bigger gains from a bigger inlet, but I read the Hot Rod article as well. It wasn't as conclusive as "run away from the LS2", but it clearly was not showing huge improvements from it as they thought there were other issues with the overall 2 piece design that minimized any gains from the larger intake. With all of the porting Darth has done on this engine, I'm feeling quite content with staying with the OEM LS4 intake, small intake and all!
Back to the 12" Corvette Brake update. Darth received all the parts needed for the upgrade from Rockcrawl. Hopefully Darth can send me a quick picture so I can see how the slotted cross drilled rotors look. I received my 1988 Front Calipers from calipersonline.com and painted the front half of them with red caliper paint. Not as nice as powder coating, but I didn't feel really bullish about taking these calipers apart. The below picture looks really "bloody", as they actually look good for paint, but not as good as powder coating. Maybe in the future...
I'm still waiting to get my 1988 Rear Calipers from calipersonline.com, and maybe I'll try powder coating these. That is one skill I can at least claim competency on! I had Darth take my main suspension parts off my car and send them to me. Didn't look too bad, in terms of rust as the car had been given a Ziebart undercoating back in 1988. This first picture is the underside of my front suspension. Can't wait to get these OEM shocks, springs, and 9" rotors replaced!!
This second shot are my rear upper control arms. Not too much rust, if at all, but definitely could use a good cleaning and powder coating.
I joined a private garage last year in Fairfield, Ohio called Painters Lane (http://www.painterslane.com/) which is basically a DIY center that supplies all the equipment and "coaching" one needs to do restoration and repair to your car. I learned how to powder coat, and decided to apply this new skill to my suspension parts. The biggest task is getting these pieces sand blasted down to the metal. The paint and rust comes off pretty easy, but the undercoating and 20 years of caked on grease was a pain, but I think the results were well worth it!
So I've still got to do the Front Lower Control Arms and the Rear Knuckles, which are going to be a big task in getting all the rust and Ziebart undercoating off, but once done, should look pretty nice up against the red polyurethane bushings, red shocks, and blue springs. The coating I used is a Black with Silver Vein with a coat of gloss. I kept the coating out of the bearing areas as much as possible. I've also still have to do the Front Spindles, which I'm likely to find some bolts to screw into the threads to keep the powder coat out. There's also some heat tempature tape I'll use to keep the powder out of the areas it shouldn't be allowed to go.
Once all of this is done, I'm shipping it back to Darth so he can have them for assembly. It always amazes me how much shops charge to powder coat, as it's a pretty easy process if you have the right equipment...then I remember how tough it is to get the parts down to the metal and then it makes sense. But if you can do it yourself, it saves a bundle. I may just get the Fiero Store sway bars and powder coat them myself as well.
Hope you guys don't mind all the pictures. It really helps to have mini-projects to do on the car while Darth has the main project going to "keep busy" while my baby is gone! I can't wait to see this project finished. Next step is finding some dang wheels to fit this car! Someone said this part was more of an "art" then hard fast guidelines. They are soooo right. The 12" Corvette Rotors will NOT fit my 15" OEM Wheels, unless Darth does a bit of creative cutting and grinding, so I have to at least go 16". Of course I'll be going bigger than that. My goal is 17x7 w/ 225/45 on the front and 18x8 w/ 255/35 in the rear. Like I said...not an easy task! The trick is getting the right offset, which is difficult to do without having the car to test fit!
[This message has been edited by blkcofy (edited 10-21-2007).]
Lookin' good, blkcofy! I will get you some pictures of the rotors tomorrow.
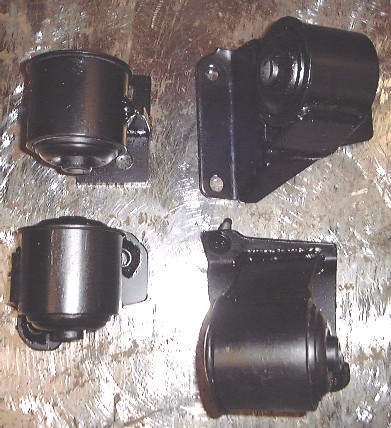
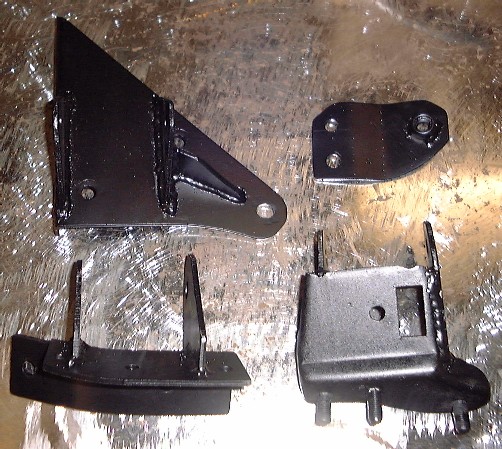
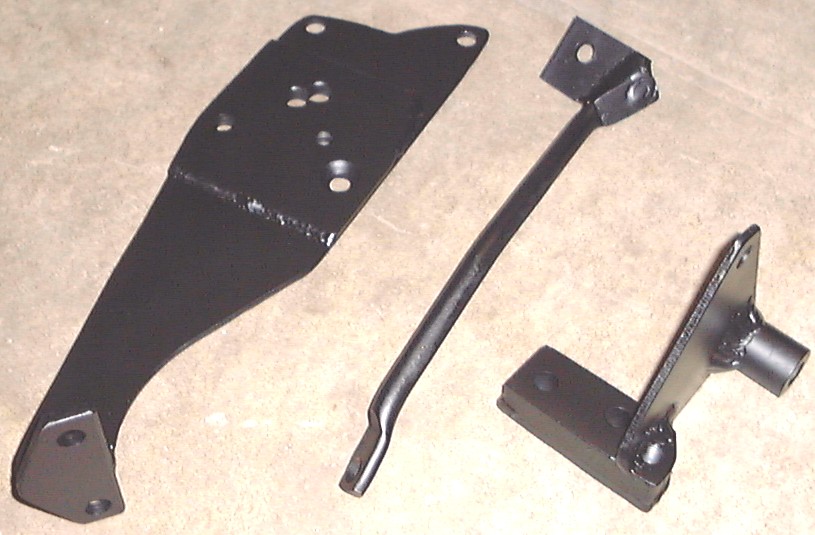
The paint has dried on the mounts so as promised here are the pictures...
Not pictured is the one bracket that had to be welded to the cradle for the right rear transmission mount. It did work out that the other half of this RR trans mount bracket was able to be bolted directly to the cradle so that will make it easier to remove and install the mount in this location. As with previous swaps utilizing this mounting design, I am using OE-Replacement 84-87 Fiero front cradle mount bushings for my rubber mounts. They aren't quite as firm as poly mounts but I believe they are just about as strong. The benefit of using the rubber vs. the poly is better noise and virbation isolation which is what blkcofy opted for.
quote
Originally posted by FIEROPHREK:
Hey Darth Edelbrock makes a victor manifold that has injector bosses pre drilled. I'm sure you could make a TB adapter easily and mount it to the top facing up. Then you would just need an elbow for the TB inlet. The only problem with this is making the engine to tall to fit under the stock decklid.
The fuel rails are pn EDL-3638 from summit . List for 77.95
Thats just a tic over 400 bucks not to shabby , I bet you could make it work. Granted you'll neeed to fab a TB adapter and fab some fuel lines but thats nothing to difficult.
Thanks for the info but I have never been a fan of using "converted" carb intakes in port FI applications. The airflow path and distribution aren't as good as an intake designed for port FI; but the ultimate decision on this rests with the owner. But it already sounds like he wants to stay with the factory LS4 intake. Thanks anyway.
[This message has been edited by Darth Fiero (edited 10-22-2007).]
Not to mention Ryan makes his living tuning FI systems...
Anyway, those mounts look fairly basic, nothing to far from what I would of made on a 3800 swap anyway, am I right? With no major cradle revisions, I think this might be the new "techie" swap of choice eh? I think we can pretty much count the LSJ out of the picture, but it still looks like thats the best bet for the manual enthusiast's on here.
Totally off topic question, but while researching manual transmissions, I found a CVT (constantly variable transmission) in some of the early saturn vue's. Anyone ever see what sorta bolt pattern those have?
Totally off topic question, but while researching manual transmissions, I found a CVT (constantly variable transmission) in some of the early saturn vue's. Anyone ever see what sorta bolt pattern those have?
I have been interested in one of these also. My idea was to mate it to an electric motor though. 100% torque through a CVT could be tons of fun.
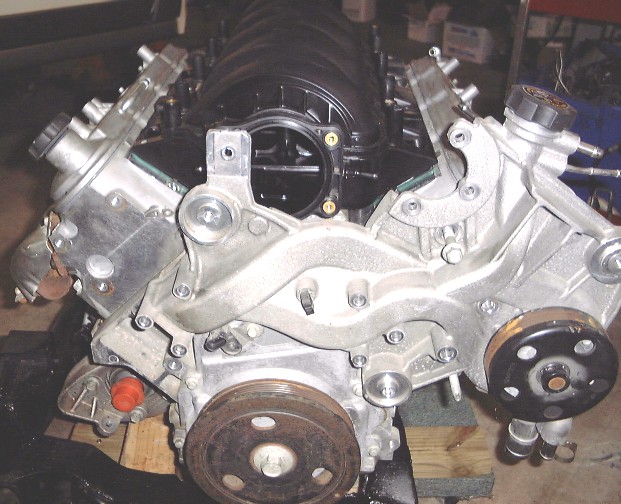
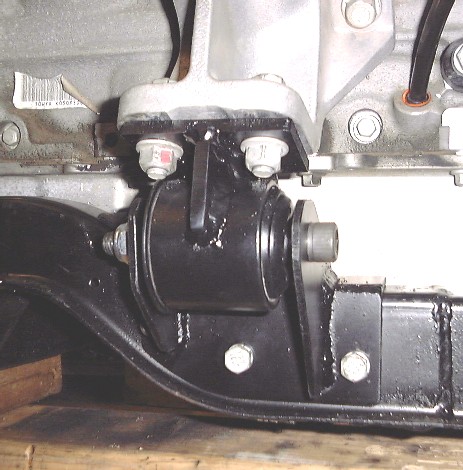
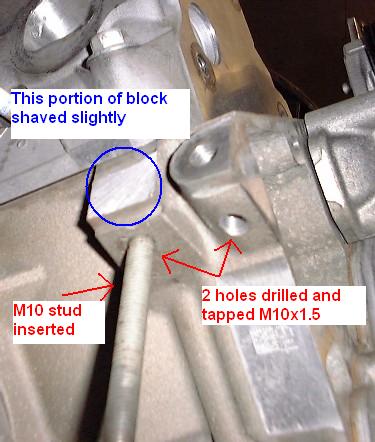
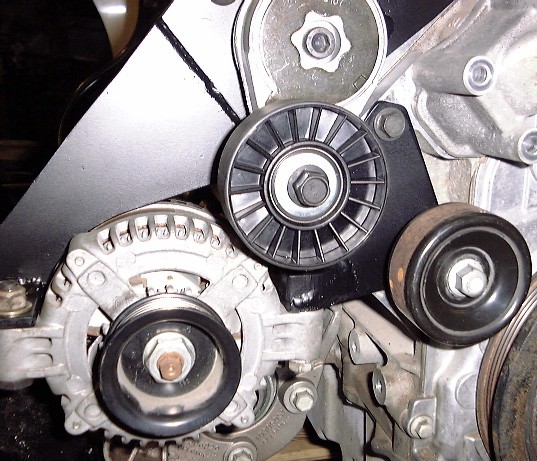
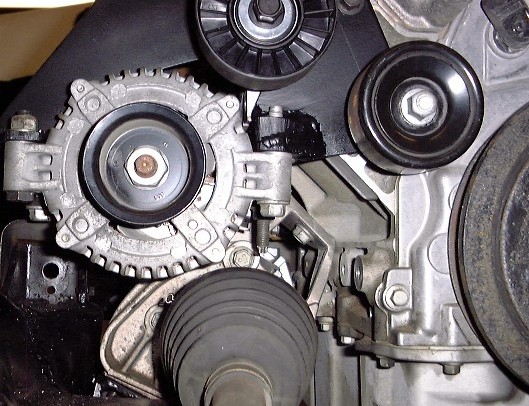
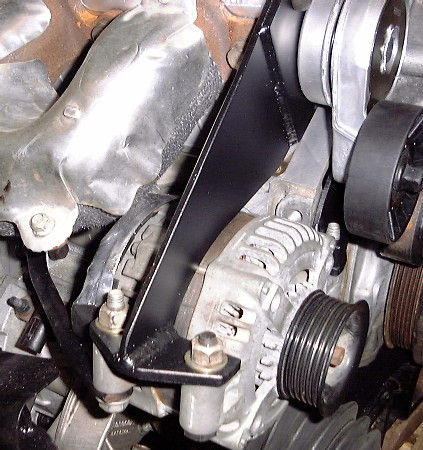
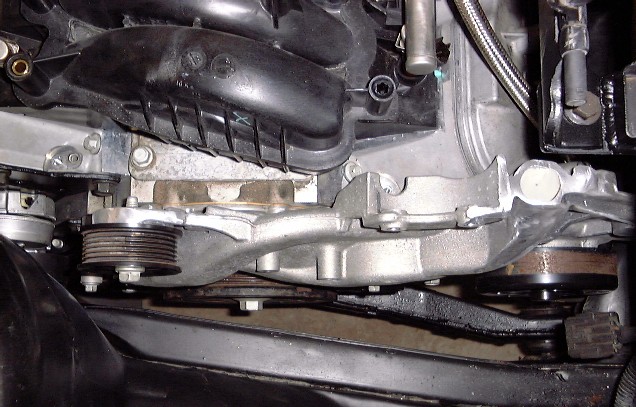
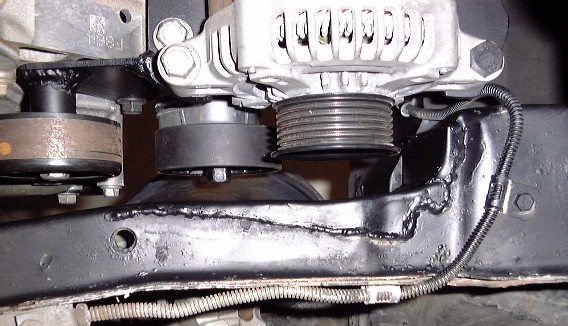
I figured out a solution for relocating the alternator but it was a tight fit; and some modifications were required to the block and chassis to accomidate this mounting location...
It may be hard to see in the pictures, but there is about 1/4" clearance between the alternator and CV drive axle and exhaust manifold. The CV drive axle tripod end shouldn't ever be able to come in contact with the alternator and the exhaust manifold is double wrapped with thermal barrier. I also applied some heat reflective tape to the area of the alternator that is closest to the manifold. Should keep it sufficiently protected.
This Thread is going to make installing the LS4 into a Fiero so much easier. I have been slowly working on mine but seeing this one being put together so fast makes me want to get mine going. I have a long ways to go though and sure its going to be many more months before its even close.
This Thread is going to make installing the LS4 into a Fiero so much easier. I have been slowly working on mine but seeing this one being put together so fast makes me want to get mine going. I have a long ways to go though and sure its going to be many more months before its even close.
Yeah no crap. I'm waiting on pistons that have been back ordered for 2 months. I'll get to mine some time this millenium. Good job with the mounts darth ,they look very well made.
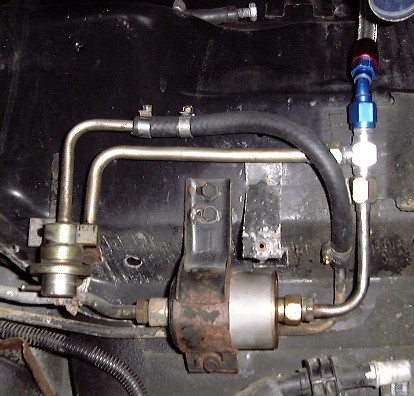
Finished the fuel pump install (Walbro 255lph) and hooked up the fuel pressure regulator...
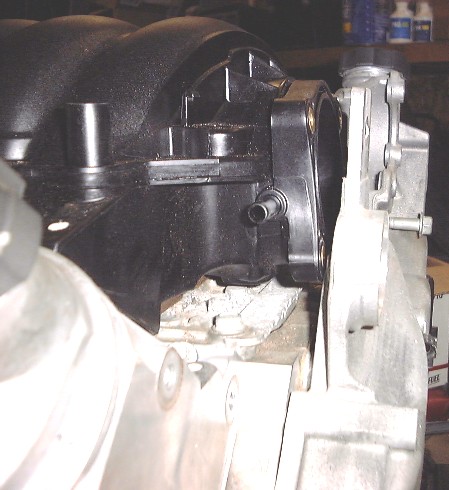
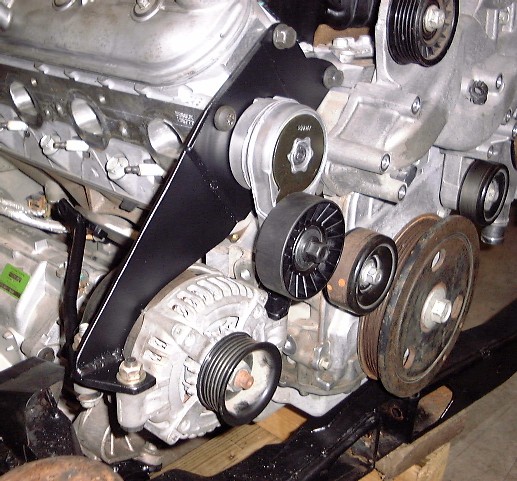
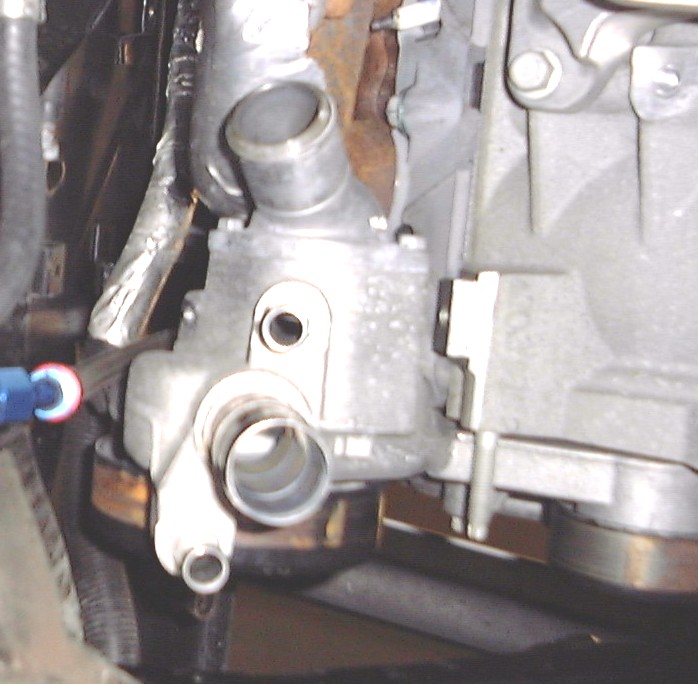
Also got the water pump housing/cover cut down and ready for welding. But before I do that it was time for another test fit to make sure everything I have done so far is going to work...
And it looks good. I think I have the belt routing sorted out so as soon as I get the welding done to the housing I will add the last idler pulleys. The tensioner I decided to go with on this engine was the most compact one I could find -- which was for an LQ1 engine (3.4 DOHC).
Think I'm going to take a break from the mechanicals for a couple of days and start on the wiring. More pics to come...
Then again....anyone interested in buying a Grand Am front brake set for an 87' Fiero!!
Oo! Oo! Me! Me! How much?
------------------ 1984 Fiero SE, White, first love, sold... 1986 Fiero SE 2M6, gold 1988 Fiero 2M4, the Fox 1987 Fiero GT, Blue, 3.4/4T40 Still looking for that perfect CJB 88 GT...
Welp...I paid $299.95 less than two years ago. I've put at most 400 miles on them since then. They looked like this when new...
84-87 VENTED FRONT BRAKE CONVERSION KIT Greatly improves stopping power, decreases your stopping distances and produces far less brake fade under extreme braking conditions. Bolt-on kit, no modifications needed. Kit Includes:2 vented front rotors, 2 front calipers (5mm larger piston diameter), 2 wheel bearing hubs, caliper brackets, semi-metallic brake pad set, Inner/outer wheel bearings & seals, new wheel studs and caliper bolts.(As reported by The Fiero Store).
If your serious, and if Darth can repurpose all the original parts you'd need since my 12" Corvette Kit should be fitted directly to the OEM setup instead of the Fiero Store Grand Am kit...then based on the depreciation calculations, the position of the moon in respect to mars and venus...$84.95. Which just happens to be how much I need to buy front tie rods from the Fiero Store!
For an extra $25, I'll have Darth send them to me first and I'll media blast everything...'cept the rotors of course, so you'll have a "clean start". I'm not sure how much is left on the pads, but should be more than 75%. Shipping not included. PM me if your serious and we can figure out what Darth needs to keep and what he doesn't and we can adjust down from there.
Okay, I've finally gotten the rear knuckle brackets and front spindles sand blasted and powder coated. True labor of love, this one. I opted to go with an Argent Silver instead of the darker powder on the control arms.
I taped off the ends of the spindles and plugged any of the holes with threads to keep the powder out of these areas. I'm pleased for the most part, 'cept for the wierdest thing that occurred on the way back from the ovens. Using the same powder and process, one pair of knuckle/spindle remained bright chrome when I added the clear gloss coating, and the other pair turned a bit gray! Have no idea how or why, unless the oven was baking unevenly and the clear coat didn't cure as it should have. All four parts were the same after the first coating, but changed during the last. Oh well, you won't really see much of these parts to be able to compare side by side once Ryan get's them on the car...and they're a millions times better than the rusty mess they were before.
Well, on to the final phase with the front upper control arms...which are covered in thick under coating from Ziebart. I've soaked these things for days, and still can't soften them up enough. I'll probably go to a more coarse medium of sand to blast them off later this week.
[This message has been edited by blkcofy (edited 11-04-2007).]


 Granted you'll neeed to fab a TB adapter and fab some fuel lines but thats nothing to difficult.


 How much?


