Originally posted by HC:Thats a very nice car... Are you going to do any mods to the outside? Like a stretch, a widebody, paint job? Or all three?
Any mods to the outside? Which car are you looking at? The white Fiero or the blue Mustang? Except for the roof panel and the glass, the entire outside of my Fiero has already been modified by installing the GT40 rebody kit I bought from NAF (later known as ASPP). It used to be red, but I may go white next time. This white primer is growing on me.
[This message has been edited by WAWUZAT (edited 12-14-2007).]
Yeah, it'll fit in the stock location fine. There is actually a large recess in the firewall right where it sits, like it was meant to be.
I looked at the engine compartment again today. Sure enough, that recess ought to be my ticket out of extra work. And it's shaped to allow relocating the engine straight up ... not slanted the same as the passenger cabin bulkhead ... so being that my drivetrain is 5/8" further aft, everything ought to work out OK. Thanks again.
Originally posted by dohcfiend: i noticed some of the background pix. are you a xerox tech? what's with all the xerox boxes?
also i have not read the thread in it's entirety but there may be a few parts available for your engine at www.chrfab.com
Thanks. I've already purchased a few items from CHRFab. The Xerox boxes? We toss them out at work (we build aircraft carriers and submarines), and those boxes are the perfect size for shipping items I build for Ford Excursions. In the Excursion world, I'm known as Landyot ... just Google "Landyot Radius-Rods," and you'll find a lot of online chatter.
The #6 car above was one of the prototypes made before production started on the current Ford GT (they cannot use the name "GT40"). The #14 car was a one-off test model made during development of the GT40 MKIV. Mine is a replica of the MKII version, and it's already wide ... when I rented a U-haul car trailer in the 90s, the rear tires rode atop the trailers side-rails 'cuz they would not fit down in the tire-tracks.
[This message has been edited by WAWUZAT (edited 12-23-2007).]
Originally posted by HC:Nice... I was just thinking how people would cringe if you put a Ford engine in the fiero, but you put a Ford body and caddy engine, and every one loves it.
Thanks. Cringe? Why? When it was new it had a Pontiac chassis, a Chevy 2.8L V6 engine, Chevette front suspension, and an Isuzu transaxle. And to top that, Pontiac once offered the "Mera" which was nothing but a Fiero with a Ferrari-style skin. You're in Phoenix? That's where I went to buy this body kit back in June of 1990. Stayed at Westcourt in the Buttes, and NAF was located in Mesa.
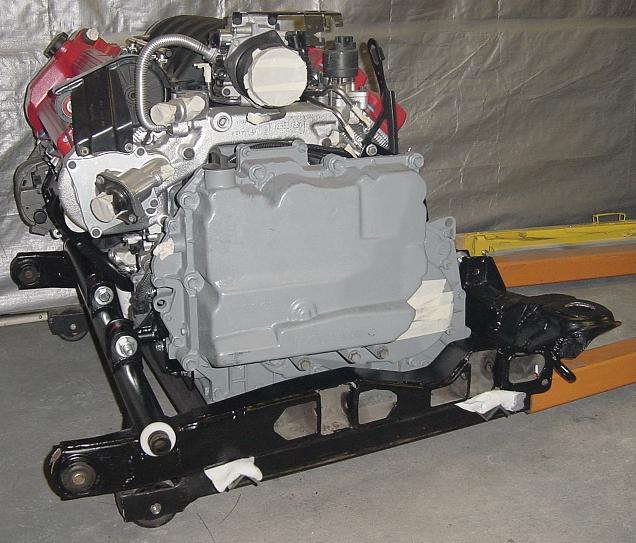
I finished the engine cradle mods today ... lots of grinding, fitting & welding. I had to make some minor clearance adjustments to the new rear crossmember, and I fit & welded the new front crossmember. If all goes well, I'll re-fit the drivetrain to the cradle tomorrow, line it up according to where the axle centers should be, and start fabricating engine & transaxle mounts.
[This message has been edited by WAWUZAT (edited 12-15-2007).]
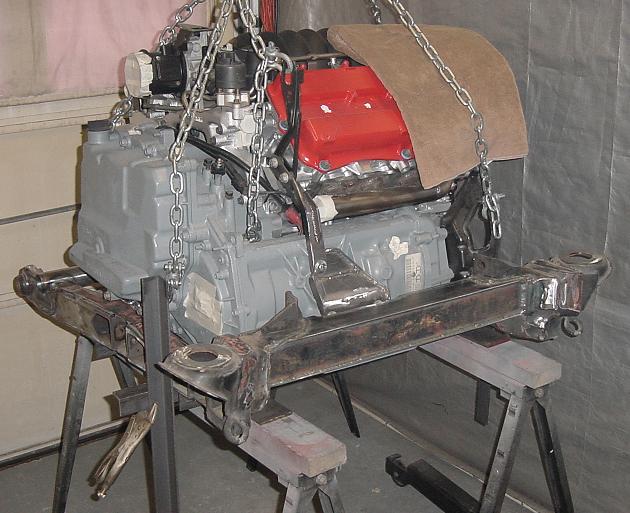
I set the engine cradle up on sawhorses today, and then set the drivetrain in position. The drivetrain is aligned to the cradle using the axle-centers as reference points. Having the temporary angle-bars tackwelded beneath the cradle made it easy for setting the engine place ... just used some wooden shims atop the angle-bars to hold it at the correct height. Once the engine was "level" with the cradle, nudging it around into position required only a crowbar ... and I only needed to move it about 1/8". The vertical angle-bar held in place with Visegrips (see the photo below) worked as a solid surface for aligning axle-centers (there's one on the other side, too). The tubular cross-member seen at the front of the cradle will house my anti-swaybar.
The next step is to fab some motor mounts between the cradle and some previously fabricated bracketry bolted to the engine & transaxle. Here's a sneak preview of what's going to happen with the motor mounts ...
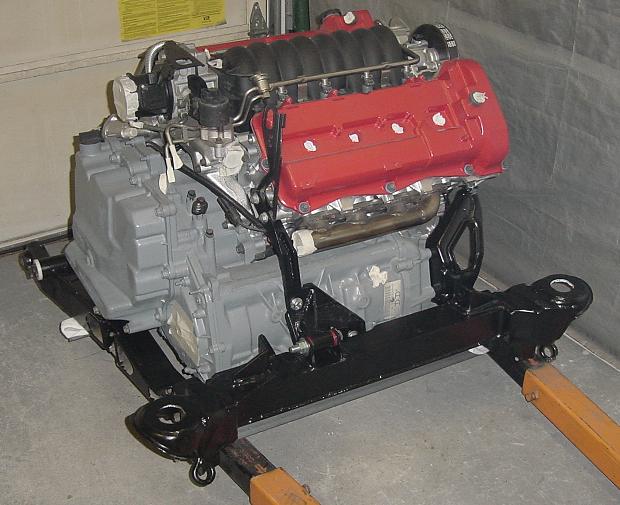
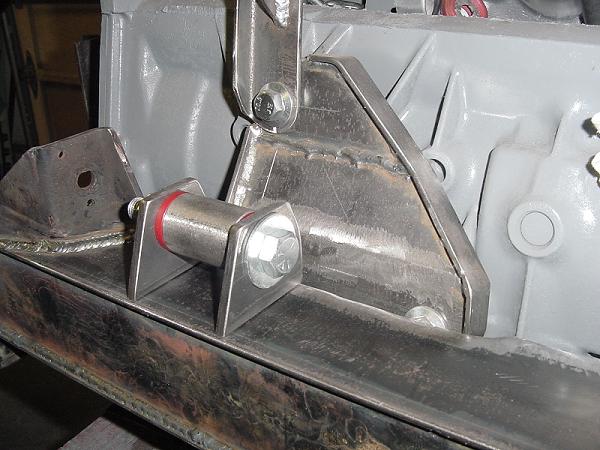
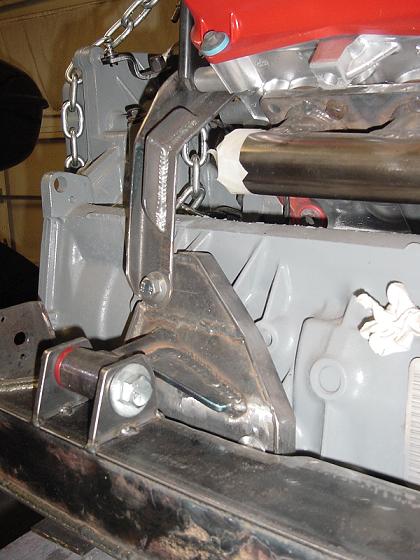
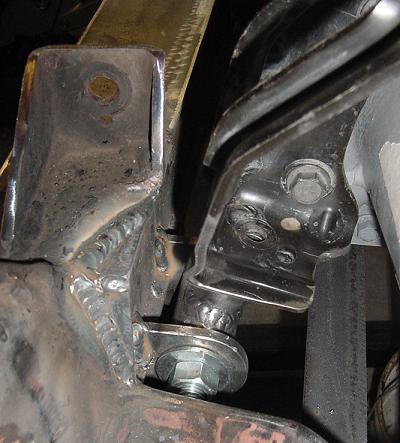
I have fabricated my motor mounts, and most of them installed. All I have left to do with them is to add a couple more gussets, and finish all of the welds after I pull the engine back off the cradle. Since I last posted a teaser-pic of the left-rear mount, here's the nearly finished product (this is one place I need to add a gusset) ...
Below is a shot of the right-rear mount. This was the easiest one to fab because I used the original Caddy bracket with only some minor trimming ...
And here are the front mounts. I did some extensive mods to the Caddy bracket that connects the head with the block ...
Welding the front cross-tube caused it to bow a little bit. I may attempt to pull it straight & add a flat-bar across its front face. I have plenty of room to mount my 2-in/2-out catalytic converter beneath the cross-tube, and I won't start any routing of the exhaust pipes until after it's in the car ... I need to ensure there's sufficient room to run the pipes where I'm visualizing them to be.
I sure wish this small package was readily available without costing who-knows-how-much!
The Hayabusa V-8 is an impressive design for sure, but would be a dissapointment in our 2800 lb cars. with 250 ft lb of torque it would need a light chasis to drag around in order to see it's actual potential, and would have a pretty narrow power band I would imagine....... stilll... it is an awsome design for it's intended use. I'd love to get ahold of one myself actually .
looks like you're getting your project well in hand. that's some awsome work there guy. I especially like the sway bar tube/crossmember idea.
You'd just need stiff enough gears to make it work.
The 2.8 Fiero only made 175 ftlbs and it did OK with a 12:1 overall first... Now imagine having 40% more torque and carrying that first to 70 MPH instead of 35...
[This message has been edited by Will (edited 12-24-2007).]
I sure wish this small package was readily available without costing who-knows-how-much!
Nice, I also think this engine will really do for a nice engine swap, not only you can reach 70 mph in first gear, but the handling with this engine has to be great since it is one light little engine. Man I wish I could afford it.
Originally posted by Russ544:looks like you're getting your project well in hand. that's some awsome work there guy. I especially like the sway bar tube/crossmember idea.Russ544
Thanks, Russ. After seeing your handywork, I accept your compliment in the highest regard. I originally gave thought to using the front cross-member as a pipe to transfer the engine coolant from the passenger-side of the car, but that left me with the question of where to mount the anti-swaybar. I opted to fab the swaybar-tube as a cross-member because I can always route the coolant plumbing a different way. Gotta' install the more difficult items first, then the plumbing, and save the wiring for last.
I finished fabricating the drivetrain mounts today, and pulled everything back apart so I can paint the items. I straightened the cross-member tube by cutting two strategically placed slots across the bottom of the tube, and welded the slots closed. The draw from welding pulled the tube almost straight, and once I cut & welded a third slot, the tube was near perfectly straight again.
In order to make reinstallation easier, I beveled the motor mounts so the polyurethane bushings will slide between them when I lower it back onto the cradle. I'll post more pix when painting is complete, and the drivetrain is mated to the cradle again ... and hopefully for the last time. Then it will be time to insert this thing in the car.
Happy New Year! I spent part of the day reinstalling the motor mounts so I could reintroduce the drivetrain to the cradle. I'll replace the motor mount nuts with a self-locking variety later. For now, it's ready for popping back into the car. Then this project is going to sit idle a few months while I manufacture more radius-rods for Ford Excursions. Here's a couple pix, and I'll post more after it's in the car.
In this first shot, you can see my combination front crossmember / anti-swaybar housing ...
Where did you get the tubs and poly bushings you are using for the motor mounts? I am installing a Twin Turbo 4.0 Aurora with a G6 6 speed in my 88 coupe/F-40 replica, and have been looking for a solution to motor mounts. Thanks and Great build by the way I've been following it. James
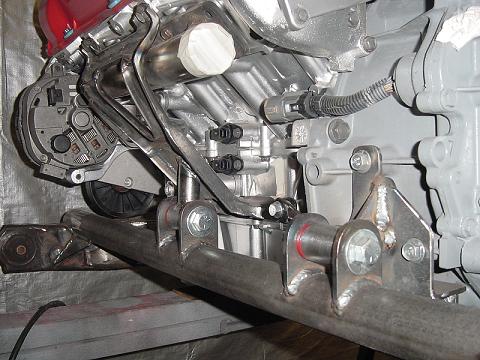
Well, the engine is finally in the car, but not without a couple minor hiccups. See below ...
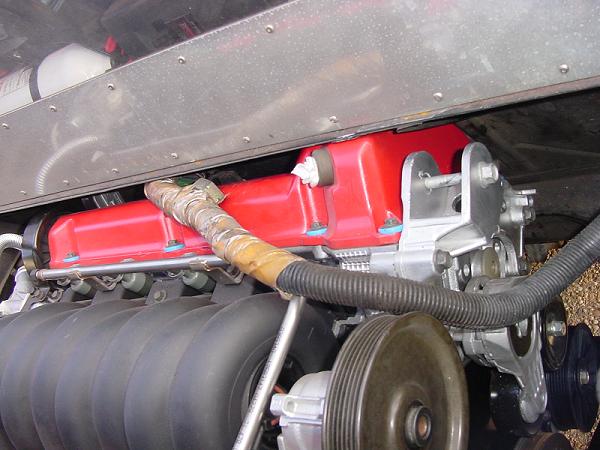
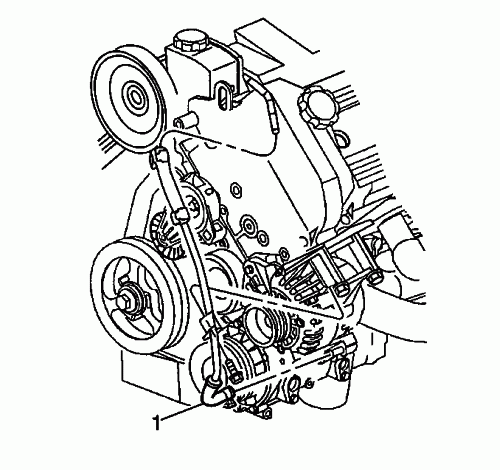
In this first photo, you can see that I have ample clearance along the passenger-side of the engine compartment ...
And this photo shows that I have a LOT of room for running the exhaust cross-over pipe from the rear head, and down to the 2-in/2-out catalytic converter (similar to the standard V6 exhaust routing) which will be mounted below the front crossmember. I have enough room that I can run the exhaust pipe between the transaxle and the strut tower ...
I'm kicking myself in the tail for cutting out the front bulkhead of the trunk. It looks like I would've had plenty of room there, too. Oh well, I wanted a fresh look for that bulkhead anyways ...
Now here is a close-call that I did not anticipate. The front valve cover is a fraction of an inch below the bottom edge of the rear window. I can fix this easy enough, but it will have to wait a few months. I'll also need to fab a flush-fitting "710" cap to screw into the cover.
This water pump pulley gave me some concern, but it does (barely) clear the passenger cabin's rear bulkhead. Later, I'll fabricate a clearance hump in that bulkhead.
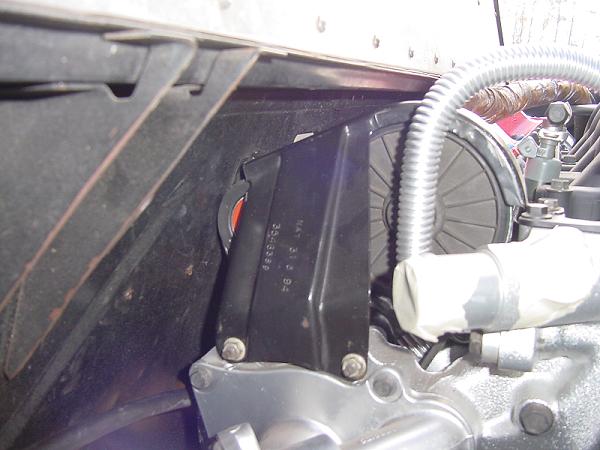
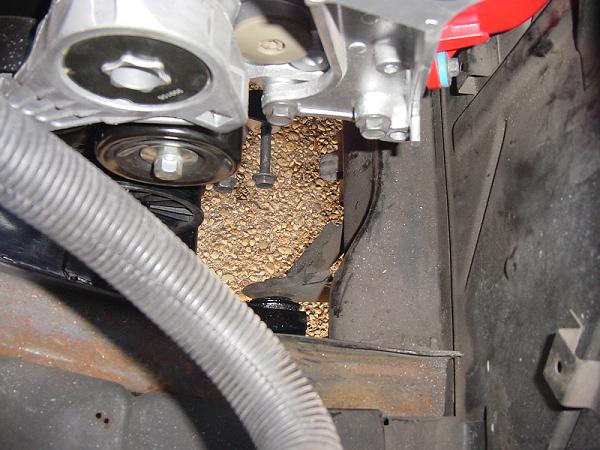
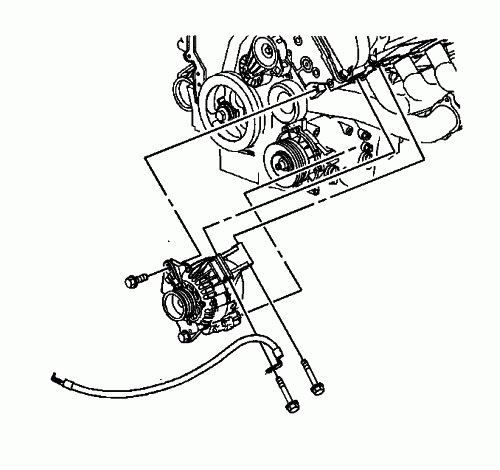
The alternator did not clear the chassis crossmember shown below. It was hard against this member, so I removed the alternator until I get back to this project later. I'll need to fabricate more of a clearance relief in that member.
I can now reinstall the rear suspension and roll this car out of the way for awhile. I might get back to it in the summer.
I centered my engine in the car and mounted it the the body and then built the craddle.
I cut the bracket fro the dog bone up and just used the part for the alternator, but you can go one step more and use a 98+ Seville alternator that bolt directly to the block. You might need a differnt P/S pump. I am not sure. I am working on a conversion thread for using a 00+ engine in a 98 or 99 Seville.
This is a 98 to 99 Seville Alternator mount.
I wish I had seen what you have done now before I started mine.
Originally posted by AJxtcman:I wish I had seen what you have done now before I started mine.
Thanks! Considering what you've accomplished with the Northstar, that's quite a compliment! But since I did my stuff after you did yours, it was impossibile for you to see mine first. I wish I had seen your stuff before I bought the CHRFab and PCS computers for running my N* and 4T80E. In regards to the alternator, I'll just fabricate the relief in the chassis' crossmember ... mostly because I've already invested about $150 in this alternator.
[This message has been edited by WAWUZAT (edited 01-06-2008).]
A liquid-cooled alternator? Wow! That's a new one on me. I can understand the reasoning behind cooling it, but being that the air-cooled units I've had have been sufficient, water-cooling seems ... well, kinda neat actually. How many more miles are they seeing out of water-cooled units versus the air-cooled units? Not that I'd consider using one ... just curious.
I wish I had seen your stuff before I bought the CHRFab and PCS computers for running my N* and 4T80E. In regards to the alternator, I'll just fabricate the relief in the chassis' crossmember ... mostly because I've already invested about $150 in this alternator.
That CHRFab ECM is turning out to be a hot potatoe! I sold it to use Ryan's 7730 instead, now you would rather have AJ's setup instead. We live and learn don't we? Your work sure looks well planned, neat and tidy. Cheers, Dave.
A liquid-cooled alternator? Wow! That's a new one on me. I can understand the reasoning behind cooling it, but being that the air-cooled units I've had have been sufficient, water-cooling seems ... well, kinda neat actually. How many more miles are they seeing out of water-cooled units versus the air-cooled units? Not that I'd consider using one ... just curious.
I think the water cooling is just for noise reduction.
If flow space for air cooling isn't necessary, than the same capacity armature can be put into a smaller housing.
BUT, I've read that the idea behind a liquid cooled alternator is to get rid of the noise that the cooling fan makes. More output in a smaller package is a side-effect.
Originally posted by Daviero: That CHRFab ECM is turning out to be a hot potatoe! I sold it to use Ryan's 7730 instead, now you would rather have AJ's setup instead. We live and learn don't we? Your work sure looks well planned, neat and tidy. Cheers, Dave.
Yeah, things change over time. Some of the current items available today weren't around when I started this project. I already have both the CHRFab & PCS controllers in hand, so I'll move forward with those. And thanx for the compliment. I try to stay somewhat organized. I find it helps a lot since I have too many irons in the fire.
quote
Originally posted by Kuta: What a great thread! Looking forward to the conclusion
Conclusion? What's that? This thing will never be complete 'cause there will always be something else I can (or want to) do to it. I've been driving it since installing the rebody kit back in '92.
[This message has been edited by WAWUZAT (edited 02-05-2008).]
If flow space for air cooling isn't necessary, than the same capacity armature can be put into a smaller housing.
BUT, I've read that the idea behind a liquid cooled alternator is to get rid of the noise that the cooling fan makes. More output in a smaller package is a side-effect.
Well, I will leave the air-cooled unit alone since its noise is not a concern of mine. Still, interesting stuff.
If you need help with the CHRFab Setup, shoot me a message. i have been running mine for about 8 months now. (Holley 950 and PCS). I am running the 288 cams though. Just let me know if you need a pep talk with it. It is truely a wonderful setup. You'll love the tune-ability of both of them. Well worth the extra expense if you are going to do it right the first time.
No, sorry. I stated in my 01/06/08 post that I might get back to this car sometime during the summer. I'm now wondering if I'll get any time to work on it before 2009. This year has gotten very busy for me ... and that's a good thing. Thanks for inquiring!
I used 2 Beretta shafts ( I think the left side ), Fiero outer CV joints, 2 inner Tripods ( needle roller bearing type ) from a 4.5 or 4.9L caddy (that is the same size shaft as the Fiero), and two Tulips from a 4T80E with roller type bearings.
What year/configuration Beretta? A 92 DeVille has the appropriate tripods.
Bob
Edit: Per AJ
quote
The right shaft from a 1996 Beretta is the short one. 12 3/4" long $18 from A1 Driveshaft http://a1driveshaft.com/index.html I used a inner CV Tripod from a 1990 Cadillac 4T65 trans. Mine had slides The inner tulip (outside portion) from a 1994 to 99 This also had the slides I used the stock Fiero outer CV.
Although I just looked at a pair of axles out of a 96 Beretta and the driver's side (left) axle was shortest. It appears to be the same length as my other axle (a little less than 13") -I think out of the Celebrity wagon. I'm using the Celebrity outers because I upgraded to the larger bearings and brakes from said Celebrity.
Bob
[This message has been edited by RCR (edited 07-25-2008).]
Sor, but this is just a bi-monthly "bump" to keep this thread out of the archives. I should be back on this car full steam again in January or February. <Ken>


.jpg)


 .
.