Pennock's Fiero Forum
  Technical Discussion & Questions
  What do I need for replacing a water pump? (Page 2)

Post New Topic  Post A Reply
Email This Page to Someone! | Printable Version

This topic is 2 pages long:  1   2 
Previous Page | Next Page
next newest topic | next oldest topic
What do I need for replacing a water pump? by Cliff Pennock
Started on: 05-04-2020 09:54 AM
Replies: 77 (2012 views)
Last post by: greenturnedblue on 10-18-2022 04:09 PM
creaky78
Member
Posts: 137
From: Greendale IN USA
Registered: Nov 2015


Feedback score: N/A
Leave feedback

Rate this member

Report this Post05-10-2020 09:03 AM Click Here to See the Profile for creaky78Send a Private Message to creaky78Edit/Delete MessageReply w/QuoteDirect Link to This Post
If there is a lot of crud in the hole, give the tap a few turns, back it out, flush and repeat to get all the trash out.
IP: Logged
fierofool
Member
Posts: 12811
From: Auburn, Georgia USA
Registered: Jan 2002


Feedback score:    (13)
Leave feedback


Total ratings: 154
Rate this member

Report this Post05-10-2020 10:03 AM Click Here to See the Profile for fierofoolClick Here to visit fierofool's HomePageSend a Private Message to fierofoolEdit/Delete MessageReply w/QuoteDirect Link to This Post
It will break everything loose and collect in the fluting of the tap. Some will come out when you remove the tap, but if you flush and blow as creaky78 describes, you will be good.
IP: Logged
Cliff Pennock
Administrator
Posts: 11609
From: Zandvoort, The Netherlands
Registered: Jan 99


Feedback score: (2)
Leave feedback


Total ratings: 699
Rate this member

Report this Post05-13-2020 05:13 AM Click Here to See the Profile for Cliff PennockClick Here to visit Cliff Pennock's HomePageSend a Private Message to Cliff PennockEdit/Delete MessageReply w/QuoteDirect Link to This Post
For future reference:

IP: Logged
Cliff Pennock
Administrator
Posts: 11609
From: Zandvoort, The Netherlands
Registered: Jan 99


Feedback score: (2)
Leave feedback


Total ratings: 699
Rate this member

Report this Post05-13-2020 07:02 AM Click Here to See the Profile for Cliff PennockClick Here to visit Cliff Pennock's HomePageSend a Private Message to Cliff PennockEdit/Delete MessageReply w/QuoteDirect Link to This Post

Cliff Pennock

11609 posts
Member since Jan 99
BTW, I'm still waiting for the torque wrench I ordered last week. Until then, I will not be able to install the waterpump.
IP: Logged
fierosound
Member
Posts: 15145
From: Calgary, Canada
Registered: Nov 1999


Feedback score: N/A
Leave feedback


Total ratings: 286
Rate this member

Report this Post05-13-2020 09:05 AM Click Here to See the Profile for fierosoundClick Here to visit fierosound's HomePageSend a Private Message to fierosoundEdit/Delete MessageReply w/QuoteDirect Link to This Post
 
quote
Originally posted by Cliff Pennock:

BTW, I'm still waiting for the torque wrench I ordered last week. Until then, I will not be able to install the waterpump.


Bolt 4 goes into the water jacket of the block.
Don't forget sealant in the threads.
IP: Logged
css9450
Member
Posts: 5423
From: Glen Ellyn, Illinois, USA
Registered: Nov 2002


Feedback score: (2)
Leave feedback


Total ratings: 85
Rate this member

Report this Post05-13-2020 09:14 AM Click Here to See the Profile for css9450Send a Private Message to css9450Edit/Delete MessageReply w/QuoteDirect Link to This Post
Bolt 8 must be a little camera shy?

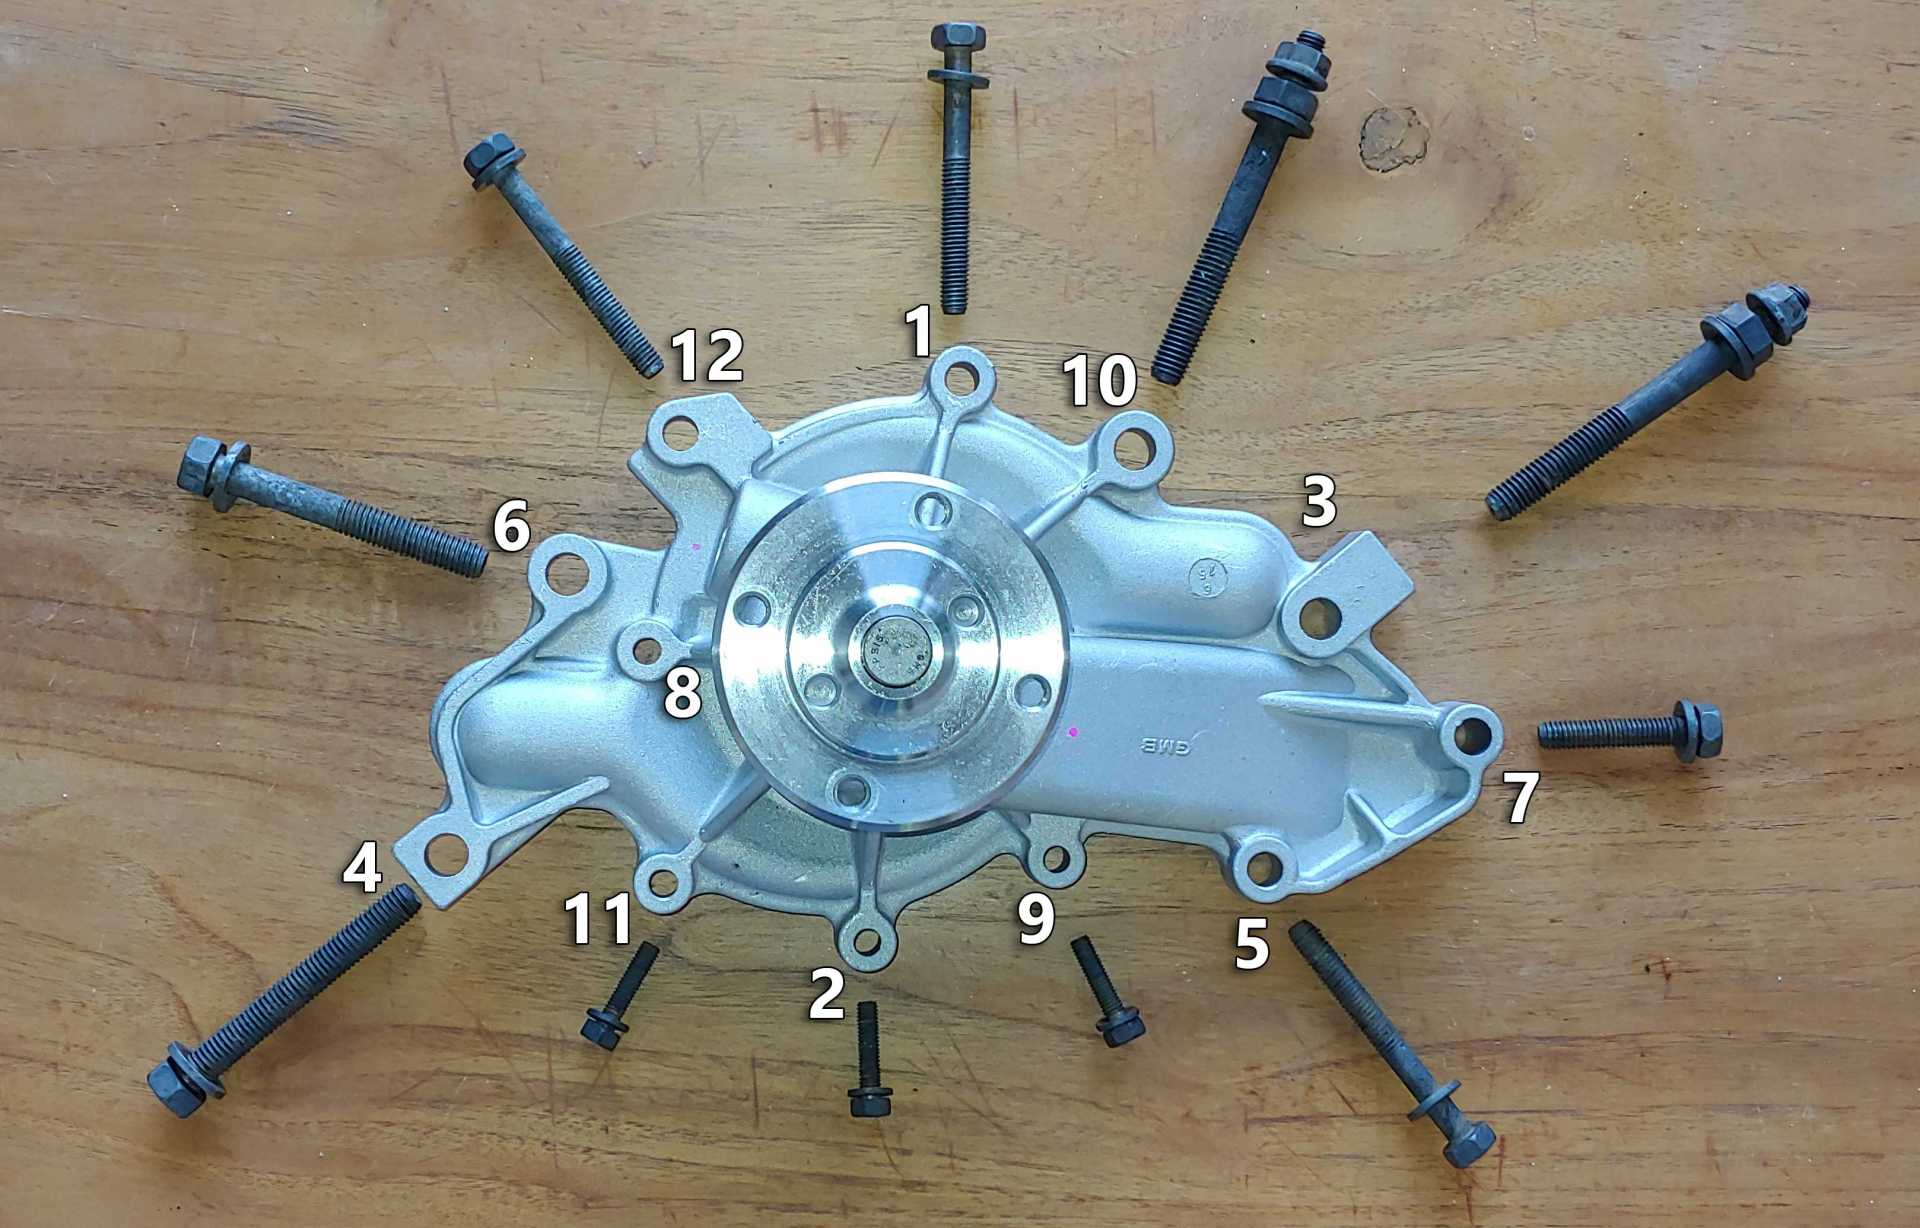
But seriously... I remember Bolt 8 because on mine, I couldn't figure how to bust loose the pulley bolts, so I just left it on. Then, when it came to to remove Bolt 8, I found it was hiding there behind the pulley! I eventually got it our with a Hex bit I turned with a 1/4-inch wrench. Fortunately it wasn't super tight (or stripped)!
IP: Logged
Cliff Pennock
Administrator
Posts: 11609
From: Zandvoort, The Netherlands
Registered: Jan 99


Feedback score: (2)
Leave feedback


Total ratings: 699
Rate this member

Report this Post05-13-2020 09:32 AM Click Here to See the Profile for Cliff PennockClick Here to visit Cliff Pennock's HomePageSend a Private Message to Cliff PennockEdit/Delete MessageReply w/QuoteDirect Link to This Post
 
quote
Originally posted by css9450:

Bolt 8 must be a little camera shy?


Bolt 8 apparently was sheared off at some time on my water pump. That's why it is missing. There's still part of it extending out of the timing cover. I'm guessing it's the same bolt as 2, 9 and 11.
IP: Logged
Cliff Pennock
Administrator
Posts: 11609
From: Zandvoort, The Netherlands
Registered: Jan 99


Feedback score: (2)
Leave feedback


Total ratings: 699
Rate this member

Report this Post05-13-2020 09:39 AM Click Here to See the Profile for Cliff PennockClick Here to visit Cliff Pennock's HomePageSend a Private Message to Cliff PennockEdit/Delete MessageReply w/QuoteDirect Link to This Post

Cliff Pennock

11609 posts
Member since Jan 99
 
quote
Originally posted by fierosound:

Bolt 4 goes into the water jacket of the block.
Don't forget sealant in the threads.


Yes, that's the only bolt that needs sealant, right?

I have this stuff for that: https://www.henkel-adhesive...ers/loctite_243.html
IP: Logged
Patrick
Member
Posts: 36402
From: Vancouver, British Columbia, Canada
Registered: Apr 99


Feedback score: (1)
Leave feedback


Total ratings: 458
Rate this member

Report this Post05-13-2020 04:05 PM Click Here to See the Profile for PatrickSend a Private Message to PatrickEdit/Delete MessageReply w/QuoteDirect Link to This Post
 
quote
Originally posted by Cliff Pennock:

I'm still waiting for the torque wrench I ordered last week. Until then, I will not be able to install the waterpump.


IMO, a torque wrench isn't necessary for a job of this sort. As a matter fact, it might even be detrimental. If it's a "click" type torque wrench, and you're relying on hearing that "click" before you stop tightening, it's very easy to screw up and over-tighten... especially if you're using a ft lb torque wrench when an in lb torque wrench would be more appropriate. You definitely don't want to over-tighten those small bolts that thread into the aluminum timing cover. It would be safe to use a 3/8" drive ratchet on all these bolts, but just go easier on the four smaller bolts. Remember, you're not tightening lug nuts or head bolts!


quote
Originally posted by Cliff Pennock:

Bolt 8 apparently was sheared off at some time on my water pump. There's still part of it extending out of the timing cover.


Is there enough protruding to get ahold of it with vice-grips? If so, this would be a good time to soak it with penetrating oil (not WD-40) and try to get it out.


quote
Originally posted by Cliff Pennock:

#4 is the only bolt that needs sealant, right? I have this stuff for that.


Personally, I wouldn't use thread "lock" on any of the water pump bolts. I'd use anti-seize on all of them except for the one that goes into the water jacket.

 
quote
Originally posted by Patrick in This thread:

I recommend using Permatex® Aviation Form-A-Gasket® on both the gasket and the threads of the #4 bolt. I've used this stuff for 40 years.

[This message has been edited by Patrick (edited 05-13-2020).]

IP: Logged
Dennis LaGrua
Member
Posts: 15145
From: Hillsborough, NJ U.S.A.
Registered: May 2000


Feedback score:    (13)
Leave feedback


Total ratings: 328
Rate this member

Report this Post05-13-2020 04:27 PM Click Here to See the Profile for Dennis LaGruaSend a Private Message to Dennis LaGruaEdit/Delete MessageReply w/QuoteDirect Link to This Post
To remove a stud is sometimes a tricky process. You must be very careful not to use excessive pressure so that rusty bolt or what remains of it doesn't break off in the timing cover. Soak in PB Blaster for a couple of days, then grab with vice grips as Patrick indicated, and try to unscrew it. If you tap the stud head a few times with a hammer not too hard that can help. If you are dealing with heavily rusted bolt, the key is to not use excessive force. If the stud breaks off you will have another set of problems

------------------
" THE BLACK PARALYZER" -87GT 3800SC Series III engine, custom ZZP /Frozen Boost Intercooler setup, 3.4" Pulley, Northstar TB, LS1 MAF, 3" Spintech/Hedman Exhaust, P-log Manifold, Autolite 104's, MSD wires, Custom CAI, 4T65eHD w. custom axles, Champion Radiator, S10 Brake Booster, HP Tuners VCM Suite.
"THE COLUSSUS"
87GT - ALL OUT 3.4L Turbocharged engine, Garrett Hybrid Turbo, MSD ign., modified TH125H
" ON THE LOOSE WITHOUT THE JUICE "

IP: Logged
Cliff Pennock
Administrator
Posts: 11609
From: Zandvoort, The Netherlands
Registered: Jan 99


Feedback score: (2)
Leave feedback


Total ratings: 699
Rate this member

Report this Post05-13-2020 04:49 PM Click Here to See the Profile for Cliff PennockClick Here to visit Cliff Pennock's HomePageSend a Private Message to Cliff PennockEdit/Delete MessageReply w/QuoteDirect Link to This Post
 
quote
Originally posted by Patrick:

Is there enough protruding to get ahold of it with vice-grips? If so, this would be a good time to soak it with penetrating oil (not WD-40) and try to get it out.


I was actually going to leave it as it is. I thought I might be causing more problems trying to get it out than just leaving it in.

 
quote
Originally posted by Patrick:

Personally, I wouldn't use thread "lock" on any of the water pump bolts. I'd use anti-seize on all of them except for the one that goes into the water jacket.


I'll only use the Locktite on bolt #4, and only use anti-seize on the bolts going in the timing cover (2, 9 and 11). And use a little oil on all other bolts.
IP: Logged
PFF
System Bot
Patrick
Member
Posts: 36402
From: Vancouver, British Columbia, Canada
Registered: Apr 99


Feedback score: (1)
Leave feedback


Total ratings: 458
Rate this member

Report this Post05-13-2020 04:56 PM Click Here to See the Profile for PatrickSend a Private Message to PatrickEdit/Delete MessageReply w/QuoteDirect Link to This Post
 
quote
Originally posted by Cliff Pennock:

And use a little oil on all other bolts.


I don't know why you'd want to use oil... but nevertheless, The Ogre should be along shortly to remind us that torque readings are thrown off unless all threads are clean and dry.

[EDIT] I re-checked page 1, and sure enough, The Ogre already commented on this. (... although I'm not 100% sure what he meant by "w/o" below.)

 
quote
Originally posted by theogre Here:

Bolt Torque specs, most need Clean Dry holes and bolts. Use a torque wrench w/o that is useless and can even break bolts or strip threads. Anti-seize and thread sealer is lube during install and throw out most torque specs.

[This message has been edited by Patrick (edited 05-13-2020).]

IP: Logged
Cliff Pennock
Administrator
Posts: 11609
From: Zandvoort, The Netherlands
Registered: Jan 99


Feedback score: (2)
Leave feedback


Total ratings: 699
Rate this member

Report this Post05-13-2020 05:13 PM Click Here to See the Profile for Cliff PennockClick Here to visit Cliff Pennock's HomePageSend a Private Message to Cliff PennockEdit/Delete MessageReply w/QuoteDirect Link to This Post
 
quote
Originally posted by Patrick:

I don't know why you'd want to use oil...


I actually got that from this post: https://www.fiero.nl/forum/F.../HTML/000047.html#p1
IP: Logged
Patrick
Member
Posts: 36402
From: Vancouver, British Columbia, Canada
Registered: Apr 99


Feedback score: (1)
Leave feedback


Total ratings: 458
Rate this member

Report this Post05-13-2020 05:30 PM Click Here to See the Profile for PatrickSend a Private Message to PatrickEdit/Delete MessageReply w/QuoteDirect Link to This Post
 
quote
Originally posted by Cliff Pennock:

I actually got that from this post.


Are you going to listen to a banned member or to one still in good standing?

Both JazzMan and The Ogre have warned about torque readings being affected when anything is applied to bolt threads. I hope you saw what I had earlier added to my previous post Here.

[This message has been edited by Patrick (edited 05-13-2020).]

IP: Logged
Cliff Pennock
Administrator
Posts: 11609
From: Zandvoort, The Netherlands
Registered: Jan 99


Feedback score: (2)
Leave feedback


Total ratings: 699
Rate this member

Report this Post05-14-2020 02:08 AM Click Here to See the Profile for Cliff PennockClick Here to visit Cliff Pennock's HomePageSend a Private Message to Cliff PennockEdit/Delete MessageReply w/QuoteDirect Link to This Post
 
quote
Originally posted by Patrick:

Are you going to listen to a banned member or to one still in good standing?


Well, he was banned for being an ******* , not for not knowing what he was talking about when it came to Fieros. Using a little bit of engine oil kinda makes sense. It doesn't change torque readings much and will help bolting the bolts in since they are no longer new, smooth bolts.

 
quote
Both JazzMan and The Ogre have warned about torque readings being affected when anything is applied to bolt threads. I hope you saw what I had earlier added to my previous post Here.


I'm planning to use slightly lower torque than stated. So at least I know I'm in the ballpark.
IP: Logged
fierofool
Member
Posts: 12811
From: Auburn, Georgia USA
Registered: Jan 2002


Feedback score:    (13)
Leave feedback


Total ratings: 154
Rate this member

Report this Post05-14-2020 08:45 AM Click Here to See the Profile for fierofoolClick Here to visit fierofool's HomePageSend a Private Message to fierofoolEdit/Delete MessageReply w/QuoteDirect Link to This Post
If you will bump the head of the bolt with a brass hammer or use a brass drift, it will help to break the bond. You can then use a few good shots of AC refrigerant on that broken bolt to help loosen it further. Place the end of the hose over the end, open the valve on the can and give it a 10-15 second shot and try to remove it. The extreme cold of the refrigerant will shrink the bolt, allowing it to come loose. Dry ice will work, too but I think in this situation, you may not have a large enough stud to be that effective.

I would suggest some plumber's pipe dope applied to the water jacket bolt. It's made for that purpose. And YES! In the machine shop, we never lubricated any fasteners that required a specific torque. All bores were chased with a thread tap to clean them and the fasteners were installed dry.
IP: Logged
creaky78
Member
Posts: 137
From: Greendale IN USA
Registered: Nov 2015


Feedback score: N/A
Leave feedback

Rate this member

Report this Post05-14-2020 10:50 AM Click Here to See the Profile for creaky78Send a Private Message to creaky78Edit/Delete MessageReply w/QuoteDirect Link to This Post
When I tighten threaded fasteners with a torque wrench, I always make sure the threads are clean and free of rust and crud. I also use a lubricant, the majority of the time anti-seize. Here's a link to an interesting article on the subject.

https://www.reliabilitysolu...e-Threaded-Fasteners
IP: Logged
Cliff Pennock
Administrator
Posts: 11609
From: Zandvoort, The Netherlands
Registered: Jan 99


Feedback score: (2)
Leave feedback


Total ratings: 699
Rate this member

Report this Post05-15-2020 12:16 PM Click Here to See the Profile for Cliff PennockClick Here to visit Cliff Pennock's HomePageSend a Private Message to Cliff PennockEdit/Delete MessageReply w/QuoteDirect Link to This Post
The taps I have aren't anywhere near long enough to be able to clean the holes entirely so I just took some long bolts an cut a few slots in them:

IP: Logged
Cliff Pennock
Administrator
Posts: 11609
From: Zandvoort, The Netherlands
Registered: Jan 99


Feedback score: (2)
Leave feedback


Total ratings: 699
Rate this member

Report this Post05-15-2020 12:20 PM Click Here to See the Profile for Cliff PennockClick Here to visit Cliff Pennock's HomePageSend a Private Message to Cliff PennockEdit/Delete MessageReply w/QuoteDirect Link to This Post

Cliff Pennock

11609 posts
Member since Jan 99
For future reference, the thread sizes are:

M6 x 1.0
M8 x 1.25
M10 x 1.5
IP: Logged
Patrick
Member
Posts: 36402
From: Vancouver, British Columbia, Canada
Registered: Apr 99


Feedback score: (1)
Leave feedback


Total ratings: 458
Rate this member

Report this Post05-15-2020 02:25 PM Click Here to See the Profile for PatrickSend a Private Message to PatrickEdit/Delete MessageReply w/QuoteDirect Link to This Post
 
quote
Originally posted by Cliff Pennock:

I just took some long bolts an cut a few slots in them:


Not bad. How'd you cut the slots?

IP: Logged
Cliff Pennock
Administrator
Posts: 11609
From: Zandvoort, The Netherlands
Registered: Jan 99


Feedback score: (2)
Leave feedback


Total ratings: 699
Rate this member

Report this Post05-15-2020 04:29 PM Click Here to See the Profile for Cliff PennockClick Here to visit Cliff Pennock's HomePageSend a Private Message to Cliff PennockEdit/Delete MessageReply w/QuoteDirect Link to This Post
 
quote
Originally posted by Patrick:

Not bad. How'd you cut the slots?


Dremel.
IP: Logged
PFF
System Bot
Cliff Pennock
Administrator
Posts: 11609
From: Zandvoort, The Netherlands
Registered: Jan 99


Feedback score: (2)
Leave feedback


Total ratings: 699
Rate this member

Report this Post05-16-2020 10:32 AM Click Here to See the Profile for Cliff PennockClick Here to visit Cliff Pennock's HomePageSend a Private Message to Cliff PennockEdit/Delete MessageReply w/QuoteDirect Link to This Post
Waterpump installed. I torqued all large bolts to about 20-21 ft lbs, I'll recheck once the liquid sealant has dried. Torquing the smaller bolts was a lot more difficult since I really couldn't feel when my torque wrench went "click". In the end, I just tightened those by hand because I was afraid they were over tightened.

I'll now let the liquid sealant dry for 1-2 days before filling the system with water and trying to start her up. No idea if she (he? she? it?) will start up at all since she has been sitting there since I guess august last year.

Man, I miss driving her.
IP: Logged
Cliff Pennock
Administrator
Posts: 11609
From: Zandvoort, The Netherlands
Registered: Jan 99


Feedback score: (2)
Leave feedback


Total ratings: 699
Rate this member

Report this Post05-16-2020 02:48 PM Click Here to See the Profile for Cliff PennockClick Here to visit Cliff Pennock's HomePageSend a Private Message to Cliff PennockEdit/Delete MessageReply w/QuoteDirect Link to This Post

Cliff Pennock

11609 posts
Member since Jan 99
Ok, the reason I applied some liguid gasket is because I read that in Jazzman's post here:

 
quote
Originally posted by JazzMan:

Apply a good sealer to both sides of the gasket very sparingly and spread evenly. Stick the gasket to the water pump first and then the pump/gasket assembly to the block.


So I did just that. Applied some liquid gasket. I'm not sure how much "sparingly" is, but I applied about as thick of a coat as I would apply thermal paste on a CPU (if you are also a computer nerd like me, you know exactly what I mean 😁

But now I read on a few sites to never ever combine a liquid gasket with a dry gasket... 😕
IP: Logged
Cliff Pennock
Administrator
Posts: 11609
From: Zandvoort, The Netherlands
Registered: Jan 99


Feedback score: (2)
Leave feedback


Total ratings: 699
Rate this member

Report this Post05-16-2020 06:03 PM Click Here to See the Profile for Cliff PennockClick Here to visit Cliff Pennock's HomePageSend a Private Message to Cliff PennockEdit/Delete MessageReply w/QuoteDirect Link to This Post

Cliff Pennock

11609 posts
Member since Jan 99
Ah well. I just saw a YouTube video of a guy installing a water pump on a Chevy (and it seemed he knew what he was doing) and he did exactly what I did. So I guess that's the proper way after all.
IP: Logged
Dennis LaGrua
Member
Posts: 15145
From: Hillsborough, NJ U.S.A.
Registered: May 2000


Feedback score:    (13)
Leave feedback


Total ratings: 328
Rate this member

Report this Post05-16-2020 07:14 PM Click Here to See the Profile for Dennis LaGruaSend a Private Message to Dennis LaGruaEdit/Delete MessageReply w/QuoteDirect Link to This Post
Spray in a strong cleaner like brake cleaner. Then get in there with a small brass pick or screwdriver and gently pick out the crud. I don't believe that you will need to use a tap unless the threads are rusted. It might be a good idea to use new bolts. Maintain the proper torque and bolt tightening sequence. Important :Use a new gasket with Permatex water pump gasket sealer.

------------------
" THE BLACK PARALYZER" -87GT 3800SC Series III engine, custom ZZP /Frozen Boost Intercooler setup, 3.4" Pulley, Northstar TB, LS1 MAF, 3" Spintech/Hedman Exhaust, P-log Manifold, Autolite 104's, MSD wires, Custom CAI, 4T65eHD w. custom axles, Champion Radiator, S10 Brake Booster, HP Tuners VCM Suite.
"THE COLUSSUS"
87GT - ALL OUT 3.4L Turbocharged engine, Garrett Hybrid Turbo, MSD ign., modified TH125H
" ON THE LOOSE WITHOUT THE JUICE "

IP: Logged
Patrick
Member
Posts: 36402
From: Vancouver, British Columbia, Canada
Registered: Apr 99


Feedback score: (1)
Leave feedback


Total ratings: 458
Rate this member

Report this Post05-16-2020 07:58 PM Click Here to See the Profile for PatrickSend a Private Message to PatrickEdit/Delete MessageReply w/QuoteDirect Link to This Post
 
quote
Originally posted by Dennis LaGrua:

Spray in a strong cleaner like brake cleaner. Then get in there with a small brass pick or screwdriver and gently pick out the crud. I don't believe that you will need to use a tap unless the threads are rusted. It might be a good idea to use new bolts. Maintain the proper torque and bolt tightening sequence. Important :Use a new gasket with Permatex water pump gasket sealer.


Dennis, you appear to have responded to the last post of page one!

[This message has been edited by Patrick (edited 05-16-2020).]

IP: Logged
Cliff Pennock
Administrator
Posts: 11609
From: Zandvoort, The Netherlands
Registered: Jan 99


Feedback score: (2)
Leave feedback


Total ratings: 699
Rate this member

Report this Post05-17-2020 08:34 AM Click Here to See the Profile for Cliff PennockClick Here to visit Cliff Pennock's HomePageSend a Private Message to Cliff PennockEdit/Delete MessageReply w/QuoteDirect Link to This Post
Everything is bolted back in place. I'm ready to fill her up again.

Do I absolutely need to drain all old coolant from the system? Asking because I'm lazy. Well, that and that I'm not looking forward to perhaps destroy the drain plug on the coolant pipe.

I'm not even sure how much coolant is still in there. When I tried to drain it from the petcock at the radiator, nothing came out. The only coolant coming out was when I removed the last (#4) bolt from the waterpump. And that was less than a cup or so.
IP: Logged
Lambo nut
Member
Posts: 4442
From: Centralia,Missouri. USA
Registered: Sep 2003


Feedback score: (2)
Leave feedback


Total ratings: 262
Rate this member

Report this Post05-17-2020 11:50 AM Click Here to See the Profile for Lambo nutSend a Private Message to Lambo nutEdit/Delete MessageReply w/QuoteDirect Link to This Post
 
quote
Originally posted by Cliff Pennock:

Everything is bolted back in place. I'm ready to fill her up again.

Do I absolutely need to drain all old coolant from the system? Asking because I'm lazy. Well, that and that I'm not looking forward to perhaps destroy the drain plug on the coolant pipe.

I'm not even sure how much coolant is still in there. When I tried to drain it from the petcock at the radiator, nothing came out. The only coolant coming out was when I removed the last (#4) bolt from the waterpump. And that was less than a cup or so.


If the coolant looked clean that came out of the bolt hole, I would fill it back up with 50/50 mix and call it good.
IP: Logged
TM_Fiero
Member
Posts: 1076
From: Brookville, PA
Registered: Jun 2002


Feedback score: N/A
Leave feedback

Rate this member

Report this Post05-17-2020 12:01 PM Click Here to See the Profile for TM_FieroSend a Private Message to TM_FieroEdit/Delete MessageReply w/QuoteDirect Link to This Post
I wouldn't worry too much about what little is left in the pipes. The new will dilute the old stuff out to the point it wouldn't matter, the old stuff might be ok anyway.

The Fiero should start up just fine. I've had mine sit for 2 years and it fired right up on the old gas with no stabilizer in it. IMO fuel these days is pretty good and last longer than a lot of people think. Perhaps top the tank off to mix in some fresh with old when you get a chance.

My biggest concern on starting a car that has been sitting is mouse nests. I give a good look over to make sure there are none in places that can catch fire. Exhaust, heater, etc.

Just my opinions based on my personal experience.

IP: Logged
Cliff Pennock
Administrator
Posts: 11609
From: Zandvoort, The Netherlands
Registered: Jan 99


Feedback score: (2)
Leave feedback


Total ratings: 699
Rate this member

Report this Post05-17-2020 01:21 PM Click Here to See the Profile for Cliff PennockClick Here to visit Cliff Pennock's HomePageSend a Private Message to Cliff PennockEdit/Delete MessageReply w/QuoteDirect Link to This Post
Awesome! I'll get some coolant and oil tomorrow and start her up. Fingers crossed! 😁
IP: Logged
85fieroguy
Member
Posts: 309
From: Chicago
Registered: Aug 2015


Feedback score: N/A
Leave feedback

Rate this member

Report this Post05-17-2020 02:01 PM Click Here to See the Profile for 85fieroguySend a Private Message to 85fieroguyEdit/Delete MessageReply w/QuoteDirect Link to This Post
1st off. you will need a tranquilizer or have a 12 pack of beer in the garage...kidding.. With assistance from a close friend, I recently replaced my " gunked up" stock water pump with one that has a metal impeller. Not an easy job but doable. Well worth doing, and flush out the entire cooling system with a cleaner ,add new hoses, thermostat if your budget can take it. My 85GT with 57,700 miles needed this new maintenance. The advice on this site and the previous posts are EXCELLENT..just follow the postings.
IP: Logged
PFF
System Bot
Cliff Pennock
Administrator
Posts: 11609
From: Zandvoort, The Netherlands
Registered: Jan 99


Feedback score: (2)
Leave feedback


Total ratings: 699
Rate this member

Report this Post05-18-2020 06:29 AM Click Here to See the Profile for Cliff PennockClick Here to visit Cliff Pennock's HomePageSend a Private Message to Cliff PennockEdit/Delete MessageReply w/QuoteDirect Link to This Post
Put about 2 gallons of coolant in it, checked the oil and started it up. It started right up as if I have been driving it daily. No problems there fortunately. The bad news is that it's still leaking coolant quite a bit. I don't think it's leaking from the water pump. Wasn't able to check properly because I spilled a bit of coolant while filling it up so the water pump wasn't dry. I'll wait for it to dry up and start it up again.

I think it's leaking from where the outlet hose connects to the pipe. But I will check later. I'll jack the car up and start it to get a clearer view.
IP: Logged
Cliff Pennock
Administrator
Posts: 11609
From: Zandvoort, The Netherlands
Registered: Jan 99


Feedback score: (2)
Leave feedback


Total ratings: 699
Rate this member

Report this Post05-18-2020 07:09 AM Click Here to See the Profile for Cliff PennockClick Here to visit Cliff Pennock's HomePageSend a Private Message to Cliff PennockEdit/Delete MessageReply w/QuoteDirect Link to This Post

Cliff Pennock

11609 posts
Member since Jan 99
PS: Not looking forward to draining the system again... 😕
IP: Logged
pmbrunelle
Member
Posts: 4376
From: Grand-Mère, Québec
Registered: Sep 2008


Feedback score: N/A
Leave feedback


Total ratings: 62
Rate this member

Report this Post05-18-2020 12:59 PM Click Here to See the Profile for pmbrunelleSend a Private Message to pmbrunelleEdit/Delete MessageReply w/QuoteDirect Link to This Post
Often, shortly after putting together these things, you have to slightly re-tighten the hose clamps where coolant leaks between the rubber hose and the barb fitting.

You don't need to drain anything to do that.
IP: Logged
Cliff Pennock
Administrator
Posts: 11609
From: Zandvoort, The Netherlands
Registered: Jan 99


Feedback score: (2)
Leave feedback


Total ratings: 699
Rate this member

Report this Post05-19-2020 07:23 AM Click Here to See the Profile for Cliff PennockClick Here to visit Cliff Pennock's HomePageSend a Private Message to Cliff PennockEdit/Delete MessageReply w/QuoteDirect Link to This Post
Damn.

It's leaking from the exhaust pipes. I have a small hole in one of my exaust pipes and a small hole in my catalyst en it's leaking coolant from there.

Sooooo... blown head gasket? 😕
IP: Logged
Cliff Pennock
Administrator
Posts: 11609
From: Zandvoort, The Netherlands
Registered: Jan 99


Feedback score: (2)
Leave feedback


Total ratings: 699
Rate this member

Report this Post05-19-2020 07:28 AM Click Here to See the Profile for Cliff PennockClick Here to visit Cliff Pennock's HomePageSend a Private Message to Cliff PennockEdit/Delete MessageReply w/QuoteDirect Link to This Post

Cliff Pennock

11609 posts
Member since Jan 99
BTW, the engine ran fine. Actually purred like a kitten.
IP: Logged
Patrick
Member
Posts: 36402
From: Vancouver, British Columbia, Canada
Registered: Apr 99


Feedback score: (1)
Leave feedback


Total ratings: 458
Rate this member

Report this Post10-18-2022 03:45 PM Click Here to See the Profile for PatrickSend a Private Message to PatrickEdit/Delete MessageReply w/QuoteDirect Link to This Post
 
quote
Originally posted by Cliff Pennock:

It's leaking from the exhaust pipes. I have a small hole in one of my exaust pipes and a small hole in my catalyst en it's leaking coolant from there.

Sooooo... blown head gasket?


I suspect this turned out to be nothing more than condensation. Right?
IP: Logged
greenturnedblue
Member
Posts: 81
From: Vancouver, Canada
Registered: Jan 2022


Feedback score: N/A
Leave feedback

Rate this member

Report this Post10-18-2022 04:09 PM Click Here to See the Profile for greenturnedblueSend a Private Message to greenturnedblueEdit/Delete MessageReply w/QuoteDirect Link to This Post
If coolant did leak into the crankcase, it would have vaporized long before it dripped down the exhaust pipe
IP: Logged
Previous Page | Next Page

This topic is 2 pages long:  1   2 
next newest topic | next oldest topic

All times are ET (US)

Post New Topic  Post A Reply
Hop to:

Contact Us | Back To Main Page

Advertizing on PFF | Fiero Parts Vendors
PFF Merchandise | Fiero Gallery | Ogre's Cave
Real-Time Chat | Fiero Related Auctions on eBay


Copyright (c) 1999, C. Pennock