Back when I was in High School (Class of 2008) I got a 1986 Pontiac Fiero (4 cyl, MT). It was a fun car and I always had big plans for it, but they never panned out. A few years into college I got an Engineering Co-op and needed a reliable car to get me from point A to point B. While my parents were gracious enough to have stored my Fiero in their garage while I was at school, I couldn't afford to get a new car without selling the Fiero. It was a sad day for me, but I always figured I'd pick up another one.
Nearly 10 years later that's finally come true. This time around I've found a 1988 Fiero (4 cyl, MT) with 60k-ish miles. It's not flawless, but it has a good body, decent paint, and seems to have been taken care of mechanically. I've driven it in it's stock state for the summer and fall and now it's time to start the big plans I had so long ago.
I've gathered the following parts to date: -Ecotec 2.0L LSJ -ZZP Dual Pass Intercooler Endplate -GM F40 6 speed Transmission -Haltech Elite 1500 w/ Wideband O2 -Self-designed strut tower lifting plates -Harbor Freight Gantry Crane
Major parts to be selected yet include: -Flywheel/Clutch -Axles -Fuel system
While I've always been quick to turn a wrench on a car or anything else, this is my most ambitious project to date. I'll be planning on updating this thread with pictures, ideas, and questions as it progresses. My goal is to have the drivetrain mechanically complete by early spring 2020 and to move on the electronics from there.
Today I started on the process of losing my cradle drop virginity. Everything disconnected and cradle bolts broken free.
The LSJ I picked up to swap in
0-mile F40 from ZZP
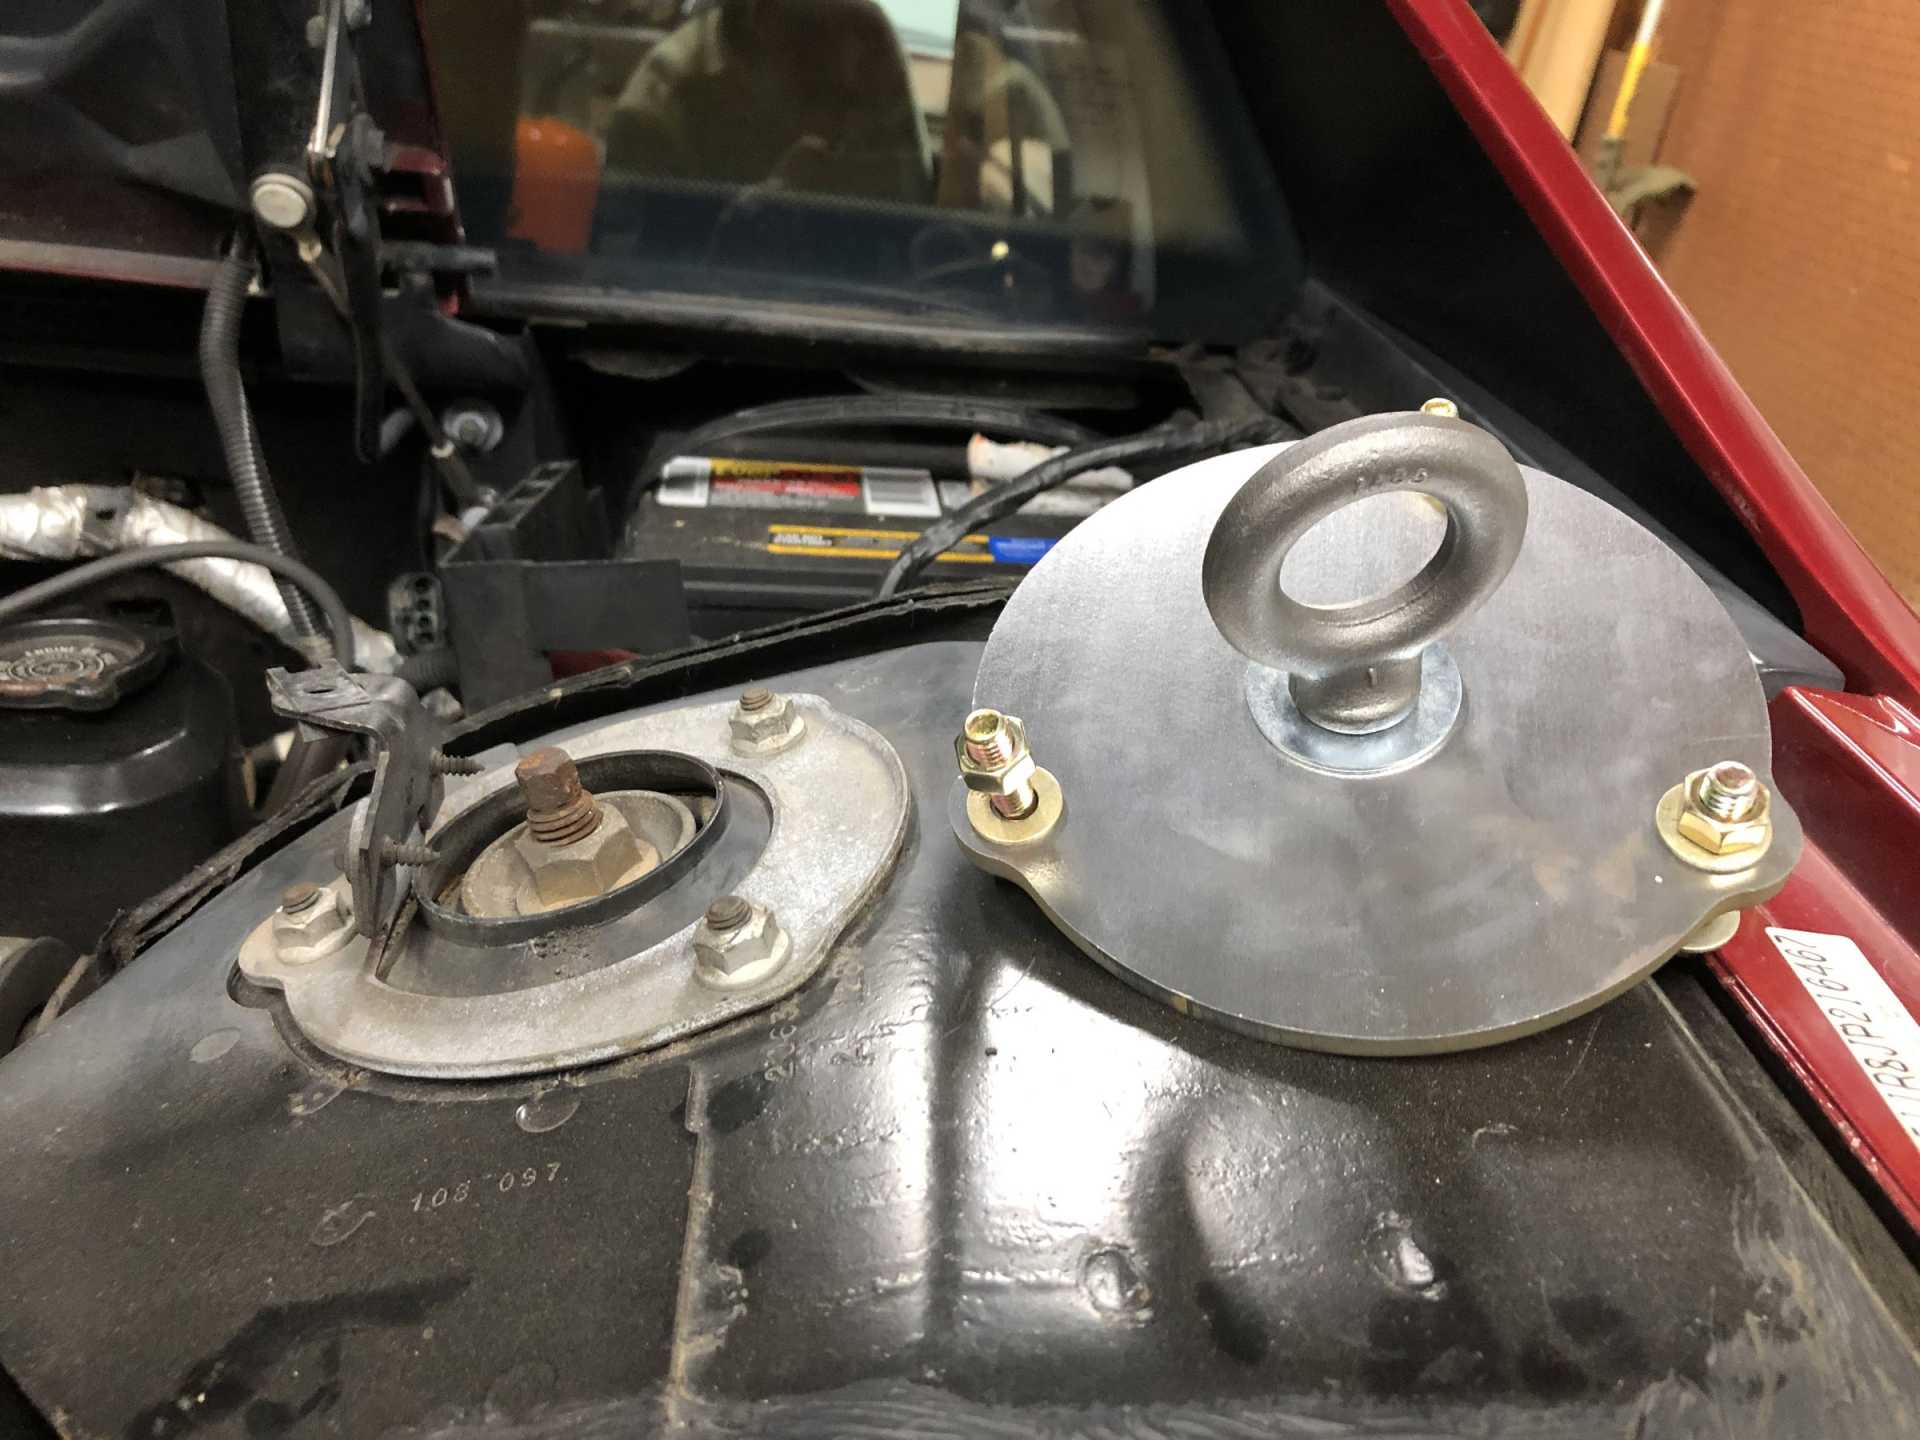
My planned Fiero-hoisting setup
A better look at the swapee
[This message has been edited by 86FieroCentPa (edited 12-23-2019).]
Looks like a nice project. I have yet to see anyone on PFF actually finish an LSJ swap. For the F40, get the axles that came with your engine from a Cobalt SS supercharged. The turbocharged axles will not fit Fiero hubs. Also, make sure you get the latest version of the cam chain tensioner, early versions led to cam chain failure. Good luck with it, thanks for posting this.
------------------ 86 GT built 2.2 ecotec turbo rear SLA suspension QA1 coilovers on tube arms
I'll give you an "A" for effort... but there are two holes on the front trunk wall (under the carpet) that are perfect for hooking a lifting chain into.
I have to give credit to Nathan Bittinger and Toddster for creating the guide I've been using for disconnecting everything and a engine dolly design. See it here
quote
Originally posted by wftb:
Looks like a nice project. I have yet to see anyone on PFF actually finish an LSJ swap. For the F40, get the axles that came with your engine from a Cobalt SS supercharged. The turbocharged axles will not fit Fiero hubs. Also, make sure you get the latest version of the cam chain tensioner, early versions led to cam chain failure. Good luck with it, thanks for posting this.
Thanks for confirming that the Cobalt SS Supercharged axles will work; I'd seen hints and ideas that they would work but was looking for some more information. Unfortunately I'll have to hunt those down at some point; this LSJ came from someone that was planning on swapping it into an off road buggy before deciding to go another direction. With that said I am planning on fully custom axles from The Driveshaft Shop or some other outfit at some point
The tensioner is a good reminder. I've had a number of Ecotec engines in my and family households over the years and I've done a few tensioner replacements.
quote
Originally posted by Patrick:
I'll give you an "A" for effort... but there are two holes on the front trunk wall (under the carpet) that are perfect for hooking a lifting chain into.
I've been a lurker and researcher around here for awhile and I'm aware of all of the different philosophies (mostly trunk latch or trunk wall holes) for lifting the rear of a Fiero. While I realize that both methods have been used with success by dozens of people, I'm more comfortable loading something that was designed to take high vertical loads. That and it gave me an excuse to brush up on my Autodesk Fusion 360 skills and test out eMachineShop on a fairly non-critical part.
Nice find and it looks to be in good shape. As for the Ecotec swap, most of them that I have seen were of the very early N/A variety but the LSJ should be doable. Roger Thelin makes swap mounts and parts for that engine. I would check with Roger to see if he has mounts brackets and other items needed for that year engine swap. That engine provided decent power for the Cobalt and Saturn Ion Redline. Stock they ran low 14's in the 1/4 mile. Should work real well in a Fiero. Good luck with the project and hope you decide to join us and show your work at Fieros at Carlisle in June 2020.
------------------ " THE BLACK PARALYZER" -87GT 3800SC Series III engine, custom ZZP /Frozen Boost Intercooler setup, 3.4" Pulley, Northstar TB, LS1 MAF, 3" Spintech/Hedman Exhaust, P-log Manifold, Autolite 104's, MSD wires, Custom CAI, 4T65eHD w. custom axles, Champion Radiator, S10 Brake Booster, HP Tuners VCM Suite. "THE COLUSSUS" 87GT - ALL OUT 3.4L Turbocharged engine, Garrett Hybrid Turbo, MSD ign., modified TH125H " ON THE LOOSE WITHOUT THE JUICE "
I've been a lurker and researcher around here for awhile and I'm aware of all of the different philosophies (mostly trunk latch or trunk wall holes) for lifting the rear of a Fiero. While I realize that both methods have been used with success by dozens of people...
Over the course of 35 years, I suspect it's been a whole lot more than "dozens of people".
I wouldn't trust the trunk latch method myself, but IMO the Fiero's trunk wall is more than robust enough for lifting purposes. Some people are adamant that those holes were actually put there for that very purpose.
The only real hiccup were the rear cradle bolts. The sheet metal capturing the "Witches Hat" completely came apart. I ended up cutting a 2" hole in the frame so that I could get some heat on the bolts and grab them with a vice-grip. From there it was as simple as lifting the car up and rolling the engine out. I'll need to work on separating the Iron Duke and transmission from the cradle so that I can start coming up with a mounting solution for the Ecotec.
Anybody in the market for a 60k-ish mile Iron Duke and Isuzu transmission? It'll eventually get posted for sale here and elsewhere once I have it dismounted.
[This message has been edited by 86FieroCentPa (edited 12-23-2019).]
Capturing the "Witches Hat" completely came apart. I ended up cutting a 2" hole in the frame so that I could get some heat on the bolts and grab them with a vice-grip. From there it was as simple as lifting the car up and rolling the engine out. I'll need to work on separating the Iron Duke and transmission from the cradle so that I can start coming up with a mounting solution for the Ecotec. .
No need to butcher cut the frame to access the rear cradle nuts. You just remove the rear facia and you can access them within the frame with a faucet wrench. Works well every time. ------------------ " THE BLACK PARALYZER" -87GT 3800SC Series III engine, custom ZZP /Frozen Boost Intercooler setup, 3.4" Pulley, Northstar TB, LS1 MAF, 3" Spintech/Hedman Exhaust, P-log Manifold, Autolite 104's, MSD wires, Custom CAI, 4T65eHD w. custom axles, Champion Radiator, S10 Brake Booster, HP Tuners VCM Suite. "THE COLUSSUS" 87GT - ALL OUT 3.4L Turbocharged engine, Garrett Hybrid Turbo, MSD ign., modified TH125H " ON THE LOOSE WITHOUT THE JUICE "
[This message has been edited by Dennis LaGrua (edited 02-23-2020).]
Capturing the "Witches Hat" completely came apart. I ended up cutting a 2" hole in the frame so that I could get some heat on the bolts and grab them with a vice-grip. From there it was as simple as lifting the car up and rolling the engine out. I'll need to work on separating the Iron Duke and transmission from the cradle so that I can start coming up with a mounting solution for the Ecotec. .
No need to butcher cut the frame to access the rear cradle nuts. You just remove the rear facia and you can access them within the frame with a faucet wrench. Works well every time.
[This message has been edited by Dennis LaGrua (edited 12-17-2019).]
Good luck on that swap, I do hope you keeps us up to date with information and pictures so that we can all live vicariously through you.
Btw, I used a chain through bracing in the trunk area to lift both my fieros up. Worked like a charm and it also allowed my cherry picker to be further back. I would rather have your hoist for sure. I bet it gives much better access to swing that cradle out.
1. I just stumbled on this swap and will be following - thanks for sharing! 2. I have used the trunk latch several times through the past 25 years but each time I have to bend it back down with a BFH a couple inches. In my case I think the metal has is starting to fatigue a little and I will be using an alternate lifting point next time. 3. Nice work on your custom lifting plates - Laser cut? 4. Should be a heck of a nice ride. 5. What do your frame rails look like inside the trunk area behind the carpet on both sides? This is where they tend to rust the most (in Minnesota anyways...) 6. Nice to get that IRON DUKE out. In 2020, that thing needs to go for sure!!!!!!!!!!!!!!!!!!!!!!!!!!!!!
Good luck!!
------------------ 84/87 NB, 3800SC, E-85, VS Cam, 2.8 Pulley, 4T65E-HD, HP Tuners, AEM Wideband, Regal GS Gauges, S-10 Brake Booster. 1/4 mile -11.85 at 114mph
[This message has been edited by DimeMachine (edited 12-23-2019).]
Over the past week or so I've really just been doing some odds and ends
Got the old drivetrain off of the cradle
Got the exhaust, engine mounts, suspension, etc off of the cradle
And spent far too much time on this guy:
3-Jaw Puller was no match for it, heat and beat only succeeded in putting about 1/8" of slop into the bearing. I'm going to see if a local machine shop can press the axle out
As far as cutting into the frame goes, I think that a hole saw leaves it pretty tidy
I know some that have done the hole saw method have left the hole there without issue. I'll probably be welding a patch back int there once the swap is complete. The picture also gives a pretty good look at the rust situation. Not quite "no rust" but nothing catastrophic. Here's a look inside the trunk.
quote
Originally posted by Pontiac Fan 89:
I know lightspeedfieros have been working on an LSJ swap. They have a lot of content on YouTube, I'd reccomend checking it out.
Thanks for the tip. I'd seen their channel but not checked it out yet. There's another YouTube channel doing a pretty good restoration of an 84; Check it out here
quote
Originally posted by DimeMachine: ... 3. Nice work on your custom lifting plates - Laser cut? ...
I'm not actually sure what the process was for making these, though the edges look more machined than cut. I actually used eMachineshop to have them made. You send in the CAD or make a drawing using their software, select a material and they issue a quote. This was my first time using their service and I was pretty happy with it. I can see myself getting some more parts made that way in the future.
Thank you all for your interest, insight, and support. It'll soon be time to get into some fabricating
I usually use a cutoff wheel and just cut a flap in the lower frame rail, bend it down for access to the witch-hat nut and the fold it back up, tack weld and seam seal the area.
3-Jaw Puller was no match for it, heat and beat only succeeded in putting about 1/8" of slop into the bearing. I'm going to see if a local machine shop can press the axle out
Wait, so is the half shaft rust-welded to the bearing at the splines??
Prettier maybe, but that looks like the unusual WO2 package..(only offered in red or white). Is It?
Good eye. Yes, it is. I'm kind of torn between keeping it looking "stock" (such that it is) or going back with the dark lowers. It's getting painted Lexus/Toyota pearl white at some point.
I don't have much in the way of photo updates. Since my last post I've:
-De-loomed the factory Ecotec Harness and labeled all the wires -Powered up my Haltech for the first time -Ordered and received a full set of Ecotec Motor Mounts and Late Model F40 Transmission mounts from Roger Thelin. I've only eyeball fit everything, but it all looks to fit great -Ordered a 2.2L Ecotec oil pan to accommodate the Thelin mounts
I'm excited to get the motor and transmission in place so I can keep making progress.
Nice project you have going although I'm not familiar with the LSJ conversion. I completed my 3800sc swap last year. Some years ago before I had a lift I needed some exhaust work done and found a place in Oxford called Jenning's Muffler Shop. Just up the street from there was a Fiero for sale at the Sunoco station. I did check it out and now I'm wondering if that was the 1986 Pontiac Fiero you used to have.
Good luck on your project.
Spoon
------------------ "Kilgore Trout once wrote a short story which was a dialogue between two pieces of yeast. They were discussing the possible purposes of life as they ate sugar and suffocated in their own excrement. Because of their limited intelligence, they never came close to guessing that they were making champagne." - Kurt Vonnegut
Progress has been slow, especially this past week while I was down for the count with a fever of 104. However, I try to get a few small tasks done here and there.
I got a jackshaft from a Buick Regal bolted up to the Ecotec block, as well as the 2.2L oilpan test-fitted so that the Thelin front engine mount can go on. As best as I can tell the Thelin mount was designed for the Cobalt SS Jackshaft, which I haven't had any luck coming across at a reasonable price. Saab/Ecotec jackshafts are a dime a dozen, but I settled on the Regal one for the time being since that's where my transmission came from. The mount required a bit of grinding to accommodate the different shape of the support bearing
If you're of a weak constitution or are disturbed by an 88 cradle being cut up, avert your eyes
The Thelin Ecotec brackets require the use of a weld-in cradle reinforcement and the partial removal of the forward crossmember. I went ahead and tacked a length of angle in the middle of the cradle to keep it from flexing too much during the surgery. I'll need to spend some quality time trimming the new crossmember to fit before burning it in.
quote
Originally posted by fierobear:
Wait, so is the half shaft rust-welded to the bearing at the splines??
Sorry; missed this before. You've got the size of it, that thing was not going anywhere. The local tire shop was able to press it out using their hydraulic press
Tonight I made some big (for me) progress. It was time to undertake my biggest welding project to date; the new cradle crossmember. When I settled in to work this evening I figured I'd just work on the fitment
The box section didn't quite fit the side rails of the cradle the way I liked
So a bit more massaging was in order
Now was the moment of truth; did I want to burn it in tonight? I hadn't really been planning on it, but there was really no time like the present
And as they say, a grinder and paint make me the welder I ain't
In all honesty, the cradle is just being stored outside for the moment so I wanted to get something on the welds before they rusted. Before final assembly I think I'll have the cradle media blasted and coated. I've got a few steps between here and there though; starting with test fitting the LSJ and F40 to my modified cradle. Hopefully I'll have time to take a stab at that this weekend.
Before you go much further, I would recommend test fitting the cradle back under the car. There have been several people who did N* swaps who braced their cradles before welding and still found they pulled the front mounts inwards. It'll be easier to correct it now, before you have it refinished and have the driveline on it.
Progress has been slow but steady; I’ve done some test fitting of the cradle assembly into the car and ran into issues. The next goal is to have the engine/transmission mounted and 4 bolts mounting the cradle to the frame.
Here’s just a little teaser from one of the test fits
This weekend I managed to get everything tweaked and adjusted so that the cradle can be reattached to the chassis. While I did use a "bolt-in (with minor welding)" set of mounts, I couldn't find a way to get everything lined up so that all the mounting points were tight and the engine and transmission fit in the engine bay. The issue was the entire assembly seemed about an inch too far to the drivers side. Note the contact in the lower left part of the image
I figured I'd just need to create some additional movement to the passenger side, so I extended the rear transmission mounting slots about 1/2"
After another test fit this showed promise; now I could get the cradle down to the mounting points. However, I was doing this with the engine front mount supported by wood blocks and not on the weld-in crossmember. It would appear to me that the mounting pad on the crossmember needed to be about 1 inch or so further to the passenger side. So out came the cutoff wheel
While I was making this modification I figured there was no sense in constraining my options, so rather than clean up and re-weld the old bracket I made a new mount out of two pieces of structural steel welded together. I made it a bit longer in case I needed to relocate the mounting holes.
After another test fit it became apparent that the snout of the supercharger would be precisely in the same place as the passenger side hinge box. I did some clearancing to get it to fit for the moment. I think I'll need to make a few more cuts before making it final. I'll probably end up changing to a gas strut system, or maybe even a prop rod. I like the FieroGuru hinge box elimination too. A few options to consider down the road.
Now for the payoff; it fits!
I did cheat a little, the rear cradle mounts are lined up but the fronts need to come up about 1" in order for them to be "in place". The only place this might be an issue is the supercharger snout which as I said I plan on addressing in the near future. Part of the reason the front cradle mounts don't slide right in are these:
When I did the initial engine removal the front air dam was starting to touch the ground. Knowing that I'd have the car up and down quite a few times I knew I needed to lift the front end to keep from damaging anything.
Up next will be a day sandblasting parts, then I can start assembling the suspension to start figuring out what to do with axles. I could also start piecing together the engine harness now that it's located pretty much in its final location.
I just found this thread. Good skills you have,there, 86FieroCentPa
Thank you for posting this. I am in the 'cleaning out my garage to make room' & gather materials phase of a planned swap of an Ecotec Turbo 2,0 into an '84 2M4 with an '86 SE parts donor car. I intend to use an F35 5-sp MT.
I look forward to seeing your future updates.
------------------ Steve Mushynsky
1984 Fiero 2M4 34K miles
1986 Fiero SE I4 (donor now) Lots of good miles. One very bad mile.
1987 Fiero Tried to kill me (gone to a 'better place') Prior owner failed to tighten a bolt. Trailing arm separated at 70 mph
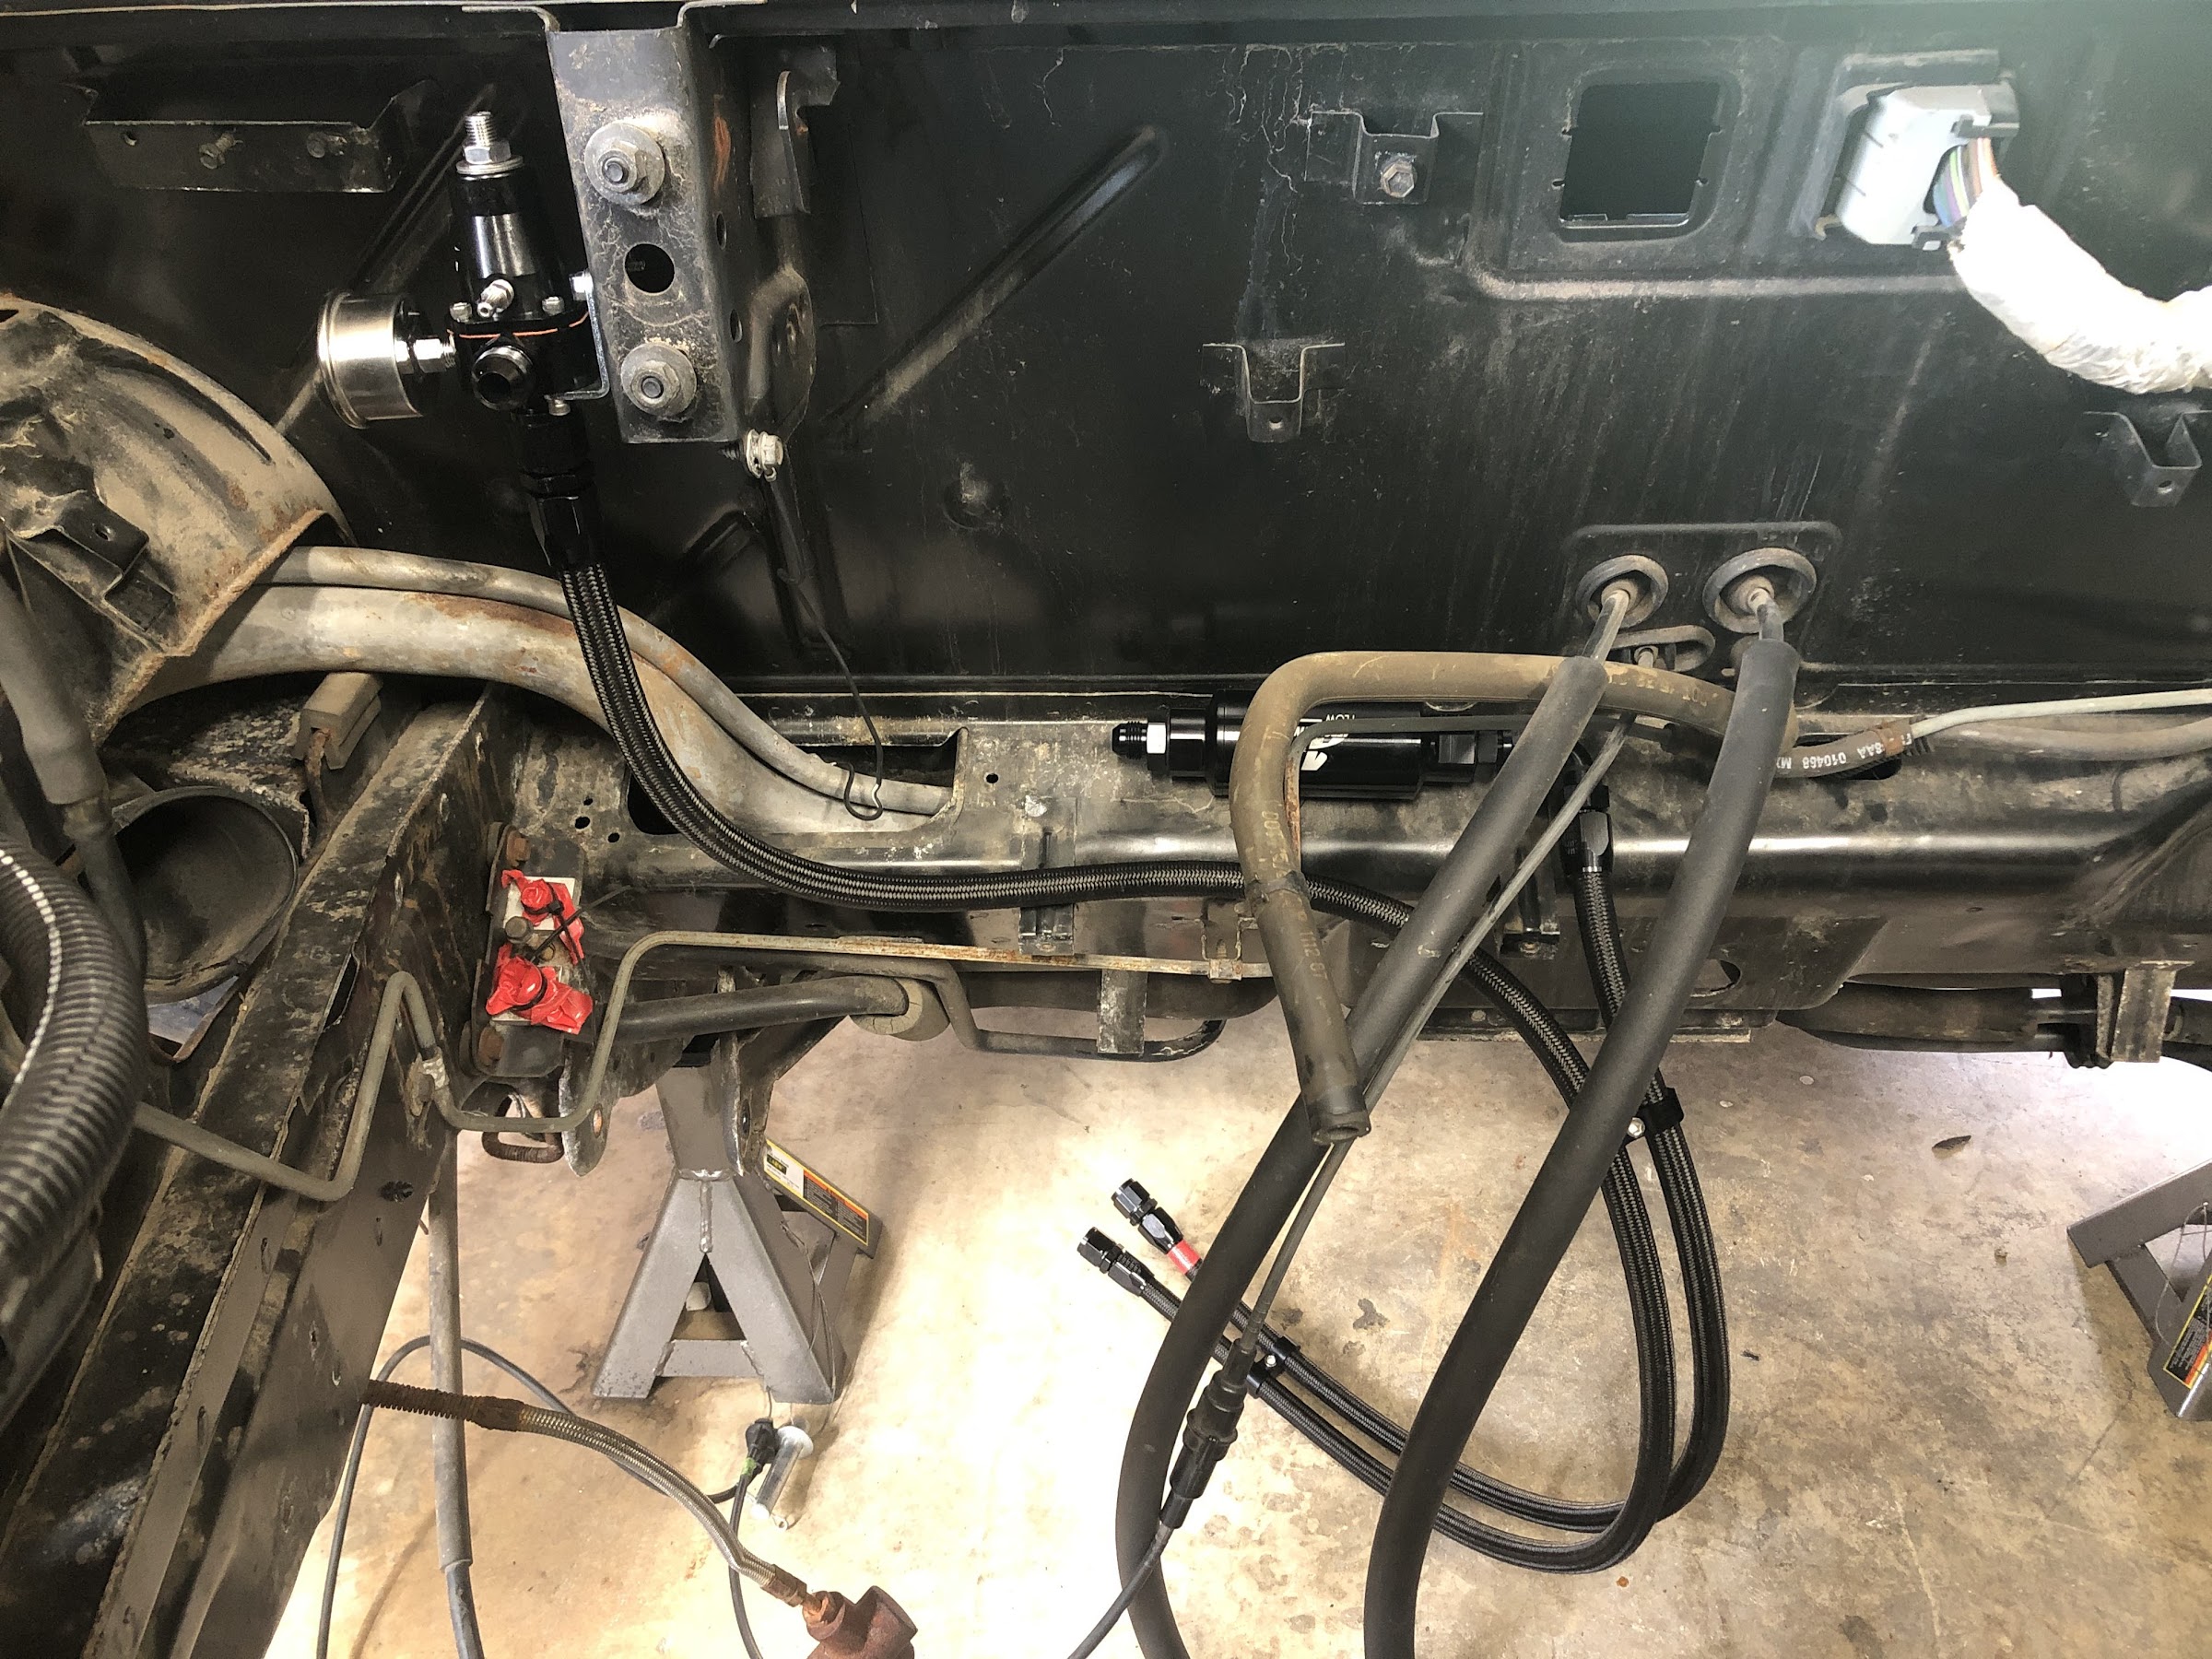
Fuel System I ended up going with a fully custom fuel system. Aeromotive 340LPH fuel pump mounted in a new Fiero Store sending unit. Earls -8AN line and fittings to an Aeromotive fuel filter. From there it goes to a OTTP Billet fuel rail and then onto an Aeromotive Compact regulator. I started some of the plumbing this weekend
Intercooling The LSJ intake manifold utilizes 4 Laminova heat exchangers for intercooling. From the factory they run the cores in series which under high load/heat is known to make the last exchanger fairly inefficient. ZZP offers a new endplate that sets the system up as 2 sets of 2 parallel paths. I've cleaned the the Laminova cores and installed the endplate, but that's fairly easy. As anybody that wants to add an intercooler to their Fiero knows, the hard part is where to mount the heat exchanger. I'm not saying this is the best solution, but its the one that I've come up with.
I have to say, I think I've achieved one of of my favorite looks. The exterior will look completely stock, but if you look closely in the grill you'll see a big honking air to water heat exchanger; hinting at what's going on. In this case I went with Frozen Boost Type 101 (26x7x3.5). I'll be plumbing it to the back with Earls -10 hose along the heater and A/C lines. To be detailed in a future post.
The list of systems to get in order keeps shrinking. The next big one will be the clutch. I opted for a Spec Stage 3+ for a 2011 Buick Regal. Mounting the Clutch and Flywheel won't be that big of a deal, but deciding how I want to get the F40 Hydraulic Throwout Bearing plumbed to the clutch pedal might be. I'll also have to check the TOB height and make sure I wont be over extending it. I know I'm not the first to attempt an F40; if anybody out there has experience or a good thread for me to read be sure to post it.
Being a bit cheap and up for a challenge, I plan on taking the original radiator and removing the plastic end tanks and fabbing up slimmer aluminum ones in place of the plastic ones and fitting it in front of the AC condenser for my inter-cooler heat exchanger. I plan on using the Champion fiero fit rad as well and that requires some trimming up front anyway.
Also, congrats on the lack of rust on your car. My first one car that got hit was nice but not that nice, the new one im working on right now is in bad shape. Big parts of the trunk and rear frame rails gone, as well as holes in the cabin floor. Not looking forward to dealing with all of that.
[This message has been edited by KillerFrogg (edited 03-19-2020).]
I don't think you have mentioned what you plan on doing with your dash, but I just got my Haltech setup working to drive the factory speedo and posted the rough version in my thread. It's ~$15 tops in parts a some basic soldering, and doesn't require any mods to the factory speedo board.
The weather finally dried out and warmed up a bit so I figured it was time to address some of my rust issues. Fortunately everything is intact, so I just needed to prevent things from progressing. I was thinking about sandblasting but without a cabinet it would be difficult, and the chassis-side work would be challenging. Based on all this, I started researching rust treatment products and ended up with Corroseal.
I started by knocking off as much rust as possible with a combination of sanding, wire wheeling, and grinding where necessary. Following that I started applying the product with a brush
It goes on with the consistency of buttermilk, then starts to turn purple-ish. The rust turns black. A coat or two later and you end up with....
Here's a good before/after of the suspension pick up points
After letting things cure for a day I then put a few coats of Rustolem Matte and ended up with a finished product
I also went through the same process with the rear wheel well, trunk corners, and a few spots in the engine bay. I have to say, I'm pretty impressed. Obviously it'll be few months/years until I can pass real judgement; a fresh coat of paint straight onto rust will look good for at least a day or two .... the trick is for it to actually have converted the existing rust and holding new rust at bay.
Outside of this sub-project I've been trying to get parts and everything in order to complete the swap. I think I have everything either in hand or on order, except for the coolant system. I'm thinking about trying out AutoPlumb. Does anybody have experience with their product? I think it should work much nicer than corrugated flex tubes or trying to piece together lines from cut up factory pieces.
Thanks for following along; stay safe and healthy out there.
Cradle looks good. I did the same thing with mine a few years back with the rust converter and paint. Needs it again, I got some brake fluid on it bleeding the clutch and it ate the paint off where it was but thankfully no rust still.
Really I don't see any reason why those AN hose neck adapters wouldn't work. AN is AN and those adapters are the only part that I would be concerned about leaking. I was going to comment about the water manifold neck being plastic, but looking at your thread, your's is aluminum! Thankfully you don't need much hose, $23/ft is not cheap but looking around that about going rate for -20an hose. I don't have much room to talk, just ordered everything I need for my fuel system and -6an teflon hose is ~$12/ft and I got 12 feet of it.
Apparently the Saab unit is different as well, one of the barbs for (i think) the heater core lines is in a different location.
It’s been a couple weeks since I spent some meaningful time on the Fiero, but today I made some progress. I might come back in with pictures later, but for now I:
- Finished clearancing the passenger side hinge box. I ended up having to remove the lower stud, so I’ll have to come up with a method of adding a second bolt/stud.
-Got all 4 cradle bolts installed. The engine will come in and out a bunch more times I’m sure, but it’s good to know that even after all the cradle surgery that things line up
-Prepped the rear suspension parts and knuckles for paint. To start I burned out all the rubber bushings; it’s an easy if offensively pungent job. Then I wire wheeled the crap out of everything. Next time I get a few hours on a sunny day I’ll do the same rust converter base coat followed by a topcoat.
When I write it all out it doesn’t feel like much, but it’s all things that need done to get from here to driving again.
I hope that everyone out there is keeping safe and healthy. My wife and I are fortunate in that we’ve both been able to continue working, but the current state of affairs still wears on me. It’s probably been what’s slowed me down as of late.
It's been a bit since I posted. I've been making progress, just not much of anything worth writing about. I'll try to do a catch up here
Cleaned up the rear suspension components
Finished adding an external oil filter. The location of the Ecotec oil filter isn't terribly convenient when there's a supercharger in the way and the engine is mounted on the wrong (right?) end of the car
Getting the Haltech wiring harness sorted out
I'm actually even a bit further along than when I took this image; I've got everything separated out into what will go into the engine bay, what will go somewhere in the cabin, etc. This weekend I'm hoping to start merging the Haltech harness with the Ecotec engine harness Got the Autoplumb fittings installed
Overall, everything is starting to come together. I think driving the car this summer is within reach.
Looking good. I have been working on my swap as much as i can, but haven't had much time to take photos. Rust repair on the frame rails on ended up taking the better part of a week and a half. The bottom of my strut towers were rusted out and just barely hanging on and the supports from the lower frame rails to the trunk were gone so the entire back of the car was just kind of flopping around.
I'm about the same spot with my wiring harness for my Haltech.
The remote oil filter is nice and clean. I have am running the supercharger manifold with a custom 90* adapter for an oval throttle body, and the piping clears the oil filter well enough. Even then the factory Ecotec setup is still easier to deal with than some of the other block mounted filters. It might not be a bad idea to make a simple gravel shield for it tho. It should be relatively safe where it is but it never hurts. Something like a section of 4in thin wall pipe split and then mounted to the cradle with space to still get in to change the filter.
Those coolant fittings look real slick too! Should make it easier to get to the passenger side hard line. Thankfully I don't have a supercharger pulley in the way but the line still points straight into the AC pump but that won't be too big of a deal.
KillerFrogg - That's a bummer with the rust. I'm fortunate in that regard; I found a car that the worst of the rust can be fixed with a wire wheel and some paint . As far as the oil filter goes; that might not be a terrible idea with the gravel guard. Once I have the cradle in the car I'll have to eyeball how everything looks. Outside of just making oil filter changes easier this does net me the ability to run a much larger filter, which helps for filtration as well as nets me some additional oil capacity. When I switched from the LSJ pan to the 2.2L pan I lost about a quart; between the filter an the -12AN lines I hope to have gained most of that back. On top of all that, when v2.0 of this engine comes to be I'll have a nice easy place to grab plumb my oil feed from.
Outside of that, just a quick update. I realize that it's not the most glamorous part of the swap, but I'm really happy with how it turned out:
Made a 1/2" spacer out of some 1/2" box and tube. Then bolted on some cushion clamps to secure the intercooler hoses.
All tucked up out of the way
I'm not sure I lost any ground clearance. The rocker panels still might be the lowest thing on the car
At this point I'm really just trying to procrastinate on the wiring. I'm sure once I start it'll be a breeze; it's just a bit close to my day job and not usually what I want to do on my nights and weekends.
3" downpipe into a Kooks catalytic converter 3" inlet dual 2.5" outlet Spintech muffler
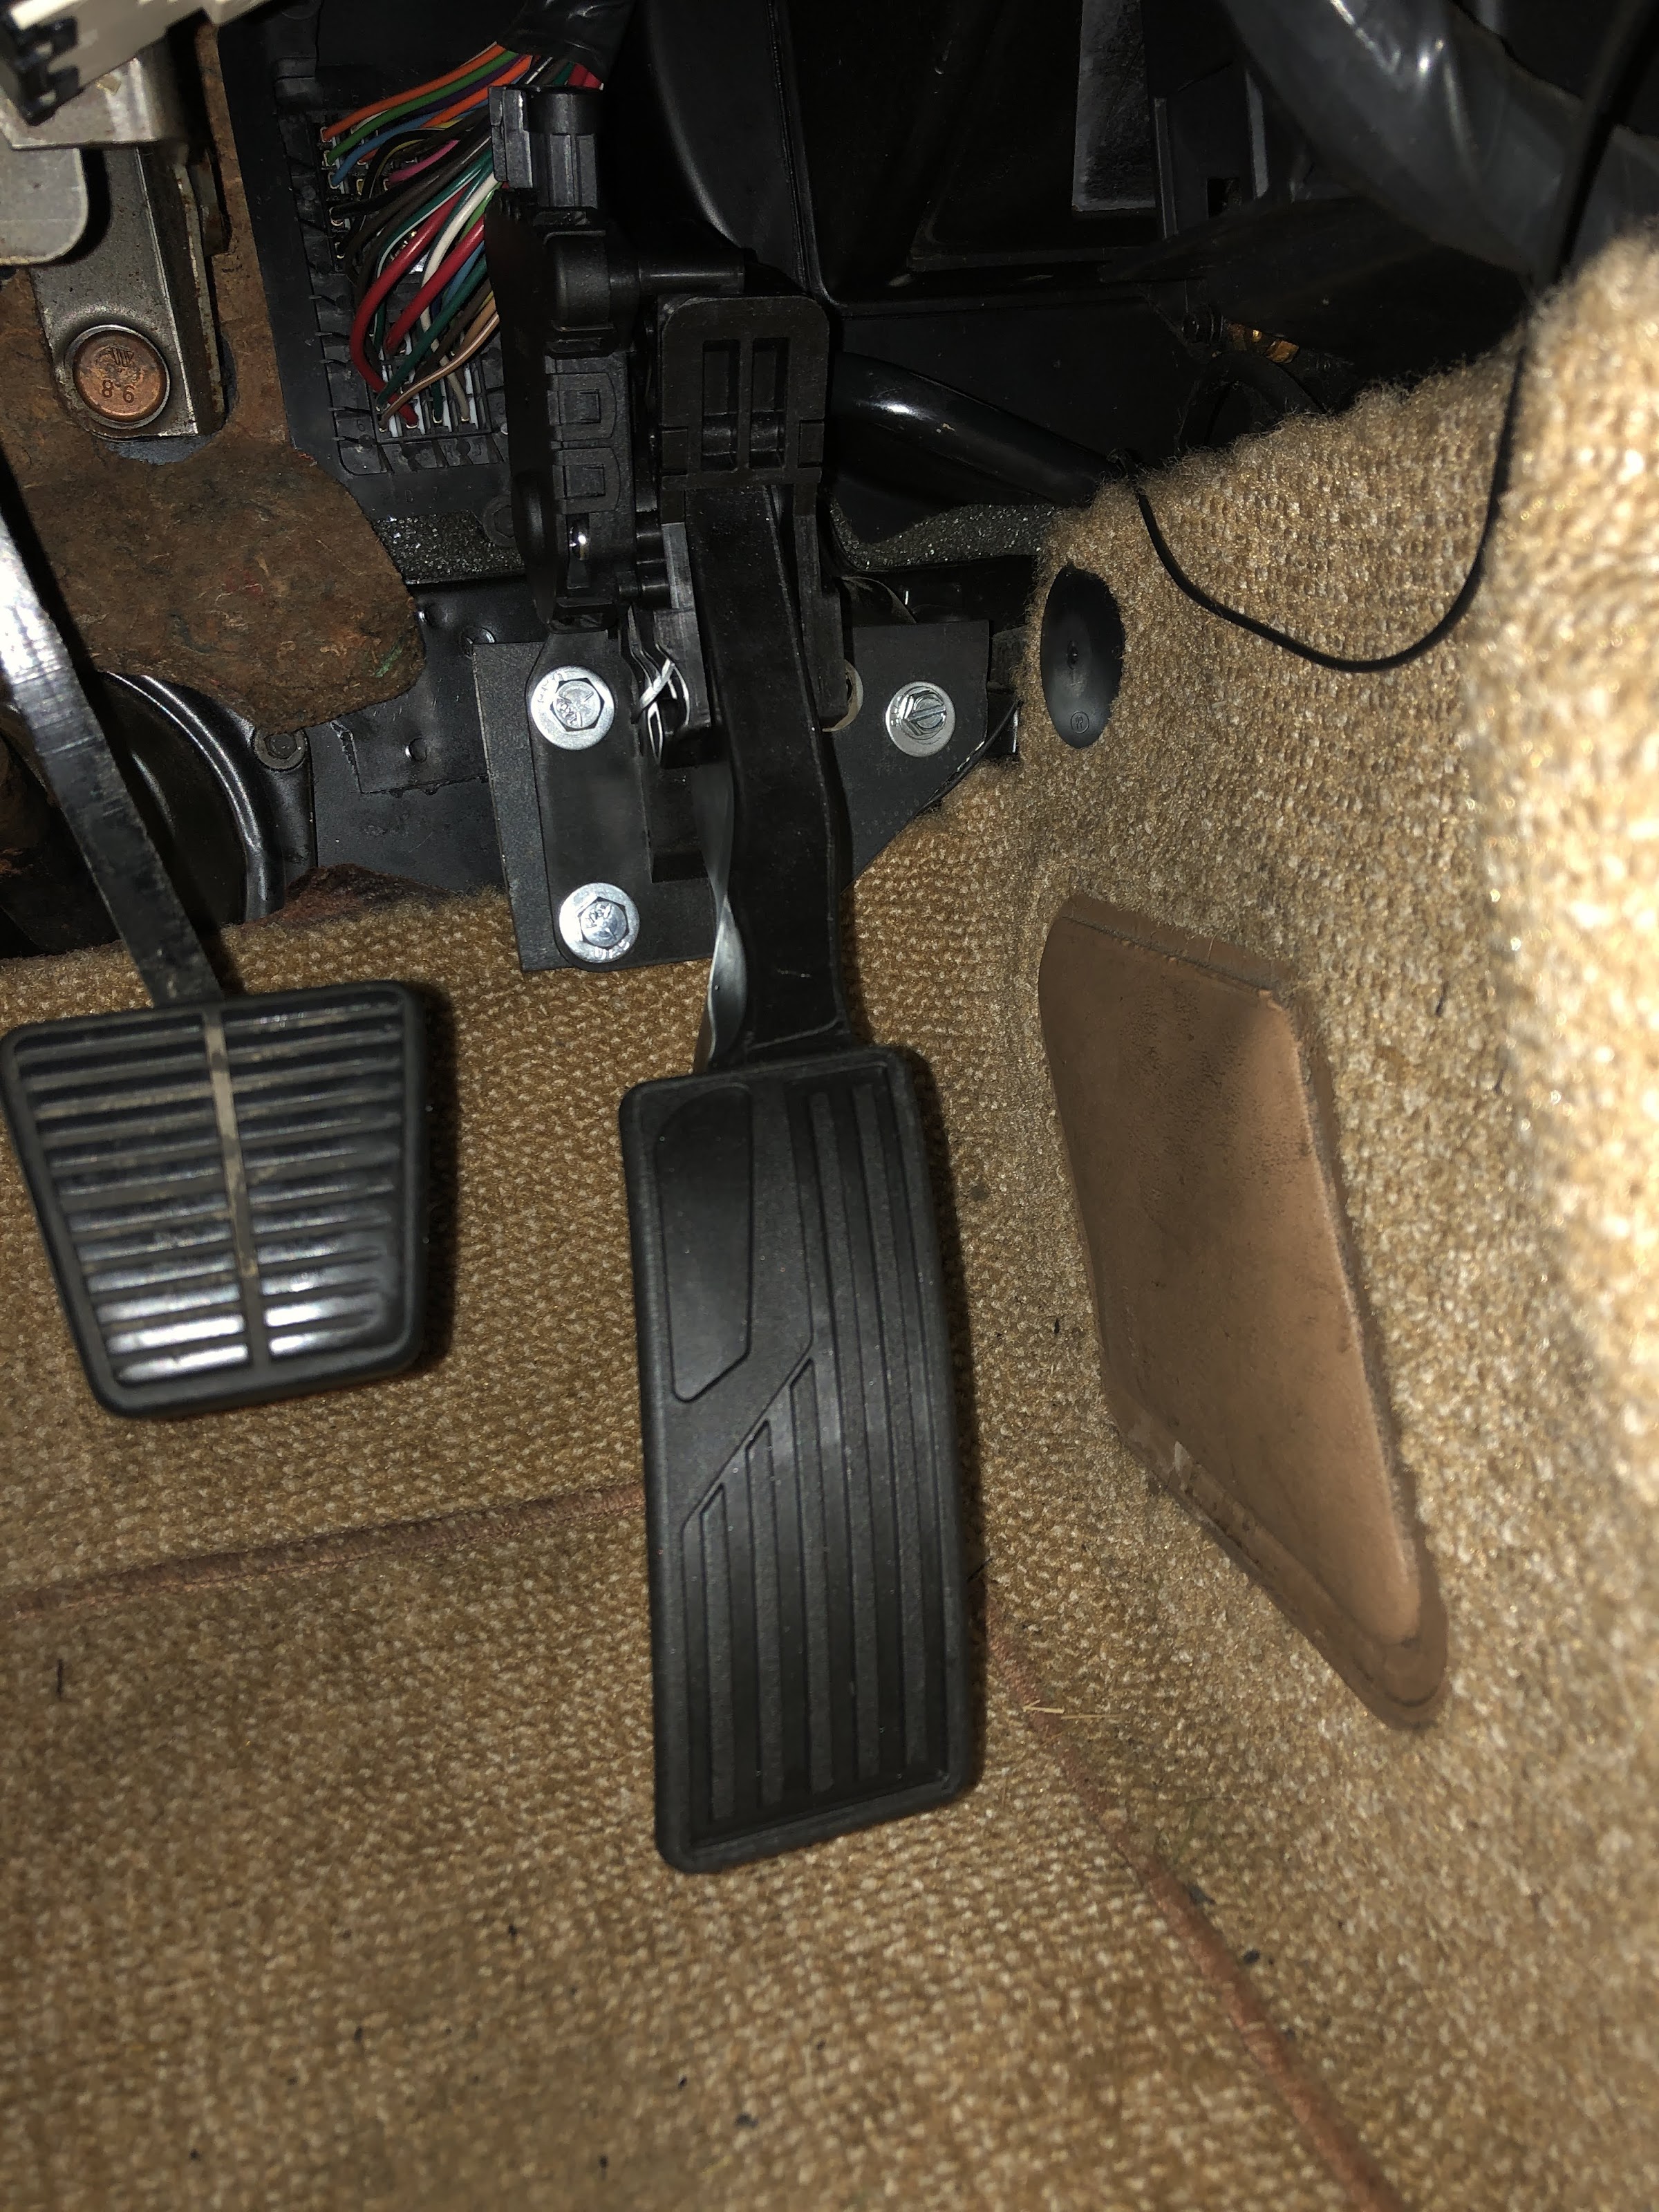
Test fitting the DBW pedal. Shout out to ericjon262 (thread here) for the inspiration
Did a bit of welding to the cut hinge so that it's still supported by two bolts. I may end up having to shim the new bolt depending on decklid adjustment, but it shouldn't be too bad.
Outside of that:
-I have the engine harness 99% complete and loomed, as well as pulled into the car and through the firewall for integration with the chassis harness -Setup the Haltech TDC offset -Tested the the Haltech's control of the throttle
The cradle will likely be going in for (hopefully) the last time soon. From there I can actually do a test firing, which will be a big motivational boost to get this thing up and running


 Good luck with your project. Mine is going to take a while. Have to move, first.
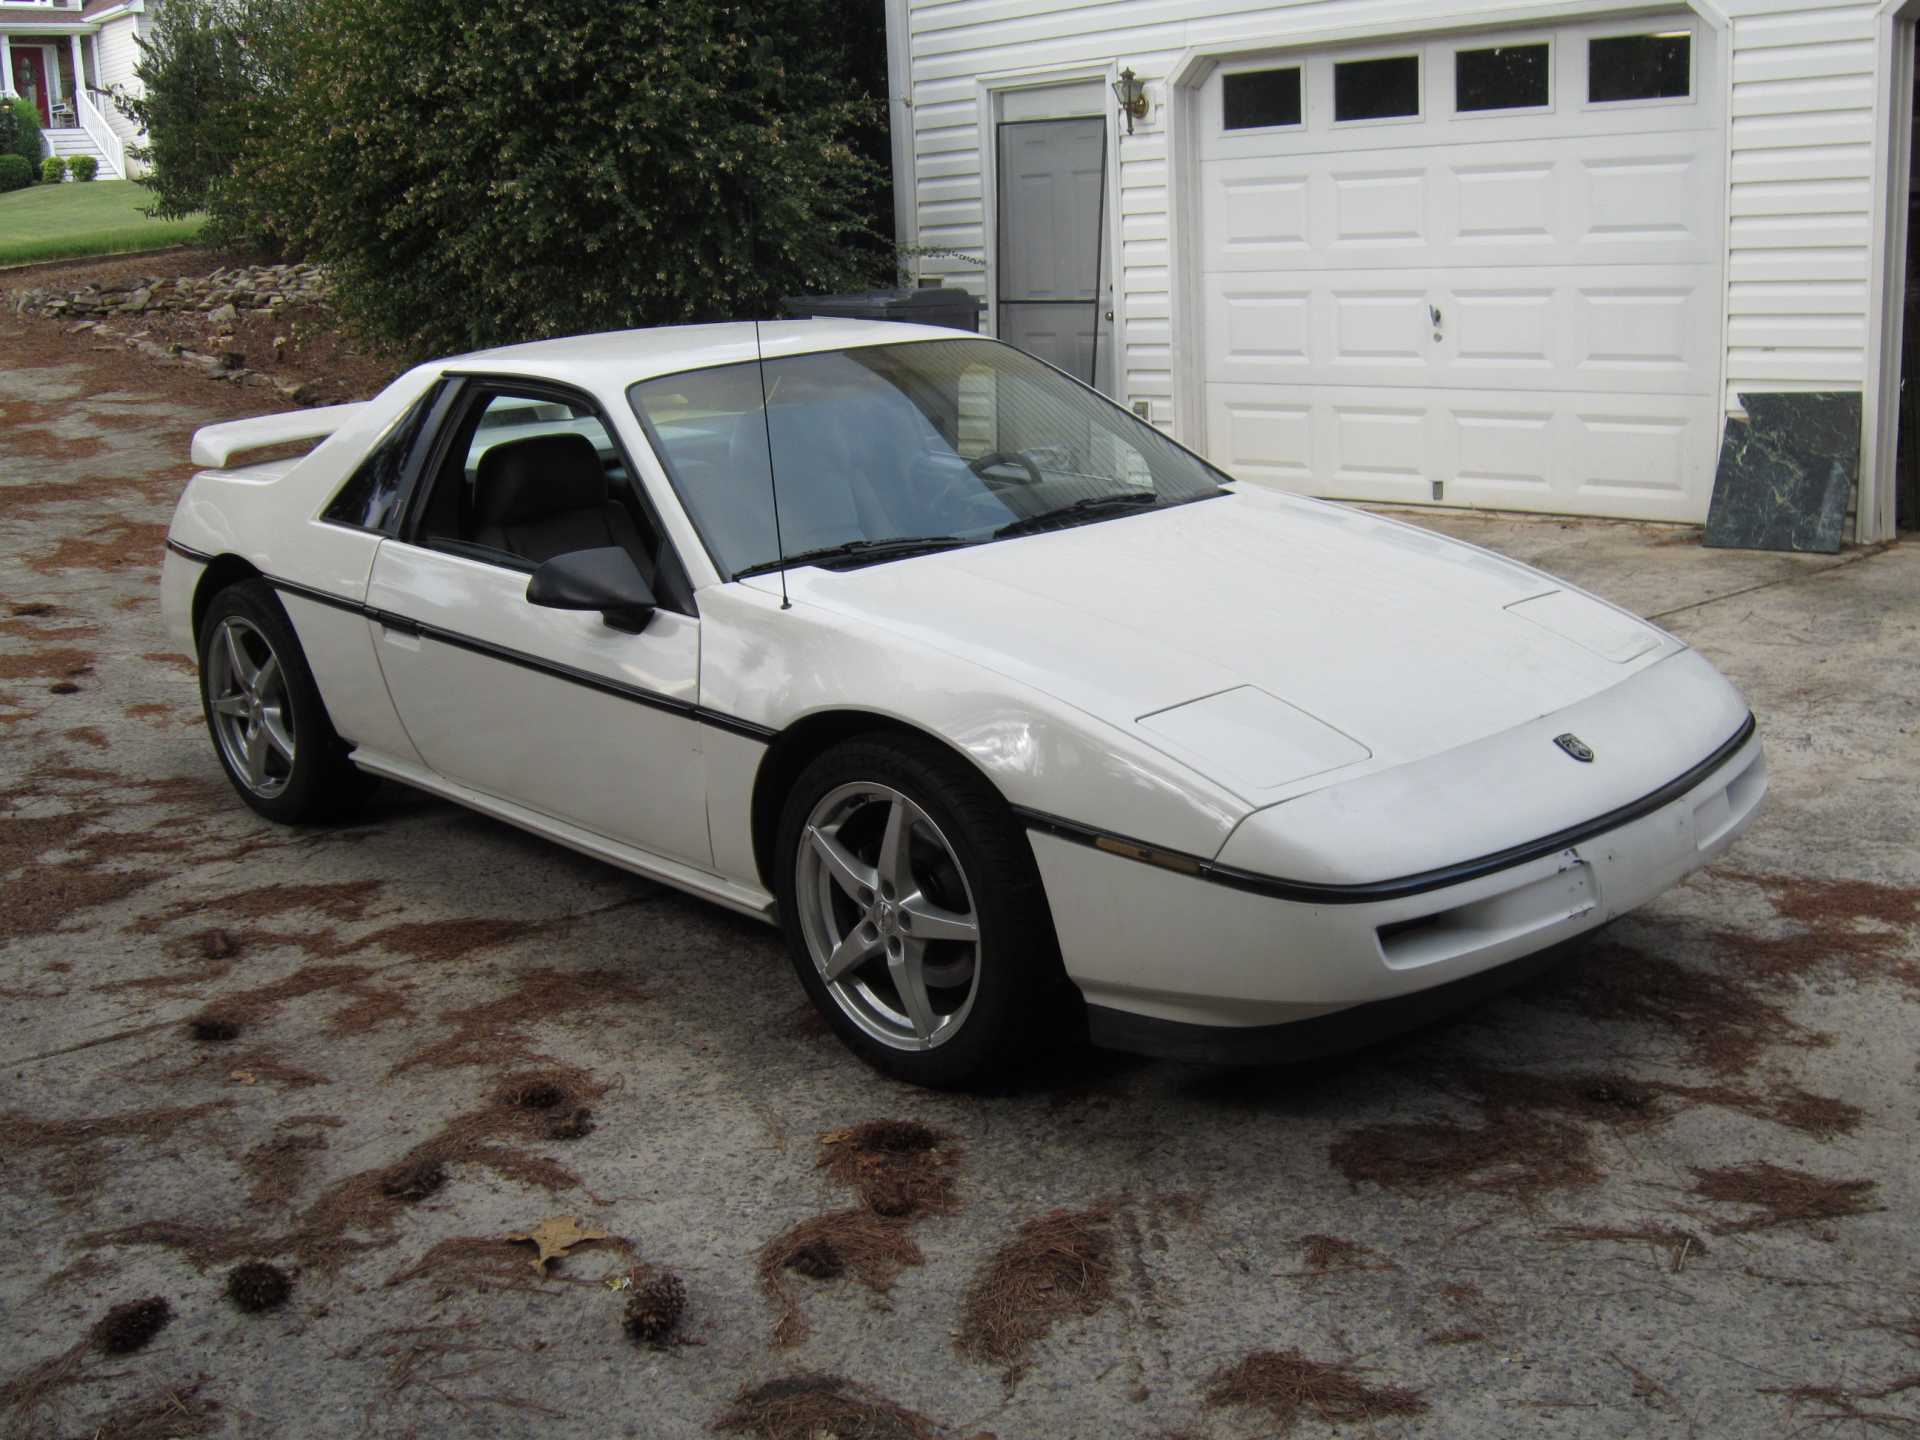


 .... the trick is for it to actually have converted the existing rust and holding new rust at bay.