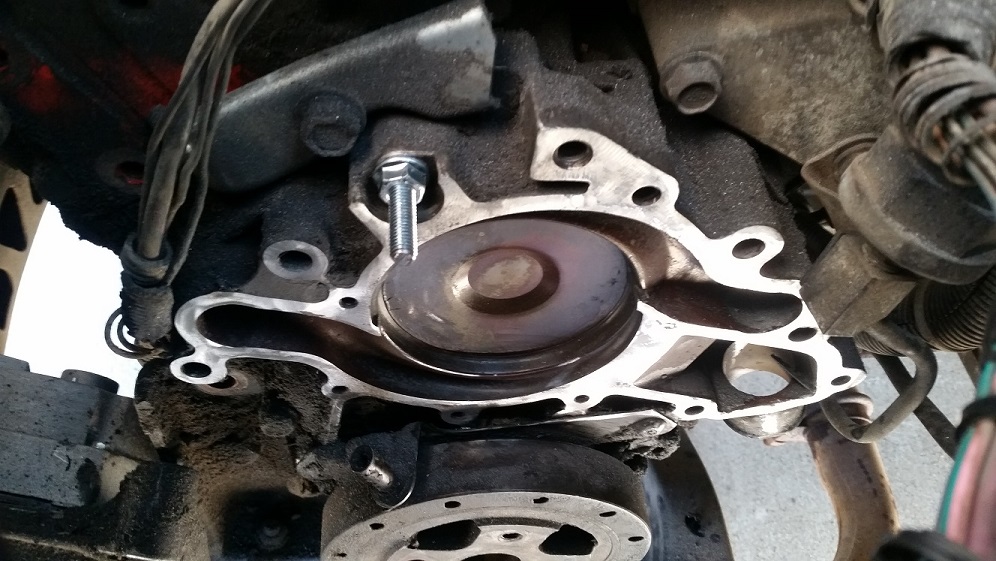
Went to replace another v6 water pump, deciding whether to use the upper timing cover clamp or just risk it........came here for ideas. Someone on this forum pointed out how you need to be careful tightening one of the upper water pump bolts 'cause there's a gap behind it in the timing cover. This gave me an idea. I replaced that bolt with a homemede stud (allthread) slightly longer than the original bolt. Won't need the clamp next time. Had a couple great pictures, but don't see how to post them......
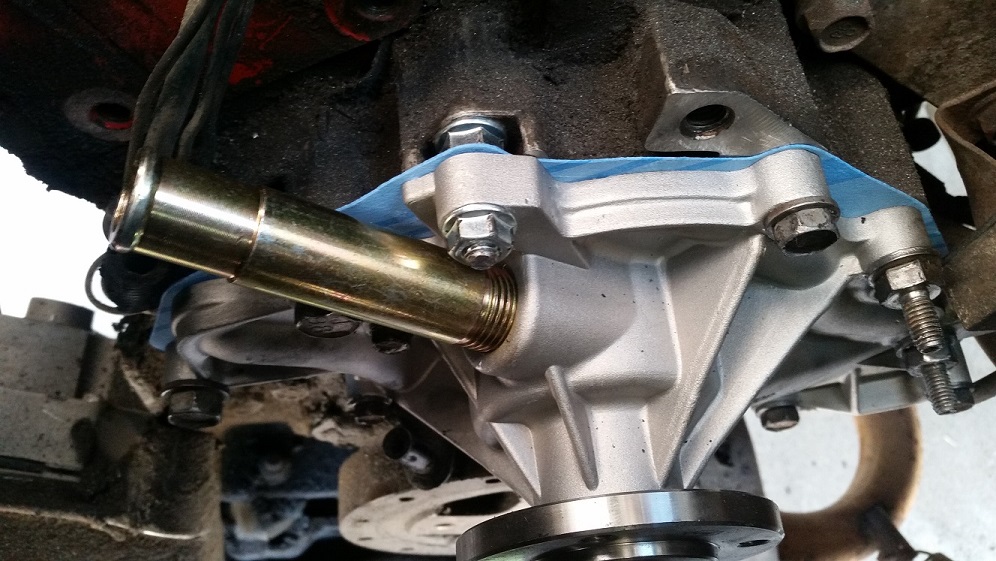
Plenty of room. How do I post a couple of pictures? Installed it upon assembly (using a clamp on the timing cover for disassembly), but I conceivably could have pulled that bolt first, installed the stud through the nut, and tightened the nut enough with an open-end wrench to keep the timing cover from moving...........
Plenty of room. How do I post a couple of pictures? Installed it upon assembly (using a clamp on the timing cover for disassembly), but I conceivably could have pulled that bolt first, installed the stud through the nut, and tightened the nut enough with an open-end wrench to keep the timing cover from moving...........
To post pictures here you can download the "app" at the link at the bottom center of the page. Only works for Windows though.
The other option is to upload the picture to someplace on the web that you can link from and use the img tag, ex:
{img}http:// web location of the picture{/img} - change the {} brackets to the square ones []
When unscrewing the water pump nut, you must ensure that the stud doesn't turn with it, or it too will unscrew, unclamping the timing cover.
Maybe a tack weld (or 2 or 3) between the stud and captive nut would help prevent that occurrence, along with an open-ended wrench on the captive nut to keep the weldment from rotating. I don't know if an open-ended wrench would fit in the space available.
[This message has been edited by pmbrunelle (edited 10-24-2019).]
Someone on this forum pointed out how you need to be careful tightening one of the upper water pump bolts 'cause there's a gap behind it in the timing cover. This gave me an idea. I replaced that bolt with a homemede stud (allthread) slightly longer than the original bolt...
I was wondering about this same issue several years ago. It seems like such a strange arrangement.
What is the purpose of the gap that I've indicated with a question mark? Shouldn't there at least be a stud with a nut on it used to hold down the timing cover below the water pump at that location?
quote
Originally posted by Patrick:
After reading of so many people breaking that part of the pump off, I was very careful not to over tighten the bolt, plus I used a large washer to help dissipate the force of the bolt against where it goes through the pump. I was very pleased that I had no problems.
When unscrewing the water pump nut, you must ensure that the stud doesn't turn with it, or it too will unscrew, unclamping the timing cover.
Maybe a tack weld (or 2 or 3) between the stud and captive nut would help prevent that occurrence, along with an open-ended wrench on the captive nut to keep the weldment from rotating. I don't know if an open-ended wrench would fit in the space available.
I tightened that inner nut a lot more than the outer nut. Pretty sure the friction of that inner nut and the threads into the block exceed the friction of the lone outer nut. However, if you take Murphy's Law into account, I should have put Loctite on the threads where the inner nut went, and NeverSieze on the outer nut. I considered Loctite on the stud going into the block at the time, but didn't in case I ever had to remove it. Probably should have just used the Loctite on the stud, and if I ever needed to take it out, use a stud remover...........
Originally posted by Patrick: What is the purpose of the gap that I've indicated with a question mark? Shouldn't there at least be a stud with a nut on it used to hold down the timing cover below the water pump at that location?
I can imagine two reasons:
1. The gap is there to allow for a mechanic to insert a pry-bar to separate a stuck-on water pump.
2. For most molding processes (plastic especially so, aluminium less critical) there is the cardinal rule of "uniform wall thickness". If the molded part is of constant wall thickness, it should cool and shrink equally everywhere, as well as making the mold easier to fill. If there is a thick spot somewhere, then that thick spot can take longer to cool down than the rest of part, and then the part can shrink/warp unevenly. There can also be porosity in thick spots.
So if you have drawn a "thick spot" in a molded part, normally you would hollow it out, leaving just the perimeter intact, having the same "nominal wall thickness" you have selected for the remainder of the part.
quote
Originally posted by LoganDog:
I tightened that inner nut a lot more than the outer nut. Pretty sure the friction of that inner nut and the threads into the block exceed the friction of the lone outer nut. However, if you take Murphy's Law into account, I should have put Loctite on the threads where the inner nut went, and NeverSieze on the outer nut. I considered Loctite on the stud going into the block at the time, but didn't in case I ever had to remove it. Probably should have just used the Loctite on the stud, and if I ever needed to take it out, use a stud remover...........
Murphy is a pesky bugger. Nevertheless, I like your idea.