I found several new 'kits' on Ebay, consisting of compressor, drier and orifice tube and including 8 oz of oil, for $202. You must pay attention to what pulley they have and also to the clutch harness connection. Autozone gets $181 for a rebuilt 4 Seasons, including the $10 core charge.
The 58255 has the wrong harness connection for the clutch unless the Fiero harness will plug into that pigtail. The parts houses couldn't tell me if it would or not so I opted for one that looked like what I took off. I also found that same new compressor on Ebay for $121.00.
The 58255 has the wrong harness connection for the clutch unless the Fiero harness will plug into that pigtail.
It will work, the connector just looks different. It's still the two male spade terminals as the original Fiero clutch coil, just in a different form factor. The original wiring connector will plug into it fine.
Not knowing that cost me a bundle. I could have had everything new for less than I spent for a rebuilt compressor.
BTW, the variable orifice tube I got from AutoZone was a failure. It went so far into the housing that the installer couldn't pull it out. He had to pry it out, thus destroying it. We went back with a standard orifice tube and it works very well. $19.99 for the variable. Just a couple of bucks for the standard.
Does anyone know if the 87GT's came with "parallel" condensers? I saw a posting where the OP was concerned that flushing would not work on this type of condenser. I am making plans and gathering materials (flush kit, vacuum pump, seals, dryer, new compressor), and getting ready to work on it. I am already stretching the budget with the new compressor, but I really don't like surprises, like some element of the system that isn't flush-able.
It will work, the connector just looks different. It's still the two male spade terminals as the original Fiero clutch coil, just in a different form factor. The original wiring connector will plug into it fine.
That is good to know. The 58255 compressor is the one that I am going to get... based largely on your recommendation (thank you for that). I have all the parts I need queued up in a Rock Auto shopping cart, ready to go. I plan to source a compressor from Autozone locally, when I have confirmed the rest of the system is salvageable.
[This message has been edited by computer_engineer (edited 07-30-2018).]
My condenser seems to be of the parallel variety, as suggested in another post (here). I don't really know, because I haven't taken it out and I have limited visibility of it in it's current location. I am still going to try flushing this guy, as I REALLY don't want to purchase a new one if I can help it (have already spent more money on repairs than I can afford ). I have an idea on how to close off the branch line temporarily during the flush, but I need to know how the lines are routed through the fins, to know if my idea has any hope of working. Does anyone have a diagram or cut-away showing how the flow goes???
[This message has been edited by computer_engineer (edited 08-01-2018).]
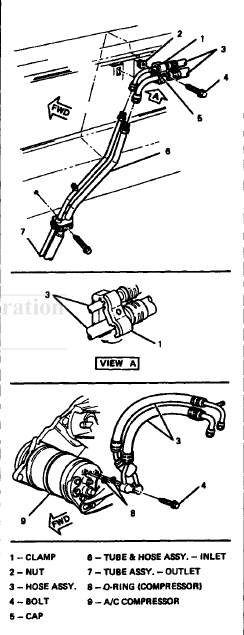
I couldn't find a picture of a condenser for my car, but I found some stuff in the Fiero SM....
This picture shows the hoses starting at the compressor
It is not exactly the same as what is on the 87GT, but I am guessing it will be close enough to guide me through this.
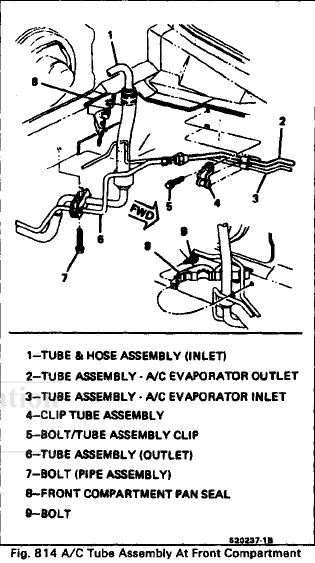
Here is a picture of the hoses and tubes at the front part of the car...Not really sure "where" this is, as I can't recognize any landmarks.
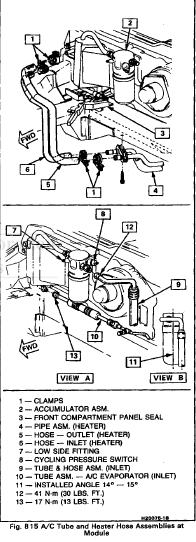
And here is a shot showing the hoses and tubes around the AC module.
Does anyone have anything they have put together showing all the connections??? I would like to make sure I am getting to all the connections, flushing every part and have the o-rings to seal everything back up when I am done.
[This message has been edited by computer_engineer (edited 08-04-2018).]
Does anyone have a picture of the DA6 compressor right next to a new 4 Seasons 58255 compressor??? I am concerned about the depth from the mounting ears at the front. I have put in new headers from WCF, and I hoping someone will have the dimensions, images, or something that will tell me that the new compressor is either exactly the same depth (which may be a concern for the rear bracket) or slightly less (which would be a relief, and give the new header pipe some room).
Does anyone have a picture of the DA6 compressor right next to a new 4 Seasons 58255 compressor??? I am concerned about the depth from the mounting ears at the front. I have put in new headers from WCF, and I hoping someone will have the dimensions, images, or something that will tell me that the new compressor is either exactly the same depth (which may be a concern for the rear bracket) or slightly less (which would be a relief, and give the new header pipe some room).
I just did this in my 87GT a little while ago and the 58255 is exact same dimensions as the DA6. From the outside you can't tell them apart. Also good choice not getting a reman from ebay. I did and it was a POS!
I am putting the AC compressor back in place to see if it will fit - and it doesn't. Starting to wonder if getting these new West Coast Fiero headers is going to be worth it. None of the heat shields fit, and now the AC compressor bracket. Has anyone ran across this before? I am sure someone has put on new headers, and then had a host of things not fit back on the engine. For some people, it may not be a big deal, as they can fabricate a new bracket or modify the current one, but I do not possess those skills and I just want to get this sucker back together again.
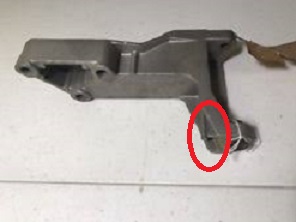
It looks like I just need to grind off the back side of the bracket (about a half inch, maybe less), that holds onto the ring to the rear and the front lug on the compressor. Now I just need to find someone who has a grinder... I'm also nervous about grinding into stock parts like this, that may not be replaceable.
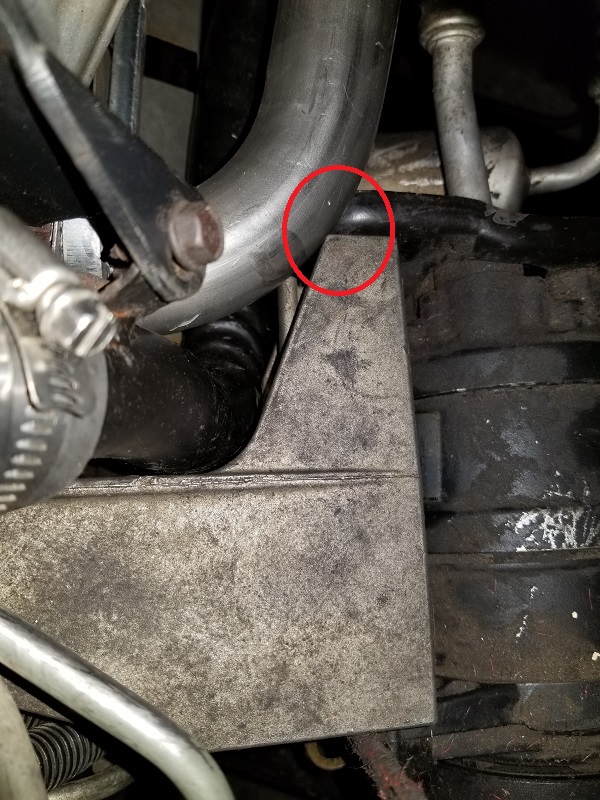
Here is a picture of the bracket nearly in place, with the new header blocking it.
The circle area is where I see most of the problem.
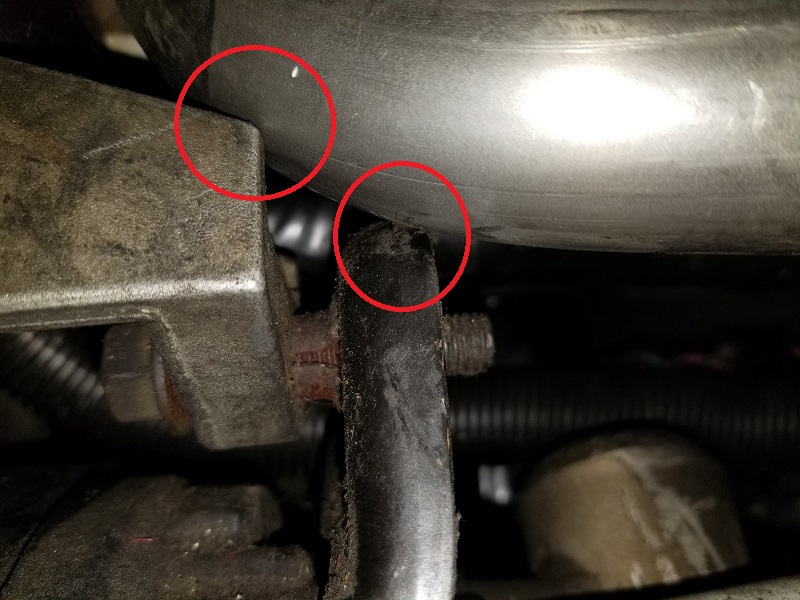
However, this next photo also seems to indicate that I will need to grind some off of the circular bracket on the back of the compressor.
That makes me nervous, so radically modifying a somewhat irreplaceable Fiero part.
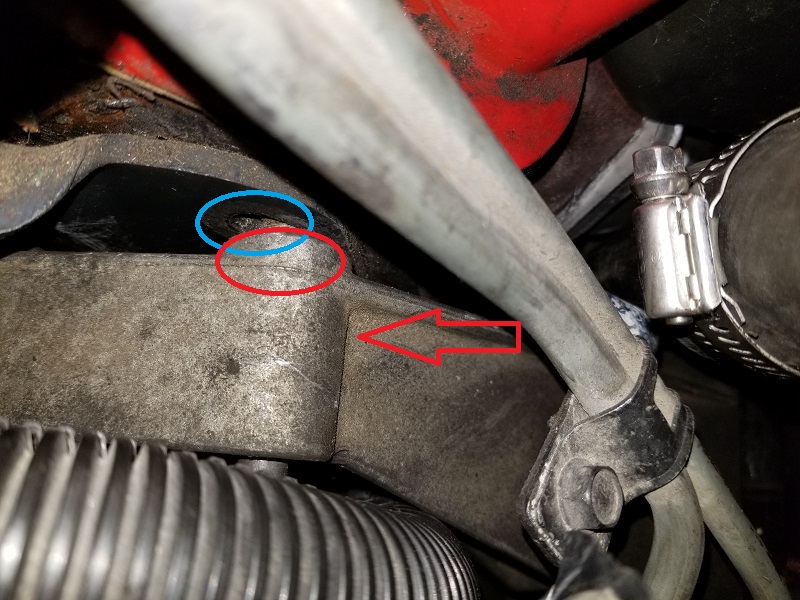
This last one shows the bracket from the AC compressor that mounts to the engine, and how close I am to getting the holes lined up.
The blue circle shows the mark on the engine bracket where the AC bracket went originally. The red circle is where the bolt is, and the red arrow the direction I need to move the bracket.
How much do I grind off? Is it safe to grind material off of both brackets? Is there an alternative?
Instructions that came with my compressor suggested when installing a replacement HR or DA, that the mounting brackets be loosened at the engine, then tightened at the compressor. In part because the compressors don't have dowel pin locators for the 3 case parts, and because there's a little give in the mounting holes in the brackets. This will help to prevent twisting the case, therefore breaking seals, and to help the mounting brackets align.
If all else fails, maybe put a little dimple in the header with a ball peen hammer.
Does anyone have a spare rear "ring" bracket for the AC compressor, for an 87 GT? Better yet, anyone have a bracket that they could measure for me? I am thinking about making a replacement bracket that is more friendly with headers, but I need a detailed drawing and some measurements.
Doing ac on an 87 for the first time myself. I ordered a remanufactured Four Seasons compressor from Rock Auto. According to the tech notes from Four Seasons that are linked to the Rock Auto site, the compressor comes prefilled with 3 oz of PAG. Doesn't say what weight. Just getting into my newly built workshop so not sure when I will get to this project
I have read about a direct replacement for the R12 that they claim should work on old R12 systems aswell as newer R134A systems. Anyone who have tried one of these?
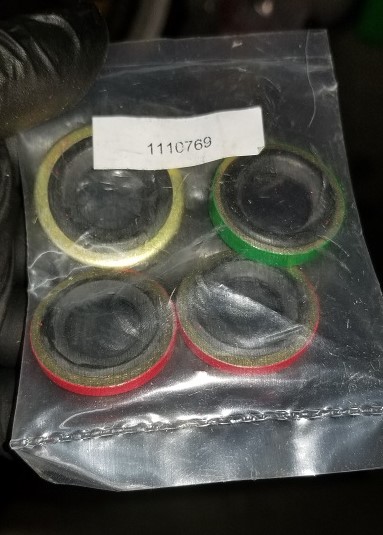
Got a new 4 Seasons compressor. I did not come with a notice as to what kind of oil was in the compressor, but it did come with a bag of rings or seals or something. Can anyone tell me what these are for?
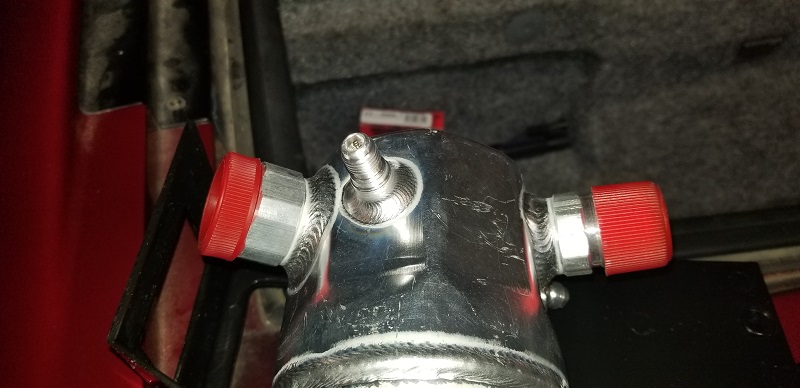
Also, the new accumulator as R12 fittings on it, and one will need an R134 adapter screwed on. Question...should I put any thread sealant on the adapter?
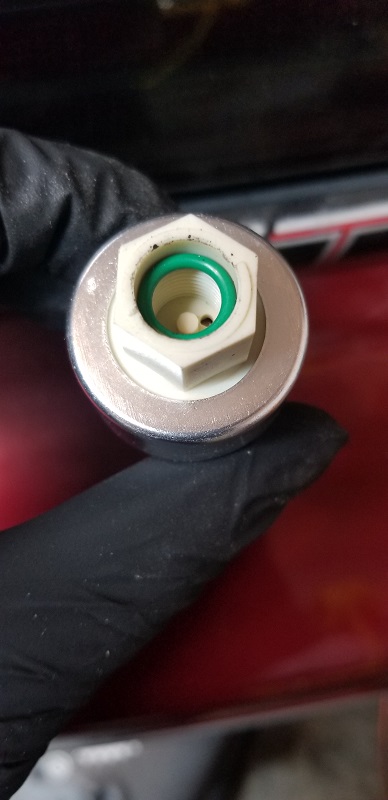
The cycling switch that gets screwed on the other R12 fitting, has a small O-ring, but does it seal around the top or the bottom of the fitting? The ring does not seem to fit down at the base of the threads, but it is loose enough, that it does not seem to fit at the top of the fitting against the switch.
Any idea how the switch is supposed to seal against the fiting?
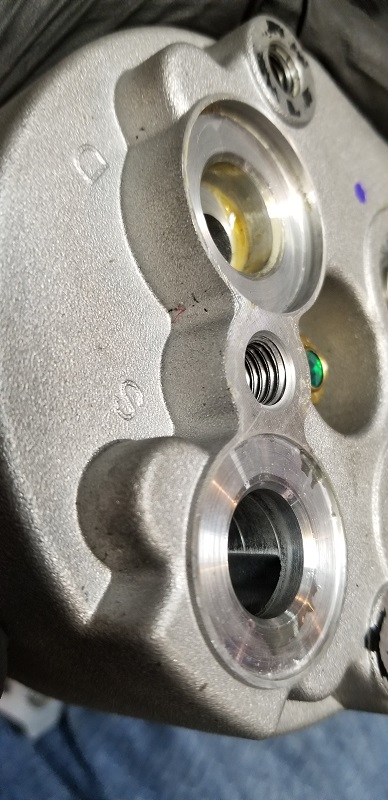
The sealing washers replace the special o-rings as the compressor seals on the suction and discharge ports. The compressor should have come with instructions showing how to match up the compressor ports and your hose assembly connections. If you pull the sealing cap off the compressor, you'll see instead of o-ring recesses, two flat recesses of different depths. Good time to also spin it over and see if any oil comes out the discharge port and install switches.
A good conversion fitting like Four Seasons 59976 will have a little thread sealant on it. Make sure to remove the schrader valve from the accumulator on the port you install the conversion valve on with the 59976, it comes with it's own valve. Cheap pot metal adapters without valves like you find at most auto parts stores should be avoided.
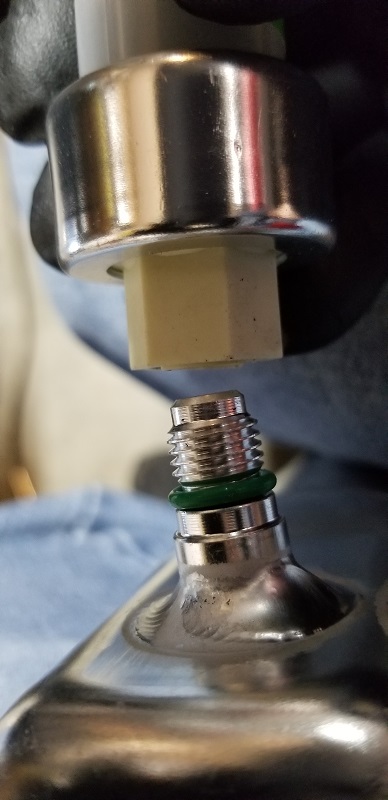
The o-ring on the cycling switch seals on the shoulder at the end of the threads as it's screwed down. The port you install it on should keep the schrader valve in place, so that the switch can be removed. This is what the little raised dot in the bottom of the switch is for, it opens the valve once fully seated.
The seal for the switch seemed to fit past the threads on the port. Is this the way it goes???
The new compressor did not come with any instructions for fitting the sealing washers. It also, DID NOT, come with anything that says if the compressor comes pre-filled with oil. Should I assume there is oil in the compressor, and that it is PAG?
Should I look under the plastic cover of the new compressor to see if it takes O-Rings or sealing washers?
Should I open the new compressor or leave it sealed until I am ready to install it?
[This message has been edited by computer_engineer (edited 06-08-2020).]
Right before you put the compressor on the car, install the switches, and take the suction/discharge plastic cap/cover off and see if it takes sealing washers (it should if it came with them and really is a 58255). With the ports pointing down towards a cup, spin the clutch over a few times and see if any oil comes out. If the Four Seasons website is accurate, it should contain 3oz of PAG150.
The point of the cap is to keep moisture out, as refrigerant oil absorbs moisture, and prevent corrosion in the compressor. If you get the whole system assembled and draw a vacuum with a vacuum pump down to 29 inHg for a minimum of half an hour, that should boil off any moisture in the system, leaving the total system capacity of 8 oz of oil you add to the compressor and accumulator. If the system doesn't leak, you can just leave it that way until you're ready to add refrigerant.
Here's a good explanation of why it is important to use the type of oil that the AC compressor is designed for. My experience using ester oil in a new Delco V5 compressor was not good, the compressor got very noisy after 2 seasons. I flushed the system and installed a new condenser, drier and compressor with the correct PAG oil and all has been good since.
The reman Four Seasons #57255 I just picked up came with 3oz. PAG 150. The compressor was labeled as such as well. When drained the 3oz was there for sure.
On install I put 4oz. Ester100 in the suction port of the compressor and 4oz. into the drier/ accumulator. This is the same as I did for the previous compressor and accumulator that lasted 10 yrs. when it (a reman HR6 #57255) failed due to a compressor case seal leak. My guess was the compressor case may have been compromised during install while tightening the a/c belt. Oh well, that reman compressor worked great for 10 yrs. till the case seal leaked using Ester100.
I used Ester initially as there may have been residual oil from the OEM R-12 system in the lines and condenser. For a complete rebuild and flushing I would just use the PAG150 (8oz total).
If I may make a suggestion, when replacing, always buy a new GM A/C compressor. We've seen quite a few problems with the "rebuilt" kind. Sometimes they work great and other times they fail within a year. I would also advise against using PAG oil in a system that originally used mineral oil. Ester oil was developed especially for retrofits and will not be negatively affected by any remaining mineral oil. Pag oil was designed to be used in new R-134a A/C systems.
------------------ " THE BLACK PARALYZER" -87GT 3800SC Series III engine, custom ZZP /Frozen Boost Intercooler setup, 3.4" Pulley, Northstar TB, LS1 MAF, 3" Spintech/Hedman Exhaust, P-log Manifold, Autolite 104's, MSD wires, Custom CAI, 4T65eHD w. custom axles, Champion Radiator, S10 Brake Booster, HP Tuners VCM Suite. "THE COLUSSUS" 87GT - ALL OUT 3.4L Turbocharged engine, Garrett Hybrid Turbo, MSD ign., modified TH125H " ON THE LOOSE WITHOUT THE JUICE "
[This message has been edited by Dennis LaGrua (edited 06-11-2020).]
So the ports on the new compressor are not like the old ones with the O-Rings. The instructions you posted (RWDPLZ) seem to indicate I use the top row with the first column arrangement. I have the sealing washers, but no pilot adapters came with the kit. Do I really need those? The instructions that came with the compressor do not mention the washers at all.
Post a picture of the hose end that mates to the compressor, and measure the diameter of the suction and discharge holes on the compressor.
Will it hurt the system if I crack it open to get the photo you need? I have a new condenser, accumulator, and orifice to put it, but I may not be ready to install everything or flush the system for a week or so. There may be residual R-12 and R-134 left in the system (yeah, I know, a stupid mistake I made years ago), but I am pretty sure the system still has some pressure. Since the car has not moved for several years, while I have been re-assembling it after a clutch job (long story, there were several dozen other things I found that had to be repaired as well), I cannot take it to a service shop to evacuate the system properly. But while the engine is still tilted with the cradle, and access to the compressor is WAY easier, I have made the decision, wise or not, to disassemble the system, flush the parts I can, and replace the parts that you and others have recommended, that will hopefully give me the best chance of having a functioning A/C system, once the car is on all fours again, and running.
My plan is to mount the new compressor (new 4 Seasons), snug the belt (new), replace the condenser, the accumulator, and the orifice tube. Then flush all the lines and the evaporator, replace all the O-rings on every connection, then pour some oil in the accumulator, and the compressor, the seal everything up, and then pull a vacuum. If it holds for and hour or 2, or even longer, then I will consider the system good to go. But then things will have to wait until such time as I can get the car re-assembled, and the engine running. I will then re-charge the A/C with R-134, and get the A/C running. My plan is to have everything done, and the car back on the road this summer.
[This message has been edited by computer_engineer (edited 06-14-2020).]
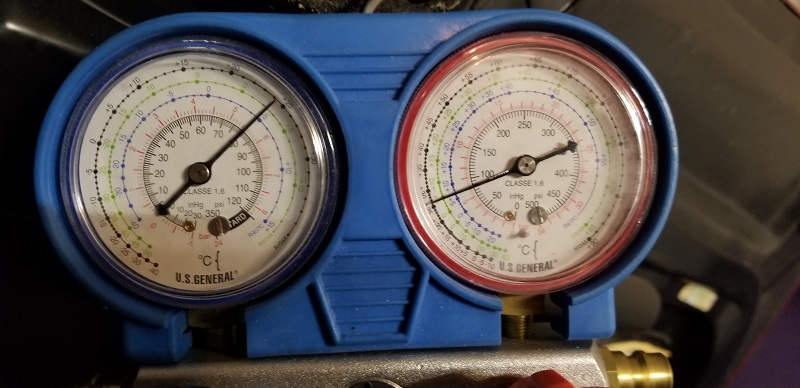
Check the system pressure first with a gauge set, you don't want a face full of refrigerant. If it's empty, and you haven't installed any of the new parts yet, it doesn't really matter, worst case the residual oil is absorbing water in the old condenser, old accumulator and/or old undercar lines. Once you re-install the hose assembly, you can vacuum it down to remove air and boil off any moisture that may have been introduced. It would also a good time to pull and check the old orifice tube to check for bits of old compressor. Just hold off on installing any of the new parts until you're ready to replace everything including the o-rings and vacuum it down to check for leaks, if the car is going to be sitting a while before it's running, you want it to be holding vacuum. You can't add refrigerant until the engine is running.
Check the system pressure first with a gauge set, you don't want a face full of refrigerant. If it's empty, and you haven't installed any of the new parts yet, it doesn't really matter, worst case the residual oil is absorbing water in the old condenser, old accumulator and/or old undercar lines. Once you re-install the hose assembly, you can vacuum it down to remove air and boil off any moisture that may have been introduced. It would also a good time to pull and check the old orifice tube to check for bits of old compressor. Just hold off on installing any of the new parts until you're ready to replace everything including the o-rings and vacuum it down to check for leaks, if the car is going to be sitting a while before it's running, you want it to be holding vacuum. You can't add refrigerant until the engine is running.
Well,
There is still pressure in the system. In a way, I suppose that is good news - no major leaks. Maybe just a slight leak on a schrader valve or an O-ring.
There is still a small amount of R-12 and R-134 left in the system, but the car doesn't run, so I can't take it anywhere to have it evacuated. But I have to put the new compressor in place, replace the dryer, condenser, orifice tube, and the O-Rings. The only way to replace the compressor, is with the engine tilted with the cradle.
So I will need to crack open the system, unfortunately the refrigerant will get "accidentally" released.
Do you have a recommended schrader valve to replace the ones on the low and high side ports?
I doubt any shop would recover it with known contaminated/mixed refrigerant, anyway. The new conversion fittings listed in the parts list come with new valves, see Spadesluck's first reply to this thread, under 'Valve Cores'
I doubt any shop would recover it with known contaminated/mixed refrigerant, anyway. The new conversion fittings listed in the parts list come with new valves, see Spadesluck's first reply to this thread, under 'Valve Cores'
I would also like to put a new schrader in the high-side port as well. Do I need a certain part number for this one, or are the high and low side schrader valves the same? Also, I assume that anything from 4 Seasons would be okay, and stay away from anything cheap or from the auto supply stores???


 ). I have an idea on how to close off the branch line temporarily during the flush, but I need to know how the lines are routed through the fins, to know if my idea has any hope of working. Does anyone have a diagram or cut-away showing how the flow goes???