Pennock's Fiero Forum
  Technical Discussion & Questions
  Front Exhaust Manifold Replacement

Post New Topic  Post A Reply
Email This Page to Someone! | Printable Version


next newest topic | next oldest topic
Front Exhaust Manifold Replacement by darcfyre
Started on: 07-27-2013 07:21 PM
Replies: 29 (1375 views)
Last post by: jjd2296 on 11-27-2023 08:33 PM
darcfyre
Member
Posts: 12
From: El Dorado, Arkansas USA
Registered: Jan 2013


Feedback score: N/A
Leave feedback

Rate this member

Report this Post07-27-2013 07:21 PM Click Here to See the Profile for darcfyreSend a Private Message to darcfyreEdit/Delete MessageReply w/QuoteDirect Link to This Post
1988 Fiero Formula T-Top Red 5 Speed. I cannot seem to find replacement front exhaust manifold replacement for stock unit. I see the rear at the Fiero Store. What am I missing?
How can I get a replacement and what parts do I need to order for a local shop to be able to do the replacement in one day? It's my work car, believe it or not. Thank's in advance to all the kind kindred.
Dave the Weekender!

------------------
Away from his arms in the open field
A man shall fare not a foot;
For never he knows when the need for a spear
Shall arise on the distant road
Hovamol 38 "The Sayings of Odin"

IP: Logged
PFF
System Bot
88FieroGT TTops
Member
Posts: 710
From: Woodbridge,Va USA
Registered: Mar 2012


Feedback score: (4)
Leave feedback

Rate this member

Report this Post07-27-2013 08:52 PM Click Here to See the Profile for 88FieroGT TTopsSend a Private Message to 88FieroGT TTopsEdit/Delete MessageReply w/QuoteDirect Link to This Post
check this one in the mall--he can probably help
//www.fiero.nl/forum/Forum4/HTML/066741.html
or
//www.fiero.nl/forum/Forum4/HTML/066583.html

------------------
Pat Jones

IP: Logged
trotterlg
Member
Posts: 1378
From: WA
Registered: Aug 2011


Feedback score: (2)
Leave feedback

Rate this member

Report this Post07-27-2013 10:33 PM Click Here to See the Profile for trotterlgSend a Private Message to trotterlgEdit/Delete MessageReply w/QuoteDirect Link to This Post
Keep in mind that is is likely that the shop will break off at least one of the exhaust studs when they try to take them out. It may be worth your time to try it your self, you might be a little kinder to the bolts than a shop will. Larry

[This message has been edited by trotterlg (edited 07-27-2013).]

IP: Logged
mrfiero
Member
Posts: 8996
From: Colorful Colorado
Registered: Mar 99


Feedback score:    (91)
Leave feedback


Total ratings: 149
Rate this member

Report this Post07-28-2013 01:30 AM Click Here to See the Profile for mrfieroSend a Private Message to mrfieroEdit/Delete MessageReply w/QuoteDirect Link to This Post
I have a good used one. It's actually in a set I have, but I could separate them if you can't find one. If you can get the manifold off without breaking any bolts then all you need is a manifold and a new gasket. I need to double check, but I probably have a new gasket too (Fel-Pro).

IP: Logged
Dennis LaGrua
Member
Posts: 15143
From: Hillsborough, NJ U.S.A.
Registered: May 2000


Feedback score:    (13)
Leave feedback


Total ratings: 328
Rate this member

Report this Post07-28-2013 03:38 PM Click Here to See the Profile for Dennis LaGruaSend a Private Message to Dennis LaGruaEdit/Delete MessageReply w/QuoteDirect Link to This Post
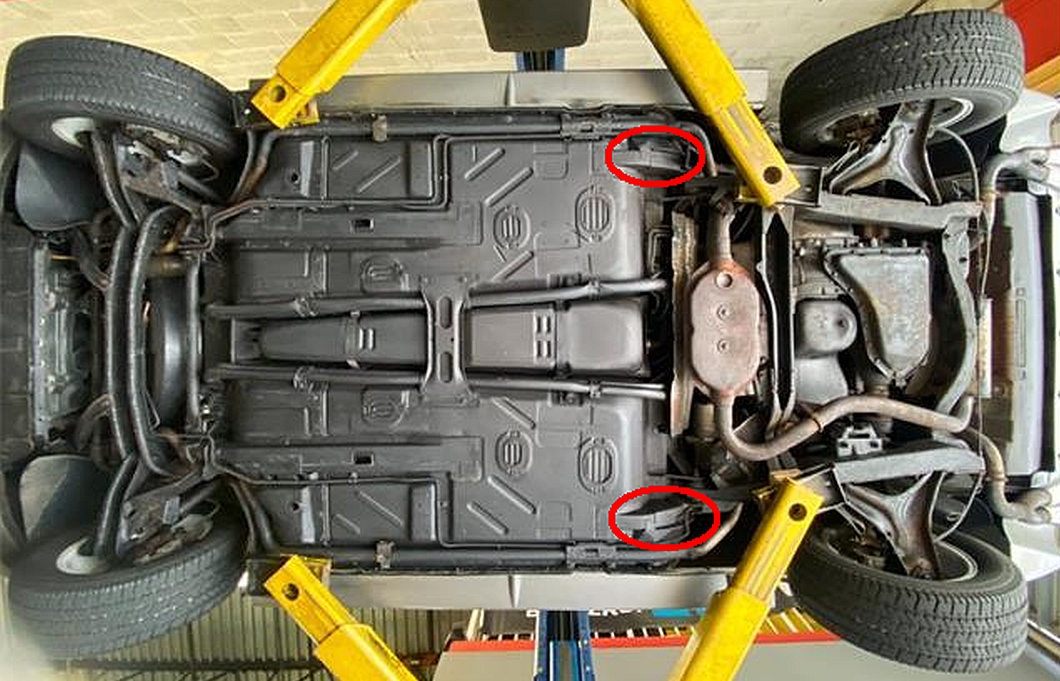
Tip: Remove the deck lid and loosen the rear cradle bolts about 8-10 turns but do not remove them. Disconnect the dog bone. Jack the rear wheels off the ground and support the car with jack stands. Don't drive the car and soak the exhaust manifold bolt studs and the crossover pipe nuts with PB Blaster for a couple of days before attempting to remove them. If they break off the only way to removal will be by using a special Kent Moore drilling fixture that was designed for the 60* V6 engine.

------------------
" THE BLACK PARALYZER" -87GT 3800SC Series III engine, custom ZZP /Frozen Boost Intercooler setup, 3.4" Pulley, Powerlog manifold, Northstar TB, LS1 MAF, 3" Flotech Afterburner Exhaust, Autolite 104's, MSD wires, Custom CAI, 4T65eHD w. custom axles, HP Tuners VCM Suite.
"THE COLUSSUS"
87GT - ALL OUT 3.4L Turbocharged engine, Garrett Hybrid Turbo, MSD ign., modified TH125H
" ON THE LOOSE WITHOUT THE JUICE "

IP: Logged
gold87
Member
Posts: 434
From:
Registered: Jul 2006


Feedback score: N/A
Leave feedback

Rate this member

Report this Post07-28-2013 03:52 PM Click Here to See the Profile for gold87Send a Private Message to gold87Edit/Delete MessageReply w/QuoteDirect Link to This Post
I did the front Manifold twice in 2 years when i had my 87. PB buster is your friend as others have said. I sprayed the bolts for about a week once a day. i had to much trouble removing one of the bolts so i removed the driver seat and the back pannel behind the seats and cut a access hole to get at the bolts strait on using a cut off wheel. just be carefull cutting since the fuel lines run behind there. JB welded the pannel back in. also add stud insteas of the bolt with anticease only on the part not in the head. Made my second repair alot easier to do. hope this help you out it was a 2 day job for me figuring out everything and trying all the ideas i seen on here.
IP: Logged
Arns85GT
Member
Posts: 11159
From: London, Ontario, Canada
Registered: Jul 2003


Feedback score: (1)
Leave feedback


Total ratings: 202
Rate this member

Report this Post07-28-2013 05:15 PM Click Here to See the Profile for Arns85GTSend a Private Message to Arns85GTEdit/Delete MessageReply w/QuoteDirect Link to This Post
I don't recommend cutting an access panel into a structural piece when you can loosen off 2 bolts, and lift the body.

Like Dennis said, unhook your dogbone, and back out the rear cradle bolts until you can lift the body away from the engine. The engine will tilt downward and back and make access to the front bolts do-able. You don't have to remove the deck, but it does make life a little easier.

And I can repeat that PB Blaster for a few days is an absolute necessity.

However, if you can get a couple of carbide bits from a machinist supply place, you can drill out a broken bolt, and then tap it for a Heli-coil.

That worked for me. Good luck with it.

Arn
IP: Logged
darcfyre
Member
Posts: 12
From: El Dorado, Arkansas USA
Registered: Jan 2013


Feedback score: N/A
Leave feedback

Rate this member

Report this Post07-28-2013 06:06 PM Click Here to See the Profile for darcfyreSend a Private Message to darcfyreEdit/Delete MessageReply w/QuoteDirect Link to This Post
MrFiero
How much for the set?

[This message has been edited by darcfyre (edited 07-28-2013).]

IP: Logged
88FieroGT TTops
Member
Posts: 710
From: Woodbridge,Va USA
Registered: Mar 2012


Feedback score: (4)
Leave feedback

Rate this member

Report this Post07-28-2013 07:11 PM Click Here to See the Profile for 88FieroGT TTopsSend a Private Message to 88FieroGT TTopsEdit/Delete MessageReply w/QuoteDirect Link to This Post
I just did mine---engine in car too! PB blaster--dremel tool too. make sure your socket sits squarely on the bolt and you shouldn't twist it off--go to e-bay and find the stud kit--15.00 to 50.00 depending on if you want stainless steel or not. Here is a link for the manifold gasket replacement--it also has a couple of links inside it
//www.fiero.nl/forum/Forum9/HTML/000016.html
//www.fiero.nl/forum/Forum1/HTML/090376.html
these should help

------------------
Pat Jones

IP: Logged
mrfiero
Member
Posts: 8996
From: Colorful Colorado
Registered: Mar 99


Feedback score:    (91)
Leave feedback


Total ratings: 149
Rate this member

Report this Post07-29-2013 02:18 AM Click Here to See the Profile for mrfieroSend a Private Message to mrfieroEdit/Delete MessageReply w/QuoteDirect Link to This Post
 
quote
Originally posted by darcfyre:

MrFiero
How much for the set?


How about $75 shipped for the pair? The front one (closest to the firewall) is nice and even has the stock bolts that attach it to the y-pipe, but the rear (trunk side) manifold has a broken y-pipe bolt still stuck in the welded on nut. I am attaching a picture for you. Both are uncracked and in nice shape....the only issue is that broken bolt. Most people knock it off and reweld a new nut onto it. LMK if you're interested....I can get them shipped out anytime this week.


IP: Logged
darcfyre
Member
Posts: 12
From: El Dorado, Arkansas USA
Registered: Jan 2013


Feedback score: N/A
Leave feedback

Rate this member

Report this Post07-29-2013 05:49 AM Click Here to See the Profile for darcfyreSend a Private Message to darcfyreEdit/Delete MessageReply w/QuoteDirect Link to This Post
$75 sounds good. You have Paypal?
David Campbell
814 East 7th Street
El Dorado, AR 71730
IP: Logged
PFF
System Bot
GodSend
Member
Posts: 861
From: Hamilton, Ontario, Canada
Registered: Aug 2000


Feedback score: (1)
Leave feedback

Rate this member

Report this Post07-29-2013 09:36 AM Click Here to See the Profile for GodSendSend a Private Message to GodSendEdit/Delete MessageReply w/QuoteDirect Link to This Post
With this method is there enough clearence to drill out the broken bolts if need on the firewall side?
IP: Logged
James Bond 007
Member
Posts: 8868
From: California.U.S.A.
Registered: Dec 2002


Feedback score: (1)
Leave feedback


Total ratings: 263
Rate this member

Report this Post07-29-2013 10:36 AM Click Here to See the Profile for James Bond 007Send a Private Message to James Bond 007Edit/Delete MessageReply w/QuoteDirect Link to This Post
Befor Installing, you may want to grind out the metal flange inside each exhaust port.This will increase your HP slightly. Allso be carefull when removeing the truk lid,theres loads of pressure on the hindge and you coud bust out the rear windows (dont remove the security bolts).
IP: Logged
mrfiero
Member
Posts: 8996
From: Colorful Colorado
Registered: Mar 99


Feedback score:    (91)
Leave feedback


Total ratings: 149
Rate this member

Report this Post07-29-2013 03:28 PM Click Here to See the Profile for mrfieroSend a Private Message to mrfieroEdit/Delete MessageReply w/QuoteDirect Link to This Post
 
quote
Originally posted by darcfyre:

$75 sounds good. You have Paypal?
David Campbell
814 East 7th Street
El Dorado, AR 71730


I'll PM you......check your inbox.
IP: Logged
thesameguy
Member
Posts: 1536
From: California
Registered: Dec 2012


Feedback score: N/A
Leave feedback

Rate this member

Report this Post07-29-2013 06:51 PM Click Here to See the Profile for thesameguySend a Private Message to thesameguyEdit/Delete MessageReply w/QuoteDirect Link to This Post
Here's a question:

Has anyone ever slotted the upper bolt holes especially on the forward manifold to make future removal easier? Or does that weaken the flange excessively? If you could remove the lower bolts but only loosen the top, you'd have a much easier time I'd think.
IP: Logged
darcfyre
Member
Posts: 12
From: El Dorado, Arkansas USA
Registered: Jan 2013


Feedback score: N/A
Leave feedback

Rate this member

Report this Post07-29-2013 08:55 PM Click Here to See the Profile for darcfyreSend a Private Message to darcfyreEdit/Delete MessageReply w/QuoteDirect Link to This Post
Ordered from mrfiero. Does anyone have the exact list of parts links to order so the shop will have everything they need?
IP: Logged
mrfiero
Member
Posts: 8996
From: Colorful Colorado
Registered: Mar 99


Feedback score:    (91)
Leave feedback


Total ratings: 149
Rate this member

Report this Post07-29-2013 10:32 PM Click Here to See the Profile for mrfieroSend a Private Message to mrfieroEdit/Delete MessageReply w/QuoteDirect Link to This Post
 
quote
Originally posted by darcfyre:

Ordered from mrfiero. Does anyone have the exact list of parts links to order so the shop will have everything they need?

They'll be in the mornings mail! I could not find the new gasket, otherwise I would have thrown that in for you.....sorry.

IP: Logged
jjd2296
Member
Posts: 1421
From: toronto ON
Registered: Jan 2016


Feedback score:    (8)
Leave feedback

Rate this member

Report this Post11-25-2023 08:11 AM Click Here to See the Profile for jjd2296Send a Private Message to jjd2296Edit/Delete MessageReply w/QuoteDirect Link to This Post
I’m about to undertake this but I want to clarify one pint in Dennis instructions. Where am I placing the Jack stands if I’m losing the rear cradle bolts (trunk side) in order to properly support the car and let the cradle tilt at the same time?
IP: Logged
82-T/A [At Work]
Member
Posts: 22714
From: Florida USA
Registered: Aug 2002


Feedback score: (1)
Leave feedback


Total ratings: 198
Rate this member

Report this Post11-25-2023 11:27 AM Click Here to See the Profile for 82-T/A [At Work]Send a Private Message to 82-T/A [At Work]Edit/Delete MessageReply w/QuoteDirect Link to This Post
Is there a recommendation for replacement exhaust manifold bolts after the old ones have been removed? Anyone know if ARP studs might be a better solution / option?
IP: Logged
lateFormula
Member
Posts: 1048
From: Detroit Rock City
Registered: Jul 2002


Feedback score: (2)
Leave feedback

Rate this member

Report this Post11-25-2023 12:35 PM Click Here to See the Profile for lateFormulaSend a Private Message to lateFormulaEdit/Delete MessageReply w/QuoteDirect Link to This Post
All this talk of removing the decklid, or removing cradle bolts and lowering the cradle. Nahh. If you put the car up in the air on jackstands, this job can be done from underneath the car. But to do this you need to remove the AC compressor from the bracket if you have AC, and also remove the Y pipe. Both of these can be done from above before you raise the car up.

As for replacement hardware, here's my suggestion: Buy one of these to chase the threads in all the mounting holes in the heads before you start re-installing the manifolds. https://www.mcmaster.com/8305A59/
Then buy three of these: https://www.summitracing.com/parts/arp-761-1002. If you want to retain the factory heat shields you will need some M8 x 1.25 x 50mm studs and a package of these: https://www.mcmaster.com/93033A102/

Remember, when using stainless steel fasteners you ALWAYS need to coat the threads with anti-seize!
IP: Logged
sleek fiero
Member
Posts: 294
From: British Columbia
Registered: Aug 2022


Feedback score: N/A
Leave feedback

Rate this member

Report this Post11-25-2023 12:36 PM Click Here to See the Profile for sleek fieroSend a Private Message to sleek fieroEdit/Delete MessageReply w/QuoteDirect Link to This Post
When I changed out mine I went to a local bolt and nut store and purchased a full set of grade 8 studs and nuts for about $20 Canadian. makes it super easy to remove down the road. sleek
IP: Logged
PFF
System Bot
82-T/A [At Work]
Member
Posts: 22714
From: Florida USA
Registered: Aug 2002


Feedback score: (1)
Leave feedback


Total ratings: 198
Rate this member

Report this Post11-25-2023 01:19 PM Click Here to See the Profile for 82-T/A [At Work]Send a Private Message to 82-T/A [At Work]Edit/Delete MessageReply w/QuoteDirect Link to This Post
 
quote
Originally posted by lateFormula:

All this talk of removing the decklid, or removing cradle bolts and lowering the cradle. Nahh. If you put the car up in the air on jackstands, this job can be done from underneath the car. But to do this you need to remove the AC compressor from the bracket if you have AC, and also remove the Y pipe. Both of these can be done from above before you raise the car up.

As for replacement hardware, here's my suggestion: Buy one of these to chase the threads in all the mounting holes in the heads before you start re-installing the manifolds. https://www.mcmaster.com/8305A59/
Then buy three of these: https://www.summitracing.com/parts/arp-761-1002. If you want to retain the factory heat shields you will need some M8 x 1.25 x 50mm studs and a package of these: https://www.mcmaster.com/93033A102/

Remember, when using stainless steel fasteners you ALWAYS need to coat the threads with anti-seize!


Your URL has the period within the URL, so reposting your link: https://www.summitracing.com/parts/arp-761-1002


When I removed my forward exhaust manifold, I was able to do so without removing the decklid. It was not easy... but I basically leaned over the engine, and I had to move my hand around the front left of the engine, and the front right of the engine. I had to remove the air cleaner tube, and the battery / bracket in order to be able to get leverage in there. But none of my bolts snapped... and I was able to remove them all.


Thanks!!!
IP: Logged
jjd2296
Member
Posts: 1421
From: toronto ON
Registered: Jan 2016


Feedback score:    (8)
Leave feedback

Rate this member

Report this Post11-25-2023 02:57 PM Click Here to See the Profile for jjd2296Send a Private Message to jjd2296Edit/Delete MessageReply w/QuoteDirect Link to This Post
 
quote
Originally posted by lateFormula:

All this talk of removing the decklid, or removing cradle bolts and lowering the cradle. Nahh. If you put the car up in the air on jackstands, this job can be done from underneath the car. But to do this you need to remove the AC compressor from the bracket if you have AC, and also remove the Y pipe. Both of these can be done from above before you raise the car up.

As for replacement hardware, here's my suggestion: Buy one of these to chase the threads in all the mounting holes in the heads before you start re-installing the manifolds. https://www.mcmaster.com/8305A59/
Then buy three of these: https://www.summitracing.com/parts/arp-761-1002. If you want to retain the factory heat shields you will need some M8 x 1.25 x 50mm studs and a package of these: https://www.mcmaster.com/93033A102/

Remember, when using stainless steel fasteners you ALWAYS need to coat the threads with anti-seize!


That depends on the model of engine you have and if you have mods like a 3.4 block. In most cases the coolant crossover tube for 87-88 will be in your way if you try to do it from the bottom. Plus the top is much easier. I don’t know about you but I’m 6.1 220lbs. The car has to be jacked up fairly high for me to get under it comfortably. But then the reach to the manifold is That much further away! And I would prefer to do it with light shinning from above.

IP: Logged
Patrick
Member
Posts: 36367
From: Vancouver, British Columbia, Canada
Registered: Apr 99


Feedback score: (1)
Leave feedback


Total ratings: 458
Rate this member

Report this Post11-25-2023 05:40 PM Click Here to See the Profile for PatrickSend a Private Message to PatrickEdit/Delete MessageReply w/QuoteDirect Link to This Post
 
quote
Originally posted by 82-T/A [At Work]:

But none of my bolts snapped... and I was able to remove them all.


Count your lucky stars. Drilling out broken exhaust manifold bolts on the forward side of the engine is one helluva job!

IP: Logged
82-T/A [At Work]
Member
Posts: 22714
From: Florida USA
Registered: Aug 2002


Feedback score: (1)
Leave feedback


Total ratings: 198
Rate this member

Report this Post11-25-2023 05:57 PM Click Here to See the Profile for 82-T/A [At Work]Send a Private Message to 82-T/A [At Work]Edit/Delete MessageReply w/QuoteDirect Link to This Post
 
quote
Originally posted by Patrick:

Count your lucky stars. Drilling out broken exhaust manifold bolts on the forward side of the engine is one helluva job!


Yeah, I got lucky... the car didn't have a lot of miles when I went to remove the manifold to replace it with hogged out ones... but when I did remove them, half of them were heavily pitted and looked like they would have snapped at some point. I went really slow though...
IP: Logged
Dukesterpro
Member
Posts: 358
From: Onalaska, WI
Registered: Aug 2022


Feedback score: N/A
Leave feedback

Rate this member

Report this Post11-27-2023 04:06 PM Click Here to See the Profile for DukesterproSend a Private Message to DukesterproEdit/Delete MessageReply w/QuoteDirect Link to This Post
I literally just finished mine.

I hate to break the bad news, this is not going to be a one day project. You absolutely need to take this slow and do it right.

You have to avenues of approach, I did both to see what I liked better.

Top Approach remove the decklid, tilt engine backward after disconnecting dogbone. Reach down and unbolt.

Bottom Approach remove catalytic converter, unbolt AC compressor (If equipped) (you dont have to remove it, just unbolt the bracket and lower it), tilt engine backward after disconnecting dogbone. Reach up and unbolt.


I personally like the bottom access cause it was easier to see the bolts and align the new gasket. I was so unbelievable lucky that not only did I not break any bolts, they were so loose they practically all fell out. Nor were they rusty, most likely due to the fact my car has not been recalled. Most of the time this wont be the case. You need almost 4 or 5 days of PB blasting and soaking (without running the car) to bust them loose. if even one breaks you are screwed until you can find time to get the head off. Replace all the bolts with studs (The Fiero store ones were nice to me)

[This message has been edited by Dukesterpro (edited 11-27-2023).]

IP: Logged
Patrick
Member
Posts: 36367
From: Vancouver, British Columbia, Canada
Registered: Apr 99


Feedback score: (1)
Leave feedback


Total ratings: 458
Rate this member

Report this Post11-27-2023 06:01 PM Click Here to See the Profile for PatrickSend a Private Message to PatrickEdit/Delete MessageReply w/QuoteDirect Link to This Post
 
quote
Originally posted by Dukesterpro:

Top Approach remove the decklid, tilt engine backward after disconnecting dogbone. Reach down and unbolt.


The other option, which I've used, is to remove the two rear cradle bolts (and dogbone) and swing the cradle down just enough to gain the necessary access up front.
IP: Logged
jjd2296
Member
Posts: 1421
From: toronto ON
Registered: Jan 2016


Feedback score:    (8)
Leave feedback

Rate this member

Report this Post11-27-2023 07:20 PM Click Here to See the Profile for jjd2296Send a Private Message to jjd2296Edit/Delete MessageReply w/QuoteDirect Link to This Post
Patrick read the thread above, thats what it says and my question was where do I place the jack stands to do this? they cant go on the cradle in the middle where one would normally put them if you want to let the front of the cradle drop a few inches?? where did you place the jack stands?
IP: Logged
Patrick
Member
Posts: 36367
From: Vancouver, British Columbia, Canada
Registered: Apr 99


Feedback score: (1)
Leave feedback


Total ratings: 458
Rate this member

Report this Post11-27-2023 07:46 PM Click Here to See the Profile for PatrickSend a Private Message to PatrickEdit/Delete MessageReply w/QuoteDirect Link to This Post
 
quote
Originally posted by jjd2296:

...where do I place the jack stands to do this? they cant go on the cradle in the middle where one would normally put them if you want to let the front of the cradle drop a few inches?? where did you place the jack stands?


First of all, just to be clear... it's not the front of the cradle that drops. The method that I (and Dennis) described has the rear of the cradle drop.

The rear jack stands are located under the frame just in front of where the cradle pivots.

[This message has been edited by Patrick (edited 11-27-2023).]

IP: Logged
jjd2296
Member
Posts: 1421
From: toronto ON
Registered: Jan 2016


Feedback score:    (8)
Leave feedback

Rate this member

Report this Post11-27-2023 08:33 PM Click Here to See the Profile for jjd2296Send a Private Message to jjd2296Edit/Delete MessageReply w/QuoteDirect Link to This Post
Thanks Patrick much appreciated and yes you are right the rear cradle bolts!!
IP: Logged

next newest topic | next oldest topic

All times are ET (US)

Post New Topic  Post A Reply
Hop to:

Contact Us | Back To Main Page

Advertizing on PFF | Fiero Parts Vendors
PFF Merchandise | Fiero Gallery | Ogre's Cave
Real-Time Chat | Fiero Related Auctions on eBay


Copyright (c) 1999, C. Pennock