What the inside diameter of the tubes you're hiding in the rocker panels? Do you expect this size tube to properly flow a sufficient volume of air to your intercooler without producing too much lag?
What the inside diameter of the tubes you're hiding in the rocker panels? Do you expect this size tube to properly flow a sufficient volume of air to your intercooler without producing too much lag?
The tubing is 2.125" and should be fine up to a certain point. I've performed an estimated calculation but will need to go back and perform an actual calc based on the full length of tubing and the number of bends along with the max CFM expected. I believe it will be fine given it should perform much better with a long distance intercooler instead of a long distance turbo as found in the rear mount systems. The ultimate result will be provided by an exhaust manifold pressure compared to boost pressure and a similar swap of the boost signal line from the compressor housings to the intake manifold and noting the difference in boost resulting from plumbing resistance. My previous difference was about .7 psi with 8 psi wastegate springs and about 7.3 psi registering in the datalog with the wastegate signal connected to the compressor housing.
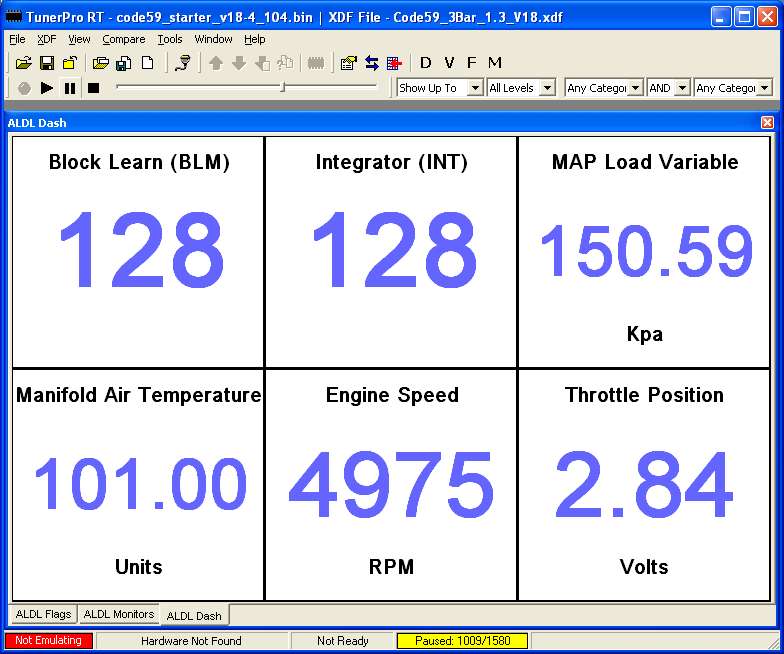
Did you change the MAP Load Variable to output the 2-bar MAP? In my version the .ads file had the value in volts, not kPa. If yours is correct then you were making some serious boost at 150 kPa and a bit over half throttle.
Also, for Data Tracing, I found the x and y axis in the .xdf file were listed as a "string" but need to be an "integer" in order to link up with the ALDL output. If you have switched to Tunercat then disregard......
I don't recall if I checked it but by default for TGP code the MAP variable should be 2 Bar. 150 Kpa is only about 7 psi of boost which is about right since my wastegate springs are 8 psi, but with 9.8:1 compression on midgrade gas that is pretty serious boost I guess. The gates were connected to the compressor housing and max boost registered a little over 150 Kpa. I did have an ads. file that read differently but after a post about it on the 60 degree forum some guys provided me with a conversion to Kpa.
I haven't taken anytime to modify conversions in the program. I have both TunerproRT and TunercatRT but prefer Tpro because of ALDL monitoring, I use Tcat to confirm correct settings and make changes sometimes as it has proven more accurate with TGP bin changes, for example the rev limiter adjustments in Tunerpro for the TGP code works in reverse so it actually comes in earlier the higher you set it. Tunercat also has a base pulse constant in the constants file that actually works in addition to the BPC vs. EGR and that was important in getting the engine up and running properly.
The Beretta A1 code was a very good startup bin although you have to be careful with BPC settings since it used lower flowing injectors than the TGP, otherwise both bins started the engine without much difficulty with the proper BPC adjustment. Another reason A1 code worked so well is because my 2 Bar MAP sensor at the time was bad and I didn't know it and it had been over two previous applications that performed erratically (V8 Fiero with Accel power processor) and hardly at all (3100 Turbo conversion attempt to 2 BAR MAP= no start). The bad MAP never set a code and it wasn't until I finally succeeded in getting an ALDL link with the TGP code that I saw the constant MAP reading with the engine running that I realized it was bad, but no code was ever set and it would lean the engine out as the throttle was opened.
That was a real headache because I had no clue as to what was wrong just like now with code59 which I now believe started out as a problem with the timing limits as discussed in the link I posted early this morning in the trouble starting thread and progressed to a possible ignition part failure from what I found with the timing light and oscilloscope tracing of the crank sensor.
Keep trying with code59, I'll give it another shot with a brand new module and coil packs as I have no history on the current used parts and will check my C203 connector pin assignments to make sure it is wired correctly as that was not double checked like the rest of the harness.
Cliff Pennock my eyes are telling me the forum colors are to dark for friendly viewing over long periods
I'm having trouble with my car not revving above 3k like it's losing fuel pressure suddenly. It's acting just like a rev limiter being set at 3k. Since I'm using the TGP code too you may have solved my problem.
So if it works in reverse what did you set yours to?
I'm having trouble with my car not revving above 3k like it's losing fuel pressure suddenly. It's acting just like a rev limiter being set at 3k. Since I'm using the TGP code too you may have solved my problem.
So if it works in reverse what did you set yours to?
Sorry it will take a bit as I'm trying to get out the door for work. I actually ended up setting it in Tunercat and when I compared it to Tunerpro I noted it had gone down when I adjusted it up in Tcat. The problem is finding the right table which I was having trouble with. If you look on page 4 I believe of my thread at the WBO2 reading with the Zeitronix you will see the sign waves caused by the rev limiter kicking in right about where you are having your problem. PM me your email address and I will send you the xdf file I'm using along with a bin with the rpm limit set by Tcat to whatever you would like until you can I.D. the correct limiter as it's been a while since I've actually made any adjustments to TGP code and will have to refresh my memory of some things.
My limiter is set to about 6500 rpm In Tunercat though and I believe that came out to something in the 4k range for Tunerpro.
[This message has been edited by Joseph Upson (edited 01-13-2009).]
joe, i would be getting onto tuning mine sooner, but its this darned weather keeping me from figuring out what my wiring problem is. ill be catching up once it warms up man.
joe, i would be getting onto tuning mine sooner, but its this darned weather keeping me from figuring out what my wiring problem is. ill be catching up once it warms up man.
Be sure to check your sensors extra close as that was and is probably currently the biggest headache and unusual failure coincidence I've had. I had a bad MAP sensor that never set a code and made the car undriveable and immediately afterwards a bad crank sensor that stumped me until just before I was out of time to work on the car.
Problems like this keep happening but I look at it as a force causing me to replace crucial parts that will ultimately make the car very dependable and trouble free once it is up and running. The timing of the parts failures is what makes them so hard to catch if you don't check them constantly during a trouble shoot. You just don't suspect such as in my case where initially the car would not start because of programming and suddenly an ignition part failure creeps in before you fix the first problem.
how would i check to make sure the sensors are working? i know how to test things like the TPS and IAC. but how would i check the MAP? and how to test the others? and since you would probably know more about my crank trigger wheel from TCE, what crank sensor works for that? i have 3 coil packs that all work. so i know those arent an issue.
how would i check to make sure the sensors are working? i know how to test things like the TPS and IAC. but how would i check the MAP? and how to test the others? and since you would probably know more about my crank trigger wheel from TCE, what crank sensor works for that? i have 3 coil packs that all work. so i know those arent an issue.
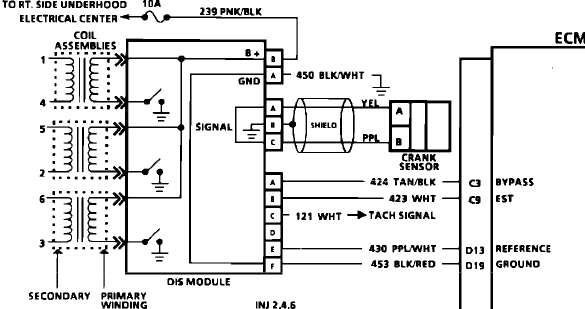
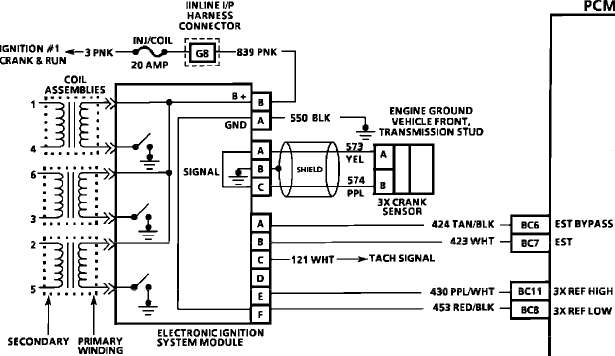
Data link with your emulator, once you are able to see the sensor values before and during startup to confirm the appropriate initial values that leaves the crank sensor and MAP sensor which will not register the proper reading until the engine starts up since it measures vacuum. The crank sensor is usually working fine if the fuelpump is cycling continuously during cranking and a little after the engine stops turning over during a start attempt. Since you rewired the harness, did you unwind the two wires coming from the crank position sensor? They are wound together for a reason at not less than 9 times per foot according to a diagram I read. Mine are unwound this time and unsheathed which maybe why I measured an irregular waveform on the oscilloscope when I checked it. The sensor has less than 30 miles on it. It is not a GM sensor unfortunately.
Make sure your spark plugs are wired correctly, I have found two different firing orders for the coils 1-4,5-2,6-3 and 1-4,6-3,5,2 I'm just not sure which is correct because the second order was for a 94 3100 and was also on an 03 Impala and is how my engine is wired. I also figured out that the TPS sensor wiring diagram is listed in orders ABC and ACB, I thought it was a typo but it is not, the first is for sensors with plug terminals in line, the second is for sensors with round plugs. I initially had my TPS sensor connected backwards on the new harness as a result and that showed up in the datalink as 100% TPS at closed throttle and decreased as the throttle was opened. Take your time and back probe the harness sensor plugs against the ecm plug with a multimeter.
One indication that there maybe a problem with wiring is if the engine light does not flash once immediately after you turn the ignition on.
last time i linked up, all my sensor values looked fine. ill check it again to see what the results are. the fuel pump is cycling during the cranking process. but i need to link up to verify what the fuel pump readings are.
the two crank wires are just run along side eachother. from what you have just told me, ill need to wind those two up in the no less than 9 times per foot that you mentioned. i just talked to TCEMOTORSPORTS, and any 60*v6 crank sensor will work with my crank trigger wheel kit.
i know the firing order of the engine is 1-2-3-4-5-6 (duh). my coil pack, along with others ive seen and snagged from in the salvage yard say on them the 1-4,
I believe the firing order at the coil packs will be determined by the ignition module that you're using. Also, I'm thinking the 94 3100 would have been one of the weird OBD 1.5 setups, and may have used a different ignition module than the common OBDI or OBDII ones (I'm running a 2000 ignition module off $A1 code).
last time i linked up, all my sensor values looked fine. ill check it again to see what the results are. the fuel pump is cycling during the cranking process. but i need to link up to verify what the fuel pump readings are.
the two crank wires are just run along side eachother. from what you have just told me, ill need to wind those two up in the no less than 9 times per foot that you mentioned. i just talked to TCEMOTORSPORTS, and any 60*v6 crank sensor will work with my crank trigger wheel kit.
i know the firing order of the engine is 1-2-3-4-5-6 (duh). my coil pack, along with others ive seen and snagged from in the salvage yard say on them the 1-4,
post more, gotta get to work......
continuing from where i left off.
a diagram i got off of that 3rdgen.org site with the 7730 conversion info
and here is the firing order diagram i used. these are also the same but with different coilpack orders. hmm...?
i never went by the ABC ect.... on any of my sensor wiring. i went by what each wire and color was from the GM schematics. so thats why we had no trouble the first time when jon did his initial install. im using the 4.3 70mm TB and TPS/IAC sensors.
the engine light does flash immediatly when the ign is turned on. i did notice something though. when i did the ALDL test, the oil light came on. but the guage didnt show anything different. am i crazy or is that the way it works?
tomarrow when there is daylight in the arctic cold, ill check to see what my other two coilpacks say on them. they were some ICM/coilpacks i snagged from the junkyard from a 98 buick of some sort w/ a 3100 and a 03 alero 3400(?)
i did verify through partsamerica.com that the 88 2.8's coilpack ICM used on the Z24 was the same as a 98 buick 60* v6. so the firing orders are the same and no changes in the wiring. ------------------ First LX9 Fiero GT, 1987 If you can't fix it with a hammer, you've got an electrical problem Fiero's are people too. We pay just as much attention to them, if not more than our loved ones My Fiero Fuel Economy Videos of My GT Google Videos of My GT
[This message has been edited by americasfuture2k (edited 01-14-2009).]
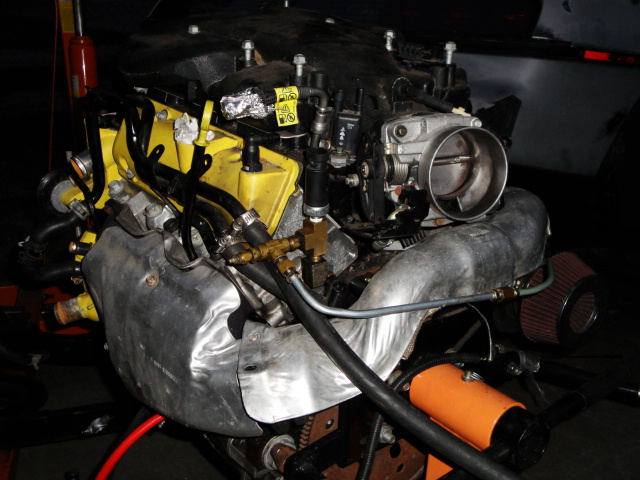
Closing in on the test drive, I didn't want to post anything until I made some appreciable progress. I switched the harness (1 wire) back to Turbo Grand Prix 8F code specs since I was unsuccessful with code59. It took a little effort to get the engine started but once it did there were no further difficulties.
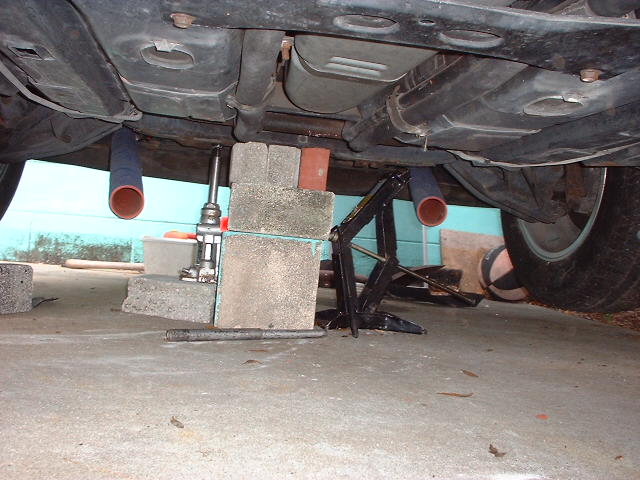
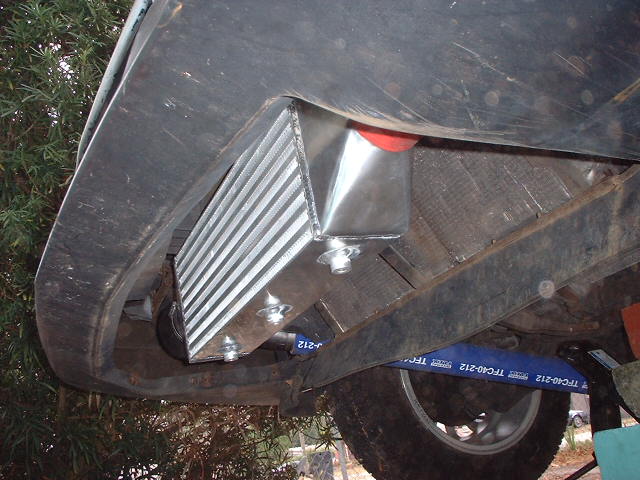
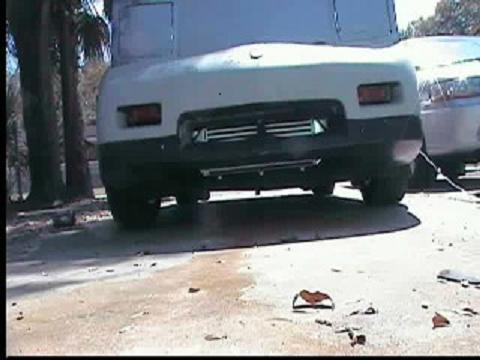
The intercooler is installed and went right in place as if it belonged there, I'm using silicone tubing for much of the distance underneath the car where there is risk of contact with debris hazards on the road. I've pretty much completed all of the plumbing pieces and need to make a trip tomorrow to pick up a little more silicone to button everything up and hopefully take it for a spin.
The cam is fully advanced now and that resulted in a 5 point increase in vacuum suggesting that the bottom end performance should be improved over the previous status where the cam was locked at full retard. The VVT works and caused a momentary drop in idle and an exhaust note change when activated. I'm going to tune for the advanced position first before incorporating cam retard.
I have a video of my exhaust test and interestingly the car is quieter without the silencers than it is with them.
I've been watching the thread here and 60degreev6. I didn't want you to think nobody was paying attention. I have pretty much everything I need to get mine going, except warm weather. I'm having Westers do the tune. Hopefully it works out reasonably well. Keep up the good work!
Closing in on the test drive, I didn't want to post anything until I made some appreciable progress. I switched the harness (1 wire) back to Turbo Grand Prix 8F code specs since I was unsuccessful with code59. It took a little effort to get the engine started but once it did there were no further difficulties.
The intercooler is installed and went right in place as if it belonged there, I'm using silicone tubing for much of the distance underneath the car where there is risk of contact with debris hazards on the road. I've pretty much completed all of the plumbing pieces and need to make a trip tomorrow to pick up a little more silicone to button everything up and hopefully take it for a spin.
The cam is fully advanced now and that resulted in a 5 point increase in vacuum suggesting that the bottom end performance should be improved over the previous status where the cam was locked at full retard. The VVT works and caused a momentary drop in idle and an exhaust note change when activated. I'm going to tune for the advanced position first before incorporating cam retard.
I have a video of my exhaust test and interestingly the car is quieter without the silencers than it is with them.
Sounds good with those racing mufflers and sound supressor baffles. What are you shooting for in the 1/4 mile? I would expect comparable numbers to a 3800SC.
------------------ " THE BLACK PARALYZER" -87GT 3800SC Series III engine, 3.4" Pulley, N* TB, LS1 MAF, Flotech Exhaust Autolite 104's Custom CAI 4T65eHD w. custom axles, HP Tuners VCM Suite. 87GT - 3.4L Turbocharged engine, modified TH125H " ON THE LOOSE WITHOUT THE JUICE "
Originally posted by Dennis LaGrua: What are you shooting for in the 1/4 mile? I would expect comparable numbers to a 3800SC.
The goal is sub 12s in the quarter and if it performed similar to the 3800SC on the same amount of boost I'd be very disappointed considering its stock hp rating naturally aspirated is only 18 hp less than the 3800SC. At 7 psi I would expect well over 300hp and lb/ft of torque. I plan to finish it around the first week of March and hopefully be able to get it dynoed, I'm pretty confident it will put down greater than 300/300 at the wheels at 7 psi. I'm predicting at least 380/340 and I believe that's conservative since the dyno simulation is showing 410 hp and 355 lb/ft.
Finally got around to testdriving but with no tuning to maximize performance. Verdict, down right impressive, the cam advance did excactly what I was expecting it to for the offline performance, it doesn't chirp the tires in first and second gear as easily as before partly because the tire pressure is low and traction is better, however it doesn't use the flywheel inertia the way it did before to cause that chirp, it pulls and sustains and although I didn't catch the first testdrive on tape to show it, it nearly got sideways once on acceleration.
I've owned a TPI 350 Fiero and TPI 383 stroker Z28 and neither was this fast. The boost gauge is showing about about 9 psi but the MAP sensor is showing a max of 152 Kpa which is a tad over 7 psi which is about 1 psi below the wastegate spring pressure.
I'll post video tomorrow since I'm about to hit the road headed back. I have an example of the VVT effect but the car is so fast with the cam advanced, that due to being reground to high performance specs I might not need the benefit of the VVT for higher output. I'm certain beyond a doubt that this engine is putting out over 300 hp given how hard it pulls throughout the rpm range.
The front mount intercooler cut the intake air temps by more than half of previous temps on an 80 degree day as you will see in the screen shots below. Previously the intake temps as you can see above in a previous post were around 100 deg C or 212 deg F at 7 psi, during the test runs the inlet temps reached a maximum of about 42 deg C, 107 deg F, and that was idling in the driveway after the second testdrive. Note the 38 deg C at 7 psi. I'm not taking the car yet because it needs to be tuned. You can see the timing retard due to the lean condition. I expect it to be a little lean up top due to the cam position change and the higher efficiency shift to the left (lower rpm), I wasn't expecting it to be that lean though, good thing I used premium fuel to avoid a serious detonation event.
Hopefully the next trip home will be the one that completes it.
[This message has been edited by Joseph Upson (edited 02-25-2009).]
i got a garage for the fiero at my new apartment, so i can start working on it without having to worry about the elements. even though its starting to warm up. ill be out on the open road soon. good job on all you have done.
In regards to previous concerns about turbolag due to the front mount intercooler, my calculations suggested and the testdrive confirmed that it would not likely be noticeable. Boost still comes on by 3000 rpm and although I didn't demonstrate it on camera the engine responds very well stomping the pedal from a dead stop, I didn't discover it until a drive without the camera. I should get a 10% power increase according to the rule of thumb stating for every 10 deg drop in inlet air temps you gain 1% increase in power output, from 212 deg F to 100 deg F.
It took a very lean moment at 7 psi to get 1 deg of timing retard as can be seen in the screen shot above so once it is tuned properly I expect to be able to run over 10 psi without the use of water/meth injection especially since I was able to run 7 psi previously with 212 deg inlet air temps and proper fueling without any detonation. Another 3 psi with proper tuning, coupled with the elimination of wastegate creep (http://autospeed.com/cms/A_1053/article.html) should put me at an extremely addictive acceleration rate. Hopefully I'll be able to make the trip back home in short order again to get tuning out of the way and hopefully take it to the track or the dyno or both to get the performance truth.
The VVT function is demonstrated starting at around 6 min, with a before and after shot of the vacuum change with cam position, you can also here the engine sound change when it's engaged and stumble when it's disengaged due to not being tuned in at a specific rpm point.
Here is a shortened version of the video that was placed in the previous link that still hasn't finished being processed yet apparently due to the file size. The engine has a lot more in it and it will probably be more inclined to get sideways at 7 psi the way it nearly does in the last test run once it is tuned properly, I checked the current bin spark table against a previous an noted that I pulled as much as 4 degrees of spark timing under boost as a precautionary measure and there should be room enough to return more than that without a problem.
Forgot the intercooler was edited out of the video during the resubmit so here are some snap shots from the video
Do you think the engine sounds close to what the engine in this Porche does or is it wishful thinking. Except for the noisy gears and tin can sound I believe I came pretty close and once my cheap shift cables are replaced with something more rigid along with faster shifting and possibly taking the mufflers off it could probably get a little closer though I'd have to row through more than two gears.
I am on dial up so I don't bother with the videos but good job on getting the car going! You should try and make the Dells show so we can do a little turbo/NA comparson.
No it's not running yet. I need to take a some vacation time to finish up but I have pretty much everything I need and Westers sent the chip a couple days ago. It's obd1. There are some pictures here https://www.fiero.nl/forum/F...1/HTML/051348-5.html
Still didn't get much if any tuning done although some extremely lean areas in the low rpm range were cleared up and probably pushed to the opposite extreme. Advance Auto Parts shift cables need to be replaced with better quality cables, they are not rigid enough and can not take the heat, I left the car with a seized selector cable. You can note the delay between the 1-2 shift at the beginning of the video due to flimsy shift cables.
On a half tank of 87 octane the car ran very strong at what appeared to be as much as 8 psi, there is plenty of room for improvement at that boost level with higher octane fuel and installation of the alcohol injection kit. The two changes together should make 15 psi very easy and probably attainable with just one or the other. 12 psi should be more than enough given how strong it runs at 7psi.
Unfortunately the datalogs were saved to a corrupt file I discovered a little while ago so I have nothing to take snap shots of to show inlet temps and boost pressure.
I removed the mufflers as a precaution since the body supports have not been installed yet. Hopefully it will be finished by the end of the year.
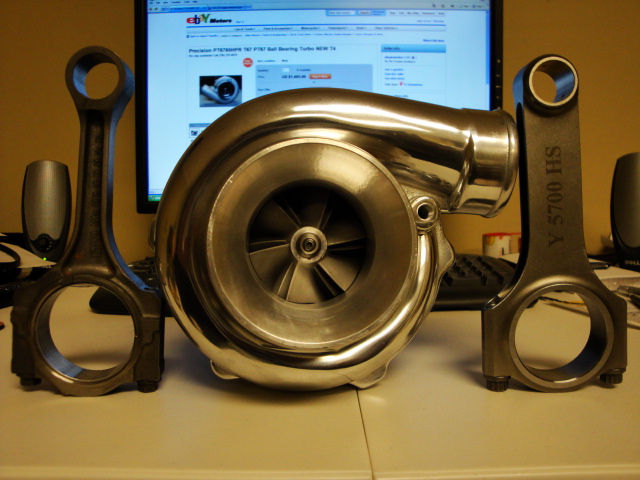
A brief update to keep the thread alive. I'm gathering parts for a complete forged high boost motor. I've sourced a shop for the offset grind of the crank and modification of the chevy small journal rods. I'm going to do away with the twin turbo setup for a single T67 to make things less complicated in the engine bay, it looks like an Ebay knock off but it's not and was priced pretty reasonable for its size $500 which is slightly more than what the ebay knock-offs run and many of them don't meet the compressor wheel dimensions to be what the sellers are calling them, T67 with a 54 mm compressor inducer for example. That may seem like a small difference but it can have a drastic effect on the compressor map and over all performance of what you actually have planned.
So far head studs, machine work and balancing for the rotating assembly and some connectors are all that's left to complete the engine. I'm going to have a second cam reground with focus on increased intake valve opening speed and about 225/225 duration to take advantage of the resulting increased compression ratio to over ~10.5:1. It's currently 9.8:1 but I want to increase efficiency for off boost steady state driving to maximize MPG with the 6 spd. It seems high but the engine quite detonation resistant runing lean at times at 8psi and once all of the anti detonation parameters are in order; coolant temps and oil around 180 pre and post turbo alcohol injection, I shouldn't have a problem reaching my goal of at least 500 hp and 30+ mpg on less than premium fuel. I'm also going to have the dual mass flywheel lightened by hopefully 5 lbs possibly 10 given the amount of excess metal on the backside perimeter. I will not be able to start the build until Jan. or Feb.
Stock rod on the left, small journal chevy on the right
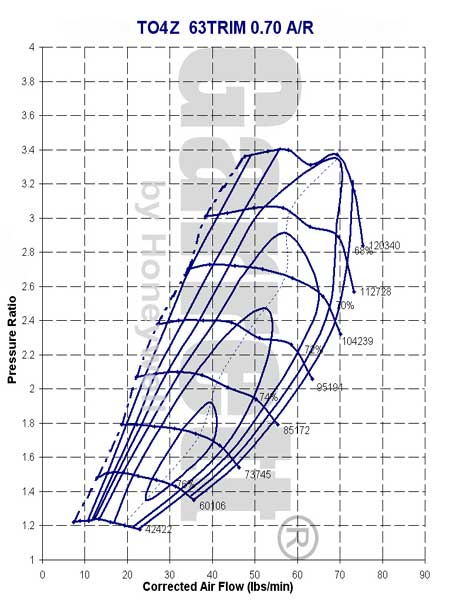
Compressor Map, boost onset to max goes up through the left side of the second smallest center island and peaks at the 68% island at 7000 rpm. A general rule of thumb that I had not realized is that the closer the boost onset is to the choke line or far left, the slower the turbo spools so for best performance it's better than boost onset starts up the center of the map or as close to the right as you can get without going far outside of the efficiency island you want turbo operation in. Peak performance sitting in the center of the island would be ideal but the spool up time to get there may be counter productive in say the quarter mile or an attempt to get the quickest 0-60 time possible for the car which is what I favor.
The intercooler will be moved to the rear since alcohol injection will be present along with lower oil temps being sprayed on the bottom of the pistons.
[This message has been edited by Joseph Upson (edited 11-29-2009).]
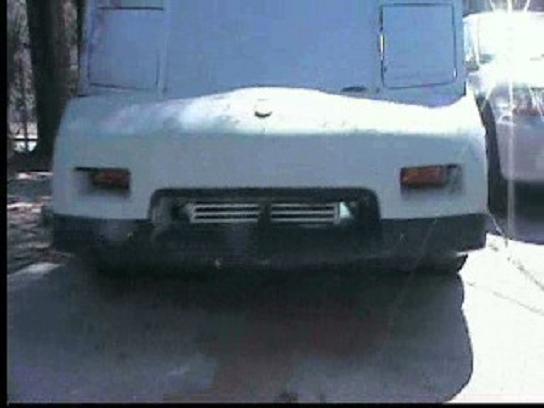
I came up with an idea that will allow me to keep the front mount intercooler and not have any problems with running the tubes straight, front to back underneath the car since they will not enclose completely in the rocker skirts.
I just finished a ten day long stretch of working on the car in an effort to simplify the initial manic run of creativity. I wish I had taken this route from the start. As mentioned earlier the plan is to convert it to a single turbo system which it should have been from the start and correct the camshaft and other odds and ends.
First I put the GTech rr module to work for a baseline run of the car in its current state. The GTech unit measures net performance which is a little less than dyno performance at the wheels. Here's a link to some track testing for the units accuracy for those who are interested: http://www.youtube.com/watc...YzOM&feature=related I felt that it would be a much better investment over the long run for tuning than an occasional trip to the dyno.
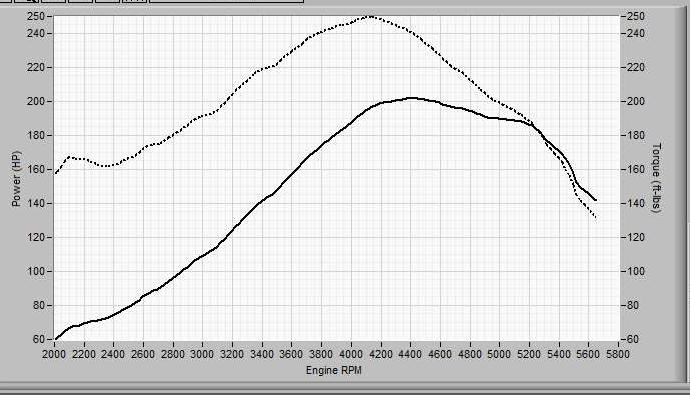
Here's the best of 3 runs. This is with the camshaft fully advanced. I wasn't impressed with the plotted results but the actual testdrive seemed a lot more powerful than what the graph suggests. I entered a vehicle weight of 2710 lbs per registration, now I realize I forgot to add an additional 200 lbs worth of me and gasoline which would have netted a bit more than 202 hp @ 4305 rpm and 250 lb/ft @ 4108 rpm (overly advanced cam at work). It certainly felt faster than that. The car still isn't tuned some of which you can see in the torque graph (dotted line) note the initial climb and sudden drop then climb toward peak. I found a major problem that contributed to the low numbers in addition to the cam position, the exhaust leak I was hearing turned out to be a leak at the flange at 5 of the 6 exhaust ports 3 of which were severe.
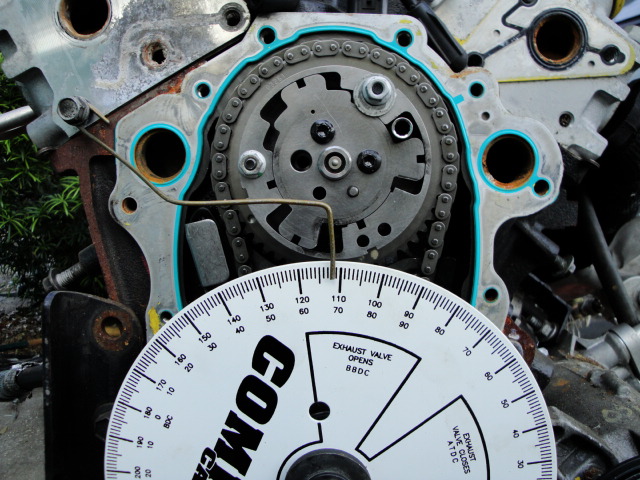
I started with the camshaft, my reground cam has an intake centerline of 112, using a backup cam phaser with its front spring loaded hub removed and a degree wheel, I found that my intake lobe centerline was being reached at 92 crank degrees instead of 112 indicating the valve was closing before maximum cylinder filling could occur. Once I figured out how thick I needed to make my spacer (aluminum tubing) I used drill bits inserted in the bolt holes of the module I would be using to prevent the spring loaded hub from unwinding as I removed the sprocket from the backside of it. So with the camshaft degreed in my horsepower and torque peaks should occur at a later rpm than just over 4000 rpm and be much higher in theory.
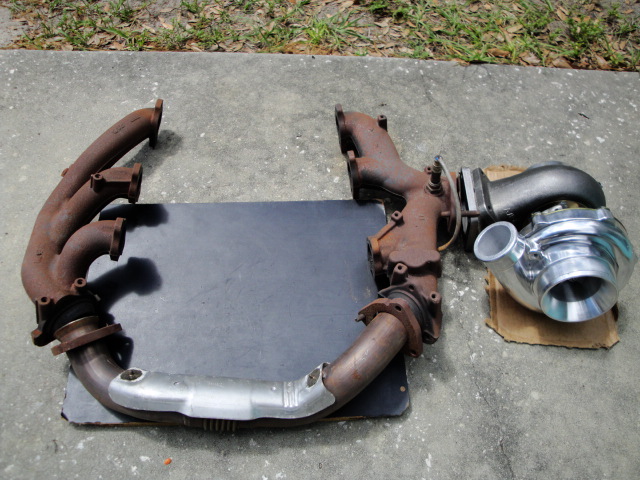
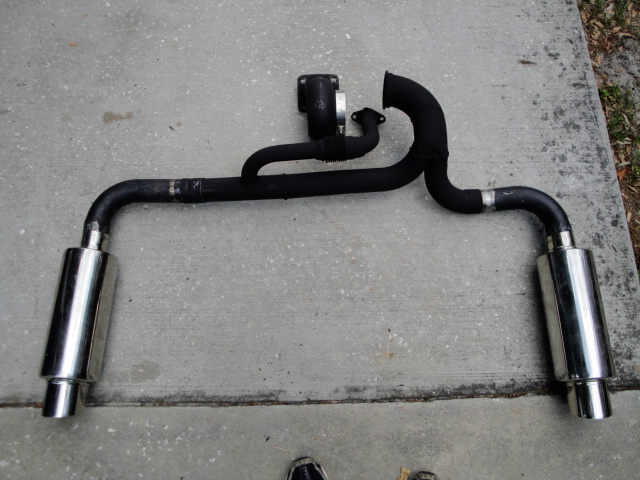
Next I addressed the twin madness. The T3s are out along with the headers in exhchange for what I believe is a much more dependable and exceptionally well designed factory exhaust manifold system, modified. 0 exhaust leaks ahead of the turbo should also improve appreciably on the net performance.
The exhaust is shorter over all 3" from the turbo split into 2.25" duals. I also incorporated a bellows for the wastegate this time as the previous arrangement left no room for variation in positioning. All of the manifolds are painted, wrapped and then heat shielded and the layered steel exhaust gaskets installed to insure no leaks occur.
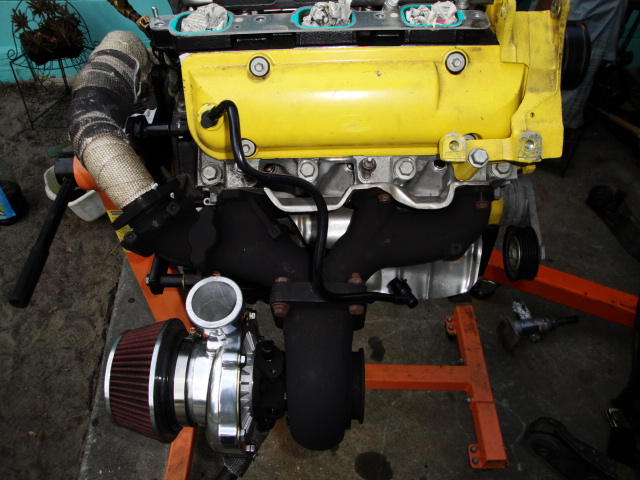
The end result will be a much cleaner and cooler engine bay with room where the O.E. air filter was installed to hold the electronic cruise and water meth system if I decide to install it.
I'm at a stopping point once again just before getting the car back to at least start and run condition but I discovered and fixed several problems in the process:
Leaking radiator, will be replaced with the HD aluminum. Seap at the coolant crossover pipe connected to the heads due to old gasket reuse without RTV sealant. Multiple exhaust leaks. Cam position has been corrected. Twin turbos removed and replaced with one T67.
I believe the above in addition to tuning will make a significant improvement above the posted baseline once everything is in order. The GTech test was performed on 88 octane and the timing under boost was conservative as a precautionary measure so I'm certain that there is a lot of power left in the setup on the current 7 psi. Hopefully I'll be able to put the changes to the test within the next month or two.
[This message has been edited by Joseph Upson (edited 11-11-2010).]
You have answered a question I had about the intercooler. I am debating an air/water vs air/air because my intake temps are hitting 100*C like yours and I have no alcohol injection. And my oil temps hit 250*F+ on anything over 70mph cruise. Glad to see some ideas.
You have answered a question I had about the intercooler. I am debating an air/water vs air/air because my intake temps are hitting 100*C like yours and I have no alcohol injection. And my oil temps hit 250*F+ on anything over 70mph cruise. Glad to see some ideas.
I was not able to completely enclose the pipes in the panels so I'm going to settle for silicone tubes straight back so there's no problem going over speed bumps or uneven roads given that the tubing will collapse momentarily if something presses against it. McMaster Carr has it reasonably priced as coolant hose for trucks in 12 foot sections or less. There's also a partial length slot on each side of the bottom of the car that can be seen in the picture with the tubes hanging down that they can fit into to reduce the profile for part of their length which is a good find since the car will be lowered after everything else is complete.
The intercooler may have taken more than 100 deg out of the intake charge, I never acquired any highway data so what I have posted was for a short run, there's also room for a larger intercooler. I have a water/meth injection kit but once the single turbo outfit is tested the results may indicate it isn't necessary. At just over 100 deg inlet temps it really isn't necessary now unless the temps start to climb considerably when boost is increased beyond 7psi.
[This message has been edited by Joseph Upson (edited 06-11-2010).]