When they painted it, it was facing "nose up". CaptnDean actually noticed it while he was here yesterday, that they did not paint the back lip, where it goes towards the hood. So, it has to go back to the paint shop in a week or so with the car to be another thing to touch up......
Well, in the mean time while the paint just sits there and cures, I decided to get to working on the new headliner. I got a new Fiero Store fiberglass headliner last year for Christmas. I Dremeled out the 3rd brake light area, and cut all the holes out for the sun visors. When I put it in the car, I put the right sun visor on with 2 finger tight screws to line things up. The left sun visor hole however is well over an inch off, and the headliner appears way to long on the left side. The way it is, there would be no way to put the "A" pillar back in place.... again, if it's not one thing it is another!
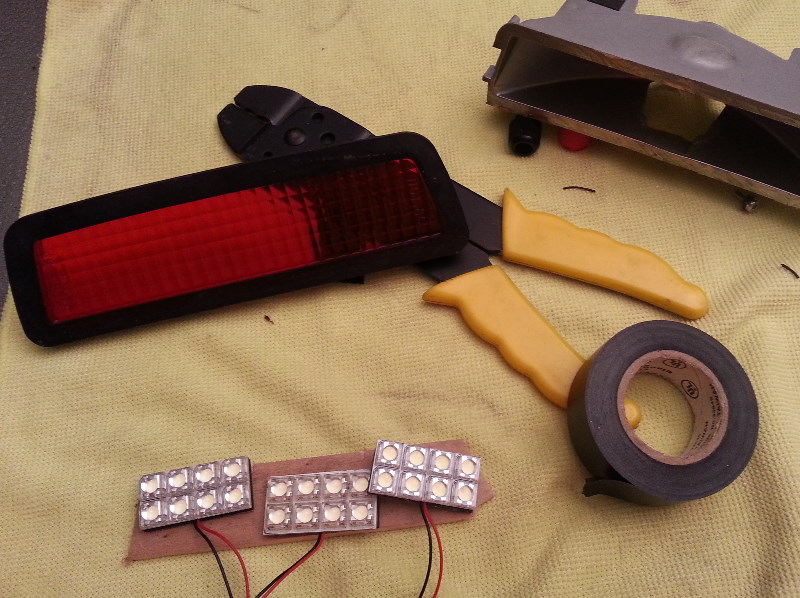
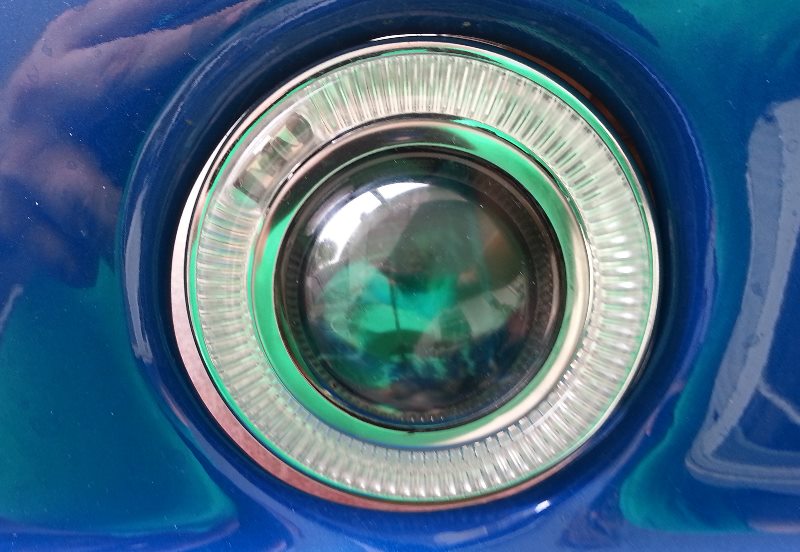
Anyways, well I contemplate how I am going to remedy this, I had taken the 3rd brake light out while messing with the headliner, and decided to convert it to LED tonight. Both the brake light housing from the car, and an extra one I had, are melted pretty bad from the heat of the bulb. I took the better of the two, and set out to convert it. I had some extra LED panels left over from re-doing my dome lights, and decided to put them to use. Be forewarned, It is far from professional job! It is rigged together, but gives the correct end results!
First, I needed something to attach the LED panels too, something to hold them in place. I looked around, and saw a paint stick, perfect! A little trimming later, and see how things line up: . .
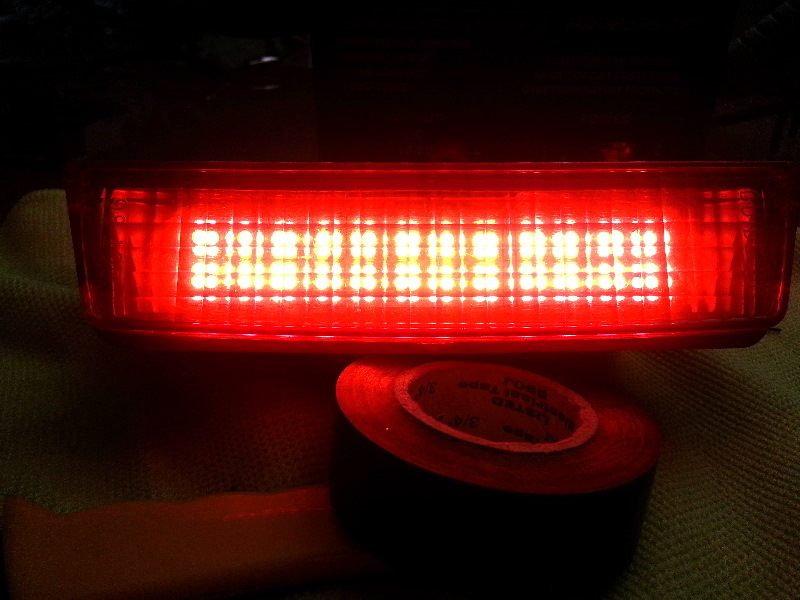
I cut the wood down to the correct size to fit in the 3rd brake light housing. I wanted the LED's back about a 1/4 inch from the lens, and not directly mounted to it. This allows for some light scattering, and fills the whole lens with light, and you do not see just individual LED's up against the lens. I then peeled the sticky backing off the LED panels, and stuck them to the paint stick: . . To make sure everything was secure, I ran a bead of hot glue around the edges of everything: . . The end result, nice BRIGHT brake light, and no more melting the housing from the heat of the bulb! It is much brighter that it looks in the picture, as my S3's camera reduced the shutter time to compensate for being pointed directly into bright lights! (The same work lights are still on in this photo, the same as the above photo's)
[This message has been edited by JohnWPB (edited 03-12-2013).]
Ok, here is something a bit different, and I actually have never heard of anyone doing this on their Fiero..... on any car for that matter!
I will pull into the gas station, and usually go inside to get a drink or something, and come back out to the car, have to unlock it, open the door, and pop that gas door. Not strenuous by any means, but a bit of an inconvenience at least.
The fix? An electric door lock solenoid, and an RFID receiver. I had my gas door and cable dissembled, as I just had the car painted, and wanted those painted separately. Today, I was at the junk yard, and saw an electric lock solenoid hanging off the rear hatch of a Ford Mini-Van. That got the wheels spinning, could I use that solenoid to open the gas door?
I got home and with a couple zip ties, a 12v power supply, I gave it a try as a proof of concept, and it worked! I then was thinking about putting a button in the dash, below the trunk popper button (I do not have a rear defogger). Then I started thinking, I would still have to open the car to press the button, that's not gonna work!....
Then I remembered I bought a cheap set of RFID receivers and key fobs a couple years ago, to use with my CarPC. I dragged one out, ran a few wires, and gave it a try, and again, it worked!
So, by simply holding my car keys within 6" or so of the RFID receiver, hidden behind the rear quarter panel, the gas door pops open like magic!
Now that I know it all works, I measured inside the car behind the "B" pillar, there is plenty of room for the RFID receiver and the solenoid to fit in there, nice, neat, and hidden! (I will hide a monofiliment line / string behind the B pillar as a manual release in case something electronic fails)
[This message has been edited by JohnWPB (edited 12-03-2012).]
Well, in the mean time while the paint just sits there and cures, I decided to get to working on the new headliner. I got a new Fiero Store fiberglass headliner last year for Christmas. I Dremeled out the 3rd brake light area, and cut all the holes out for the sun visors. When I put it in the car, I put the right sun visor on with 2 finger tight screws to line things up. The left sun visor hole however is well over an inch off, and the headliner appears way to long on the left side. The way it is, there would be no way to put the "A" pillar back in place.... again, if it's not one thing it is another!
These are a pain. I have installed more than one. They should line up better than that, but mine were only I'd say 1/4 inch off, but it was more trouble with the 3 little screw holes than getting the center hole of the visor to line up. If it lines up with the holes in the plastic liner it didnt line up with the holes in the metal roof. Good luck and take a break and come back if it gets aggervating.
Good advice 2.5, or I am sure I would have smashed it in a million pieces... on accident of course!
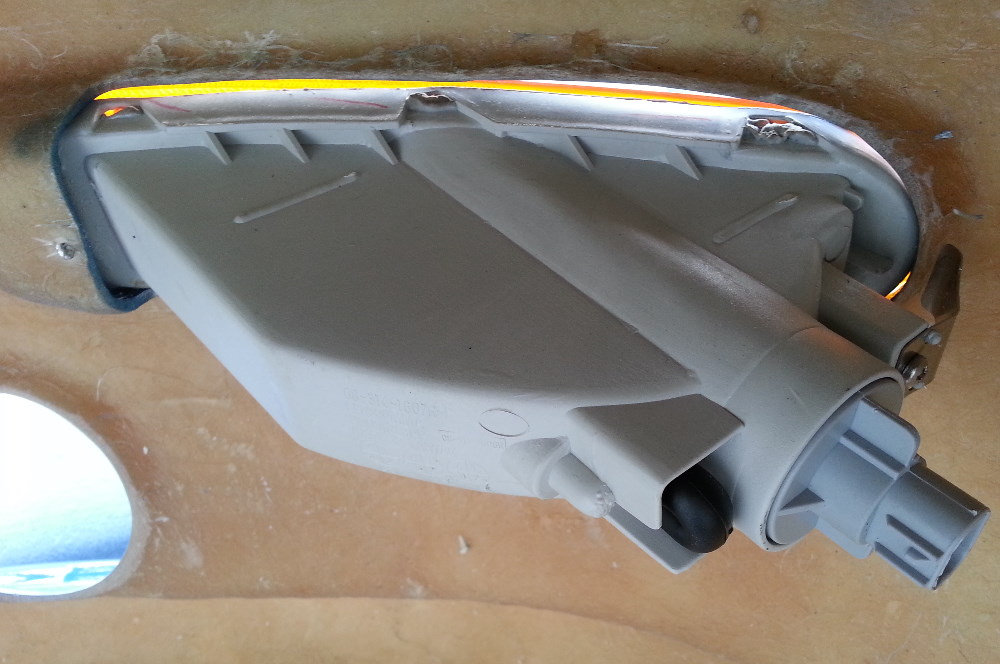
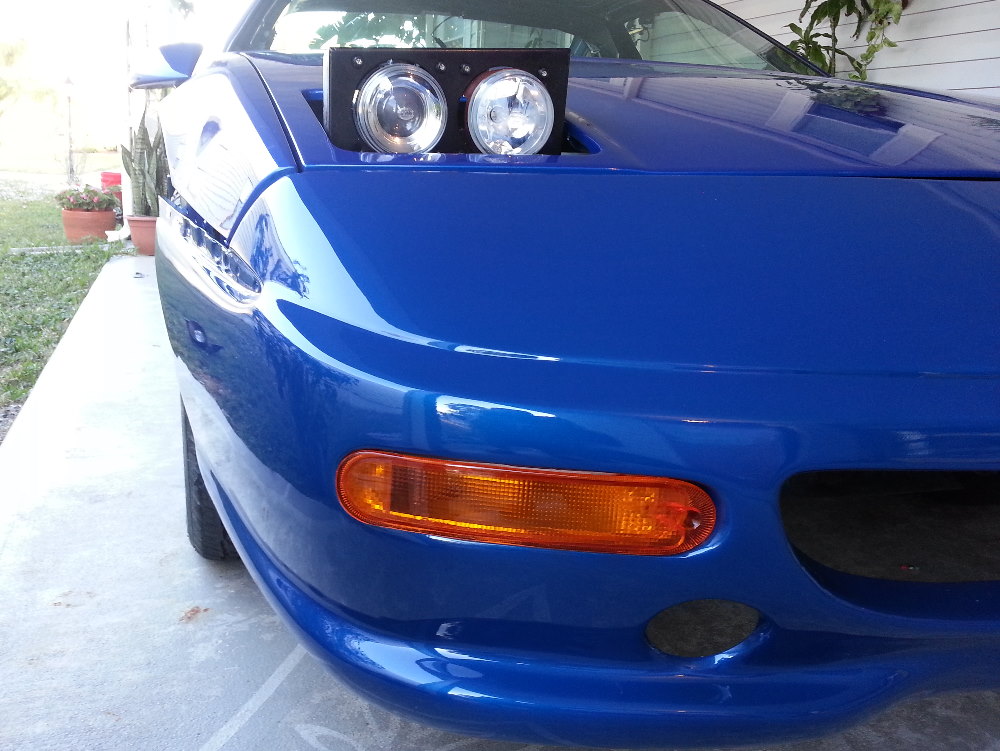
So, leaving the headliner on the back burner, I decided to go back outside the car, the front bumper specifically. I bought the F355i bumper, with a slot for the belt molding from JimmyS at Fiero Fiberglass.
The bumper is molded to fit the Chrysler Sebring front marker lights. I have seen a few posts, and talked to people how they epoxied or fiberglassed brackets inside the bumper for the lights to mount to. It was something that I kept putting off, as I know nothing about how to work with fiberglass. I decided to tackle it today, and get the measurements and an idea of what would be needed.
While I was fitting the lights, I noticed that they did not fit correctly into the bumper. The one end was being held out by the part of the hole that was not removed when they light holes were cut out. So, I grabbed the Dremmel and headed for the bumper. As I was moving the light around to see where it was hitting, I noticed it was the back of the light, with alignment pins and a screw that holds the lens on, that were preventing the light from sitting flush. Looking at the way it was designed, that alignment pin and stuff was to fit into the original Sebring bumper. I decided I sure didnt need it, and on a whim, I backed the screw out, and headed to the bench grinder to grind it down a bit, and then see if that helped. That did the trick! I could now fit the light into the opening nice and snug.
Here is one of the lights that has been ground down, and the other still untouched: . . . After that I was thinking about grinding down the screw, as it did not need to be so long, as I was not screwing it into a Sebring bracket. Then DING! Another though... (this could get dangerous if I keep this up)! I tightened the screw down, to where it was just the point sticking out of the back of the light, and put the light in the bumper where I wanted it. I then tightened and loosened the screw a half a turn, quite a few times to make a mark on the bumper, that I proceeded to drill a pilot hole for. . . .
After drilling the pilot hole, I lined the light back up, and tightened the screw through the fiberglass:
With that screw in the fiberglass, and the light all lined up, this was going to easy to fabricate a mount, as the light was held securely in place. It was then that I noticed the metal clip on the other end of the light. Backing out the Phillips screw, I could tell that this was high tension spring like steel, and after losening it up, I could see that I could probably guide it over the lip in the bumper. I gave it a try and tightened down the screw. As the screw tightened, it pulled in the steel tab tightly against the bumper. . . . Now, with the screw in one end, and the steel tab on the other end, I started to pull and push on the light.... it was in there really solid, and not going anywhere! . . . So rinse and repeat (I did the other side the same way ) The lights are now all installed in the bumper, I'll remove the lights in a few weeks after the paint has fully cured, so I can tape up the bumper, and spray the inside of the bumper with bed liner. This way when I get the grill in, you do not see raw fiberglass through it. I also still need to find a nice set of 4" fog lights that I like to fill up the other 2 holes . . . Here it is with the bumper carefully just resting on the car.
[This message has been edited by JohnWPB (edited 12-03-2012).]
Good advice 2.5, or I am sure I would have smashed it in a million pieces... on accident of course!
The bumper is gonna look great
Another tip on the visors, make sure they are the right direction. I once got one in and was so happy, only to find out it now would not swing over to the side window....
Today I decided to tackle the sunroof track installation. I bought new tracks from the Fiero Store a couple years back. When I went to install the front rail, the studs attached to the track did not line up. I could get one end in, and the other was about a quarter inch off. I finagled around, and eventually made the hole just a bit larger, and was able to get both studs through the roof.
I did not want ANY leaks, so I sealed up every hole with sealent. Even the ones that I had to pass bolts through This way there was a nice leal around every hole and bold, hopefully making everything water tight.
The first bit of sealent layed down... queezing this stuff onto a new paint job just felt so very wrong! . . . Laying down more goop as I progress around installing each section of track: . . .
Here are all of the tracks finally installed: . . . Here is the Fiero Store sun roof gasket installed into the new tracks: . . . It seems to all fit very nicely! Here is a fairly close up of the left hand side: . . . Finally, a pic from above, showing the sunroof in and completed with the new tracks and gasket: (Yes, I am missing one screw for the latch, I will be getting that from CaptnDean when they are done painting his storage unit ) . . . Hmmm now what to tackle next!
Well. I decided to work on getting fog lights into the front bumper today. Fiero Warehouse states that they are set up for 4" fog lights. I started searching the web, and one of the ones that came up, believe it or not, was a pair at Wal~Mart for $15:
I probably will never ever use the fog lights, as I think I have seen fog here in South Florida maybe once I really just need something to fill in the holes, and look nice These are made with an ABS plastic housing but have glass lenses, that pretty much match the look of my 90mm headlights. I am not worried about the cheap mounting brackets, as they come off easily with 2 screw, and I can fabricate something that will attach on the inside of the bumper correctly.
The package says that they are 3 1/2 inches, so I figured that would be perfect, a 1/4 inch to spare all the way around to put a gasket or something. I ran up to the local Wally and picked up a pair. When I got home, I held one behind the bumper, and to my surprise, they are quite a bit too big. Looking closer at the bumper, I would not want to make the hole any larger, as then it would almost remove the raised lip that surrounds the hole. Now I am left to try to figure out what to do.... gotta think on it a bit.
[This message has been edited by JohnWPB (edited 12-07-2012).]
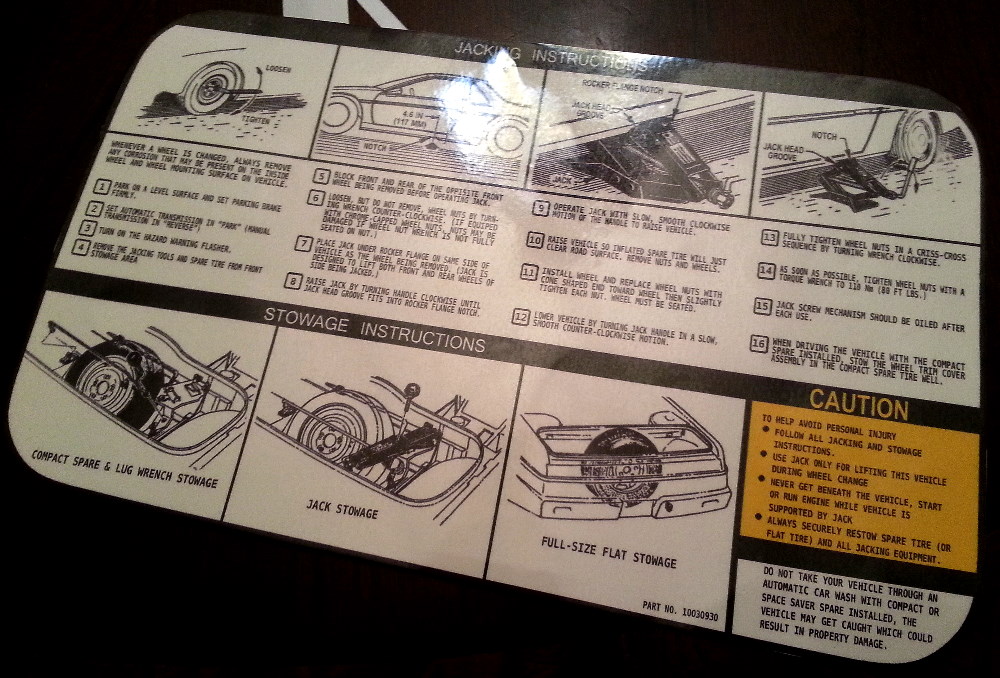
Well, on to some stuff I can do indoors Being I have painted just about everything on the car, as well as under the decklid and hood, new stickers were in order. I have spent countless hours, I honestly do not want to know how many!) re-creating just about every sticker for the car. From jacking instructions, Coolant filling procedures, Emission stickers, fan warning and on and on.
Here are a couple printed out on a vinyl that is made for ink jet printers, that has a peel off backing. I then covered that in a transparent laminate. This gives the stickers a nice gloss over them, much like the factory stickers.
Here is one that goes under the decklid:
. . . And here is one that goes under the front hood:
I am most certainly not keeping the car "true to stock", but I think replacing the stickers will give it a bit of an extra touch.
Oh, I almost forgot, CaptnDean called me, and we are going to head to the junk yard and browse around. We keep looking for Fiero's, but we never find one. Anyways, he has an idea for some fog lights, available in the junkyard. He says they are a better option for the ones that I mentioned in the previous post. Better quality & cheaper, that's fine by me!
[This message has been edited by JohnWPB (edited 12-08-2012).]
Well, went to the junk yard, no luck finding anything to fit the holes in the bumper for fog lights. I am actively searching for a solution. If anyone has installed any brand or type of foglights in the JimmyS 355i bumper, I would be more than open to a suggestion or two
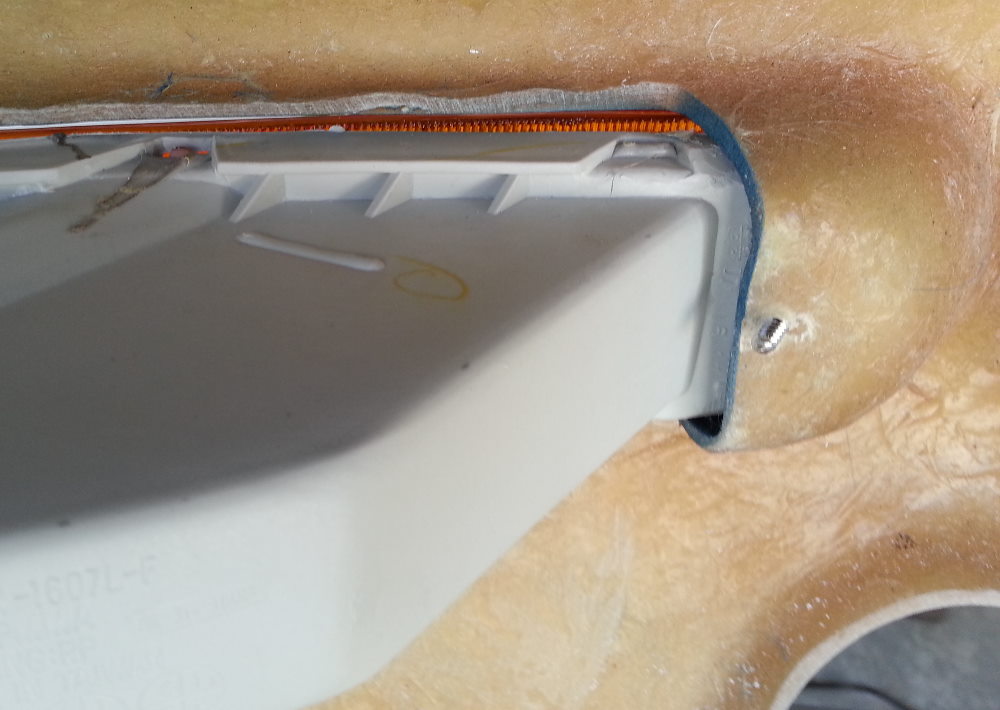
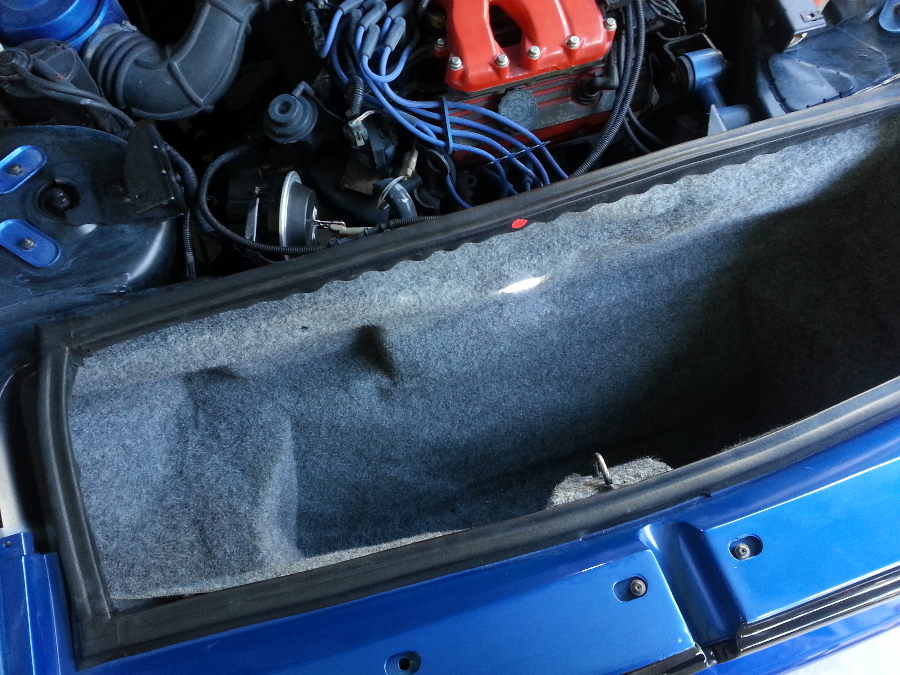
I continued the LED conversion this afternoon. I placed one of the same LED lights that I posted a few posts back for the trunk light. It seems to be much brighter, and is a nice "whiter" light: . . .
Here is a photo of it installed. You can also see the nice new InfinateWill trunk seal. Everything is still very dusty and dirty, and will be till they do the final touchup's on the paint.
I got a few more of the stickers reproduced. I am almost done with them. The next step is figuring the best way to produce them, and have them just like the factory ones. My ink jet printer will not work. I can get a nice vinyl made for Ink Jets, but the ink is far from waterproof!
.
[This message has been edited by JohnWPB (edited 09-08-2013).]
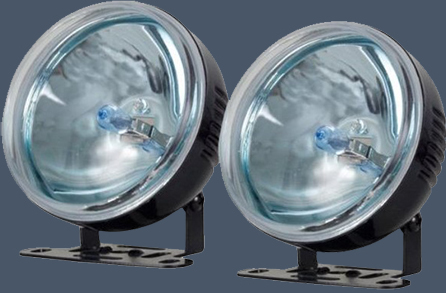
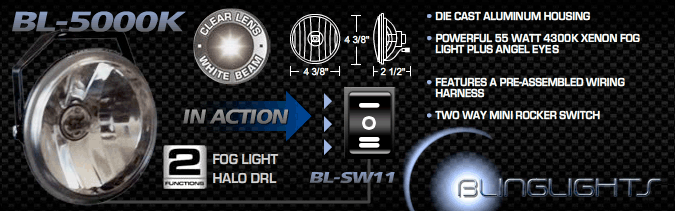
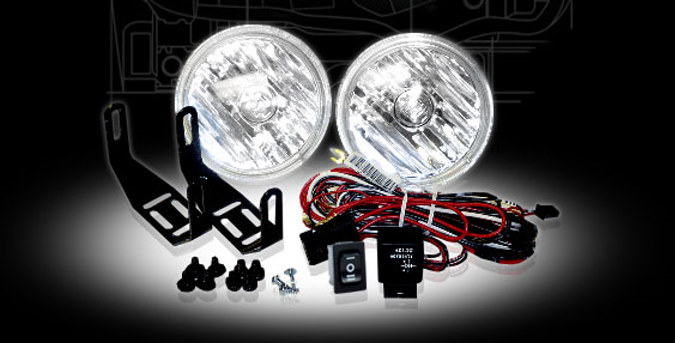
Well, I just purchased a set of fog lights on eBay. They have aluminum housing, and glass lenses. They also have a halo ring, that can be used for daytime running lights. There are very few options when searching for a 3" fog light!
They are listed all over the place for around $70. With a Google product search, I was able to find a set for $35. I should get them in a week or so, and hopefully they will fit, and I can check this off the very large list of things to do!
[This message has been edited by JohnWPB (edited 12-10-2012).]
According to that pick you posted it shows a drawing of the lights dimensioned at 4-3/8" O.D.. If the holes are 4", isn't that going to be to big?
Funny thing is, when I purchased the bumper, everyone mentioned that they were designed for a 4" fog light. In fact, the hole is only 3" in size. They can not be made larger, as the lip around the edge would then be cut, leaving a perfectly flat area where the hole is.
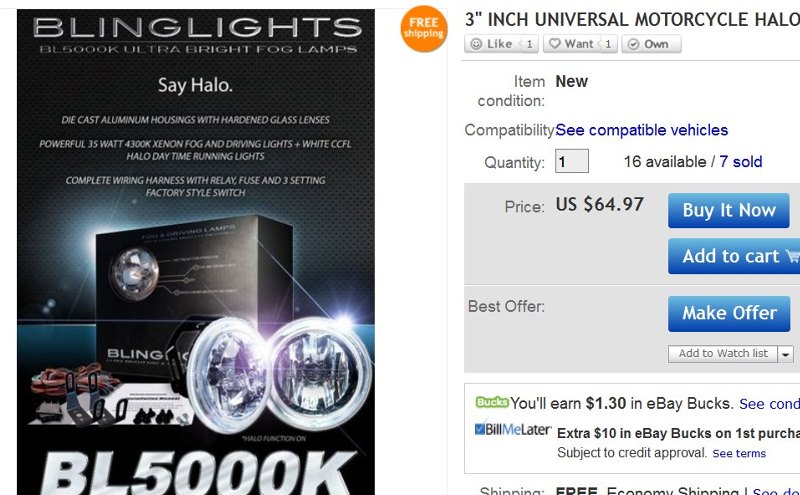
Anyhow, You are indeed 100% correct! WTF?!?!??! I searched all over the place, and settled on the "BL5000k" that ARE 3" in diameter. I did a search for that model number, and found them, and purchased them. I did not take the time to read everything completely, so it is indeed my mistake. On the other hand, who makes different products with the same exact model number? Argh!
Here is the original one I found, 3" and same model number:
Well anyways......I sent a note to the seller to see if we can work something out before I pay for them. I told him if not, I will stand by the commitment and buy them. Hopefully he offers me an out...... If not, look for them in the mall soon! LOL
[This message has been edited by JohnWPB (edited 12-10-2012).]
Well that actually went smoothly! The seller totally understood that I made a mistake, and opened a ticket on eBay to cancel the purchase. I followed the link, and all is canceled. I dropped him $5 in PayPal just as a thank you.
quote
Item: NEW FOG & DRIVING LIGHTS HALO ANGEL EYES XENON H3-55W WHITE HALOGEN BL5000K SET ( 110853529642) View purchased item - opens in a new window or tab Transaction end: Dec-09-2012 Seller: Seller name: supportmyeconomy
Case type: Cancel transaction Case status: Closed. You agreed to seller's request to cancel the transaction.
Thank you for responding to supportmyeconomy. This case is now closed. You are no longer obligated to purchase this item.
with the literally hundreds of things I have bought and sold on eBay, This was my first cancellation. It was almost too easy LOL
Now to order the same model number, color and style, just in 3" size instead of 4 3/8"! ! !
Can I install one of those handy RFID readers behind the molding next to my lock cylinder on my door to unlock the doors when it gets close enough? That would be Pretty cool!
Can I install one of those handy RFID readers behind the molding next to my lock cylinder on my door to unlock the doors when it gets close enough? That would be Pretty cool!
There is a guy in the Minnesota club who has RFID door locks, wish I could rememeber who. It also enables push button start.
Not much to report lately...... I have yet to get the car back to the paint shop. I was supposed to take it back the week before Christmas, and was just too much going on. Then after Christmas, the New Year's day long weekend, followed by my birthday and every other delay and procrastination I can think of LOL
Anyhow, just ordered new brake lines for both sides on the rear. I can pick em up tomorrow morning. Once those are replaced, it will have had just about everything to the back axles that can be. New Hubs & bearings, new calipers & pads, and new brake lines.
Since replacing the engine, I have a few vacuum leaks that I need to fix. I have to pull out the book and see what all goes where. I can hear one leak, sounds like it is around the distributor somewhere. There are a couple more on the Cruise Control, and the metal lines that run behind it along the trunk wall.
Even though the back right brake is disconnected and plugged up, I took it for a drive through my neighborhood just around the block today just to stretch it's legs so to speak. Man it drives nice! I am so hoping to have it in shape enough to drive up to Daytona.
It's not looking like I will be making it to Daytona There is just too much to do in a very little time. I am 99% that next year WILL be the year I get the car to Daytona.
I just replaced both rear hubs bearings and calipers with all new parts. (Well... my friend / mechanic did at least )
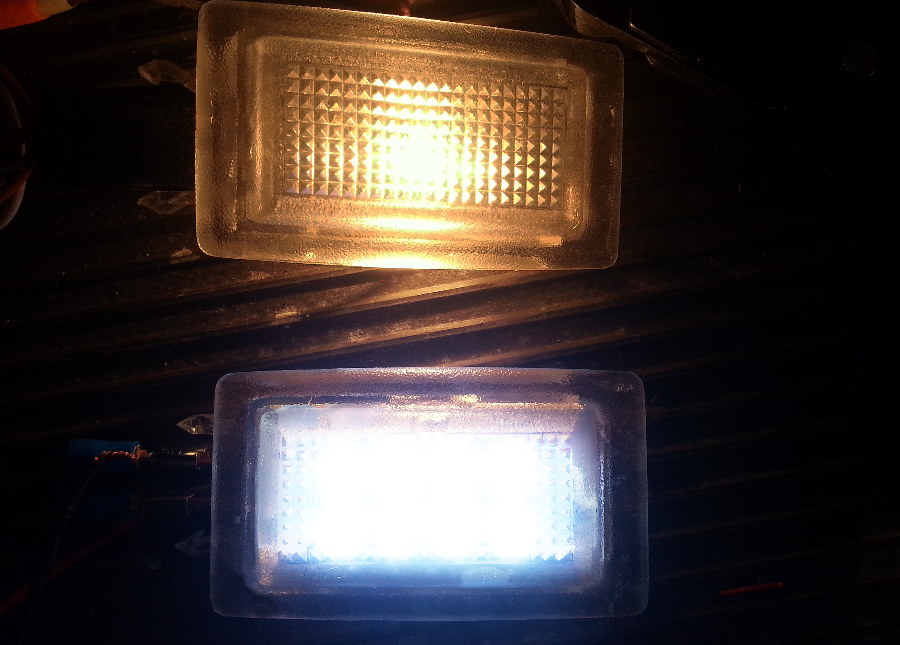
It seems like I have been putting LED's in everything lately, dome lights, floor lights, side markers, trunk (front and rear), 3rd brake light ect... Well one spot I overlooked until now, the license plate lights. What a difference the pure white light makes in brightness and how clean it looks without the dingy yellow look
I got the new fog lights in the mail yesterday. I will tackle installing them on the front bumper this weekend. Then I just need to fins a Mini Cooper in the junk yard that I can scavenge the mesh from for my 355i bumper.
The car finally goes back to the paint shop tomorrow to fix a couple things they screwed up. I will be SOOOOooo happy when the paint is done, and cured so I can start putting it back together! All new belt molding and markers, sail windows, emblems ect. Then I can also tackle the painting of the wheel wells, brake parts and such. No sense in doing it now with it going back to the paint booth and getting more over spray everywhere!
Not a lot going on... Been tinkering with the instrument cluster and gauges. As shown back a couple pages ago, I re-did the gauge needles in blue. Well the stock lights in back of the gauges are not near bright as I want them to be to light up the needles. I am going to have to add in some LED's. Little stuff....
On an unrelated side note, I see all the time people apologizing in many different threads... something like "Sorry for the crappy cell phone pictures". Well here is a neat bit of info I just realized.
Anyone who knows me from Frazee, Georgia, North Texas Fiero Club, or locally, know I am a bit of a shutter bug (Ok, so that's an understatement! ) I have a fairly decent Digital SLR camera and lenses ect. However, going over the past 2 pages of this thread, I realized something. I have not taken a single picture with my camera setup on the last 2 pages of this thread!
Every single picture, (Pictures I have taken, not product images and such) as well as the video of the gas door were all taken with my Galaxy S3! I have to say, I am highly impressed how far cell phone camera's have come in the past few years. Like I said, nothing special, just a neat bit of information.....
Love these build thread when they're so detailed, informative and innovative! +s for you and DIY Stu!!
~M
------------------ ~Michael '85 GT 4sp white - SOLD | | '85 2M6 Auto red - SOLD | | '84 2M4 bare chassis - SOLD Crap, I'm out of Fieros! Time to buy another!! - "Your mileage may vary." WTB: Formula 5sp
Still not to much going on with the car, as other things are taking priority lately. However, thanks to CaptnDean, I do have a nice set of reflectors for the rear bumper now. They are not NOS, but you can not tell by looking at them that they are not new! Little things.... tons and tons of little things it seems
It seems like I have been putting LED's in everything lately, dome lights, floor lights, side markers, trunk (front and rear), 3rd brake light ect... Well one spot I overlooked until now, the license plate lights. What a difference the pure white light makes in brightness and how clean it looks without the dingy yellow look
Did you put LEDs in your tail lights and Pontiac letter lights?
Originally posted by 2.5: Did you put LEDs in your tail lights and Pontiac letter lights?
No, that is just about the only thing I did not convert to LED. I did change the bulbs for the PONTIAC lights though. A client was replacing some under cabinet kitchen lighting. They looked like they would have had a florescent light in them till I opened them up. Instead they had 4 12v bulbs in them. The same socket as the ones for the PONTIAC lights. I plugged one in to test it, and it was at least twice as bright as the stock bulbs. I have no idea the bulb numbers or anything, just that they are made for low voltage under cabinet lighting.
I decided to get the fog lights installed in the bumper today.. Guess what... as usual, another problem LOL. When I got the bumper up on the table to work on it, I held one of the fog lights in place from behind, and the holes in the bumper are no where near being round. The light clears with about 1/2 inch left on the sides, but it does not fit from top to bottom.
I am at a bit of a loss, as there is no way I can cut the hole 1/2" larger. There is a lip that curves inward from the front. If I were to cut 1/2", I would loose the lip, and basically have a flat surface with a hole in it. Another obstacle to overcome.... gonna have to think on this one for a bit!
So you need to somehow get the hole more perfectly round? Is it just flexed or not cut round? If it is a flex thing could you brace it from behind somehow, build a sort of frame on the backside that flexes it back to correct?
So you need to somehow get the hole more perfectly round? Is it just flexed or not cut round? If it is a flex thing could you brace it from behind somehow, build a sort of frame on the backside that flexes it back to correct?
It's definitely not flexed, as it is thick fiberglass. The problem is to make the hole round, I would have to cut material from the top or bottom of the hole, thus removing the lip that curves inward. Then if I can do that sucessfully, there will still be a gap on the left and right, because, as of now, it is already wider than the light before cutting anything.


 But overall it looks really good!