Unofficial update. The motor is in and headed to GA for the Run this weekend.
------------------
**************************************** 88 Formula CJB Arrived Finally. #689 of 1252 Time to start Working TONY! There are Two kinds of Fiero's : Notchies and Donors!
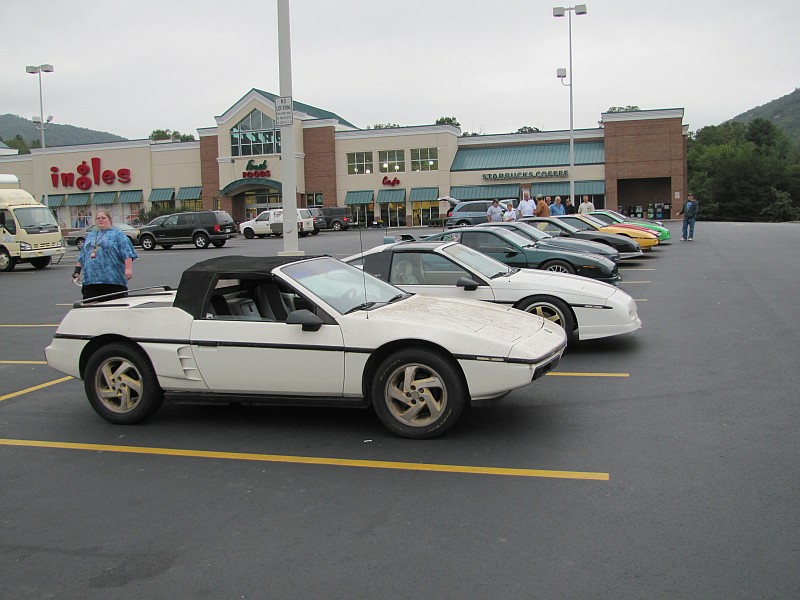
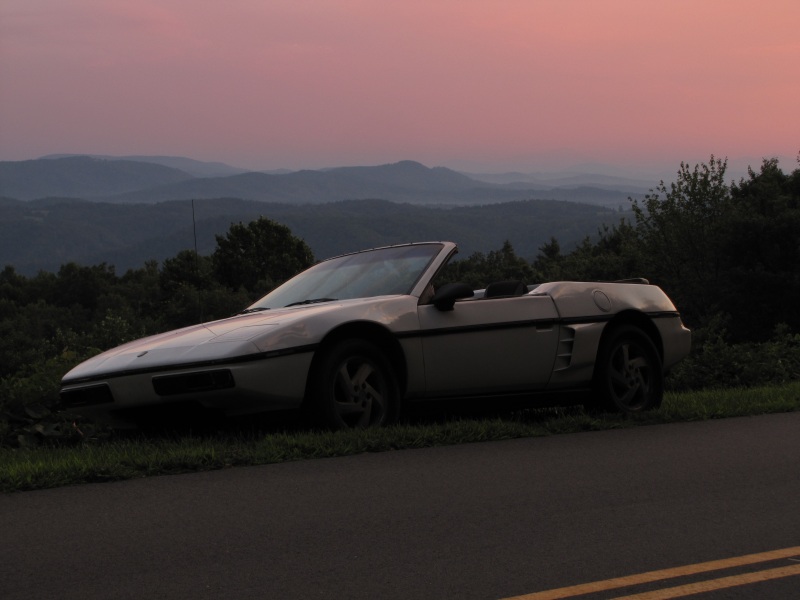
I have been a little lax on the pics and updates...but Kento was right...we made it to Run For The Hills.
Thursday morning, the engine was on the cradle on the floor of the garage. We crammed it in the car, and first problem came while filling the coolant...we had a leak in the thermostat housing gasket. New gasket, and a shitload of permatex, and we were ready to try again. Second problem were two other hoses that we didn't get tightened well enough...no big deal. We got everything in, tried to fire it up, and we got nothing but cranking. Had to be either spark or fuel. First thought was "Oh **** ...which ground didn't I clean up enough." Pulled the air cleaner cover, tried to crank it, and found nothing coming from the injector. Cracked the line open, had plenty of pressure. Multimeter on the injector plug confirmed power to the injector and signal to the injector. So...we tore open the injector and replaced it (nice to have parts cars sitting around). With a new injector, it fired right up, and has run perfectly ever since. So...technically we had it fired up Thursday night, but didn't get a chance to drive it.
Friday morning, we got up early...burped the coolant, and headed in to get new rear tires. It passed inspection while we were there. From there, we headed home to pack some clothes, and headed to Georgia. The car ran perfectly the entire weekend other than three issues that popped up. First, the kickdown cable wasn't adjusted properly...but I suppose that is expected after a project like this. Second, the brake dust shields were scraping on the rotors. I ran the entire run like this thinking I had a wheel bearing going out...kinda embarrassed to know it was something so simple. Third, one of the guys on the run that was following me said it was running rich...I need to check that out, gas mileage confirms it (only pulled 25mpg on the highway). Overall, I am real happy with it.
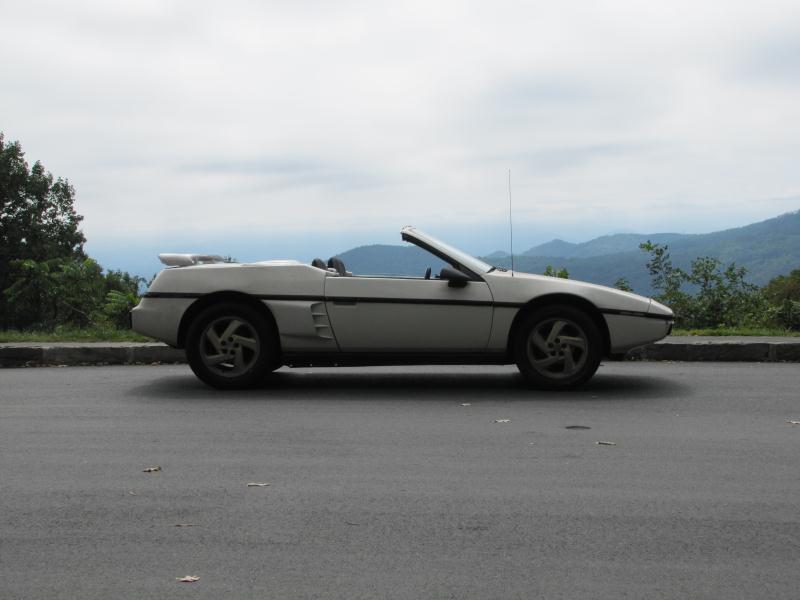
This pic was taken at the run after we already had close to 300 miles on it. Forgive the dust.
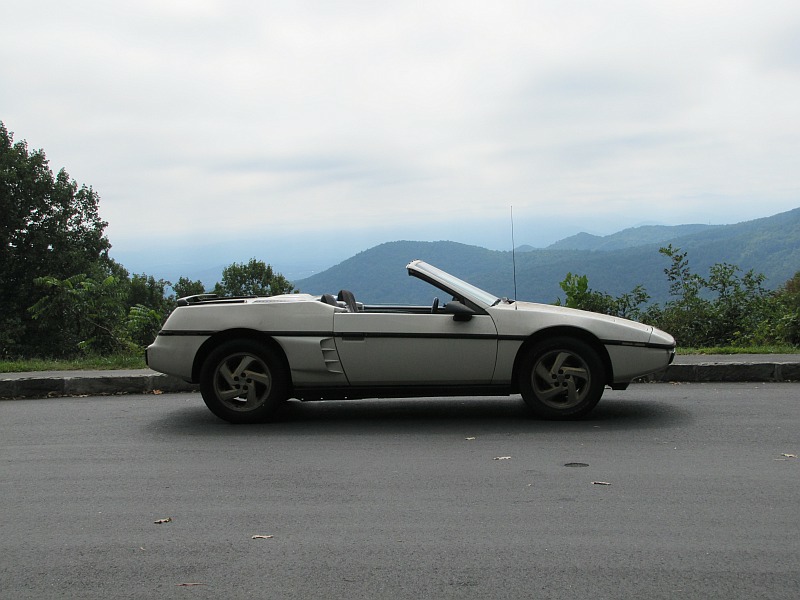
Although the automoda conversion looks better with the top up...I think this looks better with the top down. And...since we only use the top for emergency use, I think the top down looks are more important.
[This message has been edited by CowsPatoot (edited 09-21-2011).]
Originally posted by CowsPatoot: I think the top down looks are more important.
Agreed! I really like the hard body look at the tops of the b-pillars and the absence of the bulky top just laying on topside of the car.
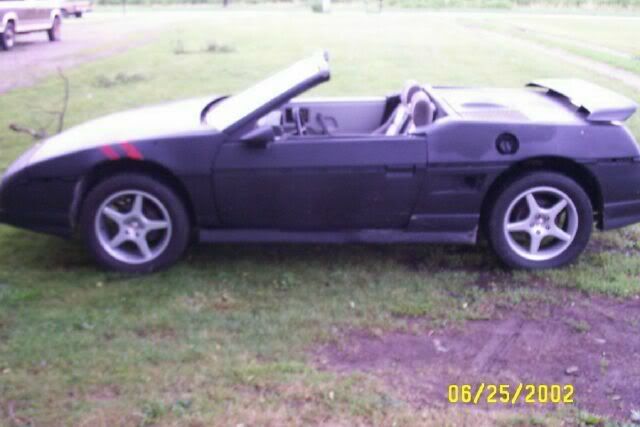
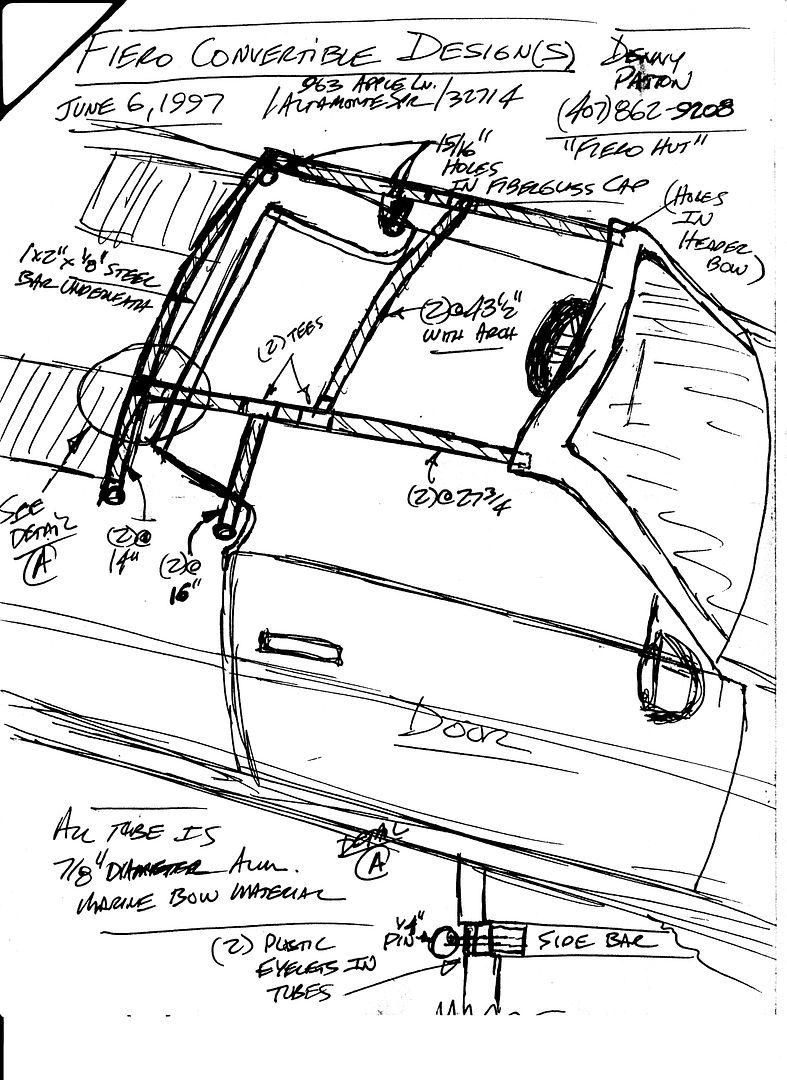
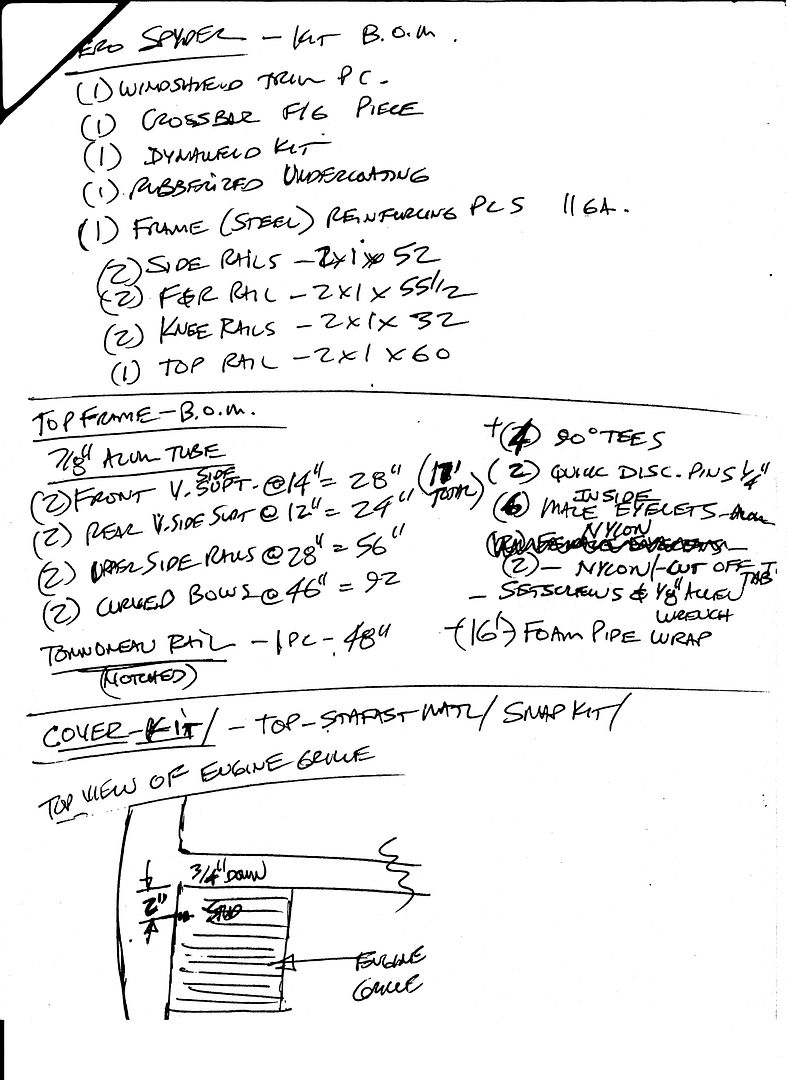
I think that convertible used the same b-pillar cap panel I used for my Roadster back in 2001. It came with the instructions/diagrams to make a top from canvas and PCV tubing that would fold up and could be stored in the trunk. Here is my old Roadster:
[This message has been edited by fieroguru (edited 09-22-2011).]
Those are definitely the same caps. Any idea where they came from? Don't happen to still have a copy of those instructions do you (they are probably the same ones followed for the top we have, but we are open to improvements)?
Finally got it washed tonight...only to find out the windshield wipers don't work again. Grrrr. Glad they didn't check them when they did the inspection. Could be just a fuse...
On a side note...I have Fierfly convinced to let me put the wing on it...but we are still discussing the bumpers. She says it should stay a bumperpad....I think we should convert it to the aero package and paint it all white (other than the beltline trim). What do you think? I don't expect any other body mods to happen to this.
Those are definitely the same caps. Any idea where they came from? Don't happen to still have a copy of those instructions do you (they are probably the same ones followed for the top we have, but we are open to improvements)?
Finally got it washed tonight...only to find out the windshield wipers don't work again. Grrrr. Glad they didn't check them when they did the inspection. Could be just a fuse...
I got my cap from Denny Paton/Penton in FL... supposedly it was the last one. He sold his molds to Twin Lakes Fieros, but I do not know if the b-pillar cap was part of that purchase or, if it was, what happened to them when they shut down. I will check in an old fiero binder I have to see if I filed the instructions for the top.
On a side note...I have Fierfly convinced to let me put the wing on it...but we are still discussing the bumpers. She says it should stay a bumperpad....I think we should convert it to the aero package and paint it all white (other than the beltline trim). What do you think? I don't expect any other body mods to happen to this.
I am not convinced.
As far as the top goes, I would like to add some fabric deltas to the back to make it look less boxy.
Also.... Does anyone have any idea what the little toggle switch is on the center console,about where the passenger power window switch would be? If anyone knows the history of this car, maybe they remember? Otherwise we will eventually find out by following wiring.
------------------ A good man is hard to find...but a good Fiero mechanic is "rare".
I got my cap from Denny Paton/Penton in FL... supposedly it was the last one. He sold his molds to Twin Lakes Fieros, but I do not know if the b-pillar cap was part of that purchase or, if it was, what happened to them when they shut down. I will check in an old fiero binder I have to see if I filed the instructions for the top.
Don't happen to still have a copy of those instructions do you?
quote
Originally posted by Fierofreak00: I pm'd you the same question.... -Jason
I just checked my old binder and it didn't have the instructions in it... if they were not in there, they probably went in the trash during one of my last 2 moves.
[This message has been edited by fieroguru (edited 09-23-2011).]
Originally posted by fieroguru: I just checked my old binder and it didn't have the instructions in it... if they were not in there, they probably went in the trash during one of my last 2 moves.
Well...we went almost 1000 miles trouble free. OK, more accurately would be "we went almost 1000 miles without a problem stopping us". That running rich thing suddenly reared it's ugly head. Started last night as we came into town as a little bit of a stumble while we were at a stoplight....then by the time we got back to the house, it wouldn't idle at all. Check engine light never came on. Went out to troubleshoot today and immediately found a code 45...and as soon as the car warmed up, it threw a check engine light. Found this thread: https://www.fiero.nl/forum/F...HTML/118614.html#p10 and thought about the trouble I had sealing the thing after replacing that fuel injector. Turned the key on, pulled the air cleaner cover, and....drip...drip...drip...drip. Yeah, I think we found the issue.
On a side note...I have a real good argument for engine swaps. I'm getting real tired of having to special order every part for this car. It's a friggin O-ring!!! And it will take you 3 days to get it here?!?!
Well...we went almost 1000 miles trouble free. OK, more accurately would be "we went almost 1000 miles without a problem stopping us". That running rich thing suddenly reared it's ugly head. and....drip...drip...drip...drip. Yeah, I think we found the issue. !
Just throw on a Turbo to make up the difference, Match the Air to the Fuel leak
------------------
**************************************** 88 Formula CJB Arrived Finally. #689 of 1252 Time to start Working TONY! There are Two kinds of Fiero's : Notchies and Donors!
The fuel injector O-rings for the duke have got to be the hardest O-rings in the world to find. After a bout of the wrong ones being ordered for me, and a failure in trying to match them up to anything else available....I finally ordered a throttle body rebuild kit from AutoZone for $35. I am not sure what makes me more desperate here....paying $35 for a set of O-rings, or going to AutoZone to get them.
Regardless...She is running REALLLY smooth now. I cannot help but compare myself to The Great Zohan - "I make you silky smooth." This thing is running so smooth now that it is a bit disconcerting. A Fiero is not supposed to be this smooth...something has to be wrong.
But...the convertible is running perfectly...it is 75 degrees and sunny out...and the roads here are so twisty that the nearest passing zone is 3 miles away...forcing me to quote another famous movie character...Ferris Bueller - "It is so choice. If you have the means, I highly recommend picking one up."
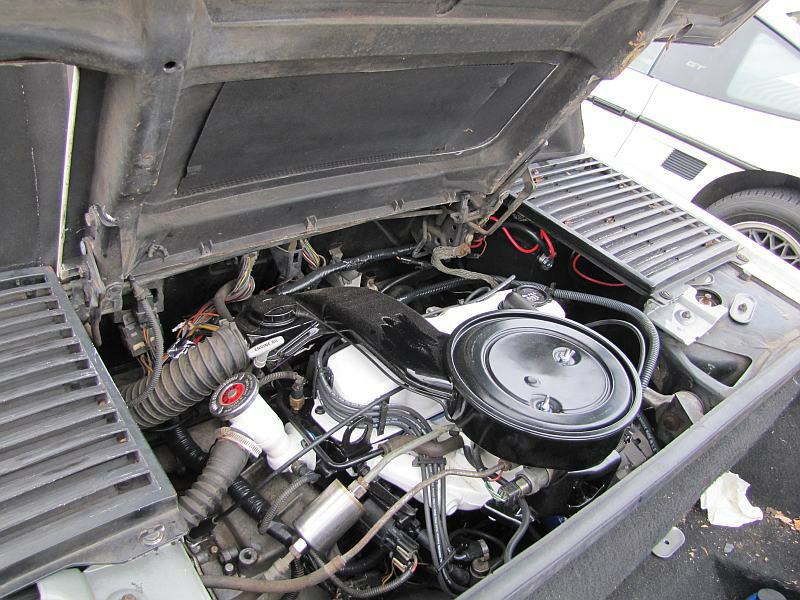
Cows can ya post a few more pics of the motor? Great looking motor. Be good for reference. Your motor and ours looks slightly different. Guessing the changes from 84 to 87.Fuel lines to TB are on other side?
Great looking drop top. Looks sweet off! Did you have to re-enforce?
Originally posted by weloveour86se: Cows can ya post a few more pics of the motor? Great looking motor. Be good for reference. Your motor and ours looks slightly different. Guessing the changes from 84 to 87.Fuel lines to TB are on other side?
Unfortunately, I don't have a lot of pics other than what I have posted here, in your thread, or sent in a PM to you. By the time we were putting it back together, we were in such a rush that we didn't think about pics until it was time to quit for the day, and it was always dark by them. Besides, with the differences you mentioned (yes, it is the differences between an 84 and an 87), it wouldn't be a lot of help as reference. I admit, I had an advantage. I had another complete cradle dropout from another 84/duke/auto sitting untouched in the garage to use as a reference...but I didn't use it much, mainly because it was only a few days between teardown and rebuild. I did steal a lot of bolts off it when I was trying to get matching sets.
There are two parts of the rebuild....putting the engine back on the cradle, and putting the cradle back in the car. Putting the cradle back in the car was pretty straightforward...kinda hard to miss anything. Only issue we had was that some friends had helped pulling it, and loosened both ends of a couple of the coolant hoses...when we put it back together, we assumed they had only loosened the end they pulled off. Oops, simple fix, little bit of coolant on the ground. I do admit to looking up a vacuum diagram though...I didn't bother labeling it when I pulled the vacuum lines apart because I didn't trust how any were run to begin with.
Now...to prepare for putting the engine back on the cradle. When pulling it apart, first, you de-wire it. The wiring is pretty straightforward...with one exception, there is only one place each plug will go....and finding that is simple because it is the place the wire will reach to. That exception (for the 84 at least) is the MAP and TPS plugs...they are both 3 wire weatherpack connectors in the same spot on the harness. I had to verify by wiring diagram which one was which (I had drawn up a wiring diagram because an 84 wiring diagram is impossible to find....still need to clean it up and publish it). Once the wires are off, you can pull it off the cradle/tranny and put it on the engine stand. From there...for each bracket, take a pic before you remove it, bag the bolts for it, and label the bag. A key point is anywhere you have two brackets held on by the same bolt...photograph the connection so you can remember which one goes on top. I will also note that had Fierfly not been helping, none of my bolts would have been bagged or labeled. I have a bad habit of setting them aside thinking "I will bag and label them in a minute", and by the time I get to it I can't remember what was for where.
Fierfly did a vast majority of the cleaning. I can't count how many times she asked me "How clean does this have to be?" I had a couple standard answers..."We are painting it" (meaning it needs to be perfectly clean and de-greased)..."I am sandblasting it" (meaning it needs to be clean enough to not pollute my blasting sand)..."People will see it" (meaning it is you car, how clean do you want it?)...and "Nobody will know" (meaning I don't want to get my hands dirty putting this thing back together). She used a wire brush, a nylon brush, a toothbrush, and lots of Purple Power to clean. I used a sandblaster and a wire brush dremel bit on an 1/8" die grinder for my cleaning (you know....men and their power tools). For the record....every bolt on that engine was hit with the wire brush on the die grinder, then painted, then put in very carefully to not scratch it. There are a couple nuts on studs that I chipped the paint on. I did use a torque wrench on everything I could find specs for.
quote
Originally posted by weloveour86se: Great looking drop top. Looks sweet off! Did you have to re-enforce?
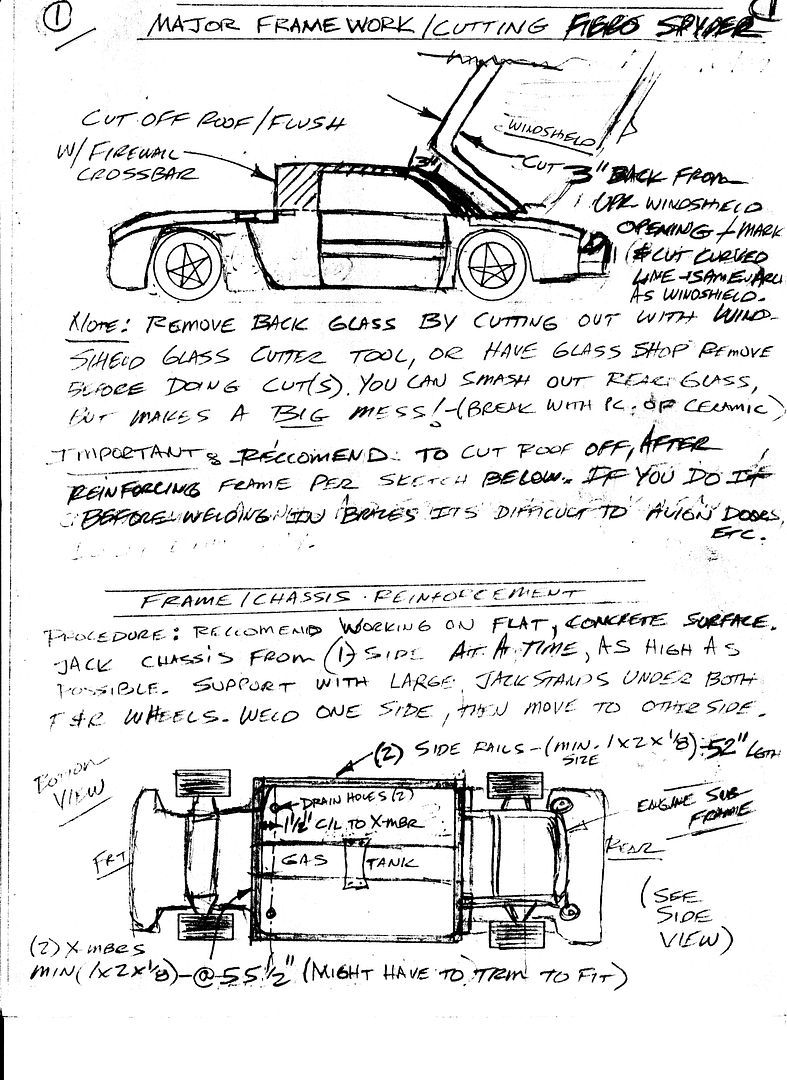
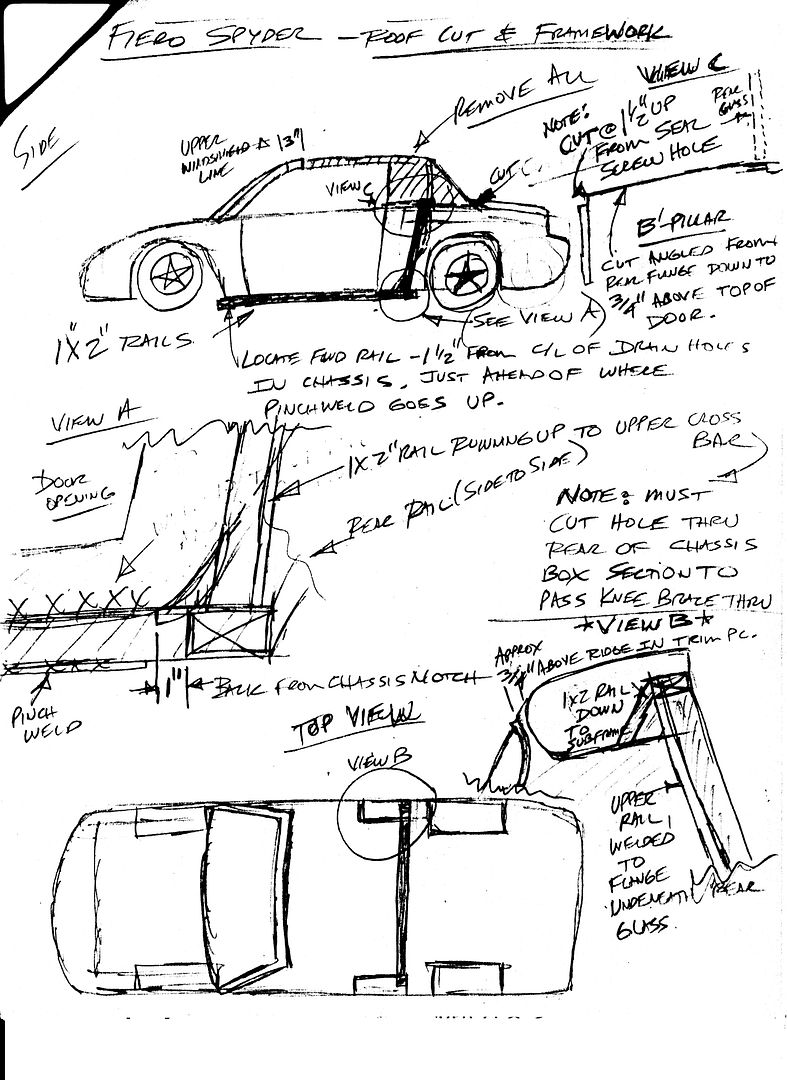
It is reinforced along the bottom, but I am not completely happy with the amount of reinforcement. I notice a bit of binding at the tops of the doors, especially when you get two large people in it. When we paint it, I intend to do a panel off paint job, and at that time I will add reinforcement similar to this: https://www.fiero.nl/forum/F.../HTML/000006.html#p9
quote
Originally posted by weloveour86se: Also how'd you address the mounts? Replace em?
New rubber mounts from Advance Auto (Anchor brand). Was only about $45 for all three, and well worth it. The manufacturer's paint job was pretty bad on these...I repainted them. The old mounts were worn enough that we could move the engine freely in any direction. As you can imagine, we get a bit more vibration through the new ones...but at least we know it isn't going to fall out on us.
It's amazing...I finally get to post with good news. Put a lot of miles on the car today...about 400 miles. Car ran beautifully all day. Even better news...I hit a bit of rain, and the windshield wipers actually worked (I did replace a bad fuse, but they didn't work when I tested it afterwards...I must not have had the key forward enough). And the best news....I didn't get a single drop of rain on me...which means Fierfly's repair of the top seal worked.
But...it can't be all good. I only averaged 25mpg (24 going up the mountain, 27 coming back down). All highway. I expected better...which brings me to my next issue. I think the TCC isn't kicking in. Hard to tell with the tach not being accurate, and the fact that I am not used to driving an auto...but I think we have an issue. I will place bets on one of two issues...either it is the wire that comes from the brake pedal (the only one I didn't run myself), or it is possible that when it was converted to an auto, the previous owner never replaced the ECM with an auto ECM. So...while doing the brake job tomorrow, I will test the brake switch wire...and if that isn't it, I will swap with an auto ECM from a parts car.
One more bit of good news though....the Detroit Lions won again yesterday. Woo hoo...they are finally giving me a reason to pay attention to football.
You were debating about changing body styles and my two cents is lose the bumper pad and go aero.
It will make the car look 100 x better and more modern. If you do please do the ground fx and rear bumper as well to complete the look, otherwise it just ends up looking goofy.
Originally posted by exoticse: If you do please do the ground fx and rear bumper as well to complete the look, otherwise it just ends up looking goofy.
I agree...if I talk her into going with the aero package, it will be a complete one...front and rear bumpers and ground effects. I would also wait until we are ready to paint to do it...the car has lousy paint right now, but at least it all matches.
I got the rear brakes done on this...and as expected, it turned into quite an event. First, I pulled the driver's side, and found practically new pads...funny, I thought I remembered the rear pads being pretty much worn...regardless, I dropped in the new Wagner Thermoquiets and the freshly turned rotor (pulled the rotors off a parts car so I would have them ready). 15 minutes start to finish...no problem...couldn't ask for it to go any smoother. Then I went to the passenger side. Pulled the wheel, and found pads that were down to metal on metal....that's odd. But wait...the metal backing on the pads are different than the ones on the driver's side....why would someone change one side and not the other?
So...I pulled out the trusty T50, and tried to pull the caliper bolts. They wouldn't move. Ahhh...someone else must have done this and decided to give up on the passenger side....that explains it. Out comes the breaker bar....couldn't get a good position on it. But...I am determined...I will NOT allow a Fiero to beat me. Out comes the trusty impact wrench. Put it on the top bolt that I could access easily...it hit a couple times, then spins freely. Ha!!! I win, right? Well...no...it stripped the head of the bolt. At this point, I am stuck pulling the knuckle to get at these bolts. As I start pulling the tie rod nut, it hits me....I have a parts car sitting right over there that I already removed the caliper and rotor from. It would be easier to swap the entire knuckle than to fight with these bolts. So...I pulled out the electronic level and measured the current alignment (I had just gotten it aligned about 2000 miles ago), and yank the entire knuckle. Then over to the parts car, and yank the entire knuckle from there. Woo hoo!...Bonus!...this parts car looks like it has a brand new bearing on it (since I couldn't remove the old caliper and rotor from the knuckle, I would have to swap out the bearing also).
To make a long story short...the "new" knuckle went on smooth, and I was able to get the alignment dead on what the old one was (0.8* camber). Car is drivable again, with no annoying scraping sounds from the back...but I think I will need to re-bleed the brakes. I will probably wait till I do the front (next couple days), and just bleed all the old fluid out for fresh stuff.
Originally posted by Fierfly: Also.... Does anyone have any idea what the little toggle switch is on the center console,about where the passenger power window switch would be? If anyone knows the history of this car, maybe they remember? Otherwise we will eventually find out by following wiring.
The mystery is solved. Oh, and the TCC works now too. Please people, if you have to rewire something (like putting an auto into a car that was a manual)...PLEASE do it right. The TCC wire goes through pin P of the C203, and should be 12v+ when the ignition is on and the brake is not pressed. The wiring is simple...should go from the C203 to the brake switch, and from there to the gauge fuse. Sounds simple enough. First, I tested the power at the C203...sure enough, dead...so at least we know where the problem is. I followed forward from there, and found that the wire goes into the switch in the power window plate...and if it is on, then the signal continues up to the brake switch, and if the brake switch is off, then the signal went to an open spade terminal that was hanging out near the fuse box.
I can accept the open spade terminal...some people aren't good with wiring and will stick it in somewhere to get power...and I may have kicked it loose somewhere along the way. But can anyone come up with a single valid reason for having the switch? To take it a step further, it is an illuminated switch...it is on if the TCC is getting power.
Decided to start a list of what needs to be done for our Winter/Spring project for this...but we will start with a photoshop of the car with the wing (thanx, 85SEnochie)
Pull the entire interior, including the non-A/C air box Coat the entire interior with Lizard Skin Install the A/C components from the parts car Install the power window doors from the parts car Install wiring harnesses for A/C/power windows/power locks (with backlit switches from a Grand Prix) Wire up courtesy lights and dome light (LEDs...will be using an LED strip along the top of the windshield for the dome light) Wire up the auto dimming mirror Correct the wiring for the TCC Install proper automatic brake pedal and steering column Install proper seat belts (currently only has lap belts) Find a new dash Install new speakers (marine grade 6x9s in the dash?)
The purpose of the list is to make sure we have everything ready...I will edit it as we remember more that we need to do. Install "new" carpet Reinstall a freshened interior Re-skin the new seats
Originally posted by fieroguru: I got my cap from Denny Paton/Penton in FL... supposedly it was the last one. He sold his molds to Twin Lakes Fieros, but I do not know if the b-pillar cap was part of that purchase or, if it was, what happened to them when they shut down. I will check in an old fiero binder I have to see if I filed the instructions for the top.
quote
Originally posted by fieroguru: I just checked my old binder and it didn't have the instructions in it... if they were not in there, they probably went in the trash during one of my last 2 moves.
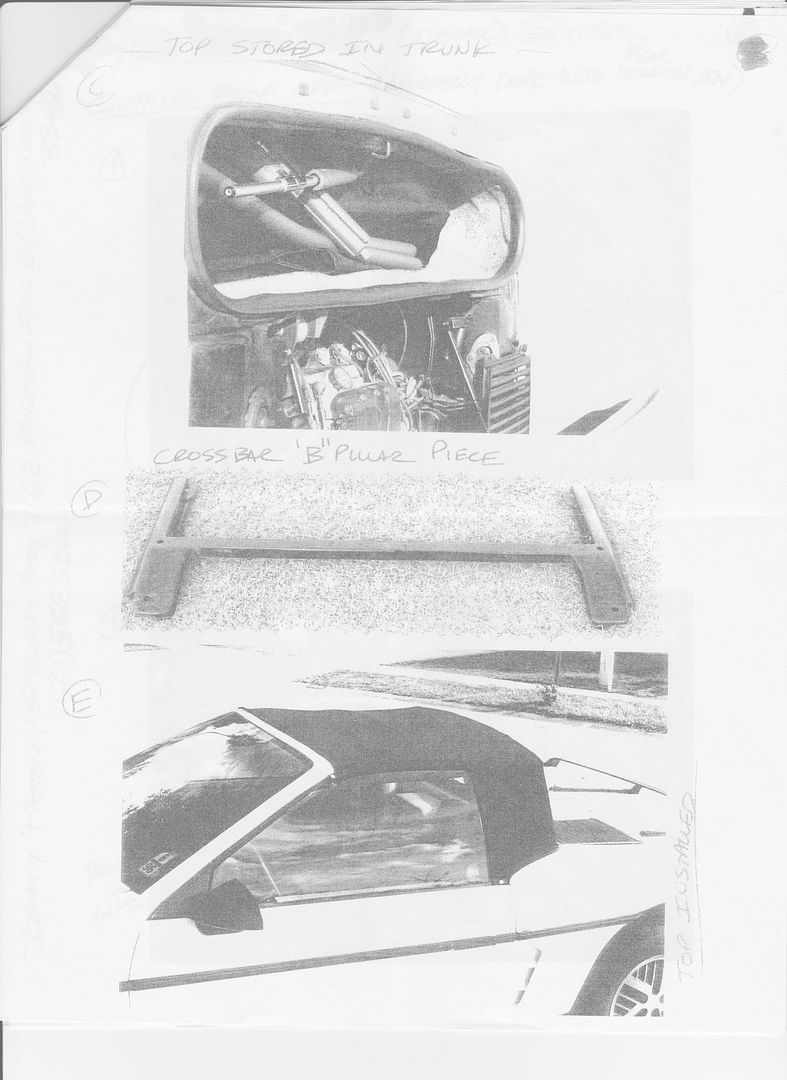
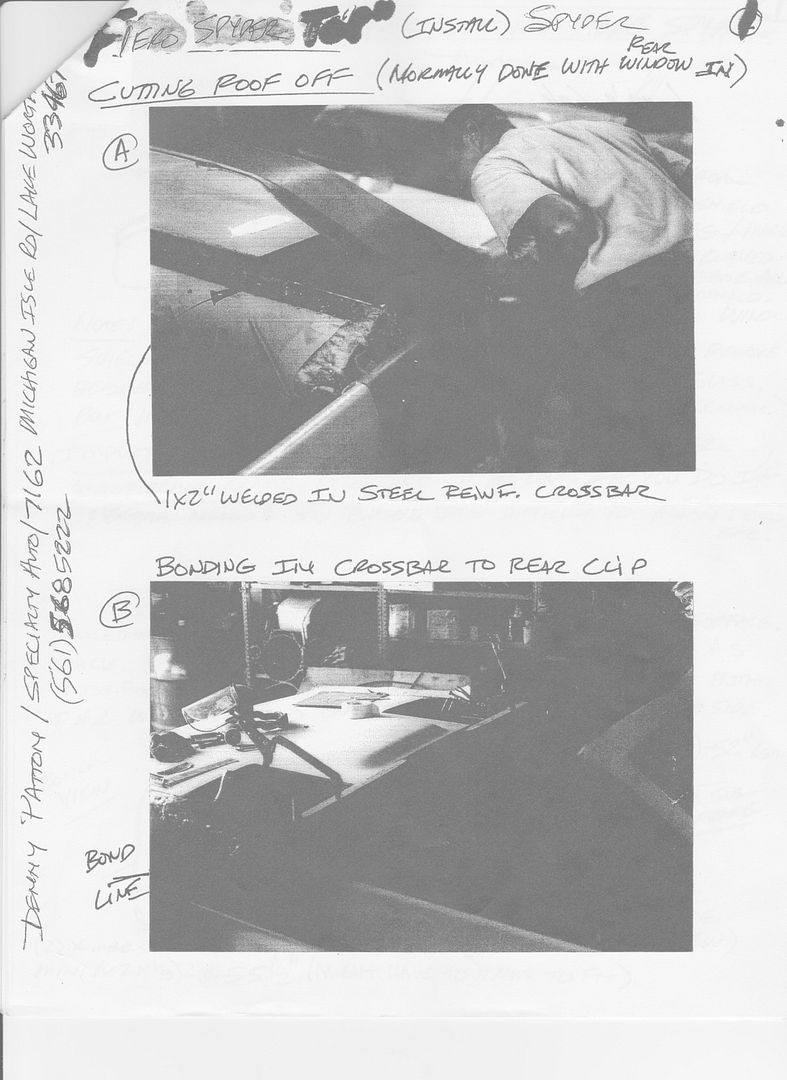
My wife made me go through a box that hadn't been opened in 6 years and guess what I found... What makes it even cooler is I am pretty sure most of the pictures of the car with a top in the instructions are from your car (white notchie with bulging side scoops and a luggage rack), but one of them (truck picture) is of an 88.
[This message has been edited by fieroguru (edited 08-03-2012).]
Originally posted by CowsPatoot: Don't happen to still have a copy of those instructions do you (they are probably the same ones followed for the top we have, but we are open to improvements)?
I guess they ARE the same instructions followed since this car was used to model the instructions. Thank you very much, Fieroguru. For the record...if anyone decides to duplicate this, first change I would make is to use one solid clear piece across the back instead of the separate roll up window. That separate piece causes real bad blind spots when the top is up...the roll up window is useless (if you want it more open, remove the top)...and the zippers on the sides and velcro on the bottom of the window were the first things to go bad. Second change is to do something about seals along the side windows...I have ideas, but they will require me to completely redesign the support for the top. Third change would be to add some kind of angled sail panel to improve the look when the top is up. I plan to redesign the top just before paint is done (since it may require different mounting).
Originally posted by CowsPatoot: Thank you very much, Fieroguru.
Glad I could help. Being able to get copies to the current owner of one of the cars used to create them is just too cool.
I also got to prove to the wife that I am not a pack-rat, but an archivist!
For the side windows, I would take the top off another car and trim the metal down around the window seals to make it lighter and more compact, then bolt the front to the end of the A-pillar and let the rear be positioned via a pin on the b-pillar cap (you might want to make a steel reinforcement under it) and have a couple of snap into place cross bars to keep the two sides upright and the top off your head. That steel pieces on the sides could have the top attached to them and the metal might still be short/compact enough to fit in the trunk.
[This message has been edited by fieroguru (edited 08-03-2012).]
That is pretty similar to the ideas going through my mind on the side windows. I don't think it would take much to get them to sit into the windshield and B-pillar with a peg similar to the way the current top does (but with smaller holes). Of course, making the top attach to them would mean a remake of the fabric...but it is looking pretty rough after 15 years anyway. I was thinking something similar to the pic below for attaching it to the window frames...that design is from an Extang tonneau cover.
My wife made me go through a box that hadn't been opened in 6 years and guess what I found...
quote
Originally posted by fieroguru:
I also got to prove to the wife that I am not a pack-rat, but an archivist!
Considering I still haven't unpacked everything from my move to this house (in 1996) plus the fact that my living room is full of stuff from my grandmother's estate sale (in 2009 I think?) and I am pretty sure I still have my lab books from college physics (I graduated in 1992), etc, etc... Pfft! Six years?? Amateur.
I will definitely be using the term "archivist" from now on!
Thanks again for knowing that sometimes "useless stuff" is really treasure. Acknowledgements your wife for getting you to go thru it.
[This message has been edited by Fierfly (edited 08-04-2012).]
In the process of adding a few options to the car, along with fixing a couple issues. I tried to do a detailed write-up on this, but it didn't seem to get any interest, so I will just relay some of the info here.
The initial goal was to fix the windshield wipers, but this one snowballed quickly. I troubleshot the problem to a switch issue. So...I decided to just replace the column with an auto column from a parts car (correcting the auto/manual issue at the same time). It turns out, the new column had delay wipers too. In order to get to the delay wiper module, I had to pull the dash and remove it from the side of the column. Now...the convertible was already torn down enough that removing the dash to put it in properly wasn't a big deal. But...while the dash is out...
The center console skeleton came out too:
Wow...everything is nice and open for working on that wiring...I might as well fix a couple other issues. Remember that TCC issue? Done. I have wanted to install power windows...and this is the ideal time to at least install the wiring for it...since I have both the parts car and convertible torn down. NEED to add that auto-dim rearview mirror (original mirror is shot). It is all open, will add the courtesy lights (was shocked when I went to put bulbs in and discovered there wasn't even any wiring for it...I didn't know you could get a Fiero without courtesy lights) and dome light (dome light was removed along with the top...replaced it with an LED strip across the top of the windshield).
But then...once the wiring is in place for the power windows, all it takes to add them is swap the doors. There is another advantage there...the parts car is a proper white car with nice panels inside and out. Finally get to replace those dingy door panels that were the wrong gray color...and that outer drivers door that looks like someone used house paint on a roller to turn a red door into a white door. Heck...this car is going to look pretty good after these minor updates. Might as well replace the dash too...the parts car had a nice SE dash. And found my other dot-matrix trim panels, so it will all match there. And...swapped tachs out...so now the tach reads properly. In fact, all gauges and lights work properly now.
Window switches from the parts car were bad...didn't get a quick response from the mall for new ones, so went to the junkyard. First option was 97-03 Grand Prix window switches in Malibu bezels...they would have looked like this...
Didn't like it...looked too bulky. Second option was the switches from the rear doors of a 2002 Silverado.
Ooh...I think we are getting somewhere. Sure, they light up white rather than red...but they fit in there so well. And the real advantage is that they are sealed from the elements...unlike the older style switches. I find this to be a nice advantage in a convertible.
Did some measuring, and figured I could make them fit with a little dremel work. Here, I have the plate all marked out for cutting.
I had to modify the console skeleton a bit too...trimmed a little at the back of the window switches.
Test fitting with the trim and center console bezel.
Had trouble finding the wiring diagrams for these switches on the internet. Was finally resolved when I remembered I have a Haynes manual for my 2001 Silverado. I will post the wiring conversion once it is in the car and tested.
All wiring is done in the car other than these switches....just need to put it all back together tomorrow.
nice job on those switches. sold the motor and will be getting the new one so we can start on mine again soon
------------------
**************************************** 88 Formula CJB Arrived Finally. #689 of 1252 Time to start Working TONY! There are Two kinds of Fiero's : Notchies and Donors!
I drove the convertible up to Pete's cruise in Pennsylvania this past weekend. Put about 1500 miles on the car. This was the furthest the car has been from home without a backup plan (I have towed it further, but this time I was relying on it to get me home). It ran good...overall I am pretty happy with it. No more changes until after Run For The Hills now.
I have had 3 little eccentricities pop up. I call them eccentricities because I don't consider any of them severe enough to dedicate much time or money into resolving. 1. Speedo has glitched on me several times this past weekend. Will read normal, then jump way up or down, then go straight back to normal. Happens quick enough that my eye is catching the movement, and I look just in time to see it fix itself. Has been in heavy rain almost every time it has happened (I hit more rain this past weekend than the car has seen since we had it). I am thinking loose connection somewhere...possibly from when I replaced the dash.
2. TCC. With the new tach that reads properly, I can now see what the TCC is doing. Isn't this supposed to only lock up above a certain speed? It seems to be locking up as low as 25 mph....as long as I'm not using too much gas pedal in 3rd gear.
3. High idle. Again, the new tach has alerted me to this issue. Tends to idle a bit high when NOT in gear...as soon as I put it in gear it holds steady at 8-900 rpm. Out of gear, holds about 1200-1500. When I first pull it out of gear after a long drive, it will idle up around 2000-2500 until I shut it off...as soon as I shut it off and restart it, it idles back around 1200.
And a pic to satisfy the illiterates out there....
Just realized I haven't updated this in a while...so thought I would throw in a couple more pics.
On Run For The Hills, we made Killboy's weekly highlights with this pic...
Don (Aerodonamic) also made the highlights...
Of the eccentricities listed after Pete's cruise, I did solve the idle issue. A new PCV vavle (even though the old one "tested" good) made it idle like a new car. The speedo eccentricity has been limited to only when it is very wet...since I try to avoid driving it when wet, I don't plan to look into it further.
The current project for the car is doing a front mount battery. This project started when I noticed that the battery tray had broken loose from the side and wheel well (again) and was cutting into the coolant hose below it (again)...
So...I picked up a front mount battery tray, held my breath, and cut into the front compartment. This really is a simple process...but still makes you nervous to cut into the car.
Hole is cut, and drilled for the mounting bolts...
I decided to use the push-pin style rivets to mount it rather than bolts or screws...I think this will look much cleaner when done. Here is the test fit of the tray...
Wiring is still being completed as I type this...I am using 1/0 welding lead for power and ground, and running the ground to both the frame up front and to the engine.
[This message has been edited by CowsPatoot (edited 01-13-2013).]