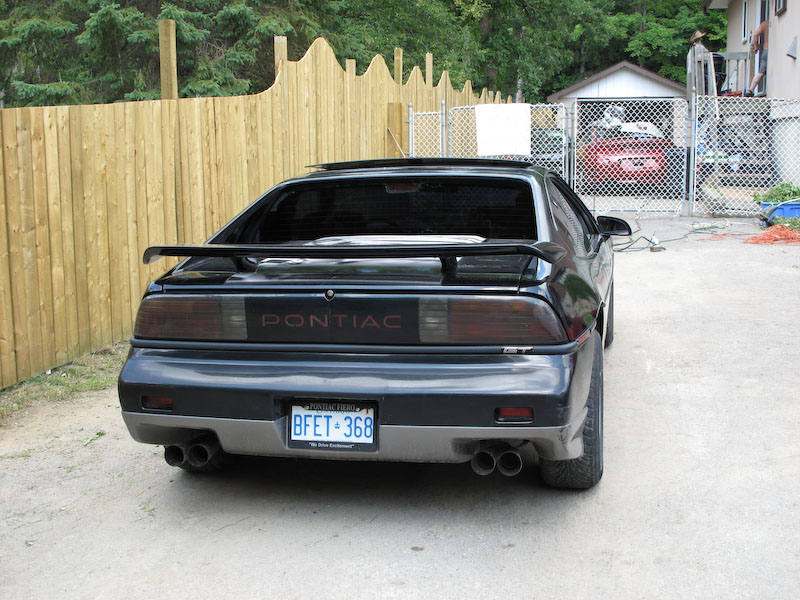
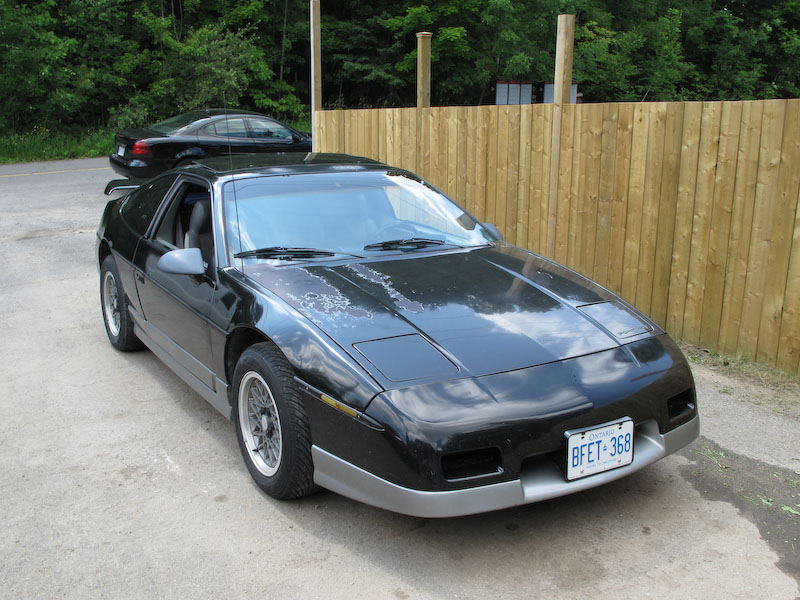
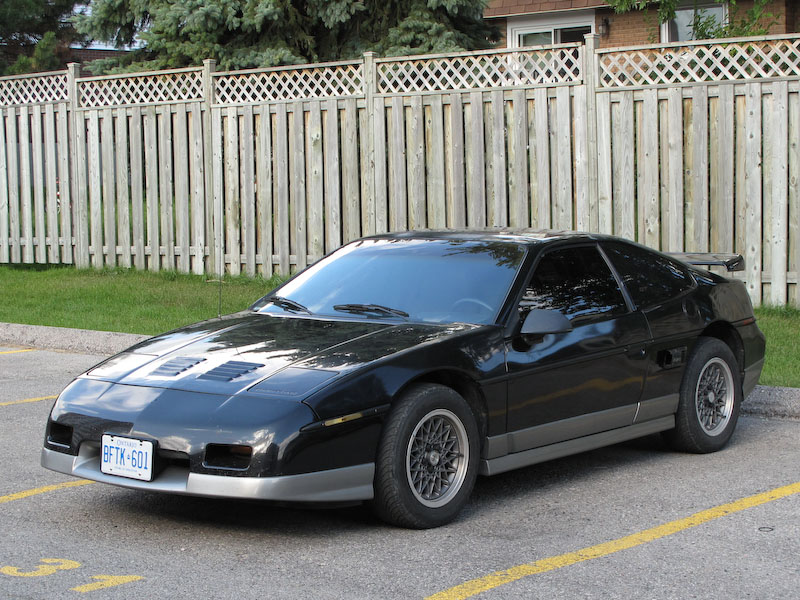
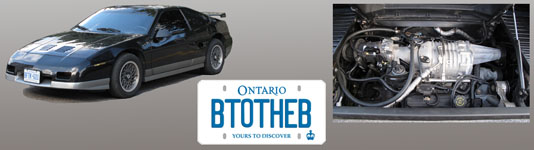
After being Fieroless since late 2004, I picked up a GT last summer. I knew exactly what I wanted – a rust-free ’86 or ’87 GT with a 5-speed and a sunroof. I spent a couple months looking and found this one on kijiji outside of Ottawa.
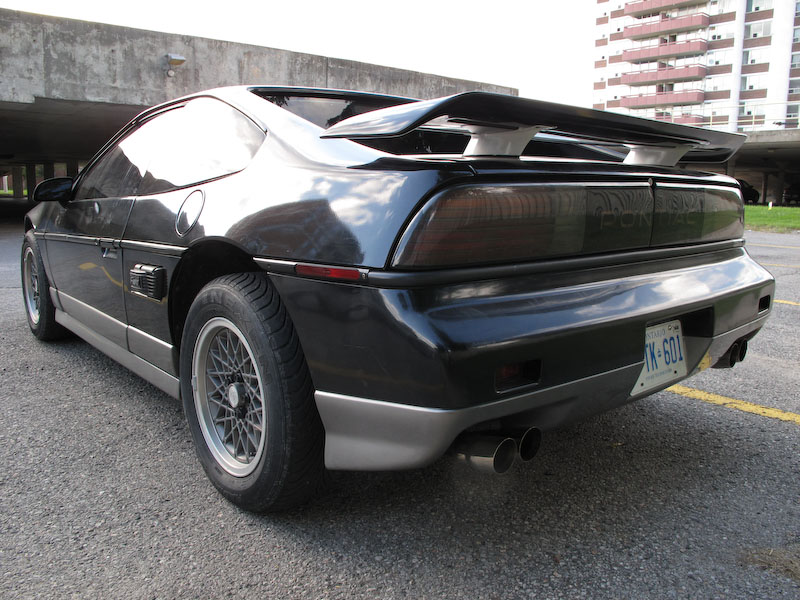
It had a weird decal on the decklid:
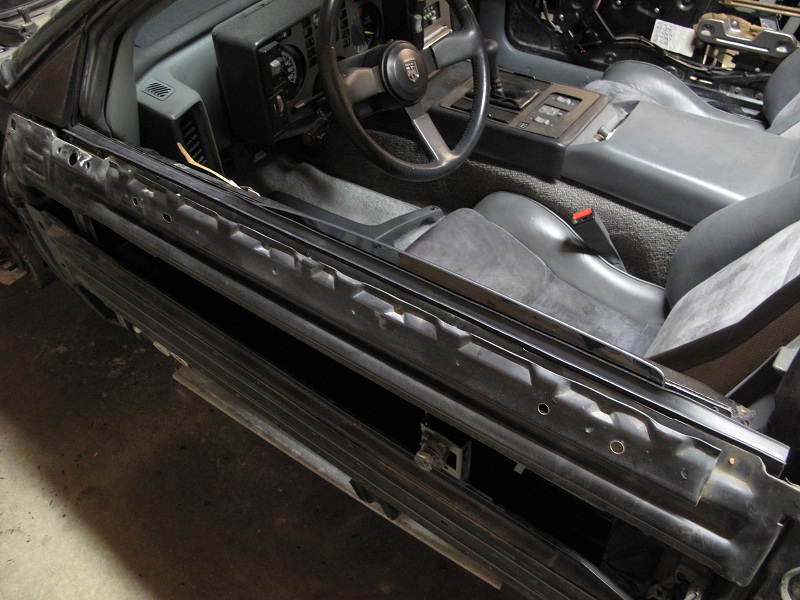
I think those are Saturns? Either way, it was just covering up a perfectly good decklid. The car was in surprisingly good shape, the paint was pretty bad in some spots but the interior was pretty clean and there was very little visible rust. It’s fully loaded as well, with performance sound, power mirrors, windows and doors.
So, I bought this and drove it back to Belleville without any troubles. It didn’t run very well on the trip back, but I did a quick tune-up and it ended up being a bad sparkplug with no gap causing a misfire. Not that I was keeping the 2.8 for long anyways…
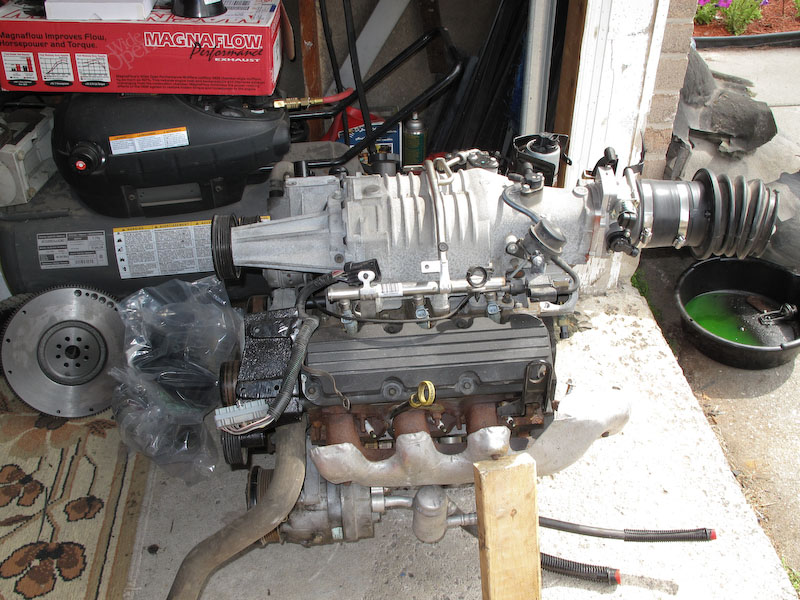
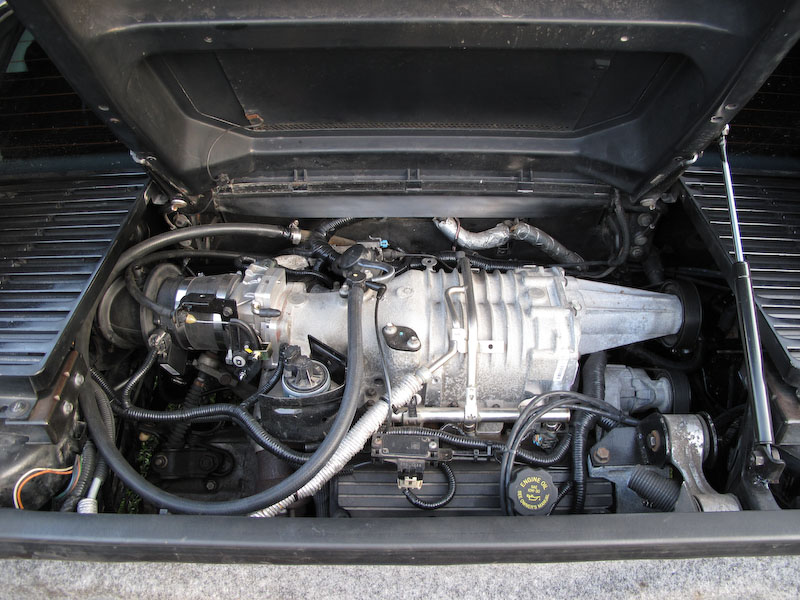
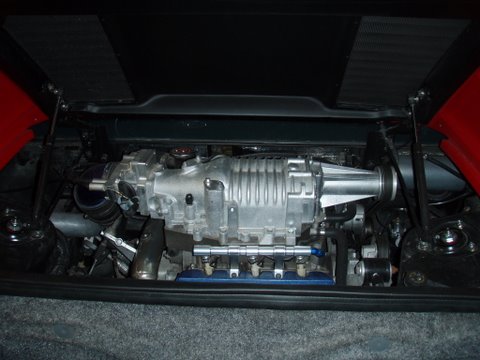
Dan (Fieroflyer) agreed to do a swap for me, and I decided to go with a Series III from an ’06 Grand Prix. Here’s the first time I saw the engine, in Dan’s garage...
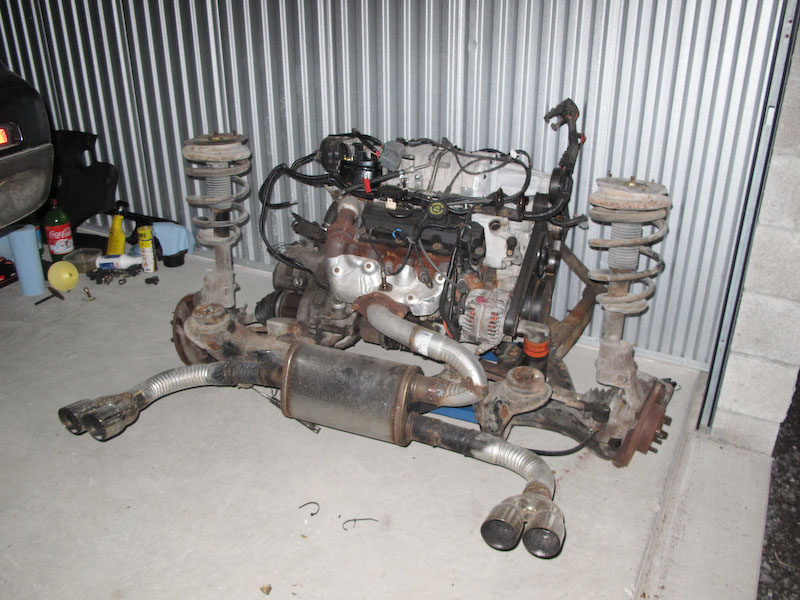
Some other goodies installed and behind it, a Northstar throttlebody, LS1 MAF, Magnaflow muffler and a WCF cast iron flywheel.
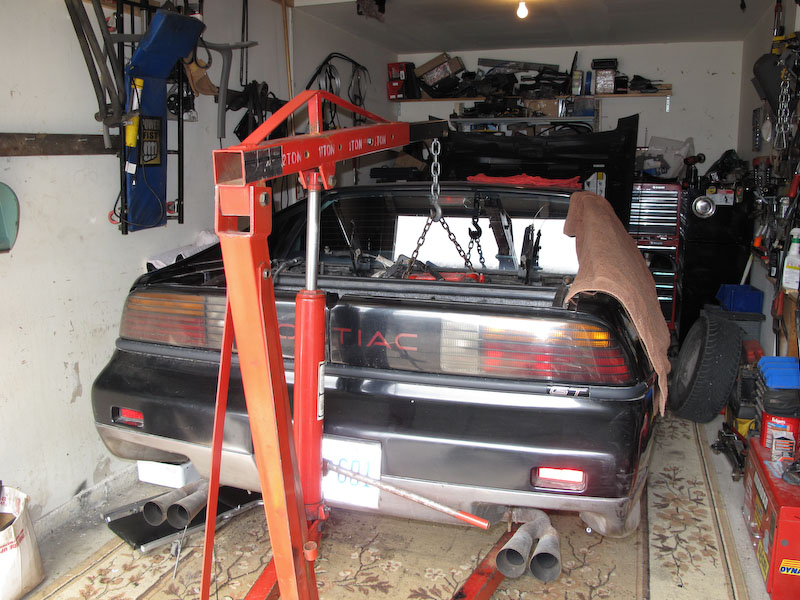
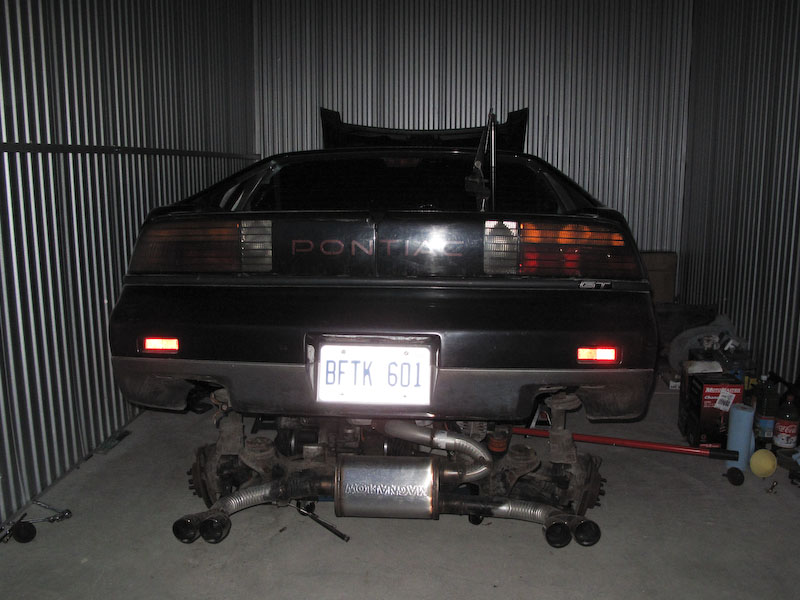
The last time the 2.8 was in the car:
A little over a month at Dan’s and he had this installed and running...
Had a few issues with some junkyard parts I’d bought – the starter solenoid was bad and one of the coils went (about 15 minutes after I left Dan’s with the car). There was another nagging problem with a misfire after it warmed up that took a week or so to figure out. After replacing and testing just about everything with the ignition system, Dan and I tracked it down to a bad connection to one of the injectors.
I changed out a few other things once it was running properly – installed an adjustable poly dogbone from Rodney and a new hood from Arns85GT. I love the vents on this hood... I was researching on PFF how Arn installed these, and it turned out he just put his hood up for sale. Perfect colour already too...
And a shot of the C6 exhaust tips from TLG (before installing hangers):
About a week after we got it running at full power, it started to develop a chattering noise. A trip up to Dan’s and he figured it was coming from the differential in the Getrag. Unfortunately, on the drive back from Peterborough to Belleville it let go and I had to get a tow truck back home.
So, it’s a winter project now. Earlier this month I pulled the engine and got the transmission off.
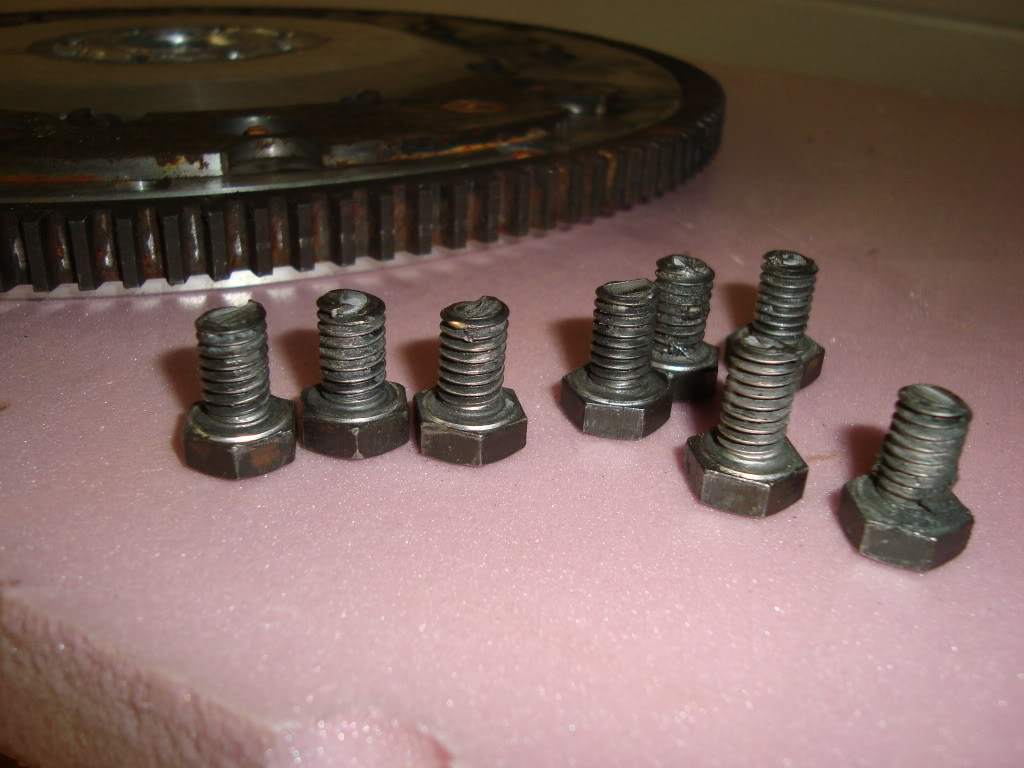
Some pics of the damage…
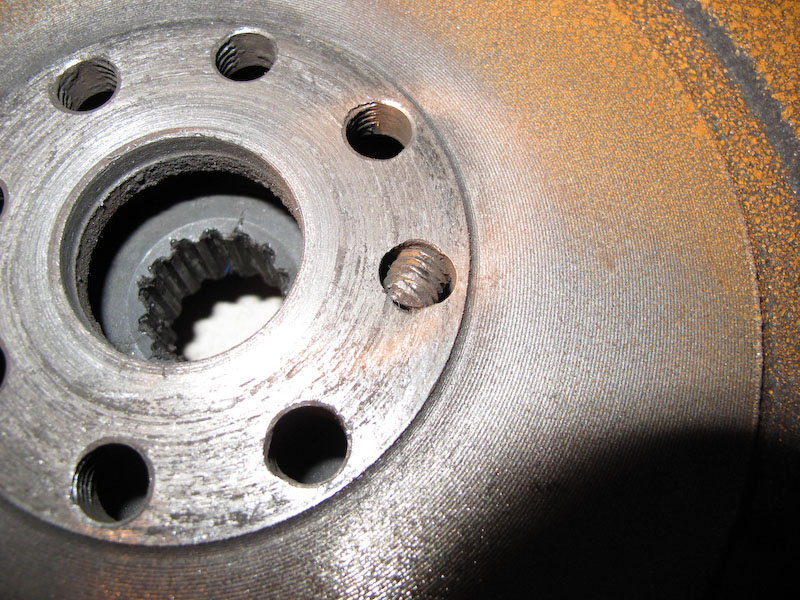
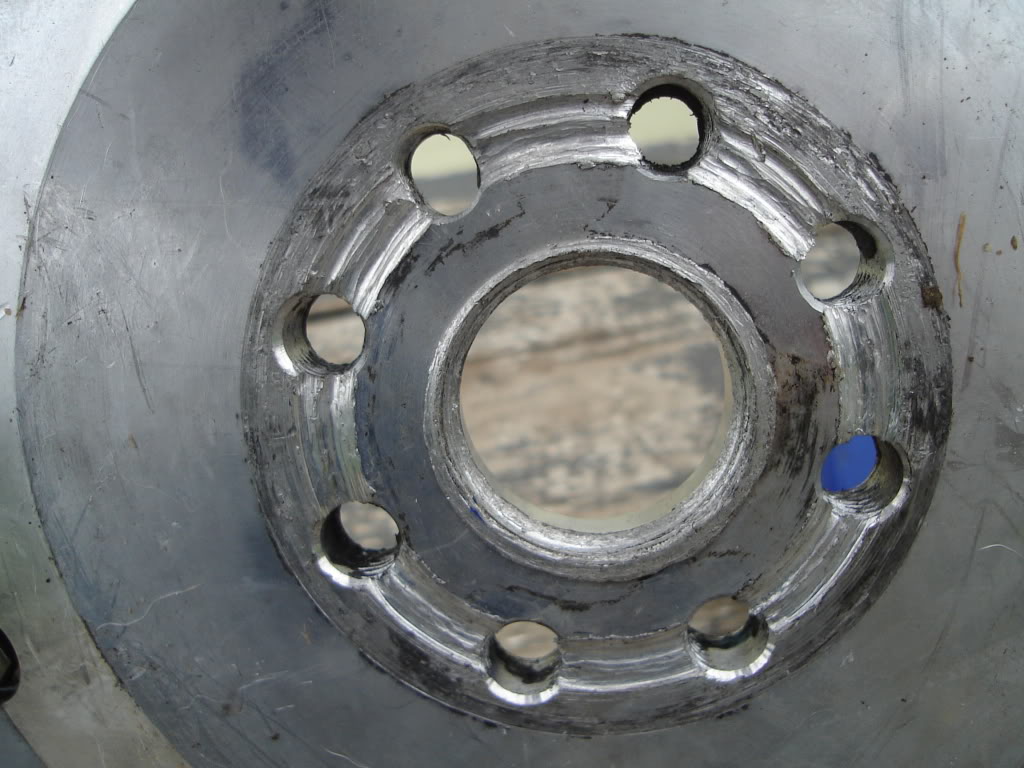
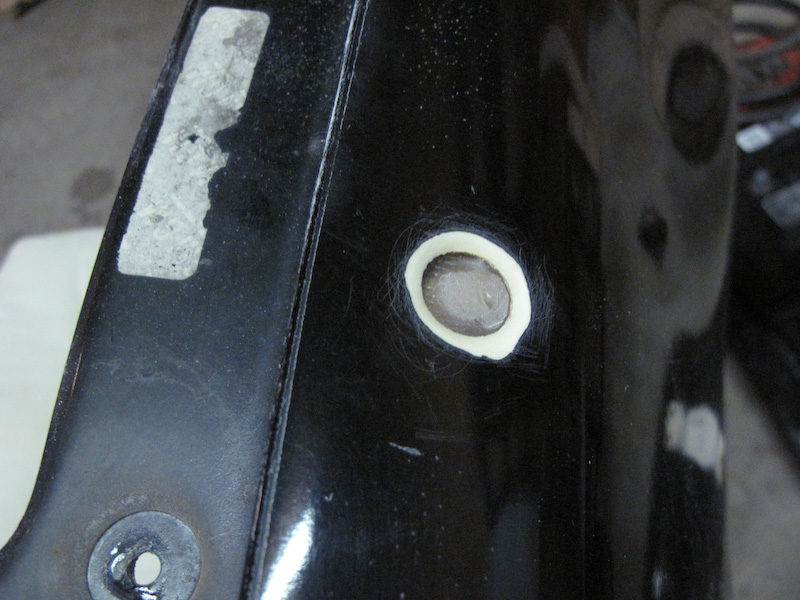
The flywheel was sheared right off. I see some easy outs in my future…
I took the transmission into the shop last week, still waiting to hear if I can replace the diff or if I have to start shopping around for a new 5-speed.
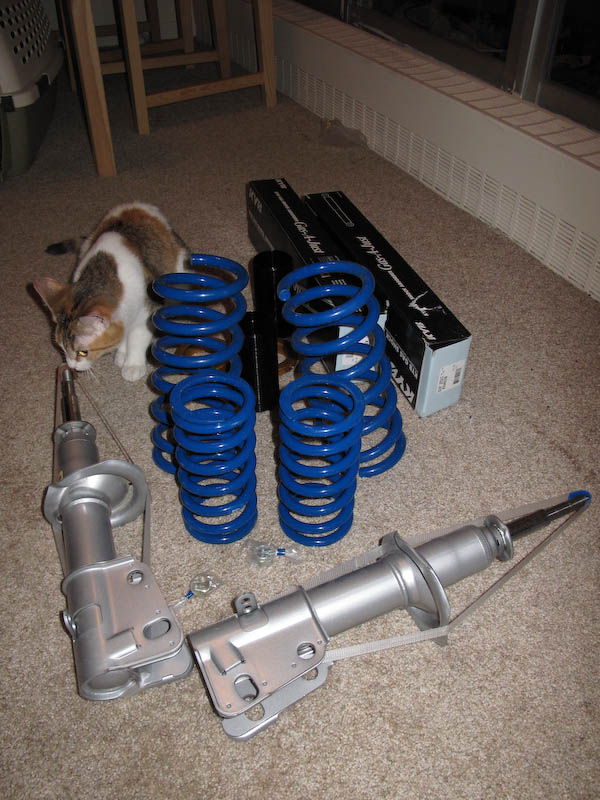
Other than that, I’m doing a suspension rebuild while the car’s up on jackstands. I’ve ordered poly bushings, ball joints, tie rods, lowering springs for the front, a coilover kit for the rear and some KYB shocks. Should be fun!!
Feel free to post comments if you like, I’m putting this on here because I like seeing threads like this, and hopefully having it on here can help keep me motivated while I’m working in that unheated, no power storage unit.
Brad
------------------ 1987 Fiero GT - 3800 Series III, N* TB, LS1 MAF, Magnaflow and a broken Getrag
IP: Logged
08:35 PM
PFF
System Bot
doublec4 Member
Posts: 8289 From: Oakville, Ontario, Canada Registered: Jun 2003
Looks good. I'm doing something similar. Are you running series III electronics or did you downgrade to series II?
------------------ 1988 Fiero GT "Rolling Thunder" Restoration Project Soon to have 3800 SC III "I'm a Rolling Thunder and a Pouring Rain... I'm coming on like a Hurricane - ACDC"
IP: Logged
09:28 PM
BtotheB Member
Posts: 2581 From: Peterborough, Ontario Registered: Dec 2001
It will be all worth it when the work is done. I have a big job ahead of me too. Good luck, hopefully the car doesn't fight back too hard!
Thanks, I've been following your build too, you're doing a lot of the same stuff as me this winter with the suspension..
And yeah, Dan wired it up as a Series II. I think the ECM is from a '99 Grand Prix? I could be wrong. I had to get an O2 sensor from a Series II, and needed a different throttlebody.
Well that's interesting. I had the exact same problem with my 3800SC 5spd swap in my 88GT. All the bolts for the flywheel broke off, ruined my Spec aluminum flywheel and left broke off bolts in the crank like that. I used left hand drill bits to get the broken bolts out of the crank, they came out easy. My problem was I believe the bolts I got were not of the right hardness and were not torqued properly. My car was making a chattering noise for a few days and I kept driving it and eventually that happened. Did a good amount of damage. I am now swapping my car over to an automatic because of that incident. If that didn't happen I'd still be driving the car with a Getrag. Mine only lasted about a week until all the bolts for the flywheel broke off. What did you use for bolts to hold the flywheel on?
IP: Logged
05:21 PM
Tony Kania Member
Posts: 20794 From: The Inland Northwest Registered: Dec 2008
Looks like a winner to me. I really like the direction that you are taking this Fiero. I am about to install a set of TLG tips. I love the look of them.
Good luck with your GT.
Tony
IP: Logged
05:34 PM
darkhorizon Member
Posts: 12279 From: Flint Michigan Registered: Jan 2006
Tracking down that miss was a real pain especially when it would not act up until you drove for a while and every thing warmed right up. Using noid lights did not show a problem but it kept coming back to one injector, replacing it also did not help and it turned out to be a bad connector. Got to like the series III injector connectors that are sealed up so you can not see the metal unless you take it apart. The flywheel bolts were grade 8 bolts torqued to 40 ft lbs and locktite was used the same as all my manual swaps. Problem was the tranny diff siezed up while driving and the bolts did their job instead of doing any engine damaged when the tranny locked up. As you can see in the photos the bolts are all still threaded in they sheared right off while tight against the flywheel. I feel bad that Brad had to drive home once we found the diff was going and that is when it failed, unfortunately I no longer have the room to store cars or he could have left it here instead. Brad if you need another tranny I still have that Getrag here you can use or the local wreckers still has the 94 Beretta FWD Getrag that is a better tranny. Dan
[This message has been edited by FIEROFLYER (edited 02-01-2010).]
IP: Logged
06:50 PM
darkhorizon Member
Posts: 12279 From: Flint Michigan Registered: Jan 2006
Ok first my appologies I was wrong according to the tranny shop the tranny is fine, this is getting stranger all the time. When the car was last here I had it up in the air checking over every thing and I know I reefed on the flywheel as well to check it. There was a bad noise that you could here under the car when you engaged the clucth that cane from the diff area and when you held one wheel still and turned the other wheel you could here a good strong clunk and there was a lot of play when rocking the wheel back and forth. The noise had been there for a few days that appeared on a long road trip Brad had taken. In total over 400 km was put on the car after this noise appeared before getting back to me to check, if this was the bolts losening causing the noise I find it hard to believe they held for that long before shearing off or even if it was the bolts failing they should not have lasted that long. What concerns me the most right now is they are the same grade 8 bolts that I used on many other swaps, this actual batch was bought recently but from Brafasco. Is there a way to have the bolts tested to see if they are some Chineese weak pieces of crap as I also have bolts from the same batch on my car and still have a few sets in my tool box for future swaps. Dan
IP: Logged
07:48 AM
PFF
System Bot
olejoedad Member
Posts: 20072 From: Back home again in Indiana Registered: May 2004
Originally posted by FIEROFLYER: There was a bad noise that you could here under the car when you engaged the clucth
When this happened on my car the noise changed when the clutch was pressed in too.
I drove the car for a few hundred miles before the noise started. The noise then appeared and I continued to drive the car(should have dropped out the engine when I first heard the noise). After a few more hundred miles the bolts finally broke off. I started the car, started out of the driveway, got 500 feet and then it happened. My Getrag transmission was fine.
The bolts I used were also grade 8 bolts from a local hardware store. Maybe there is a bad batch of bolts out there?
quote
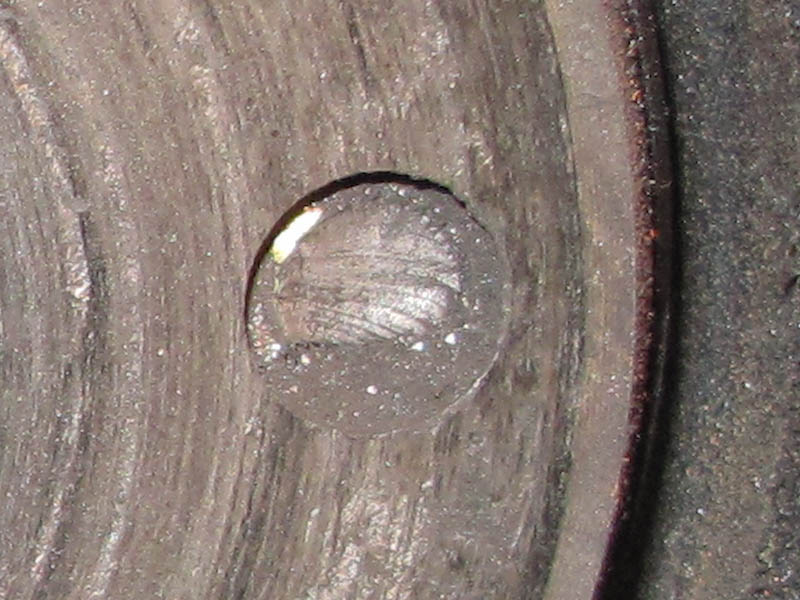
Originally posted by olejoedad: I notice that the threads have impressed into the leading and trailing side of the bolt hole bore in the picture of the flywheel.
My flywheel holes looked the same, only there was more damage to my flywheel as it was aluminum.
Here's a picture of my flywheel.
[This message has been edited by Fiero Owner (edited 02-02-2010).]
IP: Logged
12:31 PM
BtotheB Member
Posts: 2581 From: Peterborough, Ontario Registered: Dec 2001
Originally posted by olejoedad: I notice that the threads have impressed into the leading and trailing side of the bolt hole bore in the picture of the flywheel.
The pattern indicates movement of the flywheel relative to the bolts.
I see what you mean... When I get home from work today I'll post a close-up shot of the damage to one of the bolts stuck in the crank. Time to break out my old mechanical engineering textbooks and do some failure analysis...
Fiero Owner, what happened to you is basically identical to me, even the driving distances between first hearing the noise and failure. I'd really like to find the root cause of this... going auto isn't an option for me.
18" x 8" Original Roja's, 225-40-ZR18's up front, 265-35-ZR18's rears, Aerospeed adjustable coil-overs, KYB shocks, dropped 2"+, K&N filters, Holley side scoop, upgraded front & rear sway bars with poly, fully loaded, original paint!...and dreaming of a fierce 3800SC swap!
Originally posted by BtotheB: Fiero Owner, what happened to you is basically identical to me, even the driving distances between first hearing the noise and failure. I'd really like to find the root cause of this... going auto isn't an option for me.
Brad
I would also really like to know what the cause of this is. I believe it to be the bolts. Either too long and bottoming out before torquing in properly or the hardness of the bolt itself not being enough. I probably could have just bolted my flywheel back on using different/better bolts and it likely would've been fine but who knows for how long. My flywheel also had some damage to it that would have had to been dealt with first too. I decided to do an auto swap as I feel it will be stronger and more reliable in the end.
It sucked for me at the time as I just got the swap completed and only got to drive the car for a week until that happened.
The bolts that were broke off in the crank, I used left hand drill bits to get them out. That worked good enough for me. Broken bolt extractors would likely work as well.
I am still in the process of swapping the auto into mine. I went straight to GM and bought the bolts from them that hold the flexplate on. They are 11.9 hardness. I think it was around $20 at the dealer for the eight bolts that hold the flexplate on, but knowing they're the correct ones is worth it for me.
With the bolts I use nthere is over 1/8 inch still with them tightened down as checked with a depth gauge on an empty bolt hole with all the other bolts in and torqued to 40 ft lbs so I can't see it being the bolts bottoming out. Strange though that the auto bolts are a lot stronger then the manual flywheel bolts but in the case of a tranny lock up failure the torque converter on an auto will prevent damage to the engine where the flywheel bolts are the shear point or weak point on manual trannies to prevent engine damage. On the first manual swap I ever did I bought new bolts from the dealer at around $10 each and when torqueing them to the reccomended 19 ft lbs many had the head twist right off, this is why I went with the grade 8 bolts instead and have used them on well over a dozen swaps with only this one failure. This makes me wonder if I got a bad batch of bolts or maybe there is a balance issue or some thing. Dan
IP: Logged
05:06 PM
BtotheB Member
Posts: 2581 From: Peterborough, Ontario Registered: Dec 2001
good find in the car, welcome back & good luck with the repair...once it's all sorted out you'll be one very happy camper.
(i'm not going to drag with ya anytime soon either, until mine comes up to speed!!!)
Thanks man... yeah, we had some good races at the strip that one time. Nothing says excitement like two 2.8 auto Fieros neck and neck the entire length of the quarter mile. heh
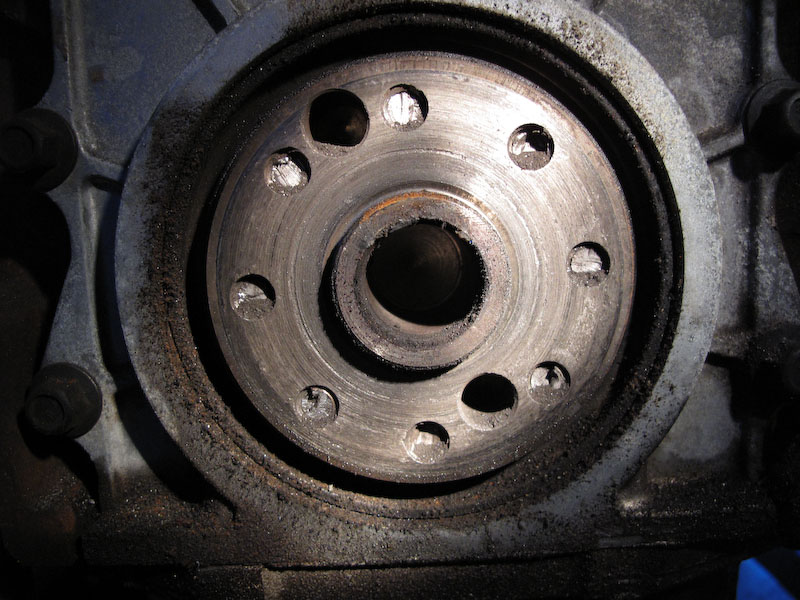
Well, here's a photo of one of the bolts still in the crank...
You can see that this one didn't shear off immediately. Most of the others look as though they're more of a clean break.
To fix mine and if I'm going to re-use that flywheel I'll have to step up to a larger size bolt. I realize this is meant to be the weak point to prevent damage, but I think I'll be going with a harder bolt also when I reinstall..
Originally posted by FIEROFLYER: With the bolts I use nthere is over 1/8 inch still with them tightened down as checked with a depth gauge on an empty bolt hole with all the other bolts in and torqued to 40 ft lbs so I can't see it being the bolts bottoming out. Strange though that the auto bolts are a lot stronger then the manual flywheel bolts but in the case of a tranny lock up failure the torque converter on an auto will prevent damage to the engine where the flywheel bolts are the shear point or weak point on manual trannies to prevent engine damage. On the first manual swap I ever did I bought new bolts from the dealer at around $10 each and when torqueing them to the reccomended 19 ft lbs many had the head twist right off, this is why I went with the grade 8 bolts instead and have used them on well over a dozen swaps with only this one failure. This makes me wonder if I got a bad batch of bolts or maybe there is a balance issue or some thing. Dan
The aluminum flywheel I purchased from Spec came balanced. They only fit on one way, correct? The supercharged engines are externally balanced by the flywheel. So if it's a balance issue it would lie in the flywheel itself?
I also checked the bolt hole depth on the crank and flywheel and it was a tad deeper than the bolts I used as well. I was surprised when I was reading this thread and got to the end of the first post to see the same exact problem I had. I don't believe it is a very common problem. So it looks like it's pointing to we both got a bad batch of bolts? Whatever it is, it would be nice to find out so it doesn't happen to anyone else again.
I could see where it might be possible with an aluminum flywheel for the bolts to come loose if the aluminum was to compress at all after the initial torque where the steel flywheels are denser but I doubt it. Your flywheel being balanced for the series II engine also eliminates the balance issue causing some kind of vibration where Brads is a steel one from WCF which I believe does not have them balanced after machining but atleast the WCF ones are made from new flywheels and not used high mileage ones from a wreckers. The bolts I use come from Brafasco so they should be good and not some Chineese rip offs but these days you never know for sure. Only thing tha I can think of is the original clucth used was a 4 speed one that SPEC sent instead of a 5 speed and it did rub on the tranny, the engine only ran for about ten minutes total like this before being pulled and the proper 5 speed clutch installed. At that point I double checked the torque on the flywheel bolts but did not remove or replace them. Could the vibrations from the rubbing have weakened the bolts then it took them that long to break. It really would be nice to figure out what caused the problem to make sure it does not happen again. Dan
IP: Logged
06:43 PM
darkhorizon Member
Posts: 12279 From: Flint Michigan Registered: Jan 2006
Got a nice package in the mail today, the last piece of the puzzle on my suspension rebuild...
WCF coilover kit, KYB shocks and front lowering springs. This goes with new black poly bushings, new ball joints and tie rods all around. Should be good.
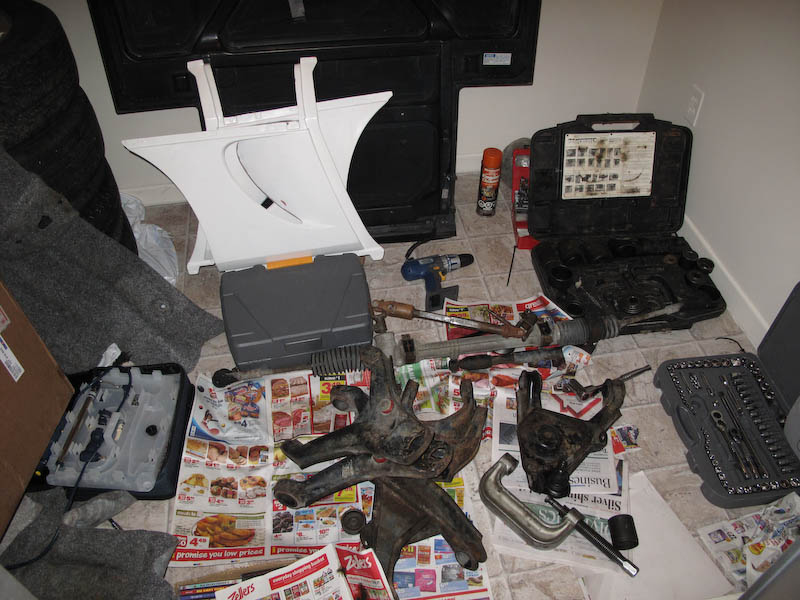
Still no luck with the broken bolt removal... guess I'm going to have to take the engine into a shop and pay to have them taken out.
Work is difficult living in my apartment, here's a shot of my very messy workroom - the only cat-free room in the place.
Got all the control arms out, the rubber bushings removed and am starting to re-assemble. Here I just finished pressing in the new front lower ball joints.
Brad
IP: Logged
09:37 PM
BtotheB Member
Posts: 2581 From: Peterborough, Ontario Registered: Dec 2001
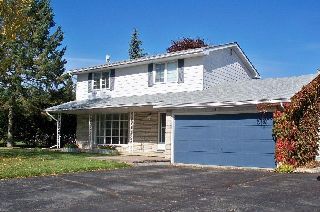
My goal this month will be to at least get the suspension back in the car so I can get it rolling again. I just bought my first house last month and move in the beginning of April.
The house...
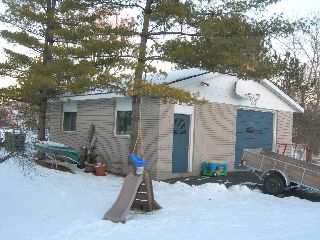
And the real reason I bought it...
Ohh yes. The guy I'm buying it from has a plane in there now... I should be able to fit in 4-5 Fieros then
Brad
IP: Logged
09:47 PM
Oct 6th, 2010
BtotheB Member
Posts: 2581 From: Peterborough, Ontario Registered: Dec 2001
Been a while since I've updated this, but finally have some progress in getting it back on the road. Work and the house have been taking up a lot of my time this summer, but my goal is to get it on the road for a month or so before winter.
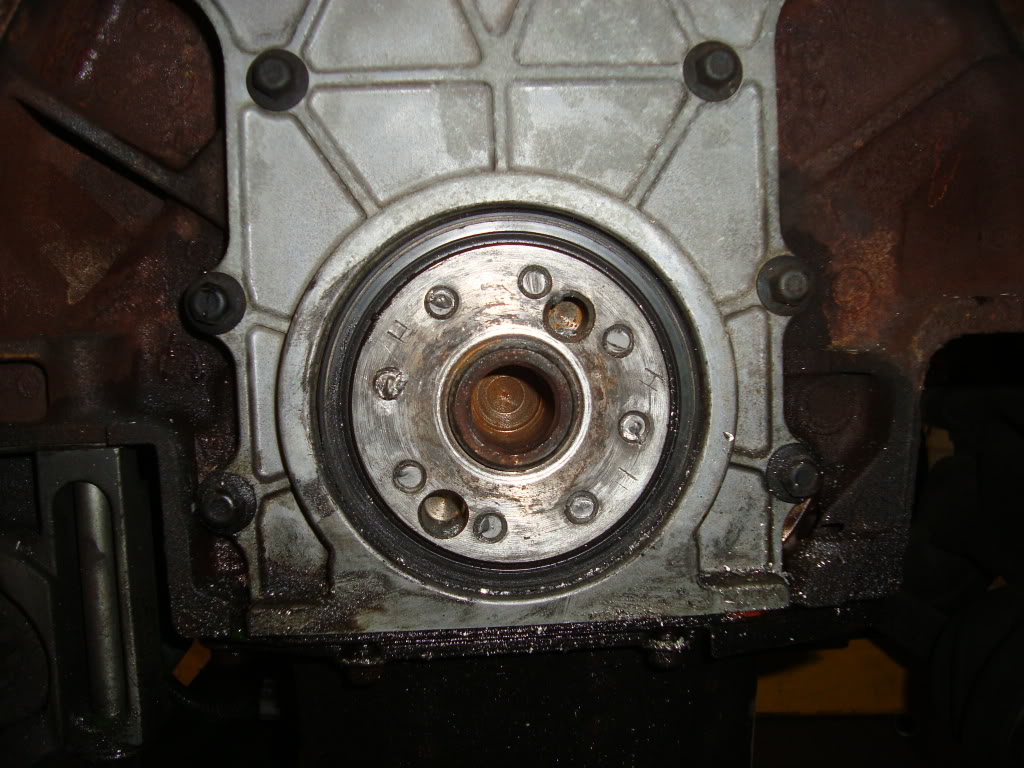
Unlike Fiero Owner, I wasn't able to extract the broken flywheel bolts. I had it in to a machine shop - they were able to back out five of the bolts by welding nuts on the end, but three were still stuck. The threads must have been damaged as well..
So, a week or so ago I got a new (used) L32, also from a 2006 Grand Prix. It's higher mileage than the last one (128K kms), but matches the mileage of the Fiero pretty well at least.
All the accessories, mounts, wiring and supercharger have been transferred over to the new engine, and last night I bolted the flywheel on. Who'd have thought a flywheel installation would be such a milestone? This time, I used the ARP SBC cam bolts, 234-1001, instead of the Grade 8 bolts Dan used. I also shimmed the oversized holes in the flywheel, so there was no rotation possible even before I torqued the bolts down. I found it interesting that the bolt holes on the auto flexplate were also well oversized for the 5/16" bolts. Seems like a poor design to me - using the clamping force to prevent any movement of the flywheel relative to the bolts.
Some photos to follow tonight.
Brad
IP: Logged
11:32 AM
Oct 7th, 2010
BtotheB Member
Posts: 2581 From: Peterborough, Ontario Registered: Dec 2001
Front suspension complete. I used the WCF lowering springs in the front, and their coilover kit in the rears with KYBs.
Clutch and flywheel finally reinstalled...
Engine back on the cradle...
It'll never be a show car, but it'll be solid mechanically. I was rushed quite a bit earlier this year in finishing up the suspension and didn't have any time to blast and powdercoat the control arms and steering knuckle like I wanted to. I had the car in a storage unit over the winter ($170 /month) and needed the car rolling to get it out of there and into my garage. Everything's been replaced though, all bushings, tie rods, ball joints, shocks and springs... just not as pretty as I'd like.
Hopefully tomorrow night I'll have the engine back in the car.
One question, anyone know the best way to get the axles back into the transmission?
Yup, the axles popped right in once I could put a bit of force on 'em (helps if the engine and cradle aren't sliding around on the dolly! )
Well, success all around. I got it running on Saturday - charged up the battery, double checked all connections and turned the key. Fired on the first try and built up oil pressure nice and quick. I've since got most reinstalled and have driven it up and down the driveway to test the clutch install.
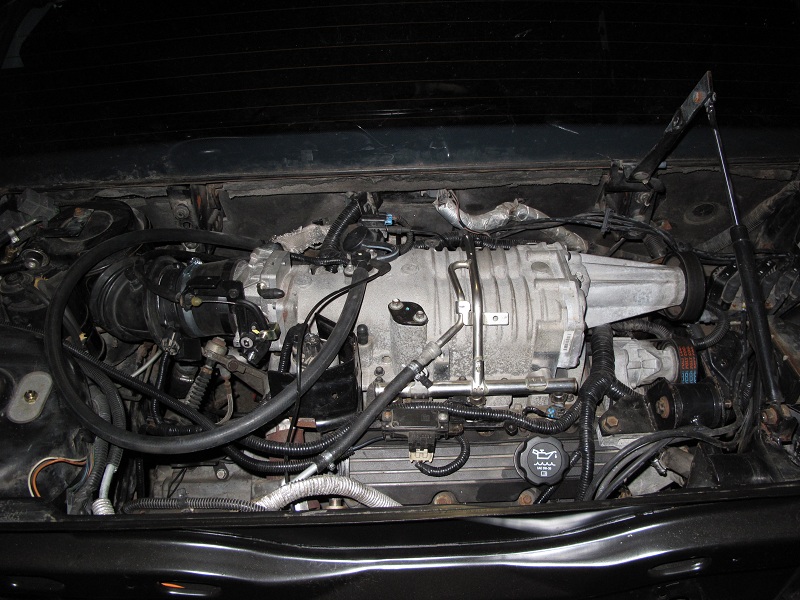
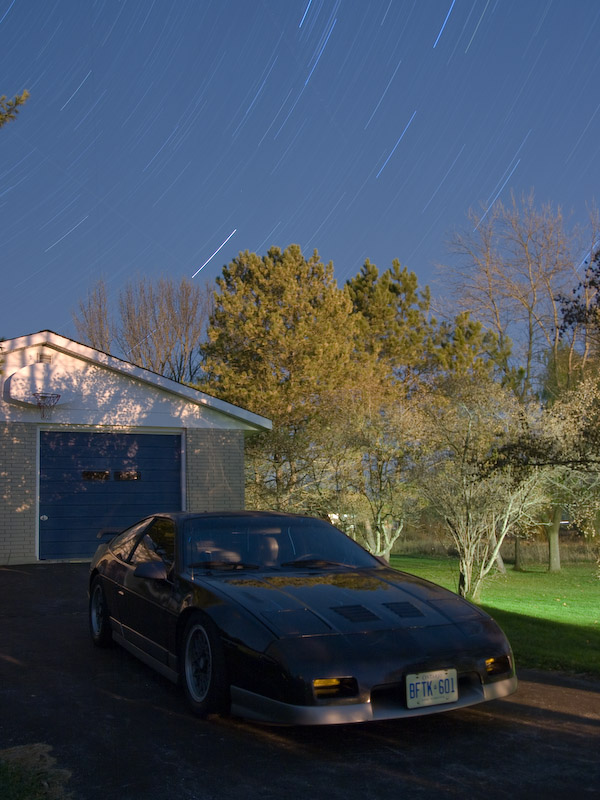
Here's a shot of the new engine in its new home:
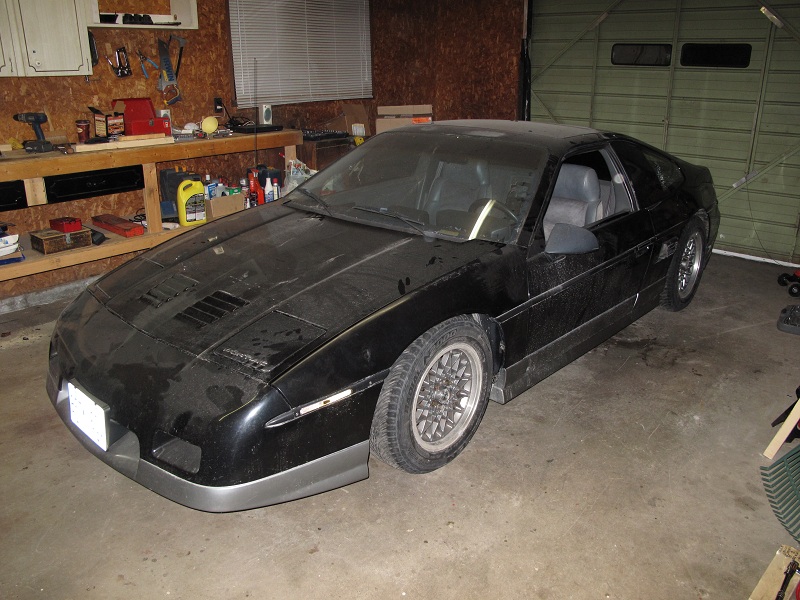
Still plenty of little stuff to do - secure some of the wiring, drain and re-fill the coolant, adjust the shifter cables, reinstall the decklid and finish the new headlight bucket installation. I did a rough alignment, but it's probably way off in some spots. Hopefully I can find a local alignment shop that'll do a Fiero. Here's a shot of it on the ground for the first time in a while..
And of course, I'll give it a good cleaning!!
Those WCF front springs are quite low, maybe too low for me. I'll have to see how they work out, I may be looking to raise it up some.
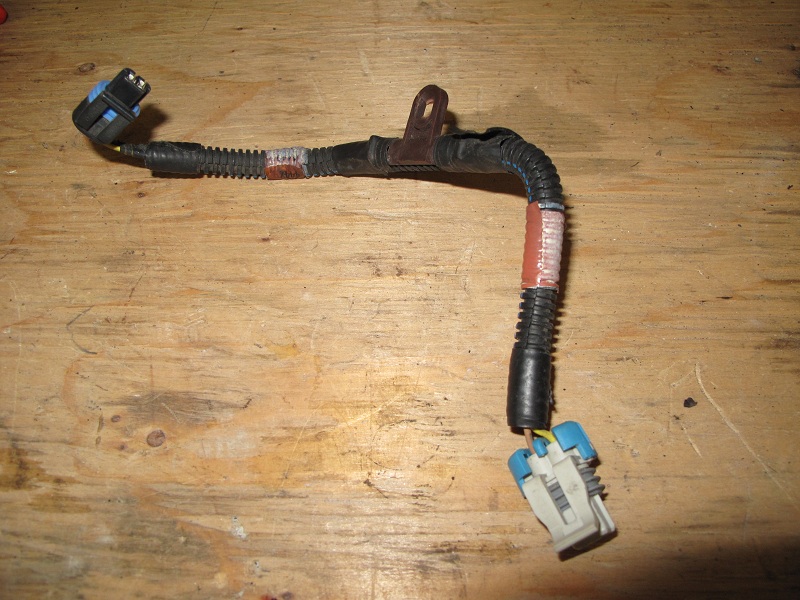
As usual, a question for anyone reading... what connector is this from? I had one left over, can't find a place for it anywhere, and doesn't seem to be affecting anything I've noticed.
Brad
IP: Logged
10:51 PM
Oct 14th, 2010
Fierofreak00 Member
Posts: 4221 From: Martville, NY USA Registered: Jun 2001
As usual, a question for anyone reading... what connector is this from? I had one left over, can't find a place for it anywhere, and doesn't seem to be affecting anything I've noticed.
Brad
That's an intake air temp sensor adapter pigtail. The GM engine harness uses the big plug (gray) to convert it to the small plug that in turn, plugs into the sensor.. If you don't have that plugged in you "should" have a check engine light on.. -Jason
IP: Logged
07:24 AM
Nov 2nd, 2010
BtotheB Member
Posts: 2581 From: Peterborough, Ontario Registered: Dec 2001
About 2,000 kms on the new engine and no real issues. There are a few things I'm going to correct over the winter though. I'm getting a bit too much engine movement with the stock rubber mounts, so I'm going to try and get some poly mounts and swap them in. The cradle mounts are due for replacement as well, I'll probably go with rubber there if I can find any.
The ride height in the front is extremely low, I can barely squeeze a finger between the tire and the wheel well liner. No rubbing though, I'd imagine this is about as low as you can go without other modifications. I think these front springs will be up for sale before too long, I want something that gives me a little more clearance in the front. The ride is too harsh for my liking as well, I have 350# springs in the rear that I may swap as well for something with a lower spring rate.
The tune on this engine is not very good as well, the power isn't the same as with the old engine. It still pulls hard, but I know there's a lot more I can get out of this with a stock pulley. I get a lot of popping on decelerating in gear as well - there's fuel still being injected with no throttle. ECM not getting a signal from the VSS? Eeeh, if Dan isn't back by spring to help out with a new tune I may look into sending the ECM out.
Well, yesterday we started getting salt sprayed on the highways, so a couple more weeks of local driving and I'll be putting it away for the winter. Besides what I mentioned earlier, I'm starting on the bodywork as well, hopefully have all that done before spring. I'll be installing JimmyS GT#2 side scoops, DIY Stu dew wipes, replacing the door glass and doing a panel-off paint job. This will be my second car I'll have painted myself, I learned a lot the first time and should get it to turn out pretty good.
Brad
IP: Logged
08:22 PM
Nov 3rd, 2010
darkhorizon Member
Posts: 12279 From: Flint Michigan Registered: Jan 2006
I always suggest not doing a "panel off" paintjob on a fiero. It may seem like it would be easier and "higher quality" if you did all of the parts on a bench, but it just isnt. Before you know it you have 3 garage fulls of parts, and you have to reassemble everything with the most care.
Simple fact is, just take off some easy stuff, or hard to paint around stuff like the front and rear bumpers, possibly the hood/decklid, and leave the rest on the car. You will thank me later.
With the bolts I use nthere is over 1/8 inch still with them tightened down as checked with a depth gauge on an empty bolt hole with all the other bolts in and torqued to 40 ft lbs so I can't see it being the bolts bottoming out.
I see your point; assuming the threads are tapped all the way to the bottom of the hole? Which in most cases, there not... Just something to think about...
IP: Logged
10:53 AM
PFF
System Bot
Feb 13th, 2011
BtotheB Member
Posts: 2581 From: Peterborough, Ontario Registered: Dec 2001
A mid-winter update! Lots of progress on all the winter projects... having a heated garage is excellent for getting things done!
I don't have any photos of this, but I've swapped out the WCF front springs with cut stock springs. I took one coil off the front, hopefully that will get me a little better ride for the rough roads around here and be low enough for the looks. I've also swapped out the rear coilover springs for some softer (275lb) springs. The ones from WCF were only 7" long, and too stiff for my liking. The new ones are 10" long, which required me to trim the spring perch from the KYB's...
Fun! (not shown - fire extinguisher. heh)
Next up was some of the bodywork for paint prep. I've removed most of the body panels I'll be taking off at this point, except for the door skins. I'll be leaving on the front hood, roof and fastback sections. Darkhorizon - I'm not too worried about a little extra work taking panels off and putting them back on, I've got probably two more months of winter at this point before I'll be wanting to get the car on the road again, so I've got plenty of time. My first paint job I did with just the easy stuff off the car - I missed too many edges and corners for my liking. Any advice is always appreciated though.
Some photos... first all the holes drilled in the JimmyS side scoops.. these were a great fit, the passenger side required some minor trimming in one spot to fit properly, but overall are very high quality. Can't wait to get these on!
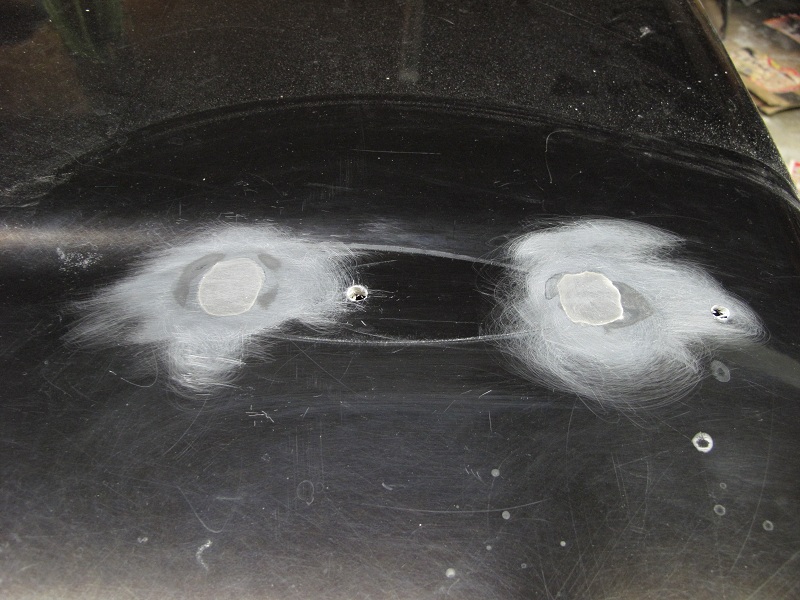
The old holes enlarged for filling in on the decklid - last year I moved the stock wing back 2". You can also see the rear bumper support painted - I had some surface rust I wanted to take care of.
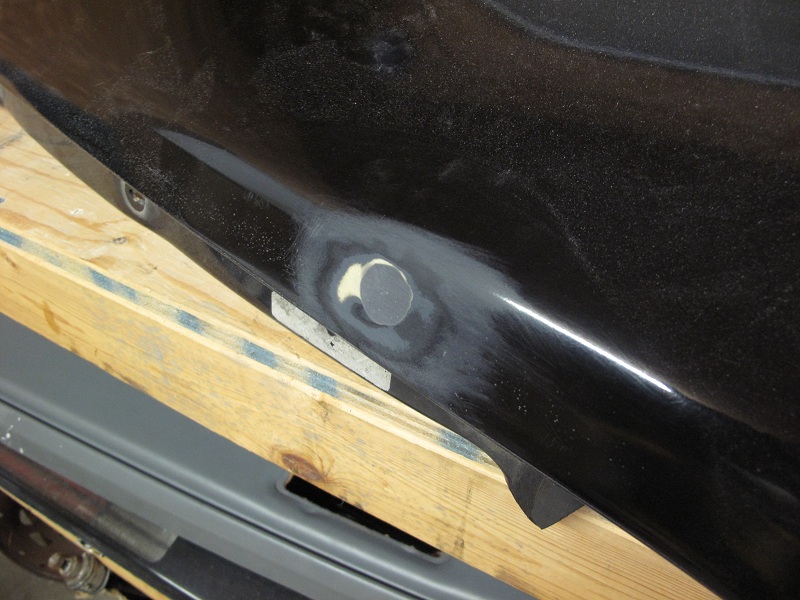
Also getting ready to fill in the hole for the antenna delete. I put a fiberglass patch on the back, and did a bit of sanding prior to fill.
Otherwise, I've just been doing a lot of sanding of body panels. I'm probably about half done the car at this point.
Also to go on in the spring are new quarter windows from the Fiero Warehouse, I got them a few weeks ago and they look excellent.
I've also ordered my wheels for the car.. TSW Vairanos. I'm going staggered diameters, with 17x8 in the front and 18x8 in the rear. There isn't a 17x7 unfortunately, so I may end up with a larger tire in the front than I would have wanted. I'm thinking 225-45R17 in the front, and 245-40R18 in the rear. One thing's for sure, with these on the stock brakes will have to be upgraded pretty soon..
Brad
[This message has been edited by BtotheB (edited 02-14-2011).]
Getting close to paint time. Everything is sanded down and ready to go except for the front bumper and hood.
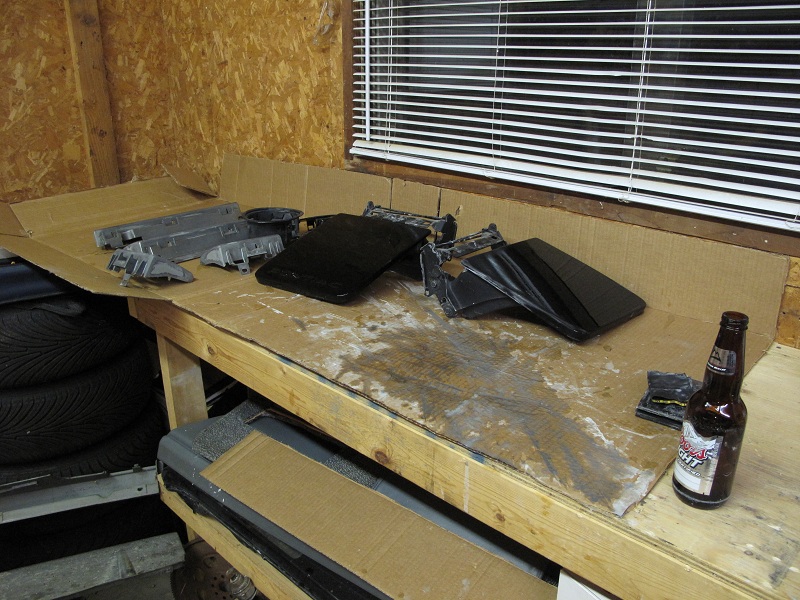
A shot of my work bench.. I discovered the secret to prep work pretty early on... (hint, it's brown and close to my right hand)
Also a photo of two of the holes filled in on the decklid. I moved the holes two inches back, and will be using the stock wing and wingstands. To fill these holes in, I cut material away around the hole about an inch in diameter. I then used a SMC adhesive as a filler and sanded smooth. I'm very happy with how this and other minor body repairs went - after sanding the rest of the area, the area repaired was almost indistinguishable from the rest. Should turn out good after paint!
A completed shot of the antenna hole filled in...
I'll post some more photos when I get the rest of the sanding done tomorrow.
Other than that, I'm waiting for my wheels to come in. I'm going to go with a two tone paint job - I want to match the bottom trim to the gunmetal on the wheels, so I'll pick up the paint when I can do the colour matching. The rest of the body will be blue, but I'm not sure of the shade yet.
Brad
IP: Logged
11:03 PM
Mar 20th, 2011
BtotheB Member
Posts: 2581 From: Peterborough, Ontario Registered: Dec 2001
Some more progress photos. First, some steel mesh cut to fit the JimmyS side scoops. I glassed some bolts on the back side to hold it down. Not too pretty, but it's very solid. I'll be painting this a flat black prior to reinstalling on the car after paint.
Next, DIY_Stu outer dew wipes installed.. great fit and quality.
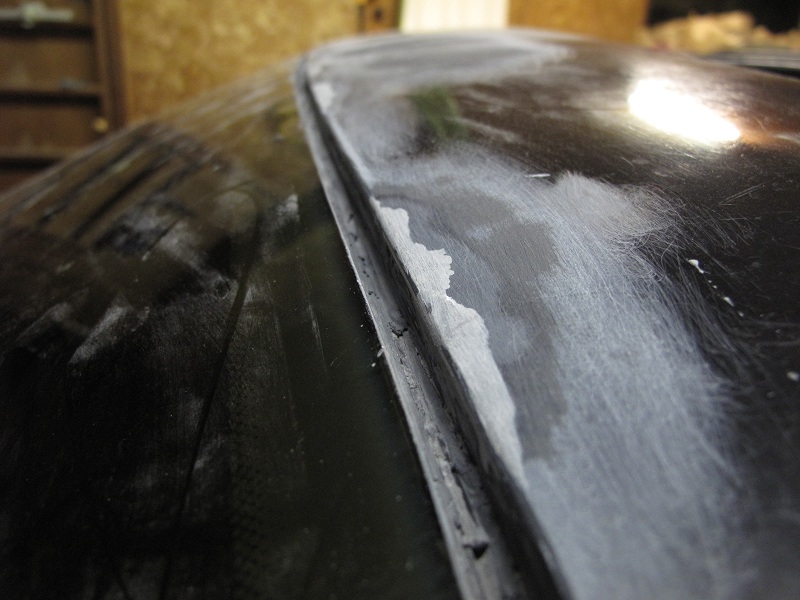
And one more prep photo. The roof on this car had some issues with paint cracking away close to the sunroof opening, and across the top of the windshield. In a number of places, the cracking paint had taken chunks out of the roof as well. These I gouged out and filled with the same SMC adhesive I used to fill the decklid holes, then sanded smooth. Again, I'm very happy with how these repairs turned out.. these took a lot of time, but if I run my finger down the edge I can't tell by touch alone where the repaired sections are.
Next will be to finish sanding a few more pieces, then I'll start setting up my paint booth. I've got some plastic sheets I'll be making an enclosure out of, some fans for ventilation and a small HEPA air purifier to hopefully cut down on the dust. I'm having a hard time finding a good paint gun locally, I want to either get one with a 1.4mm and 1.8mm tip, or two guns - one for the base/clear and the other for primer. May have to make a trip into Toronto to find an auto body supplier with everything I need - there's nothing that I've found in the area.
Brad
IP: Logged
05:18 PM
Mar 21st, 2011
cam-a-lot Member
Posts: 2257 From: Barrie- Ontario, Canada Registered: Oct 2010
I am in Belleville tomorrow visiting Deloro Stellite.(Tuesday). Let me know if I can pop in and check out your beast, and maybe have one of those training beers that is sitting on your bench (Coors Lite)
Once you get her on the road for the summer drop by and we can see what we can do with the programming to get her running better. Hopefully by then all this court crap will be behind me. Dan
IP: Logged
10:05 AM
BtotheB Member
Posts: 2581 From: Peterborough, Ontario Registered: Dec 2001
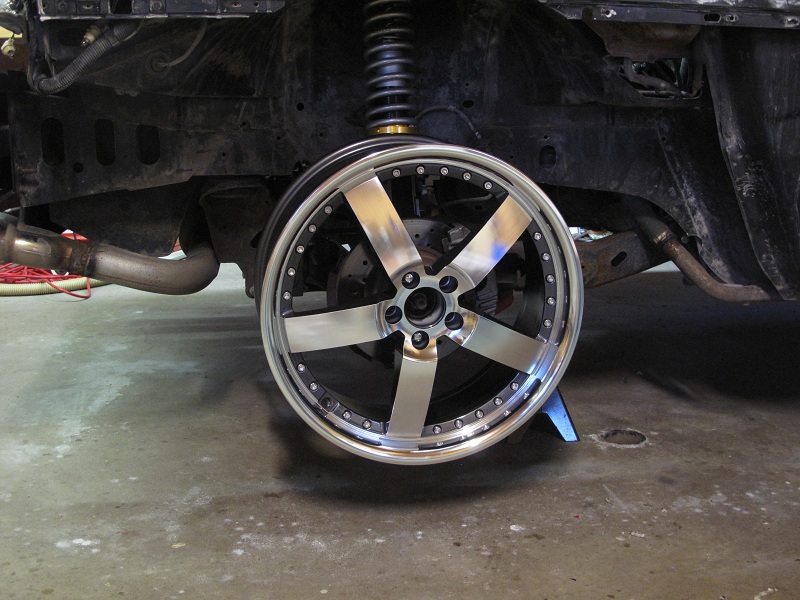
Got my wheels in today. I think these are going to look great...
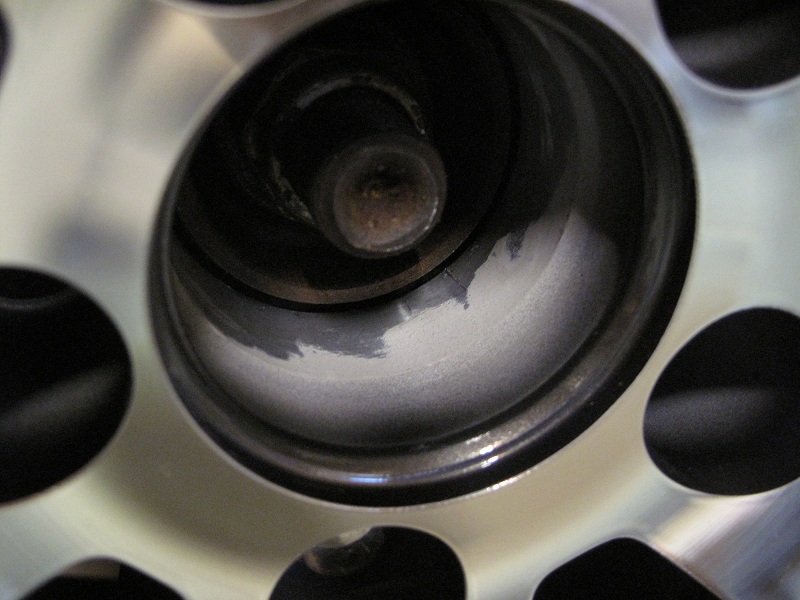
Forgot to get hubcentric rings though, I'll have to get those ordered. Should be at least a month before I get everything done and can start driving again, so lots of time. Is the amount of overlap here normal? There's barely any offset..
Monday afternoon I'm picking up my paint gun as well as primer and paint. I ordered a Pro-tek 4000GH with 1.3 and 1.8 tips.
It was good timing on getting the wheels in - I want to match the colour of the trim around the bottom of the car with the gunmetal on the wheels, so I should be able to get it right on if I bring one of the wheels in with me to the auto body supplier.
Other than that, prep is getting very close to being finished. I just have a bit more sanding on the front bumper and the hood, then I'll hit everything with wax and grease remover again and it'll be ready for primer.
Brad
IP: Logged
10:02 PM
Mar 29th, 2011
BtotheB Member
Posts: 2581 From: Peterborough, Ontario Registered: Dec 2001
Paint gun isn't in yet, but that's not really a bad thing. It's given me a bit more time to play around in Photoshop with the colours. You may recognize the Fiero I used for my PSing (might as well start with the best. heh).
For fun, seeing what the stock '87 blue looks like with darker trim, a bit of a lower and my wheels.
And what I'm going to try and do.
I was really thinking about going with a similar colour to the stock Fiero blue, but I'm not sure it really works well with a darker trim. I'm really bad at telling whether things match or not though, any opinions?


 I really like the direction that you are taking this Fiero. I am about to install a set of TLG tips. I love the look of them.


.JPG)
.JPG)
.JPG)
.JPG)
 )
)

.jpg)
.jpg)


.jpg)
.jpg)

