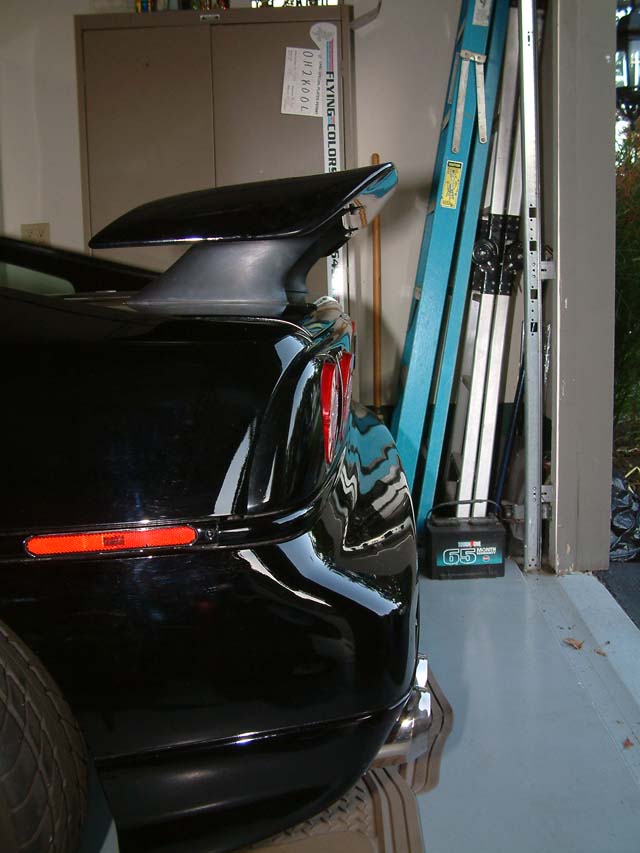
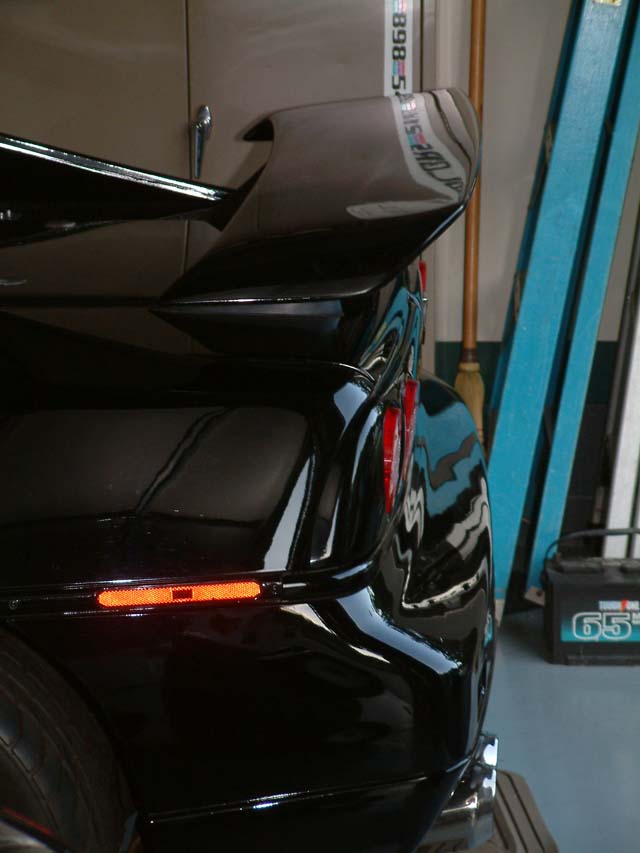
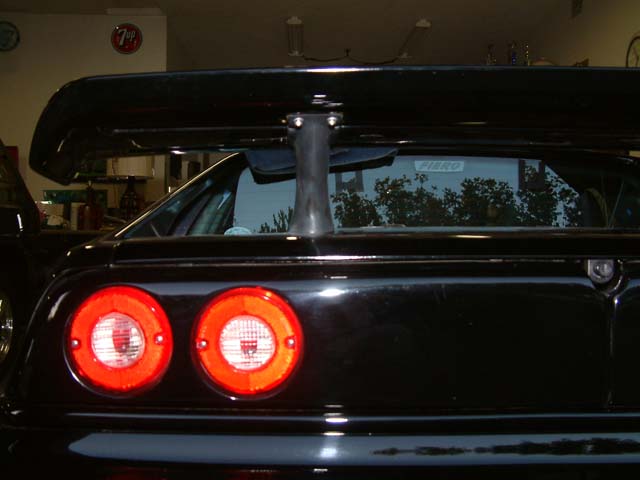
Have been meaning to do this for some time, just never took the time till now. Not that it's ever been a matter of great importance, but there was at one time, some debate about the pricing of fiberglass wingstands from Fierowarehouse. I thought I'd do a thread sharing the process of making them, since I do have orders for them, now you can judge for yourself if you think it's worth the asking price. First let me say that I prefer the wingless look, so it kind of makes the whole thing a moot point for me. Fact is, the way I make wingstands is very labor intensive and should really cost twice what we charge. I made the statement before that as long as there is a need or people that want wingstands, I will continue to make them and Fierowarehouse will continue to offer them for sale, but for my money, they are more of a community service than a money maker! Granted, there are other ways to make them, but the way I do it, works and produces what I consider a quality product. Keep in mind, we offer 3 different styles and each one has its own quirks in production. The ones featured in this thread are the 7" flared bottom stands.
So anyway here goes.
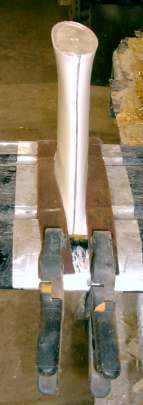
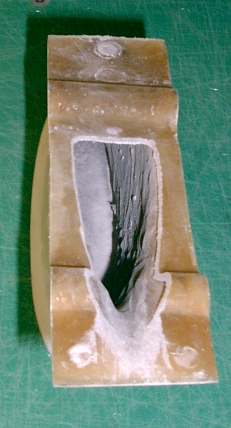
This is the mold used for the 7"flared bottom wing stands. I first made a plug from scratch, using a factory wing stand and modifying it accordingly. Each time the mold is used, it has to be cleaned and waxed i.e., prepped before the next use.
After the mold is prepped, it gets a layer of gel coat. This step is not completely necessarry, but it does help with the finish after the part is out of the mold, it helps fill small pin holes and produces a smooth even surface on most of the finished piece.
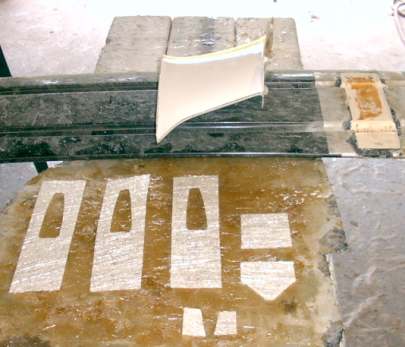
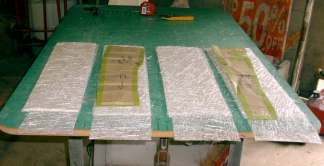
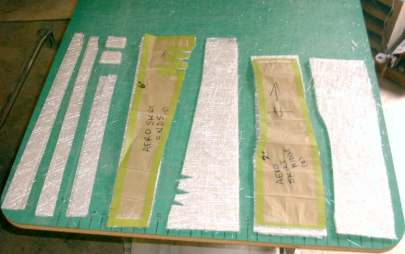
These are the pieces of fiberglass matte needed to put into the mold to make the stand. As you can probably tell, some are for the column section, some for the bottom of the stand and some to make the top where the stand attaches to the wing.
After the gel coat kicks (cures so that it is tacky but doesn't pull color when touched, about 45min. to an hour, depending on how much hardner was used and the temperature/humidity), time to lay in the matte. Here is the mold after the layup, which consists of 2 layers of ounce and half matte over one layer of three quarter ounce.
After this step kicks to the point that it can be trimmed with a utility knife, that's what happens next. This is a touchy job, as it is easy to cut into the mold,(which you DON'T want to do!), but experience really IS the best teacher, and after you do it enough, you kind of "get the feel for it". That leaves you with the two mold halves ready to be laminated. I've tried various methods and it's a toss up as to putting the mold halves together before the glass cures and waiting till it can be trimmed and then using a laminating strip. I've found you get less voids when you wait. It can be done the other way, but I've had much greater success with the "after the fact" method. This pic was taken just prior to lamination.
After the laminating strips are put in, the mold halves get bolted together before the glass kicks, basically making the entire column a one piece deal, as this is all done within a certain time period, so you have as much or more of a chemical bond as a mechanical one.
This is the mold bolted together after laminating.
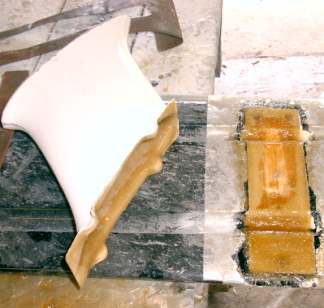
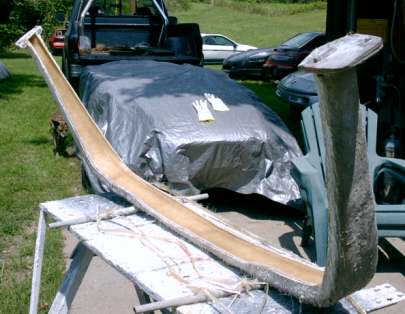
Then the bottom is layed up as soon as the column halves are together. This shot is of the glass layed into the bottom mold, (two layers of three quarter ounce and 5 layers of ounce and a half, it has to hold threads!).
Then the bottom plate mold is joined to the bottom of the column mold, again before it kicks, so you get the chemical bond, making it all like one piece of glass. While in this stage, 1" fiberglass cloth tape is layed inside the column on both seams, and resin is poured and "rolled" around the edges of the bottom, further increasing the bond between sections. Here's the whole thing left to cure.
The whole thing will set up over night, then be taken out of the mold, seams cleaned, sanded, any voids or bad spots addressed and will then get the top put on, which I'll cover in the next segment of this thread.
If there is interest, I can do some other parts offered by Fierowarehouse, like some of the IRM stuff. I've been doing this for quite a while now, and I still get a kick out of doing it. It's dirty, sticky, nasty, itchy and somewhat of a health hazard, but it's still very satisfying to pull a brand new part out of the mold.
Either way, I'll finish up this thread on the 7" flared bottom wingstand.
Hope somebody gets a little insight. The fiberglass guys can verify that it's sometimes harder to make a very small fiberglass part than a great big one, although, each is a special challenge!
HAGO!
IP: Logged
06:31 PM
PFF
System Bot
jscott1 Member
Posts: 21676 From: Houston, TX , USA Registered: Dec 2001
I have a set of the 5" (or were they 6" ) stock-shaped wing stands - they are top notch! I'd definitely love to see some of the other parts and production processes you use!
What an awesome thread...I've always wondered how hollow fiberglass parts were made. This is the most comprehensive thread I've seen on the subject. + and a bookmark
I too was put off by the price of raised wingstands, so I made some myself out of foam/thin plywood/water putty - they lasted about 8 months before they started to look really crappy. I just installed a set of Sage's 7" flared-bottom stands and they look great! Install was a breeze. This thread gives me an appreciation of how much work goes into something that looks pretty simple.
For what it's worth - I did some tuft testing w/ different height stands, and 6" is the minimum to get laminar flow over the top of the wing, which I think is essential to have any hope of actually getting some downforce. Think of the Dodge Chargers with the ring spoiler - you have to go high in order to get clean air.
Thanks everybody for looking and posting your thoughts, comments, all are appreciated!
All 3 style stands we offer retail for $200/pr. shipped. I suggest you sand with #400 paper no matter what they look like when received. You may also have to do some minor filling, sanding, but for the most part, they are close to being ready to paint when you get them. ETA can vary, especially here lately. I try not to make anybody wait more than a month, but for reasons I won't go into here, I've been running behind schedule for a while. FieroGTguy, I'm thinking you might have pm'd me last year or even earlier, but just want you to know, got a new computer last year and lost all my old pm's, so all I can do is apologize if I was supposed to get back to you and didn't. I can generally get a set done in less than a week, depending on how much time I can put in at the shop, and how many other orders I have, I do them in the order I get them from Doug at Fierowarehouse.
This might be a good time to point out that we do have a disclaimer on the Fierowarehouse site stating that these stands are for track and show use only and not intended for everyday street use. This is like the warning you see on headers It's not there because we don't think the stands will hold up to the stresses of the road, but because, not being the ones installing them, we can't be liable for improper installation resulting in failure of the part or worse. Just a reminder.
jscott1: it'd be nice to get what this job is really worth, but I guess I'd just have to sell you a set at the same price as everybody else, might even knock a little off being a repeat customer and owning an honest to goodness "movie star car"!
Thanks for posting your pics Kameo, those are good shots of the 5" raked style stands that moves the wing back further on the deck using the factory mounting holes. You can see the angle of the stand is different than stock. Kameo Kid was the inspiration for those getting into production. Something I'd thought about, but like this thread, never got around to until Kameo inquired about getting a set! Now we can produce them. If I ever raise the wing on any of my cars, those will be the stands I'll use.
Anyway, on to the next step.
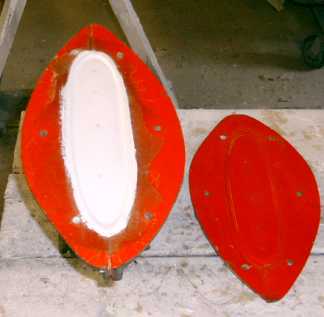
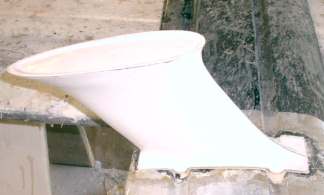
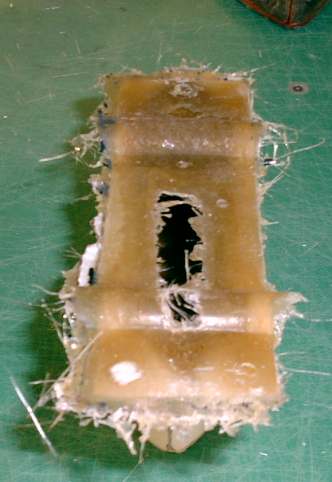
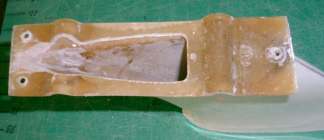
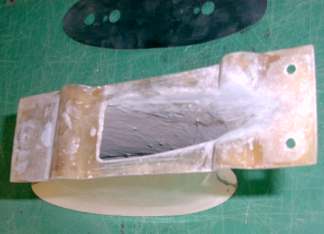
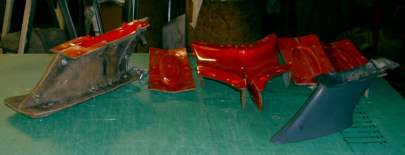
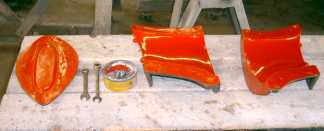
Here's the bottom plate mold removed, showing the bottom of the new stand.
Next comes separating the column mold halves. The new part usually "stays" with one half of the mold or the other. Then it's a matter of getting it to release without tearing up the part or the mold. Not usually a big deal, but I've had a sticker or two.
Then the entire column is removed from the mold. These things are supposed to just "pop" right out, but that's rarely the case. I use Meguires Mirror Glaze mold release wax, and always at least put one light coat on all pulling surfaces between pulls, but there are places that always want to stick a little. I used to use PVA (poly vynal alcohol) and still do on a new mold for at least 10 pulls, but I've found it causes more problems than it solves in a seasoned mold. If you prep it (the mold) right, and keep it waxed, you shouldn't have too much difficulty with proper release of your parts. I don't have many problems, but the nature of some parts shape and the accumulation of resin curing on two halves of some multi piece molds, creates problems from time to time.
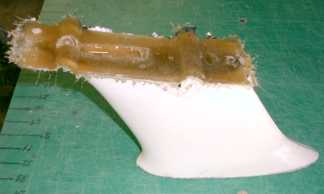
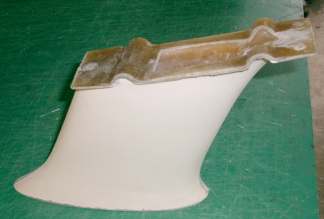
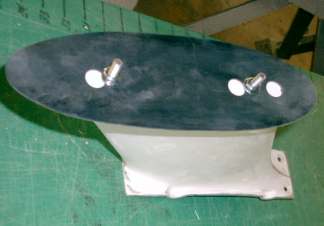
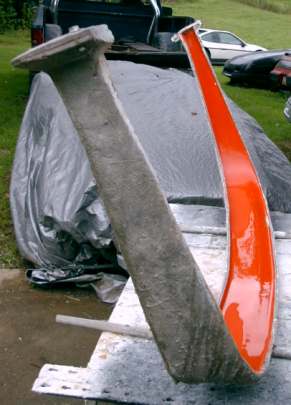
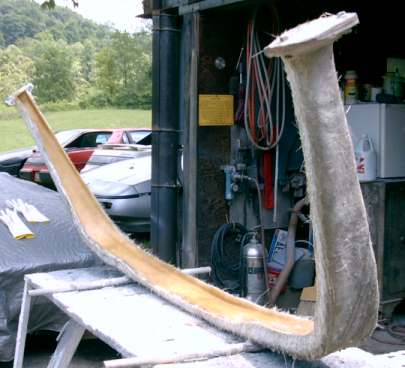
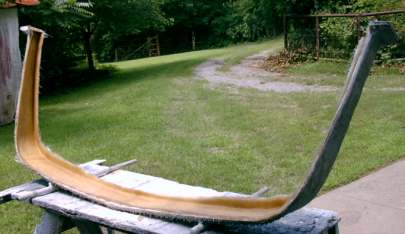
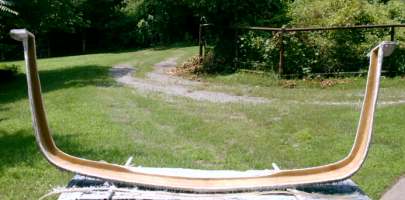
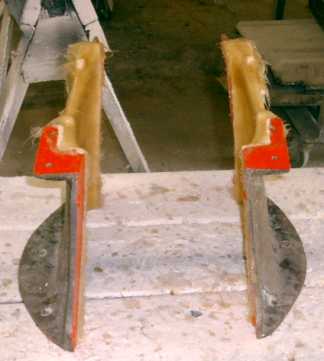
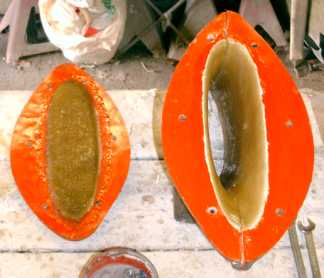
Here it is, fresh out of the mold. As you can see, the mold seams all have to be trimmed. I start with a flexible grinding disc and finish by hand with #40 grit paper. After it's "all there", I'll finish with #80, then #180.
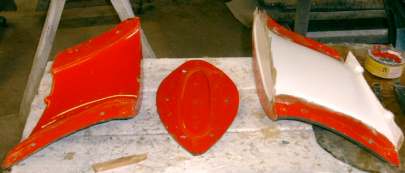
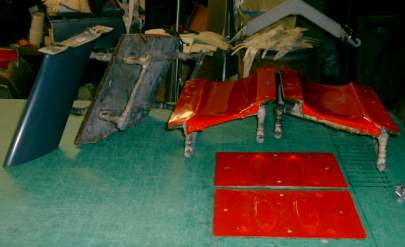
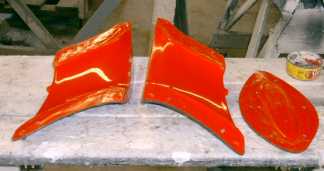
Here's a couple shots after the seams have all been cut down, roughhed in. I wait until the top is on to do the final finish work.
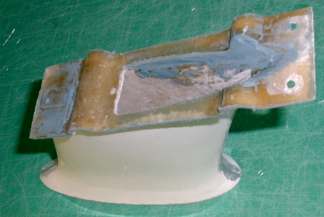
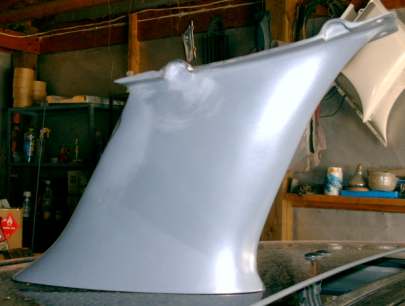
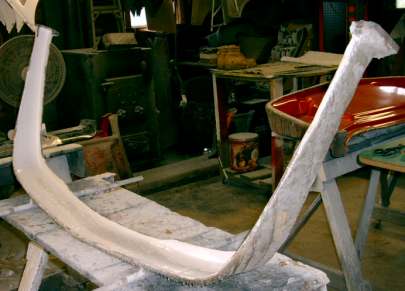
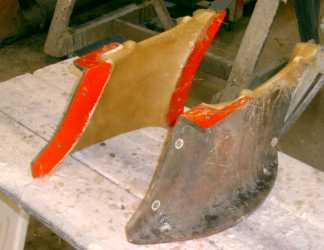
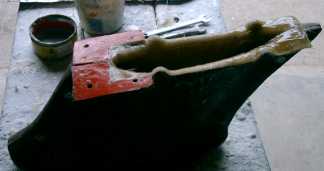
Next comes making the stand side specific. For this, I use an actual wing and shape the front and back of the stand so that it fits correctly on one side or the other like this, this one being the passenger side:
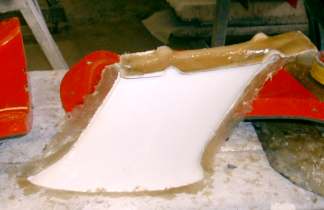
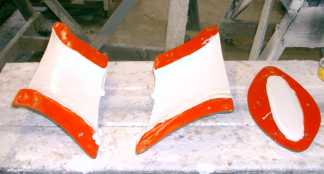
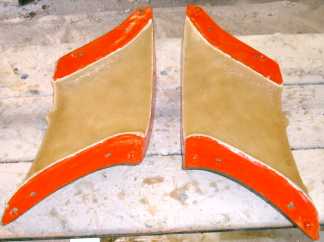
Then after sanding/roughing up the inside top of the stand, it's ready to have the top put on. This is a fairly new step that I added when making Kameo Kids stands. I started out doing it this way and actually had another mold section that was used to put the tops on. I didn't like the thickness it added to the top of the stand, so I didn't use it much. If you have an early set of stands I made, you probably weren't crazy about the fit to the wing. Niether was I, that's why this technique was developed and now used to make the tops. The thickness, doing it this way, is kind of splitting the difference between the other two methods, as it is thicker than the "open" style done early on (and selling for half the price of the new style BTW) but thinner than the ones using the fiberglass mold that I didn't like. Anyone with the early style stands can do this themselves just the way I'm showing it done here, if they want a better fit to the wing.
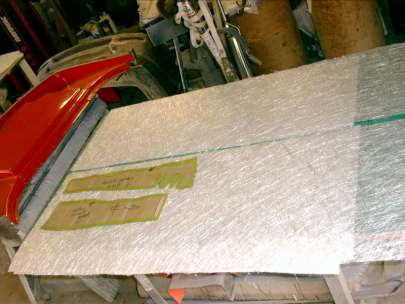
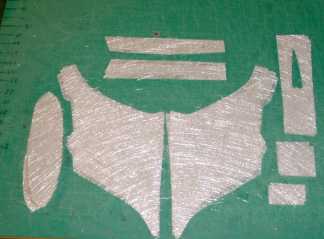
This is the layout of what will be used to create the top.
Here's a shot of the matte laid into the wing recess, before the stand is clamped onto it.
Then the stand is positioned and clamped into place till the top cures.
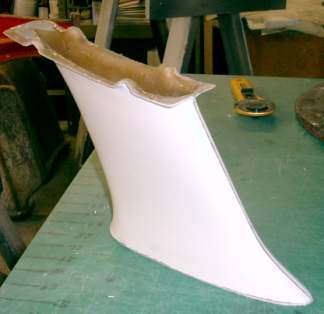
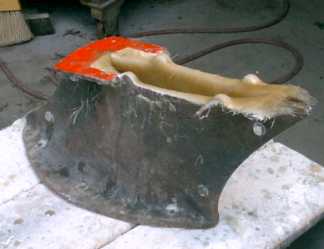
This is what you get after the top kicks and is removed from the mold/wing. Using the wing itself as a mold, pretty much guarantees at least a close fit!
As you can see, there is some trimming needs done at this point. I'll cover that in the next installment, along with drilling the holes, installing the studs and general overall finishing.
Thanks again for looking, and to those who posted, I truly appreciate all your input, support and kind words.
HAGO!
[This message has been edited by Sage (edited 07-23-2006).]
Thanks again to everybody for looking and/or posting.
twofatguys: I can make the factory configuration stands any size you want, from just a mount for the wing, to 8". Why not just bolt her wing straight onto the deck?
Here's today's installment.
I left off with the top having been added, but needing trimmed.
These pics are after trimming.
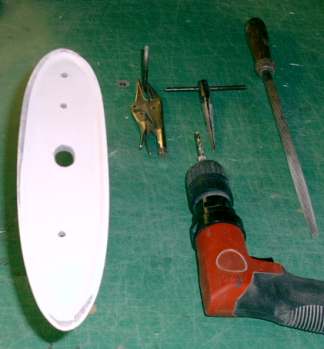
Next the holes that will be used to mount the stand to the wing are drilled.
The rear holes need to be tapered/countersunk, to allow the tapered screws to seat properly.
Next some filler is added to smooth things out, and fill any major voids. I generally use Vette panel adhesive for this.
Next is some more sanding to further smooth things out and do some finish shapeing.
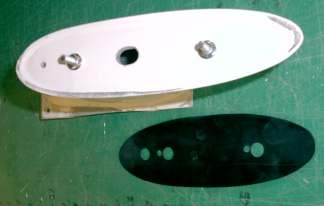
Now we go to the other end so the holes to mount the stand to the deck can be drilled and tapped. Also the larger oval hole in the center is cut to allow access to the front top screw that holds the stand to the wing. You obviously have to use a long shank phillips head screw driver when mounting, and you have to have some way to get in there! Just a footnote: there are two different bottom molds I use, one for notch backs and one for fastbacks as they require different shapes to fit the deck properly. So to anyone who may order stands in the future, you have to specify which deck they will be going on. This is only true for the flared bottom stands, (5" raked or 7" ), the straight column stands get the same bottom for both. The difference in deck configurations is compensated for by the factory gaskets which are different for the two decks, just like the factory stands.
Here is the stand ready to have the studs installed, with the gasket provided with the flared bottom stands. The gaskets were part of the IRM buy out Doug did and were intended to be used with the IRM wing stand extensions. They used a metal "Z" bracket that fit inside the fiberglass extension that the stock wingstand bolted to the top of. The pre-punched holes in the gaskets don't perfectly line up with the bottoms of the flared wingstands, so I usually punch new holes right behind the existing ones. When the studs are put in for the last time, I run a bead of panel adhesive on the threads that go into the stand, this helps secure them, but they can still be taken out if necessarry. I suggest running a nut and maybe even a washer down on the stud inside the stand, for further security, but I don't do it here, and it is not required.
Here is the stand with studs installed ready for the gasket.
And finally, the gasket installed on the bottom of the stand. I don't generally cut the gasket down to the exact size and shape of the stand bottom, but it isn't that hard to do, and I think makes the stand look better installed, but definately not a necessity.
What's left to do is final sanding, possibly polyester glazing putty added to minor discrepencies, and usually a coat of primer. I'll cover that in the next "episode".
Thanks for looking and hope this helps demonstrate that these are not exactly "pull em' outa the mold and ship em' ".
After completed you just "rinse wax and repeat", then you have a pair of wingstands!
Cool thread! Thanks for taking the time to write it up. Definitely a lot of man hours involved in making those! Heck, there was a lot of man hours involded in watching you make them here.. LOL
IP: Logged
08:46 AM
blackrams Member
Posts: 33302 From: Covington, TN, USA Registered: Feb 2003
Sage, Maybe I missed it, but I wasa wondering if there is a left and right versions to the wing stanchions?
------------------ Ron Freedom isn't Free, it's paid for with the blood and dreams of those that have gone before us. My imagination is the only limiting factor to my Fiero. Well, there is that money issue.
Next comes making the stand side specific. For this, I use an actual wing and shape the front and back of the stand so that it fits correctly on one side or the other like this, this one being the passenger side:
quote
Just a footnote: there are two different bottom molds I use, one for notch backs and one for fastbacks as they require different shapes to fit the deck properly.
Hope that answers your question? If not, LMK, I'll be happy to elaborate. Thanks for looking.
Thanks smartaxel!
HAOG!
IP: Logged
09:34 AM
PFF
System Bot
m0sh_man Member
Posts: 8460 From: south charleston WV 25309 Registered: Feb 2002
sadly i want a wing stand that is just bearly tall enough to clear the fastback section, i want it as low on the decklid as i can get it and no one offers a LOWER wing stand, my personal taste makes me hate the taller ones with a passion,id love to have my wing about 1" off the decklid.
My wife wants shorter than stock wingstands installed so that the wing sits millimeters off of the side of the car.
Any shorter ones out there?
Brad
quote
twofatguys: I can make the factory configuration stands any size you want, from just a mount for the wing, to 8". Why not just bolt her wing straight onto the deck?
quote
sadly i want a wing stand that is just bearly tall enough to clear the fastback section, i want it as low on the decklid as i can get it and no one offers a LOWER wing stand, my personal taste makes me hate the taller ones with a passion,id love to have my wing about 1" off the decklid.
matthew
quote
I can make the factory configuration stands any size you want, from just a mount for the wing, to 8". Why not just bolt her wing straight onto the deck
HAGO!
IP: Logged
09:48 AM
blackrams Member
Posts: 33302 From: Covington, TN, USA Registered: Feb 2003
------------------ Ron Freedom isn't Free, it's paid for with the blood and dreams of those that have gone before us. My imagination is the only limiting factor to my Fiero. Well, there is that money issue.
Hope everybody who looked enjoyed seeing how I make wingstands. As I've said, there are other ways to do it, this is just the best, and believe it or not, easiest way I was able to come up with and produce a quality product that works. Ideally, they would be injection molded like the originals, where hundreds a day could be made. As you can guess, there's not enough demand for them to make that a worthwhile project for anybody, as the initial molds would be somewhere in the neighborhood of $6,000 to $10,000. You'd have to sell an awful lot of wing stands for anyone to foot the bill for that!
As I stated some time ago, the only reason I ever made these was because I watched as several people announced they were going to produce them, then weeks, months went by and nobody ever did, so I gave it some thought and came up with the method illustrated in this thread. It's still allot of work and takes time and effort. More than the compensation gotten from the selling price warrents. Lets' face it, not too many folks would put in the time and effort it takes for $125, which is what I see from the sale of a pair retailing for $200. That leaves $75 which goes to Doug at Fierowarehouse, about $30 of which is in materials, and around $12 in shipping, so you see, he only makes about $33 for doing the order taking and dealing with customers, as he pays for materials. Not to mention that the real work involved was in making the plugs and molds, which is not shown here.
Keep in mind this thread just touches on the process of reproducing parts from the molds that I made. Any other fiberglass shop or individual playing with fiberglass could do the same thing, but none do that I know of. There was a place in Canada that offered them, but I've heard nothing good about their product and even heard of more than one person who sent them back after receiving them, because they just were'nt usable. There was also somebody here on this board that was making them, but I only saw them offer 2 sets, then nothing more. I never saw first hand, either of these products, so really can't speak to the issue of their quality, other than the scuttlebut mentioned. All these things are why I consider making them a "community service", cause it sure "ain't for the profit"!
Anyway, here's a few more pics.
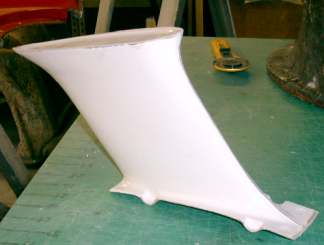
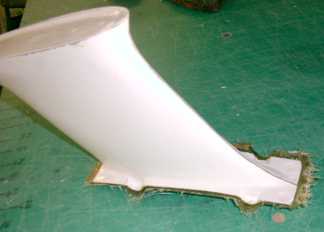
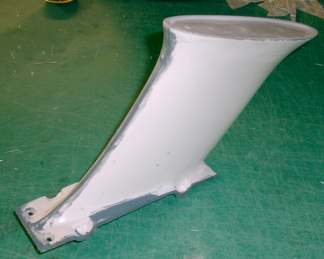
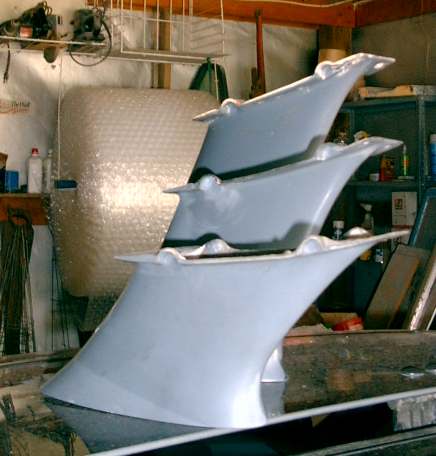
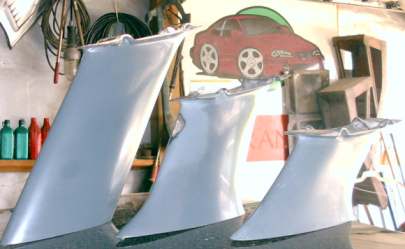
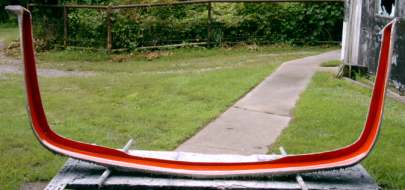
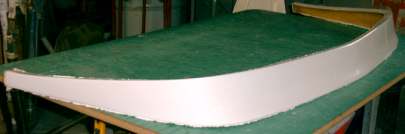
Here's one of a finished 7"flared bottom stand, like the one in the thread.
This is of the 3 plugs the molds were made from. You can see the different angle on the 5"raked style. It essentially puts the wing in the position that the 7"stand would, but at the 5" level.
Another shot of the plugs.
And one last one. The molds for the "straight" style stands were made so that I can lay up all or any portion of the column, making any height stand from 1" to 10" possible. I just refuse to make anymore 10"stands, as they are too much hassle and totally impractical IMHO.
Hope you enjoyed the thread and a few were enlightened!
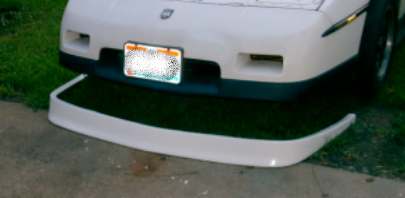
Next will be a closed mouth chin spoiler for the aero nose.
HAGO!
Here's just a couple more pics to finish up this segment.
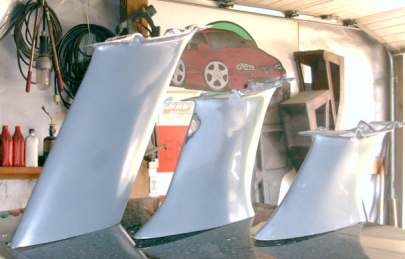
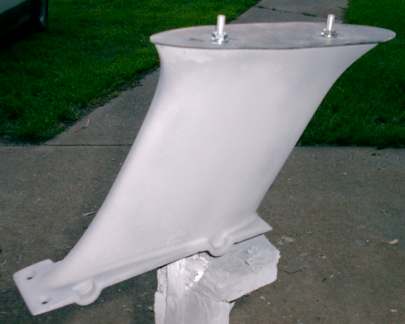
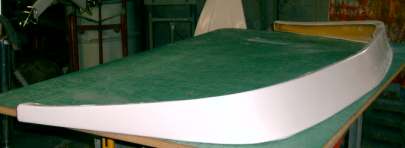
First, the finished stand from the project above. I may still do glazing putty, sand and a last coat of primer, but for the most part, it's ready to send to the customer.
Next are the molds used for the 5"raked style stand that moves the wing back on the decklid using the factory holes. Shown with the plug used to make the molds.
And finally, the original molds for making the straight bottom stands in lengths from 1" to 8" also with the plug used to make the molds.
So, there ya go!
Thanks for the space and for looking.
TW
[This message has been edited by Sage (edited 07-23-2006).]
Thought I'd just continue this thread instead of starting a new one.
A few folks asked to see some more fiberglass projects - proceedures, so I'll document the making of the IRM closed mouth chin spoiler here.
This mold was part of the collection Doug Kinney bought from Jim Sutter owner operator of IRM~International Research Motorsports. Some of the molds owned and used by IRM were bought from DGP~Diversified Glass Products, like the IMSA body kits and some were made by IRM. Not sure which the closed mouth chin spoiler is, but most of DGP's stuff is embossed with their name and a part number, this mold is not. It also has seen allot of use, judging from the condition it was in when Doug got it. Good example of over-zealous utility knife trimming, as the mold has been cut into often. It's still good enough to pull good parts from, with the understanding that the end user is going to have to do some finish work before painting and mounting. There's nothing wrong with the parts, just needs what is considered "normal" prep -fit and finish- for most aftermarket fiberglass parts.
Here's the mold prepped and ready for gel coat.
another angle:
It is then coated with gel coat. Gel coat is best shot in the mold with a gel coat gun. I generally do that with larger parts, but ones like the wing stands I usually brush in. This mold sometimes gets shot, sometimes brushed, depends on the weather as much as anything. Brushing gel coat takes some patience and experience, but nothing that can't be learned through trial and error. Here's the gel coat in the mold:
While the gel coat is kicking, I usually cut the pattern peices.
I start with this:
Cut it into strips of the right width:
Then into the shapes required to fill the mold most effeciently:
Some fiberglass shops use a chopper gun, which is a spray gun (basically) that "chops" a fiberglass matte "rope" into strands that you set the length of and mixes it with resin and hardner either at the tip outside the gun, or some of the older models, actually mixed it inside the gun, which led to problems we won't go into here. I don't have a chopper gun, so everything I do is hand laid, which involves cutting pattern peices that will lay into the mold with little or no overlap and not have too much excess hanging off the edges of the mold. Some guys just cut a peice big enough to cover their mold and force into wherever they have to. Nothing wrong with that, I just prefer to get it as close as I can to what I want to end up with, seems to work better for me.
Next the matte is laid into the gel coated mold, one layer at a time. 3 and 1/2 layers of ounce and a half matte is pretty much standard for body parts. It gives you a part that is not real heavy, but thick enough to hold it's shape and stand a little abuse. I've found it takes a hit hard enough to bend or crush a metal part to break the same part made from fiberglass. Glass is allot easier to fix to me. I've done my share of bending, beating, heating and patching metal body parts though! A chin spoiler is hanging down there where it's in harm's way all the time, so if you put one on your car, you might as well get used to the idea, that if you drive it normally, sooner or later you're going to hit it on something, and if hit often enough, or hard enough just once, it will break. It'd be nice to be able to make them out of pliable nylon material, kind of like some of the body panels on our cars, but like the wing stands, the start up cost prohibits that type manufacture IMHO.
Here's the glass laid into the mold after the gel coat kicks:
Then it has to kick. In nice weather, I push them outside under that big heat lamp in the sky. Nothing works like the sun!
After it kicks to the point it can be trimmed with a utility knife, that's what I do. Here's the result:
Then it is usually left in the mold 24 hours and pulled the next day giving you this:
You can see the rough edges, gel coat that didn't get trimmed off with the knife. On molds that have been used considerably, you don't want to trim as close with the knife as you would normally. Somebody did get too close, that's why the mold is smaller today than when it was made! I try to avoid doing that.
So then cleaning the edges all round with #40 paper, you end up with a part ready to ship to a waiting customer, who gets to do the final finish work and make it look "real purrdy".
That's about it for the closed mouth chin spoiler.
Everyone that does hand lay up develops their own technique, and that's what, in part, largely determines how good your finished part is. As someone else said here once, doing fiberglass is almost as much an art as a skill, but like drawing and painting, I believe everyone has the ability, some develop it and some don't. Just my opinion.
Hope you liked seeing the cmcs being made. If anyone has any questions, I'll do my best to provide an answer.
Sage - again, a big thanks for the visual "how-it-works" view of the process. My cousin in Florida makes fiberglass kitplanes (www.teamtango.com), and I've seen his shop - as well as Eckler's Corvette shop... and it's amazing to see the different techniques used. I'm very impressed with the way you use templates & hand trim all your glass ahead of time (Eckler's uses a chopper gun).
I've done only minimal fiberglass work (mostly small-scale repair & customization) - and it's just very impressive to see how it's done from the start!
Thanks for the feedback, Rob. Good to know somebody enjoyed looking.
I'd like to see Ecklers shop myself! I heard that they bought some of the old Corvette molds from GM, (the STEEL ones!) to make replacement parts for people doing restorations, repairs to their older Corvettes. Did you see any evidence of this when you visited?
I'd enjoy seeing what your cousin does too. No matter how long I do this, I don't think I'll ever get tired of seeing a new part come out of the mold. It just intrigues me that you can come up with an idea, and make it a reality, ending up with something that you can use. Most of us think of things being "store bought", and therefore not able to be had, except from the "store", but truth be told, with fiberglass you can make just about anything for a car body at home in your garage, with enough patience and perseverance. I think the home made wide body featured at Daytona, is a good example, course it takes some capitol and know how too!
Thanks again for looking and taking the time to express your appreciation.
HAGO!
IP: Logged
06:35 PM
Jul 26th, 2006
HarryG Member
Posts: 587 From: Central Ohio, USA Registered: Sep 99
Sage, Thanks for starting this thread and enlightening the rest of us on your techniques and tips!! Like they say, "A picture is worth 1000 words...."
Have you ever made a part like the wingstands by making the plug slightly undersize and just coating it with FRP? A "one-off" in other words. Realize you couldn't use it for multiple pieces, just curious about the techniques. Also, you mentioned a gelcoat gun; is it possible to apply gelcoat using a siphon-feed paint gun with (I'm guessing) a bigger tip?
Thanks again for the "lessons"! Harry
IP: Logged
11:33 PM
Jul 27th, 2006
exoticse Member
Posts: 8656 From: Orlando, Fl Registered: Jun 2003
Thanks Harry and Tony, like I said, it's good to know when your efforts are appreciated, thanks for saying so!
Harry, the method you decsribe is basically what was used to create the plugs for each of the wing stands. Primarily the long tall one. I started with a factory stand, cut a piece of resin resistant foam that fit down inside the bottom opening of it, shaped it till it was, like you mentioned, a "little" undersized from what I wanted to end up with, by the same amount as the thickness of laminate I added. That was then finished, creating a "one off", then the molds were made from that. The same thing works to make one off parts, but they usually end up being too heavy, for one thing, and are subject to comeing apart if used as a permanant part on a car being driven daily. That's one reason molds are made, the parts that come out of them, as a rule, are much nicer, lighter and last longer.
You can spray gel coat through an HVLP gun, but it has to be thinned to the consistancy of paint. That's what I generally use to create the surface on a plug, before pulling molds from it. The gel coat gun is a whole different set up than your normal paint gun. I'll try to get a pic of mine so you can see. As to using a larger tip on a regular spary gun, I don't know, never tried it. Thought has occured to me, but I have a "standard issue" gel coat gun, so that's generally what I use, when I shoot it. It doesn't really "spray" the gel, as it's very thick out of the can, it rather "spits" it on your mold. You don't get coverage on the first pass like a paint gun, you just keep making multiple passes, till it gets built up to the desired thickness. (about 20mills)
Hope that answers your question, if not, we'll keep trying!
Thanks again for taking the time to provide some feedback, it is appreciated.
HAGO!
[This message has been edited by Sage (edited 07-27-2006).]
Great thread! It's nice to see how the pro's do the process. Most of us probably don't realize how involved it is. Thanks for showing us how it's done.
Nolan
IP: Logged
11:33 AM
RandomTask Member
Posts: 4547 From: Alexandria, VA Registered: Apr 2005
Great thread! It's nice to see how the pro's do the process. Most of us probably don't realize how involved it is. Thanks for showing us how it's done.
Nolan
What you guys don't just dump some resin on some fiberglass then say "abra cadabra" ?
What you guys don't just dump some resin on some fiberglass then say "abra cadabra" ?
Hey, that there's funny.........I don't care WHO you are!
You forgot to mention the "shake and bake to the moon" method, my favorite. You get a contractors heavy duty trash bag, (the BIG one), then put in a few strips of matte, 5 chips of tooling gel coat from a mold that you want a part from, a picture of what you want the part to look like, and about a quart of resin and two tablespoons of regular gel coat. Then shake vigorously for 20 minutes while chanting, "Om Mani Padme Hum". This must be done on the third night of the full moon, and it only works June through the end of October. The rest of the year, you still have to wait till the third night of the full moon, but you have bury the bag and leave it in the ground for one week.
Sourmug, I've seen your work and the only difference between you and "professional" is they get paid for doing what you do. Nice work on your car, been following your thread.
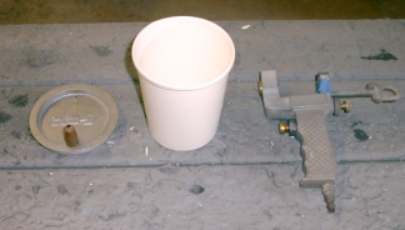
I told you I would get some pics of a gel coat gun so you could see it's not quite like a regular paint gun.
Here are the pics:
These are the components of the gun, the handle/body-the lid with nozzle and the cup.
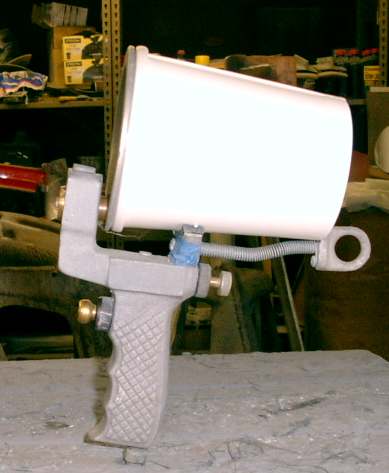
Here it is all put together ready to use.
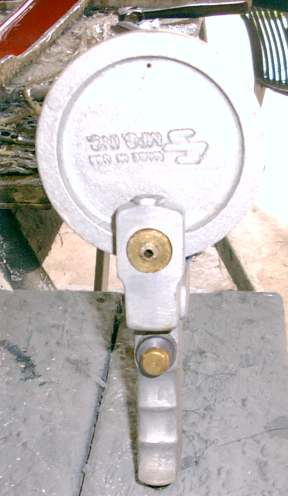
And another angle, where you can see a little better, the size of the tip opening.
It's basically a "gravity feed" gun, but not like what you would think of when you imagine a gravity feed paint gun. When shooting the gel in a mold, you have to either be squeezing the trigger, or have the tip pointed up at the sky. Otherwise, the gel coat will run out the tip, that's truly gravity feed!
In this particular gun, you have to mix the hardner in the gel coat before you spray it, so you have a limited time to get your mold coated, especially in hotter weather. You can get the same gun that has another attachment on it that holds MEKP and introduces it into the path of the gel coat as it is leaving the gun, thereby enabling you to shoot at your liesure and return any unused gel coat to the container it came from if you don't use it all. The cheapy version, ( the one pictured), usually runs somewhere between $150-$200, depending on where you buy it, the other version is generally around $200-$300, again determined by where you shop.
So, there's the skinny on regular gel coat guns. There is also available, guns that are kind of similar to chopper guns, but they run up in the thousands of dollars, and generally mix at the tip and pull from a drum of gel coat.
Hope this is helpful to somebody, just doing what I said I would.
Thanks to everybody that looked, and to those who took the time to express themselves, it's appreciated!
Glad you took my comment as a compliment, that's how it was intended, but it's more of a statement of FACT! You did an outstanding job with your car, and would have had to pay dearly for a "proffessional" to have done the same thing. Your dash is equally impressive, can't wait to see it completed, but I DO know how long some of this stuff takes.
trots:
Thanks a bunch for your compliment, it's as rewarding to know somebody appreciates what you do, as it is to get it done.
Thanks for posting, motivation is the hardest commodity to find. I have done my share of boat repair when I was in the Navy, but I had unlimited supplies and all of the needed tools. My workshop now consists of a piece of plywood on an aluminum stand, its so full of tools and parts that I just don�t have space, so nothing gets done. That�s why we need people like Sage to build the parts we just don�t have time and space to create ourselves. Thanks for sharing.


 ) stock-shaped wing stands - they are top notch! I'd definitely love to see some of the other parts and production processes you use!