I guess its about time I posted something useful from exciting southern Idaho.
I know several people on here have been toying with LED lighting in different forms so I thought I'd share some of my recent ideas and progress with everyone.
They can be cut into sections of three and can be directly wired to 12VDC so they are very easy to work with and can be used lots of places. In my case I wanted to be able to return to the stock setup if my experiment failed (that never happens ) so I went with 2 three LED segments wired in parallel, one mounted on each side of the stock bulb socket. In this configuration you could also wire one or both sets into the turn signal circuit for a little more visibility.
I'll see if I can borrow my friends good camera this weekend and get some better pics for you all.
I've also started on my LED tail light project. These were inspired by the newer model Land Rover Supercharged lights. I still have a ways to go before they are complete but I did get one brake/turn signal mocked up:
Just the turn signal halo (not quite bright enough yet, I think it needs a lower value resistor):
The plan is to use the red circular lights for brake lights in all three sockets per side, with yellow halos (turn signals) on the outermost location and red halos (running lights) in the middle two. I'm still searching for the right backup light setup, probably will just be a circular super-bright white LED array of some kind. I'm thinking I'll paint the reflector section black while I'm at it, not really a big chrome fan.
Anyway, enough rambling. Questions and comments are welcome.
that looks sick man! i especially love the marker lights, where did you find the light bar thingys? i would put one of those OEM LED replacement bulbs in the stock socket, ad have that as the running light, and wire the others as the turn signal.
------------------ Currently aStreet Rod/custom fab student at Wyotech in Sacramento. 1987 Pontiac Fiero GT, 151,000 miles!decklid window, silver guages. rear ended someone, and now the rebuilding starts! More pics of my 87 GT can be found here 1985 Pontiac Fiero 2m4 auto, 222K miles and counting <-recently lost to arson (6yo bro playing with fire) RIP! 2005 Jeep Grand Cherokee 3.7L 4x4, 72K <-Daily driver A 4 year olds knowledge of science: No matter how much jello you put into a swimming pool you still can't walk on water.
IP: Logged
07:01 AM
AquaHusky Member
Posts: 1234 From: Sedalia, Mo Registered: Dec 2006
Just a Q did you bend those rods yourself? If so I found those instructions years ago. Pretty good idea but getting even distribution is impossible. SO what you can do is place notches into the back of the rod and glue in SMD LEDs I used a wire brush on a dremel to rough up the front side evenly. placed as many LEDs in the back and wired them up with magnet wire. Then the only problem is brightness. soldering to them is not too terrible if you can handle an iron.
IP: Logged
02:08 PM
helmet1978 Member
Posts: 743 From: Boise, Idaho, USA Registered: Nov 2001
that looks sick man! i especially love the marker lights, where did you find the light bar thingys? i would put one of those OEM LED replacement bulbs in the stock socket, ad have that as the running light, and wire the others as the turn signal.
These would work and they are water proof (I have not ordered anything yet but have to do something about side markers soon so keep posting!) http://www.superbrightleds.com/mini_tubes.htm
WFLB Waterproof Flexible Light Bar 9 1/4" Waterproof Flexible Light Bar with 24 Wide Viewing Angle LEDs 12 VDC Operation, Completely rubber encapsulated and will conform to most shapes Each Bar includes 3 mounting brackets $ 6.95
[This message has been edited by Jake_Dragon (edited 08-30-2008).]
IP: Logged
02:26 PM
helmet1978 Member
Posts: 743 From: Boise, Idaho, USA Registered: Nov 2001
These would work and they are water proof (I have not ordered anything yet but have to do something about side markers soon so keep posting!) http://www.superbrightleds.com/mini_tubes.htm
WFLB Waterproof Flexible Light Bar
You might be able to make those work, but they might be to deep to fit behind the stock lens. It also doesn't say if you can cut them into segments. I think the NFLS-x30 weatherproof would be the way to go. I've got to order some more stuff from them to finish my taillights anyway so I'll get one and check it out.
Paul
IP: Logged
02:39 PM
helmet1978 Member
Posts: 743 From: Boise, Idaho, USA Registered: Nov 2001
i think it's too much work for very little gain...
------------------ 1986 GT Fiero Owner & Enthusiast For Fiero updates, visit my site and don't forget to click on the ads! http://educatorstop15.we.bs/fieropage.htm
IP: Logged
11:49 PM
PFF
System Bot
Aug 31st, 2008
helmet1978 Member
Posts: 743 From: Boise, Idaho, USA Registered: Nov 2001
If you don't get those sealed up they will rot fairly quick once they get wet. If they freeze wet it can crack parts off boards. The markers are probably more likely to drown than the tail lights but the tails still need to be kept dry. If they are made RoHS compliant they are potentially even more prone to joint damage. (RoHS solders have been causing problems around the entire electronics industry. Its a major suspect in Xbox360 RROD problem and other things.)
LED's don't work properly in the front markers. At least not if you just connect an LED across that socket as you did in back. Power needs to flow in both directions across that lamp. It's actually connected between the park and turn circuits so that it will flash when the turn signals are used. (If park lights are off, it flashes with the turn signal. If park lights are on, marker goes off when turn signal flashes on.)
------------------ Dr. Ian Malcolm: Yeah, but your scientists were so preoccupied with whether or not they could, they didn't stop to think if they should. (Jurassic Park)
Nice tweak Paul. I like it. How much did you pay for the tweak work on the side markers?
Thanks for the compliment!
When I'm done I'll be into the side markers about $30 and it took about an hour to get the first one done. Now that I know what I need to do, the rest should be about 30 minutes each with a dremel, drill and soldering iron.
Paul
IP: Logged
04:54 PM
Sep 11th, 2008
kooljess Member
Posts: 1135 From: FIEROS WEST USA Registered: Jul 2004
I guess its about time I posted something useful from exciting southern Idaho.
I know several people on here have been toying with LED lighting in different forms so I thought I'd share some of my recent ideas and progress with everyone.
They can be cut into sections of three and can be directly wired to 12VDC so they are very easy to work with and can be used lots of places. In my case I wanted to be able to return to the stock setup if my experiment failed (that never happens ) so I went with 2 three LED segments wired in parallel, one mounted on each side of the stock bulb socket. In this configuration you could also wire one or both sets into the turn signal circuit for a little more visibility.
I'll see if I can borrow my friends good camera this weekend and get some better pics for you all.
I've also started on my LED tail light project. These were inspired by the newer model Land Rover Supercharged lights. I still have a ways to go before they are complete but I did get one brake/turn signal mocked up:
Just the turn signal halo (not quite bright enough yet, I think it needs a lower value resistor):
The plan is to use the red circular lights for brake lights in all three sockets per side, with yellow halos (turn signals) on the outermost location and red halos (running lights) in the middle two. I'm still searching for the right backup light setup, probably will just be a circular super-bright white LED array of some kind. I'm thinking I'll paint the reflector section black while I'm at it, not really a big chrome fan.
Anyway, enough rambling. Questions and comments are welcome.
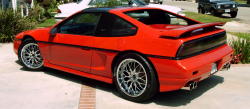
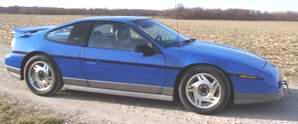
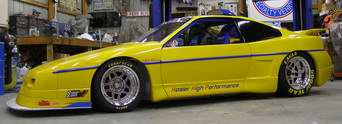
I am working on LEDs myself. Pics to come later... BUT, I would LOVE more photos of your car.
Your paint scheme is my goal (not to copy per se, but it is the one I find most striking, and would love to see it on my car.)...
Can you post some decent shots of it, or mail me as many high res photos as you can?
IP: Logged
10:52 AM
helmet1978 Member
Posts: 743 From: Boise, Idaho, USA Registered: Nov 2001
A photographer friend of mine wants to do a shoot for her portfolio so I think we'll try to do that before the weather gets nasty.I'll post those for you to check out too.
LED's don't work properly in the front markers. At least not if you just connect an LED across that socket as you did in back. Power needs to flow in both directions across that lamp. It's actually connected between the park and turn circuits so that it will flash when the turn signals are used.
A 4-diode bridge (i.e. a full wave rectifier bridge) inserted between the stock marker light wires and the LED assembly should neatly solve that problem.
[This message has been edited by Marvin McInnis (edited 09-13-2008).]
IP: Logged
12:42 AM
Sep 17th, 2008
helmet1978 Member
Posts: 743 From: Boise, Idaho, USA Registered: Nov 2001
I wired the LEDs in parallel instead of series, switched to a 270 ohm 1/2 watt resistor and made new rings just like the instructions (above) said. Big difference in the brightness and consitency of the light.
More details after I get the mounting all figured out.
I found some 1 watt red and yellow side marker LED lamps on ebay that are insanely bright. I have them on my suzuki and fiero and when you turn on the running lights they light up the road to the side of the car. Hard to look at bright. you can even easily see them in direct sunlight. They are still only single point light though. I like the 6 led's on the markers. You need to seal them up so they will last.
I wired the LEDs in parallel instead of series, switched to a 270 ohm 1/2 watt resistor and made new rings just like the instructions (above) said. Big difference in the brightness and consitency of the light.
More details after I get the mounting all figured out.
Paul
Did you use a hex rod or cylindrical? And you might want to extend the tape to completely cover the LED, that way all the light has to go out through the ring. I also thought painting the back of the ring white may be helpful, though you might want to try that on the previous rev, in case it makes it worse.
IP: Logged
12:14 PM
helmet1978 Member
Posts: 743 From: Boise, Idaho, USA Registered: Nov 2001
Did you use a hex rod or cylindrical? And you might want to extend the tape to completely cover the LED, that way all the light has to go out through the ring. I also thought painting the back of the ring white may be helpful, though you might want to try that on the previous rev, in case it makes it worse.
This is hex rod. The first one I made I had the rod facing the wrong way when I bent it so the back side was a point instead of a face. That caused my cuts to be to big and the lighting was all out of whack. Also, this time I marked the rod with a thin tip sharpie every 3mm before I cut and bent it so they are nice and even now.
As for the tape, I'm not positive if using electric tape is worse than this foil tape but it would seem to absorb more light therefore making things dimmer. I got a whole roll of aluminum tape at Home Depot for less than $8, of which I probably need about 12 square inches so if anyone else wants to try this project I'll sell whats left for $7.50
Paul
[This message has been edited by helmet1978 (edited 09-17-2008).]
I was thinking that you are probably loosing a good percentage of light out the back of the LED. If you completely cover it with tape, more would be likely to go through the rod.
IP: Logged
03:41 PM
Sep 28th, 2008
helmet1978 Member
Posts: 743 From: Boise, Idaho, USA Registered: Nov 2001
Well boys and girls I have one taillight pretty much done. I'm waiting on my backup lights to arrive as well as another pair of LEDs for the turn signal since I killed my first set
First off, heres how they look when off:
Parking lights:
Brakes and parking:
Outside halos will be the turn signals in yellow. I also rewired the rear markers so the front 3 LED segment is parking lights and the rear are turn signals.
I'll post some more details on wiring if anyone is interested. As for the turn signals working with the LEDs, I've ordered a flasher from superbrightleds.com that supposedly works with LEDs and plugs into the factory harness. I should get it next week so I'll let you know how it works out.
Paul
[This message has been edited by helmet1978 (edited 09-28-2008).]
IP: Logged
01:16 AM
kawana Member
Posts: 2329 From: Abbotsford, BC, Canada Registered: May 2007
looking good, too bad the rings dont go all the way around, still looks good though.
You could make them go further around if you wanted, except for the end socket since they aren't as big. I wanted mine to all be the same, plus it gives you a little more room to work with the LED assembly/wiring.
Here are some more details on how things are assembled and mounted.
First, the pieces ready to be assembled, note the halos have not been cut down yet.:
Here are the clips I used to attach the halos to the brake lights. I got these at Radio Shack, normally used to attach coax cable to walls. Remove the nail and cut them in half and they hold the halos perfectly:
Next we break out the epoxy and glue everything together. Also, drill the hole for the wire to go through. The black part is just a 1 1/2" PVC coupler from Home Depot.
Back view of the assembly. I think they sell a plug that fits into the brake light but I just used some screw-on type banana plugs. I'll get pics of the rest of the light wiring when I do the right side later this week.
One other thing I had to do was separate the wiring for the brakes from the turn signals. For some reason the brake circuit runs from the fuse box to the brake switch, then back to the C500 connector by the battery. From there it loops back to the turn signal switch to get distributed to the rear lights. This made it easy to tap into the wire harness and run a new wire back to the rear lights from C500.
I ran a 2 conductor, but only used one for power. I used a ground in the taillight area, but you could ground the new circuit in the battery area as well.
All six brake lights will be wired in series to this new circuit. Turn signals will be tied into the existing wiring which no longer carries the brake switched voltage. The wire nuts you see here are tying the turn signals into the back half of the new LED side markers.
I'm hoping to have at least one side completely done before I leave on Friday (maybe both), just need my parts to get here!
Paul
[This message has been edited by helmet1978 (edited 09-30-2008).]
IP: Logged
01:37 PM
doublec4 Member
Posts: 8289 From: Oakville, Ontario, Canada Registered: Jun 2003
Looking good! Did you thing of a way to darken the clear lens parts that show the old plastic pieces (right of the 3 lights)?
I'm still deciding what I want to do with that area. I'll probably come up with some kind of lighted Pontiac lettering, but for now I'll be painting the entire inner piece black (don't need chrome reflectors with these LEDs).
Paul
IP: Logged
11:44 PM
Oct 1st, 2008
Steven Snyder Member
Posts: 3326 From: Los Angeles, CA Registered: Mar 2004
This might have been mentioned, but i just did a quick scan through the thread. Where did you find the HEX shaped wand? I found the instructional website a couple weeks ago just surfing the web and had been planning on making the halo's although I can't find any hex shaped wands. The only type I've been able to find are star shapped. The only place I haven't looked yet is home depot. Lowes, Walmart, Target, etc etc have had the star ones.
Lookin good!
Matt
IP: Logged
07:37 AM
Oct 3rd, 2008
Jeckel Member
Posts: 113 From: Nampa, ID USA Registered: Mar 2008
I am working on LEDs myself. Pics to come later... BUT, I would LOVE more photos of your car.
Your paint scheme is my goal (not to copy per se, but it is the one I find most striking, and would love to see it on my car.)...
Can you post some decent shots of it, or mail me as many high res photos as you can?
Here is one of his car at NW Motorfest. Mine is the one next to his, and his dad (Art) is next to mine. Paul definately has a very nice car. I have a few more of his that I will dig out later and post up. Those lights look great!


 ) so I went with 2 three LED segments wired in parallel, one mounted on each side of the stock bulb socket. In this configuration you could also wire one or both sets into the turn signal circuit for a little more visibility.