Well, I was sent one of Rodney's new intake kit's for a little R&D. The kit is used to bypass the water seperator within the Fiero intake. It came with 4 pieces. It contained 2 metal brackets, a black tube, and a fiberglass plate. So far, the sound is louder than stock, and it definatly is recognizable (It makes a nice snake hiiiiissssssss sound, especially at idle). It's not as overpowering as the CRX CAI, but it's plenty loud. It's available now on Rodney's web site: http://www.rodneydickman.com . Anyway, Here's how the build went:
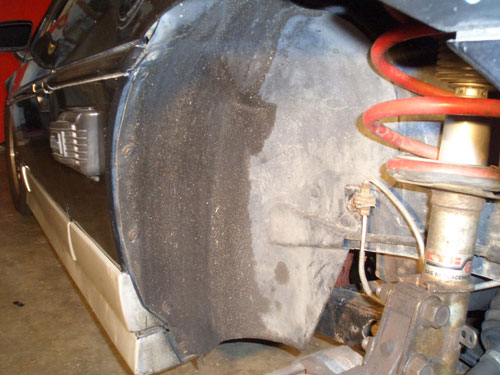
It started with the driver side rear wheel liner.
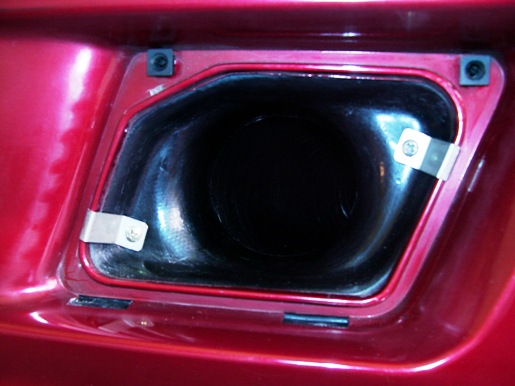
This wheel liner has to be removed to reveal the following:
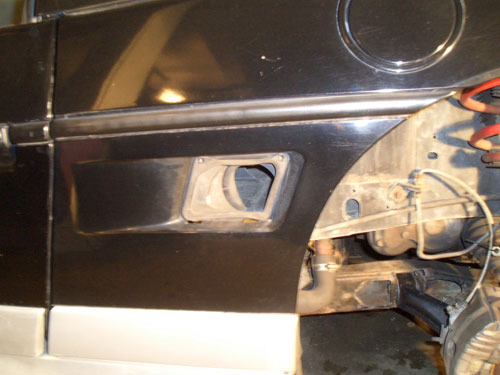
We then remove the scoop like the following:
Then removing the grill on the rear to access the tube.
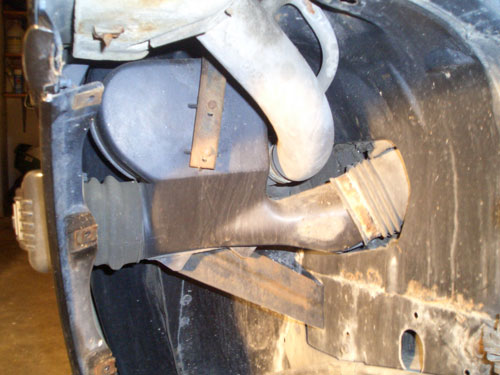
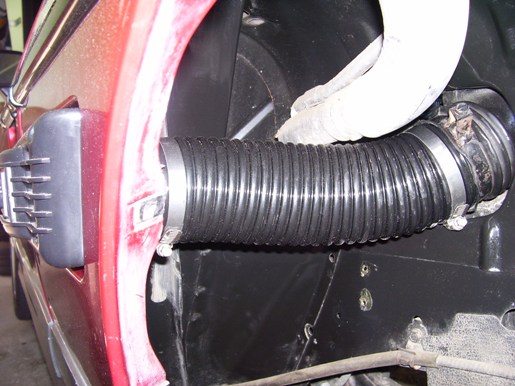
Now, remove the air tube to the throttle body:
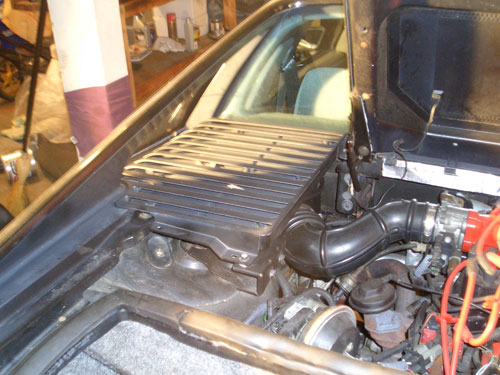
Take the screw off the top of the air filter canister, and remove the connector to the air flow sensor on the rear of it. Then just take it all out:
The "90 degree bend" is right below the stand it sits on.
It feeds through the wall like so:
Back in the wheel well, we're going to remove the water seperator as follows in the below picture. Remove the two bolts, and the one behind it.
This is the entire seperator pictured:
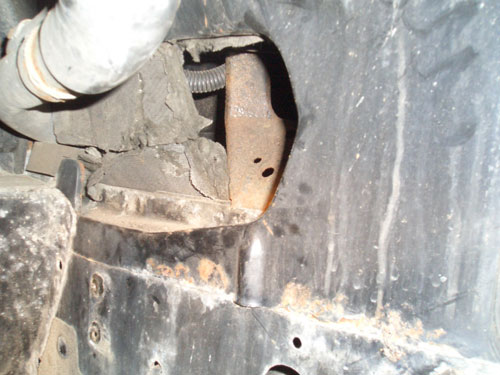
I had to remove the entire 90* bend as follows below, due to a rusted clamp.
Pictured is the 90* bend removed:
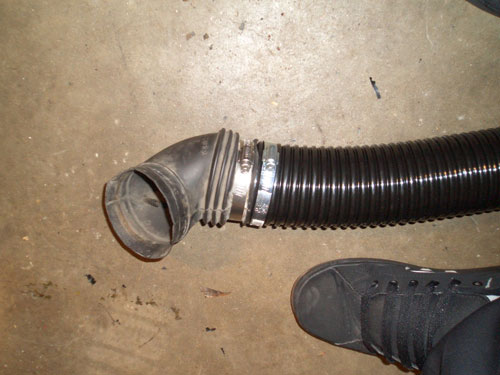
Now, connect the longer tube to the 90* bend and the included bracket:
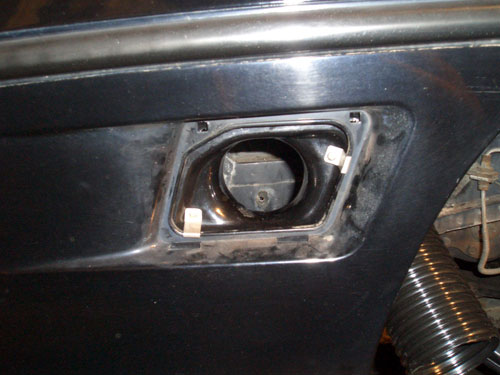
Now, attatch the fiberglass faceplate behind the quater panel. There's 2 bolts and 2 brackets. Make sure you retain the two screw clips for the scoop!
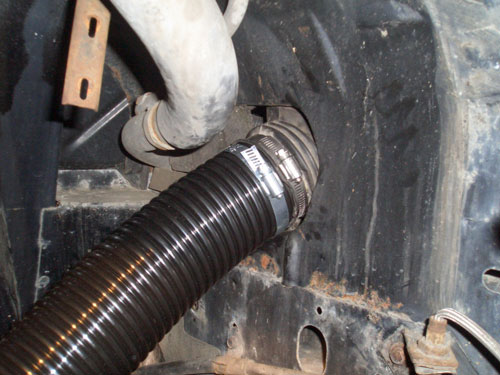
Attatch the tube to the fiberglass plate as follows. Make sure to clamp it with the included clamp!
Now, it's all connected and ready to roll!
Now, install the grill, wheel well liner, and install all the aircleaner parts back where they were before. Enjoy!
Again, it works perfect and I highly suggest it. Installation is quick and painless
[This message has been edited by Scythe (edited 06-19-2006).]
Very nice, thanks for posting the details. I have the CRX CAI but this is nice for those who want to maintain the stock look. Another good idea from Rodney !!!
Originally posted by Scurvy: any noticeable difference? sound better, breathe better?
This were my final posted notes after doing this mod in 10-2005:
Don't expect too much�The result is not going to throw you off your feet, nor will it make anyone ask you if you've got a turbo under the hood
You do get more intake sound and less restrictive air flow to your engine at very little cost!!
And to prove that I have conducted a series of "highly scientific" tests that concludes in running the engine @ idle and holding a piece of (scientific) paper against the outer intake vent. After this mod the piece of paper sticks to the vent, before it didn't.
Anyway It's around 2 hours worth of fun with your Fiero�It's worth it
[This message has been edited by Mister (edited 06-20-2006).]
IP: Logged
12:17 AM
Formula88 Member
Posts: 53788 From: Raleigh NC Registered: Jan 2001
I did a homemade version of this mod a while back, and it does make the engine sound better. Not much performance difference, if any. I did notice a large increase in the debris collecting in my air cleaner when using my Holley-style side scoop. The filter does get dirty quicker and can get water logged in a rain storm, but I've never had any problems with water getting in the engine - not even driving through Tropical Storm Alberto last week.
IP: Logged
12:21 AM
Mister Member
Posts: 1975 From: Calgary, Alberta, Canada Registered: Aug 2004
Would like something similar for supercharged swaps... Im running 4" tube now. Filter is where the water seperator was.
------------------ "Raced That, Wrecked Better"~In Memory Of Jesse Cesek~ 1980-2000 US Armored Cavalry - Fox 2/81 - Death By 120 - 1 Shot 1 Kill 3800 SuperCharged Series II Swap, ZZP Intercooler, Fastback Swap
IP: Logged
12:35 AM
slinger Member
Posts: 1403 From: grand rapids MI Registered: May 2006
I received my kit yesterday. Thanks Rodney for the quick shipping!
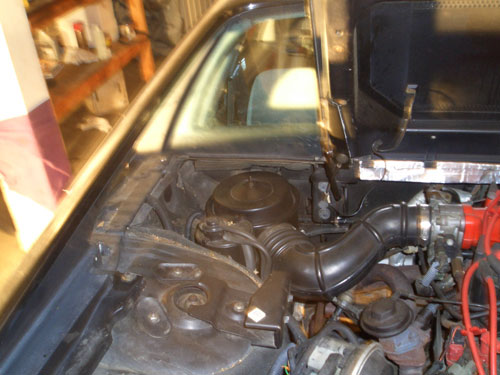
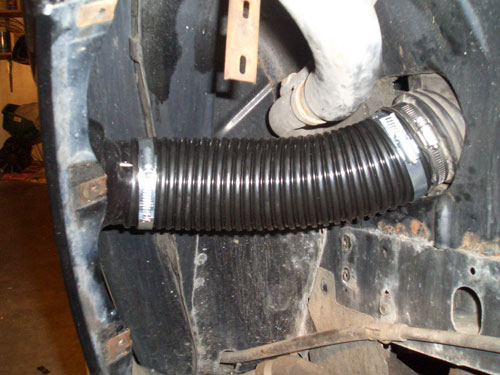
Here is my setup prior to installation. If you look closely, you'll notice you can't see the screw for the clamp going to the 90 degree elbow. That was a pain in the butt to loosen. Contrary to the instructions provided, I found it easier to pull the entire assembly out with the 90 degree elbow. It was loose anyway.
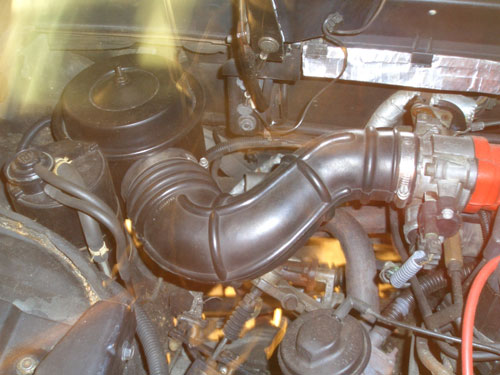
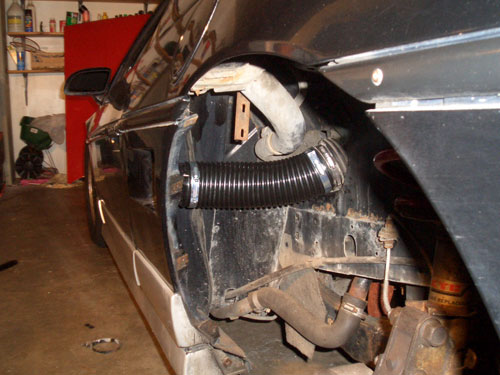
Here is the intake after installation. I chose to remove the upper mounting bracket as it serves no purpose once the stock intake is out. I also cleaned things up a bit. You might notice the stock clamp on the elbow is slightly offset and turned upward. This was to avoid interference with the re-installation of the wheelwell shields. I learned that the hard way.
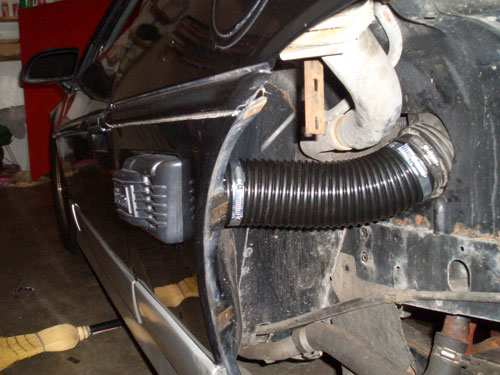
I found it best to mount the two brackets as shown. This is how it is shown on Rodney's site. I tried it the other way with the left clip toward the bottom, but could not get the fiberglass piece to seat correctly.
I'm very happy with the results. The kit was top notch quality as usual from Rodney and complete with everything you will need to do the install. It fits perfectly.
The sound is great. I already liked the hiss from the stock Fiero intake, but this multiplies it at least 3 times. Same sound, just louder. I made a mp3 sound clip to hear if interested. ===>> Intake sound
I also noticed better throttle response and what I think was a bit better acceleration. That and oh, what a glorious sound comes out of the exhaust pipes! It sounds fantastic!
All in all, I give this kit 2 thumbs up! Great job Rodney.
------------------ Visit my website! David 2 Corinthians 5: 17 1987 Pontiac Fiero GT, 5 Speed 2005 Pontiac Grand Am SE, 3400 V6
IP: Logged
10:12 PM
Jun 27th, 2006
Rodney Member
Posts: 4715 From: Caledonia, WI USA Registered: Feb 2000
Originally posted by 87_FieroGT: Here is my setup prior to installation. If you look closely, you'll notice you can't see the screw for the clamp going to the 90 degree elbow. That was a pain in the butt to loosen. Contrary to the instructions provided, I found it easier to pull the entire assembly out with the 90 degree elbow. It was loose anyway.
David;
I guessed when I made the instructions. I can see they need some changes. I'll email them to you and if you have some time add and change them as you need to make them better. I also now will include 3 hose clamps. One to replace the lower factory clamp on the elbow. This is easier than trying to reuse the factory clamp and get it in the right place for clearance for the inner wheel well liner.
------------------ Rodney Dickman
Fiero Parts And Acc's Web Page: www.rodneydickman.com Rodney Dickman's Fiero accessories 7604 Treeview Drive Caledonia, WI 53108 Phone/Fax (262) 835-9575
IP: Logged
09:14 AM
Scythe Member
Posts: 1055 From: Burke, Virginia Registered: Apr 2003
Yeah, it may be easier to remove the 90* bend. I had to remove it regardless cause that clamp was so rusted on. Also, I bought 2 new clamps to replace the ones on the 90* bend.
I drove the car through huge rain storms today [the flooding rain here in DC], and it doesnt "suck up" water. Just for those who think that the water seperator is necessary regardless.
IP: Logged
09:34 AM
Jun 28th, 2006
87_FieroGT Member
Posts: 700 From: Mill Creek, WA USA Registered: Jul 2005
I guessed when I made the instructions. I can see they need some changes. I'll email them to you and if you have some time add and change them as you need to make them better. I also now will include 3 hose clamps. One to replace the lower factory clamp on the elbow. This is easier than trying to reuse the factory clamp and get it in the right place for clearance for the inner wheel well liner.
I sent you the revisions this evening.
Thanks.
------------------ Visit my website! David 2 Corinthians 5: 17 1987 Pontiac Fiero GT, 5 Speed 2005 Pontiac Grand Am SE, 3400 V6
We know from other posts on PFF that the stock Fiero set-up already has a cold air intake system. Nevertheless, I recently installed Rodney's cold air intake system in my own car partly because of speculation elsewhere on PFF that the stock system is used primarily to muffle the induction sound of cold air rushing in from the outside air vent of the left rear fender, and partly because of Scythe's excellent step-by-step pictorials on this thread, which along with those of 87_FieroGT, also visually suggest that air might have a straighter shot into the engine with the Rodney cold air intake than with the stock one.
Although I recognize that sound preferences are a matter of personal taste, overall I like the induction sound made by Rodney's cold air intake better than what little sound there was with the stock system formerly in my car. However, the "hissing" sound described by Scythe and 87_FieroGT in regard to the Rodney intake is negligible in my car. That's fine by me, and in any case, that particular difference in our assessments might well be attributable to different equipment in our vehicles. For example, from Scythe's and 87_FieroGT's photos, it appears each of their cars uses an aftermarket (Holley brand?) air vent on the outside of the left rear fender. In contrast, mine has the stock Fiero black outside air vent, but an aftermarket exhaust system, and that also may be different from their systems.
I find it amusing that with Rodney's cold air intake system installed on my car, off-the-line throttle response FEELS noticeably improved, something which 87_FieroGT reported as well. However, without any numbers whatsoever to back that up, I'm not at all sure how much of the perceived increase in my own car's responsiveness is just a placebo effect of the improved induction sound, versus how much of it is real. Nonetheless, while the feeling of improved off-the-line throttle response that I experienced may very well be nothing more than an illusion created entirely by the improved induction sound, it's a FUN illusion!
IP: Logged
09:26 PM
87GT_97114 Member
Posts: 566 From: Dayton, Oregon, USA Registered: Mar 2005
When my 4.9 was installed, the PO threw away all of the stock V6 setup and used a CRX style to a cone filter in the fenderwell. I don't like the look and would prefer more stock looking. Besides, the 2.5" tubing is too small and just howls at the slightest touch of the throttle. I have almost all of the parts plus Rodney's kit to do it all later this week. I'll post when it's done.
------------------ '85GT Indy clone 4.9 4T60E '78 Toyota longbed, parts runner '89 Bonneville daily driver '87 30' Kit Classic TT, living in it.
IP: Logged
10:40 PM
F-I-E-R-O Member
Posts: 8410 From: Endwell, NY Registered: Jan 2005
looks good to me... . the factory water separator doesn't always work for snow. i found that a real fine powdery snow will get past your air box ans plug the filter
looks good to me... . the factory water separator doesn't always work for snow. i found that a real fine powdery snow will get past your air box ans plug the filter
Stop going sideways in the snow!
Brad
IP: Logged
01:04 AM
F-I-E-R-O Member
Posts: 8410 From: Endwell, NY Registered: Jan 2005
looks good to me... . the factory water separator doesn't always work for snow. i found that a real fine powdery snow will get past your air box ans plug the filter
...and kerosene, and mud...
IP: Logged
02:11 AM
Mar 17th, 2007
F-I-E-R-O Member
Posts: 8410 From: Endwell, NY Registered: Jan 2005
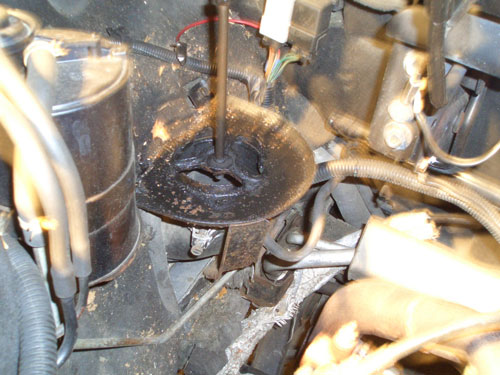
bump because I'm installing mine right now and want to make it easier to find the pics... This is also a good opportunity to clean up and repaint the air cleaner.
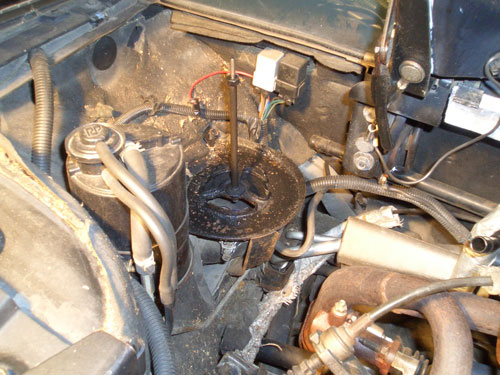
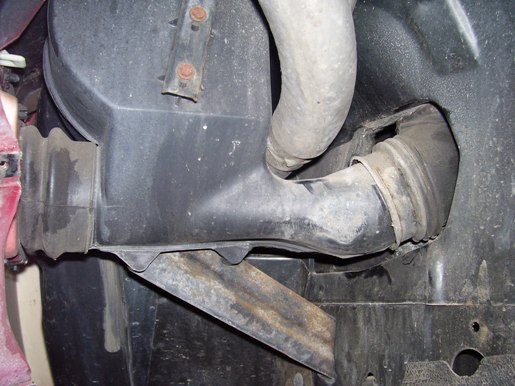
I found these just hanging out, wonder where they hook up and what they do?
Emily with her own project...
IP: Logged
04:01 PM
Mike Marden Member
Posts: 432 From: Fernandina Beach, FL Registered: Aug 2006
I found these just hanging out, wonder where they hook up and what they do?
The two wires look like ground wires, and the tube on the left looks like the fresh air source for the EGR control system on the pass side of the intake.
I found these just hanging out, wonder where they hook up and what they do?
The two wires look like ground wires, and the tube on the left looks like the fresh air source for the EGR control system on the pass side of the intake.
Those dont look like electical wires to me, more like some sort of 'support'. I dont remember seeing anything like that on my 87 when i had the engine out.
Could that hose be the one that goes back up to the rear valve cover?
[This message has been edited by User00013170 (edited 03-18-2007).]
IP: Logged
09:08 AM
2farnorth Member
Posts: 3402 From: Leonard, Tx. USA Registered: Feb 2001
bump because I'm installing mine right now and want to make it easier to find the pics... This is also a good opportunity to clean up and repaint the air cleaner.
I found these just hanging out, wonder where they hook up and what they do?
The large tube in the corner is from an "unrecalled" pcv air intake. This needs to be hooked up to filtered air. Otherwise you're drawing dirty air into your crankcase. From the looks of your air intake duct up to the throttle body your car never had the recalls done. The 2 piece plastic and rubber one was replaced by a 1 piece rubber and the pcv intake tube was changed and routed to it in the recall. What year is your car?
Dave
IP: Logged
09:10 AM
F-I-E-R-O Member
Posts: 8410 From: Endwell, NY Registered: Jan 2005
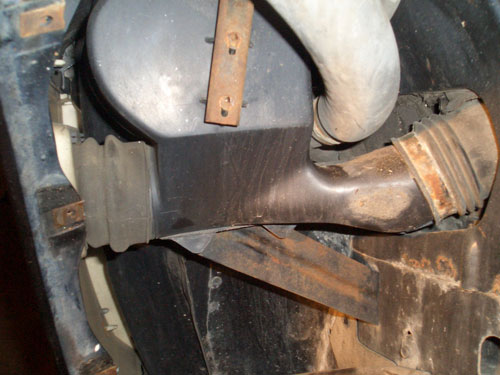
title says '87 but from what I been finding who knows what the heck I got from indyellowgt... Those are two metal tubes in the left circle, not wires. Makes me that the larger hose was left like that. I suppose I could put one of those valve cover breathers on the end of the tube...
IP: Logged
09:42 AM
PFF
System Bot
F-I-E-R-O Member
Posts: 8410 From: Endwell, NY Registered: Jan 2005
I believe that there were some "mods" done to accommodate an Isuzu tranny, this is the replacement tube they installed...
That is a pre-recall intake tube. The post-recall is the one shown in some of the original pics in this thread.
The hose in the corner should be all right with the little breather filter like you showed or if you use the original filter cannister you could just plug it back into the side of it. There should be a nipple on the side of it. That thing is out of sight normally and could quite easily been forgotten.
I don't know what the 2 smaller tubes are. There is nothing like that on my 86 GT. Might have something to do with the "larger" gas tank on the later years.
IP: Logged
01:12 PM
buddycraigg Member
Posts: 13620 From: kansas city, mo Registered: Jul 2002
you have to use the old tube if you put in an isuzu tranny because the shift cables want to go where the new air tube would be.
and since you cant used the metal PCV tube from the valve cover to the old style air tube. then you either have to use the pre-recall setup on the air filter housing or install the little breather like so.
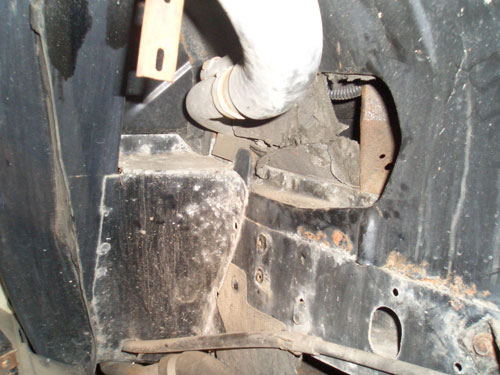
in the circle on the left is the rubber hose that would attach to the air filter housing for the pre-recall PCV system.
in the circle on the right, the metal tube on the left side should have a rubber hose on it that attaches to a small tube on the plastic elbow under the air filter housing.
the metal bar is a support bracket for the wires. the wires are supposed to be above it, not below it like in your pic.
any other questions?
[This message has been edited by buddycraigg (edited 03-18-2007).]
IP: Logged
02:11 PM
F-I-E-R-O Member
Posts: 8410 From: Endwell, NY Registered: Jan 2005
Originally posted by 2farnorth: The hose in the corner should be all right with the little breather filter like you showed or if you use the original filter cannister you could just plug it back into the side of it. There should be a nipple on the side of it. That thing is out of sight normally and could quite easily been forgotten.
NOPE.. no nipples on this baby. That would be too easy! That would be something I could figure out on my own. I don't mind trying to jury rig something to work, it's just nice to know something's wrong without having to discover it along the way.
Regarding recall issues, are these things freebies? And can I still get the dealer to supply 'em?
IP: Logged
02:27 PM
F-I-E-R-O Member
Posts: 8410 From: Endwell, NY Registered: Jan 2005
I had to drill out some of the rubber under the filter to fit over the hose connector, by hand. The 3/4" drill bit that I got was too large to fit in my drill. Vice Grips sure do come in handy. The fit is nice and snug- I had to persuade it a little to get it to get in there so I know it's not going anywhere...
IP: Logged
03:48 PM
2farnorth Member
Posts: 3402 From: Leonard, Tx. USA Registered: Feb 2001
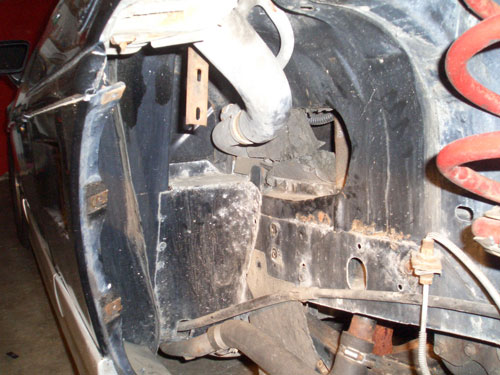
Okay this makes more sense now. This pic is a lot clearer. That little tube is a small breather tube that runs to the egr solenoid. Not a big deal as far as I'm concerned. If I recall correctly it was hooked to the unfiltered air side anyway.
Are you still going to have enough room for the filter cannister with that small filter there?
If the recalls are still available they probably wouldn't do it to a car that has been modified. As buddycraig said the parts won't work with the Isuzu shift cables in the way.
In defense of Mark (indyellowgt), anytime you buy a car that has been modified you're at the mercy of the person that performed the work. I believe he said it had been done by the previous owner. I wouldn't have known and maybe he didn't either, that the tranny mod would have these kinds of problems. The obvious stuff like the cruise and the rerouted rear vacume tubes I would have noticed and would allow for that in the purchase price. I probably would not have noticed the egr valve problem til I got to tinkering. I've done a lot of business with Mark in the past and never felt that I got less than I paid for.
Sounds like it's coming together for you now and when you get done you can say "I fixed that"
Dave
IP: Logged
05:58 PM
F-I-E-R-O Member
Posts: 8410 From: Endwell, NY Registered: Jan 2005
Yeah, I might be beating Mark up a little too much- but don't tell my wife, it gives me an excuse to buy more parts...
Went to Advanced Auto for the replacement Air Charge Temp Sensor- the first store I want to the tip was broken off, on to the next store. Got the wrong part in the box that was labeled correctly... 2-3 days to get the new one in (maybe less they say)
FOUND A NIPPLE! Now to figure out how to get the darn thing back together again- thinking I may split it a little to get it over the end it belongs to, but only as a last resort and not very much.
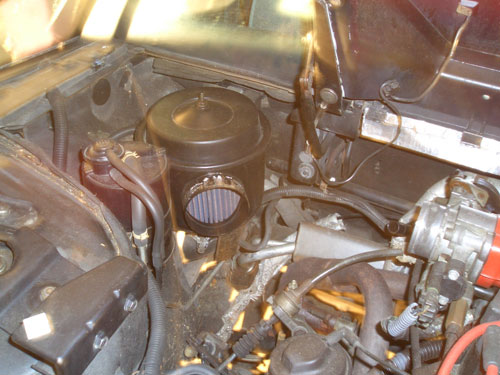
So, I figure that the orphaned tube must go there (center of picture). I had some extra pimp hose laying around so in it goes.
There looks to be plenty of room next to the hinge for the little air filter, I'm thinking that it shouldn't be too hot there...
IP: Logged
06:25 PM
Mar 19th, 2007
F-I-E-R-O Member
Posts: 8410 From: Endwell, NY Registered: Jan 2005
Everything I've ever read in the years of posts here says that the restriction is in the engine INTAKE manifolds NOT the air supply hose structures and that modifications like this don't do anything worthwhile, even for cars with engine conversions. The above posts seem to bear this out (with even a debatable change in sound), but it's a "for sure" that you'll get less air filter life and people keep buying (!?). i don't get it .....
[This message has been edited by PaulJK (edited 03-19-2007).]


 Those are two metal tubes in the left circle, not wires. Makes me
  that the larger hose was left like that. I suppose I could put one of those valve cover breathers on the end of the tube...


