Well, the official countdown has begun. We're planning on taking the '86 SE down to Daytona this year, so I figured that would be as good of an excuse as any to impose a deadline for what I wanted to have finished before taking the trip.
I've taken pics of everything and presented an outline of everything that I need to get done (hopefully) in the next 20 days. Some things I may need help with (i.e., instructions, suggestions, where to buy parts, etc.) to pull off--and those things I've indicated questions for (if I can think of any). The other stuff is listed there so I can have a bit of pressure to keep moving. (y'know how you have to have someone watching sometimes to keep you motivated to do something LOL) The good news is that once these things are done, the '86 SE will be just about finished. So I guess this will serve as a kind of "build-up or progress thread". LOL
I waited to take pics of everything and put them all together to make it easier to reference just what's going to be done. Like I said, most of it is little stuff that I think I can tackle before the show--so keep your fingers crossed for me!
Here's the first list:
Task 1: Repair Side View Mirror Control (Driver's side) Issue: Adjuster knob is not working Plan: Replace or fix the adjuster: I'm thinking that there's something missing or broken with the cable that apparently runs down from the little knob thing to the mirror. It also looks like there's a cover that's supposed to go over the top of the adjuster, so I'll have to find a new one of those too. I was thinking of checking the fiero store or the mall to see if anyone has the part. I have no idea how to go about fixing this, so I'll need some input from anyone who's done it before. Question: How the heck do I fix this--take the door off?
Task 2: Horn Issue: Doesn't work--maybe not connected Plan: Replace or fix the horn: I like the steering wheel, so I want to keep it. The problem is that I don't have a horn--which is definitely something you need if you're driving a small car in Atlanta traffic LOL. Unfortunately, I don't know anything about how the horn mechanism works. I've got a Haynes manual, so I'm gonna check there first to see how the stock horn and steering wheel is supposed to work, then from there maybe try to figure out the new one. Question: My steering wheel isn't stock, so how do I connect the horn for this one?
Task 3: Cigarrette lighter Issue: Doesn't work Plan: Replace or fix: I haven't checked the fuse yet, so hopefully this will be something simple like that. I tried plugging in my cellphone charger and it didn't work, so if it's not the fuse, I'll try to get another one and replace it. The lighter itself is still in good condition, so I shouldn't have to replace the whole thing-hopefully.
Task 4: Overhead Console Lights Issue: Lights on driver's side not working Plan: Replace entire console: Avengador1 sent me a new one already. Now I just have to take off the old one and install the new one.
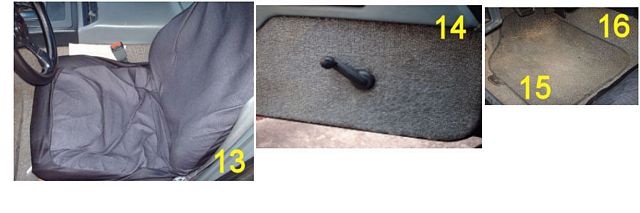
Task 5: Seat Adjuster Issue: Just exposed metal--not covered Plan: Recover it or replace the handle: This works but it's just not "pretty". hehe I'm thinking I might make my own covering to match the seats I have from Mr. Mike. In either event, this shouldn't be too hard to do.
Task 6: Pedals Issue: Covers are worn & metal exposed Plan: Recover the pedals: I want to use some cool covers for these since I'm not really looking at replacing the entire pedals. I saw some "racing-inspired" ones at AutoZone in New Orleans awhile back, but I haven't looked locally yet. I know I'm not planning on changing the shifter, so I may look for something to match the shifter that's in the car.
Task 7: Trunk Switch Issue: Dirty & worn Plan: Replace switch: Since the switch is a bit worn and old, I'll check online and see where I can get a new one to pop in. It works okay, so hopefully my replacement job won't mess anything up. hehe
Task 8: Light switch Issue: Dirty & worn Plan: Replace switch: Same deal as the trunk switch. They work okay, but I just need to get new ones where the pictures are actually still visible.
Interior/Console Issues:
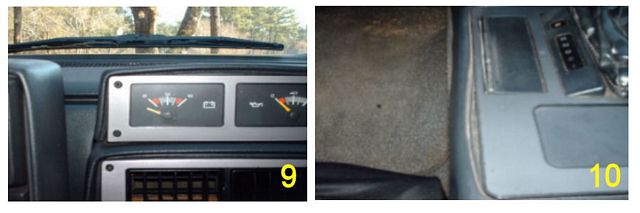
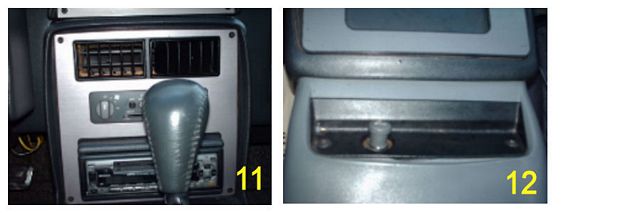
Task 9-12: Warped console cover, shifter console, radio console, cigarette lighter console Issue: Slight warping on all Plan: Repair it: Okay, these I have absolutely no idea how to repair. They're in good shape overall, they just have a slight bit of warping on the sides. Question: What's the easiest & best way to repair these? I don't want to replace the entire console 'cause it's in good condition. Any suggestions?
~cont~
------------------ I may not know alot about cars...but I make a Fiero look good!
Interior: These aren�t too difficult IMO (or at least I hope they�re not LOL):
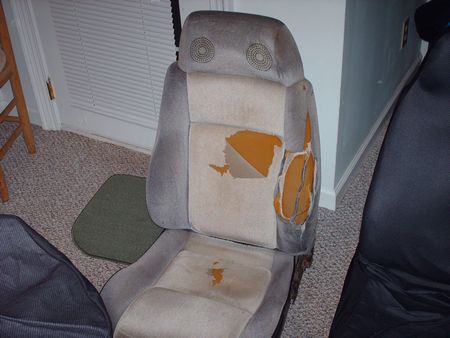
Task 13: Replace Seats Issue: Old seats are worn with some rips Plan: Install Mr. Mike's Seatcovers: I�ve been waiting to install these until I got everything else together for the interior. Since I know I want to install new carpet, I figured I�d wait to do the seats until after ordering the carpet �cause I�m sure you have to take the seats out to install the carpet anyway. I�ve already got the instructions and spoke to Mr. Mike about the process, so I should be all set.
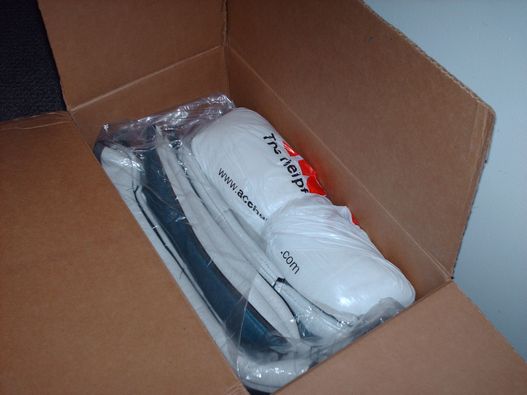
Here are the seats--still in the box! Thanks again to everyone who gave to the raffle--these were a great Christmas present for me and the Fiero! hehe Here�s everything when I first opened it.
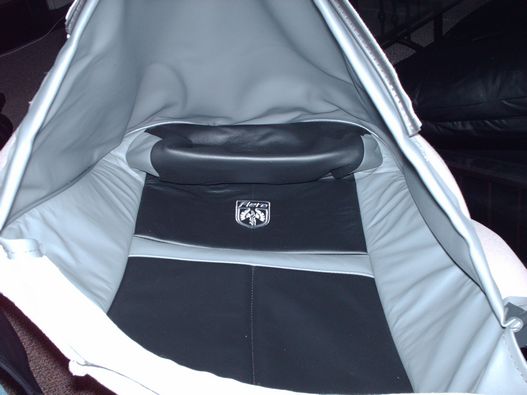
Here�s a sneak peek! Can't wait to get these puppies on! They're gonna look sweeeetttt!
I�m really pleased about the color scheme and the style, and I can�t wait until it�s all put together. The new seats plus the new carpet will make such a big difference in the car�s interior appearance. (Don�t get me wrong, the car is in great shape now, but it�ll look just that much better (almost new?) once I'm done.)
Task 14: Door Panels Issue: In need of serious updating. Plan: Replace carpet on panels�maybe�or possibly just clean them: I�m not really sure what to do with the door panels to be honest. I just know they need to be cleaned. I don�t know if I want to tackle replacing them though. We�ll see. Suggestions?
Task 15: Floor Mats Issue: Old, worn floor mats Plan: Replace floor mats: I�m thinking of getting black mats with the silver Fiero logo to go inside. I think they�ll compliment the seats from Mr. Mike�s really well. Can get those at the Fiero Store I believe.
Task 16: Carpet Issue: Old, worn carpet Plan: Replace carpet: I spoke to Mr. Mike and got a referral for where to get the new carpet (can't remember where at the moment), so all I have to do is order and install it. I haven�t decided if I�m going to go with black carpet or grey, so stay tuned for my color selections. hehe
(Are you tired yet? I�m still optimistic that I can pull all of this off. LOL) ~cont~
[This message has been edited by Miss-Tress007 (edited 03-05-2006).]
IP: Logged
06:43 PM
Miss-Tress007 Member
Posts: 541 From: New Orleans, LA, USA--now in Greensboro, GA thanks to Hurricane Katrina Registered: Feb 2004
Yup--there's more! (In case you�re wondering, no, I�m not getting intimidated by the list. I think it�ll be a good challenge to undertake. Maybe I can get in the Guiness Book of World Records or something�most Fiero updates/mods/repairs in the shortest amount of time. I doubt it, I am sure you guys have done TONS more in much less time. hehe)
Now, some of you may think these are cheating a bit, �cause I�ve technically already started.
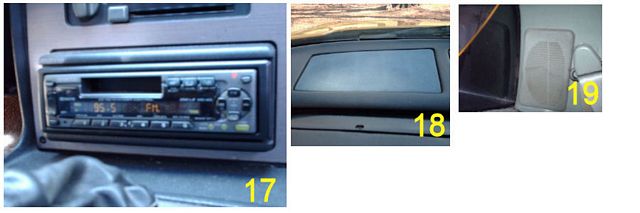
Task 17: Stereo Head Unit Issue: Current stereo had tape deck (do they even make cassette tapes anymore?) Plan: Replace with new stereo with CD player: I knew I wanted a CD player�mostly because all of my cassettes were destroyed in Katrina and mainly because all of the new releases are on CD�s. hehe So we went to Best Buy and got a new JVC CD player installed a couple of days ago. You�d think it would be pretty simple�go in, buy the stereo, they install the stereo, you drive out, right? Wrong!
The install part was okay, but I�d asked the guy to check the rear speakers because they apparently weren�t working with the old stereo. So after he installs the new stereo, we asked him if he checked the rear speakers and he promptly got an attitude and starts in with how that wasn�t on his work order and if we wanted him to do that, we�d have to pay $59.95 for the install. The only thing I wanted to know is if he�d hooked up the wires that ran to the rear to the new stereo �cause if the speakers themselves were blown or needed to be replaced, then all I�d have to do is buy new ones and hook them up from the back. Simple question, right? I don�t know if I was speaking another language or what, but it took almost 30 minutes, some heated words and talking to another employee in the department before we got the basic question answered. <sheesh> He ended up locating and checking the wires that ran to the back to make sure they worked anyway. Turns out that the wires that ran to the back speakers had been cut, so I�ll need to either get new speakers or reconnect the wires to have the sound in the back. I didn�t understand why he got such an attitude about it. If he didn�t know the answer to the question (he�d obviously never seen a fiero before, and we found out he didn�t even know where the back speakers were) all he had to do was say so instead of getting an attitude about it.
Anyway, I still don�t know what I�m going to do about the rear speakers. So far, the only 4x6 speakers that I�ve found are Pioneer and they haven�t sounded too great, so I�m not sure what kind of speakers I�ll end up going with (if I install new ones at all).
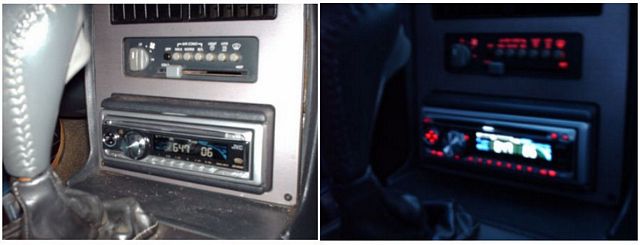
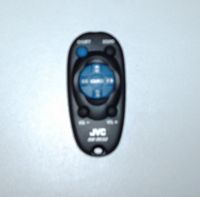
Here's a pic of the new JVC CD player that I got installed from Best Buy (by day and at night): Don�t the lights look cool!
I even have a remote!
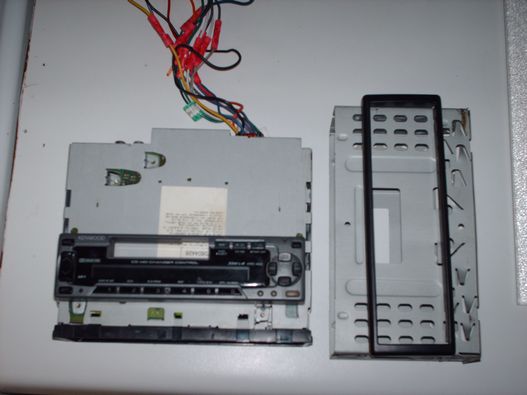
Here's the old stereo after they took it out. I�m not sure what I�m going to do with it yet. I�ll check with a couple of friends to see if they can use it and maybe I�ll just give it away. It works fine and gives out a good sound, so we�ll see.
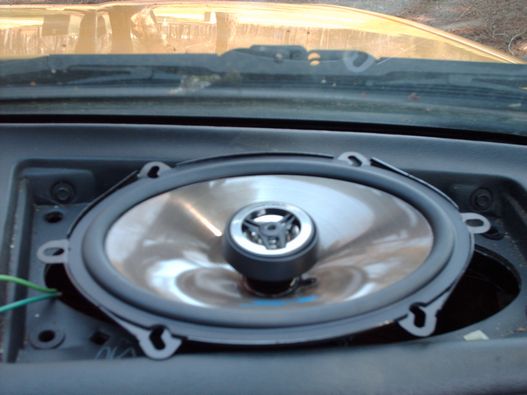
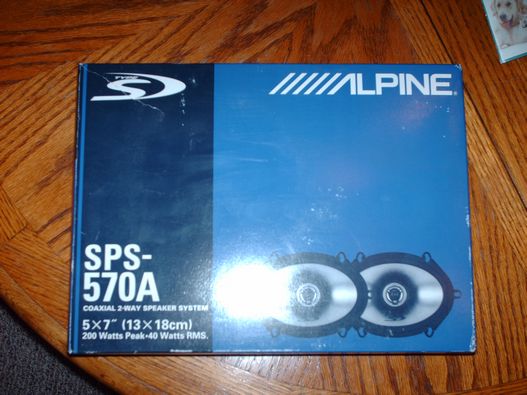
Task 18: Front speakers Issue: Old Pioneer 4x10 speakers currently installed sound a bit fuzzy sometimes, want to upgrade Plan: Install 5x7 Alpine speakers to boost up the sound: I saw a thread where someone had installed 6x9 speakers in the dash, so after I checked out all of the options at Best Buy, I saw these 5x7 Alpine�s and loved the sound! They were on sale too, so I decided to get them and try my hand at installing them myself. I�m not sure yet if I�ll have to cut into the dash to get them to fit. Anyone else installed 5x7 in the front?
Here's a pic of the new speakers for the front: They�re Alpine and sound really good. Can�t wait to get them in.
Question: How the HECK do I do this? I know I have to take the dash out, but I don't know how to do that. Any advice and/or could you point me to any threads on this?
Task 19: Back speakers Issue: Old 4x6 speakers; currently the wires are cut so they don't work Plan: Replace with new speakers and reconnect the wires so they'll work: I think that�s the plan. Upgrading the front speakers will improve the sound drastically, so I may not even need new rear speakers. We�ll see. If I need to cut something out because of time, these may be it. hehe
Other stuff:
Task 20: A/C Issue: A/C doesn't work--missing piece Plan: Replace the missing part & charge the unit: Okay, someone mentioned before what this missing part is, but I don�t remember and have no clue where to get one and how to install it. Need help with this one. Question: What is the piece that's missing, where do I get it and how do I install it?
Task 21: Hood sensor Issue: The "ajar" light was coming on even when the hood was closed. Right now I used a paper clip to temporarily fix the problem. Plan: Replace or repair the switch/sensor: I�ll probably add a washer or something to repair this a bit more permanently (a twisted paperclip doesn�t look too pretty hehe).
Task 22: Trunk Light Issue: Trunk light doesn't stay in the hole for it & bulb doesn't work Plan: Repair light and mount it correctly: I think this used to work when I first got the car, but I don�t remember. I�ll probably figure out a way to remount the light cover in the trunk (Velcro, tape, glue) so it�ll stay put, If necessary, I may replace the whole piece if I need to, we�ll see. Suggestions?
~cont~
[This message has been edited by Miss-Tress007 (edited 03-05-2006).]
IP: Logged
06:56 PM
avengador1 Member
Posts: 35468 From: Orlando, Florida Registered: Oct 2001
#4 is easy. Unsnap the visors to get access to the screws under them. You need to remove the outside lenses to get access to the other two screws holding it up, then you can unplug it. Reverse the order to install the new one. The trunk light probably needs a new lens. It has legs that hold it in and they can break off.
[This message has been edited by avengador1 (edited 03-05-2006).]
IP: Logged
06:59 PM
Miss-Tress007 Member
Posts: 541 From: New Orleans, LA, USA--now in Greensboro, GA thanks to Hurricane Katrina Registered: Feb 2004
Some of these are a bit ambitious I think, �cause I don�t know where to start.
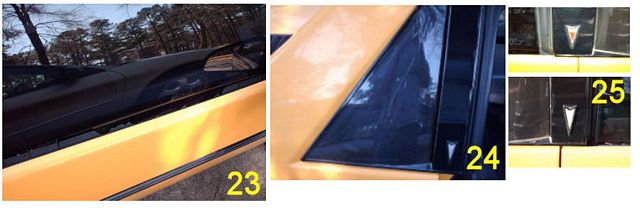
Task 23: Dew Strips Issue: Dew strips are cracked & broken Plan: Replace the strips: This is one of those �don�t have a clue� repairs that I�m gonna try and do before Daytona. The one on the right is cracked and the one on the driver's side is non-existent. I�m definitely gonna need some guidance on this one. I guess this is not a good thing when it rains. (The cracked strips on the outside just don�t look good.) I�ve also got to find out where to get the replacement strips for both doors. Question: So, how do I do this? I have NO clue. Suggestions, anyone?
Task 24: Cracked Quarter Panels Issue: Side quarter panels are cracked on both sides Plan: Replace quarter panels on both sides--possibly have custom decals added: The quarter panel on each side is cracked, although not too noticeably on the driver's side. I�d like to replace them and possibly have a custom decal (maybe my sig) put on each one. I have to find out where to get them and how to install them without cracking the new ones. I think I�d seen in other threads where they crack easily, so I�ll be sure to do my research before tackling this one.
Task 25: Side Pontiac Emblems Issue: Emblems are worn and faded on both sides Plan: Replace emblems: The emblems on both sides are a bit worn and faded. I�d like to replace them both, or maybe just touch them up with paint. It depends on whether or not I can find new ones. The Fiero Store sells these I think?
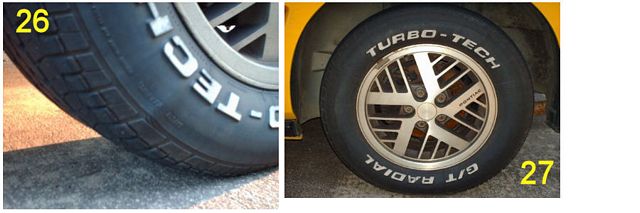
Wheels and Tires: The pics for this one speaks for itself. (Notice the bubble in pic 26; Ewww the rust in 27!!!!!)
Task 26: Tires Issue: Need new tires! Plan: Buy new tires & install them: I�m currently working on deciding with tires to get to go with the rims I�ve picked out. (Toyo�s are the front runner right now.)
Task 27: Rims & Rotors Issue: Rims are worn & rotors look a bit shabby Plan: Replace the rims & polish rotors: I�ve posted a couple of threads about trying to find the right tire size for the rims that I�ve already picked out and it�s been determined that I�ll have to get coilovers for the rear to accommodate my rim choice.
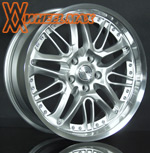
These are rims I picked out: Since they�re 40mm offset, I�ll need coilovers for the rear so they can fit. I�ve fallen in love with these, so there�s no changing my mind (be strong, believe )�plus they�re a steal at the price it�s being offered. LOL I�ll probably go with 17�s all the way around instead of 18�s on the back.
My next task is to locate and order the coilovers. The only place where I�ve found them so far is JCWhitneys and West Coast Fieros. Madcurl and Jscott1 suggested West Coast Fieros, but I�m concerned about shipping times since they�re in California. Anyone know of anywhere else to get the coilovers that�s closer to Georgia? I�ve also got to do a search for coilover installation threads to find out how to install them. I�m not sure if it�s something I can do myself if it�ll take a lot of time or require special equipment. I don�t have a garage to work in (just the driveway) and I don�t think the HOA will be too pleased about me jacking up a Fiero in the driveway and working on the suspension system.
The last bit of work:
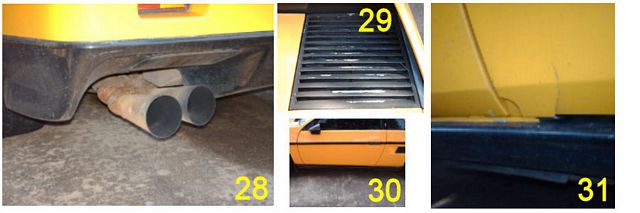
Task 28: Exhaust tips Issue: Current tips are old Plan: Replace with new "updated" tips: Exotic Rida had a set on his old car that look sweet, so I�m thinking of going with something like his.
Question: Does anyone know where I can find ones like this? Other style suggestions and sources?
In any event, I�ll check the usual auto supply places to find some cool ones to replace the ones I have.
Task 29: Battery Covers Issue: Chipped paint on covers (that is the PC way of saying they look REAL bad) Plan: Repaint covers: I don�t know if there�s a special type of paint I�m supposed to use, but I don�t think this will take a lot of time to do. They don�t look too bad now (okay, I'm lying), they�re just chipped in places.
Task 30: Add GT Lower Side Panel Issue: Add some additional accents to the side of the car Plan: Order GT Lower Side Panels & install them: I�m still undecided on this one. I might try a photoshop first to see what it would look like before I go ahead and order them. I�m not sure about the installation process either, so I�ll have to do some more research first.
Question: Could someone do a Photoshop for me so I'd have a better idea of what it would look like? Pretty-please? hehe
Task 31: Cracked door Issue: Slight crack in the door Plan: Repair crack: This might be a future project since I don�t want to have to repaint the car right now. (Oh and that money thing LOL) The crack isn�t noticeable at all, so I may just put it on the �to do later� list and not worry about it.
So now you have it--my very ambitious plan to get my '86SE complete before Daytona. I have to admit that the car was in very good condition when I bought it, so most of this stuff is cosmetic. I�ve finally gotten back into �work on the car� mode, so I figured I�d try and crank everything out at one time. This stuff should be relatively easy compared to doing engine work, so I don�t anticipate many problems. (Famous last words, I know. LOL)
So break out the popcorn and stay tuned for updates as I check off the list. I�ll be sure to post pics and detail the steps to keep you posted. (BTW�don�t even think about starting a pool to see if I finish or not�that�s just too much pressure. Hehe)
~Tress
[This message has been edited by Miss-Tress007 (edited 03-05-2006).]
IP: Logged
07:10 PM
Miss-Tress007 Member
Posts: 541 From: New Orleans, LA, USA--now in Greensboro, GA thanks to Hurricane Katrina Registered: Feb 2004
Before you get too excited---No--I don't mean the lambo doors! (Wishful thinking! LOL)
I've seen the pic of this car a few times and I really like the front ground effects. I was thinking of adding this to my list of pre-Daytona things to do, but I'm not sure yet. That would mean painting, mounting and everything, not to mention that I'd have to find the darned things first. Does anyone have any idea of where to get this? I'm also not too sure of how much clearance there would be in the front if I added it. There are some pretty high curbs around here, so I don't want to get it and then have to have it repaired/replaced all the time 'cause it kept getting scraped up.
If I'm being really ambitious and are making progress on everything else, we'll see about adding this too. For now, we'll just put it on the "maybe" list. In the meantime, I'll do some more research and see about testing out how it would look before making a decision.
Okay--that's it! (I promise.) No more tasks to be added to the list. I think we just lost another day, so we're now down to 19 days and counting.......
Caffeine, anyone?
~Tress
[This message has been edited by Miss-Tress007 (edited 03-05-2006).]
IP: Logged
09:58 PM
88White3.4GT Member
Posts: 1604 From: Hayward, CA Registered: Dec 2003
Horn list #2. Use a small allen wrench or hex to remove the 5 hex bolts to expose the horn button. You might be able to get to it w/o removing the hex screws by removing the center cap with a very small fine srew driver or file? Maybe some of the various parts are missing? You'll know once the center cap or sterring wheel is removed.
I'm almost done with my mrmike seats. Actually he has my lumbar seat bottom fixing my screw up After that I got carpet ready to go. I was wondering how difficult it is to get the old carpet out
Originally posted by Miss-Tress007: Task 16: Carpet Issue: Old, worn carpet Plan: Replace carpet: I spoke to Mr. Mike and got a referral for where to get the new carpet (can't remember where at the moment), so all I have to do is order and install it. I haven�t decided if I�m going to go with black carpet or grey, so stay tuned for my color selections. hehe
Can you post the price of the carpet at this place? One of the places I deliver (I work for UPS) sells Auto Carpet, Molded Carpet, Mats, all kindsa material and stuff. I got a quote for some molded carpet the other day, my Price was $112 for both sides - thats without shipping, and as I said thats a special price for me, but they might still beat the price you get quoted if I mention that im throwing business their way from the forum.
quote
Originally posted by Miss-Tress007: Task 20: A/C Issue: A/C doesn't work--missing piece Plan: Replace the missing part & charge the unit: Okay, someone mentioned before what this missing part is, but I don�t remember and have no clue where to get one and how to install it. Need help with this one. Question: What is the piece that's missing, where do I get it and how do I install it?
Originally posted by Miss-Tress007: Task 23: Dew Strips Issue: Dew strips are cracked & broken Plan: Replace the strips: This is one of those �don�t have a clue� repairs that I�m gonna try and do before Daytona. The one on the right is cracked and the one on the driver's side is non-existent. I�m definitely gonna need some guidance on this one. I guess this is not a good thing when it rains. (The cracked strips on the outside just don�t look good.) I�ve also got to find out where to get the replacement strips for both doors. Question: So, how do I do this? I have NO clue. Suggestions, anyone?
And although he recommends using gmpartsdirect.com, the prices arent worth the BS that place produces, sending wrong stuff etc... (do a search on forum and you will see many topics on these guys) I recommend the Fiero Store, I bought mine at the local GM counter and I kicked myself for doing that, spent a dollar more and waited 7 days(working) for them to come in when the Fiero store is cheaper, have them in stock, they have the replacement brushes/guides, and for me they are 1 day transit via UPS. Heres the guides, when replacing your dew wipes replace these at the same time (easier to put in while you have wipes out) takes two per door 5.95$ each
Before you get too excited---No--I don't mean the lambo doors! (Wishful thinking! LOL)
I've seen the pic of this car a few times and I really like the front ground effects.
That's my car . I'll be at Daytona with it . The chin spoiler is from the fierowarehouse and the rockers are from Archie . I know the feeling about get things done before the show . But once you think you did everything something else comes up or you modifie something else . Seems like your never done .
[This message has been edited by GODFATHER (edited 03-06-2006).]
IP: Logged
11:10 AM
Miss-Tress007 Member
Posts: 541 From: New Orleans, LA, USA--now in Greensboro, GA thanks to Hurricane Katrina Registered: Feb 2004
Madcurl, I'm going to check out the fuse and the horn issue tomorrow. I'll let you guys know how it turns out.
Back on Holiday: I checked the website and the carpet is $140 (shipping is free if you tell him Mr. Mike sent you). Where did you get your carpet? I'm still not decided on the color and whether or not I'm going to go ahead and change the carpet this time around (too many things on the list). I may just get the new mats first and then take some more time to decide on what color to change it out to. BTW--did you change the carpet on your doors too? I don't want to change the floor carpet and leave the same old color on the doors, so that's the holdup.
Also, thanks for the info on the ac accumulator. Did you install yours yourself? I need to find out some more info on how to reinstall that thing the correct way so I don't blow anything up. hehe It's gonna get hot here pretty soon and I want to have some cool air inside the ride.
Formula & Godfather: Thanks on the heads up for the chin spoiler. I'll call the fierowarehouse tomorrow to check out availability. (Godfather--Nice car! )
Avengador1: Thanks for the instructions on the light console and trunk light. I'm planning on tackling both of those tomorrow.
Well, I guess that means it's officially time to get to work! It's supposed to be nice weather tomorrow, so I'll get outside and start working on stuff. I'll have to place orders for the other things I need tomorrow too so I can get everything in time.
I'll keep you posted!
~Tress
IP: Logged
06:17 PM
helmet1978 Member
Posts: 743 From: Boise, Idaho, USA Registered: Nov 2001
As for your number 27 problem...coilovers...I'd recommend Held Motorsports. I have their rear coilover kit on my car and am very happy with it. http://www.heldmotorsports.com
They sell kits to convert stock struts to coilovers (requires some cutting of struts) as well as assembled units that can be bolted on in a couple hours.
As for the warped consoles, there are several methods for repairing these. On mine I just used super glue and some wood clamps. Just peel back the edge a bit, squirt in some glue, then clamp until dry (about 20 minutes should do it).
Number 14: Door panels. You should be able to clean up the upper vinyl part pretty easily. As for the bottom carpet you have a couple choices. When you order your new carpet you can ask for about 3 extra yards of carpet to use on the doors. You could also use vinyl or leather depending on what you prefer and your budget.
17 & 18: Speakers Rear speakers, depending on where the wires are cut this can be easy or hard. If they are cut near the speaker you should be able to just reconnect the wires and be good to go (black to negative and the other color to positive).
Front speakers, you shouldn't have to remove the dash. Use a flat blade screwdriver to pry off the speaker covers. The speakers are mounted from the top, usually with 7mm screws. Just unscrew and pull them up. Do a test fit on your new speakers to see if the screw holes line up with solid dash or not. If they don't line up anywhere you may need to cut a mounting plate to fit (or have one cut). Heres a pic of the mounting plates I made for my 4" components:
Task 24: Sail panels. While you have the rear interior panels out to check the rear speakers you can pull off the rear quarter windows. Check out www.fierosails.com for replacement windows and instructions for removal, repair and reinstallation.
Task 25: Pontiac emblems. You can buy new originals from Fiero Store. Another option is to smooth out the indentation where the original sits and use another arrow head. I used the front arrowhead from 1999+ Grand Am. These are larger than original and are self adhesive. Heres a pic of mine with fierosails.com glass, repainted frame and Grand Am arrowheads:
29: Battery covers/engine vents. I would recommend high temp spray paint for these since they get pretty hot. The biggest thing is to make sure you sand them well so the new paint will stick.
Good luck on your projects. Looks like you'll be pretty busy for the next couple weeks. Don't get discouraged though, I'm in the middle of dropping my cradle for the second time this year
Tress , I got mine from Carpet4cars. You probably saw mine at the WOW show. Check them out. They also sell on Ebay most of the time. Plus , it's local , comes out of Atlanta or Alabama.$130 bucks http://carpet4cars.com/ Then I bought some "off the roll" carpet from a carpet mill here in Athens pretty cheap and did my door panels and behind the seats and in my front compartment.
[This message has been edited by Ronnie (edited 03-06-2006).]
Cigarette Lighter... Here's something you might look into about this. Take the lighter out (it's only about 2 screws and pulling off the power cable once you get the access panel off) and check the inside for rust/corrosion. Mine seemed dead, but I checked it and there was a lot of rust-like build-up inside. I spent about 3 minutes total scouring the inside with a piece of sandpaper and reinstalling it, and it worked just like new again... Might not be what's wrong with yours, but it's worth a shot..
My next task is to locate and order the coilovers. The only place where I�ve found them so far is JCWhitneys and West Coast Fieros. Madcurl and Jscott1 suggested West Coast Fieros, but I�m concerned about shipping times since they�re in California. Anyone know of anywhere else to get the coilovers that�s closer to Georgia? I�ve also got to do a search for coilover installation threads to find out how to install them. I�m not sure if it�s something I can do myself if it�ll take a lot of time or require special equipment. I don�t have a garage to work in (just the driveway) and I don�t think the HOA will be too pleased about me jacking up a Fiero in the driveway and working on the suspension system.
Go with the coilovers from Held motorsports.
[This message has been edited by Zoom88 (edited 03-07-2006).]
IP: Logged
07:54 AM
Miss-Tress007 Member
Posts: 541 From: New Orleans, LA, USA--now in Greensboro, GA thanks to Hurricane Katrina Registered: Feb 2004
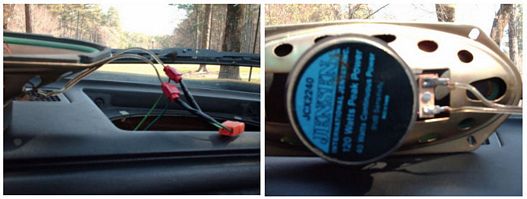
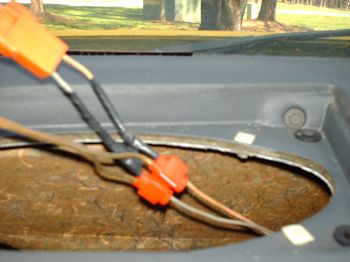
I'm attempting to install the 5x7 speakers in the dash and ran into a bit of a problem--or rather a question. The old speakers were Jensen 4x10's, but they weren't hooked up using the harness/plug thing. Instead, the wires were spliced together and wrapped around the leads instead of plugging in.
Do I need to be concerned about the spliced wires? I know speakers have a positive and negative wire that's supposed to be connected to the radio. Which wire is the positive and which is the negative? I've got a light green and a dark green wire on the right side of the car and a grey and brown wire on the left (pics below) to be hooked up to the speakers instead of a black and red so I don't know which is which and if it even matters. (Is it bad to "cross" the positive and negative? How can I tell?) Should I assume they were correct already? Of course, there are no instructions in the box with the speakers, so I can't fall back on that and I've never installed speakers before.
Left side wires:
Now, because these speakers are wider than my old ones, can I just shave off the extra bracket holes on the top and bottom so the speakers will fit in the dash? I was thinking about either cutting them off, bending them down or cutting a notch in the dash so I can slide the brackets in and then just screw the speakers down on the left and right.
BTW--Does anybody know what these are for? I'd assume the screws are for mounting the speakers, but I don't know what the black plastic things are for. Any ideas, or are these just the "extras" that you always end up with? hehe
~Tress
[This message has been edited by Miss-Tress007 (edited 03-07-2006).]
IP: Logged
02:09 PM
madcurl Member
Posts: 21401 From: In a Van down by the Kern River Registered: Jul 2003
Hmm. I'm not sure but, I think you'll need to mount those 5x7's under the dash? Sharkman mounted his 6x9's under the dash and with a few modification I'm guessing that it works okay? Here's the link: https://www.fiero.nl/forum/Forum1/HTML/053211.html
Correction: I had mine mounted xxxxx above the dash too using 6x9's so I'm guessing that a 5x7 might be easier?
[This message has been edited by madcurl (edited 03-07-2006).]
IP: Logged
02:43 PM
PFF
System Bot
Miss-Tress007 Member
Posts: 541 From: New Orleans, LA, USA--now in Greensboro, GA thanks to Hurricane Katrina Registered: Feb 2004
Maybe you said it and I missed it, but why are you putting 5 x 7s in the dash instead of 4 x 10? For the speakers to sound best you need to have a seal between the speaker and the enclosure. You are going to have to reshape the opening of the dash to get those tofit right.
As for the wiring, obviously someone has hacked it up pretty bad. I would suggest starting over with new wires. That way you know it's right.
If you cross positive and negative your speakers will be out of phase and cancel each other out,(that's how noise cancelling headphones work). You want to avoid that. It doesn't matter which wire you make plus or minus as long as you are consistent.
If you want to check it,hook up a 9V battery to the speaker wire, if it pulls in you have it check the polarity and that's how it should be. Ifit pushes out you have it backwards.
IP: Logged
09:36 PM
helmet1978 Member
Posts: 743 From: Boise, Idaho, USA Registered: Nov 2001
Making Progress! (I think) I know speakers have a positive and negative wire that's supposed to be connected to the radio. Which wire is the positive and which is the negative? I've got a light green and a dark green wire on the right side of the car and a grey and brown wire on the left (pics below) to be hooked up to the speakers instead of a black and red so I don't know which is which and if it even matters.
~Tress
My 86 manual wiring diagrams don't specify positive/negative for the speaker wires, but I would say the Dark Green is negative and Light Green is positive for the right side, and Gray is negative and Tan is positive for the left side. Get some crimp on terminals that fit the spades on the new speakers (Radio Shack or similar) and crimp them to the original wires if long enough, otherwise you should be able to use them on the wires that are there.
As for the mounting tabs, you can either cut off or bend the ones you don't use. Dont' feel bad about modifying the baskets, I've cut off about 1/4 of the basket of speakers to make them fit before.
~Helmet~
IP: Logged
10:00 PM
Mar 23rd, 2006
Miss-Tress007 Member
Posts: 541 From: New Orleans, LA, USA--now in Greensboro, GA thanks to Hurricane Katrina Registered: Feb 2004
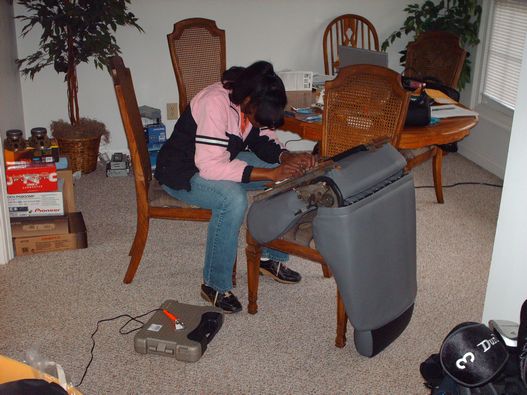
It's now hours 'til we leave for Daytona and I'm working on installing the Mr. Mike's seats. I hadn't planned on waiting until the last minute, but the whole UPS/delivery thing pushed my schedule back three days. I didn't want to install the seats if I knew I still had to take the car in to have any work done on it (I just didn't think the guys in the shop would take "extra special care" when it came to my new leather seats. )
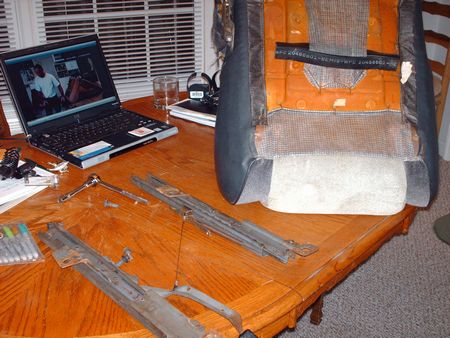
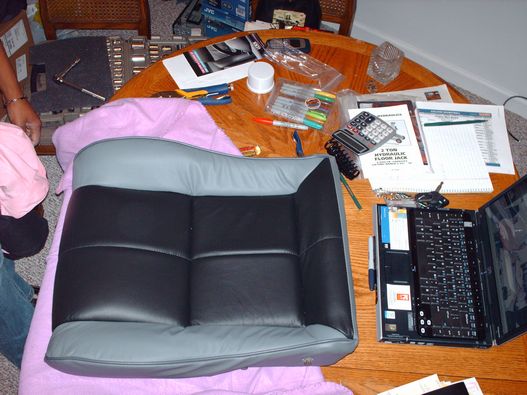
So I started the whole process at 6:37pm. I thought I had a pretty good setup on the dining room table.
Here are the original seats just out of the car:
What a difference a cover makes! LOL
Funny thing is I didn't even know I had speakers in the headrests! hehe
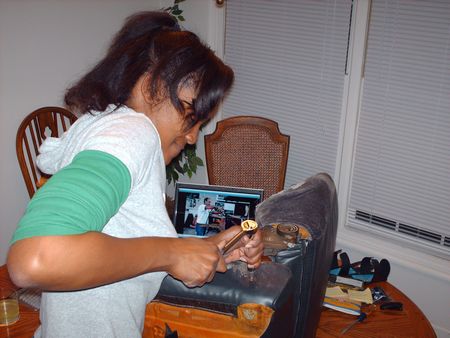
I set up Mr. Mike's instructional DVD on the laptop and worked side by side with "the Master" himself:
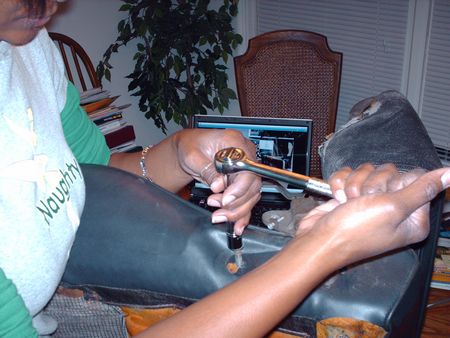
I gotta get one of those power tools that he has in the video. This process calls for alot of "elbow grease".
I was really thankful that I'd bought a new tool set. This one had everything I needed. Even a couple of "extras" to add a bit more leverage to the process.
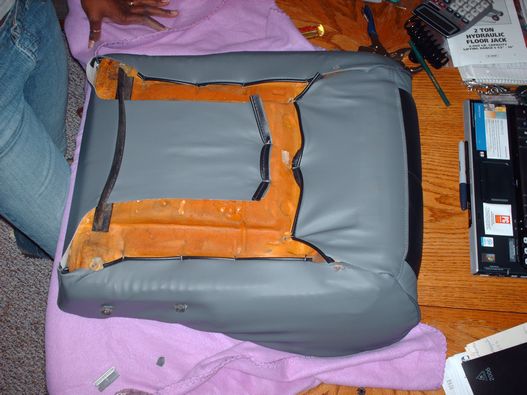
At around 9pm, here was the bottom:
Looks good so far:
Okay. McDonald's break. Then I'll finish the top part. I don't think it'll take too long to do the other one, since I'll have a better idea of what I'm doing (hopefully). If I ever get this done in time, I'll try and post the other pics of the rest of my progress on the checklist.
Back to work!
~Tress
IP: Logged
10:24 PM
Miss-Tress007 Member
Posts: 541 From: New Orleans, LA, USA--now in Greensboro, GA thanks to Hurricane Katrina Registered: Feb 2004
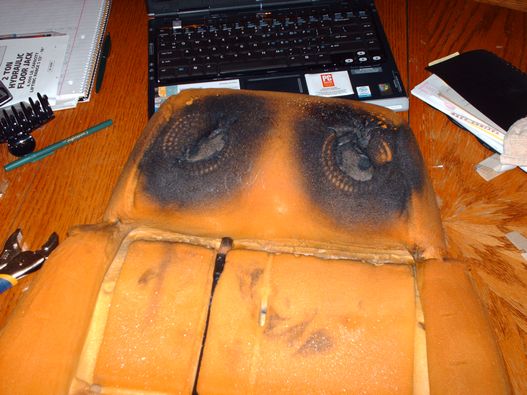
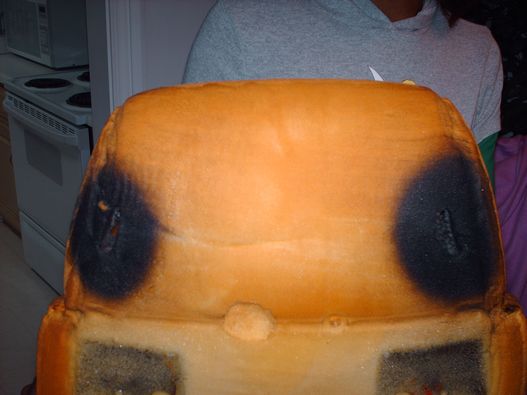
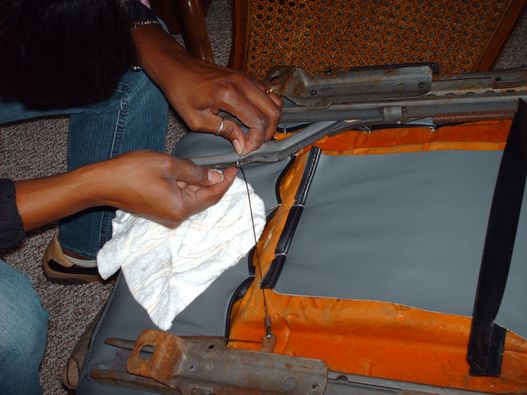
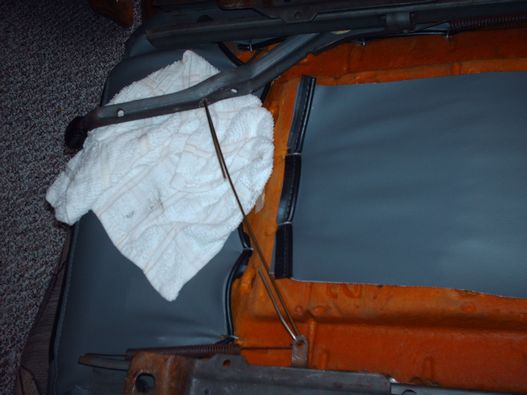
3:47am. Finished the seats. Tired. Hands are sore. Need sleep.
~Tress
Oh yea, those hog rings really kill your hands after the first 50, lol. I remember ripping the back of my hand open on an exposed hog ring and getting blood all over the insides of my covers. Oh well, it's on the inside, no big. I did have to finish the job with a rubber glove on one hand though, lol.
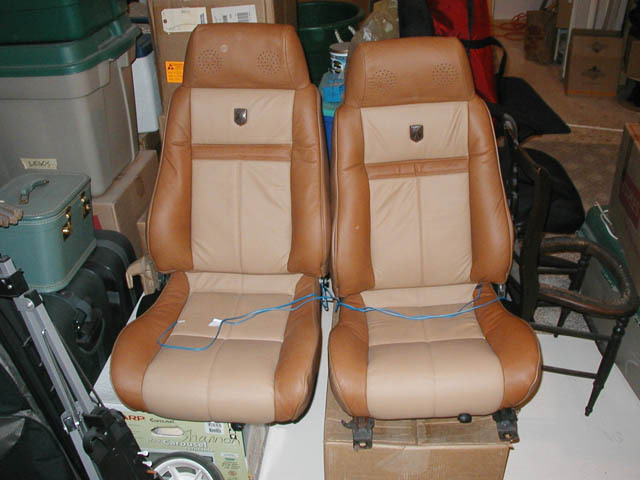
Oh, and the seats are supposed to look like that. I believe they burned the edges of the seat foam to avoid problems with loose foam, rips and tears. Seats look good though, here's mine:
I love Mr. Mike's!
[This message has been edited by 1986 Fiero GT (edited 03-24-2006).]
IP: Logged
04:31 AM
madcurl Member
Posts: 21401 From: In a Van down by the Kern River Registered: Jul 2003
I know the sore hand thing all too well. I replaced my old Mikes, withe new ones. It was not a fun job, but the after picture was worth the sore finger tips.
Post a few pics with the seats installed...
IP: Logged
06:45 AM
Miss-Tress007 Member
Posts: 541 From: New Orleans, LA, USA--now in Greensboro, GA thanks to Hurricane Katrina Registered: Feb 2004
3:47AM this morning, I thought I was finished with the seats, so I put them away for safe-keeping during the night (I have cat who's attracted to leather hehe) and planned on getting up and putting them in before heading out this morning.
Sounds like a plan, right?
WRONG!
I tried to install the seats and the driver's side went in with no problem, but the passenger side tracks weren't on properly so the stupid thing wouldn't line up with the bolts---so out they came.
After taking the brackets off (again), I figured out why they weren't lining up. I'd screwed the bolt into the wrong hole, so the track wasn't lined up straight. <Duh> (What can you expect at 3AM?) So I fixed that problem, but when I tried to test the sliding bracket, the spring popped. <DARN (insert expletive here)> Which of course meant that I couldn't slide the seat back and forth to be able to get it back in the car.
Okay. I can handle this. I decided to get a sodering iron from the local hardware store to try and solder the broken piece to the bracket.
This called for steady hands and lots of patience (which I didn't have much left anymore). That idea didn't work because the wires were too small and there was too much pressure on the spring, so it just pulled it apart. <grrr>
After fooling around with this and trying to get it to work for about half an hour, it hit me. WIRE COAT HANGER! Yup, an everyday household item solved the problem on the first try.
So......now I take the seat out to install it and of course, everything works great. The brackets and screws all lined up correctly and the seat moved back and forth even better than before.
quote
Originally posted by topcat:
Post a few pics with the seats installed...
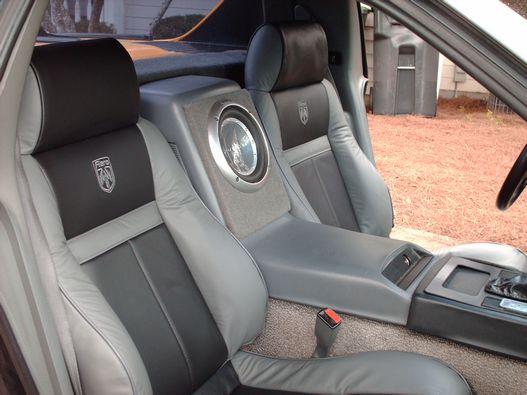
Sure! Here's a pic of the seats installed.....finally at 12:19pm!!!
Oh, there's another "extra" project that I didn't have time to post the details about in that picture. Any guesses? LOL
Well, we're hitting the road now. Will be in Daytona in about 6 1/2 hours. Try and show you the rest later
~Tress
[This message has been edited by Miss-Tress007 (edited 03-24-2006).]
IP: Logged
12:55 PM
exoticse Member
Posts: 8655 From: Orlando, Fl Registered: Jun 2003
Looking good! I'm sure you'll get those seats worn in in no time!
quote
Originally posted by Miss-Tress007:
After fooling around with this and trying to get it to work for about half an hour, it hit me. WIRE COAT HANGER! Yup, an everyday household item solved the problem on the first try.


 LOL
LOL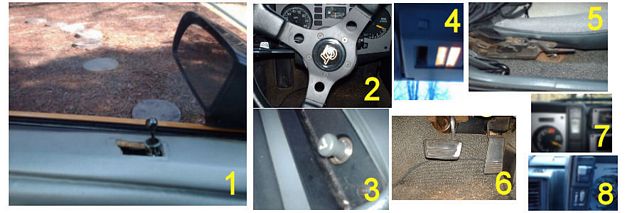


 (Wishful thinking! LOL)


 Archie's Choptop conversion #11, #15, Redux & # 20


 thats the nicest sail panel Ive ever seen