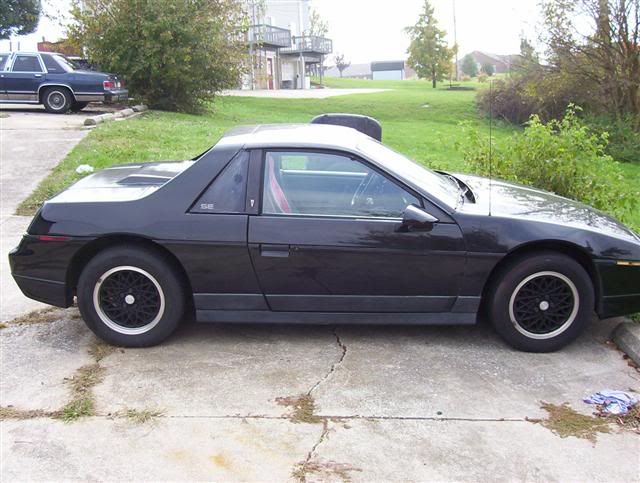
I decided since my Fiero or life size car model lol is just sitting there, why not start the long road of sanding & prep work for a paint job.
I thought ok? I'll get a friend to come over, but to be safe to see how hard it would be we started on the opening of the radiator part on the nose(I have a 86 SE aero package). We sanded for 50 minutes and barely go anywhere lol. DANG its hard, I will post pictures tonight after work.
Tommorow i'm going to go get the proper sand paper, thats better and the right kind, and sand blocks so I get an even sand.
Also I need help on something. I am far from having the whole car sanded. But I want to fill in the tiny hole where the Fiero badge was at one time on the nose, and most importantly. I want to do the hidden attenna thing in the fender. Directions on how to hide the attenna in the fender, and what to use to fill the hole(body filler at wal-mart & bondo is fine right???). Pictures are appreciated. Just telling you guys what i'm up too. I also did attempt to fix the slave after a few tricks ppl told me to try before I go & order one. Looks like i'm going to just have to order a new slave. Hopefully I can get someone to come over when I get it, to help install it & etc *hint hint people who live near me* lol .
Well pics will follow at around 2 a.m. central time when I get home. Peace!!
IP: Logged
05:38 PM
PFF
System Bot
BobadooFunk Member
Posts: 5436 From: Pittsburgh PA Registered: Jun 2003
hey where abouts in IL are you? i have to go to Mattoon to pick up some stuff durin christmas break soon....id love to stop by and look at your car maybe even give some help...
------------------
[This message has been edited by BobadooFunk (edited 12-08-2004).]
hey where abouts in IL are you? i have to go to Mattoon to pick up some stuff durin christmas break soon....id love to stop by and look at your car maybe even give some help...
Heck yeah! lol. I would love any type of help or to even just show off my new Fiero. I have no clue where Mattoon is. If you want man, IM me on aim.
IP: Logged
12:29 AM
1MohrFiero Member
Posts: 4363 From: Paducah, Ky Registered: Apr 2003
If you can, get yourself an air compressor. Then for this job get yourself a sander (I always used a 5" palm style orbital), then you can get yourself an air ratchet and such to go with it. A water trap is extremely important... never use an air compressor without one.
IP: Logged
08:37 AM
rogergarrison Member
Posts: 49601 From: A Western Caribbean Island/ Columbus, Ohio Registered: Apr 99
You need to use the filler for "flexible bumper repairs" not body filler. The way id fix the holes is sort of dish in the areas around the holes on the outside. Rough up the inside all around the holes with at least #80 paper. Wipe a thin coat of the flex filler where you sanded and lay a square piece of fiberglass cloth larger than the opening over it and immediately wipe some more filler on that. Let it harden and use the filler on the outside built up higher than the surrounding area. Block sand that down until you work down to #400 paper and primer it. If you dont ' back up ' the hole with glass cloth, it will pop back out sooner or later.
IP: Logged
12:58 PM
NotAFieroAnyLonger Member
Posts: 4413 From: 75762/Texas/USA Registered: Dec 2003
You need to use the filler for "flexible bumper repairs" not body filler. The way id fix the holes is sort of dish in the areas around the holes on the outside. Rough up the inside all around the holes with at least #80 paper. Wipe a thin coat of the flex filler where you sanded and lay a square piece of fiberglass cloth larger than the opening over it and immediately wipe some more filler on that. Let it harden and use the filler on the outside built up higher than the surrounding area. Block sand that down until you work down to #400 paper and primer it. If you dont ' back up ' the hole with glass cloth, it will pop back out sooner or later.
^^^^^^ Roger is the man if you need anything!!^^^^^^^
You need to use the filler for "flexible bumper repairs" not body filler. The way id fix the holes is sort of dish in the areas around the holes on the outside. Rough up the inside all around the holes with at least #80 paper. Wipe a thin coat of the flex filler where you sanded and lay a square piece of fiberglass cloth larger than the opening over it and immediately wipe some more filler on that. Let it harden and use the filler on the outside built up higher than the surrounding area. Block sand that down until you work down to #400 paper and primer it. If you dont ' back up ' the hole with glass cloth, it will pop back out sooner or later.
The bumper repair kit that I bought from NAPA came with a section of a metal mesh to be used as a backing. If you have that in your kit, that makes a nice backing for the inside of the hole if you don't have any fiberglass cloth. It's even sticky on the back side to help hold it in place while you smear the repair goop in place.
Mark
IP: Logged
11:18 PM
Dec 10th, 2004
Fieroking Member
Posts: 2150 From: Coeur D Alene Idaho USA Registered: Jun 2002
You need to use the Flexiable Bumper Repair Kit to fill holes. I got mine at "Schucks". When I filled in the antenna hole on my 88 I used a piece of fender material from a broken fender I had, I cut a piece to fit in the hole (wasn't a pefect fit) and then filled it with the stuff from the Bumper Repair Kit. That reduced the sanding and helped keeping the area level. AIR TOOLS are the only way to go with sanding. I did one car sanding by hand , it took me a summer to get it ready for paint. I should have become a burgler as I had no finger prints (the sand paper removed them). Also remember you do not have to remove all the paint, the paint has been on your car (if original) since it was built. If it isn't coming off now it never will. Just sand enough to remove the clear coat and ruff up the base coat so it will accept primer.
Good Luck Joe Sokol
------------------ 85 SE 2.8 - beater coupe- 86 SE 3.4 -in progress 3800 II SC - 88 Formula GT 4.9 5 speed beast Enough parts outside for another one -And a 3.4 push rod for sale in the mall Go and look-
If you were closer to me I would have been happy to lend a hand. I do this work daily, and I do everything by hand... I am a perfectionist, I have an orbital, I just never touch it. There is an art to this kind of work.. and to be able to get it right, without the use of technology, is a real accomplishment. But if you dont have patience, and dont want a masterpiece, then go get yourself a monster compressor and orbital ~! What grits are you using? I'd recommend 220 - 320 - 400 - 500 - 600 - 700 - then finish it off with 800! And you will have a masterpiece in the making!
Originally posted by Fieroking: Just sand enough to remove the clear coat and ruff up the base coat so it will accept primer.
Depends.. Make sure that if you do this, you take it down to 400 grit, then scuff it so that there is NO reflection on the paint, make sure it is all dull, no shine. Then you will know your clear is gone. Just making sure, since i've seen my hand in half shab jobs..
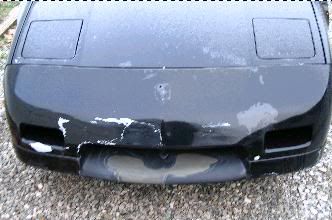
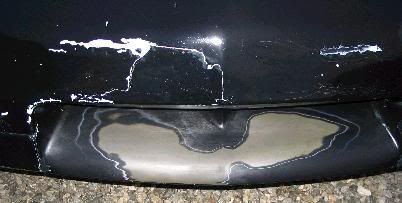
Bit delayed on this but oh well. Here is the pics of that day, like I said, it was only bout less then a hour of work plus we didn't have the right(good) enough sand paper.
We only did the opening part, the white part is the clear coat peelin off. I am going to Wal-Mart(hopefully tommorow) to get the right sand paper, sanding blocks(so we don't mess up our hands lol, plus its more "even") and a body filler kit like said above. Will definetely post more pictures once progress gets going and we actually do some REAL sanding.
Little update, friend & I went & got some good sand paper we started on the hood. Wow I didn't know there was so many layers, we went through like 8 different shades of black(my car is black duh lol) and then we went to a really grey/white shade. Which we thought was the beginning of the clear coat, more shades of black and we got to REALLY white. We were like heck yeah were at the bottom, I noticed there was a tiny black spot in the middle of my white. I sanded it......more to sand out that black spot...
All of a sudden it got bigger and I noticed there was MORE!! I was like wtf?? Come to find out I think THAT is the clearcoat, then I started hardcore sanding in that spot just to see how many more layers. I got done to a more grey/white layer which I blelieve is the final layer I hope....
Anyways were going to Wal-Mart again tommorow to get something a little stronger then the 220. I also decided since I am going to be doing quiet of bit of body mods in the next couple months to just do a spray paint job Instead of getting a nice one now & having it get "ruined". But we're getting the car down the the final layer & doing a good job, so that when I finally do go get a real paint job that I will only have to a little to get the spray paint off. Picture will follow tommorow Peace!!!
IP: Logged
04:00 PM
bubbajoexxx Member
Posts: 1630 From: Ontario Canada Registered: Aug 2003
if your car has original finish you will have a coat of clear then black base then black primer then SMC surface if there is more than that the car has been painted before
Wow... why did you go through that many layers? lol Alright, umm.. you SHOULD have only gone a couple, since the rule of thumb, is that you must feather the layers out to at least 2 inches apart... I go at least 5, but thats me.. And I do alot of metallic paint jobs. Looking at what you just did, I'd make sure you put a couple layers of primer on it.. not just one, try 3.. ohh and dont forget to block sand it after the primer is down... Block Sanding ( Prime it, then put down some black paint, from a rattle can.. just extremely lightly.. do not cover the primer, just lay dots of paint all over the spots you are doing.. then block sand it, keep the block horizontal, and go at a / or \ angle with it) that will insure that your panels are flat, and make sure you do this, because the layers that you penetrated... any more questions? feel free to PM me about it if you must!
IP: Logged
06:09 PM
USFiero Member
Posts: 4879 From: Everywhere and Middle of Nowhere Registered: Mar 2002
I had told a paint shop that I was going to take my beat up front and rear GT bumpers to Keystone to have them stripped, repaired and primed and the guy turned up his nose and said they used the 'wrong' kind of primer for him to paint it.... why would they do that?
------------------ Take a deep breath... smell that? It's a cleaner, fresher PFF! ***Custom 85 under construction, 87 Coupe in the driveway. The fun never ends!***
I didn't see this mentioned, but wherever you're going to fill a hole, make sure to take all the paint off from around the area. You want the plastic filler to stick to the bare plastic, not the paint. You'll have to feather out the paint quite a bit if there are a lot of layers. On the parts that you're not doing any plastic repair or filling, you don't have to take all the paint off, unless it's flaking real bad.
------------------ 86 SE 4 spd - 86 GT auto - 86 SE auto 85 GT parts car
[This message has been edited by sqoach (edited 12-15-2004).]
Wow suprised at all the helps lol. Thanks for the tips. Right now i'm just worried bout getting the whole car sanded down. Read what I said above for an explanation but i'm just going to spray paint it. Particulary silver or a metallic silver, whichever kidna nice silver I can find.
I think I might have extragerated a lot on the # of layers, but I was just surprised. We went through a little black, the REALLY white(clearcoat??), then it went the oppositie to really black then to a dull grey?? I guessing the dull grey is the final layer correct?? I don't want to risk going to far down. So that is the last layer right?
Also once we get the whole car down to the final layer we spray primer, then sand and repeat that 3 more times correct?? Then on the last primer we spray the silver spray paint correct?? We're not even close to the spraying step, but I like to think ahead lol.
Thx guys once again
That crazy kid with a lot of dreams - Josh
IP: Logged
02:51 AM
rogergarrison Member
Posts: 49601 From: A Western Caribbean Island/ Columbus, Ohio Registered: Apr 99
Its not even necessary to primer the whole car. BUT with silver it is a good idea to put at least a light coat of gray primer so that it covers easier. (although I myself HATE gray primer)
Bumper cover repair shops use waterbase primer usually. Although your shop may not like it, you can paint any kind of paint over it after it properly prepared. The waterbase is what all my aftermarket bumpers come in that I order. You have to scuff sand them, but they advise against sanding thru it to the bumper itself. My advice to you is if theyre painting it, let them do it their way.....they have to fix it if it messes up.
Wow suprised at all the helps lol. Thanks for the tips. Right now i'm just worried bout getting the whole car sanded down. Read what I said above for an explanation but i'm just going to spray paint it. Particulary silver or a metallic silver, whichever kidna nice silver I can find.
I think I might have extragerated a lot on the # of layers, but I was just surprised. We went through a little black, the REALLY white(clearcoat??), then it went the oppositie to really black then to a dull grey?? I guessing the dull grey is the final layer correct?? I don't want to risk going to far down. So that is the last layer right?
Also once we get the whole car down to the final layer we spray primer, then sand and repeat that 3 more times correct?? Then on the last primer we spray the silver spray paint correct?? We're not even close to the spraying step, but I like to think ahead lol.
Thx guys once again
That crazy kid with a lot of dreams - Josh
Wait a minute.. all this work and your spray bombing it? Crap.. since I am a nice guy, I will answer some questions and give you some more tips.. Now the really white "primer" is actually a sprayed on filler, similar to primer, exept with the intention to fill imperfections.. What you have to learn, is that the spray can primer lacks any means of hardner.. so it will be extremely weak and brittle. So if you get a good paint job, after a couple of months your paint might flake, or peel off! The ONLY way you would be able to make this work, is if you used paints that were meant for bonding to this primer. In other words.. If your going to cheap out on the primer.. make DAMN sure that you cheap out on the paint! Your money will be completely wasted unless you do. Personally I wouldn't let a spray bomb touch any of my cars unless it was for black trim panels.. Well to each their own I guess, have fun and good luck!
Its not even necessary to primer the whole car. BUT with silver it is a good idea to put at least a light coat of gray primer so that it covers easier. (although I myself HATE gray primer)
You still have to remeber.. that he is attempting to go from a dark shade (black) to a light light shade (silver) In order for him to make it completely even, he should cover the car with primer.. Also look at the layers he has uncovered.. Now if he were to just paint over those layers.. Well lets just say he'd be back at step one at this little project of his. Filler, and primer, and you will not notice the layers as much as just paint
I figured since I plan on doing a couple body mods over the next few months to just spray paint it.......
So....my friend & I washed the car off(to get all dirt off) and taped all the moldings, windows, and anything we didn't want to get sprayed. So we went out and got some spray paint and.....
*drum roll*
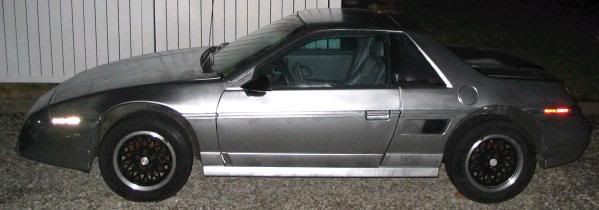
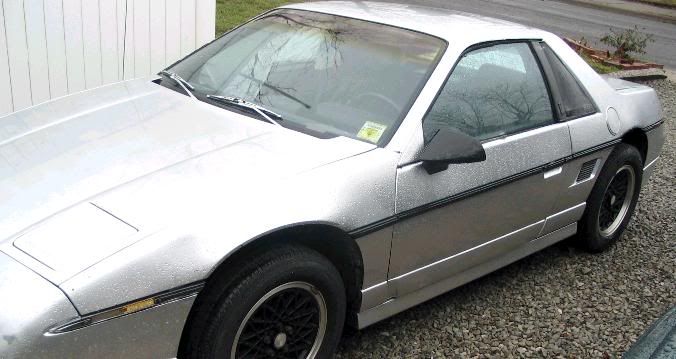
It looks SWEET. I mean in a few spots it needs touched up, and a few spots cleaned up. But this has made my Fiero ethusiasm jump, I was starting to hate it cause of it not being able to drive it. But for the first time in a while, I love my Fiero to death. I'm going to go get more batteries for my digicam so you guys can see it. It looks FRIGIN AWESOME!!! with the silver/chrome "paint" with the black rims(88 rims I think?) and the molding black and I left the mirrors black too so it looks awesome guys. I need to go get a another can to respray over some spots but overall the car looks so frigin sweet guys. All I know is that I love it so much again, and it's great. Will post pics later.
Also on a side note, I thought bout taking the body panels off like the fender to spray them to make it easy. But I couldn't figure out how to take the side moldings off without breaking them???? Oh well.
Spray can primer wont fill a thing on multiple layer paint jobs. Its WAY to thin. All it does is color it, it wont fill even the smallest imperfections. I use it to spray any ground bare metal parts that have to go outside so it wont start to rust. Most REAL auto paints arent compatible with the spray can primer. Usually be lucky if it dont bubble up like stripper when you paint it. I wont paint cars that people have spray canned primer unless I strip it all back off. Real primer thins 50/50 with thinner....spray can stuff has to be lot thinner to go thru the little nozzle...like 20% primer / 80% thinner. So if you buy a 16 oz can of it youre lucky if you have 3 or 4 oz of primer. You can by a whole quart of good stuff for price of a couple of cans.
Since it's been raining and to cold to finish the car off(giving it a 2nd coat & bombing some stuff like the side vents black to look fresh with the rest of the car) I really haven't made any progress then the original first coat. Wanted to give you guys an idea and hopefully in the next few days get the thing all nice & finished before Saturday which a generous PFF forum member is coming ot pick my fiero up and we're(more like him, since he knows what he's doing lol) going to replace my slave cyclinder & etc. well away with pics
But back onto subject, I love this new look, give me crap about bombing it but I like it & have gotten nothing but compliments from people who have seen it in person and it's not EVEN DONE. So that kinda rose my spirits a lot. I'm not done, so don't critque me yet, till I say i'm done with it like I said hopefully in the next few days if the weather permits. Well heres some pictures to hold you guys over till I finish it. Peace
Show us another pic when it's dry; I almost got eyestrain trying to figure out why it looked so odd, until I noticed the wet street in the background, lol...
------------------ '88 Formula - 4.9 conversion by The Fiero Factory Shifter surround resto by Fierotech SUPPORT YOUR FIERO MERCHANTS Proud member of the Lightbar Fraternity PFF Supporting Member "He who does not oppose evil, commands that it be done!" ----Leonardo da Vinci
Show us another pic when it's dry; I almost got eyestrain trying to figure out why it looked so odd, until I noticed the wet street in the background, lol...
you can tell that the street is wet but can't see the water droplets on the side of the car and the window? ;oP
[This message has been edited by Kohburn (edited 01-06-2005).]
IP: Logged
02:26 PM
rogergarrison Member
Posts: 49601 From: A Western Caribbean Island/ Columbus, Ohio Registered: Apr 99
you can tell that the street is wet but can't see the water droplets on the side of the car and the window? ;oP
That's what was giving me problems. I was like, "He says it looks good, but what the heck are those little pockmarks all over it??" After I noticed the street being wet, I figured it out, lol...
------------------ '88 Formula - 4.9 conversion by The Fiero Factory Shifter surround resto by Fierotech SUPPORT YOUR FIERO MERCHANTS Proud member of the Lightbar Fraternity PFF Supporting Member "He who does not oppose evil, commands that it be done!" ----Leonardo da Vinci
IP: Logged
05:47 PM
PFF
System Bot
rogergarrison Member
Posts: 49601 From: A Western Caribbean Island/ Columbus, Ohio Registered: Apr 99
And you do know that when you want to paint it with ' real ' paint, you have to completely sand that all off, every nook and cranny...........right? Real paint wont go over it till its 3 ir 4 years old without cracking or krinkling.
Im not picking on him, ive spray canned a few in my life along with a few ' brush ' jobs. Just pointing out for everyones benefit, if they go the spray can route, eventually they will pay a price.
size of the storage tank is the most important - (you can buy just the air tanks and daisy chain them) but the volume and pressure required will depend on the gun you use - check the required air rating of the guy you buy.. but remember that would be constant duty really probably only need about 60% of that if you have a decent sized tank
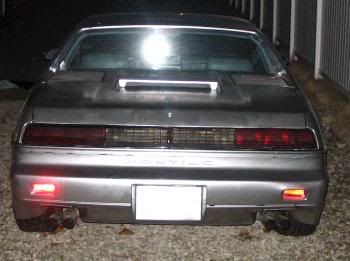
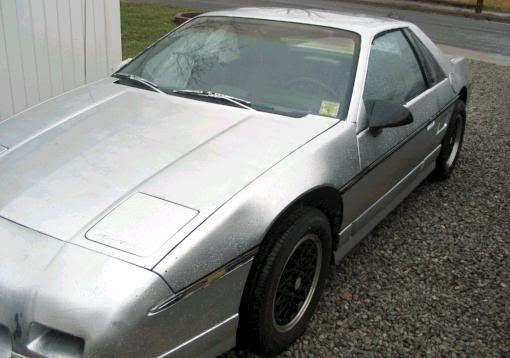
Finished it all today, as far as spraying the rest of the car that was still black(not seen in pics) and doing a double coat on some parts. Once again the car looks 100% Better in Person, seriously.
I took these about 2 hours ago(bout 7ish), so they are a bit dark not showing the greatness and how good it looks. I need to take a picture in the morning, which I will at 7 or 8 a.m. when I & someone else are going to be doing something on my Fiero(will talk about later )
Well here's some pictures.
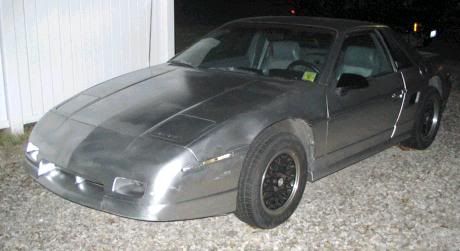
Preview of all the pictures I took -
I went a little crazy with the chrome spray paint after I was done -
Here's one right after I got done with me next to it (look at my hand lol) -
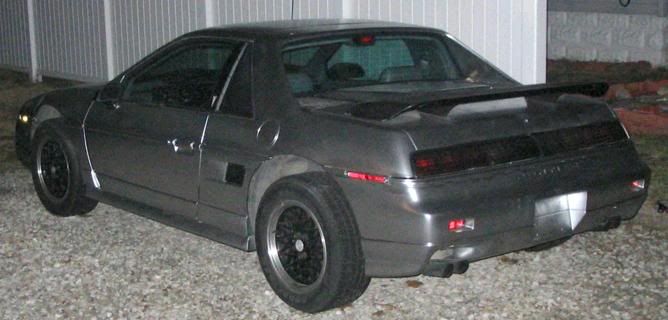
Here's one where I mocked up my GT spoiler & stands after I bombed them black so they look all fresh too. I plan on putting the spoiler on soon.
Yes I know, when I go to get a "real" paint job I will sand it all off, but I plan on doing several body mods so I don't plan on paying for a nice paint job for now. I have no experience at really painting it, so I'm not going to even try that route yet. But it looks incredibley great in person, I cannot stress that I need to go get some clear coat in a can to finish it off.
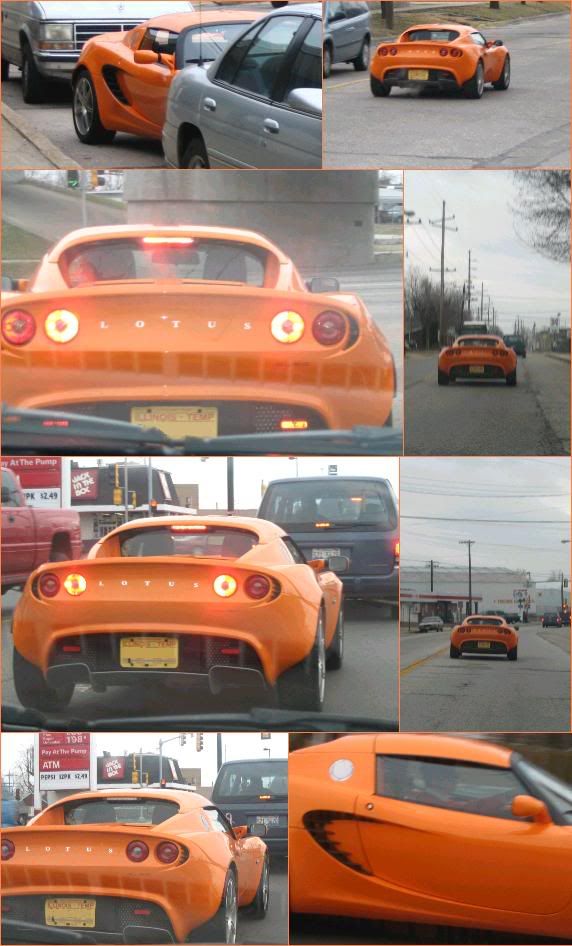
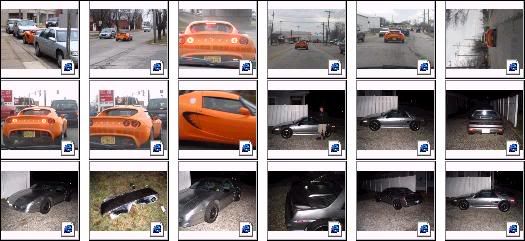
Also on the way to go get more spray paint, I saw this car and had snapped pictures like crazy(was in g/fs car). OMG this car is so sweet, anyone know what kind it is?? From the bumper I obviously got it was a "Lotus" and I can't describe the front. The front of the car is so sweet, it's also the same size if not maybe smaller then a Fiero & looked Mid-engine also? Any specs & info on this thing?? Well heres some pics I snapped.
Thx
-Josh-
[This message has been edited by Fiero Finale (edited 01-07-2005).]
IP: Logged
10:20 PM
Jan 8th, 2005
Golden86 Member
Posts: 1191 From: Glen Ellyn IL Registered: Jan 2004
That orange car in the pics is a Lotus Elise, it is a mid engine car. It uses a tweeked celica GT engine putting out 190hp and the car only weights 1975lbs. It's a definite screamer.
I don't want to be an a$$, but I think you made a mistake painting it that chrome color, its just gaudy. I could see silver, thats fine, but that chrome paint is WAY too loud, and it looks cheap. The original black paint didn't even look that bad, and you have twice as much labor trying to get all that paint off when you actually decide to paint it for real.
[This message has been edited by Golden86 (edited 01-08-2005).]


 .
. 


 wtf?? Come to find out I think THAT is the clearcoat, then I started hardcore sanding in that spot just to see how many more layers. I got done to a more grey/white layer which I blelieve is the final layer I hope....


 Real paint wont go over it till its 3 ir 4 years old without cracking or krinkling.
 -
-