Pennock's Fiero Forum
  General Fiero Chat - Archive
  My hood scoop project....PROGRESSION PICS (AND FINISHED) (Page 1)

T H I S   I S   A N   A R C H I V E D   T O P I C
  

Email This Page to Someone! | Printable Version

This topic is 4 pages long:  1   2   3   4 
Previous Page | Next Page
My hood scoop project....PROGRESSION PICS (AND FINISHED) by My7Fieros
Started on: 03-12-2002 09:20 PM
Replies: 122
Last post by: Fie Ro on 04-12-2004 11:47 AM
My7Fieros
Member
Posts: 3357
From: Germantown, TN
Registered: Jun 2000


Feedback score: N/A
Leave feedback

Rate this member

Report this Post03-12-2002 09:20 PM Click Here to See the Profile for My7FierosSend a Private Message to My7FierosDirect Link to This Post
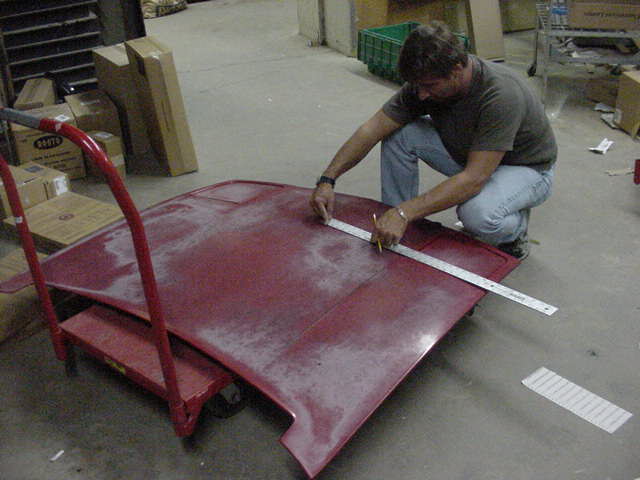
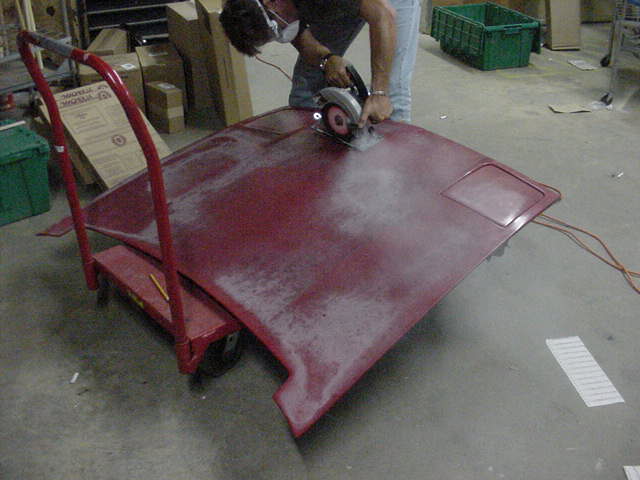
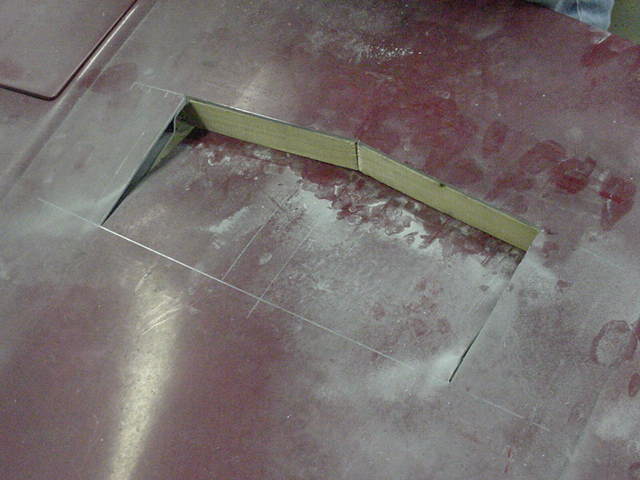
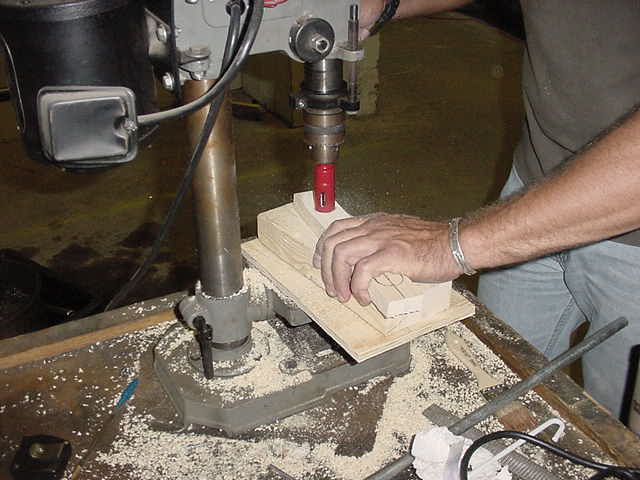
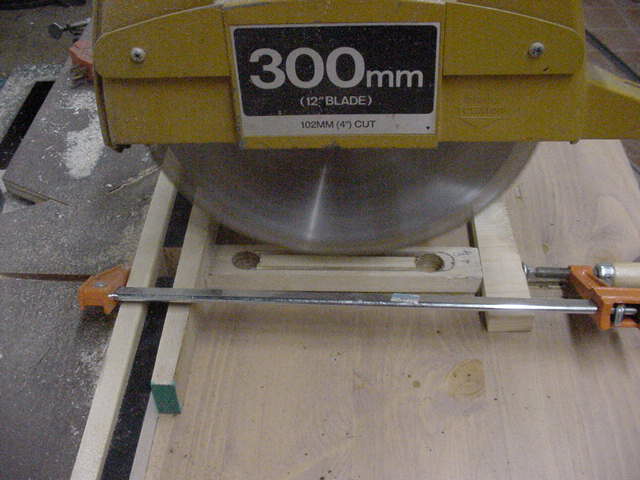
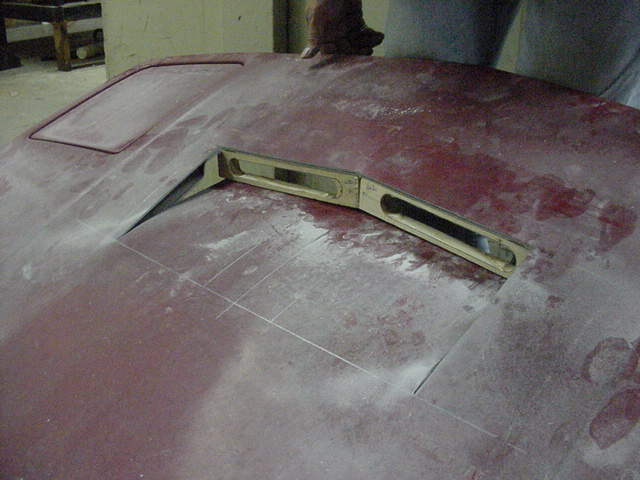
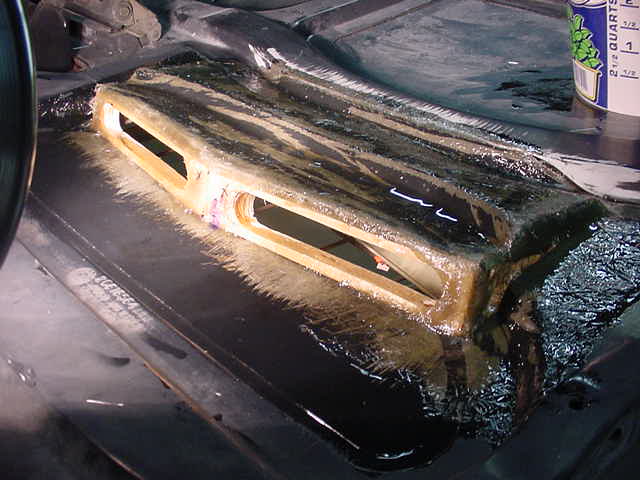
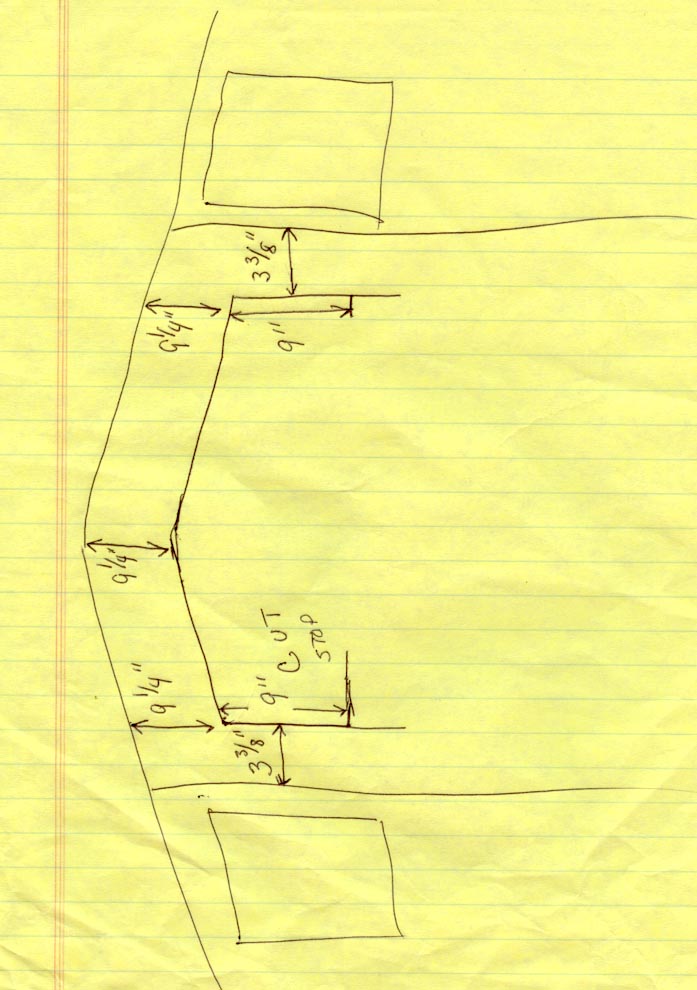
Ok, so my roommate did the work, but I took the pics lol. Anyway, not bad for the first time I dont think...(This will take two posts)
Here we go...taking measurements first (BTW this was done on a parts car hood)

...no turning back now!

The cuts have been made..(using a couple of rulers to hold the cut part down...

wooden blocks (!)...you'll see...

making the openings on the blocks...


ahhh...already beginning to take shape!

...more in a minute...

IP: Logged
PFF
System Bot
My7Fieros
Member
Posts: 3357
From: Germantown, TN
Registered: Jun 2000


Feedback score: N/A
Leave feedback

Rate this member

Report this Post03-12-2002 09:28 PM Click Here to See the Profile for My7FierosSend a Private Message to My7FierosDirect Link to This Post
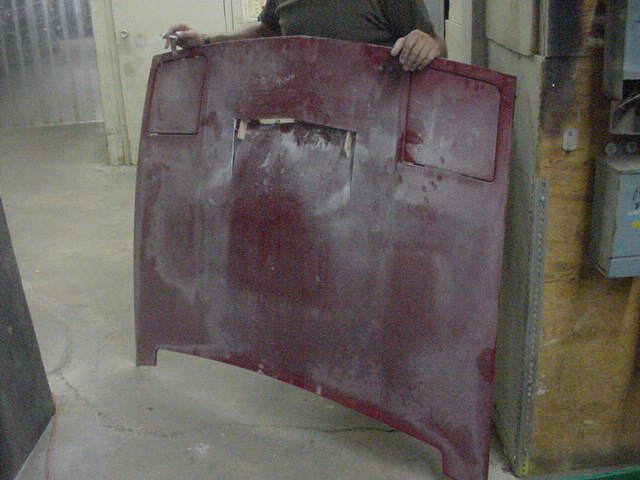
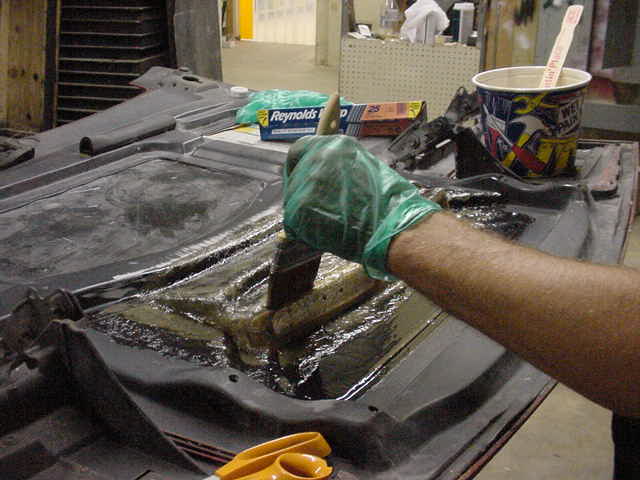
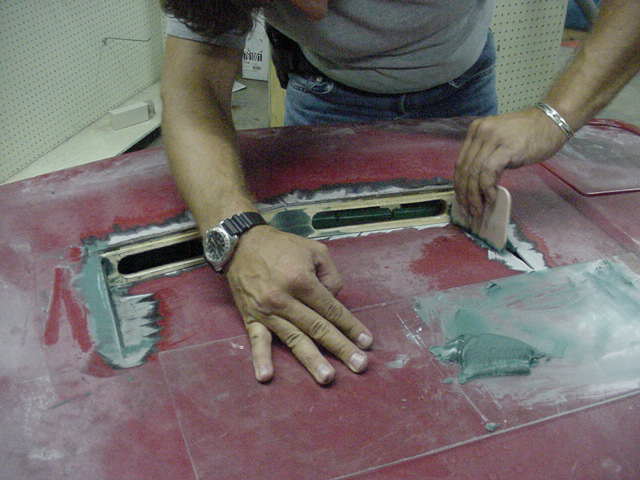
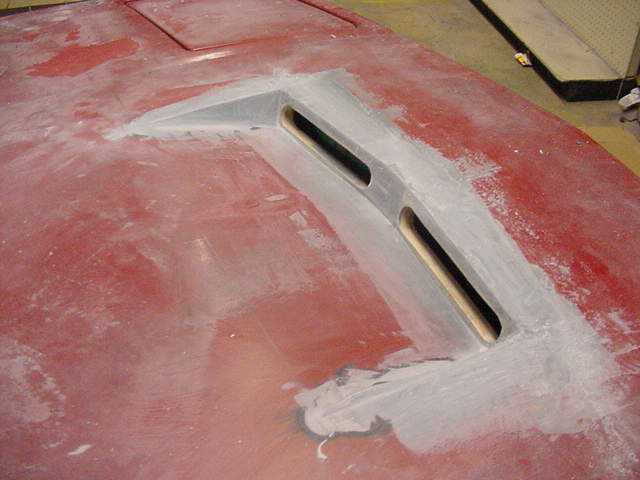
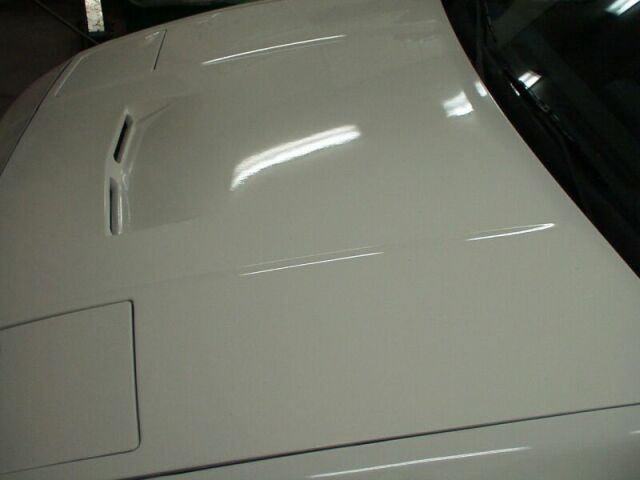
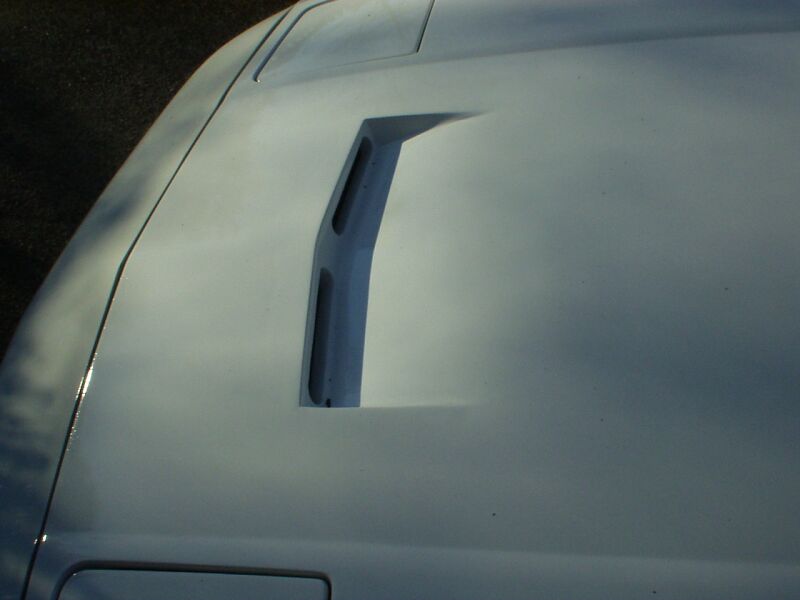
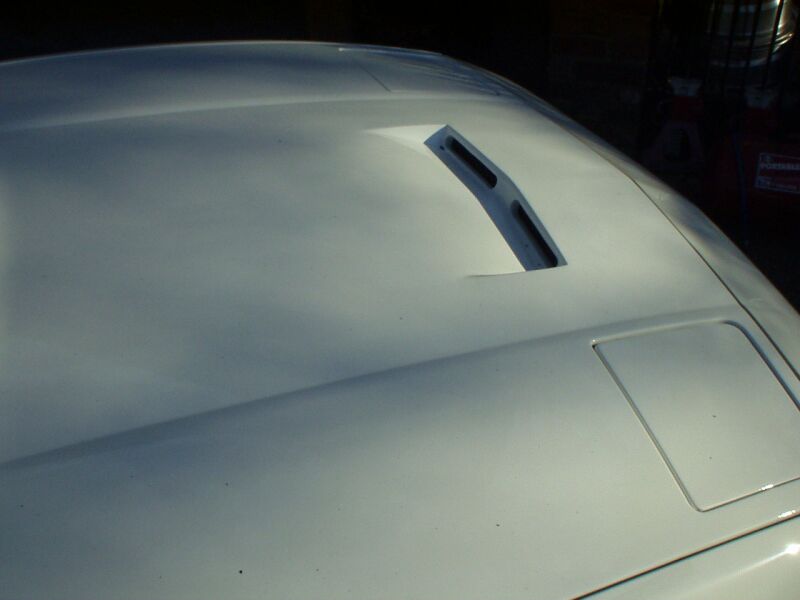
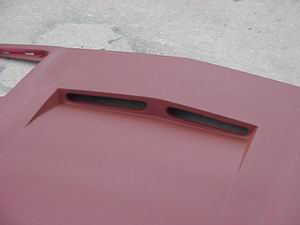
...glassing in the underside

...underside again...

...applying the "kitty hair" filler...this is the time consuming part


Unfortunantly I didnt take anymore pics of the work..but after the last pic, we sanded more, then painted. A black screen was then added to the openings...
Sorry for the bad pics, but its all Ive got..

Thanks to Oreif actually, we got the idea after seeing his car while we were in Chicago!


IP: Logged
Haze_Performance
Member
Posts: 7452
From: Illinois
Registered: Mar 2000


Feedback score:    (6)
Leave feedback


Total ratings: 99
Rate this member

Report this Post03-12-2002 09:36 PM Click Here to See the Profile for Haze_PerformanceSend a Private Message to Haze_PerformanceDirect Link to This Post
WOW.. Awesome pics My7.. Its so cool to actually see a scoop install step by step.. Great work..

------------------

ClassicFiero.com

IP: Logged
Raydar
Member
Posts: 40685
From: Carrollton GA. Out in the... country.
Registered: Oct 1999


Feedback score:    (13)
Leave feedback


Total ratings: 460
Rate this member

Report this Post03-12-2002 09:39 PM Click Here to See the Profile for RaydarSend a Private Message to RaydarDirect Link to This Post
Nice job!
Is it going to require modifying the trunk wall?

Post more pics when you get further along.

------------------
Raydar

From the Department of Redundancy Department.

IP: Logged
FieroPerformance
Member
Posts: 435
From: Cincinnati, OH, USA
Registered: Feb 2001


Feedback score: N/A
Leave feedback

Rate this member

Report this Post03-12-2002 09:49 PM Click Here to See the Profile for FieroPerformanceClick Here to visit FieroPerformance's HomePageSend a Private Message to FieroPerformanceDirect Link to This Post
Looks good!

-Charlie

------------------

IP: Logged
Bobert
Member
Posts: 371
From: Toronto, Canada
Registered: Jan 2002


Feedback score: N/A
Leave feedback

Rate this member

Report this Post03-12-2002 09:56 PM Click Here to See the Profile for BobertSend a Private Message to BobertDirect Link to This Post
Very impressive! I have to do this too. It looks great. Would you please share the actual measurements that you laid out on the hood? Thanks.

------------------
'84 Indy '84 SE

IP: Logged
BC-GT
Member
Posts: 719
From: Burnaby BC, Canada
Registered: Mar 2001


Feedback score: N/A
Leave feedback

Rate this member

Report this Post03-12-2002 11:19 PM Click Here to See the Profile for BC-GTSend a Private Message to BC-GTDirect Link to This Post
Does look very good. Where does the water go when it rain though, especially with that lip and the inserts being wood.
IP: Logged
sloth85GT
Member
Posts: 1631
From: Winnipeg
Registered: Jul 2001


Feedback score: N/A
Leave feedback

Rate this member

Report this Post03-12-2002 11:44 PM Click Here to See the Profile for sloth85GTSend a Private Message to sloth85GTDirect Link to This Post
Wow, looks great! Best part is it's almost free!

But are you sure using wood is a good idea?

------------------

Dan
1985 Silver GT

400HP LT1 Conversion has begun......

IP: Logged
HappyFiero
Member
Posts: 216
From: Salem,IN. USA
Registered: Feb 2002


Feedback score: (2)
Leave feedback

Rate this member

Report this Post03-13-2002 12:36 AM Click Here to See the Profile for HappyFieroSend a Private Message to HappyFieroDirect Link to This Post
I agree VERY nice!, and low budget What more
could you ask For.

Happyfiero
IP: Logged
Neal
Member
Posts: 1247
From: Calgary AB, Canada
Registered: Jun 2001


Feedback score: N/A
Leave feedback

Rate this member

Report this Post03-13-2002 12:37 AM Click Here to See the Profile for NealClick Here to visit Neal's HomePageSend a Private Message to NealDirect Link to This Post
I LIKE IT!!!

Please post measurements. That is the kind of mod i like most, cheap, personal, and hands on.

IP: Logged
My7Fieros
Member
Posts: 3357
From: Germantown, TN
Registered: Jun 2000


Feedback score: N/A
Leave feedback

Rate this member

Report this Post03-13-2002 12:51 AM Click Here to See the Profile for My7FierosSend a Private Message to My7FierosDirect Link to This Post
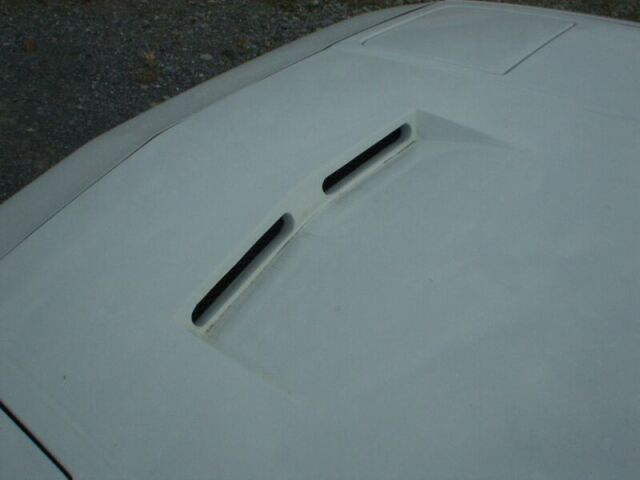
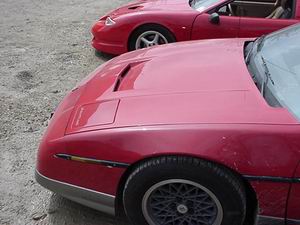
Ok for the fine details....
The project is finished..in fact, its been finished for a while, just found the pics lol. The last pic is of it complete, but for some reason the pic is bad quality..I'll take some better ones tomorrow and post them here....
I had a feeling the wooden blocks would be an issue, but they are treated, covered with the filler, then covered with the glass, then primed, then painted, then cleared..they should be fine.
I'll have to dig up the measurements, but I'll get them to those of you who asked. I almost forgot, the "trunk" area (where the spare is) was a slight prob...we just pulled up the weather stripping along the front side of it and used a metal nibbler to cut out a small area across the top, less than 1/4 of an inch, then put the weather stripping back on...you would never notice, since there is already a slight "drop" along the front side anyway...I'll get pics of that to.
After the project was completed, we sprayed the underside of the hood where it was glassed w/ that black rubberized (wheelwell) paint, just for added measure. The water just falls through when it rains, doesnt hurt anything...like I said, this project has actually been completed for a while, I just now found the pics, and no probs anywhere. All in all it was really a pretty easy project, just alittle time consuming on the filler, not to mention we didnt mix the glassing properly and it took nearly a week for it to cure! The car has been at Ed Parks for a while, and I just got it back, so I'll take some better pics tomorrow of the completed scoop on the car and post them here. Thanx for the interest.

[This message has been edited by My7Fieros (edited 03-13-2002).]

IP: Logged
PFF
System Bot
Screwie
Member
Posts: 718
From: Netherlands
Registered: Oct 2001


Feedback score: N/A
Leave feedback

Rate this member

Report this Post03-13-2002 04:50 AM Click Here to See the Profile for ScrewieSend a Private Message to ScrewieDirect Link to This Post
Very interesting stuff! Great work!
IP: Logged
Oreif
Member
Posts: 16460
From: Schaumburg, IL
Registered: Jan 2000


Feedback score:    (19)
Leave feedback


Total ratings: 442
Rate this member

Report this Post03-13-2002 08:07 AM Click Here to See the Profile for OreifClick Here to visit Oreif's HomePageSend a Private Message to OreifDirect Link to This Post
Looks Great! Great directions!
Glad I was able to help you out.
Are you guys coming up again this year? Maybe we should plan it around a show.

------------------

Happiness isn't around the corner...
Happiness IS the corner.

IP: Logged
fierosa
Member
Posts: 135
From: Atascosa, TX USA
Registered: Jul 2001


Feedback score: (1)
Leave feedback

Rate this member

Report this Post03-13-2002 08:55 AM Click Here to See the Profile for fierosaClick Here to visit fierosa's HomePageSend a Private Message to fierosaDirect Link to This Post
THIS is EXACTLY why this forum is so addictive! One Fiero Owner showing his pride in his Fiero with all others while holding nothing back, showing step by step how to improve and modify their respective pride and joy. Should I ever decide to modify my hood, I will know exactly where to go to get the best help and advice with the project wheather it be the archives or folks ready to help real time! Excellent pics, great descriptions and a fantastic looking finish! I personally dont think that you will have problems with the use of wood. (At least not in our lifetime) Boats have been using fiberglass encased wood for years with little to no problems, in fact one example sits out back now.
Thanks for sharing your expierience!

------------------
Rob White, Atascosa Texas

The Pontiac Fiero, Americas Go-Cart for Grownups....

IP: Logged
Cozmo
Member
Posts: 421
From: Ybor City, FL
Registered: Feb 2001


Feedback score: N/A
Leave feedback

Rate this member

Report this Post03-13-2002 09:08 AM Click Here to See the Profile for CozmoSend a Private Message to CozmoDirect Link to This Post
Excellent, My7Fieros!
As you stated, fiberglass encased wood should last a looong time.
On mine I also took some metal off from the leading edge of the front trunk, like you said it's barely noticable.
The only problem I have (and it looks like you may have it too) is standing water at the bottom of the vent area. I'm thinking of drilling a small (1/8"???) hole there to allow runoff...
Good job and nice writeup!

------------------
Bob Cardone
Suncoast Fieros

'85 2M6 SE Targa

IP: Logged
Neal
Member
Posts: 1247
From: Calgary AB, Canada
Registered: Jun 2001


Feedback score: N/A
Leave feedback

Rate this member

Report this Post03-14-2002 12:08 AM Click Here to See the Profile for NealClick Here to visit Neal's HomePageSend a Private Message to NealDirect Link to This Post
bump
IP: Logged
Smoooooth GT
Member
Posts: 8823
From: Lake Palestine, Texas
Registered: Jun 2001


Feedback score: N/A
Leave feedback


Total ratings: 310
Rate this member

Report this Post03-14-2002 12:18 AM Click Here to See the Profile for Smoooooth GTSend a Private Message to Smoooooth GTDirect Link to This Post
I REALLY LIKE !!!! And alot of people can do something like that!!!


IP: Logged
My7Fieros
Member
Posts: 3357
From: Germantown, TN
Registered: Jun 2000


Feedback score: N/A
Leave feedback

Rate this member

Report this Post03-15-2002 01:56 PM Click Here to See the Profile for My7FierosSend a Private Message to My7FierosDirect Link to This Post
Ok heres some better finished pics...


IP: Logged
Formula
Member
Posts: 5339
From:
Registered: Jul 99


Feedback score: (2)
Leave feedback


Total ratings: 96
Rate this member

Report this Post03-15-2002 02:13 PM Click Here to See the Profile for FormulaSend a Private Message to FormulaDirect Link to This Post
did you take note of the dimensions for the wood pieces, I would be interested in that
IP: Logged
My7Fieros
Member
Posts: 3357
From: Germantown, TN
Registered: Jun 2000


Feedback score: N/A
Leave feedback

Rate this member

Report this Post03-15-2002 03:38 PM Click Here to See the Profile for My7FierosSend a Private Message to My7FierosDirect Link to This Post
 
quote
Originally posted by Formula:
did you take note of the dimensions for the wood pieces, I would be interested in that

Doh! I forgot...I'll try to get them after I get home tonight.

IP: Logged
Formula
Member
Posts: 5339
From:
Registered: Jul 99


Feedback score: (2)
Leave feedback


Total ratings: 96
Rate this member

Report this Post03-15-2002 04:47 PM Click Here to See the Profile for FormulaSend a Private Message to FormulaDirect Link to This Post
thanks
IP: Logged
PFF
System Bot
Archie
Member
Posts: 9436
From: Las Vegas, NV
Registered: Dec 1999


Feedback score:    (12)
Leave feedback


Total ratings: 546
Rate this member

Report this Post03-15-2002 08:35 PM Click Here to See the Profile for ArchieClick Here to visit Archie's HomePageSend a Private Message to ArchieDirect Link to This Post
Nice job, we should form a club.

Archie

IP: Logged
Sage
Member
Posts: 2901
From: USA
Registered: Nov 1999


Feedback score:    (14)
Leave feedback


Total ratings: 69
Rate this member

Report this Post03-15-2002 10:43 PM Click Here to See the Profile for SageSend a Private Message to SageDirect Link to This Post
Good job! That looks as good as any you would buy from anywhere, and it's even better, having the satisfaction of doing it yourself.

A man with a plan, and the ambition and fortitude to see it through.

Good presentation too, there's got to be more than a couple people out there, armed with this article, who are now not afraid to tackle this project. Way to go.

Oh, personally, I don't see ANY problem with the wood, as long as you got it encased in glass.

------------------
Have a good one!

IP: Logged
8Ball
Member
Posts: 10865
From:
Registered: Jul 2001


Feedback score: N/A
Leave feedback


Total ratings: 162
Rate this member

Report this Post03-16-2002 02:20 AM Click Here to See the Profile for 8BallSend a Private Message to 8BallDirect Link to This Post
Oh I so have to try this now
I even have the perfect design laid out.
Thank you for the great pics and detail.
And archie Thanks for the measurements

IP: Logged
Archie
Member
Posts: 9436
From: Las Vegas, NV
Registered: Dec 1999


Feedback score:    (12)
Leave feedback


Total ratings: 546
Rate this member

Report this Post03-17-2002 01:20 AM Click Here to See the Profile for ArchieClick Here to visit Archie's HomePageSend a Private Message to ArchieDirect Link to This Post
 
quote
Originally posted by 8Ball:
Oh I so have to try this now
I even have the perfect design laid out.
Thank you for the great pics and detail.
And archie Thanks for the measurements

Give it your best shot, I'm sure you can do it.

Several years ago, when we 1st started making that design, I called it the Warber Hood. I named it after the late Rich Warber who originally designed it while working for me.

As you do the conversion to your hood & as you show the finished product to others, We would just ask that you think of Rich.

Archie

IP: Logged
Avery Montembeault
Member
Posts: 392
From: NIskayuna NY
Registered: Jan 2001


Feedback score: N/A
Leave feedback

Rate this member

Report this Post03-17-2002 09:10 AM Click Here to See the Profile for Avery MontembeaultSend a Private Message to Avery MontembeaultDirect Link to This Post
looks sharp. have you noticed any performance changes? I was thinking about toying with a parts hood myself, trying to get the venturi effect found on Lotus esprit's, but I was thiking about using maybe stainless steel to build the basic structure instead of wood.
IP: Logged
conductor
Member
Posts: 157
From: Amersfoort,the Netherlands
Registered: Oct 2001


Feedback score: N/A
Leave feedback

Rate this member

Report this Post03-17-2002 12:22 PM Click Here to See the Profile for conductorSend a Private Message to conductorDirect Link to This Post
Well, Pontiac should have thought of this beautiful option.
Looks real slick.
One question though, since its flooding here sometimes: where is the rainwater going?

Grtx Richard.

IP: Logged
My7Fieros
Member
Posts: 3357
From: Germantown, TN
Registered: Jun 2000


Feedback score: N/A
Leave feedback

Rate this member

Report this Post03-17-2002 01:50 PM Click Here to See the Profile for My7FierosSend a Private Message to My7FierosDirect Link to This Post
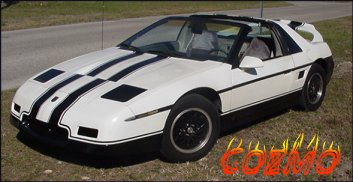
Avery, to be honest, no real "performance" changes..its really just for looks (on my application at least). It does tend to help airflow a bit when the fan kicks on..gives it somewhere to go.
Conductor, water is not a problem. It just falls through, on the radiator or the ground.
Thanx for the measurements Arch!
I would suggest to anyone who has never really done any kind of "hands on" work like this to do it on another hood, as opposed to the original one on the car. Thats what we did, just in case we screwed it up lol. Once again, thanx for the interest. We will be bringing this car (the white GT Ive posted pics here before) to the swap meet at Ed's next month, hope to see you guys there.
IP: Logged
Fierowrecker
Member
Posts: 1858
From: Lowell, MI. USA
Registered: Mar 2001


Feedback score: N/A
Leave feedback

Rate this member

Report this Post03-17-2002 02:52 PM Click Here to See the Profile for FierowreckerClick Here to visit Fierowrecker's HomePageSend a Private Message to FierowreckerDirect Link to This Post
Hey 7!
Looks great!
I plan on a simalar project, but with two openings, not just one...
crash...
IP: Logged
8Ball
Member
Posts: 10865
From:
Registered: Jul 2001


Feedback score: N/A
Leave feedback


Total ratings: 162
Rate this member

Report this Post03-17-2002 03:33 PM Click Here to See the Profile for 8BallSend a Private Message to 8BallDirect Link to This Post
 
quote
Originally posted by Archie:

We would just ask that you think of Rich.

Archie

I have loved that hood ever Since I first saw The PPE. And the sheer beauty of that car has made me wish on many many occasions,
That I could have met Mr. Warber, And that I someday soon get to meet you. Just to shake your hand.

If I could afford it that car would be my baby. It has to be the MOST beautiful Fiero I have ever seen. It was THAT car that really got me into the little guys.

E.B.

IP: Logged
Neal
Member
Posts: 1247
From: Calgary AB, Canada
Registered: Jun 2001


Feedback score: N/A
Leave feedback

Rate this member

Report this Post03-17-2002 03:37 PM Click Here to See the Profile for NealClick Here to visit Neal's HomePageSend a Private Message to NealDirect Link to This Post
what sized wood did you use? im having a hard time figuring out how deep the vent is.
IP: Logged
PFF
System Bot
tstroud
Member
Posts: 527
From: Chariton, Iowa
Registered: Feb 2002


Feedback score: (2)
Leave feedback

Rate this member

Report this Post03-31-2002 07:37 PM Click Here to See the Profile for tstroudSend a Private Message to tstroudDirect Link to This Post
Hi All:
This looks do-able to me but I have a couple questions.
How many layers of fiberglass did you use?
How deep is it?
Thanks for the how-to.
Later,
tstroud
IP: Logged
Monkeyman
Member
Posts: 15809
From: N. Wilkesboro, NC, USA
Registered: Nov 1999


Feedback score: (5)
Leave feedback


Total ratings: 182
Rate this member

Report this Post03-31-2002 08:27 PM Click Here to See the Profile for MonkeymanSend a Private Message to MonkeymanDirect Link to This Post
Archie (or whomever can answer)--I 1st heard of Rich Warber at Fierorama last year. I don't know of his history. Can someone tell me who he was and what he did (other than produce a hood)? Sounds like he meant much more to the Fiero community than just a hood designer.
IP: Logged
malacite
Member
Posts: 2213
From: Casselberry Fl 32707
Registered: Oct 2001


Feedback score: N/A
Leave feedback


Total ratings: 70
Rate this member

Report this Post03-31-2002 11:35 PM Click Here to See the Profile for malaciteSend a Private Message to malaciteDirect Link to This Post
Although i am not certian on this one, i belice Rich Warber was an employee and very close friend of archie's who has passed away.

if i am correct, putting a warber hood on your car is similar to putting a small "3" to commemorate big "E"

am i right? did i win?

------------------

IP: Logged
tstroud
Member
Posts: 527
From: Chariton, Iowa
Registered: Feb 2002


Feedback score: (2)
Leave feedback

Rate this member

Report this Post04-06-2002 12:14 AM Click Here to See the Profile for tstroudSend a Private Message to tstroudDirect Link to This Post
Hey My7fieros,
What blade did you use to cut the hood?
How far did you open the scoop?
Thanks,
tstroud
IP: Logged
jch82
Member
Posts: 730
From: Jackson, MI
Registered: Nov 2000


Feedback score: N/A
Leave feedback

Rate this member

Report this Post04-06-2002 11:44 PM Click Here to See the Profile for jch82Send a Private Message to jch82Direct Link to This Post
*bump*

So what is the depth on that? About 2in? It looks really nice!

Josh

------------------

IP: Logged
tstroud
Member
Posts: 527
From: Chariton, Iowa
Registered: Feb 2002


Feedback score: (2)
Leave feedback

Rate this member

Report this Post04-07-2002 10:16 PM Click Here to See the Profile for tstroudSend a Private Message to tstroudDirect Link to This Post
OK I went to the junkyard an got a broken hood to experiment on. I am trying the warber scoop.
I just came in from glassing it and here is what I found.
First, stick to archies measurements. They are well thought out and are as large as you can go without making lots of extra work for yourself.
Second, If you remove the bracing from the bottom of the cut-out section you won't have to modify the front trunk lip or seal.
As far as the depth of the opening goes, I found the thickness of a 2x4(1 3/4") will just miss the upper radiator hose and just clear the radiator overflow container after removing the bracing from the bottom of the cut-out section.
My junkyard hood had been in a front end collision so the bracing was already broken loose, this may not be so easy to remove on most hoods but it sure makes the 'glassing a lot easier and cleaner looking and provides better clearance.
Later,
tstroud
IP: Logged
Bobert
Member
Posts: 371
From: Toronto, Canada
Registered: Jan 2002


Feedback score: N/A
Leave feedback

Rate this member

Report this Post04-08-2002 12:09 AM Click Here to See the Profile for BobertSend a Private Message to BobertDirect Link to This Post
Beautiful work! Thanks for the dimensions Archie. I have a spare hood that I am going to try this Warber modification on.

------------------
'84 Indy (in disguise)

IP: Logged
FieroJones
Member
Posts: 695
From: Boise, ID
Registered: Dec 2001


Feedback score: N/A
Leave feedback

Rate this member

Report this Post06-03-2002 05:47 PM Click Here to See the Profile for FieroJonesSend a Private Message to FieroJonesDirect Link to This Post
Anyone done this and have the dimensions of the wood blocks? I saw Archies hood dimensions, but nothin for the wood block.

-Karl

IP: Logged
fieroshop
Member
Posts: 648
From: Palm Harbor, FL.
Registered: Jun 99


Feedback score: N/A
Leave feedback

Rate this member

Report this Post06-03-2002 10:25 PM Click Here to See the Profile for fieroshopClick Here to visit fieroshop's HomePageSend a Private Message to fieroshopDirect Link to This Post
Looks good for what you have done and accomplished. My hat is off to you.
Couple of question. Using wood as I did on my first hood vent I found that the wood even though it is sandwiched in fiberglass has a tendency to swell and contract with the weather. How did or are you going to compensate for that. Mine cracked the fiberglass.
What will you do with the water that puddles up in the vent since you have a ridge and water cannot flow out and is trapped.

------------------

[This message has been edited by fieroshop (edited 06-03-2002).]

IP: Logged
Previous Page | Next Page

This topic is 4 pages long:  1   2   3   4 


All times are ET (US)

T H I S   I S   A N   A R C H I V E D   T O P I C
  

Contact Us | Back To Main Page

Advertizing on PFF | Fiero Parts Vendors
PFF Merchandise | Fiero Gallery | Ogre's Cave
Real-Time Chat | Fiero Related Auctions on eBay


Copyright (c) 1999, C. Pennock