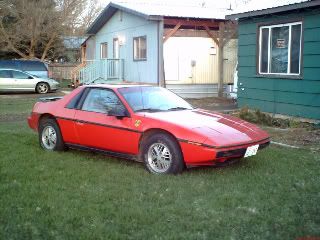
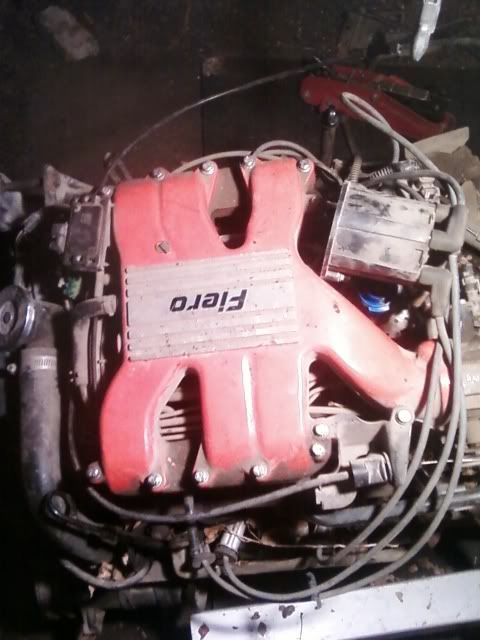
I got my 85 fiero in 2000 I love that little thing, but with over 200k that duke was nothing but problems. Time for a new engine so I got a v6 from a fiero bud who upgraded to a v8. at 287,000 miles, out with the old
then clean up and reseal the v6. I was told it had about 75k miles on it. Now i just need to get a clutch and some hoses and get it bolted to the tranny
[This message has been edited by Mr.Goodwrench (edited 11-04-2012).]
IP: Logged
07:40 PM
PFF
System Bot
Nov 5th, 2012
Stubby79 Member
Posts: 7064 From: GFY county, FY. Registered: Aug 2008
Nice I did the same swap exactly down to the 85 fiero, pretty much straight forward, just ran into lots of little problems. Don't forget to add a second fuse for the inj2 slot on the fuse box. Also, when swapping fuel pumps, you need a special fuel hose to mate the pump to the sender. The stock one cannot handle the pressure as I quickly learned when putting mine in. And it was replaced with regular fuel hose, which I had to replace AGAIN because you need a special SUBMERSIBLE fuel line. NAPA sells it, but it needs to be a high pressure submersible hose. Exhaust wise I had just hooked up the four cyl exhaust to the down pipe. It worked but probably was not ideal performance wise. I had an issue with the four cyl exhaust hitting the motor mount I used, but I did not use the stock motor mount. Also I have done plenty of burnouts on dry pavement with the isuzu and it is holding up just fine. As far as the clutch goes I am using a four cylinder spec stage 2 clutch on the v6 flywheel and it works just fine, doesn't slip at all. Good luck! the v6 is a big improvement over the duke and sounds great, especially second gear at 3000 rpms, floored at that point up to redline it just howls.
IP: Logged
05:21 PM
82-T/A [At Work] Member
Posts: 25910 From: Florida USA Registered: Aug 2002
Very very very nice... but FYI... you'll want to remove the metal shaft comming off of the waterpump. You don't need that as the Fiero's V6 doesn't make use of it. The old waterpump that you took off should have a plug already on there, so just take the plug off the old waterpump, remove the tube off the new waterpump, and replace it with the plug.
If you accidentally traded in the old waterpump with the plug attached, then you should be able to get a new one from the Fiero Store or a junkyard.
IP: Logged
06:13 PM
zkhennings Member
Posts: 1931 From: Massachusetts, USA Registered: Oct 2010
No our fieros need that tube to go to the heater line, it is different for the newer fieros where that line goes right into on of the main coolant lines. Our fieros have a heater line on the firewall side and on the trunk side. My fiero uses it and since we both have 85s that were four cylinders, I assume you will need it too. I have that tube on my engine going to the solid heater line located under the dogbone mount on the trunk side. My heat works great.
[This message has been edited by zkhennings (edited 02-03-2013).]
No Fiero six cylinders do use the metal tube. It was used on 1985 to I believe 1987 Fieros and then was revised in 1988 with a plug setup.
Now with him doing a four to six swap, I cannot recall exactly if the four cylinder cars utilized the heater tubes going into the water pump. Been forever and a day since I've worked on a duke.
IP: Logged
08:28 AM
zkhennings Member
Posts: 1931 From: Massachusetts, USA Registered: Oct 2010
87 and 88 used a different set up for the return heater pipe merging with the coolant return, passenger side in front of the rear tire area. I added a V6 to my 88 that was a 2.5 factory car. I had to locate a V6 heater feed pipe that replaces the 4 cyl one. It was made behind the engine ending up at or around the trunk firewall. sort of 'U' shaped.
If you do this, do it BEFORE you put the V6 back in the car.
[This message has been edited by josef644 (edited 02-04-2013).]
IP: Logged
04:50 PM
PFF
System Bot
Feb 24th, 2013
Mr.Goodwrench Member
Posts: 315 From: Deer Park WA. Registered: Mar 2008
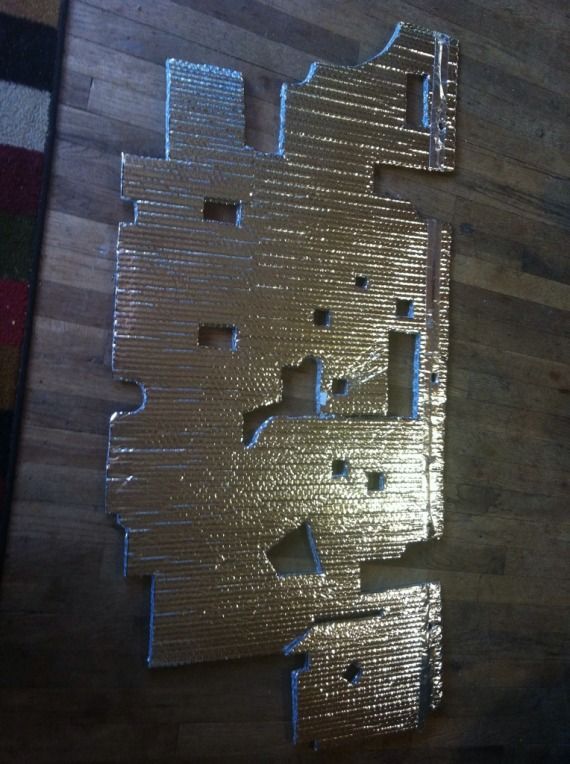
It's slow here at work, makes me wish I could go home and spend some time on my Fiero. I cleaned up the firewalll and got Pauls template from fierosails.com to make new insulation.
IP: Logged
02:11 PM
Mr.Goodwrench Member
Posts: 315 From: Deer Park WA. Registered: Mar 2008
You are so going to have to go on a run or two with us this year.
I was just up in Deer Park two Saturdays ago. I often drive north when I take the GT out. I should have thought about you, and checked out your build. I remember the car when you were at Joe's.
Good luck...
IP: Logged
08:58 PM
PFF
System Bot
Mr.Goodwrench Member
Posts: 315 From: Deer Park WA. Registered: Mar 2008
You are so going to have to go on a run or two with us this year.
I was just up in Deer Park two Saturdays ago. I often drive north when I take the GT out. I should have thought about you, and checked out your build. I remember the car when you were at Joe's.
Good luck...
That'd be fun!
IP: Logged
11:25 PM
Mar 20th, 2013
Mr.Goodwrench Member
Posts: 315 From: Deer Park WA. Registered: Mar 2008
Yeah Tony. Thanks for coming out. I had a challenge lining up the cradle bolt holes. I had the assembly sitting on a pallet that I bolted casters to so I could roll it around. Well as I pushed it under the car some casters broke off. Took all the strength I had to push it in the rest of the way. Lol
[This message has been edited by Mr.Goodwrench (edited 03-24-2013).]
IP: Logged
10:49 PM
Mr.Goodwrench Member
Posts: 315 From: Deer Park WA. Registered: Mar 2008
While you have the tank out, you installed submersible fuel hose in between pump and sender right? And also I am interested in seeing what you did with your fuel lines and fuel filter!
IP: Logged
01:50 AM
Mr.Goodwrench Member
Posts: 315 From: Deer Park WA. Registered: Mar 2008
While you have the tank out, you installed submersible fuel hose in between pump and sender right? And also I am interested in seeing what you did with your fuel lines and fuel filter!
I did that after reading that suggestion. glad I did, the prvious hose was very soft, I'm sure it would have blown up
[This message has been edited by Mr.Goodwrench (edited 03-25-2013).]
IP: Logged
09:52 AM
Apr 2nd, 2013
Mr.Goodwrench Member
Posts: 315 From: Deer Park WA. Registered: Mar 2008
Got the fuel tank seal back in. Just need to hook up coolant and heater hoses. But it does look like the oil pan is leaking at the front. Dammit. I put a new gasket in while the engine was out maybe ill just use sylicone
IP: Logged
12:01 AM
Apr 9th, 2013
Mr.Goodwrench Member
Posts: 315 From: Deer Park WA. Registered: Mar 2008
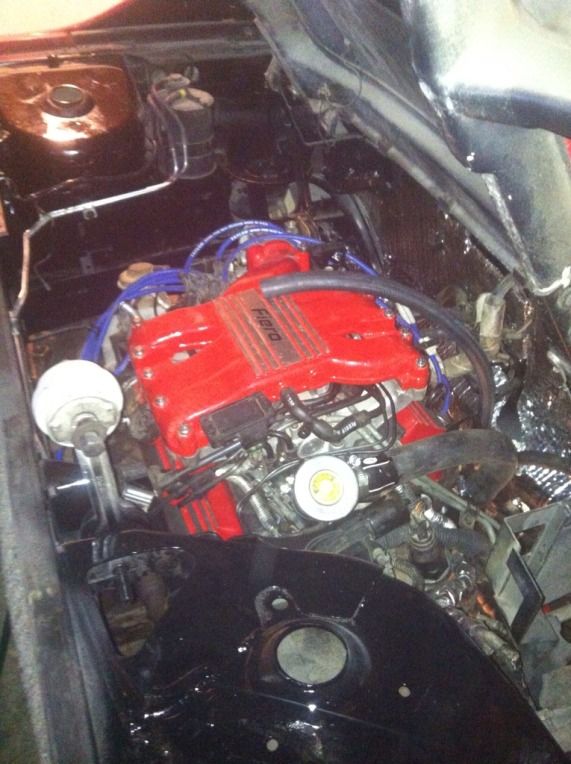
Looking good! Does your decklid close? It appears from the picture as though the intake would get in the way of the torque rod thinger? It was a problem for me when I tried something similar. I hope not!
Edit to say I did not see the gas strut, did you remove the torque rod? I need to do that it gets in the way of everything. Do you remember where you got your gas strut?
[This message has been edited by zkhennings (edited 04-09-2013).]
IP: Logged
03:38 PM
Mr.Goodwrench Member
Posts: 315 From: Deer Park WA. Registered: Mar 2008
Looking good! Does your decklid close? It appears from the picture as though the intake would get in the way of the torque rod thinger? It was a problem for me when I tried something similar. I hope not!
Edit to say I did not see the gas strut, did you remove the torque rod? I need to do that it gets in the way of everything. Do you remember where you got your gas strut?
I think it will close. havent tried yet. LOL.
IP: Logged
04:53 PM
Mr.Goodwrench Member
Posts: 315 From: Deer Park WA. Registered: Mar 2008
Oh yes I am well aware of that, I cut all mounting tabs/ brackets off the stock air cleaner and made new ones so it sits way lower and it is out of the way now.
IP: Logged
10:46 PM
Mr.Goodwrench Member
Posts: 315 From: Deer Park WA. Registered: Mar 2008
Ok, the deck lid doesn't close all the way. Not because of Rodney Dickmans strut, but the stock springboard is in the way. Should close fine once I remove that
IP: Logged
11:07 PM
Apr 12th, 2013
Mr.Goodwrench Member
Posts: 315 From: Deer Park WA. Registered: Mar 2008
Well. Hooked up battery and fuel pump kicked on, wont stop, even if I pull the relay. Maybe bad oil pressure sender? Tank is empty though. Engine won't turn over either, saw smoke near battery. Looks like someone did a half ass job splicing fusible link from battery junction block, exposed wires, all corroded. Just little bugs to work out
IP: Logged
12:33 AM
phonedawgz Member
Posts: 17108 From: Green Bay, WI USA Registered: Dec 2009
Make sure your negative battery cable is good and properly connected to the ENGINE!!
If it isn't the starter gets ground through the small cable between the battery and the body, and then the body to engine ground straps, and 2 wires in the engine harness that are way too small and they will burn the insulation off of them quickly. You will also see smoke in the battery area.
Also when this happens the starter won't crank, or just cranks slow.
IP: Logged
11:14 AM
Mr.Goodwrench Member
Posts: 315 From: Deer Park WA. Registered: Mar 2008
Make sure your negative battery cable is good and properly connected to the ENGINE!!
If it isn't the starter gets ground through the small cable between the battery and the body, and then the body to engine ground straps, and 2 wires in the engine harness that are way too small and they will burn the insulation off of them quickly. You will also see smoke in the battery area.
Also when this happens the starter won't crank, or just cranks slow.
I'll bet thats it. gonna bring my mutltimeter home from work and make sure I'm getting a good ground. I need to get a ground strap from the engine to chassis too.
IP: Logged
11:50 AM
phonedawgz Member
Posts: 17108 From: Green Bay, WI USA Registered: Dec 2009
When you go to measure it, don't measure resistance. The required resistance is too low to be accurately read by a multi-meter.
Rather than that measure the voltage at the starter during cranking. Measure it from the bolt, not the nut, and not the wire terminal that the positive battery terminal is on. Ground the multimeter against the starter body itself, on the aluminum nose. You should see battery voltage (during cranking) within 1 - 1.5v. Any larger drop indicates a problem with the wiring.
Since trying to crank it with a bad negative battery cable to block connection can burn up your wiring, inspect that first, and make sure it is making a good connection.
If the drop at the starter is too large, start by seeing how much drop is on each of the battery cables. Move the negative wire from the starter nose to directly on the bolt that connects the battery cable to the battery. See if the drop still exists. If it does then try with the positive meter lead. Move the negative lead back to the starter nose. Put the positive lead directly on the positive battery cable bolt.
Once you have determined which battery cable has the drop in voltage, then start playing higher/lower and see where the problem is. If negative, do you measure the drop at the neg cable where it bolts to the engine? Do you measure the drop on the cable where it is connecting to the battery? Yes perhaps the problem is just between the cable terminal and the battery terminal.
All these checks need to be done while someone is attempting to crank the engine. Voltage checks with no load (not attempting to crank the engine) on the system are meaningless. They almost always show the full voltage.
-------
Fuel pump always running.
Disconnect the connector from the oil pressure sender/fuel pump switch. If the pump stops then there is your problem. Note also - Your oil pressure sender/switch is set at something like 3psi. After cranking a engine with cold oil, it might take up to 2 min for the oil pressure to drop down below that amount. The fuel pump will run that entire time. That is normal. Once the engine starts running however and the oil is warm, it will just take seconds to shut off, like you are used to.
[This message has been edited by phonedawgz (edited 04-12-2013).]


 at 287,000 miles, out with the old


 maybe ill just use sylicone


