Pennock's Fiero Forum
  Technical Discussion & Questions - Archive
  I did it - 3800 low mount alt for under $50 (Page 1)

T H I S   I S   A N   A R C H I V E D   T O P I C
  

Email This Page to Someone! | Printable Version

This topic is 3 pages long:  1   2   3 
Previous Page | Next Page
I did it - 3800 low mount alt for under $50 by ALJR
Started on: 10-14-2010 10:32 PM
Replies: 81
Last post by: ALJR on 11-27-2012 12:54 AM
ALJR
Member
Posts: 3765
From: Massachusetts
Registered: Jul 2009


Feedback score:    (18)
Leave feedback

Rate this member

Report this Post10-14-2010 10:32 PM Click Here to See the Profile for ALJRSend a Private Message to ALJRDirect Link to This Post
My goal was to build something better then what is offered for sale by others. I am amazed no one has taken my approach for the tensioner design/position..

Objectives:
-To mount the alternator is a location that I did not have to modify my deck lid.
-Affordable
-Allow the use of a dog bone, preferably in the stock location
-Allow the use of the alternator I had; 2000GTP style
-Easy to make
-Use readily available parts

Items required:
-1/4" steel plate
-1/4” steel “L” channel
-Welder, or know someone w/ a welder
-Saws All
-Angle grinder/cutoff tool
-Drill
-Primer & paint
-Stock SC tensioner w/ ribbed pully
-Misc. nuts/bolts
-78" or 78.5" 6-rib belt

To make the parts, I used 1/4" steel plate and "L" channel... The metal I sourced from an old plow chassis mount. It is also available from Lowe’s and HD for around $25-$30... A welder is needed or a friend who welds is also handy. A saws all was used to cut the shape and an angle grinder/cutoff tool also came in handy to fine-tune the shape. A drill will also be needed (I forget the drill bit size I used)...

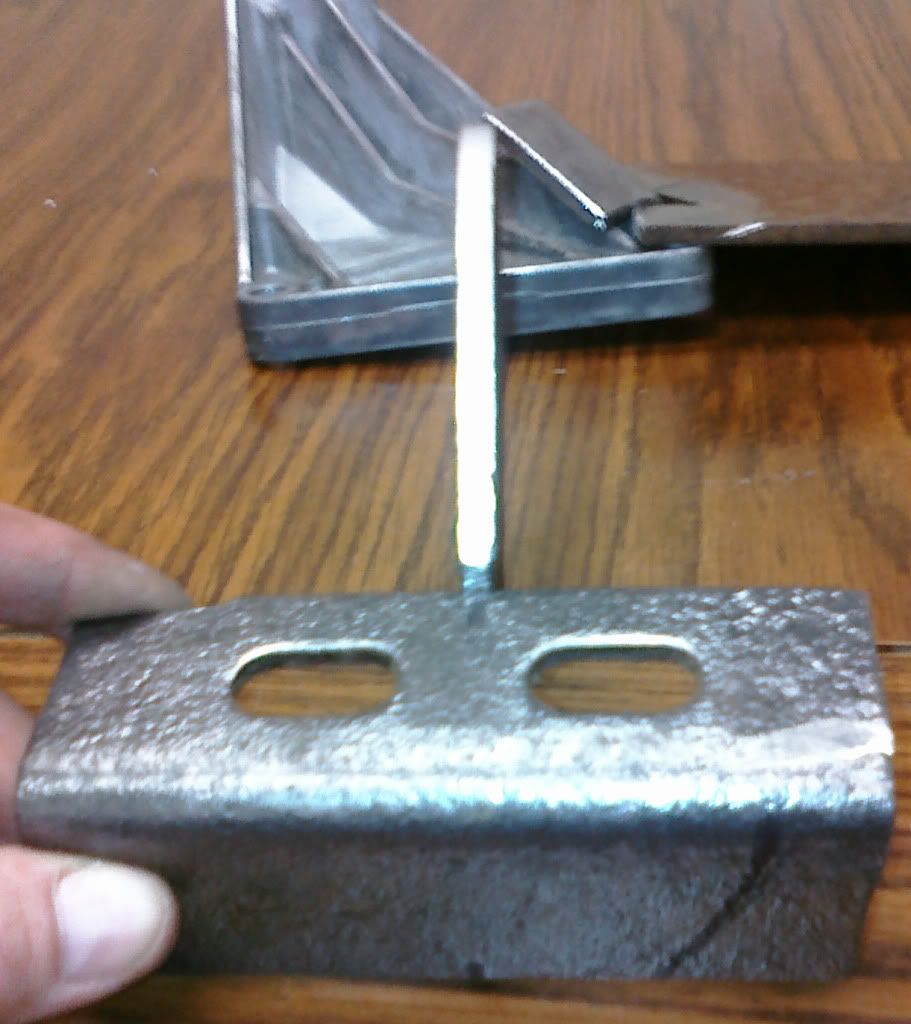
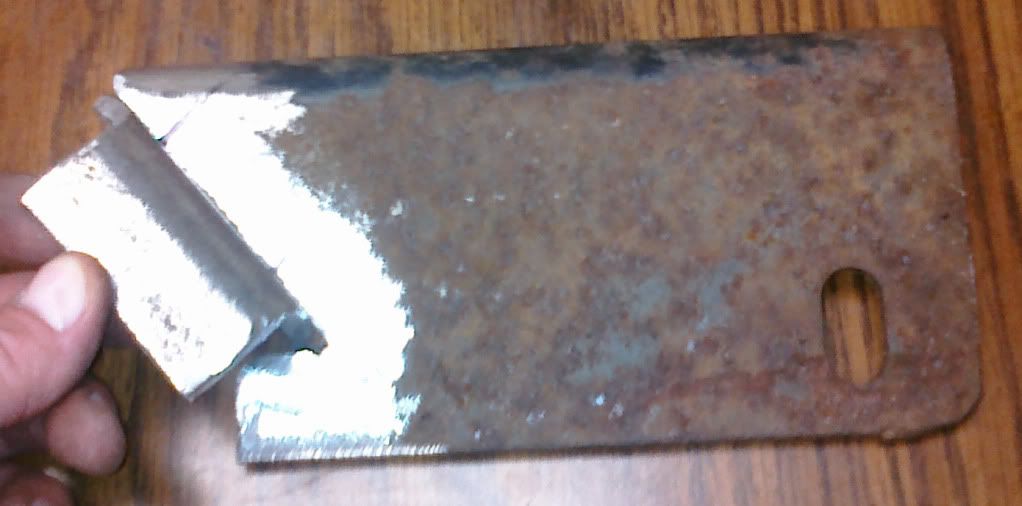
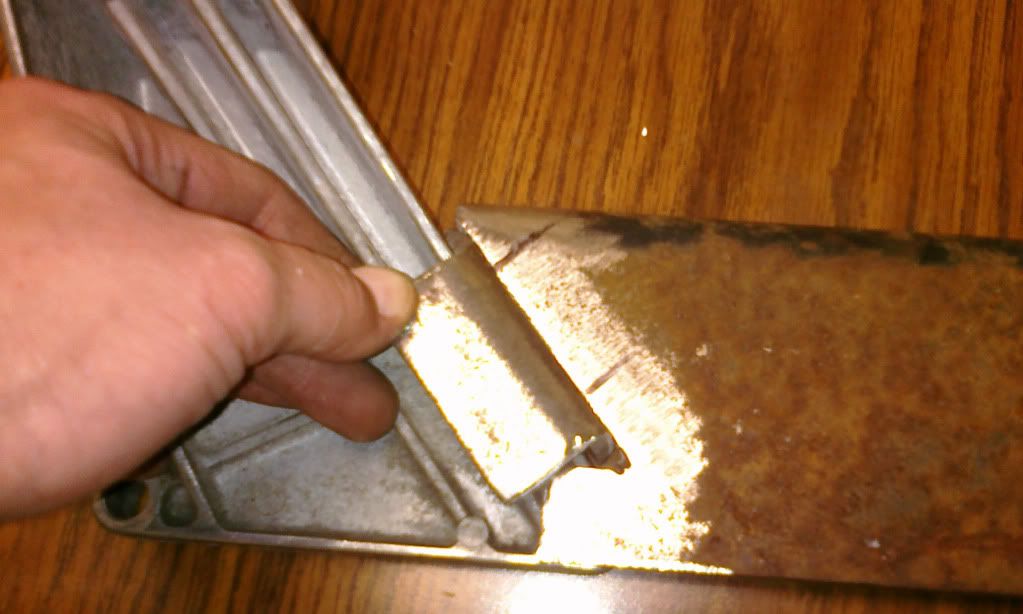
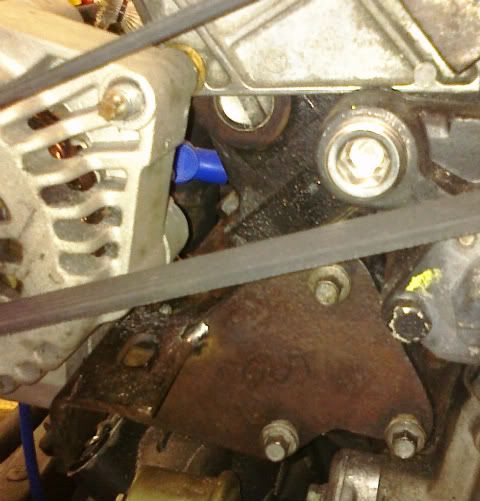
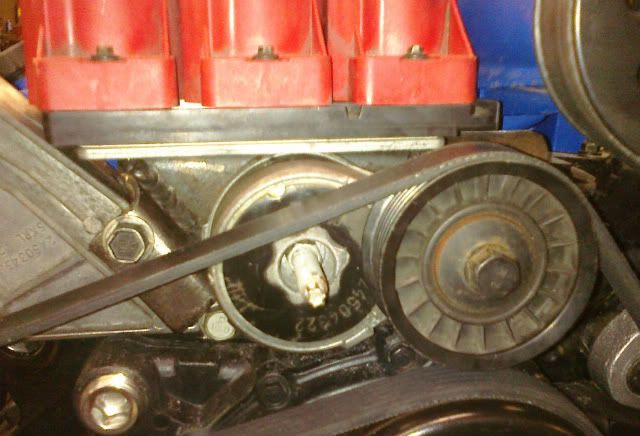
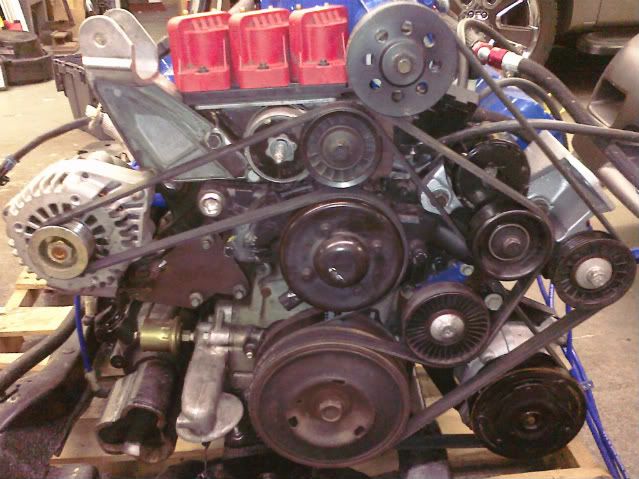
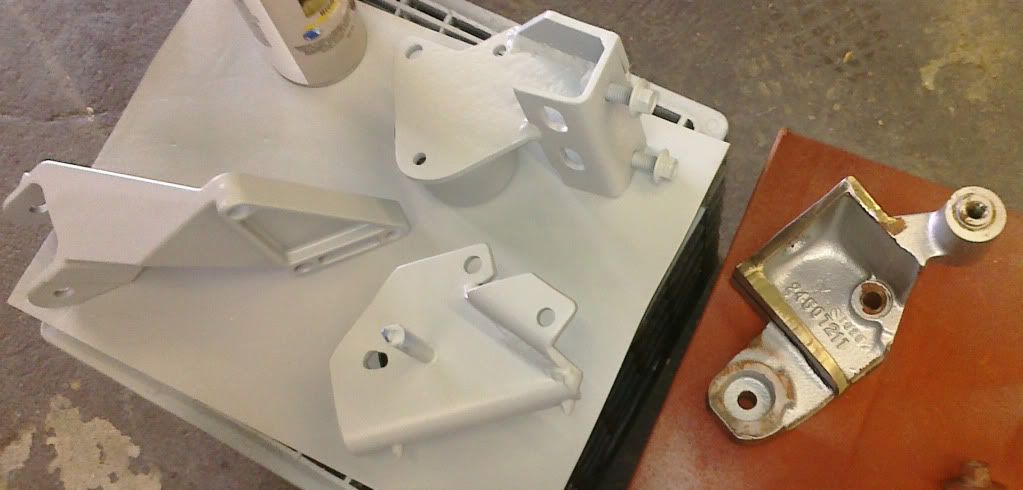
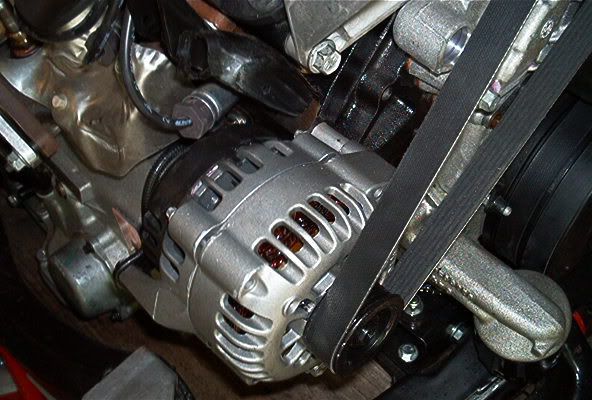
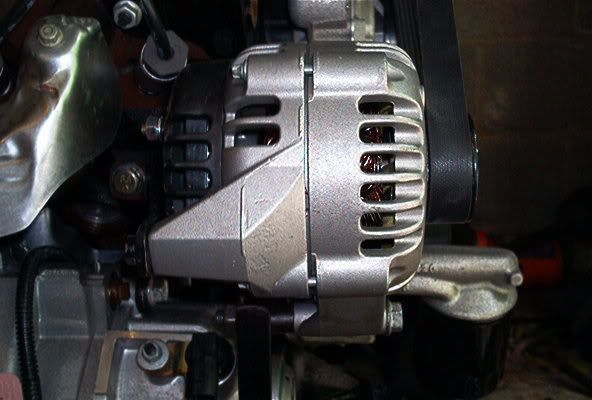
First pic shows the rough-cut of the alt. bracket

With the angle iron piece held in place


Pic of the tensioner bracket rough-cut

Tensioner bracket held together and in place on the DB mount

Alt. bracket test fit on motor; I used 1 nut between the DB mount and alt. to get proper belt alighnment. socket is there to hold it in place while I measured.

Alt. bracket partially welded and test fit

Tensioner bracket test fit. I decided to mount my coil packs on top. You want the tensioner pully as close as possible to the DB mount, so the swing clears the SC snout.

both brackets fit on motor w/ belt installed. I had to use a 1/16" thick washer behind the tensioner pully to bet perfect alignment. The belt I used is 78" long; a 78.5" belt bould prolly be perfect; but was wondering about stretch over time (still sure it would be fine though)...

Parts primed. I used a bolt welded in to secure the tensioner pully. The bolt was press-fit into the hole and prolly did not need to be welded in. I also welded nuts to the back side of the alt. bracket to make it easier to service (nuts wouldn't fall to the ground when removing the alt. for service).


I will pot more pics one the paint has dried and assembled back on motor...

I really like my tensioner mount! It is VERY strong and I did not have to alter the dogbone mount in any way. The alternator mount is also super strong; as I added a lil piece of steel to the angle iron to the plate; to prevent the belt from pulling it...

I used 1/4" steel because the thickness positions the tensioner in almost the exact proper location; not too mention it has NO flex...

Any questions, please feel free to ask!

[This message has been edited by ALJR (edited 04-02-2011).]

IP: Logged
PFF
System Bot
ace5514
Member
Posts: 692
From: west long branch, nj, usa
Registered: Nov 2008


Feedback score:    (8)
Leave feedback

Rate this member

Report this Post10-14-2010 10:56 PM Click Here to See the Profile for ace5514Send a Private Message to ace5514Direct Link to This Post
ALJR,
DUDE!!!!!!!
Such a mean thing to do!
reminds me of the joke..how do you keep an idiot in suspense.......tell YOU tomorrow!

I'll be waiting...lol
IP: Logged
ALJR
Member
Posts: 3765
From: Massachusetts
Registered: Jul 2009


Feedback score:    (18)
Leave feedback

Rate this member

Report this Post10-15-2010 09:57 AM Click Here to See the Profile for ALJRSend a Private Message to ALJRDirect Link to This Post
 
quote
Originally posted by ace5514:

ALJR,
DUDE!!!!!!!
Such a mean thing to do!
reminds me of the joke..how do you keep an idiot in suspense.......tell YOU tomorrow!

I'll be waiting...lol


Hehehe... evil grin on face...

I am uploading the pics now to photobucket; I will continue my first post in a bit once I edit the pic sizes down
IP: Logged
JumpStart
Member
Posts: 1412
From: Central Florida
Registered: Sep 2006


Feedback score: N/A
Leave feedback

Rate this member

Report this Post10-15-2010 10:14 AM Click Here to See the Profile for JumpStartSend a Private Message to JumpStartDirect Link to This Post
Without pictures,the thread is pointless and with photobucket there will be no pics in a few months.
IP: Logged
Jfrost
Member
Posts: 1092
From: Brookfield, IL
Registered: Jul 2009


Feedback score:    (29)
Leave feedback

Rate this member

Report this Post10-15-2010 11:35 AM Click Here to See the Profile for JfrostSend a Private Message to JfrostDirect Link to This Post
Looks nice! You willing to make more of these?!?
IP: Logged
ALJR
Member
Posts: 3765
From: Massachusetts
Registered: Jul 2009


Feedback score:    (18)
Leave feedback

Rate this member

Report this Post10-15-2010 11:39 AM Click Here to See the Profile for ALJRSend a Private Message to ALJRDirect Link to This Post
 
quote
Originally posted by JumpStart:

Without pictures,the thread is pointless and with photobucket there will be no pics in a few months.


Did you even read what I posted? Pics were to come as I forgot my USB cable in the office and was unable to upload pics last night!

Photobucket is the only pic hosting site I use. If you or someone else wants to cut/paste the pics to another host, feel free
I am not doing this for profit or advertising, just trying to give some another option then to pay $300+ for mounts that arn't half as good as my style...

These were very easy to make once I figured out the position of everything. I am sure some one else could make these in 1/4 the time it took me... I am NOT a metal fabricator and I used simple tools...
IP: Logged
ALJR
Member
Posts: 3765
From: Massachusetts
Registered: Jul 2009


Feedback score:    (18)
Leave feedback

Rate this member

Report this Post10-15-2010 11:48 AM Click Here to See the Profile for ALJRSend a Private Message to ALJRDirect Link to This Post

ALJR

3765 posts
Member since Jul 2009
 
quote
Originally posted by Jfrost:

Looks nice! You willing to make more of these?!?


Wish I could But w/o a plasma cutter or CNC, cutting the shape of the plate is kinda a PITA using a saws all... It would take me two hours to cut/fit the bracket using what tools I have; on top of another two hours to drill holes and weld it up... Thats 4 hours (at least) of labor on top of parts. That would put these in the price range of what others are selling them for... I would have to make ALLOT of these to justify spending $1000 for a decent plasma cutter... And any metal fabricator would charge me an arm and a leg to make such a small qty...

Would you really be willing to spend over $300 for these brackets when you could make them yourself for under $50?
IP: Logged
Jfrost
Member
Posts: 1092
From: Brookfield, IL
Registered: Jul 2009


Feedback score:    (29)
Leave feedback

Rate this member

Report this Post10-15-2010 11:58 AM Click Here to See the Profile for JfrostSend a Private Message to JfrostDirect Link to This Post
 
quote
Originally posted by ALJR:


Wish I could But w/o a plasma cutter or CNC, cutting the shape of the plate is kinda a PITA using a saws all... It would take me two hours to cut/fit the bracket using what tools I have; on top of another two hours to drill holes and weld it up... Thats 4 hours (at least) of labor on top of parts. That would put these in the price range of what others are selling them for... I would have to make ALLOT of these to justify spending $1000 for a decent plasma cutter... And any metal fabricator would charge me an arm and a leg to make such a small qty...

Would you really be willing to spend over $300 for these brackets when you could make them yourself for under $50?


Good point, I'll have to keep this idea in mind for when I eventually swap in a 3800.
IP: Logged
RotrexFiero
Member
Posts: 3692
From: Pittsburgh, PA
Registered: Jul 2002


Feedback score: N/A
Leave feedback

Rate this member

Report this Post10-15-2010 11:24 PM Click Here to See the Profile for RotrexFieroClick Here to visit RotrexFiero's HomePageSend a Private Message to RotrexFieroDirect Link to This Post
I did something similar. I purchased a new alternator (forget what make) and bolted one ear to the block. It lined up perfectly and then just made some supports, two of them, from some flat steel. Worked fine. I cant understand paying $300 for a bracket. For goodness sakes you can purchase a Harbor Freight welder and make a bracket and the 3800 mounts to boot!!!

IP: Logged
Dodgerunner
Member
Posts: 9684
From: Lincoln, Nebraska
Registered: Sep 2004


Feedback score:    (61)
Leave feedback


Total ratings: 323
Rate this member

Report this Post10-15-2010 11:50 PM Click Here to See the Profile for DodgerunnerClick Here to visit Dodgerunner's HomePageSend a Private Message to DodgerunnerDirect Link to This Post
Love it ! Good ideas for when I do mine.
One questions. the two bolts on the bottom Alt plate? How do they hold/attach to the bottom of the Alt. Just can't picture that in my head.

Maybe one more picture...
Or maybe when you post the final pics it will be clear.
IP: Logged
ALJR
Member
Posts: 3765
From: Massachusetts
Registered: Jul 2009


Feedback score:    (18)
Leave feedback

Rate this member

Report this Post10-16-2010 12:11 AM Click Here to See the Profile for ALJRSend a Private Message to ALJRDirect Link to This Post
 
quote
Originally posted by Dodgerunner:

Love it ! Good ideas for when I do mine.
One questions. the two bolts on the bottom Alt plate? How do they hold/attach to the bottom of the Alt. Just can't picture that in my head.

Maybe one more picture...
Or maybe when you post the final pics it will be clear.


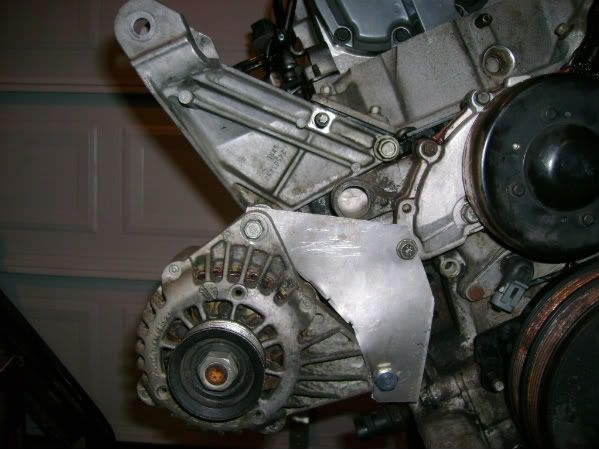
The newer style alt. (I believe 99+) has a flat portion that two bolts pass through. The bolts that are in my pic are just to keep paint from getting on the threads... Look at the 6th pic (the one that has the deep socket supporting the alt.), you can see one of the two bolt holes that will be used...

I will post more pics of the brackets when the paint dries; both on the motor and off...
IP: Logged
PFF
System Bot
ALJR
Member
Posts: 3765
From: Massachusetts
Registered: Jul 2009


Feedback score:    (18)
Leave feedback

Rate this member

Report this Post10-16-2010 12:13 AM Click Here to See the Profile for ALJRSend a Private Message to ALJRDirect Link to This Post

ALJR

3765 posts
Member since Jul 2009
 
quote
Originally posted by RotrexFiero:
I cant understand paying $300 for a bracket.


A poorly designed bracket at that...
IP: Logged
MadDanceSkillz
Member
Posts: 2591
From: Indiana
Registered: Jan 2009


Feedback score:    (27)
Leave feedback


Total ratings: 88
Rate this member

Report this Post10-16-2010 12:23 AM Click Here to See the Profile for MadDanceSkillzSend a Private Message to MadDanceSkillzDirect Link to This Post
That motor looks familiar...

Guess you beat me to the low-cost low-mount setup. Al's is very, very similar to what I was working on. The way of implementing a dogbone is a little different, but I like it!
IP: Logged
07Hoffmannd
Member
Posts: 404
From: St. Louis, Mo. U.S.A
Registered: Apr 2008


Feedback score: N/A
Leave feedback

Rate this member

Report this Post10-16-2010 04:10 AM Click Here to See the Profile for 07HoffmanndSend a Private Message to 07HoffmanndDirect Link to This Post
my low mount cost $10 including in the price a new tensoner (not pictured, but if you need it i can show it). the only power tool you need is a drill. no welding required. and i used things i had available (including the stock alt, if you include that, your price will more than double). mine is not better than what is offered. but is suitable considering ive lifted the engine with my low mount. under $50 is easily done.

[This message has been edited by 07Hoffmannd (edited 10-16-2010).]

IP: Logged
Dodgerunner
Member
Posts: 9684
From: Lincoln, Nebraska
Registered: Sep 2004


Feedback score:    (61)
Leave feedback


Total ratings: 323
Rate this member

Report this Post10-16-2010 09:33 AM Click Here to See the Profile for DodgerunnerClick Here to visit Dodgerunner's HomePageSend a Private Message to DodgerunnerDirect Link to This Post
07Hoffmannd post that picture. The more ideas we all have the better to complete our projects. It's all food for thought.
IP: Logged
ALJR
Member
Posts: 3765
From: Massachusetts
Registered: Jul 2009


Feedback score:    (18)
Leave feedback

Rate this member

Report this Post10-16-2010 04:22 PM Click Here to See the Profile for ALJRSend a Private Message to ALJRDirect Link to This Post
 
quote
Originally posted by 07Hoffmannd:

my low mount cost $10 including in the price a new tensoner (not pictured, but if you need it i can show it). the only power tool you need is a drill. no welding required. and i used things i had available (including the stock alt, if you include that, your price will more than double). mine is not better than what is offered. but is suitable considering ive lifted the engine with my low mount. under $50 is easily done.


How thick is that plate? Have you installed a belt on it yet? My bracket is 1/4" thick; with the belt installed and before I added the lil wedge brace, it would flex a little when squeezing the belt together. It does not move/flex at all now since the lil brace was welded in...

I also tried working w/ the pre-99 altenator style, but decided to use the newer style as it provided a more positive mounting position... when I was working with your style alt. I was using the same approch you have, but could not figure out an easy/cheap way for removing the flex...

[This message has been edited by ALJR (edited 10-16-2010).]

IP: Logged
ALJR
Member
Posts: 3765
From: Massachusetts
Registered: Jul 2009


Feedback score:    (18)
Leave feedback

Rate this member

Report this Post10-16-2010 04:28 PM Click Here to See the Profile for ALJRSend a Private Message to ALJRDirect Link to This Post

ALJR

3765 posts
Member since Jul 2009
 
quote
Originally posted by MadDanceSkillz:

That motor looks familiar...

Guess you beat me to the low-cost low-mount setup. Al's is very, very similar to what I was working on. The way of implementing a dogbone is a little different, but I like it!


The dogbone mount is a stock part; I did not want to reinvent the wheel... Also did not want to machine it as others have dun; to mount the tensioner to it. That just seems like a bad idea and removes just about all structural intergrity from it. Defeating the purpose of even having one (dog bone mount) to begin with...

ohh ya MD, who mounted this motor the the 88 cradle? its crook'ed

[This message has been edited by ALJR (edited 10-16-2010).]

IP: Logged
ALJR
Member
Posts: 3765
From: Massachusetts
Registered: Jul 2009


Feedback score:    (18)
Leave feedback

Rate this member

Report this Post10-16-2010 04:33 PM Click Here to See the Profile for ALJRSend a Private Message to ALJRDirect Link to This Post

ALJR

3765 posts
Member since Jul 2009
 
quote
Originally posted by Dodgerunner:

07Hoffmannd post that picture. The more ideas we all have the better to complete our projects. It's all food for thought.


I agree!
My idea in not the ultimate, ideal design; rather another option. If this turns into the "reference" thread for 3800 low mount alts. that would be fine by me Having dozens of ideas in one thread (with a searchable title) would be a valuable resource to have...
IP: Logged
Dennis LaGrua
Member
Posts: 15143
From: Hillsborough, NJ U.S.A.
Registered: May 2000


Feedback score:    (13)
Leave feedback


Total ratings: 328
Rate this member

Report this Post10-16-2010 08:57 PM Click Here to See the Profile for Dennis LaGruaSend a Private Message to Dennis LaGruaDirect Link to This Post
Here's one mounted for about $10 in steel. Some 1" W x 1/4" thick stock, a piece of 1x1 L channel about 12" L a few spacers and some hardened bolts. Its a very simple approach, requires no welding and it looks neat. However, it does use an alternator from a 99 Astro w 4.3L engine. Best of all you can change the plug next to it with ease.


------------------
" THE BLACK PARALYZER" -87GT 3800SC Series III engine, 3.4" Pulley, N* TB, LS1 MAF, Flotech Exhaust Autolite 104's Custom CAI 4T65eHD w. custom axles, HP Tuners VCM Suite.
"THE COLUSSUS"
87GT - ALL OUT 3.4L Turbocharged engine, Garrett Hybrid Turbo, MSD ign., modified TH125H
" ON THE LOOSE WITHOUT THE JUICE "

[This message has been edited by Dennis LaGrua (edited 10-16-2010).]

IP: Logged
deezil
Member
Posts: 779
From: St Louis Mo USA
Registered: Mar 2010


Feedback score: (1)
Leave feedback

Rate this member

Report this Post10-16-2010 09:23 PM Click Here to See the Profile for deezilSend a Private Message to deezilDirect Link to This Post
Dennis, Do you have any better pics of that mount?
IP: Logged
Dennis LaGrua
Member
Posts: 15143
From: Hillsborough, NJ U.S.A.
Registered: May 2000


Feedback score:    (13)
Leave feedback


Total ratings: 328
Rate this member

Report this Post10-16-2010 10:06 PM Click Here to See the Profile for Dennis LaGruaSend a Private Message to Dennis LaGruaDirect Link to This Post
 
quote
Originally posted by deezil:

Dennis, Do you have any better pics of that mount?


Its really not a mount. The alternator mounts directly to the block with a hardened bolt and spacer. There are two additional and simple brackets that hold the back and bottom firmly in place. The rear and bottom brackets are shown here:


------------------
" THE BLACK PARALYZER" -87GT 3800SC Series III engine, 3.4" Pulley, N* TB, LS1 MAF, Flotech Exhaust Autolite 104's Custom CAI 4T65eHD w. custom axles, HP Tuners VCM Suite.
"THE COLUSSUS"
87GT - ALL OUT 3.4L Turbocharged engine, Garrett Hybrid Turbo, MSD ign., modified TH125H
" ON THE LOOSE WITHOUT THE JUICE "

[This message has been edited by Dennis LaGrua (edited 10-16-2010).]

IP: Logged
PFF
System Bot
deezil
Member
Posts: 779
From: St Louis Mo USA
Registered: Mar 2010


Feedback score: (1)
Leave feedback

Rate this member

Report this Post10-16-2010 10:22 PM Click Here to See the Profile for deezilSend a Private Message to deezilDirect Link to This Post
WOW! I may just go this route!
IP: Logged
Chris Hodson
Member
Posts: 3066
From: Carpentersville
Registered: Aug 2006


Feedback score:    (6)
Leave feedback


Total ratings: 54
Rate this member

Report this Post10-16-2010 11:21 PM Click Here to See the Profile for Chris HodsonSend a Private Message to Chris HodsonDirect Link to This Post
I think I just modified a ac compressor bracket and that was about it. Looks good!
IP: Logged
ALJR
Member
Posts: 3765
From: Massachusetts
Registered: Jul 2009


Feedback score:    (18)
Leave feedback

Rate this member

Report this Post10-17-2010 01:59 PM Click Here to See the Profile for ALJRSend a Private Message to ALJRDirect Link to This Post
 
quote
Originally posted by Chris Hodson:

I think I just modified a ac compressor bracket and that was about it. Looks good!


Post up some pics if you can and a lil description of what you had to do to make it work...

The more options we have, the better And posting in one thread would give others the best options for there situation/skill....
IP: Logged
Jncomutt
Member
Posts: 8899
From: Charlotte, NC
Registered: Apr 2001


Feedback score: (3)
Leave feedback


Total ratings: 221
Rate this member

Report this Post10-17-2010 07:37 PM Click Here to See the Profile for JncomuttSend a Private Message to JncomuttDirect Link to This Post
Looks like it might hit the trunk wall, have you checked fitment for clearance there?
IP: Logged
ace5514
Member
Posts: 692
From: west long branch, nj, usa
Registered: Nov 2008


Feedback score:    (8)
Leave feedback

Rate this member

Report this Post10-17-2010 08:45 PM Click Here to See the Profile for ace5514Send a Private Message to ace5514Direct Link to This Post
Nice work all you guys!!
thanks for the info now i hate to say this but saves a lot of people from having to buy one from you know who, and pray he sends it to you....
denis,
your set up is so stealth i had to study the pic for a half hour to see what you did!
hope you guys don't mind me borrowing your designs when my time comes!
al
IP: Logged
07Hoffmannd
Member
Posts: 404
From: St. Louis, Mo. U.S.A
Registered: Apr 2008


Feedback score: N/A
Leave feedback

Rate this member

Report this Post10-17-2010 09:10 PM Click Here to See the Profile for 07HoffmanndSend a Private Message to 07HoffmanndDirect Link to This Post
ill have more pics and more info of mine tomorrow. realized i only had one pic of it. and its night now and no flash on the camera
IP: Logged
07Hoffmannd
Member
Posts: 404
From: St. Louis, Mo. U.S.A
Registered: Apr 2008


Feedback score: N/A
Leave feedback

Rate this member

Report this Post10-17-2010 09:12 PM Click Here to See the Profile for 07HoffmanndSend a Private Message to 07HoffmanndDirect Link to This Post

07Hoffmannd

404 posts
Member since Apr 2008
ill have more pics and more info of mine tomorrow. realized i only had one pic of it. and its night now and no flash on the camera
IP: Logged
ALJR
Member
Posts: 3765
From: Massachusetts
Registered: Jul 2009


Feedback score:    (18)
Leave feedback

Rate this member

Report this Post10-17-2010 10:35 PM Click Here to See the Profile for ALJRSend a Private Message to ALJRDirect Link to This Post
 
quote
Originally posted by Jncomutt:

Looks like it might hit the trunk wall, have you checked fitment for clearance there?


On mine?

Yes, I checked. I was using the sway bar as a reference point. On the stock cradle that is in the car now, if I look down my trunk wall, the back edge of the sway bar is just in front of the trunk wall (when looking down from above)... Wow, that heart typing... If it does not fit, I have two options; I could bang a dent into the trunk or I could reshape the lower alt. bracket so it pivits in more tords the block. Just have to make sure I have room for the connector on the alt...
IP: Logged
Jncomutt
Member
Posts: 8899
From: Charlotte, NC
Registered: Apr 2001


Feedback score: (3)
Leave feedback


Total ratings: 221
Rate this member

Report this Post10-17-2010 10:55 PM Click Here to See the Profile for JncomuttSend a Private Message to JncomuttDirect Link to This Post
Good idea. It was just tough to tell from the picture. I think it makes it look like it sticks back further than it actually does.
IP: Logged
americasfuture2k
Member
Posts: 7131
From: Edmond, Oklahoma
Registered: Jan 2006


Feedback score: (3)
Leave feedback


Total ratings: 105
Rate this member

Report this Post10-18-2010 02:00 AM Click Here to See the Profile for americasfuture2kSend a Private Message to americasfuture2kDirect Link to This Post
what a good time for something like this to come about...

------------------
First LX9 Fiero GT, 1987 | My Fiero Fuel Economy | MPG Display for OBD I
Youtube Videos of My GT | modernize your fiero with technology!
If you can't fix it with a hammer, you've got an electrical problem
Fiero's are people too. We pay just as much attention to them, if not more than our loved ones
screw paying those bastards. im not going to become rich by paying for things.....

since i seem to be getting so many PM's about my hitch, ill answer right here
the trailor hitch/bike rack hitch jack, lifting and resting points...

IP: Logged
PFF
System Bot
darkhorizon
Member
Posts: 12279
From: Flint Michigan
Registered: Jan 2006


Feedback score: (1)
Leave feedback


Total ratings: 451
Rate this member

Report this Post10-18-2010 08:28 AM Click Here to See the Profile for darkhorizonSend a Private Message to darkhorizonDirect Link to This Post
 
quote
what a good time for something like this to come about...


They have been around for awhile.

Unfortunately this guy took down his pictures, but it was pretty hilarious to follow the failed logic of the engine swap community even 2 years ago. This alternator mount hit both the trunk and would only work on an automatic, yet he wanted to sell them.

//www.fiero.nl/forum/A...090907-2-092328.html

//www.fiero.nl/forum/A...090907-2-092415.html
IP: Logged
ALJR
Member
Posts: 3765
From: Massachusetts
Registered: Jul 2009


Feedback score:    (18)
Leave feedback

Rate this member

Report this Post10-18-2010 09:23 AM Click Here to See the Profile for ALJRSend a Private Message to ALJRDirect Link to This Post
Dam, now you guys have me second guessing myself...

Could someone with a swap installed tell me the distance from a permanent reference point on the motor to the trunk wall? Preferable from an 88...

Thanks,
AL
IP: Logged
Dennis LaGrua
Member
Posts: 15143
From: Hillsborough, NJ U.S.A.
Registered: May 2000


Feedback score:    (13)
Leave feedback


Total ratings: 328
Rate this member

Report this Post10-18-2010 09:46 AM Click Here to See the Profile for Dennis LaGruaSend a Private Message to Dennis LaGruaDirect Link to This Post
 
quote
Originally posted by darkhorizon:


They have been around for awhile.

Unfortunately this guy took down his pictures, but it was pretty hilarious to follow the failed logic of the engine swap community even 2 years ago. This alternator mount hit both the trunk and would only work on an automatic, yet he wanted to sell them.

//www.fiero.nl/forum/A...090907-2-092328.html

//www.fiero.nl/forum/A...090907-2-092415.html


The problem with this other mount is that it located the alternator too high up where there is less room for clearance. Low mount means exactly that-down low. I would have to say that the fit of your alternator will be close.
------------------
" THE BLACK PARALYZER" -87GT 3800SC Series III engine, 3.4" Pulley, N* TB, LS1 MAF, Flotech Exhaust Autolite 104's Custom CAI 4T65eHD w. custom axles, HP Tuners VCM Suite.
"THE COLUSSUS"
87GT - ALL OUT 3.4L Turbocharged engine, Garrett Hybrid Turbo, MSD ign., modified TH125H
" ON THE LOOSE WITHOUT THE JUICE "

[This message has been edited by Dennis LaGrua (edited 10-18-2010).]

IP: Logged
ALJR
Member
Posts: 3765
From: Massachusetts
Registered: Jul 2009


Feedback score:    (18)
Leave feedback

Rate this member

Report this Post10-18-2010 11:26 AM Click Here to See the Profile for ALJRSend a Private Message to ALJRDirect Link to This Post
 
quote
Originally posted by Dennis LaGrua:
The problem with this other mount is that it located the alterantor too high up where there is less room for clearance. Low mount means exactly that-down low. I would have to say that the fit of your alternator will be close.


I just quadruple checked the clearance; I should have approx. 2" between the trunk wall and alt... Motor mounts are poly and I'm running a dog bone up top. So there should be more then enough clearance

IP: Logged
darkhorizon
Member
Posts: 12279
From: Flint Michigan
Registered: Jan 2006


Feedback score: (1)
Leave feedback


Total ratings: 451
Rate this member

Report this Post10-18-2010 01:33 PM Click Here to See the Profile for darkhorizonSend a Private Message to darkhorizonDirect Link to This Post
I had to clearance the trunk for this one. Stock 99 gtp alternator.

This images is larger than 153600 bytes. Click to view.

IP: Logged
deezil
Member
Posts: 779
From: St Louis Mo USA
Registered: Mar 2010


Feedback score: (1)
Leave feedback

Rate this member

Report this Post10-18-2010 02:24 PM Click Here to See the Profile for deezilSend a Private Message to deezilDirect Link to This Post
Like bfh clearance or did you have to cut it?
What size belt did you use and how did you route it?
IP: Logged
ALJR
Member
Posts: 3765
From: Massachusetts
Registered: Jul 2009


Feedback score:    (18)
Leave feedback

Rate this member

Report this Post10-18-2010 03:19 PM Click Here to See the Profile for ALJRSend a Private Message to ALJRDirect Link to This Post
 
quote
Originally posted by darkhorizon:

I had to clearance the trunk for this one. Stock 99 gtp alternator.


darkhorizon, could you measure the point from the block to the drivers side lower alt. bolt (outside block to inside alt.) for me?
Could you shoe a pic of the "clearancing" you had to do?
IP: Logged
americasfuture2k
Member
Posts: 7131
From: Edmond, Oklahoma
Registered: Jan 2006


Feedback score: (3)
Leave feedback


Total ratings: 105
Rate this member

Report this Post10-18-2010 11:27 PM Click Here to See the Profile for americasfuture2kSend a Private Message to americasfuture2kDirect Link to This Post
 
quote
Originally posted by deezil:

Like bfh clearance or did you have to cut it?
What size belt did you use and how did you route it?


lol, im sure he BFH'd it. it looks like it would only need to be a minimal amount.

------------------
First LX9 Fiero GT, 1987 | My Fiero Fuel Economy | MPG Display for OBD I
Youtube Videos of My GT | modernize your fiero with technology!
If you can't fix it with a hammer, you've got an electrical problem
Fiero's are people too. We pay just as much attention to them, if not more than our loved ones
screw paying those bastards. im not going to become rich by paying for things.....

since i seem to be getting so many PM's about my hitch, ill answer right here
the trailor hitch/bike rack hitch jack, lifting and resting points...

IP: Logged
darkhorizon
Member
Posts: 12279
From: Flint Michigan
Registered: Jan 2006


Feedback score: (1)
Leave feedback


Total ratings: 451
Rate this member

Report this Post10-19-2010 07:54 AM Click Here to See the Profile for darkhorizonSend a Private Message to darkhorizonDirect Link to This Post
 
quote
Originally posted by americasfuture2k:


lol, im sure he BFH'd it. it looks like it would only need to be a minimal amount.


I cut a 2 inch by 2inch block out of it and re welded it. I doubt I could have hammered it and made it look normal, or have room for flexing.

I cant measure much of anything, I can tell you that lower spacer was about 2inches tall off the block.
IP: Logged
Previous Page | Next Page

This topic is 3 pages long:  1   2   3 


All times are ET (US)

T H I S   I S   A N   A R C H I V E D   T O P I C
  

Contact Us | Back To Main Page

Advertizing on PFF | Fiero Parts Vendors
PFF Merchandise | Fiero Gallery | Ogre's Cave
Real-Time Chat | Fiero Related Auctions on eBay


Copyright (c) 1999, C. Pennock