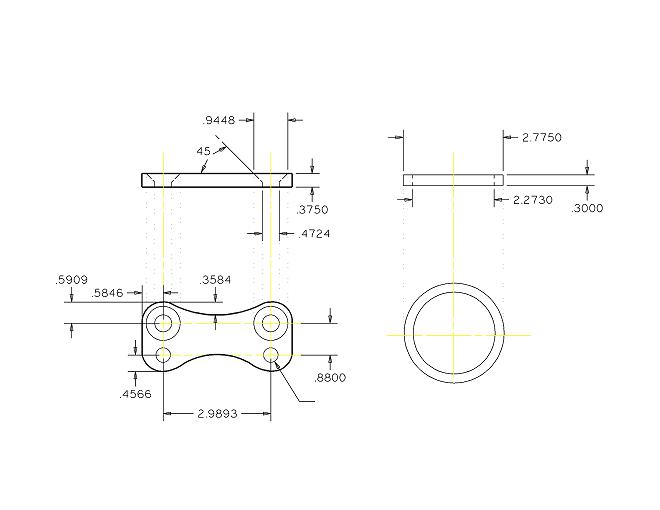
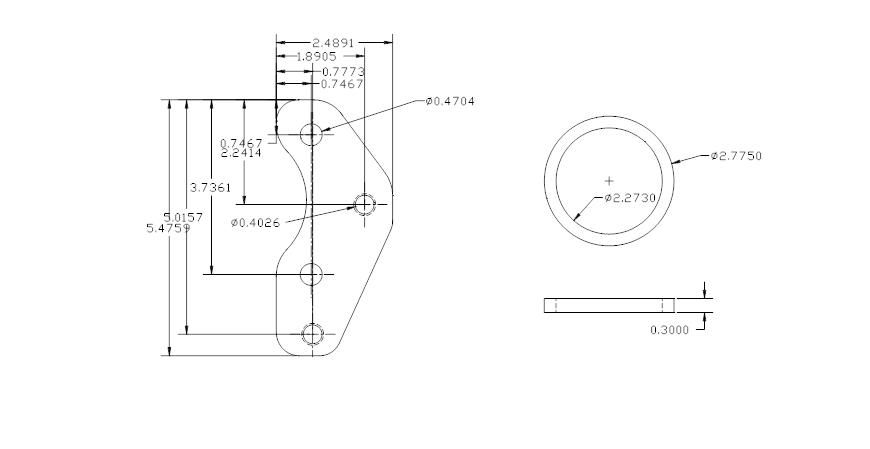
Just like it says….I want to do this upgrade (Vette rotors, stock calipers) to my formula but need all the info. I’ve gotten some drawings from a couple members (thanks) but the drawings are missing some dimensional info for the adapters. Also I’ve searched but haven’t been able to find a complete build/thread for this upgrade, just bits and pieces. Lots for 84-87, but not 88. Here’s the drawing for the bracket but there’s no dimensions for the outside radius, thickness, thread size etc etc. I want to give the drawing to a machine shop next week to have them made but am not confident about the info I have. Thanks in advance for any help you can give me.
[This message has been edited by DLCLK87GT (edited 10-29-2010).]
IP: Logged
10:05 AM
PFF
System Bot
olejoedad Member
Posts: 20072 From: Back home again in Indiana Registered: May 2004
That’s where that drawing came from (thanks again) but it’s missing info as stated above. Apparently he made a set and sold(?) it to a member who he’s waiting on to install them and make sure they fit without issue. Sort of a prototype set. I really want to drive my car but it needs brakes on all 4 corners first. I’m not sure if the machine shop will work off this with missing info. They are very anal about dimensions (as they should be) and not crazy about guessing.
IP: Logged
11:26 AM
fieroguru Member
Posts: 12639 From: Champaign, IL Registered: Aug 2003
If you are going through the effort to make them, might as well make the version that does not have upper a-arm interferance (mostly on non-stock height 88's)...
quote
Originally posted by fieroguru:
I am doing the same - making my own 88 caliper brackets to get away from the caliper/upper A-arm interferance with my current WCF set.
The stock 88 rotor measured 10.432" and vette one was 12.007". To keep the rotor pads in the same relative position the new hole distance should be 0.7875". The stock caliper distance has the edge of the brake pad inset from the edge of the rotor, so you can go out further if you would like. I pushed the pad out flush with the edge of the vette rotor and came up with 0.947" so anywhere in between would be fine... I am going to mock up some at .925" and see how it works out.
I am still looking for a lower cost counter sink bit, the ones in McMasterCarr are about $32 for a 1" bit (the head on the above bolts is 24mm in diamter). I might just end up using one from work.
quote
Originally posted by cptsnoopy:
Ok, I ordered the bag of 10 bolts, and this 6 flute, highspeed, 1" diameter, 90 degree countersink bit.
Hopefully tomorrow I will be able to pick up a foot of 2" X 3/8" cold rolled bar stock and get started.
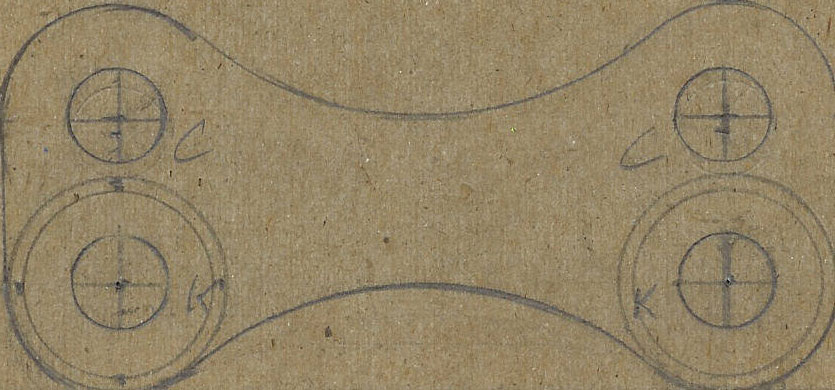
Rough layout at .85" hole centers:
Charlie
quote
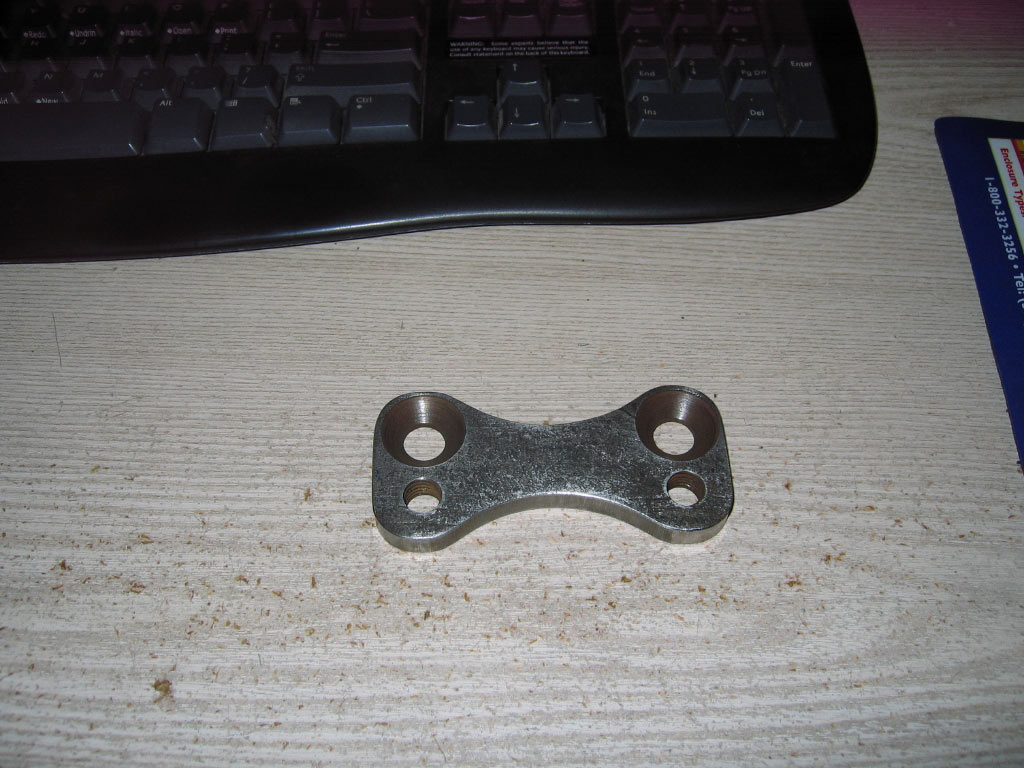
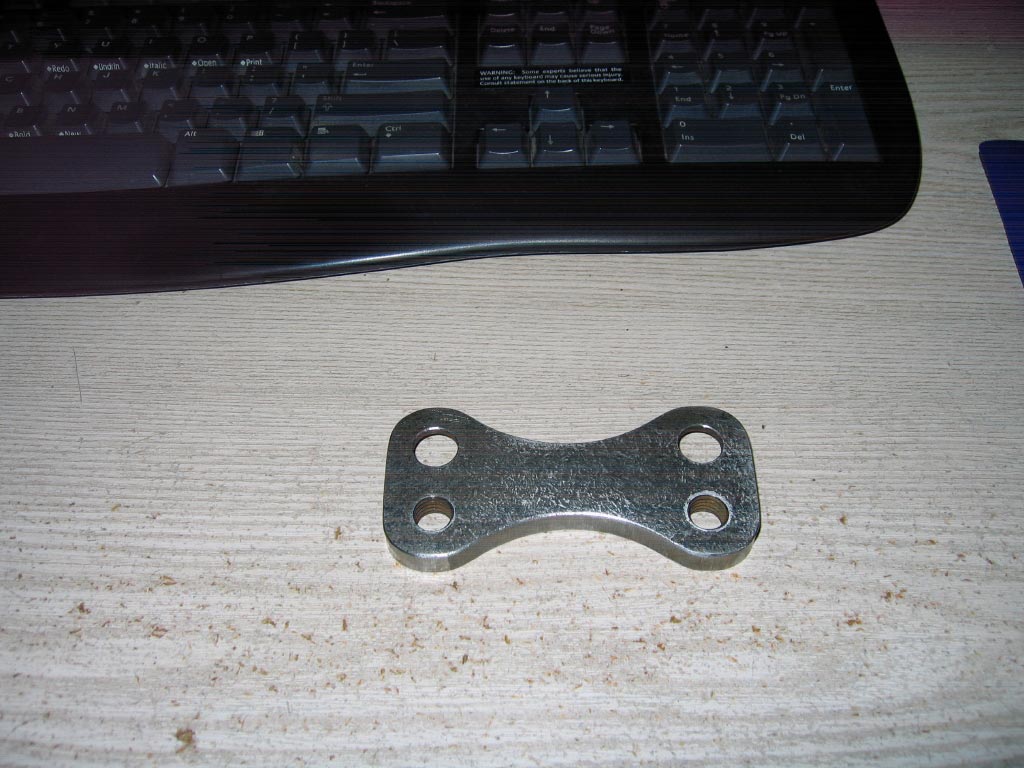
Originally posted by cptsnoopy:
I ended up doing a lot of grinding to achieve the dogbone shape I was after. I still need to paint these but for now, here are some pics.
Charlie
IP: Logged
11:31 AM
DLCLK87GT Member
Posts: 2717 From: South Jersey, USA Registered: Feb 2009
Originally posted by fieroguru: If you are going through the effort to make them, might as well make the version that does not have upper a-arm interferance (mostly on non-stock height 88's)...
do you have dimensions on that or did you just do it until it worked? Maybe i can combine the two drawings....
the bolt hole locations are quite different between the two.
[This message has been edited by DLCLK87GT (edited 10-29-2010).]
IP: Logged
12:39 PM
Mickey_Moose Member
Posts: 7594 From: Edmonton, AB, Canada Registered: May 2001
If you are going through the effort to make them, might as well make the version that does not have upper a-arm interferance (mostly on non-stock height 88's)...
...this is very similar to what Rockcrawl was making and selling before he got out of Fiero's.
IP: Logged
01:49 PM
fieroguru Member
Posts: 12639 From: Champaign, IL Registered: Aug 2003
do you have dimensions on that or did you just do it until it worked? Maybe i can combine the two drawings....
the bolt hole locations are quite different between the two.
This is a super simple design where the holes are merely offset between 0.787" to .925" depending on where you want the brake pad to run. Offsetting less will give you a better chance of running a 15" wheel, and moving them out to the edge of the rotor gives you slightly more mechancial advantage with stopping power.
The distance between the caliper bolt holes remains the same as stock @ 3.736" per the drawing above. The rest of the general shape isn't too critical, but a simple rectangular box would have a couple of interferance issues, so the dog bone shape is more ideal.
IP: Logged
01:57 PM
Fieroseverywhere Member
Posts: 4242 From: Gresham, Oregon USA Registered: Mar 2006
I have a similar setup on my 85GT. I'm running an 88 engine cradle and suspension so the rear brackets are nearly identical to the "dogbone" ones posted. They work perfectly.
The front brackets however are a completely different beast. Rectangle bracket, radiused on one side for piston clearnace, and ~.87 tube welded on to move calipers out (88's have 1" wider front track). The basic design is good but in my case execution was off a bit. I need to redesign them because the pads run off the outer edge of the rotor. First time they got hot it warped both front rotors. Should have built them myself the first time out.
Does anyone have a scematic for 12" rotors and 88 calipers on the front of 84-87 fieros? If not I'll provide them once I redesign mine. Just hoping someone has already beat me to it. The only other option would be if someone could point me in the direction of a 12.125" vette rotor...
[This message has been edited by Fieroseverywhere (edited 10-29-2010).]
IP: Logged
02:09 PM
Alex4mula Member
Posts: 7410 From: Canton, MI US Registered: Dec 1999
If you are going through the effort to make them, might as well make the version that does not have upper a-arm interferance (mostly on non-stock height 88's)...
So if the new plate pushes the caliper inward 3/8", will the new rotor needs to compensate for that? Does it needs to be a custom rotor then? Tks
IP: Logged
09:44 PM
MadMark Member
Posts: 2935 From: Owosso, Michigan, USA Registered: Feb 2010
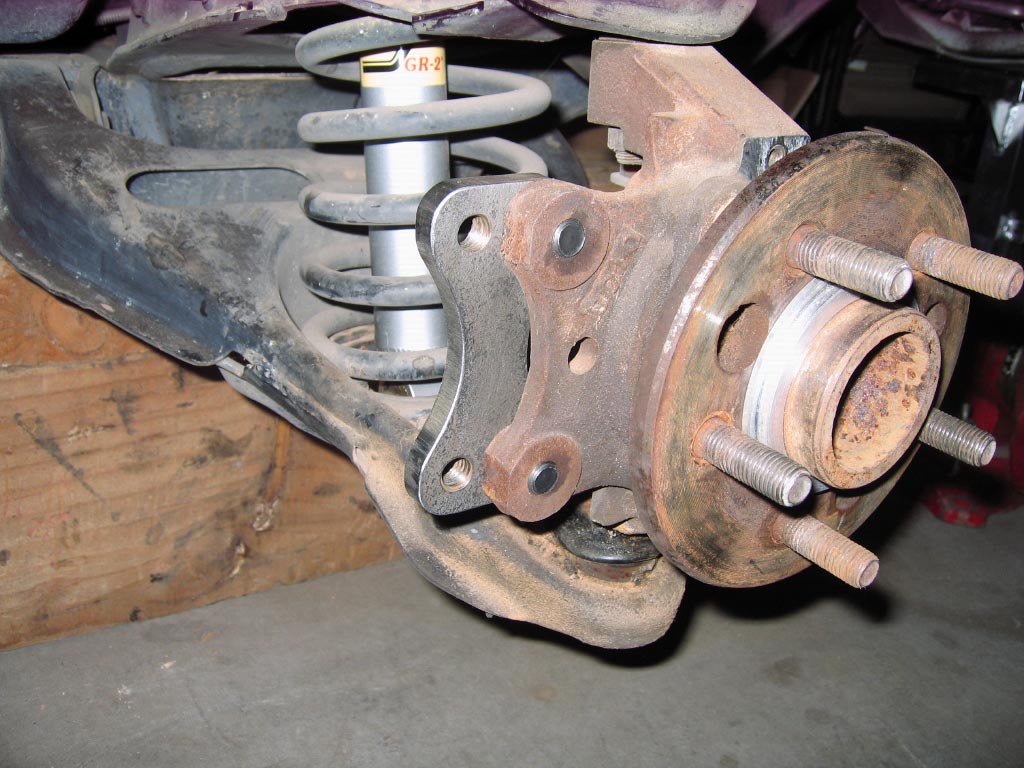
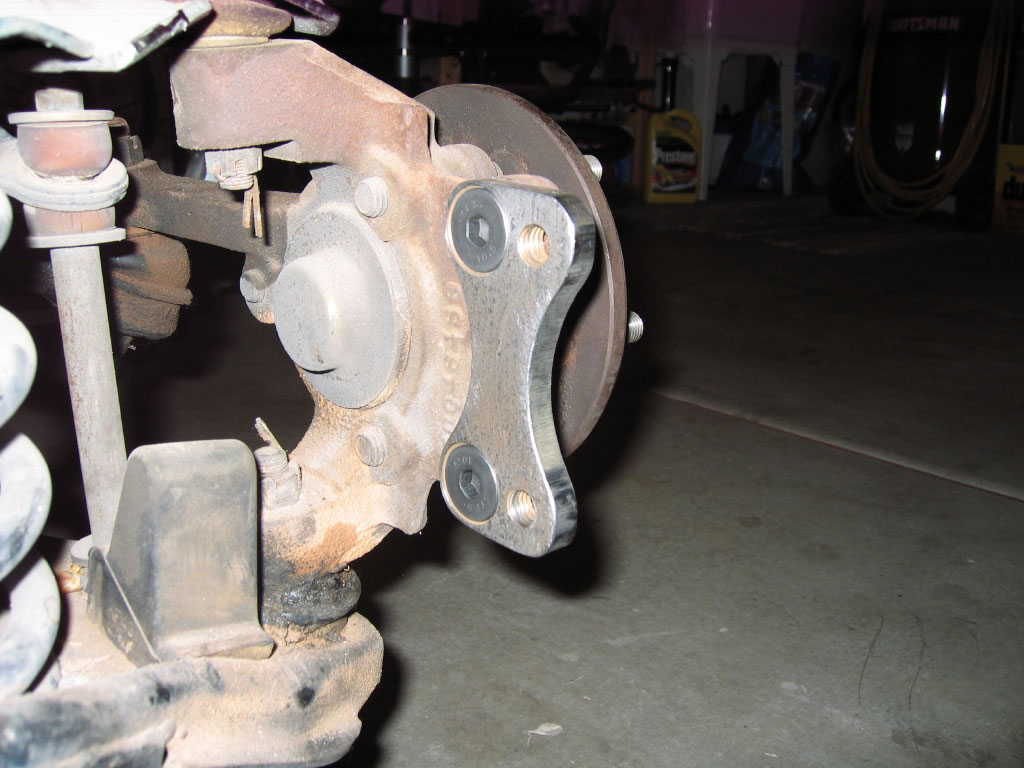
I am the person that OleJoeDad is talking about. I found this original design on Pennocks and had a set made at a machine shop that a friend of mine owns. He cut out the original design with a waterjet machine and they came out great. Who ever did the original design did a great job getting the dimensions all proper. The one thing I found when I tried to install this set, that I will call Gen I, is that there is and interference problem with the piston of the caliper. I drew up the changes that I thought would be needed and took this design back to my machinist friend and he cut out the Gen II parts for me. I installed these on my ’88 Fiero GT and found that these too were not quite right, close but still needed adjustment with a grinder to completely clear the piston. I did just that and clearance them myself at home. I then continued to install this Gen II set on the front of my Fiero.
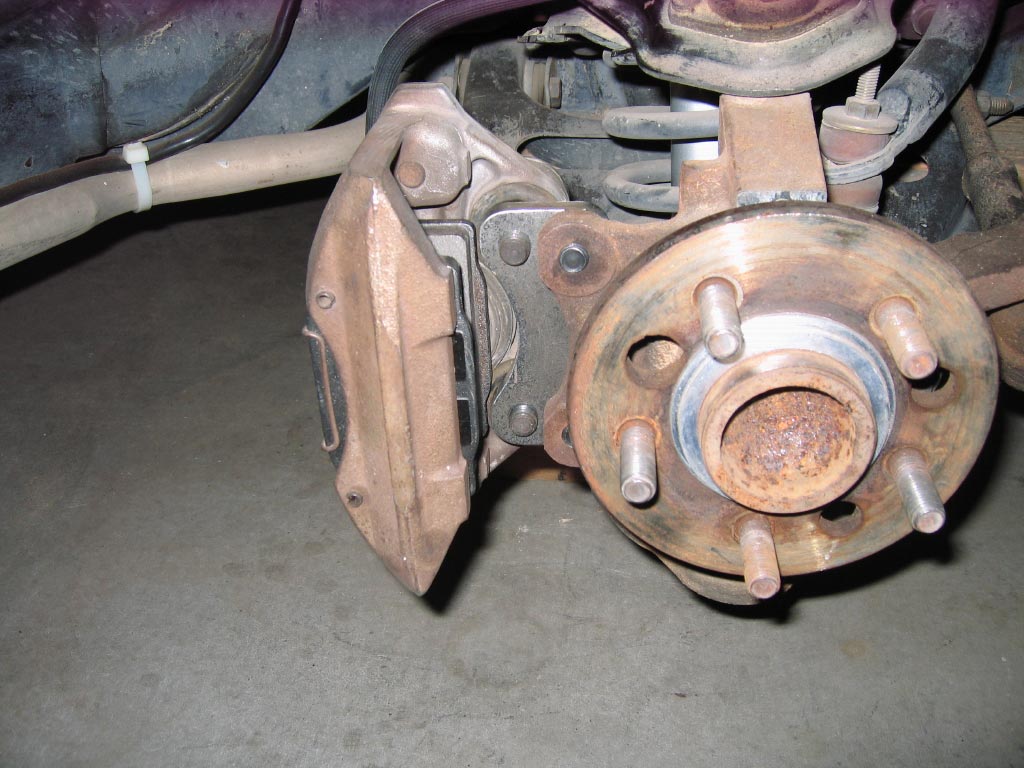
If you look real close at the design it rotates the caliper a few degrees so there is no clearance problem with the bolts you use to mount the adapter to the original position and the caliper. This design also puts the brake pad as far out on the rotor as it can get so you get the most swept area possible which gives you the best brake force. This slight rotation also moves the caliper slightly up on the front brakes so that you don’t need to add longer flexible brake lines to make it fit. On the other adapters I have seen they use flat head screws so you have enough clearance instead of this slight rotation.
Joe installed the rear brakes on my car for me along with doing some other work for me. He said that they went on really well and fit perfectly. On the rear the adapters rotate the calipers down for clearance. Joe also installed Stainless Steel flex lines on all my brakes when he did this too so now my brakes are what I call “tight”. You touch the brake pedal and there is no give or squishyness, they just work. When I did this change over I also installed EBC Red Stuff brake pads for more braking force too.
So I have done this in two steps. First step was just the Corvette rotors with adapters on the front with the EBC Red Stuff brake pads. This really increased the braking force to a point I would say increased my braking ability by about 50%. This is very subjective though since I have no way to measure this other than my own impressions. The second step was to have all brakes done with the Corvette rotors and EBC brake pads, along with the SS brake lines. This increased my braking force even more and gave me the “tightness” I wanted too.
One thing you will find is there is slightly less room in the caliper for the brake pads since the Corvette rotors are slightly bigger than the Fiero rotors. So with the EBC brake pads I had to peel off the plastic shim on the back of the brake pads to allow me to install the pads. I don’t know if you will need to do the same with the stock type of pads too, but it would not surprise me if you had too.
I then went back to my machinist and we came up with a Gen III design and one other member who heard about my project asked if he could buy a set. He finally received a set about a week ago and is going to install them on his car soon. He still needs to have the rotors drilled for the 5 x 100 bolt pattern, so I don’t know how long it will be before he gets them on his car. But, I really wanted to have a set of Gen III installed and working properly so that I know that there is no problems with them before I post everything on Pennocks. As soon as I get feedback from him I will post all the information here with drawings showing all dimensions and an AutoCAD drawing of the Gen III adapters. I have pictures of the installation and will post them at the same time. So that there will be a visual record of what you need to do to make this adaptation.
I also made arrangements with my machine shop to make these parts for people for a relatively cheap price of $15 an adapter or $60 a set plus shipping. I don’t want to make any money off of this project or anything and I want the price for others to be as low as is possible so you will be dealing with my machinist directly to order the parts. He is not planning on keeping these parts in stock and will be making them as needed, so it might take a few weeks for him to make them as he goes around other larger projects. So if you do deal with my machinist remember this is a minor thing for him to do in the whole scheme of his operation.
You can also have your own made when I get the Gen III AutoCAD drawing, by giving this drawing to your own machinist and having them build them for you.
Hopefully I will get the feedback soon so I can post the whole info package on Pennocks so everyone that wants to can do this.
quote
Originally posted by DLCLK87GT:
That’s where that drawing came from (thanks again) but it’s missing info as stated above. Apparently he made a set and sold(?) it to a member who he’s waiting on to install them and make sure they fit without issue. Sort of a prototype set. I really want to drive my car but it needs brakes on all 4 corners first. I’m not sure if the machine shop will work off this with missing info. They are very anal about dimensions (as they should be) and not crazy about guessing.
IP: Logged
10:14 PM
Oct 31st, 2010
DLCLK87GT Member
Posts: 2717 From: South Jersey, USA Registered: Feb 2009
Hey Mad Mark, thanks again for the previous info and I would really appreciate a copy of the GEN 3 brackets. I would like to compare them to your #2 and those dog-bone dwgs above. I have a friend of a friend that can make these for me locally. Hopefully he can make them this week and I can install this weekend or next….getting cold out and I’d really like to take my new one for a ride before I cover and winterize it. THANKS!
IP: Logged
05:26 PM
PFF
System Bot
fieroguru Member
Posts: 12639 From: Champaign, IL Registered: Aug 2003
So if the new plate pushes the caliper inward 3/8", will the new rotor needs to compensate for that? Does it needs to be a custom rotor then? Tks
The 12" vette rotor is offset to the inside about 3/8" as well and matches the new caliper location. The down side to this is on lowered cars the nose of the lower A-arm can dig into the rotors (they are much closer now). It isn't really an issue except on lowered cars where the A-arm is near horizontal or angled upward to the wheels. Clearancing the outer nose of the lower A-arm will provide ample clearance.
IP: Logged
06:01 PM
Alex4mula Member
Posts: 7410 From: Canton, MI US Registered: Dec 1999
The 12" vette rotor is offset to the inside about 3/8" as well and matches the new caliper location. The down side to this is on lowered cars the nose of the lower A-arm can dig into the rotors (they are much closer now). It isn't really an issue except on lowered cars where the A-arm is near horizontal or angled upward to the wheels. Clearancing the outer nose of the lower A-arm will provide ample clearance.
Thank you. Good to know as the car I plan to do this is lowered.
IP: Logged
06:10 PM
cptsnoopy Member
Posts: 2587 From: phoenix, AZ, USA Registered: Jul 2003
The 12" vette rotor is offset to the inside about 3/8" as well and matches the new caliper location. The down side to this is on lowered cars the nose of the lower A-arm can dig into the rotors (they are much closer now). It isn't really an issue except on lowered cars where the A-arm is near horizontal or angled upward to the wheels. Clearancing the outer nose of the lower A-arm will provide ample clearance.
My car is not lowered yet and I won't be able to because of the ~3/8" offset inward of the rotor. (deeper offset that the stock rotor). From what I can tell it looks like the 13" Viper rotors have the correct offset and may be the answer to getting back the clearance that the stock brake system has. I could be wrong but from looking at the adapters they show on the West Coast Fiero website it appears that the secondary adapters to move the calipers out another 1/2" also put the calipers back into their original position for rotor offset. I wonder if anyone would like to buy a 12" brake upgrade that has been mounted but never driven on the street?...
Charlie
IP: Logged
06:20 PM
Nov 2nd, 2010
DLCLK87GT Member
Posts: 2717 From: South Jersey, USA Registered: Feb 2009
Originally posted by fieroguru: The distance between the caliper bolt holes remains the same as stock @ 3.736" per the drawing above.
I don't think that's correct...3.736 would be from center line to edge of bracket, not CL to CL. That looks to be 2.9894"...right? Alos a bump for updates from MadMark
IP: Logged
12:47 PM
fieroguru Member
Posts: 12639 From: Champaign, IL Registered: Aug 2003
I don't think that's correct...3.736 would be from center line to edge of bracket, not CL to CL. That looks to be 2.9894"...right? Alos a bump for updates from MadMark
Correct... guess I mis-read it before.
IP: Logged
01:32 PM
Nov 3rd, 2010
DLCLK87GT Member
Posts: 2717 From: South Jersey, USA Registered: Feb 2009
Hey Fieroguru, i made this last night for my friends machine shop...see anything i missed, messed up or ?? Oh how about the threaded hole, what's the size and thread info...don't suppose you know off hand?
IP: Logged
01:22 PM
fieroguru Member
Posts: 12639 From: Champaign, IL Registered: Aug 2003
I am the person that OleJoeDad is talking about. I found this original design on Pennocks and had a set made at a machine shop that a friend of mine owns. He cut out the original design with a waterjet machine and they came out great. Who ever did the original design did a great job getting the dimensions all proper. The one thing I found when I tried to install this set, that I will call Gen I, is that there is and interference problem with the piston of the caliper. I drew up the changes that I thought would be needed and took this design back to my machinist friend and he cut out the Gen II parts for me. I installed these on my ’88 Fiero GT and found that these too were not quite right, close but still needed adjustment with a grinder to completely clear the piston. I did just that and clearance them myself at home. I then continued to install this Gen II set on the front of my Fiero.
If you look real close at the design it rotates the caliper a few degrees so there is no clearance problem with the bolts you use to mount the adapter to the original position and the caliper. This design also puts the brake pad as far out on the rotor as it can get so you get the most swept area possible which gives you the best brake force. This slight rotation also moves the caliper slightly up on the front brakes so that you don’t need to add longer flexible brake lines to make it fit. On the other adapters I have seen they use flat head screws so you have enough clearance instead of this slight rotation.
Joe installed the rear brakes on my car for me along with doing some other work for me. He said that they went on really well and fit perfectly. On the rear the adapters rotate the calipers down for clearance. Joe also installed Stainless Steel flex lines on all my brakes when he did this too so now my brakes are what I call “tight”. You touch the brake pedal and there is no give or squishyness, they just work. When I did this change over I also installed EBC Red Stuff brake pads for more braking force too.
So I have done this in two steps. First step was just the Corvette rotors with adapters on the front with the EBC Red Stuff brake pads. This really increased the braking force to a point I would say increased my braking ability by about 50%. This is very subjective though since I have no way to measure this other than my own impressions. The second step was to have all brakes done with the Corvette rotors and EBC brake pads, along with the SS brake lines. This increased my braking force even more and gave me the “tightness” I wanted too.
One thing you will find is there is slightly less room in the caliper for the brake pads since the Corvette rotors are slightly bigger than the Fiero rotors. So with the EBC brake pads I had to peel off the plastic shim on the back of the brake pads to allow me to install the pads. I don’t know if you will need to do the same with the stock type of pads too, but it would not surprise me if you had too.
I then went back to my machinist and we came up with a Gen III design and one other member who heard about my project asked if he could buy a set. He finally received a set about a week ago and is going to install them on his car soon. He still needs to have the rotors drilled for the 5 x 100 bolt pattern, so I don’t know how long it will be before he gets them on his car. But, I really wanted to have a set of Gen III installed and working properly so that I know that there is no problems with them before I post everything on Pennocks. As soon as I get feedback from him I will post all the information here with drawings showing all dimensions and an AutoCAD drawing of the Gen III adapters. I have pictures of the installation and will post them at the same time. So that there will be a visual record of what you need to do to make this adaptation.
I also made arrangements with my machine shop to make these parts for people for a relatively cheap price of $15 an adapter or $60 a set plus shipping. I don’t want to make any money off of this project or anything and I want the price for others to be as low as is possible so you will be dealing with my machinist directly to order the parts. He is not planning on keeping these parts in stock and will be making them as needed, so it might take a few weeks for him to make them as he goes around other larger projects. So if you do deal with my machinist remember this is a minor thing for him to do in the whole scheme of his operation.
You can also have your own made when I get the Gen III AutoCAD drawing, by giving this drawing to your own machinist and having them build them for you.
Hopefully I will get the feedback soon so I can post the whole info package on Pennocks so everyone that wants to can do this.
I did the WCF 12" corvette rotor upgrade on my 88. Its actually quite a cheap upgrade for the car, all things considered. The conversion was VERY straight forward, and easy. But, I wasn't 100% happy with it at first. It still took far too much effort at the pedal then it should have to get the car to really stop hard. So I did the booster upgrade, and now it's a completely different animal. I did absolutely need to run a minimum of 16" wheels. Even then, there was a bit of a challenge to getting the brake lines to not rub anything in the front. I had to bend and tweak the short stem that is part of the braded lines I installed.
In the end, I replaced pretty much the whole braking system. Here's my shopping list:
88 caliper rebuild kits Front and rear New slider boots Stainless brake line kit Braided steel hoses One man bleeder kits Carbomet pads
Total $510.85 at Fierostore.
WCF Corvette rotor upgrade + Cross drilling
Total 594.00 at WCF
Brake booster upgrade (+ core charge )
104.99 at Autozone.
Total spent on my brakes... $1209.84 +/- a little for shipping, taxes, and a nice discount I got on some parts.
However, these brakes are now nothing short of shocking. And the E-brake works too. My goal was to install a braking system that has perfect balance for this particular car. Not the balance fit for only a Corvette. The Fiero has the unique property of having symmetrical brakes on 88 models. ALL 4 wheels have the same size calipers, rotors and pads. And, under light to moderate braking, all 4 calipers do EXACTLY the same amount of work. Under harder braking conditions, the rears pressures are trimmed back slightly to curb any potential of the rears locking before the fronts. Sounds perfect for a car with slightly rearward weight distribution.
In my opinion, I do think the 88's pistons are too small. But with the booster upgrade, the line pressures are high enough to make up for the lack of fluid area on the pistons. Because of this, I don't think a caliper upgrade is necessary, nor would it yield that much of a benefit, unless of course the pad area was increased, then you would want bigger, or multiple piston calipers to take advantage of the added potential of pad heat distribution.
IP: Logged
02:04 AM
mera7 Member
Posts: 1355 From: piedmont oklahoma usa Registered: Sep 2009
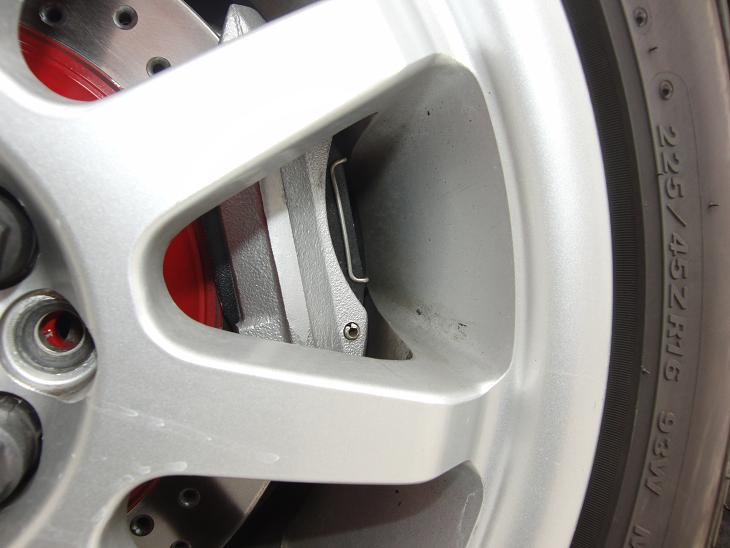
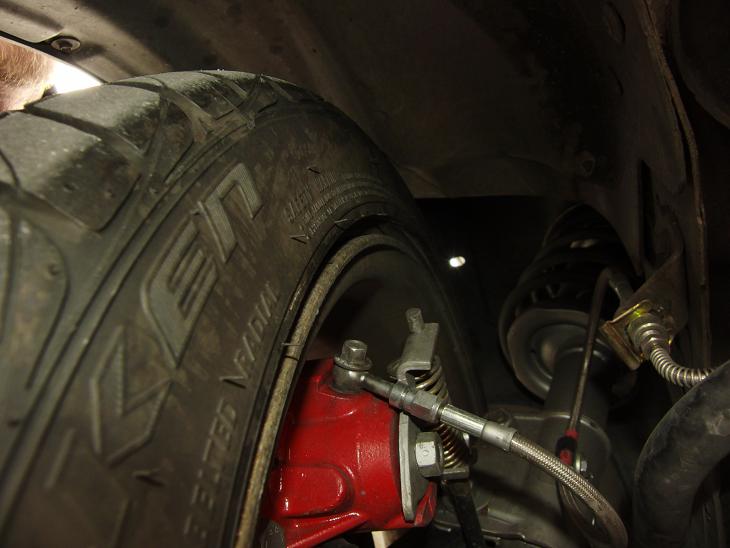
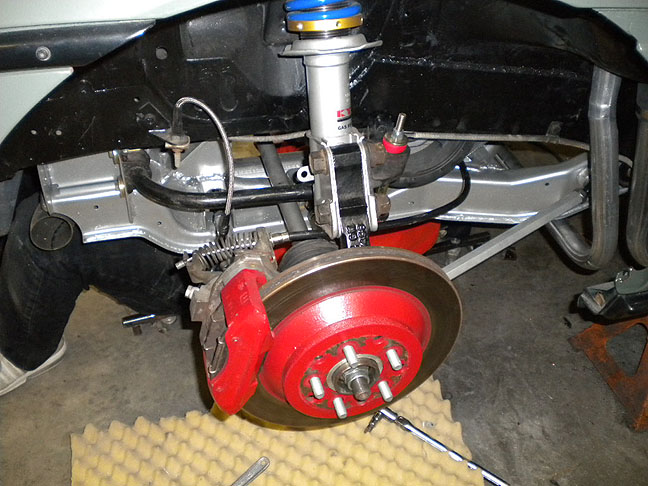
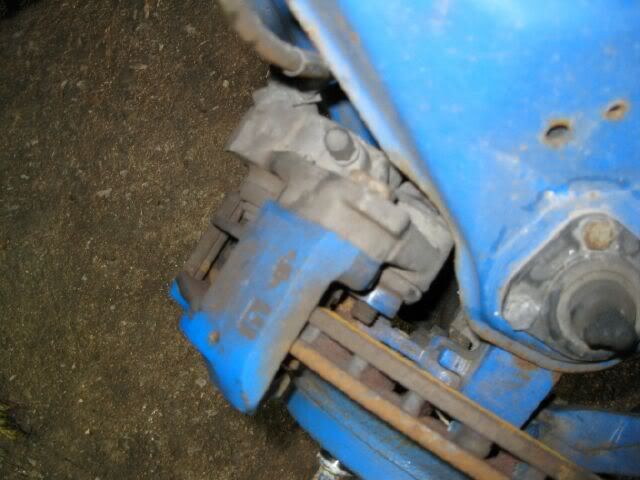
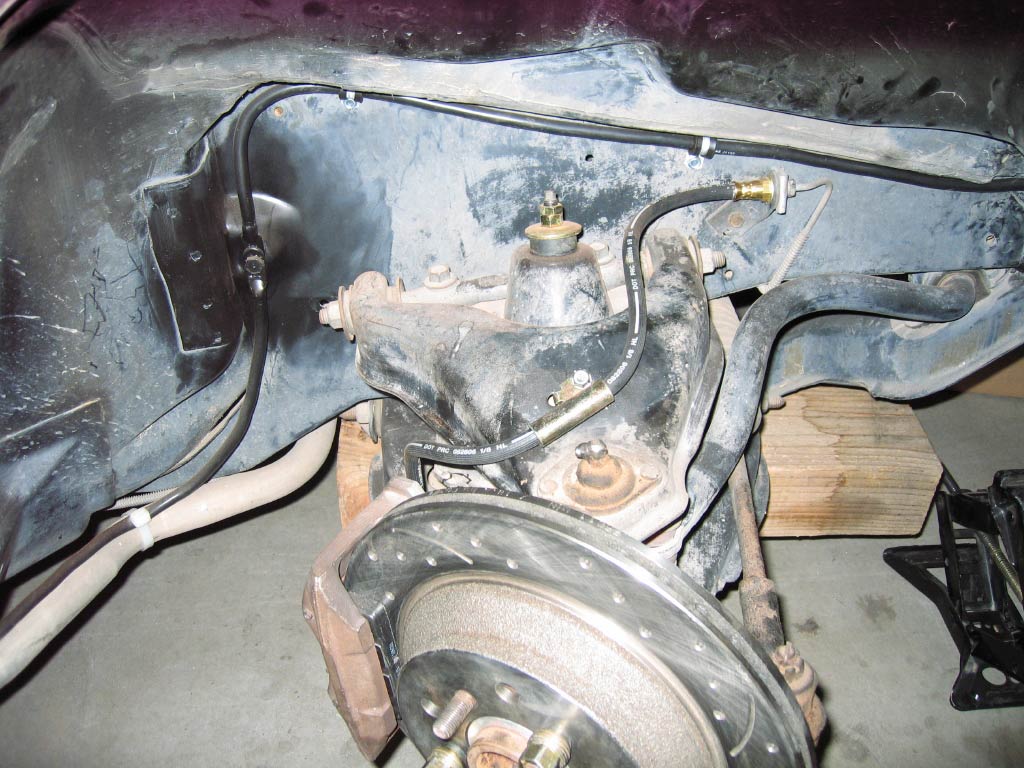
Interesting line routing on the front brakes. I had to point the brake lines slightly forward of the bleeder. This was done so that when the wheel was turned so that the caliper was closest to the A-Arm, the brake line wouldn't touch the A-Arm. I had to bend the fittings slightly so that the line wasn't pointed to far towards the wheel. If I had 17" wheels on all 4s this might not have been a concern.
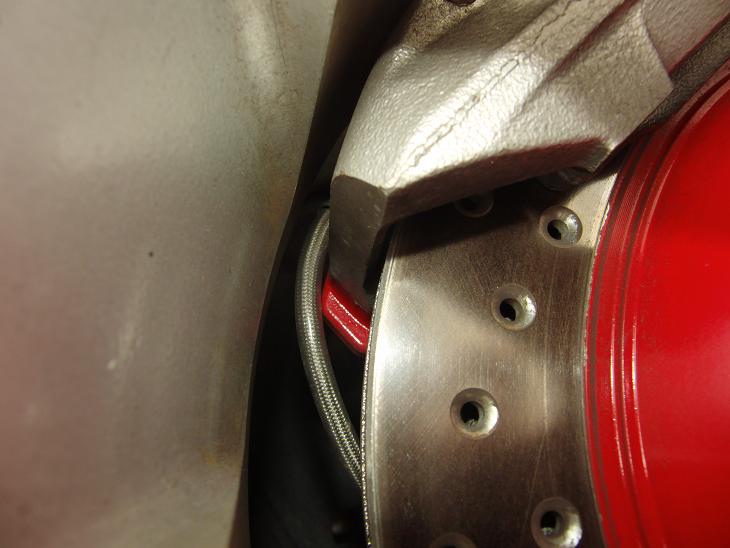
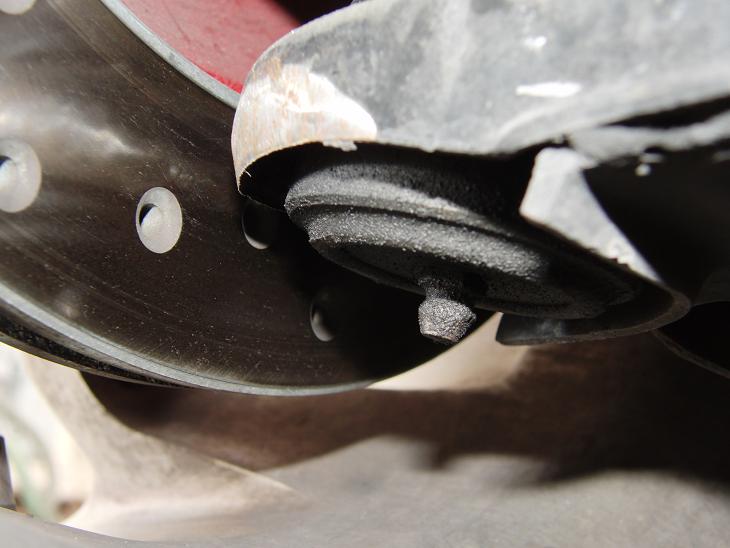
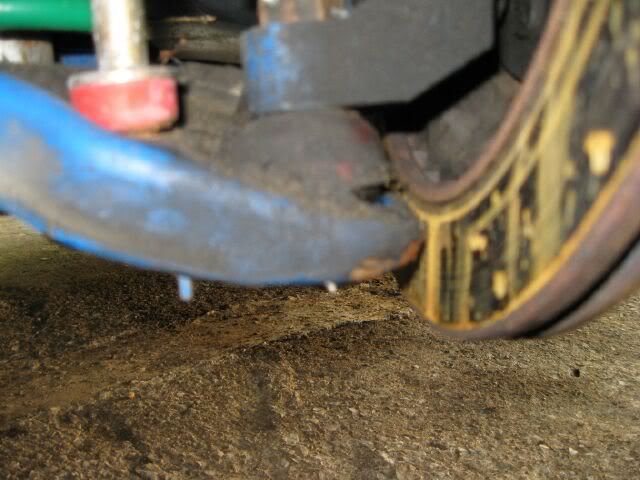
The A-Arms WILL RUB THE ROTORS HERE when the suspension is fully compressed. You need to do a little grinding on the lower edge around the ball joint. I used an angle grinder with a flap disk. I didn't take a whole heck of a lot off, but it stopped them from rubbing.
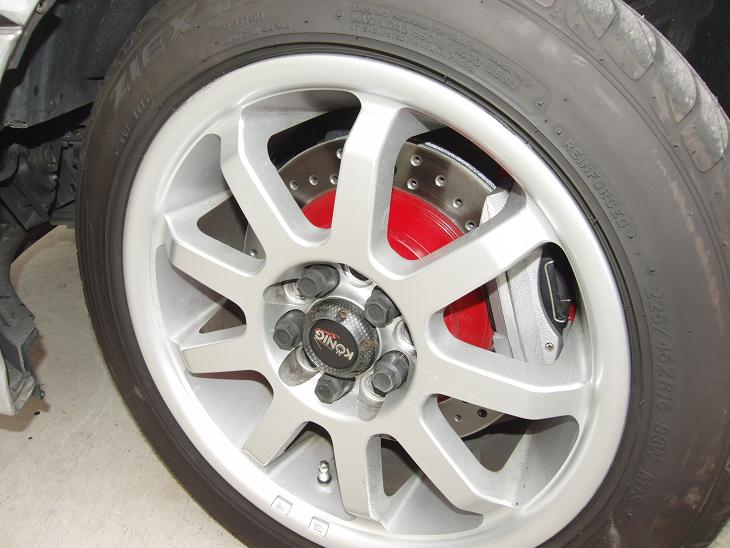
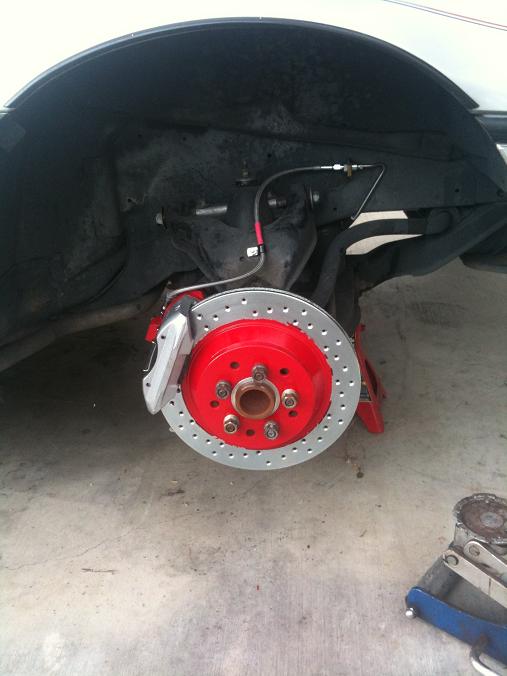
Pretty looking 16" in the front
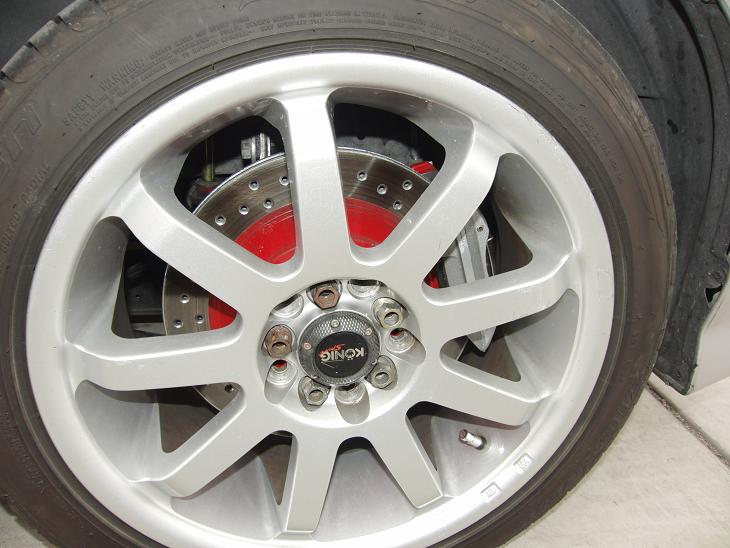
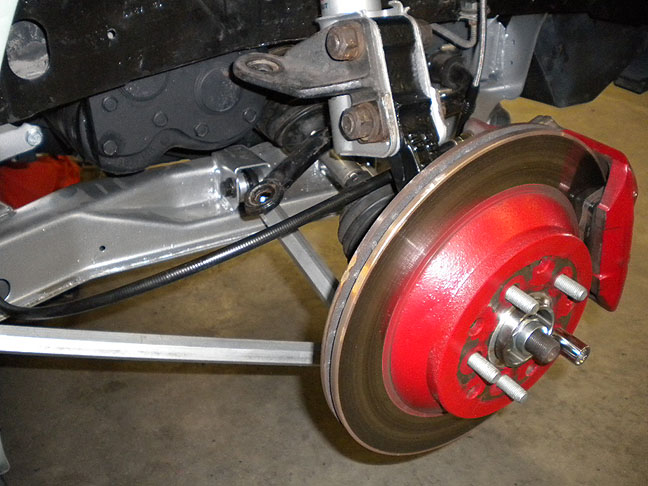
Bit better clearance in the rear with the 17" wheels
Easier routing in the rear.
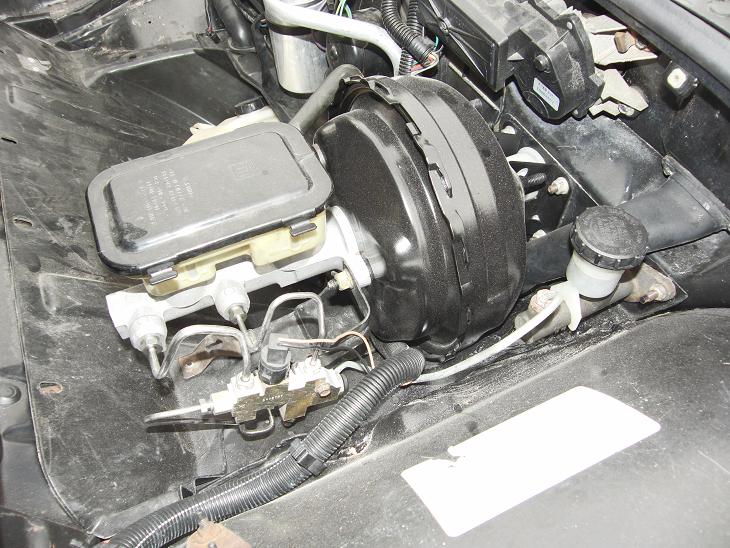
Booster upgrade. I cut off the banjo's from both the fiero and the S10 booster. Threaded the rods, and used a coupler nut to join the two, and used two jam nuts on either end. It works just fine. But it is a bit sketchy when you consider the consequences of a failure here. I will highly endorse Rodney Dickmans booster once he has them in stock. To mount the booster, you have to cut the sheet metal bracket off the Fiero's booster, then simply bolt it to the S10 booster. You have to hammer the snot out of the metal around where the booster sits. It's heavy hammering, I recommend ear protection because its so loud. Once you've concaved the metal a bit, the booster slides right in, and bolts right up. It's a bit tough to put the nuts on to secure it, but it's manageable. I didn't even need to remove any lines from the master cylinder.
To replace all the brake lines, and install the Corvette rotors, it was only about 1 good solid days work. But to rebuild all 4 calipers, clean and paint everything... well that's another story. The booster only took a couple of hours of my time to do. It's pretty straight forward.
[This message has been edited by Fierobsessed (edited 01-11-2011).]
IP: Logged
04:50 PM
Fierobsessed Member
Posts: 4782 From: Las Vegas, NV Registered: Dec 2001
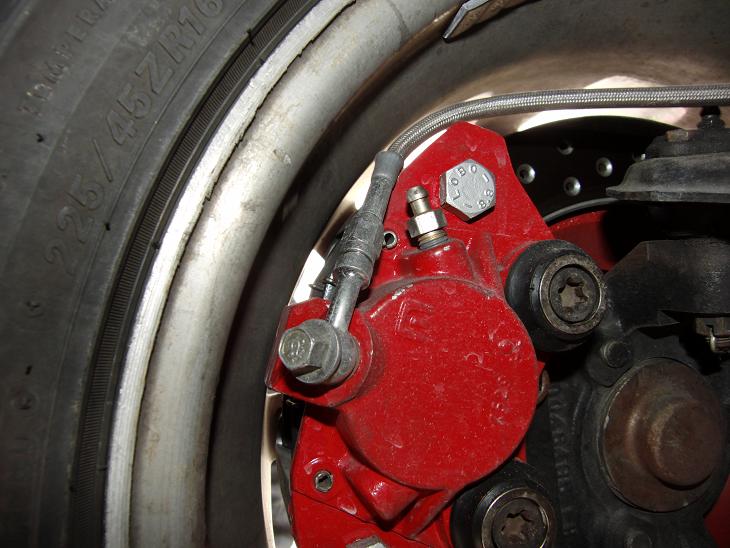
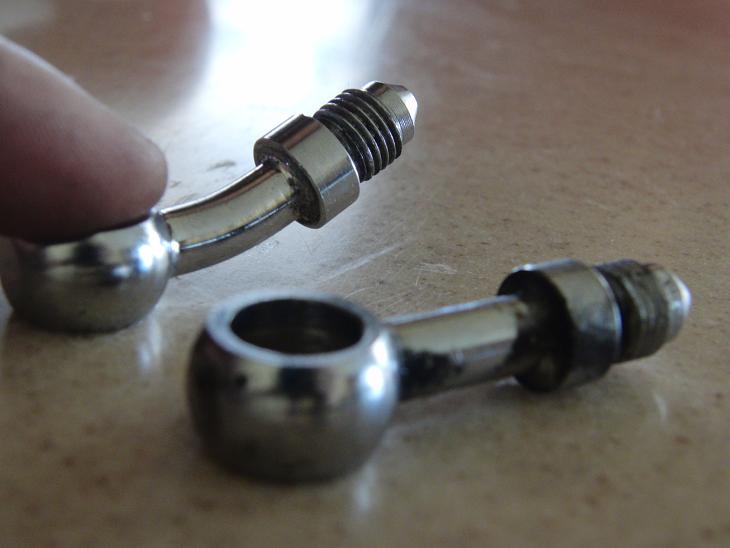
The reason this whole upgrade movement kicked off...
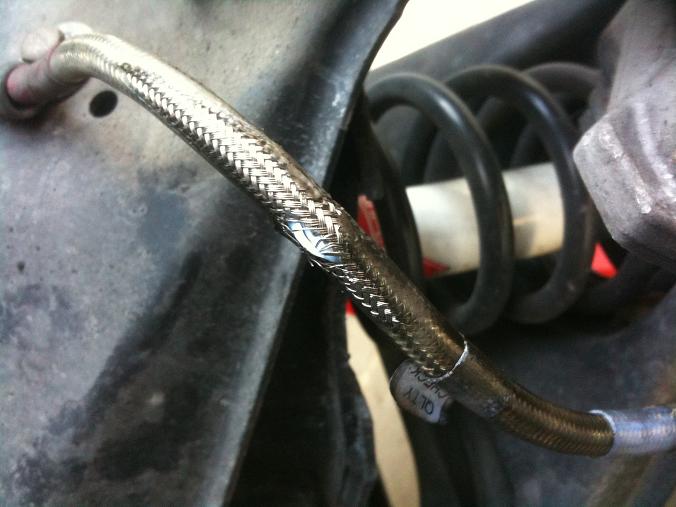
This happened because the line rubbed the inside of the wheel, not to worry, this failure occurred in my driveway while I was pressure testing the brakes. The pedal was sinking sometimes. So I started the car in the driveway, and held the brakes as firmly as I could, then the line burst. To re-iterate, this would have never happened if I was more careful when checking for line clearance, not because of the quality of the lines. I replaced these lines with the same model ones. This gave me the spare fittings to do some test bending on.
This was the final layout in the front. I found that orienting the brake line clamp as shown here was the only combination that worked flawlessly when the wheel was turned to either side, and at the most extreme travels of suspension. Nothing rubs, and the line is very unstressed. It's the magic combination I was looking for.
IP: Logged
05:13 PM
Jan 12th, 2011
mera7 Member
Posts: 1355 From: piedmont oklahoma usa Registered: Sep 2009
I bought some front rotors for an 87 C4 from Pep Boys. They are 11,5. I googled around for the size of the C4 rootors and I have not come across one site that say C4 have 12 inch, all say 11.5. What am I missing here?
------------------ Stefan - Fiero Miami - T-top - 88
They might need to be heated up to slide in place, but then they stay there and the rotor could slide over them.
Once you figure out a price for these adapters I might be interested in up to 3 sets.
I ordered a set of these rings, the 70-5710, off of Amazon, $9.02 with free shipping. Downside was that it took over three weeks to get shipped and another week to arrive. They look nice. Though plastic, it's a very hard plastic, hard enough that they ring like ceramic. Nice thing is that plastic will not rust in place, so rotors will always be easily removable.
IP: Logged
10:00 AM
Mar 23rd, 2011
FieroMiami Member
Posts: 69 From: Miami, FL, USA Registered: Oct 2010
Lowered or not, this upgrade is not for people that do not want to cut 3-4mm off their control arm
I grinded like 0.5 to 1 mm of the control arms but the discs are rubbing the lower arms hard so I will need to put on 3mm spacers. In reality this also means that the brackets would need to be grind off 3 mm but at that point I don’t know if they have enough strength, they probably do but probably not enough threads… would need to weld a nut on there.
So the quick solution will be to shave 2-3 mm off the outer brake pads, that are slim from the start on a fiero. This will also move the front wheels out and they are too much out on the 88s from the start and also increase the scrub radius.
I guess my conclusion is that the corvette discs are just not a good option for the front, they are too deep. Somebody mentioned VW golf rotors that are already 5x100 and maybe they are shallower. I checked NAPA and the VW rotor are 11.3 and about 0.4 too shallow instead of 0.4 inch too deep for the Corvette rotors. VW is also too thick so not an alternative for stock calipers.
My car is not, to my knowledge, lowered and still looks too high in the front like all 88s
Could not somebody in the business look up a 3mm shallower disc than the vette ones?
------------------ Stefan - Fiero Miami - T-top - 88
IP: Logged
08:23 PM
MadMark Member
Posts: 2935 From: Owosso, Michigan, USA Registered: Feb 2010
I have the same adapters on my 88 GT and don't have the problem with interference that you do on the disks up front. I wonder what is different with yours? If it makes a difference I rotated my front calipers up with the adapters. These adapters can mount either way and mounting them so the calipers go up a few degress worked for me. However, you are describing an interference with the disk rotor in some way. So I guess I don't understand what your problem is coming from.
IP: Logged
10:32 PM
Mar 24th, 2011
FieroMiami Member
Posts: 69 From: Miami, FL, USA Registered: Oct 2010
My guess is that it depends on different production runs of the lower arms and or spindles. If you have the right combo, great, but if you don’t you are out of luck…. Still works if you wanna cut of the control arm tip or use spacers so it would be better to use other discs and as a result other brackets.
The brackets were great though, but the whole principle of this upgrade may not work without significant tweaks.
------------------ Stefan - Fiero Miami - T-top - 88
There are no clearance issue with my brackets, they were perfect. The Clearance issue is between the disc and the lower control arm as described by several people. I have tried two different rotor brands, my car is not lowered.
The right way (one alternative) to do this would be to make the bracket so it allows for a 3mm spacer behind the disc.
Also note that you need a couple of mm clearance to allow for the suspension movements. This would mean that you have to cut like 4 mm off the lower control arm if you don’t use spacers. Control arm is made of profiled 3mm steel so you would cut away the whole profiling which gives it its strength = NoNo!
I will get the spacers today and will need to grind down the brake pads 3mm to put it together…
------------------ Stefan - Fiero Miami - T-top - 88
IP: Logged
09:22 AM
fieroguru Member
Posts: 12639 From: Champaign, IL Registered: Aug 2003
It is the lower edge of the nose on the A-arm that has the interferance issue with the rotor. This interferance issue is more common on lowered applications and more common on the driver side vs. passenger (driver's weight I assume). As the lower A-arm becomes parallel with the ground and starts to angle upward and the bottom lip of the A-arm will become closer and closer to the rotor. Rounding the bottom edge of the nose on the lower A-arm will prodide the needed clearance w/o removing all the material at the nose. It is a perfect swap, nope, but for the simplicity of the install, very low upgrade costs and amount of braking increase, it is a very difficult swap to beat, which is why it remains so poplular even with the need to clearance the lower a-arm nose on some installations.
This is at full droop:
The rotated style caliper brackets can have interferance issues between the caliper and upper a-arm (again more common on lowered applications). The rotated style raise the bracket and the lowered stance brings upper a-amr down closer to the caliper as well. The interferance only happens at full lock and it took me a year to notice the reduction in turning radius (I started swapping out between 2 88's). The caliper brackets that just offset the caliper outward do not have this issue.
[This message has been edited by fieroguru (edited 03-25-2011).]
IP: Logged
10:06 AM
Aug 8th, 2011
Raydar Member
Posts: 41580 From: Carrollton GA. Out in the... country. Registered: Oct 1999
I have had a set of (offset) brackets, rotors, and rings in my garage for... ever, it seems. Had to drill one rotor, and clean up the other three, and I'm ready to try this.
I saw a lot of pics that show the front caliper rotated upward. I only saw one pic of the rear, that also seems to show the caliper rotated upward. Is that correct?
My stock brake lines are in decent shape. I'm hoping there will be no surprises with the installation.
So... we have the tip of the LCA that might contact the rotor. (Grind or bend as necessary, trying not to compromise the integrity of the LCA.) We have the caliper that might contact the UCA. (Massage with a hammer? Or put up with it?) Possibly thicker rotors. Check.
I'm using 17" wheels, by the way.
Am I missing anything? are there any other suggestions?
Thanks.
------------------ Raydar 88 4.9 Formula IMSA Fastback Read Nealz Nuze!Praise the Lowered!
IP: Logged
10:56 PM
Aug 9th, 2011
Raydar Member
Posts: 41580 From: Carrollton GA. Out in the... country. Registered: Oct 1999


 Should have built them myself the first time out.