After doing so research I have decided to attempt to fabricate my on design extractor hood scoop. I am roughly following Archies Warber design and using his dimensions for the layout. I'm a novice at best at fiberglass work and have never tried to mold anything with it before. So, it's a first time.
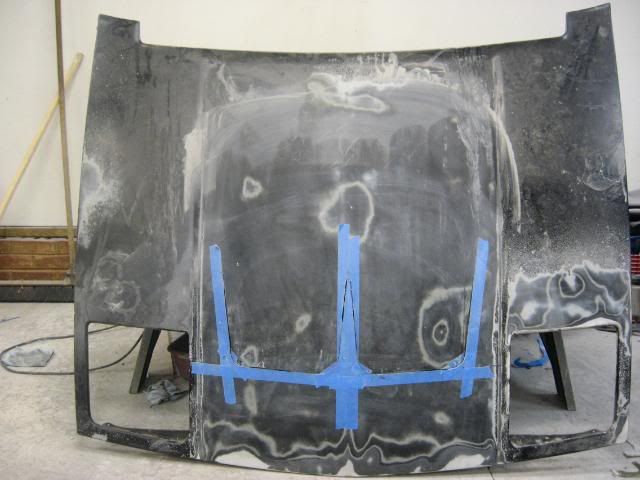
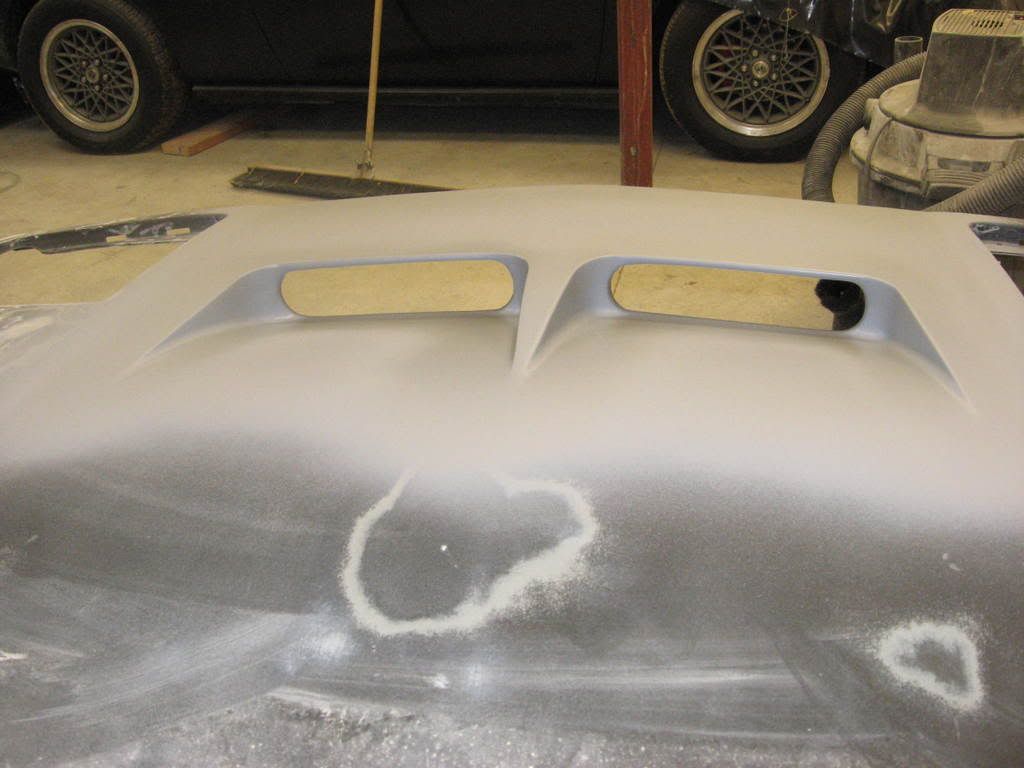
The first step was to clean up the old spare hood and layout the openings on the top side. Instead of one opening I have chosen to try to do two openings. Both are 9" wide and the side cuts go back approximately 9 1/4". I put a 1 1/2" radius in the corners to avoid the square corner look and hopefully have a smoother appearance on the finished hood. Here is the layout on the hood.
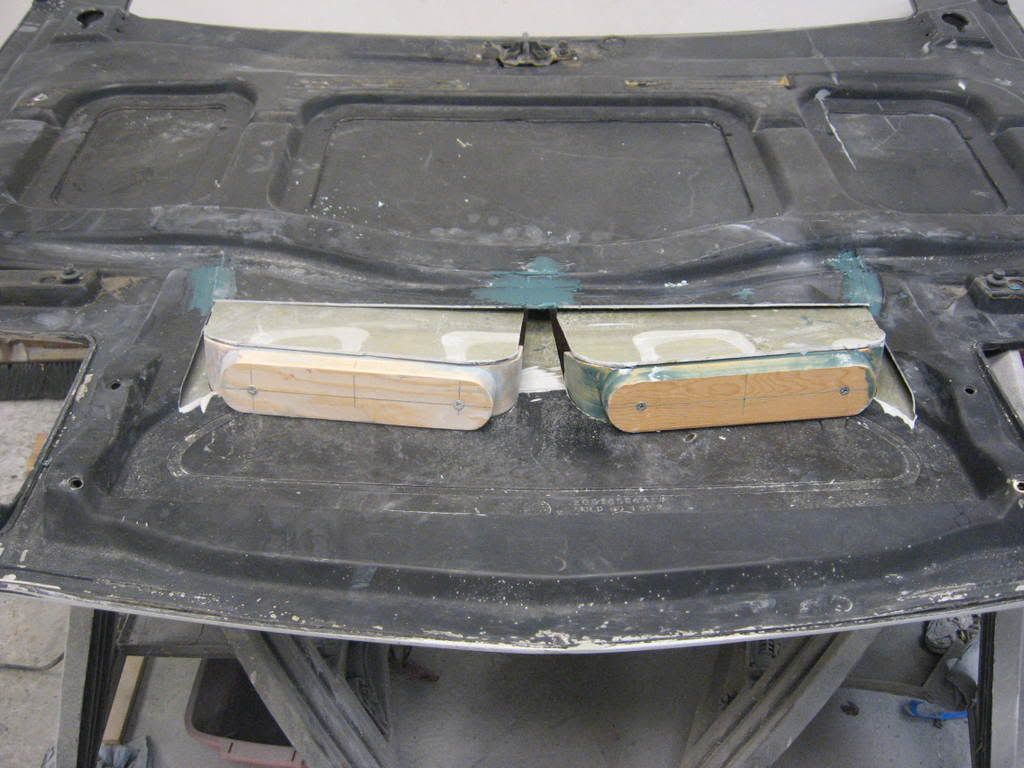
After doing the layout and checking the dimensions twice I used my 4 1/2" angle grinder with a cutoff wheel to cut through the top layer of the hood SMC. Do not cut into the hood support structure yet. To cut the radius I used a jigsaw with a metal working blade to get a smooth cut. Now flip the hood over and observe where the cuts are and where the hood seal surface is . Measure back (torwards the front of the hood) about 1/4" from the seal land and make a straight cut across the hood support structure from the left side cut to the right side. Next cut from the side of the hood hinge support to the line you just cut on each side. Then using a chisel seperate and remove the surplus hood structure. See pics below for more detail on the cut.
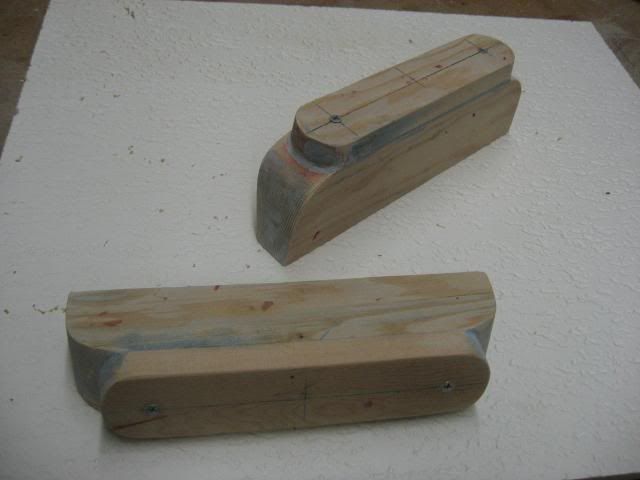
Now with the hood cut it's time to make the "Plug" blocks. I used what ever was laying around. In this case it was some left over fir. But, before I cut the fir I pushed down the newly cut extractor portion of the hood and place a piece of 1/4" plywood under the hood and above the extractor "flap". Then I traced the exact profile of the opening onto the plywood to make a template to cut the plugs by. I chose to make my extractor opening a full 2" so I cut a block 2" and proped the extractor vent open and used some cardboard to mark the profile of the opening in the vertial direction. I found that the angle was ~ 18 degrees. So next I set out to make the plugs, I used the plywood template to mark the fir and cut them out using a ban saw. then a used a table saw to cut the plug blocks at the 18 degrees angles. Take a look a the plugs below and you will get the idea.
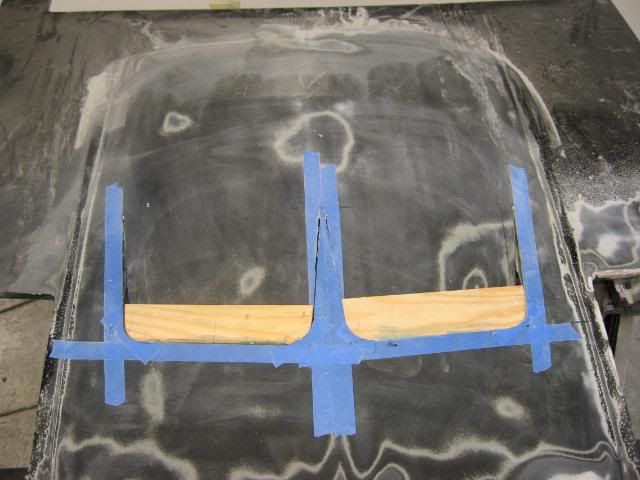
To form the actual openings I cut two pieces of wood 8" L x 2"w and put a 1" radius on each end then attached the opening profile blocks with wood screws. Next I used some filler and filled any voids on the plugs and sanded smooth. Now it's time to check the plugs for fit.
Now that we have test fitted the plugs in the hood it's time to give them two coats of laquer sanding sealer to seal the wood and make it smooth and slick. After the laquer is dry use a scotch brite pad and remove any roughness that the laquer has and finally give the plugs three good coats of wax. You should use fiberglass mold release wax but I did not have any so I just used regular car past wax. Take time here, wax on, let it dry buff it off, and repeat three times! This is the mold release so we hopefully can get the plugs out when we're done.
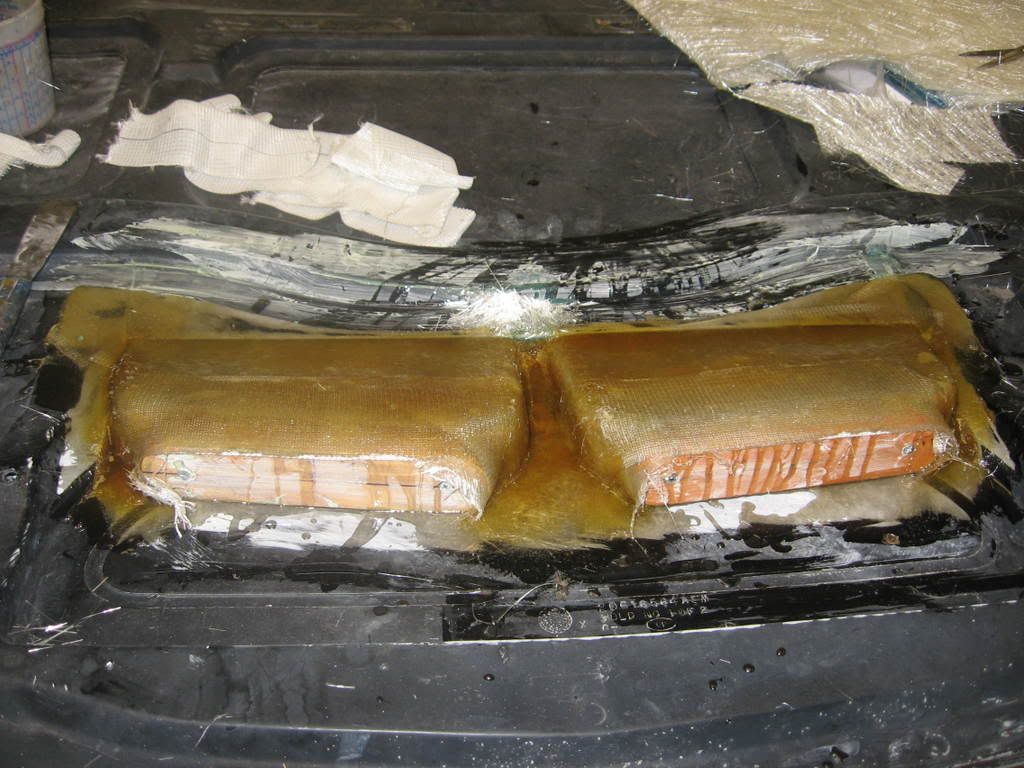
After the waxing is done, it's time to place the plugs back into the hood. I sealed any remaing gaps between the plugs and hood masking tape. Here clay can be used but again did not have any at the time. Once the plugs are in it's time to lay the glass. I started out with three layers of 1oz woven glass followed up with two layers of 6 oz mat and topped with another layer of woven. Now it's starting to look like a hood scoop.
Now if I'm lucky we can use a block of wood and a hammer to knock the plugs out.
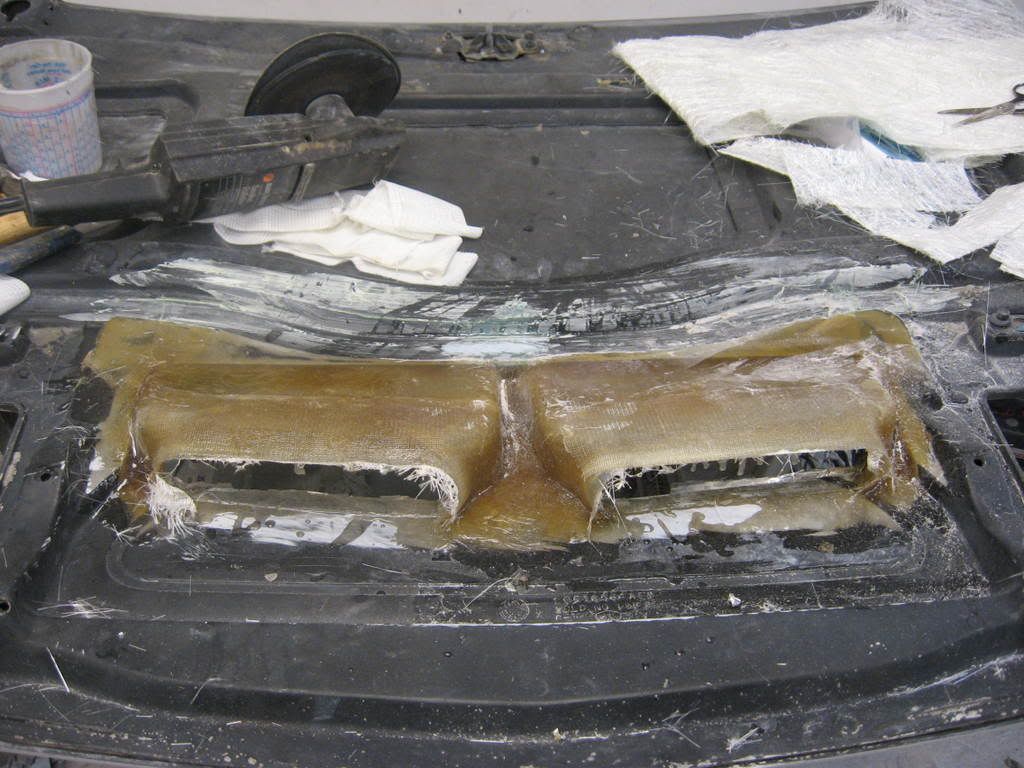
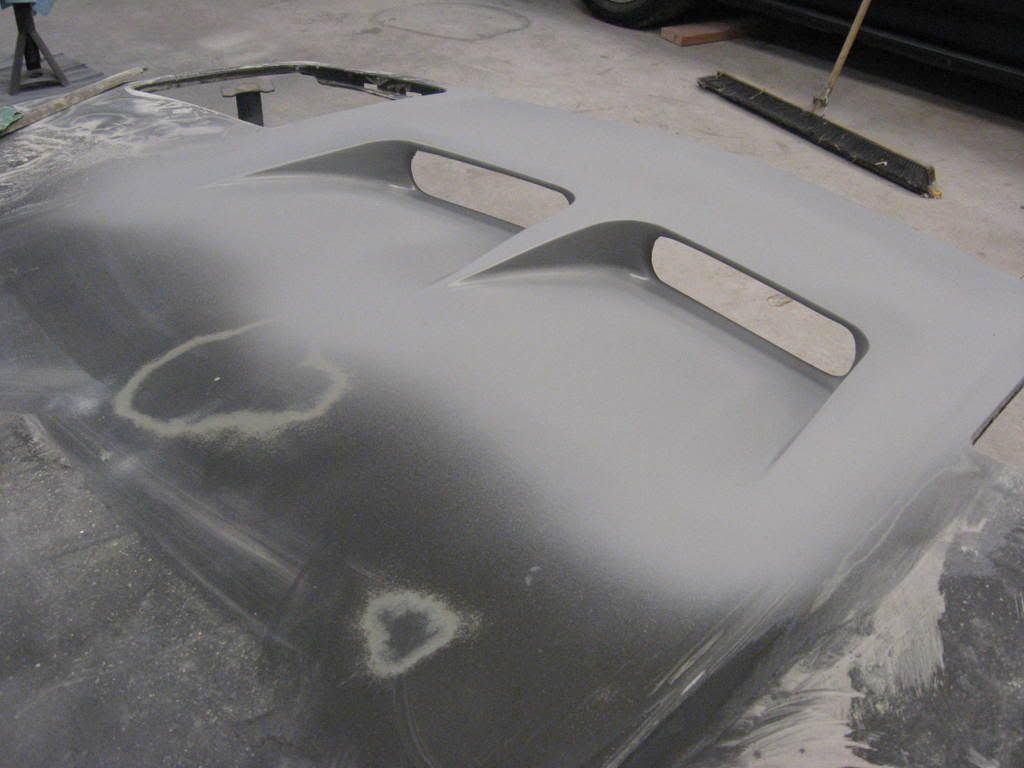
After getting the plugs out (popped right out), the fiberglass is trimmed up, I started to apply some filler on the top side of the hood to make the fillets around the bottom edges. I found that I could take the end of a hacksaw blade and use it as a scraper to form the 1/4" radius around the entire lower/side corners. Followed up with some 100 grit wet/dry to smooth it up.
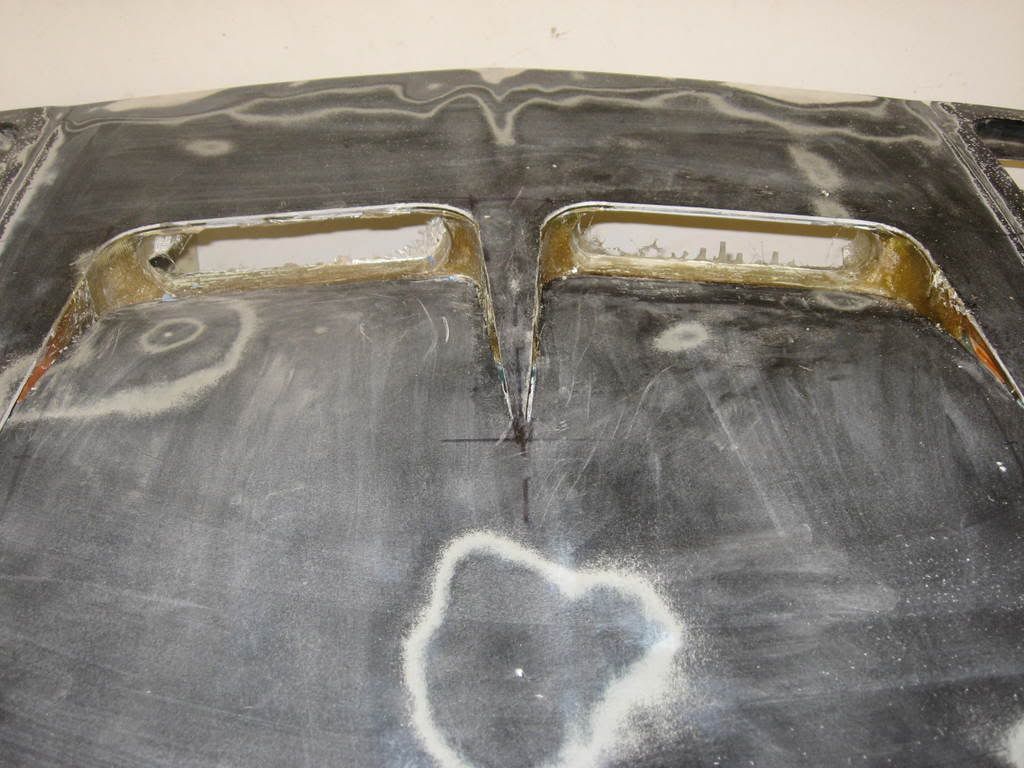
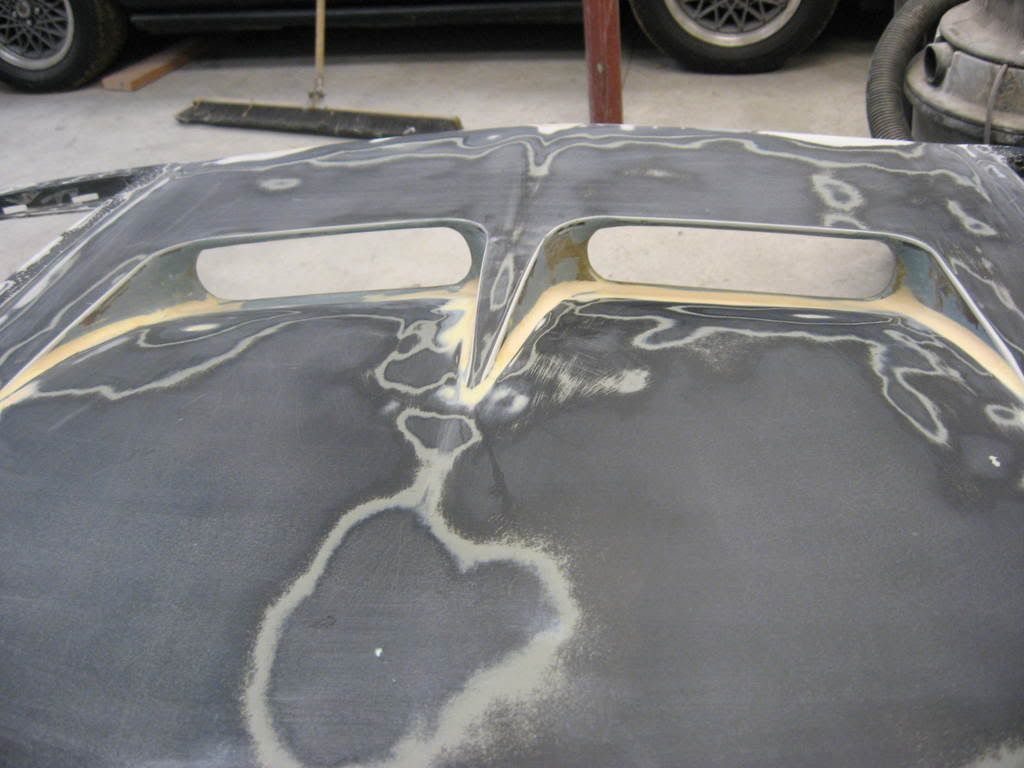
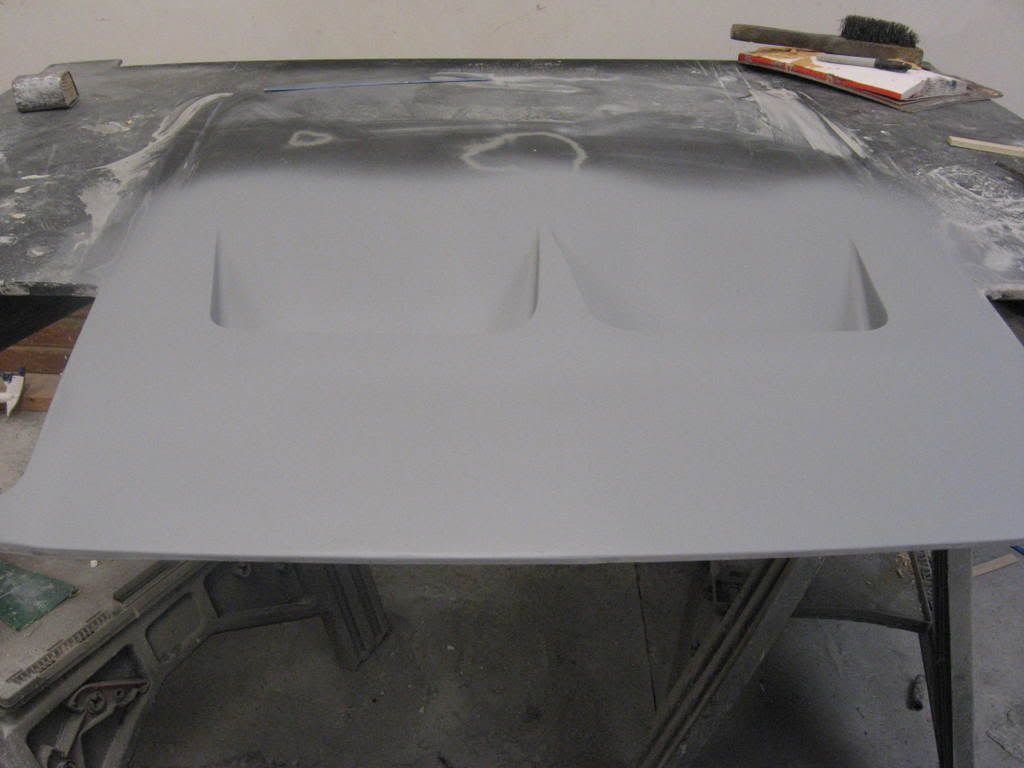
Now I'm ready to put down some 2K filler primer. Two coats of 2K and tomorrow we'll start final wet sanding and filling any small voids.
After I get the top side finished I will put a skim coat of filler on the bottom side to "smooth" up and blend in the glass then finish up the hood for final paint. How do you guys think it looks? Ideas? I was thinking about maybe adding a raised lip arount the profile to add a detail dimension...... Tired of sanding though..
Hey Tom, that looks great. You say you have not done glass work before? I would have never guessed that. Do you have plans for some kind of mesh in the openings or just going to leave it open? I think a little "lip" would look nice and give it some definition. Again, looks great. I may grow some hair and try this myself - I have a spare hood so if I goof it up - it won't be a big loss. Thanks for sharing your work. I'm inspired now!
Pat
IP: Logged
09:43 PM
Archie Member
Posts: 9436 From: Las Vegas, NV Registered: Dec 1999
The only glass work that I had done before was to do some repair work on my boat. Mostly gelcoat. It's not that hard and lots of info out there, I figure that if I could do it it would be worth posting. Definately not an Archie job but I think that it's satisfactory results. It's looking OEM now.
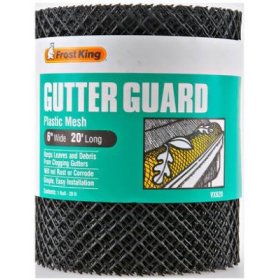
I do plan on putting an expanded metal mesh over the openings painted satin black. Not sure what I am going to use yet, thinking about some gutter guard from Lowes, suggestions?
IP: Logged
09:48 PM
oldfiero Member
Posts: 142 From: Graham, NC, USA Registered: Nov 2007
Geeze, that's alot simpler than I would have thought... I've always liked those hood-vents, but had no idea how to go about actually making them... Thanks for posting this thread! Maybe some day when I get a spare hood I'll tinker with the idea.
IP: Logged
09:57 PM
Mike Gonzalez Member
Posts: 5093 From: Colorado Springs, CO. USA Registered: Jul 2001
Get some extra rear deck vent and use the honeycomb screen off of them. You just got added to my Fav's, I've been sketching hood vent designs and this looks almost identical to what I was going to do ! Great Job !
IP: Logged
09:58 PM
Mike Gonzalez Member
Posts: 5093 From: Colorado Springs, CO. USA Registered: Jul 2001
I used polyesther resin and a combination of woven and mat glass. I did use a 50 grit wheel on my grinder and scuffed the surfaces that I would be adding glass to. I also applied wax to the surfaces around the area where I did not want the resin to stick, like on the seal surface. The adhesion was equal to or better that the adhesive that was used to bond the lower and upper hood members together with if that helps any.
I have the plug blocks available if anybody wants them, make me an offer...... I could make more to if there is intrest.
Tom
IP: Logged
10:16 PM
anwalker Member
Posts: 243 From: High Point, NC Registered: Aug 2007
That's a great job. For future reference you should grind with 24 grit for better adhesion, & you shouldn't use the cloth at all (just 3 to 4 layers of ounce-&-a-half mat). I also prefer the look of a lip on the top edges (as mentioned above). Polyester resin is not the best, either... Check out my hood vent posts for info on where to get expanded mesh. I think the one in the mall "Angel vent hood scoop for sale" has it. ~ Paul aka "Tha Driver"
IP: Logged
11:58 PM
Jan 19th, 2009
oldfiero Member
Posts: 142 From: Graham, NC, USA Registered: Nov 2007
Thanks guys, on my scoop there is not lip at the bottom but is a smooth transition to the vent opening so that water does not pool up behind the vent opening. The water just simply drains into the area behind the radiator then on to the ground. The functional aspect is that the vents provide a way to air to escape from behind the radiator and over the car to help reduce the pressure behind the radiator and the headlights popping up at speeds over 110 (so they say)... Plus helps reduce the positive lift issues on the front end. And finally, lt looks better.
The reason that I chose to use the woven/knitted cloth was two fold, 1 I had it on hand and 2 this cloth comformed to the tight radius around the opening plugs much easier than the mat. So after a couple of layers of the cloth around these areas the radius was larger and the mat layed in well. As for the resin what would you recommend over the polyesther so that others that may be interested in trying may learn from my mistakes?
On the raised profile around the openings how do you guys in the know suggest building it up other that just adding body filler? I was thinking about cutting some thin strips of SMC to the vertical profile of the proposed detail then filling to it. Still that would be a lot of filler sitting on the hood. Suggestions?
Thanks for the leads on the screen. I was thinking that after I painted the hood I would install the screen using hot glue, that way it could be removed fairly easy if needed for repaint etc.
Nic, its a Fiero not a mustang, but the light idea is cool...... Maybe....
may be a stupid question but what keeps the rain out of the front of car, trunk area? does look great however. any driving benefit
If you look under your hood, you'll see the radiator-area is seperated from the trunk area by a wall with a gasket on the top of it that goes all the way around the trunk. These vents don't interfere with that, and are only over the radiator area.
I've heard people make the claim that it raises the cars top speed, and increases horsepower.... dunno about that, but it definitely helps keep your engine cooler, because there's alot more free-flowing air through the radiator at-speed, since it doesn't just hit the back of the wall and wash back in odd directions. Makes the radiator much more efficient.
For the raised sections, you could carve up some foam and fiberglass over it. If you're using polyester resin, don't use styrofoam. Use urethane foam instead.
[This message has been edited by Blacktree (edited 01-19-2009).]
The reason that I chose to use the woven/knitted cloth was two fold, 1 I had it on hand and 2 this cloth comformed to the tight radius around the opening plugs much easier than the mat. So after a couple of layers of the cloth around these areas the radius was larger and the mat layed in well. As for the resin what would you recommend over the polyesther so that others that may be interested in trying may learn from my mistakes?
On the raised profile around the openings how do you guys in the know suggest building it up other that just adding body filler? I was thinking about cutting some thin strips of SMC to the vertical profile of the proposed detail then filling to it. Still that would be a lot of filler sitting on the hood. Suggestions? Tom
Big no-no using the woven cloth on the top surface. It has a bad tendency to "print through", showing the woven pattern in your painted surface after awhile. All you need is a very small amount of bondo (SMC filler) around the edges to make a lip. The lip dosen't need to be big (high) enough to warrant using any strips or foam. Just enough to keep it from looking so flat. ~ Paul aka "Tha Driver"
[This message has been edited by Tha Driver (edited 01-19-2009).]
IP: Logged
01:22 PM
RCR Member
Posts: 4453 From: Shelby Twp Mi Registered: Sep 2002
Paul, Thanks for the inputs, I had read about the print though on finish coats so I skim coated the interior with short hair filler. I hope that does it. I got one coat of 2K on it now and did an initial sand this afternoon before the wife caugh me and "re directed" my efforts to helping her paint in the house. Hard to cruse in a hallway.... I 'm planning on laying down three coats or until flat.
Hopefully in the next couple of days I will get the rest of the hood preped and the filler primer layed down and sanded. I'll try and post more pics as I progress.
Tom
IP: Logged
05:55 PM
oldfiero Member
Posts: 142 From: Graham, NC, USA Registered: Nov 2007
Paul, second question do you make the lip free hand or cut a pattern in a scraper or something to make it consistant around the edges? Doing something like that free hand is pretty much art work to me and I can't even draw a straight line.....
I do think that adding that detail would really set it off though, Worse case is that if it don't work out, I can just grind it off and sand smooth, right?
Oh the turn signal lights that Nic posted is off his 67 GT Mustang.
I find it eaiser to cut a bondo spreader to the shape I want. You have to keep in mind that you will need to lean it forward about 45 degrees when spreading, so the pattern needs to be deeper than the shape. Also, have the inside edge drop straight down below the surface of the hood, so that you can just drag it around the edge as a guide. You'll want to use a wooden dowel or peice of 1/2" CPVC (or something similar) to wrap your sandpaper around when doing the finish work on the leading edge. Work it both straight back & forth & at a 45 degree angle to feather it in without forming a groove. Don't worry about the top untill you have everything shaped & with a sharp point at the top, then you can eaisly sand the top to the radius you want. ~ Paul aka "Tha Driver"
IP: Logged
06:30 PM
oldfiero Member
Posts: 142 From: Graham, NC, USA Registered: Nov 2007
OK, I think that I'll give it a try as may be the weekend before I can get back to it so, pics may be slow in coming. Paul, say about 1/4" height and maybe ~ 3/4" wide? I've seen one in the archives somewhere but can I can't seem to find it again. I'll look again later this evening. Do you recommend a glass filled filler or a lite?
Shaping an applicator is what I did to lay the filler for the radius on the inside the scraped it followed up with sandpaper wrapped around 3/8" fuel line. That worked pretty good for getting around the compound curves.
Tom
Yeah 1/4" & 3/4" sounds about right. Dosen't need to be any bigger. I would use SMC filler (no need for fibers); make sure you grind the primer back off down to the SMC. ~ Paul aka "Tha Driver"
IP: Logged
11:35 PM
Jan 20th, 2009
exoticse Member
Posts: 8655 From: Orlando, Fl Registered: Jun 2003
Thinking about adding the lip detail around that outside edges tapering off on the trailing edges and maybe laying in some LED turn signal lights that nic suggested in the detail above the vent openings....... I did go back into the archives and found the hood that was done like that less the signals. Probably will be the weekend before I can get back to it.
Oh, the plug molds are taken. Could make more if anyone is wanting them.
Tom
IP: Logged
03:20 PM
oldfiero Member
Posts: 142 From: Graham, NC, USA Registered: Nov 2007
Yeah, I though that you would say that.... It's what I had so I stuck it in to see what it would look like. Noticed that a box fan in my shop has a grill on it that looks very simular to the mustang inserts having the horizontal slats on ~ 1/4" centers..... Fan may be missing a guard soon....
IP: Logged
10:10 PM
PFF
System Bot
anwalker Member
Posts: 243 From: High Point, NC Registered: Aug 2007
Yeah, too big IMO. Funny you mention the fan: I had a fan go bad, & saved the grills from it. If you want one let me know &I'll locate it, & you can come by next time you're around or we'll find a way to get one to you. ~ Paul aka "Tha Driver"
IP: Logged
12:11 AM
oldfiero Member
Posts: 142 From: Graham, NC, USA Registered: Nov 2007
Paul, thanks for the offer.... I'm going to keep poking around a bit should be able to find something laying around that is unique and looks good. Guys, any suggestions to try?
Tom
IP: Logged
12:54 PM
anwalker Member
Posts: 243 From: High Point, NC Registered: Aug 2007
I like the products on Mcmaster Carr Page 3677 or something similar to part number: 9344T27 or 9344T55 may look nice. Their prices are expensive but I think you could do better.
IP: Logged
01:54 PM
anwalker Member
Posts: 243 From: High Point, NC Registered: Aug 2007
This was some old expanded metal I had laying around......I kind of like the mustang look posted above so I'm kind of looking around for something simular like my box fan guard in my shop, but it's plastic, don't know how well it would hold up.
Tom
IP: Logged
04:21 PM
Patrick Member
Posts: 39282 From: Vancouver, British Columbia, Canada Registered: Apr 99