Pennock's Fiero Forum
  Technical Discussion & Questions - Archive
  Need Help on T-top Seal Install

T H I S   I S   A N   A R C H I V E D   T O P I C
  

Email This Page to Someone! | Printable Version


Need Help on T-top Seal Install by bowrapennocks
Started on: 08-26-2009 03:53 PM
Replies: 18
Last post by: bowrapennocks on 11-04-2009 09:05 AM
bowrapennocks
Member
Posts: 872
From: Seattle WA
Registered: Jun 2008


Feedback score: N/A
Leave feedback

Rate this member

Report this Post08-26-2009 03:53 PM Click Here to See the Profile for bowrapennocksDirect Link to This Post
I am in the process of replacing the seals on my 1987 T-top and would like to get some ideas from those who have gone before. Based on previous posts, I decided to go with F-82 (1982-92) Camaro/Firebird seals. I realized that the bottom of the A pillar was quite different and other folks have grafted the Camaro seals to the existing Fiero seals. I wanted to minimize the cutting of the seals, so I ordered a set of F-82 Camaro seals and a set of regular Fiero seals. Using new seals, it looks like I have to do seams in only three places.

First the A pillar: In the picture below, I show three seals (1) New Fiero store seal on top, (2) Camaro seal in the middle, and (3) existing Fiero T-top seal on the bottom. The A butt joint is an exact match. I was planning on joining the new Fiero seal to the Camaro seal at roughly the point shown with the arrow. This would allow me to have an exact fit at the bottom of the window, and only one seam on the A pillar.


The two seals are both hollow and have slightly different cross sections. I was planning on gluing them together with super glue (regular or gel?). I was also thinking of putting some low density foam inside the hole on either side of the joint. Any comments or suggestions on the approach?

Next the center of the T-top: I plan to section the seal that goes around the T-top itself in the middle as shown. I saw this on a Yellow 88 Formula at the Carlisle PA Kit Car Nationals in May. This car was from Poughkeepsie NY. He used Mustang seals and had to do a lot of cutting and gluing overall on his seals. This approach to the center section seems to be common for all seals adapted to fit a Fiero, and appears to be a very workable solution. The NY guy used super glue, which I plan on using as well.


Finally the B pillar: I plan to glue together below the B butt joint as shown. Note that the B Butt joint is not an exact fit and based on previous posts on Pennock, a little metal had to be cut from the body to make the bend in the seal fit better. I plan to glue the two seals together in the same way as the front seal in the placed as shown.


Any comments, suggestions, and improvements on my approach would be much appreciated. When I get this done, I plan on posting the complete install on Pennocks.

Thanks
Jim

------------------
Jim

86 SE 355 Body Kit w/3.1 Auto (Sold)
87 T-Top Coupe 2.8/5 Speed new project

IP: Logged
PFF
System Bot
sjmaye
Member
Posts: 2468
From: Hendersonville, TN USA
Registered: Jun 2003


Feedback score:    (13)
Leave feedback

Rate this member

Report this Post08-27-2009 04:28 AM Click Here to See the Profile for sjmayeSend a Private Message to sjmayeDirect Link to This Post
I will watch your post here cloaely. I am lucky enough that my t-top seals are still in good shape. Only issue is that one of them was not installed right and there is a slight misalignment between the Apillar and the t-top on the passenger side. I believe I would have to break the seal loose and reset to get it in the right position. Not going to do it. Afraid of damage.

What I can offer you is what came out of the discussion on my thread dealing with gluing of weatherstrip. I used common super glue, but apparently there are some better suited for gluing this stuff. Check this post out.

https://www.fiero.nl/forum/F.../HTML/102703.html#p5
IP: Logged
Fierofreak00
Member
Posts: 4221
From: Martville, NY USA
Registered: Jun 2001


Feedback score:    (20)
Leave feedback


Total ratings: 170
Rate this member

Report this Post08-27-2009 01:01 PM Click Here to See the Profile for Fierofreak00Send a Private Message to Fierofreak00Direct Link to This Post
Post lots of pics...I'm watching this with eager anticipation...Mine are in ok shape, and only leak under hard rain..but I know I need to replace them at some time. -jason
IP: Logged
fyrebird68
Member
Posts: 725
From: Cincinnati, OH
Registered: Jul 2008


Feedback score:    (17)
Leave feedback

Rate this member

Report this Post08-27-2009 04:26 PM Click Here to See the Profile for fyrebird68Send a Private Message to fyrebird68Direct Link to This Post
 
quote
Originally posted by sjmaye:

I will watch your post here cloaely.


Me too....
IP: Logged
bowrapennocks
Member
Posts: 872
From: Seattle WA
Registered: Jun 2008


Feedback score: N/A
Leave feedback

Rate this member

Report this Post08-31-2009 11:48 AM Click Here to See the Profile for bowrapennocksDirect Link to This Post
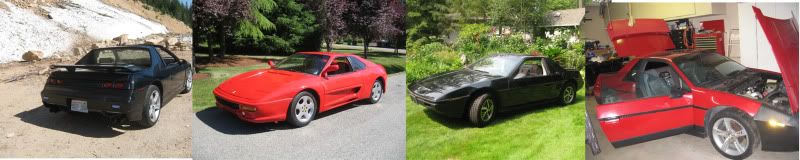
Just a step back for a moment. I decided to replace the seals because there were a few leaks that I could not stop. When I bought the car, it had been sitting outside in the rainy Northwest for perhaps 15 years, and was dry on the inside. Of course, once I removed the T-tops and opened and closed the doors a few times, things changed, or perhaps my water leak tests were more forceful then the rain. Anyway after having done all of the work on the car, I did not want it turning into mold city.
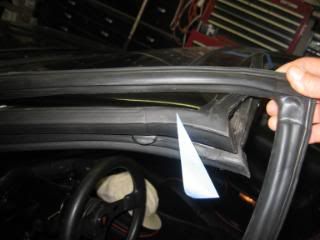
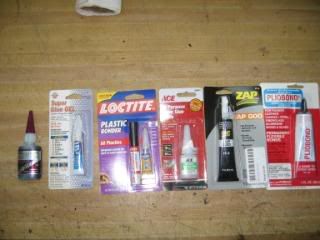
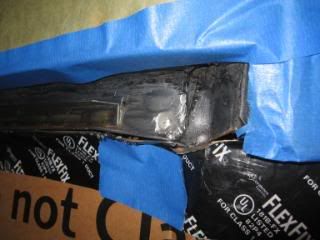
It is much easier to see the leaks before the carpeting and trim pieces are installed. After my first trip to the car wash, there were leaks everywhere. The first thing I did was to try and identify the actual place of the leaks. I came up with way of checking how well the seals worked by coating them in a drizzle pattern using Sil Glyde, a silicone grease meant for sealing O-rings, and coating weather stripping. I bought a tube from NAPA and put it in a plastic syringe, available at hardware stores. I used this syringe to apply the grease to the seals. Below is a picture of the driver’s side B-butt joint with silicone grease applied:


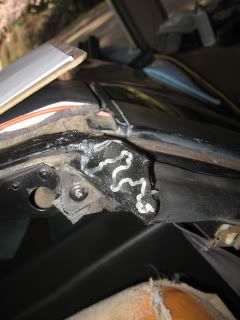
After I put the grease then I installed the t-tops, rolled up the windows, shut the door, then took everything back apart. You can see how well things are sealing by looking at how much the silicone is squished. In my case, the B butt joint looked fine from the outside with the doors shut, but was a different story when I removed the T-tops. The pattern was virtually intact. I did this for all weather strip areas to identify the leaks. I solved the leak problems by shimming the back side of the weather strips with closed cell foam. I got mine in rolls from
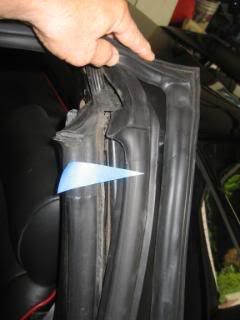
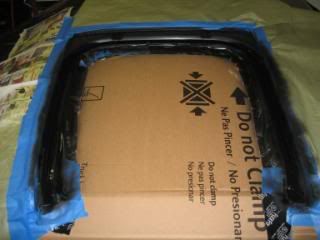
http://www.findtape.com/?SSAID=232256

As I worked through the problem areas, the B butt joint on the driver side was leaking and I was not prepared to move the seal (i.e. unglue it from the back), so I added some foam tape on top as follows:


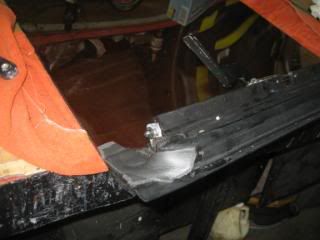
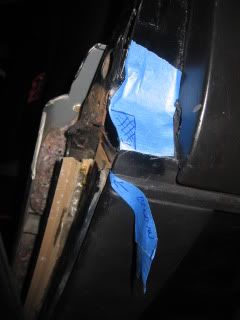
This approach cured all of the major leaks, so I put a sprinkler on the car and let it run for quite some time. I ended up with smaller more troublesome leaks inside the space frame as indicated by the arrows on the tape behind where the speaker goes is harder to see. The second one .


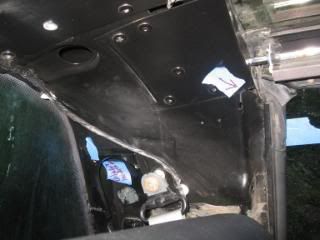
These leaks were small and would probably not even be noticed in a car with the interior installed. This would lead to a long term problem as there is no drain at the bottom, and the inside would remain wet.
The water was running down the inside, behind the speakers, and also inside by the rear latch pin of the T-tops. At first I thought that it was the seal between the back of the roof and the T-top frame, so I pulled off the rear trim piece. This was quite a struggle, after removing the pop rivets, as it was really glued down well with Butyl. I slowly worked it up and managed to remove it successfully without breaking it. I thought it was aluminum, but in fact it is plastic. I did this before the car was painted


I gouged out all of the butyl which was amazingly flexible after all of those years. I cleaned it up with paint thinner, sanded the metal, painted, and primed it. I then re-caulked it with Butyl and replaced the trim strip. Recognizing that I might have to remove the trim strip, I placed some plastic from plastic zip lock baggies between the butyl and the trim strip so that if I had to remove it again it was not going to be solidly glued down. There are clips in the rear that hold the back down. After reassembling and doing a water test again, the roof still leaked in the same spots. I drilled out the pop rivets again and pulled off the trim piece, which this time came very easy. I applied more butyl and replaced the trim piece again. After another water test, the roof was still leaking. I finally concluded that it was never leaking in the joint that I re-caulked, but rather the water was working its way around the back of the T-top seal just above the B butt joint. I slowly and carefully removed the T-top seal. Luckily, the glue was dry and separated pretty easily using screwdrivers and putty knives.


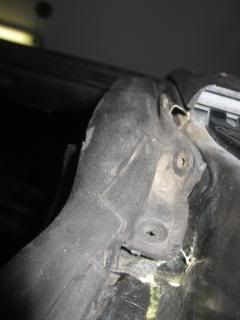
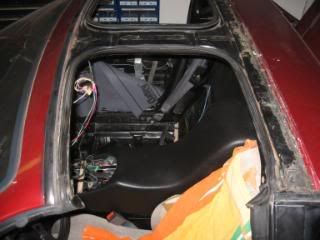
The first potential source of a leak is a pop rivet as shown below. It is just above the “a” on the cardboard. The center of the pop rivet was hollow. I wire brushed the frame, and epoxied over the pop rivet.


Then I cleaned, primed and painted the frame


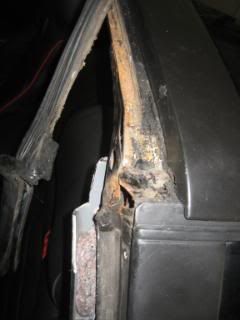
Then I started looking at the design of the T-tops and found this troublesome problem


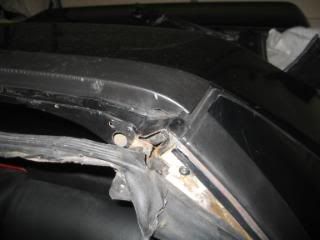
When the Fiero roof frame is cut to install the T-top, the end of the sheet metal (U shaped piece) is left as is. Apparently when the T-top seals are installed, this cavity is filled with some sort of caulking, which in my car had come loose. The back of the T-top seal rests against the edge of the U shaped channel providing a very poor seal especially after the caulking dries up. My best guess is that my car was leaking around the back of the seal. Also note in this picture that the pop rivet is no longer visable. It has been epoxied over and painted.

This area must be dealt with before seals are reinstalled. I am now considering alternatives as to what to do. The first question is: Do I reinstall the existing seals or adapt the Camaro/Firebird seals?
If I keep the Fiero seals, then I plan on filling the end of the U with epoxy to provide a good back surface for the seal.

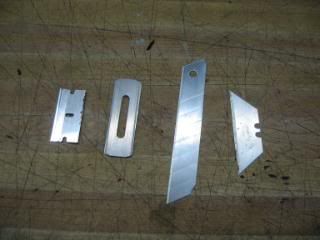
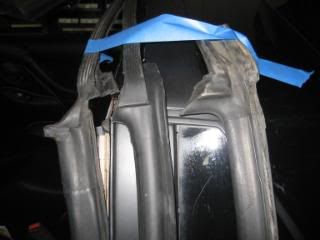
If I use the Camaro/Firebird seals, then I have more complex issues to deal with. Since these seals do not have the jog, I may to cut some metal as others have done. Below is a picture of three seals L to R: Original Fiero, F-82 (C&C) Camaro/Firebird, Fisher (GM Factory install) Camaro/Firebird.


With the Camaro/Firebird seals, I will have to cut and glue the seals and I have yet to decide exactly where to seam them (see posts above).

I have also decided that I will most likely glue the seals down with butyl. This stuff seals well and never harden, which means I can move, or remove the seals without harming them. Butyl can easily be removed with ordinary household paint thinner which will not harm the painted surfaces or the seals.

What do you folks think about my approach? Any suggestions would be most appreciated before I proceed.

Jim


------------------
Jim

86 SE 355 Body Kit w/3.1 Auto (Sold)
87 T-Top Coupe 2.8/5 Speed new project

IP: Logged
fyrebird68
Member
Posts: 725
From: Cincinnati, OH
Registered: Jul 2008


Feedback score:    (17)
Leave feedback

Rate this member

Report this Post08-31-2009 08:31 PM Click Here to See the Profile for fyrebird68Send a Private Message to fyrebird68Direct Link to This Post
No suggestions - you are WAY ahead of me .... Sound approach, though. Keep it coming.
IP: Logged
sjmaye
Member
Posts: 2468
From: Hendersonville, TN USA
Registered: Jun 2003


Feedback score:    (13)
Leave feedback

Rate this member

Report this Post09-01-2009 05:16 AM Click Here to See the Profile for sjmayeSend a Private Message to sjmayeDirect Link to This Post
 
quote
Originally posted by fyrebird68:

No suggestions - you are WAY ahead of me .... Sound approach, though. Keep it coming.


Same here. Your approach is very thorough. This is definitely a favorite thread. Saved.

I have weatherstip alignment issues at the passenger B-pillar joint with the t-top. I have been afraid of taking the seal loose from the spaceframe for fear of tearing or creating leaks. How hard is it to remove a seal that has been there 21 years?
IP: Logged
bowrapennocks
Member
Posts: 872
From: Seattle WA
Registered: Jun 2008


Feedback score: N/A
Leave feedback

Rate this member

Report this Post09-01-2009 09:44 AM Click Here to See the Profile for bowrapennocksDirect Link to This Post
I was afraid of destroying my seals, so I did not start the project until I had the Firebird seals as a backup. I would suggest that before removing the seals you make sure that the leak is the B joint itself. If so, I would try the foam tape solution as described above. This works quite well, and you can always pull it off if you do not like the solution. Paint thinner will work to remove the glue you can't scrape off with your fingernail. If you use foam, make sure it is closed cell. Much of the stick on foam tape sold in home stores is open cell. That works like a sponge and does not seal. I ended up going to findtapes.com because they sell tape in various thicknesses down to 1/16" and in varying denisities. The only closed cell foam that I found in home stores was grey. The stuff at findtapes is black. That worked well for me where the leaks were in the actual joint.

If your leak is not at the joints and you are bold, then remove your seal. I think once you start, you are probably committed to remove the whole seal, so you can clean up the metal surface below. I removed the screws first. There are two screws at the bottom of the B pillar and one at the top. I think the overlap of the T-top seal to the cut down stock Fiero seal is with silicone. The rest of the seal appears to be glued with wearthstrip adhesive. The A pillar seal bottom also has two screws as well and is overlapped with silicone. These screws are harder to find. I carefully pulled the seal up using a small putty knife to separate the overlap joint. Be careful once you are above that overlap, as the seal has a ridge the runs along the length and is tucked under a sheet metal piece that is screwed to the B pillar whose cross section has a j shape. The seal ridge tucks under the j shape. Push down with the putty knife to unhook it. In the bottom picture which is shot pointing up, you can see the j shape. It is not necessary to remove either of the trim pieces that go across the roof or the sheet metal pieces that run up/down the A and B pillars.


I used a putty knife to push it toward the car. I did rip a piece of the ridge. I think if you are careful you can get it out without ripping. This portion is glued on the back and mine separated pretty easily. I worked my way up the B pillar and used a putty knife to separate the area around the B butt joint. Once above that, I used a wide flat blade screw driver and scraped arong the bottom. This part of the seal was pretty well glued and I left some seal behind. I continued around and repeated the procedure for the A pillar. Once removed, I cleaned the car frame with a small (1 1/2" diameter) wire wheel on my electric drill. I removed everything down to bare metal and primed with rust reformer. There was little rust though. Then I painted with semi gloss black. Once the seal was off, I tried to clean the glue off of it. The silicone peeled off pretty easily. I tried adhesive remover on the weatherstrip adhesive, but it did not seem to work. I cut the protruding adhesive with a sharp razor blade. With all this done, the bottom of the seal is no longer smooth. This is also why I plan on using Butyl to reglue it (if I reuse the seal) as it fills voids very well.

Good luck!

My next task is to try gluing up spare weatherstrips to see what glue works best. I will age test in an oven.

A note on butyl. This is the stuff used for windshields and comes in a tube, like bathroom caulk. It is available at auto parts stores and requires a caulking gun to apply. It is about $20/tube.

Jim

------------------
Jim

86 SE 355 Body Kit w/3.1 Auto (Sold)
87 T-Top Coupe 2.8/5 Speed new project

IP: Logged
bowrapennocks
Member
Posts: 872
From: Seattle WA
Registered: Jun 2008


Feedback score: N/A
Leave feedback

Rate this member

Report this Post09-02-2009 01:31 PM Click Here to See the Profile for bowrapennocksDirect Link to This Post
I have been looking into how to install the Firebird seals and I plan to cut the frame a little bit as shown in the cross hatched areas.


I then plan to bend the vertical piece inward just at the top of the sheet metal strip that is screwed on. Then I plan to fill the cavity to make a nice surface for the back of the seal. What do you folks think?
Jim

------------------
Jim

86 SE 355 Body Kit w/3.1 Auto (Sold)
87 T-Top Coupe 2.8/5 Speed new project

IP: Logged
bowrapennocks
Member
Posts: 872
From: Seattle WA
Registered: Jun 2008


Feedback score: N/A
Leave feedback

Rate this member

Report this Post09-03-2009 01:28 PM Click Here to See the Profile for bowrapennocksDirect Link to This Post
.
IP: Logged
sjmaye
Member
Posts: 2468
From: Hendersonville, TN USA
Registered: Jun 2003


Feedback score:    (13)
Leave feedback

Rate this member

Report this Post09-03-2009 05:11 PM Click Here to See the Profile for sjmayeSend a Private Message to sjmayeDirect Link to This Post
Looking good. I still don't know what to do with mine. As mentioned the joint at the passenger A pillar looks distorted against the mating glass panel seal. I am thinking it was installed incorrectly and even if I remove it it will continue to hold the distorted shape.
IP: Logged
PFF
System Bot
bowrapennocks
Member
Posts: 872
From: Seattle WA
Registered: Jun 2008


Feedback score: N/A
Leave feedback

Rate this member

Report this Post09-04-2009 05:43 PM Click Here to See the Profile for bowrapennocksDirect Link to This Post
It will probably hold the distorted shape. If it is leaking, you could try some of the stick on foam tape as described above. I will be getting back to work on this when I return from Labor Day weekend, next week
Jim
IP: Logged
crt454
Member
Posts: 292
From: Montana
Registered: Feb 2006


Feedback score:    (12)
Leave feedback

Rate this member

Report this Post09-25-2009 08:58 PM Click Here to See the Profile for crt454Send a Private Message to crt454Direct Link to This Post
My car leaks at b-pillar also, the water leaks down behind my speakers, but doesn't seem to leak to bad anywhere else. I wanted to remove my rear trim pieces to see if I could fix this. But I can't figure out how to remove the trim pieces. Where are these pop rivets? Mine just has one screw in it by the weatherstripping. When I remove that, it seems like it might only be held by that butyle stuff. However, I don't want to pry too much and end up breaking the piece. Do I have to remove my headliner to get to the pop rivets to take these pieces off? Sorry for jumping in on your thread, but it sounds like you could help.
IP: Logged
rogergarrison
Member
Posts: 49601
From: A Western Caribbean Island/ Columbus, Ohio
Registered: Apr 99


Feedback score: N/A
Leave feedback


Total ratings: 551
Rate this member

Report this Post09-26-2009 07:13 AM Click Here to See the Profile for rogergarrisonSend a Private Message to rogergarrisonDirect Link to This Post
If your going to use superglue, go to a model hobby shop and get a bottle of IC-2000. Its a black FLEXIBLE superglue thats used to mount tires on RC cars and planes. Other superglues dry hard and brittle. Its only a few bucks. Make sure you clean the rubber good with something like acetone to get all the mold release and talcum off of it first.
IP: Logged
bowrapennocks
Member
Posts: 872
From: Seattle WA
Registered: Jun 2008


Feedback score: N/A
Leave feedback

Rate this member

Report this Post09-26-2009 09:49 AM Click Here to See the Profile for bowrapennocksDirect Link to This Post
Re: trim pieces
If you are referring to the two trim pieces that are on top of the roof, just behind the glass of the t-top. Here is what you have to do to remove them:
There are 6 pop rivets located on the inside channel. These have to be drilled out with a 1/8" drill. Protect the rubber seals with a putty knife so you do not harm them. Then the very hard process begins. There are two clips on each side of the back, hooking to the underside of the trim pieces that clip onto the bottom of the rear roof shell. However, when the trim pieces were installed, the cavity below them was filled to the top with butyl. While butyl will remain flexible even after 25 years, it is very difficult to get the trim pieces out. I gently pried and pushed from the back with a putty knife. It took me 1-2 hours to get the trim pieces (there are two glued together) off. I thought they were metal and was not worried about breaking them. It turns out that they are plastic. Luckily, mine came off in one piece with the two halves still joined together. Work slowly and carefully. Gorilla techniques will cost you big money if you have to replace them. I then cleaned out the cavity. Regular paint thinner will soften the butyl and not harm the car’s paint. It took me a few hours to clean it out. I primed and painted the metal and refilled the cavity with new butyl. The cross section of the trim molding is T shaped, with the stem pointing down. This stem has the stainless steel clips hooked to them, but more importantly, it sinks down into the butyl. That is why it is so hard to get the trim pieces off. So anticipating that I might have to remove the trim pieces again, I filled the cavity with butyl, and then covered most of the channel with section of zip lock baggies. Having two layers of plastic guaranteed that the butyl would not bond the entire trim piece to the body. I left enough area so that it would bond in the back. When I reassembled everything and applied the water test, water still came down behind the speakers! I removed the trim piece again (this time it was easy), and put more butyl in. I reassembled and it still leaked. It was then I realized that it was not the place it was leaking. After removing the weatherstrip seal, I now believe that the leak was actually leaking from behind the seal:


Notice how there is a u shaped cut on the frame. That was originally filled with caulk, and now I believe that is where the leak is. This area should probably be filled with something that the seal can be glued to.

I think the screw you are referring to is the one that holds the seal (not the P seal or trim). To remove the seal,I started at the back. Remove the two screws at the bottom, and gently pry the seal loose. When you get to the area where it is in the channel, you have to push in from the side to release. The seal appears to be glued with weathstripping adhesive. I worked my way slowly around, up the b pillar, removed the single screw at the B butt joint, and used a screw driver to pry it from the channel. I worked all the way around to the A pillar. It came out reasonably clean, but with some lumps of glue on it.

Good luck.

Re: glue
Thanks for the suggestion. I will be doing some glue tests with that glue in addition to the following. Any comments will be well appreciated.

Pliobond
Loctite plastic bonder (also for rubber) with activator

Thanks,
Jim

IP: Logged
crt454
Member
Posts: 292
From: Montana
Registered: Feb 2006


Feedback score:    (12)
Leave feedback

Rate this member

Report this Post09-26-2009 12:12 PM Click Here to See the Profile for crt454Send a Private Message to crt454Direct Link to This Post
Thanks for the help. It just dawned on me what you were saying with the u-shaped area. I didn't understand that the first time I read it. It makes sense now, so hopefully I won't have to pull those trim pieces.
IP: Logged
bowrapennocks
Member
Posts: 872
From: Seattle WA
Registered: Jun 2008


Feedback score: N/A
Leave feedback

Rate this member

Report this Post10-02-2009 07:50 PM Click Here to See the Profile for bowrapennocksDirect Link to This Post
Thanks rogergarison, I did buy IC2000 and are now testing these glues (IC2000 on the left):


I was able to get a used Fiero weatherstrip from one of our club members and am using it for glue tests. First and most important to section weatherstripping is to get a very sharp knife to cut it. Here are the ones that I found:


They are left to right: single edge razor (sharpest and thinnest), carpet cutting knife, snap off blades, and regular utility blades. The razor cut the best, but was physically too small to span all of the cross section of the weatherstripping. I found that I could do my best cuts with the snap off knife. Since you need a very sharp knife, it is best to use the blade only once or twice for weatherstripping cuts. The next item is to have a way to make perfect 90 degree cross cuts. I chose a jig mage of scrap aluminum as shown:


By using the three pieces of aluminum, I can cover three side of the weatherstripping and get an almost perfect clean straight crosscut.

I glued up a few samples for later destructive testing. They are in the oven now for accelerated life.


The Pliobond takes 48 hours to cure, so I will test all next week. I tried a few of the superglues, and for the most part, the material separated before the glue joint came apart.

Next week: cut the B pillar to accept Camaro seals, glue up and go for water testing!
IP: Logged
hooks
Member
Posts: 215
From: Virginia
Registered: Jan 2008


Feedback score: (2)
Leave feedback

Rate this member

Report this Post11-03-2009 08:51 AM Click Here to See the Profile for hooksDirect Link to This Post
Did this get finished, if so how well did it work??
IP: Logged
bowrapennocks
Member
Posts: 872
From: Seattle WA
Registered: Jun 2008


Feedback score: N/A
Leave feedback

Rate this member

Report this Post11-04-2009 09:05 AM Click Here to See the Profile for bowrapennocksDirect Link to This Post
I got a little sidetracked, but the seal replacement is mostly done. I posted the install on a separate post:

https://www.fiero.nl/forum/Forum2/HTML/104028.html

The left side is glued down, the right side has yet to be glued. So I still have final adjustments to make. When I went through a rainstorm, the butt joints dripped a bit. The right side did not appear to leak eventhough it is not glued. What I did was position the seals as best as I could without the glue, then mark them with a felt tip pen, so when I glue them, they will be close to final position. A minor repositioning of the seal can make a big difference on leak integrity, so trial in error is the best approach. The benefit of using Butyl is that it never hardens, so you can pick up weatherstripping and move it. I am currently working on another (non car) project and will get back to the seals later. I will be pulling the seats and carpeting out so I can do a final leak check and install the sound insulation. I will post the final results on the one listed above.

If anybody has any more questions, please post to the above URL, as I forgot to check the email warnings box on that one, and may not notice any questions.

Almost dry in Seattle
Jim

------------------

87 T-top 2.8 5sp Camaro Dash Bonneville door panels; 86 355 body & interior kits 3.1 Auto; 85 SE 2.5 5sp, 86 SE 2.8 auto parts car

IP: Logged


All times are ET (US)

T H I S   I S   A N   A R C H I V E D   T O P I C
  

Contact Us | Back To Main Page

Advertizing on PFF | Fiero Parts Vendors
PFF Merchandise | Fiero Gallery | Ogre's Cave
Real-Time Chat | Fiero Related Auctions on eBay


Copyright (c) 1999, C. Pennock