Seems to be some interest in following along as I do this widebody kit, so I keep posting as long as people keep watching I guess. I'll be doing this a bit different than some others have in the past, and perhaps if it comes out well we can even talk Sage into re-doing the molds a bit to save others some work. IMHO a race inspired car should look like a race car, and those tiny wheel openings on the street version of the IMSA with 215x14 tires just dont look like race material to me so I'll be opening those up to allow for some serious rubber to meet the road. I also ordered my kit "wing deleat" and had Tedd make me up some 5" wing stands for a stock type wing.... but that's just my preference. BTW: here is some info on the 4.3L Chev that powers the car: https://www.fiero.nl/forum/Forum1/HTML/044164.html
So without further ado........... First we gota get nekid.
This has been covered numerous times so I won't go into how the old cloths come off, but it's a fairly simple matter and should only take about a half day for a first timer.
We'll be re-using the substructure from the rear clip and a small portion of the original skin. Start by cutting just deep enough to go through the skin without damaging the substructure under it. When I did this step I hadn't received the IMSA parts yet, so I left much more of the old skin than I needed to, but you'll want to cut closer to the red lines. It's hard to see in the photo, but all but about 1 1/2" on each end of the rear "tray" will be re-used as well.
Carefully pry loose the sides with whatever tools you have handy, but the key is to go slow and try to only sacrafice the old skin and not the substructure that needs to be re-used. Fortunatly the substructure seems to be a stronger material, so it's not as hard as it sounds.
A couple of alteration will need to be done to the rear bumper area. About 2" needs to be cut off each end to clear the mating flange where the rear fenders and rear facia join. A small portion of the rear facia support tray needs to come off also, and the old lower facia support hardware can hit the dumpster as well. I found out the hard way that once the IMSA rear fenders and facia are permanently joined, it becomes imposible to remove the rear clip as you can no longer lift the rear of the clip up that few inches needed to free the three roof studs. You can laugh at me later when you see what I had to do to remove the bumper bolts with the clip on the car, but just trust me for the meantime and cut about a 2" x 6" piece out of the lower ends of the bumper where noted in green before you glue the parts together .
To be continued:
[This message has been edited by Russ544 (edited 12-02-2004).]
IP: Logged
11:36 PM
PFF
System Bot
Electrathon Member
Posts: 5241 From: Gresham, OR USA Registered: Dec 2002
Drooling so much over this one, I feel almost like I should be looking over my shoulder for the Vice Squad...great start, keep it coming. The fish will wait, and grow bigger in the meantime too...yeah, that's it...let dem fish grow.
------------------ 88 Formula, "Asphalt Aviator"
Celebrate Artesian New Year!!!
IP: Logged
01:54 AM
NotAFieroAnyLonger Member
Posts: 4413 From: 75762/Texas/USA Registered: Dec 2003
Thanks guys. I was gona use your 85 Aaron, but at the last minute I decided to use this 88 coupe I had laying around. this is also the car that I built and installed the 4.3L into, so it should be a fun ride ================
CHAPTER 2:
Before trial fitting of the rear fenders and facia begin you'll want to set them on the floor and carefully align the parts wile you drill 4 or 5 1/4" holes in each flange and bolt them together. it's much easier to do this off the car. When you're satisfied with the alignment of the parts you can remove the bolts and set them aside for now.
After setting what's left of the rear clip back on the car, you can begin trial fitting of the fenders and rear facia to locate areas of the substructure that will need slight trimming. The thickness of the new fiberglass parts require that you do some slight trimming of the substructure to allow them to fit over it. The areas that I found necessary to trim are noted in red. I removed the tab near the door ( the IMSA fenders have a tab that replaces this tabs function), and trimmed about 1/8" off the other areas. the red dots indicate that the area trimmed was on the inside edge and not actually visible in the photo. Each body will no doubt be slightly different, but this should give you the general idea.
The better the fit of the IMSA parts on the substructure the less bodywork will be required to fill any gaps and smooth the transitions, so spend plenty of time on this phase. When you have everything fitting as well as you think you can, install a couple bolts in each flange and check some more. fitting and adjusting until the parts feel like they belong together. Once the parts are glued together you can't come back and adjust anymore !!! When the parts fit on the substructure to your satisfaction it's time to reinstall the rear decklid to check the gaps between it and the fenders, and to locate the two screw holes in each side that retain the top of each fender. I placed a piece of tape over each of the original fender mounting holes on the chassis and drew a line on it to indicate center. At a marked distance out from the hole I drew a crosshair over the line so when the new fender is installed, and covers the hole, you still know exactly where the hole needs to be drilled in the IMSA fender to line up with the chassis hole (it's easier than I make it sound ). With the rear decklid installed you can check the gaps along the fenders, and when the're straight and equal on each side, you can drill the mounting holes in the fiberglass.
When you're comfortable with the fit of the parts on the substructure and have checked that the gaps at the door and rear deck are straight and not too wide or narrow, and holes are drilled in the top of the fender flange........ you're almost ready to commit to the glue. I highly recommend 3M panel bond adhesive #8115 (thanks for the tip Sage). It gives the needed working time to get everything aligned and provides excellent strength and flexibility. A special applicator is needed for this, but most automotive paint suppliers who sell this product will loan you the applicator gun. One 200ml cartridge will JUST be enough to join all of the rear clip components. (also available at handsontools.com if you prefer online purchase)
Place the substructure on the car and have all your tools, nuts and bolts, adhesive, cleaning solvent, rags, and whatever else you might need in a handy place next to the car so you don't have to chase all over for them wile the adhesive is setting up. You should have plenty of time to work, but not a great deal to spare chasing tools, so prepare for battle early. The areas noted in yellow below are the only points that make contact between the substructure and the IMSA fenders, and are therefore also the places to place a generous amount of adhesive. Set one fender and quickly pull it off again to see where the adhesive has made contact. you can add more adhesive to areas now that didn't make contact. set the fender again and bolt on the rear facia using adhesive this time on the flanges, then on to the other fender. use clamps to hold the roof section in alignment and recheck for rear decklid and door alignment as you install the upper fender mounting bolts. Once the rear clip is glued on you can take a day off to drink beer and watch the Speed Channel wile the adhesive cures. you earned it
[This message has been edited by Russ544 (edited 12-02-2004).]
IP: Logged
12:39 AM
gumert Member
Posts: 400 From: Hunderton, NJ Registered: Mar 2004
This has a seriously high cool factor. I've always loved the lines of the Fiero IMSA flares. Now I get to see every step that goes into the finished product. This thread goes into my favourites.
BIG + for you...
David
------------------ His Fiero: 1984 2M4 Coupe
Her Fiero: 1984 2M4 Convertible
IP: Logged
11:05 AM
PFF
System Bot
FieroMGDriver Member
Posts: 961 From: Concord, NC USA Registered: Nov 2001
Yeeeeesssssss! Nice. This is a great thread. I agree completely, it needs to look like a race car. Good for you!
BTW R Runner, Are you using the 5 x 100 bolt pattern on your IMSA? I've been looking for some Nascar style rims like you're using but can't find anything with decent offset in the 5 x 100 pattern. Any ideas?
Thanks, Russ
FieroMGdriver, I haven't given a lot of thought to the fate of the fender vents, but I'll most likely open them up at some point. The 88 chassis I'm using has the fuel "burp" tank behind the right side and the fuel fill pipes behind the left, so that limits the vents functionality somewhat. From my experience with my SBC car I've found that it's very benificial to have all the cool air in the engine bay you can get, so that will most likely be the goal on this car as well however.
[This message has been edited by Russ544 (edited 08-31-2004).]
After the adhesive has cured overnight, you can lift the rear clip back off for some finish work. Begin by checking to see that the adhesive has made good contact at all points, and add more to fill any gaps. I used 3M #8227 SMC/Fiberglass adhesive for this as it has a much faster cure time than the panel adhesive. The fender/rear Facia below the rear flange needs to be joined with a bit of fiberglass and resin (note red arrow), and you can place a small reinforcement inside the exposed roof seam edges with the leftovers as well.
This is a good time to do some body work to fill and smooth the exterior seams, and clean up any raged fiberglass edges. The inner sail panels may need some minor fitting and trimming of the edge that mates up with the new fiberglass, but 10 minutes with a bench grinder should take care of both sides. BTW: If you forgot to cut out the notch on the lower ends of the rear bumper as noted back in chapter 1, I've convieniently drilled 1 1/2" holes in the rear of this clip just to point out where the holes need to be drilled to gain access to the bumper bolts you'll need to take out in order to remove the rear clip once it's all permanently joined together........ Not that I would ever forget to do that myself
I'll be doing a couple modifications on the rear clip at this point which aren't part of the normal installation, but that's why I call this "Russ style". As I mentioned earlier, I want to open up the wheelwells in order to install some larger tires. The size hasn't been finalised yet, but this looks about right to me:
I also plan to extend the fuel fill pipe in order to bring it back up to the level of the new flared fender, and trim open the IMSA fiberglass in order to reinstall the stock Fiero flip open fuel door. I have a 4 day weekend coming up, so perhaps I'll get those things taken care of and written up soon.
[This message has been edited by Russ544 (edited 12-02-2004).]
IP: Logged
10:13 PM
Will Member
Posts: 14305 From: Where you least expect me Registered: Jun 2000
You ought to have enough extra width to run 335/35-17's
------------------ Punch the gas and feel the back step sideways; rip off a powershift and hear the tires punished by torque; downshift, lift off and feel the engine braking that comes only from big cubes, listen to the pop and gurgle. Know that you are driving an American V8. There are finer engines made, but none that are this cool.
Luck, Fate and Destiny are words used by those who lack the courage to define their own future
IP: Logged
10:17 PM
Russ544 Member
Posts: 2136 From: S.W. Oregon Registered: Jun 2003
You ought to have enough extra width to run 335/35-17's
Sounds good to me . But first I need to find some Nascar style rims in the offset and width I need. BTW. I like the last line of your sig. Wasn't it a race driver who once said, when acused of just being a lucky winner: "yes, and the more I practice, the luckier I get".
IP: Logged
10:28 PM
Sep 2nd, 2004
Will Member
Posts: 14305 From: Where you least expect me Registered: Jun 2000
Have you figured out the width and offset yet? According to WCF, a 17x9-45 will fit the stock suspension and body work. Based on looking at my car, I think a 17x9-38 would work as well. You've got 4 extra inches of width on each side, right? 9+4 = 13... which is pretty good for a 335. The resulting offset would be about 60mm in the opposite direction, or 17x13+60 (maybe +55ish). That's a pretty wild wheel. The positive offset will reduce wheel bearing loads in hard cornering.
------------------ Punch the gas and feel the back step sideways; rip off a powershift and hear the tires punished by torque; downshift, lift off and feel the engine braking that comes only from big cubes, listen to the pop and gurgle. Know that you are driving an American V8. There are finer engines made, but none that are this cool.
Luck, Fate and Destiny are words used by those who lack the courage to define their own future
IP: Logged
09:08 AM
Russ544 Member
Posts: 2136 From: S.W. Oregon Registered: Jun 2003
Have you figured out the width and offset yet? According to WCF, a 17x9-45 will fit the stock suspension and body work. Based on looking at my car, I think a 17x9-38 would work as well. You've got 4 extra inches of width on each side, right? 9+4 = 13... which is pretty good for a 335. The resulting offset would be about 60mm in the opposite direction, or 17x13+60 (maybe +55ish). That's a pretty wild wheel. The positive offset will reduce wheel bearing loads in hard cornering.
I haven't determined wheel sizes yet, but I need to take some time and do that here pretty soon. I may end up making or buying wheel adaptors so I can get wheels of my liking on the 5 x 100 pattern. The original 84 race IMSA had 345 35 15 on the rear and 225 60 15 on the front, so I've been kind of using that as a general guide as to what fits and looks right.
Lookin' great... about the gas door thing. I had originally planned on using an Izuzu VehiCross (aircraft-style) gas door (it's flatter and closer in size/shape than the Audi or Eclipse doors), but have since changed my mind. LMK if you're interested - I paid around $75-$85 for the parts I've got... I'd let 'em go for about $25 shipped.
In order to enlarge the wheelwells a small air reciprocating saw makes quick work of the fiberglass:
To replace the lip, A thin piece of sheet aluminum is hammered to form a "mold" to support the new glass and resin. By rolling the edge, the contours can easily be blended into the fender, eliminating a lot of grinding and filling later on. An old sign provides a good source for cheep aluminum of suitable thickness, and is easily formed to the proper curve and taped onto the wheel opening after spraying the back side with wax:
Once the form has been set, and fully taped, you can flip the rear clip right side up again and lay in several layers of glass onto the form, and an inch or two up the side. Pretty simple actually, and after it cures for a day I'll pull off the tape and aluminum strip and do some bondo work to finish it off.
Now THIS is a proper size wheelwell for a "race" car
[This message has been edited by Russ544 (edited 12-02-2004).]
IP: Logged
09:42 PM
Sep 4th, 2004
Russ544 Member
Posts: 2136 From: S.W. Oregon Registered: Jun 2003
CHAPTER 4 + Although it feels like I worked plenty hard enough, I didn't seem to make much headway today. I am, however, pretty happy with the results of the fiberglass work on the wheelwells. After the aluminum strips came off, It didn't take too much body work to smooth out the minor irregularities and fill a few small voids. It does, however, make me appreciate just how good the fiberglass work is that Tedd (Sage) did on this body kit. I've yet to find a void in his layup bigger than a pin head or two. Pretty amazing IMHO.
[This message has been edited by Russ544 (edited 12-02-2004).]
IP: Logged
10:38 PM
Sep 5th, 2004
BtotheB Member
Posts: 2581 From: Peterborough, Ontario Registered: Dec 2001
No huge progress to report for this week as I've had a lot of other business to attend to.... and not much time to devote to the important stuff ..... I did get the finish body work on the rear clip pretty much done however..... seams molded in etc.. I also managed to get the hood vents cut in and in primer, and I've opened up the front wheel wells about an equal amout as I did to the rears. The fronts don't have the flanges in yet as I forgot to order more resin last week, and I refuse to use the stuff you can buy at Wally world etc.. "If it's worth doing.... it's worth doing right". The car will get lowered, as well as receiving fatter rubber on wide rims, but with some imagination it's getting easier to see what it's becoming now.
Stay tuned for updates. don't give up on me just yet
Russ
[This message has been edited by Russ544 (edited 12-02-2004).]
IP: Logged
05:55 PM
Sep 13th, 2004
fierogt4e Member
Posts: 119 From: up state New York Registered: Mar 2003
WOW!!!! HOLY SH## You have blown my F&&&ing mind. I have also done this to my IMSA (85 GT/4E) I am very excited to see another person customizing and updating this body style I realy want to see what you will do next to refine the body and thanks for showing it to us. VERY cool indead ! ------------------ Sincerely George www.switch-tray.com
edit; used words instead of photos
[This message has been edited by fierogt4e (edited 09-15-2004).]
IP: Logged
12:55 AM
PFF
System Bot
Vonov Member
Posts: 3745 From: Nashville,TN,USA Registered: May 2004
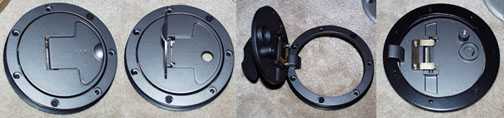
Another abbreviated chapter today, but I have two days ahead of me with no obligations other than working on the IMSA project so perhaps a better chapter will follow by Monday. Today I worked out a solution for the fuel filler, which with the IMSA fender becomes recessed about 4" deeper, and lacks any provision for an outer fuel door. my trusty air reciprocating saw was used to remove the abbreviated cup provided (taped back into the fender for this photo). I wanted to utilize the Fiero flipper door, so some modifications were in order. I first thought of extending the metal fuel tube, but upon more detailed investigation I found it to be more work than I was willing to devote to it. The new filler opening doesn't line up with the old filler well enough to simply extend the metal pipe without a tricky curve. but by carefully removing most of the bottom of the fuel filler "cup", ...... there is now room to reach the fuel cap without too much effort. The areas originally used to secure the fuel cup to the fender are now out of reach, so I plan to bond my modified fuel cup, which retains areas used to support the cover latch and hinge mechanisms, to the fiberglass fender with the same 3M body panel adhesive used to attach the substructure to the rear clip fiberglass. Now when the filler door gets reinstalled everything will function the same as the stock unit, compleat with interior door release.
<front facia and fender installations come next>
[This message has been edited by Russ544 (edited 12-02-2004).]
IP: Logged
10:15 PM
Sep 18th, 2004
NotAFieroAnyLonger Member
Posts: 4413 From: 75762/Texas/USA Registered: Dec 2003
Originally posted by Russ544: The areas originally used to secure the fuel cup to the fender are now out of reach, so I plan to bond my modified fuel cup, which retains areas used to support the cover latch and hinge mechanisms, to the fiberglass fender with the same 3M body panel adhesive used to attach the substructure to the rear clip fiberglass. Now when the filler door gets reinstalled everything will function the same as the stock unit, compleat with interior door release.
Just out of curiosity, once you do that, are you going to be able to remove the rear clip, should it be required at some point in the future?
------------------ Turn the key and feel the engine shake the whole car with its lope; Plant the gas pedal and feel in your chest neither a shriek nor a wail but a bellowing roar; Lift and be pushed into the harness by compression braking that only comes from the biggest cylinders while listening to music of pops and gurgles. Know that you are driving and American V8. There are finer engines made, but none of them are this cool.
Luck, Fate and Destiny are words used by those who lack the courage to define their own future
IP: Logged
07:39 AM
Russ544 Member
Posts: 2136 From: S.W. Oregon Registered: Jun 2003
Just out of curiosity, once you do that, are you going to be able to remove the rear clip, should it be required at some point in the future?
Yes. even though it's bonded to the body panel now, the fuel filer "cup" has had it's base removed so it no longer captures the metal fuel filler tube (plus the metal filler is now below where the base was anyway). The three sheet metal screws which retain the metal fuel tube to the rear clip substructure can still be removed if one should need to pull the rear clip.
Russ
[This message has been edited by Russ544 (edited 09-18-2004).]
IP: Logged
10:20 AM
gascarracer Member
Posts: 129 From: Batavia, Ohio, USA Registered: Apr 2003
Outstanding thread, has given me several ideas that may get used on my Pantero project. Hope you don't mind. The gas filler is one that I've been trying to figure out. Keep up the great work.
------------------ Ron aka: Blackrams
IP: Logged
04:53 PM
Russ544 Member
Posts: 2136 From: S.W. Oregon Registered: Jun 2003
Outstanding thread, has given me several ideas that may get used on my Pantero project. Hope you don't mind. The gas filler is one that I've been trying to figure out. Keep up the great work.
Glad to hear people are getting some usefull info and ideas out of this. The process of observing others creations and then devising "but I'd do this part a little different here" ideas is what hot rodding is all about IMHO.
IP: Logged
06:47 PM
Russ544 Member
Posts: 2136 From: S.W. Oregon Registered: Jun 2003
CHAPTER 7 Not a bad day........ The front wheel openings received an enlargement similar to the rears, but the same process as used on the rear, with the temporary aluminum strip "molds", was used to replace the lip in the front wheel opening so I won't repeat those details. Wile the resin set up on the fenders I went ahead and permanently secured the rear clip. It took 18 1/4" rivets and 7 bolts, + the 8 bolts/nuts that hold the rear facia and fenders to one another, so she's solid as a rock now ! I had originally intended to paint the parts individually, but for a variety of reasons I've decided to change my assembly process, requireing that I paint everything except the front and rear decklids wile on the car. One reason for the change is that I've decided to permanently attach the lower rockers to the front and rear fenders, and fill in the gaps, for a smooth look. also, I've had some trouble with bondo cracking at the upper B piller joint each time the rear clip is removed and replaced on the car, so painting it wile installed seems like a better idea today . Wile I had the front clip setting on the car doing preliminary checks, I found that the hood opening is almost 1/4" too wide on each side, so it will be necessary to epoxy a strip of fiberglass onto each side of the hood and fill/sand for an acceptable gap...... I'm getting ahead of myself however as that may still be a few chapters down the road......
<to be continued>
[This message has been edited by Russ544 (edited 12-02-2004).]


 .
.