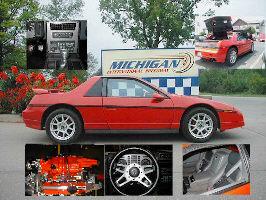
Engine is from an 01 GTP with ~51k. Good condition, but it has a bent SC pulley.
So here she goes!! Im going to use the engine as it is, just remove PS and remount the alternator. I dont know if I will redo the wiring or not yet, more than likely not unless I see a really good reason too. I dont have the wiring yet, he forgot it and its in the mail now. Everything is from one car so it all should work together well, im going with the stock tranny, and more than likely not messing with the engine.
I really want this engine for a little more punch, but more than that the fuel economy and reliability so the less I tweak the better. Any "must do" mods that I would be dumb not to do? I cant help but notice that the downpipe is like 2" ID at the collector, I think im going to chop that off and run mandrel 3" all the way with a short "S" curve into a flowmaster 40 series
I made seperate posts for the diffrent areas so they could be found easier, and this thread understood better.
Heres the "Quick Link" section with prices and part numbers
CV Shafts- https://www.fiero.nl/forum/Forum2/HTML/074727.html What you will need: The inner cup and tripod joint from the stock axels that came with the donor car. Autozone part# 9535 $59.99 (Drivers Side 94 Beretta with 4 spd) Autozone part# 9534 $69.99 (Pass Side 94 Beretta with 4 spd) 2 new 4.25" CV boot clamps
ISSUES TO OVERCOME:
Relocate Alternator/ Remove PS Lookin like im going to use the general idea of the setup found in here to mount the alternator where the PS used to be http://www.photosled.com/showgallery/cat/631
Mounting I will likely use the GTP style 2 main mount system and throw in a low mount front dog bone and a standard high mount rear dogbone. I will just fab up plates for them to bolt to on the cradle. Im liking several of the ideas here http://www.photosled.com/showgallery/cat/631
Plumbing AC Wow, I have no idea yet... Ideas?? Im going to see if it has the same outlets as the 3.4DOHC and go from there.
Coolant Routing Looks not too complicated. Planning on regular rad and heater core return lines, move the heater feed over to the drivers side and weld up a Fiero thermostat housing and run it there and the rad feed. Pass side hose $9.99 Drivers side hose $22.99 Heater hose - Intake port 5/8ths hose Water pump port - 1" freeze plug (87-88 models only)
SC tensioner I believe being an 01GTP Im all set here
Coil Packs I'll have to figure this one out whereever seems best when I see how much wire I have to work with and what kind of room I have
ECM mounting Mabye behind the battery, in the cabin if wiring permits
Wiring Shouldnt be too hard, im working on plans - diagram below will be very helpful to you guys
Guages: The stock engine has a dark green wire from the CTS, which I believe will feed a guage. The stock engine has an oil pressure switch, which I will simply replace with a sending unit and run that wire intended for a warning light instead to the guage.
PARTS I BOUGHT (OR WILL BUY)
Cooling system
------------------ Boost is like Venereal Disease, one night of passion can result in weeks of pain (and work.) Its not always about who gets to the finish line first, its who looks good when they get there. 'Course it doesnt hurt to have both. http:\\www.myspace.com\keeptherubbersidedown
[This message has been edited by 86GT3.4DOHC (edited 07-04-2006).]
Hi, Check www.fastfieros.com for the low mount deal, I think Loyde uses Fiero alt mounts fabricated to work some how.
Ryan has how to make your axles on his web site www.gmtuners.com
On the a/c I was told by a local, the Fiero compressor & set up --could be made to work, if not you can have a rad shop that know s how to do aluminum soldering make custom hoses.
Coil packs can be mouned on rear trunk wall, easy to fab. Looks cool too..
Ecm , why not install it behind the center consol & leave the dio plug hang out behind the drivers seat. Or tucked in.
Engine & trans mounts can be fabricated or bought right here on the forum.
One thing I would do is either clean up those pulleys or replace them , I had to go back and replace 1/2 of mine that had about 1/3 of the rust . Believe it or not your belts will ride the ridge if their not squeaky clean.
Thrasher has the pulley rental tool, do it while its out of the car, I switched to the 3.4 after it was installed , my arms still hurt thinking about it, it helps to give the sc pulley a gentle little tap every now and again when your arm starts hurting ...lol...
I`m sure you`ll get more people to chime in and help out... Good Luck ...
IP: Logged
11:38 AM
86GT3.4DOHC Member
Posts: 10007 From: Marion Ohio Registered: Apr 2004
Im going to keep the top post updated with pricing and plans and quick information best I can. I will try to give credit where I can, if you do not want me posting your information here I will take it down if you let me know, but its all posted elsewhere for free. Also if you see something you think is yours and want credit let me know, I didnt take notes on where I got some of this stuff.
Wow, thats great. +!! Mind if I refrence and post the specific pics when I do the post on alternator mounting ?
The layout is planned so that the breif summary will be in that first post, then detailed explanations and pics will be in the thread as I do them.
And for anyone who is worried about me depleating the worlds supply of L67's like I have the LQ1, fear not, I do not have a seemingly endless supply of these, so im gonna be careful with this one.... not real careful, just reasonably....
[This message has been edited by 86GT3.4DOHC (edited 03-27-2006).]
IP: Logged
05:42 PM
Mar 28th, 2006
86GT3.4DOHC Member
Posts: 10007 From: Marion Ohio Registered: Apr 2004
Oh well, anyway, I got the harness and ECM, I think its going to be easier to rewire it rather than try to eliminate the fuseblock and try to trace the wires through the looming. Im workin on the alternator mount when I get time next, then the wiring, then mounting. I'll keep ya posted with pics
IP: Logged
11:09 PM
Mar 29th, 2006
fierce_gt Member
Posts: 1517 From: Winnipeg, Manitoba, Canada Registered: Oct 2002
Have you seen what I used as the low mount alternator? I retained the stock 3800sc alternator. I can get to a sketch whith dimensions if you would like. I machined the GTP dog bone bracket to a thickness of about 1.040 that was located on the right rear of the engine. I then got tensioner for a 95 ford winstar 3.8l. The result is that the accessory belt is perfectly aligned. You are welcome to come to akron ohio and take a look.
I can get to a sketch whith dimensions if you would like. I machined the GTP dog bone bracket to a thickness of about 1.040 that was located on the right rear of the engine.
Umm...Like yea.
86GT3.4DOHC Great write up so far. I should be starting this soon. I'm picking up an 88 coupe this weekend.
IP: Logged
02:01 AM
KeithGT Member
Posts: 540 From: Huntsville, Al Registered: Jan 2006
great to see you already got going on it, and it sounds like youve got alot figured out already. Cant wait for this, sorry bout forgetting the wiring, glad you got it already. I was planning on keeping that 3800 alt, for no other reason than its higher amperage, cant hurt anything, also, youve got PM......
IP: Logged
02:47 AM
darkhorizon Member
Posts: 12279 From: Flint Michigan Registered: Jan 2006
Oh well, anyway, I got the harness and ECM, I think its going to be easier to rewire it rather than try to eliminate the fuseblock and try to trace the wires through the looming. Im workin on the alternator mount when I get time next, then the wiring, then mounting. I'll keep ya posted with pics
So I`m taking it --your going to keep/use the 3800 fuseblock ?? I know you don`t have to , I went through 3 re-wires before I figured this was the best way to go.. Along with alot of help from the conversion guys--some do some don`t, but so far it has the other way beat..
IP: Logged
08:34 AM
ohio86se Member
Posts: 1308 From: akron, ohio, summit Registered: Mar 2002
Just an update, im working my way through the wiring while working on the alternator mount on the side. While modifying the original tensioner bracket looks fairly simple to accomplish what im going for, I opted to make it myself. Im going to hang the alternator off the outwardmost bolt hole in the head, but spaced out, and have a triangular plate across all 3 holes that will support the idler and dogbone. I not sure if im just bolting the alternator right into the head or if I'll hang a boss off the bracket to shift it out more. The only clearance problem im having is the spark plug wire head is pushing up against the back. I dont think this will be a problem since not only is the insulation 1/2" thick at the head, but also the alternator has a plastic cover on the back.
As for the wiring I tore the whole harness apart, im working on IDing all the plugs and I made a picture walk through for disassembling the ECM connectors. I will post it when I have it all done, then later once I get the engine cleaned up, route the wiring.
IP: Logged
09:20 AM
Apr 4th, 2006
ohio86se Member
Posts: 1308 From: akron, ohio, summit Registered: Mar 2002
Just an update, im working my way through the wiring while working on the alternator mount on the side. While modifying the original tensioner bracket looks fairly simple to accomplish what im going for, I opted to make it myself. Im going to hang the alternator off the outwardmost bolt hole in the head, but spaced out, and have a triangular plate across all 3 holes that will support the idler and dogbone. I not sure if im just bolting the alternator right into the head or if I'll hang a boss off the bracket to shift it out more. The only clearance problem im having is the spark plug wire head is pushing up against the back. I dont think this will be a problem since not only is the insulation 1/2" thick at the head, but also the alternator has a plastic cover on the back.
As for the wiring I tore the whole harness apart, im working on IDing all the plugs and I made a picture walk through for disassembling the ECM connectors. I will post it when I have it all done, then later once I get the engine cleaned up, route the wiring.
Thought I would revive this before it went to archives.
Update, the targent car has switched from the yellow 86GT to a black 87GT (and possibly again before this is over and done with )
So last night I got bored and rolled the car into the garage to look at it. Well one thing led to another and 2 hours later im starting to lift the body... oops...
So shes about to go into mounting mockup soon. Ive got a whole pile of mounts and brackets that should make this relatively easy. Wire is all broke down and just needs routed, and as far as appearances go, I think the black cover with red stripes will match the black car with white and red pin stripe perfectly, so I'll just clean it up and put it on there
IP: Logged
03:10 PM
Jun 6th, 2006
86GT3.4DOHC Member
Posts: 10007 From: Marion Ohio Registered: Apr 2004
Well Mounting will be the next step (and eventualy I will get to updating the top of this thread)
Looks like I have a gammett of possiblilities for mounting.
The front mount is the same bolt pattern as the stock Fiero mount, as well as most any other GM engine/tranny mount of the same genera. So I might fit the stocker, or the Fiero one, or one of the others I have laying around. I havent quite gotten to how the mount is going to attatch to the frame yet
As far as the tranny side, Ive got this neat-o bracket and mount that either came off a lumina 3.4 car or a TGP, but regardless it should fit the bill with a little tweaking. Its big and beefy, sits up high, and uses a stock tranny mount that is easily changeable and fits the tranny holes. Im just going to have to torch and trim the bracket a bit to get it at the right height.
As far as torque control I'll probably weld a dog bone to the plate I used to hold the tensioner and alt, but I think I will stick something down low too (cant over mount a drive train) either off of the AC bracket or those lower holes in the tranny case. Ive got to go home and look, but if there are holes on the tailshaft of the tranny like the 4t60's had with a mount that encircles the pass drive shaft, I'll use that.
Then I move on to drive shafts. This has been a very foggy area for some reason, so my first try will be 2 Fiero manual tranny drivers side shafts, remove the inner cups and replace them with the 4T65EHD cups and see if that looks right.
IP: Logged
09:17 AM
86GT3.4DOHC Member
Posts: 10007 From: Marion Ohio Registered: Apr 2004
According to a forum member in this thread, the stock hoses can be used with an adapter. My hoses and the seals and adapter should be in before the weekend, and I will post the results.
I Believe the adaptors work, so you should be fine, in the event that it does not work out for you, and you need to fabricate hoses, you don`t have to send them off somewhere & pay a small fortune, just take the hoses to your local rad shop or someone that knows how to aluminum solder. An AC shop buddy of mine helped me--he has done AC for 25 plus years. He said we actually could have stayed with the Fiero stock system & R-12, this of course was after the fact. He does alot of older rods --that didn`t have AC .
Im going to keep the top post updated with pricing and plans and quick information best I can. I will try to give credit where I can, if you do not want me posting your information here I will take it down if you let me know, but its all posted elsewhere for free. Also if you see something you think is yours and want credit let me know, I didnt take notes on where I got some of this stuff.
I do have a bunch of new pulleys.
Keeping the top post updated and current as to what you do and works is VERY helpful to the NewBees and others alike. It is so easy to loose track of the project by reading the thread. Lots of people have good inovenative ideas, but hafving the summary of what you actually did and what worked is a big big help.
I wouldn't mind seeing one of your postings dedicated to failures, not in your update post but shortly after it. Show what you tried and why it didn't work. Failures are as important as sucesses, to keep others from going down the wrong path.
I know how difficult it is to document a project and it will be sincerely appreciated.
I pulled the pulley off yesterday with just a 3 jaw puller. It dinged the inner groove a little, but who cares it was bent already. Still looking for a replacement.
Im also working on the AC hoses, I have a lead on that.
As far as the shifter goes, im looking at the tranny end still, will have to use the Fiero lever I think, mounted at a diffrent angle.
For the interior shifter, I have a 4spd assembly, not really anything interchageable there, I could cut it up and weld it on, but I think it would be easier just to cut a 4th notch into the Fiero shifter, though I havent looked into how to make the trim work with it.
IP: Logged
11:00 AM
Jun 24th, 2006
86GT3.4DOHC Member
Posts: 10007 From: Marion Ohio Registered: Apr 2004
Rescuing this from being archived again, its just hard to keep it updated without a ton of intrest, but I guess I got spoiled by all the attention I got with my first build thread, but I did that back when 3.4DOHC's were still kind of new to the Fiero community.
So I got all the mounts made, went to autozone and bought an arm full of random mounts, I just opened every small box they had and took what looked promising. I used 3 mounts from them, each about $5 Autozone part # 2337,2393, 2394
I also used a stock fiero front mount, and a stock I have no idea rear tranny mount. It either came off a 3.4DOHC or a 90 TGP. I also used a bracket from whichever vehicle it was, heavily bent, for the tranny mount. The front engine mount was just a 3/16th plate and some angle iron welded to the bottom of the cradle. The front torque mount (under the AC) was just a little piece of angle welded to the AC mount, the front tranny side torque was just a lenth of 3/16th plate welded to the stock 4T65HD mouning plate, and the rear was a piece of 1/8th plate. Also I cut and rewelded the 4t65HD tranny mount to lower the engine in the cradle.
The welds aernt pretty, but I dont care, I just wiped the slag off and painted them, im more function over form, no one will probably ever see them again anyway.
well you're just going to have to imagine the front engine mount until I get it up in the air a little
I also notched the cradle at the front where the 3.8 engine mount loops around to the front of the engine so I could keep it sitting lower, I replaced the removed metal by welding in some angle and boxing it in. This could have been avoided by reworking the engine mount on the front side, or just raising the engine
Well there she sits.
I was able to reverse the fuel rail by simply turning it around and trimming a little on a few things, no biggie.
We'll heres where I stand now
[This message has been edited by 86GT3.4DOHC (edited 06-24-2006).]
IP: Logged
12:42 PM
tjm4fun Member
Posts: 3781 From: Long Island, NY USA Registered: Feb 2006
well, it is interesting to see where you are in this build. I read thru most all of the build threads, but don;t often post. just to give ya some support. Nice box of stuff there. every build needs a box of stuff to finish it off the exhaust is an area that interests me, will be curious to see you put that together.
IP: Logged
03:24 PM
darkhorizon Member
Posts: 12279 From: Flint Michigan Registered: Jan 2006
Your mounts look alot like mine, but with the 88 cradle I get a bit more options so I decided against using the nice side mount. This allowed me to put the trans pan just below the cradle itself, so I can get the engine LOW. I too am disapointed how noone cares about our build threads, so lets just bump eachothers lol.
Now its a race to see who can post the first running car video!
BTW I am stealing your idea for your "dogbone" replacement mount, cuz I love it. ------------------ Check out my 3800 swap thread and lend your advice!
ROTFL, thats not the remaining parts, thats just for the wiring, lol. Oh I wish the remaining parts would fit in a shoe box.
As far as the dogbone replacement, make sure you have a strong torque control setup on the front of the engine, you wouldnt want to crack the tranny case, as I think it would put some odd force on that mount without sufficient support.
I actualy had to raise my engine some as I was concerned about the inner CV shafts hitting the cradle, I think I have about two finger widths at rest from the bottom most of the inner tripot, and I figure the engine will squat when I get on it.
IP: Logged
06:00 PM
86GT3.4DOHC Member
Posts: 10007 From: Marion Ohio Registered: Apr 2004
Actualy I looked while I was working on it, my tranny pan hangs slightly below the cradle too, unfortunately in my case, as I had not considered this as a problem. Not sure if I will make a skid plate or just cross my fingers.
I got the tranny shifting figured out and made tonight. Odd thing, unless Im completely missing something here, the stock shifter is actualy notched for a 4 speed, it will go back one more click past "1" in the window, but I guess the TH125 is what stopped it before. Unfortunately I might have tweaked the shift ratio's just a hair, its dead on for PRND, but by the time you get to 1 (on the tranny 0 on the shifter) its a little iffy as to which gear it will be in. I finalized the welds and will have to check again.
I got the fuel rail about finished, I just flipped it around and trimmed some clearance where needed. Turns out I also have to tweak the mounting tabs a little. I've got about 3' of the plastic lines, so if I can find some kind of repair kit so I can work with them, im going to cut them to lenght and attatch the stock fiero metal lines so it will be a stock fuel connection.
I also test fitted the engine, man TONS of room in there, fits great. I gutted all the extra lines and what not to clean it up.
The throttle cable seems simple enough, and I think if I flip the cruise module and maybe use the stock cruise system (lol, as if that would be the simple answer)
Tranny lines are close, im going to try and bend them to point to the drivers side to save making all new lines as I havent even looked at how they connect into the tranny, but it looks kinda like a complex fitting
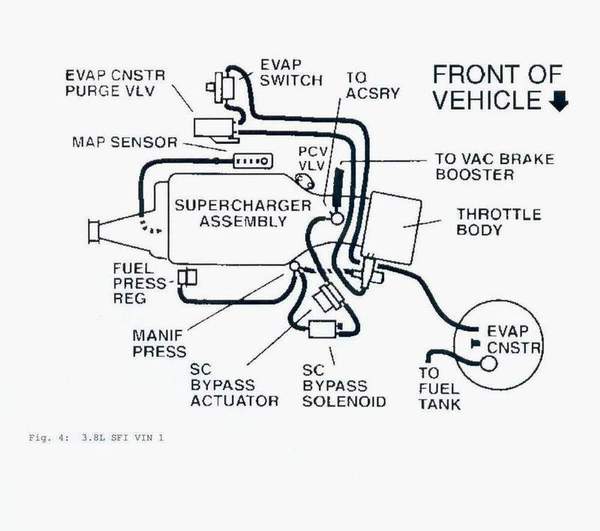
I flipped the vac distribution block on top of the SC, so the stock brake booster hose fits like a glove, I just have to cap off one of the ports that is blocked now.
IP: Logged
11:18 PM
Jun 26th, 2006
darkhorizon Member
Posts: 12279 From: Flint Michigan Registered: Jan 2006
I am making all new trans lines, at least to where they are sorta on the body. The stock lines dont really work out to be very pracical coming straight out the front, so I am going to run them around and to the side a bit.
I havent test fit the motor yet, but I am expecting a similar reaction as all my measurements show lots of room all around also.
I am super lucky to have the only trottle cable that goes on without any modifications. I am running stock cruise off a GTP, as it plugs right in, no vacume or anything to mess with.
I wish I had the stuff ontop of the SC, I got mine from somone that left all the fancy plastic off it.
What excatly did you do for trans shifting? did you make a reverser or a extender?
IP: Logged
12:48 AM
86GT3.4DOHC Member
Posts: 10007 From: Marion Ohio Registered: Apr 2004
Actualy I was a little worried about clearance, but aparently my estamations were way off as I have tons of room.
What throttle cable do you have?
I might end up getting rid of the vanity cover, when you flip the valve covers and the cover its nowhere near where it should be
I might pick up a 3.8SC cruise unit, seems like it would be easy and more reliable.
As for shifting I made a modified shift bracket, kind of a C shape that reaches under the cross over, just barely clearing the tranny on the bottom, and curves around the bolt that holds the tranny switch down. I'll get some pics and what not for you. I then welded the cable holder to the tranny mount bracket. I took both parts off a TH125 and modified them. I was making a reverser, even had little tie rods and everything, but I spent all that time making it only to realize I made it too short to reach the outer gears DOH!!
IP: Logged
12:58 AM
PFF
System Bot
86GT3.4DOHC Member
Posts: 10007 From: Marion Ohio Registered: Apr 2004
I placed all the sensor plugs and routed the wires through the engine, now there is a giant ball of wiring stuffed through the firewall passthrough. I am going to need a LOT of heat shrink tubing. I wrapped the harness completely and tightly with electrical tape, forming a moldable harness so I can bend and tweak it into the exact shape I want.
I also finished the fuel setup. Apparently the way to repair the new plastic fuel lines is to heat them up and cram a barbed fitting into them, so I mated them to a 3" section of fuel injection hose then the stock fiero hard connections
I tried to rotate the tranny cooler lines, but that did not work well, I'll look into that tomorrow.
I checked on CV shafts, all I can find are 1" inner shafts, so I might just use the stock drivers side shaft and make a passenger side
Im working on cutting the crap off the exaust flange and I rounded up my 3" tubing to get started on that.
Im still contemplating heater hose routing and cooling tubes
I suppose pics would help.....
Now if I could just find the damn fuel rail bolts and nuts....
QUESTION: Does the fuel pressure regulator need to be hooked to the vacum before the SC or after to get pressure under boost? Im guessing the latter but I would appreate confirmation.
IP: Logged
11:38 PM
Jun 27th, 2006
darkhorizon Member
Posts: 12279 From: Flint Michigan Registered: Jan 2006
The fuel pressure reg runs on boost, it just gives a bit of "anti knock" assurance aside of the computer programming. It doesnt do anything unless the vac lines have pressure.
We seem to be in aboutt the same place in our swap honestly, my mounts look awesome, going to get some nice painted pictures tommorow.
I am sorta jealous of your luck with lines, I might just get some high pressure rubber hose and just run them instead of the fancy setup I wanted. That plastic stuff gives me nightmares, really...
My trans lines just keep looking worse and worse, I am going to run rubber from all the way underneath them to the stock lines. are you going to run an extra cooler? I think I want to put another one up front.
i am putting my PCM where the stock intake goes, right by the black grill. It will get wet when it rains, but meh its designed to. I am going to make a "wiring" thread here in a few mins after my pictures finish uploading, I will make it seperate from my build thread as I think it coule be really cool as I am posting lots of pictures.
I have my cruise unit all mounted up, I just need to get a plug for it, as i thought there was one on my wiring harness.
My 88 4cyl throttle cable is awsome, it just clips right in, with the addition of one small hole in the TB bracket. Then the cruise just clips into the stock bracket, really trick, and really simple.
IP: Logged
11:37 PM
Jun 29th, 2006
86GT3.4DOHC Member
Posts: 10007 From: Marion Ohio Registered: Apr 2004
Well a little torch work and I got the tranny cooler lines pointed the right way, then I cut off the crimp fittings.
I also took the heater hose elbow out of the tensioner/alternator bracket that was eliminated, then made a little fork to bolt in and keep it from poping off. Also replaced the waterpump while I was in there.
I bolted up the alternator, but the belt I got (790K6) was about 1.5" too short
Well, its getting there. I spent all day at work finishing the plans for the wiring harness, AND NOW ITS GONE!!! All the stuff I pulled off my work pc onto my jump drive is missing, though it reports 80 megs used, and I can only find 25 of them so I know its there, now I just have to recover it...
IP: Logged
10:38 PM
Jun 30th, 2006
86GT3.4DOHC Member
Posts: 10007 From: Marion Ohio Registered: Apr 2004
Does anyone have vacum routing diagrams? Im a little stumped by the EVAP system, there are 2 solenoids, I think I only have one, and no idea how they were setup originaly
Awesome, thanks! nice to see some people are watching this thread. I know its probably a little boring without pics, I'll get some today.
Heres a nice treat though, wiring conversion information !!!!
Well here is what Ive come up with for the wiring, please dont yell at me if something is wrong, I have not tried it yet, but from cross refrencing probably 20 diffrent schematics, Ive come up with this. I spent a lot of time on it, and am not getting anything out of distributing it, so gimme a plus if its helpful.
I still have not figured out the trunk release saftey yet, as I cannot figure out how its wired in the Fiero, there only appears to be one wire going to the tranny, and its not like ground=enable, at least as far as I can tell. I will look into it later, and if nothing else I will just have to disable the saftey lockout on it. I also am not sure about the tempature sender for the guage. There is a dark green wire from the CTS that runs straight to the "instrument cluster", and there is already a wire for the temp warning light, so Im assuming it will feed a guage, though I have never seen it said specificaly in a diagram.
Also note I have decided to use the original upshift indicator for the change oil light (though I may go with the low oil indicator, dunno yet). I am also not sure about the AC yet, I think the Fiero sends 12v to signal on, and the L67 sends ground to the PCM to turn it on. I'll update when I figure this out.
Anything other than wire color thats highlighted is something im unsure of
****NOTE: I forgot the 12v feed for the tranny, itsa pink at location 5 of the round tranny connector, you will have to select a feed for it****
AND you may want to evaluate my distrubution of 12v(pink) feeds, to make sure im not over powerering one wire, but I think I distributed them evenly C203 Pin - Wire Color - Original use - New Use - Pin on conversion harness
C500 Pin - Wire Color - Original use - New Use - Pin on conversion harness
ALDL link, Fuel Pump Relay, and AC relay
L67 Tranny connector (not shown in any diagrams, only pieceing things together here - use at your own risk)
I am fairly positive Pin D must be grounded for the ECM to see the gear posistion, as the other four wire connector (the one that runs to the ECM) terminates to ground in the tranny, which is this black wire
[This message has been edited by 86GT3.4DOHC (edited 07-01-2006).]
IP: Logged
12:48 PM
86GT3.4DOHC Member
Posts: 10007 From: Marion Ohio Registered: Apr 2004
Here is how I attatched the alternator, there are easier ways if you have a diffrent style alt
And how I attatchedscrewed up the heater hose. You will not want to use this port with an 87-88. Use a 1" freeze plug to block it off. I was able to do this because I made a custom bracket that I welded a nut to, you may have to use someplace diffrent to bolt it down. I will put a freeze plug in the hole on the intake. Its about .86 inches, whatever that is.
How I attatched the fuel lines. The plastic lines are supposed to be soaked in hot water, then barbed fittings jammed into them, but I decided to heat the fittings and push them in, worked great and the hoses heat shrink onto the fittings, so its a good seal. I also used s pipe cutter to put some ridges into the steel pipes so the hose holds better
Heres what I did for the shifter cable. Works good but I made the mistake of matching the shift throw to the L67 tranny, where I should have made the arm to match the Fiero shifter.. doh!
Heres a bad pic of the throttle body, I welded a nut over the hole where the throttle cable ties in, and got a bolt that is just long enough to go through, and just thick enough to pass through the stock cable end. Should work great
Now I just have to sort though the rest of this
[This message has been edited by 86GT3.4DOHC (edited 11-27-2006).]
IP: Logged
01:12 PM
Jul 2nd, 2006
86GT3.4DOHC Member
Posts: 10007 From: Marion Ohio Registered: Apr 2004
Now for the Cooling system. The car I went with was an 87, so I did not need a coolant return line from the heater core, if you use an 84-86 car you will have to make one, but it would be relatively easy. Instead, 87-88 cars you simply plug the heater port in the LIM right under the blower snout, its about .86" ID, use a steel freeze plug.
For the other hoses, I used these: You can see where I trimmed them. There is also 2 sections of 2' 5/16ths tranny cooler line for the tranny cooler.
I will elaborate more later, but the part #s for the hoses were XL62144 - Autozone $19 XL60715- Autozone $10
I'll finish this post later,
[This message has been edited by 86GT3.4DOHC (edited 07-17-2006).]


 so I know its there, now I just have to recover it...