Pennock's Fiero Forum
  Technical Discussion & Questions - Archive
  87 - 88 Headlight motor rebuild instructions.

T H I S   I S   A N   A R C H I V E D   T O P I C
  

Email This Page to Someone! | Printable Version


87 - 88 Headlight motor rebuild instructions. by RACE
Started on: 09-06-2005 11:34 PM
Replies: 3
Last post by: Fastback 86 on 12-26-2005 04:37 AM
RACE
Member
Posts: 4842
From: Des Moines IA
Registered: Dec 2002


Feedback score:    (45)
Leave feedback


Total ratings: 157
Rate this member

Report this Post09-06-2005 11:34 PM Click Here to See the Profile for RACEClick Here to visit RACE's HomePageSend a Private Message to RACEDirect Link to This Post
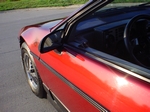
When my car started winking I had to do something about it. I hate to see Fiero's with permanently raised headlights.

If you have an 84-86 go here. Your lights are different and these directions will not apply.

Owners of 87 or 88 Fieros you are in luck, these are the easier of the two systems. Although it is not all that hard to do, I thought I would post my build project.

This build is based upon removing the electric motor from the gear assembly during the project. I found it to be much easier than trying to slot one of the gears and pulling the end off of the axel shaft. (Don't worry if you did not understand the last sentence. It won't matter using this method).

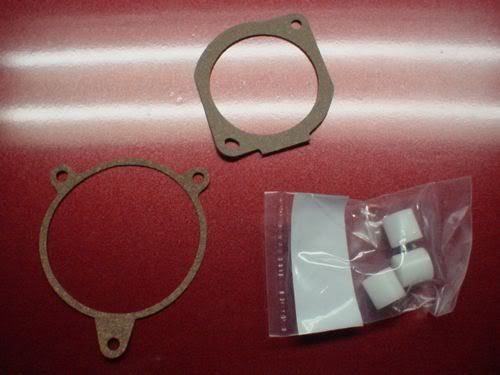
After ordering Rodney Dickman's rebuild kit I thought I had received the wrong parts but I got everything that was needed. Buy the gaskets, you will need them during reassembly. (Go to the Electrical Tab and then scroll down to the headlights section). I bought kits for both sides even though I will not install the driver's side until it fails. You can't beat $9/per side shipped when you order both at the same time. For pop-up headlights these are a bargain.

Step 1

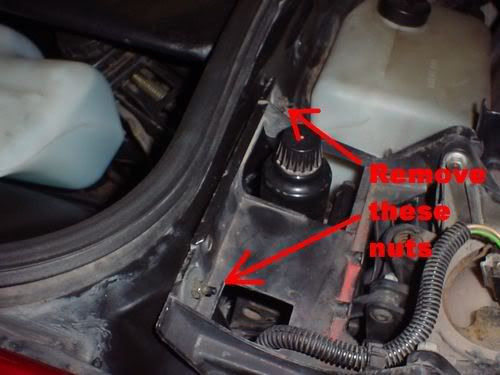
Crank the headlights up using the knob by the top arrowhead in the photo because you will need room to loosen the bottom two bolts. They do not need to be completely removed like the top ones. The assembly has slots for the bottom two bolts instead of holes so that the assembly can slide onto the studs.

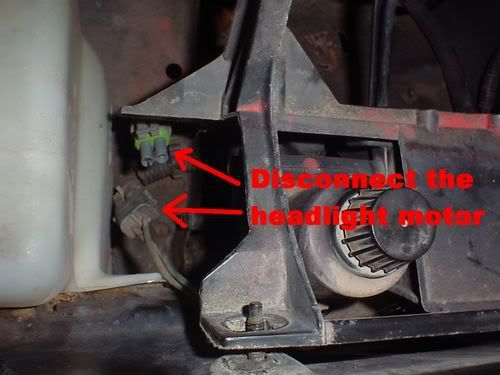
Step 2 Remove the wire from the back of the headlight and disconnect the wire for the headlight motor. I did not find it necessary to disconnect the battery cable.

Step 3 Remove the assembly

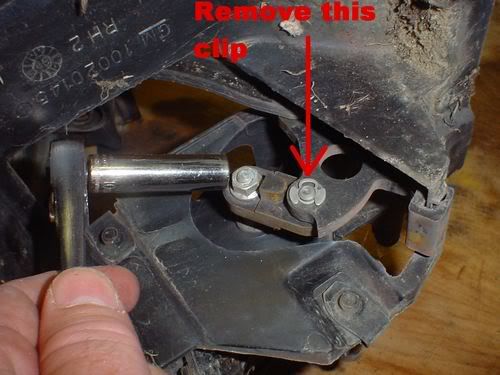
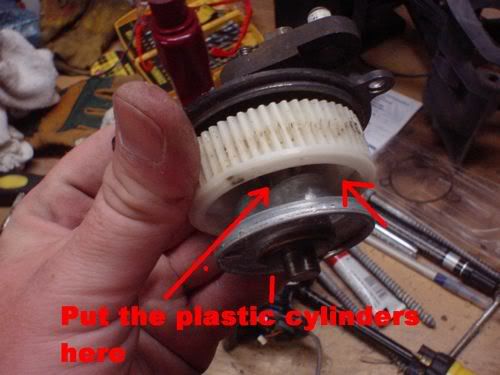
Step 4 Remove the clip. Do not remove the nut. It is not necessary when the electric motor will be removed. (There is also no threat of bending or scratching the axel shaft). Once the bolts are out this will allow you to separate the motor assembly from the actuator arm that actually moves the headlight up and down.


v CONTINUED v

[This message has been edited by RACE (edited 01-20-2006).]

IP: Logged
PFF
System Bot
RACE
Member
Posts: 4842
From: Des Moines IA
Registered: Dec 2002


Feedback score:    (45)
Leave feedback


Total ratings: 157
Rate this member

Report this Post09-06-2005 11:35 PM Click Here to See the Profile for RACEClick Here to visit RACE's HomePageSend a Private Message to RACEDirect Link to This Post
Step 5 Remove the electric motor from the gear assembly. This will allow you to be able to disassemble the gearbox. (The worm gear from the electrical engine hangs up on another gear inside and prevents disassembly unless it is removed). Spray the screws holding the electric motor with Liquid wrench. They may be stuck and you could accidentally shear one off. I forgot to get a photo of the motor separate from the gear assembly. There will be little springs that may pop out when you do this step so take care not to loose them. (They are also tricky to reinstall. - The most difficult part of the build).

Step 6 Take apart the gearbox and clean out the debris. The old cylinders will have been pulverized and need to be removed.

Step 7 Install the white cylinders into the three slots between the gears. They will fit perfectly. These pieces are what connects the outer gear to the driveshaft that runs the headlight up and down.

When you put this gear back in, it does not matter if the teeth line up like they were when you pulled it out. There are no internal mechanical stops. If the teeth on the gear are stripped replace it. They should be fine since they don't normally strip like the ones on the 84 - 86 headlights.

Reassemble in reverse order and crank down the headlight

Reassembly Note: I looped waxed dental floss around the wires that are attached to the brushes in order to hold them back in their proper place when I put the electric motor back together. (There is not enough room to stick anything else in there when the parts go together). After everything was in place I pulled the loose ends of the floss out and put the screws back in. The brush wires proved to be strong enough.

The project took about an hour. Next time it will probably take less than 20 minutes if I don't spend a lot of time cleaning. Reassembling the electric motor would have gone faster and been much easier if I had another person to help me.

------------------
1987 Fiero SE

[This message has been edited by RACE (edited 01-20-2006).]

IP: Logged
cyrus88
Member
Posts: 394
From:
Registered: Jun 2003


Feedback score: N/A
Leave feedback

Rate this member

Report this Post12-26-2005 04:32 AM Click Here to See the Profile for cyrus88Send a Private Message to cyrus88Direct Link to This Post
Thanks, that was very helpful .
IP: Logged
Fastback 86
Member
Posts: 7849
From: Los Angeles, CA
Registered: Sep 2003


Feedback score: (1)
Leave feedback


Total ratings: 231
Rate this member

Report this Post12-26-2005 04:37 AM Click Here to See the Profile for Fastback 86Send a Private Message to Fastback 86Direct Link to This Post
Nicely done! I probably spent twice as much time cleaning everything while I had it all out as I did actually rebuilding the motors. Rodneys stuff works perfect, and the 87-88 motors are soooooo much easier than the earliers. My headlights work like new again, its great.
IP: Logged


All times are ET (US)

T H I S   I S   A N   A R C H I V E D   T O P I C
  

Contact Us | Back To Main Page

Advertizing on PFF | Fiero Parts Vendors
PFF Merchandise | Fiero Gallery | Ogre's Cave
Real-Time Chat | Fiero Related Auctions on eBay


Copyright (c) 1999, C. Pennock