Ok, my story will basically follow the same path as the PFF'ers that inspired me to do this. You will know who they are soon enough as I will thank everyone periodically and every time I copy their ideas. Now you can follow my story as I have followed others, and hopefully I can give back to the Fiero comunity the insperation? everyone here has given me. Not just the DOHC'ers either, I have learned alot from all the Fiero enthusiasts.
I got tired of this...
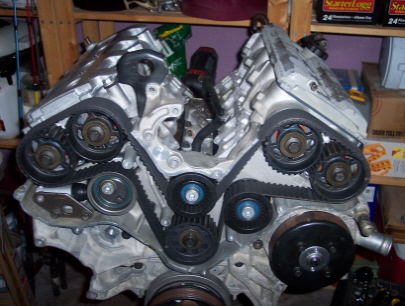
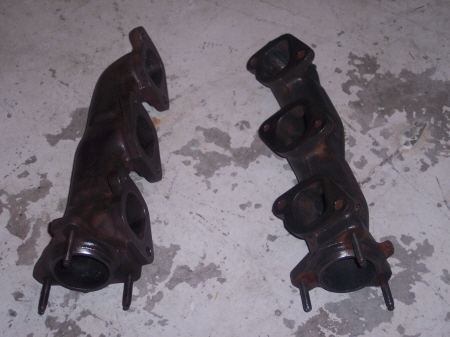
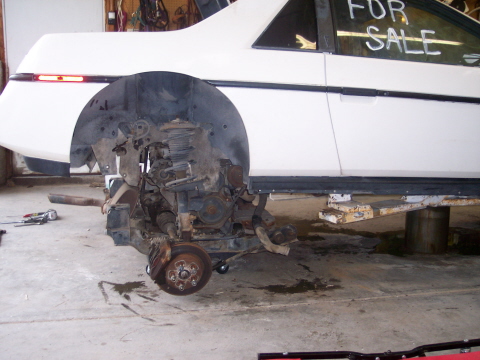
Sold it, & bought this... (Auction) It started out looking like this.. was tired, so off to the "month spa" to get in shape.. Anyone remember this "special" tool... so it came home looking like this...
IP: Logged
01:09 AM
PFF
System Bot
t76racer Member
Posts: 233 From: Salt lake, Utah, Salt Lake Registered: Nov 2004
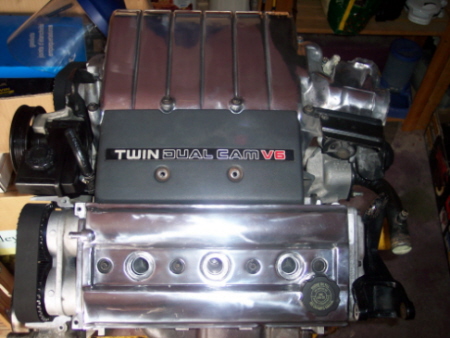
Full tubular suspension! Fully adjustable coilovers front and rear! Poly everything! 3.4L TWIN DUAL CAM V6 240+H.P. Heads p/p! underdrive pulley! Darth chip! Accell performance ignition! Borla exhaust (how sweet)! Strut tower brace Now who ever said that a V6 can be fast????????
IP: Logged
01:48 AM
t76racer Member
Posts: 233 From: Salt lake, Utah, Salt Lake Registered: Nov 2004
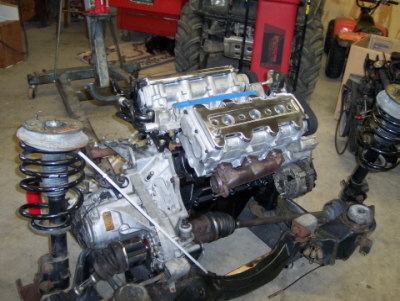
Ok, now I was looking for parts right? So after some research, (here) I got the "bug"(here) and then got this... I started pulling the cradle the day after I got it. This one is directly related to you all at PFF! It's your fault I bought this one, oh well it's an 88 so you know what the plan is. Anyway I definately need help on this... This is where I am today I will get into it more tomorrow and explain to the other "newbie's" how easy it has been up till now. So that's the the "short" of it for now. I got alot more pic's but I will spare yah for now.
Congratulations on starting the swap and I hope it goes well. It looks like you've eliminated the possibility of the biggest bummer that seems to be hitting us DOHC'ers - getting a bad motor. Nice work on the rebuild - what'd you have done to it and what'd you put in it?
IP: Logged
03:19 AM
Jun 22nd, 2005
t76racer Member
Posts: 233 From: Salt lake, Utah, Salt Lake Registered: Nov 2004
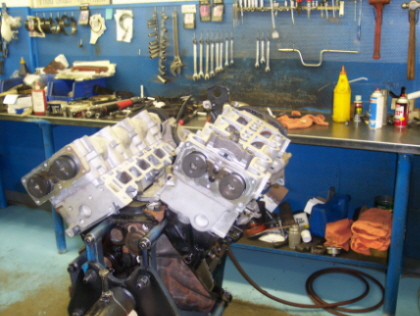
Ok, not much tonight. Exotic - thanks, I cant wait to rev on a Stang! Blue Shift- Well this motor has a complete rebuild (everything) Try'ing to be short: These are all new: Pistons(FM), Rings(JE), Crank, Lifters(Clevite24$!!), Clevite:rod berarings, cam bearings, main bearings, timings sets, every gasket, oil & water pump. The crank and rods are knife edged, shotpeened, balanced. The pistons are ceramic coated. The valves are stock with 3 angle grind. Springs were tested and reused. All belts are new, dampner is new, even timed for me. It has been hot tanked twice, magnafluxed everything. I even had to bring the clutch and flywheel with the bolts to be balanced. I figure I will get it running right first and then I will start to upgrade the internals, and the usual mods.
IP: Logged
01:43 AM
t76racer Member
Posts: 233 From: Salt lake, Utah, Salt Lake Registered: Nov 2004
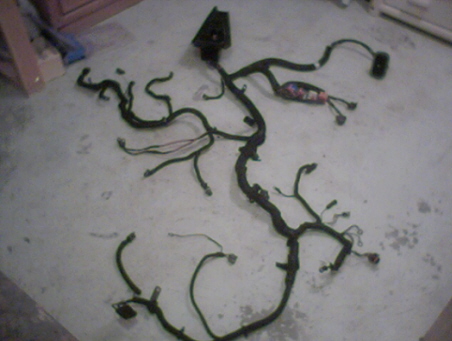
Oh, and the only thing I had time to do today was pulling the Fiero engine harness. There is a mess of vacum lines under the plenum, I usually work on 4 bangers so I was suprised on how many lines this thing has. I forgot my camer so, no pics today.
I was wondering though, I plan on using an aftermarket dashbord display, and I am under the assumption that most of the wiring that needs to be changed is for the stock gauges? So if I use an aftermarket unit like one from "Racepack" could I just use the Z34 harnes without alot of splicing? Or should I just get in contact with "Erik" the member that does harness? Tell me what you guy's think.
IP: Logged
01:53 AM
Steven Snyder Member
Posts: 3323 From: Los Angeles, CA Registered: Mar 2004
Most of the modifications to the harness are for eliminating the fuse box on the Z34 harness that was in the engine bay and incorporating the Fiero's fusebox in place of it. The circuits themselves do not need to be modified to use the Fiero's gauges; y ou just have to make splices to get the signals to them through the firewall via the C203 and C500 connectors on the Fiero. The Z34 does not have identical connectors, so you would have to splice the circuits into the Fiero connectors anyway to get the signals into the car. Its the same amount of work as far as wiring goes.
IP: Logged
02:29 AM
Aardon Junior Member
Posts: 1 From: Indianapolis, IN Registered: Jun 2005
Steven Snyder, I have copied the DOHCFiero, schematics and am going to try to make some sense of it, now that I have both harness out together. Are you done with yours fully? I will go over to your build thread and take another look, thanks.
Aardon, The complete cost I paid was $2900.00 , and yes it was professionally built. A company here in Salt Lake, called "Temples Maschine" (yes it is spelled correctly) I am part of a race crew, we race Pro Modified at the same track as this company's builder. Many of the local teams use this shop and they have a great reputation. They have been around for along time, and are experianced high performance builders.
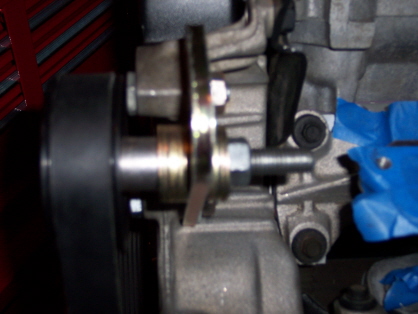
I am giong to pressure wash the cradle tomorrow, and I will post pics, but for now: Here is my idler pulley
I found an idler pulley at a local freight salvage store, I simply drilled another mounting hole, for the bracket and had to move the pulley down some. I used the pulley and the provided spacer, but needed to use some more washers to space it further. It was easier than I thought, anyone wondering about specific parts to do this, don't stress it. All you really need is a 6 groove pulley(with bearing) mount it to a peice of metal (bracket) space accordingly, done.
I will clean it up some though, like the long *ss bolt.
IP: Logged
01:11 AM
Steven Snyder Member
Posts: 3323 From: Los Angeles, CA Registered: Mar 2004
Originally posted by t76racer: Steven Snyder, I have copied the DOHCFiero, schematics and am going to try to make some sense of it, now that I have both harness out together. Are you done with yours fully? I will go over to your build thread and take another look, thanks.
Yes, mine was completely done (rebuilding the motor now after running it for 1000 miles before it starte dknocking). There are errors in the DOHCFiero.com wiring guide. PM me with your email address and I will send you all of my wiring notes. I am not sure that I have recorded everything so I don't want to post it on the forum until I've made sure my notes are complete.
IP: Logged
03:38 AM
PFF
System Bot
Jun 25th, 2005
t76racer Member
Posts: 233 From: Salt lake, Utah, Salt Lake Registered: Nov 2004
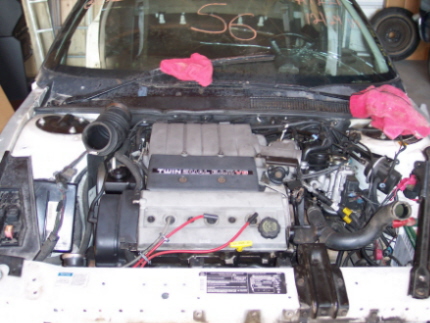
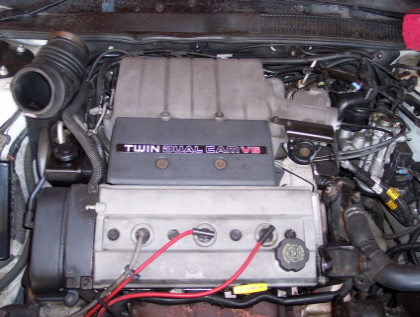
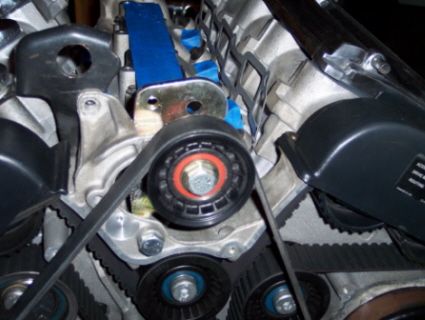
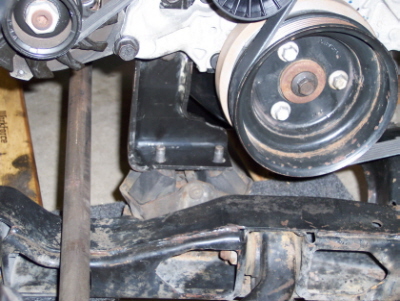
Ok, Today I made some progress. For anyone contemplating doing this swap, let me just say it is exactly as everyone say's , that it is a complete bolt up affair. The only modification I had to do, is the front motor mount. I just trimmed alittle off the sides like I saw in "Blue Shift's""86GT3.4DOHC" and Steven Snyder's build up thread. Thanks guy's it really is that easy. I am using the stock "old" mounts just to get it in and running. I know, I know no one needs to say it, I am going to use poly on my on my 88 cradle, which is where it will end up. I figure I will kill two birds, by doing this..1 I need to get the motor running and break it in...2 I will show others that are wondering that you actually can use the the stock mounts. I definately would not recomend any spirited driving though as the stock ones suck and are old and flexable!
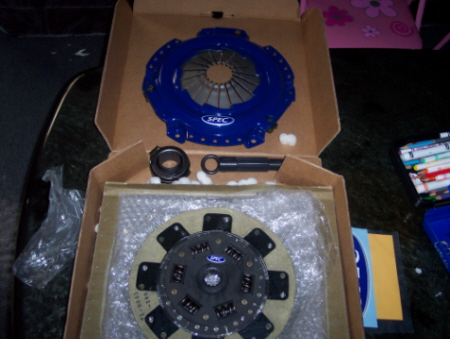
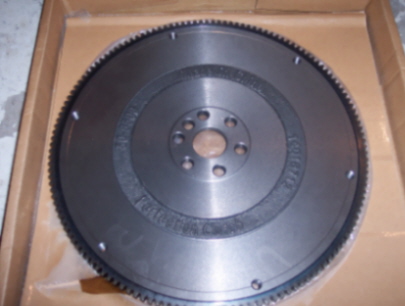
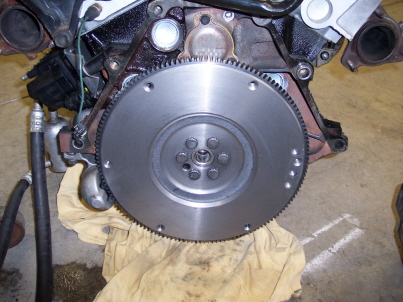
I am going to just get it running, and debugged before I buy more mounts. This is a pic of the stock 87 mount on the 3.4DOHC I am using a new flywheel from "Napa" it is for an 89 Berretta with the flywheel bolts. The flywheel part# 50-6500 & the bolts #615-1564 easy as sh*t. I copied "86GT3.4DOHC" for this part, so I will take the time to thank him, Thanks Next I copied many on here that use the "Spec" clutch "stage 2" everyone recomends it so I wont "fix it" I then simply bolt the motor to the tranny (every bolt lines up perfectly) yet again to asure anyone (that dont know) that it bolts right up. Made to fit the fiero cradle
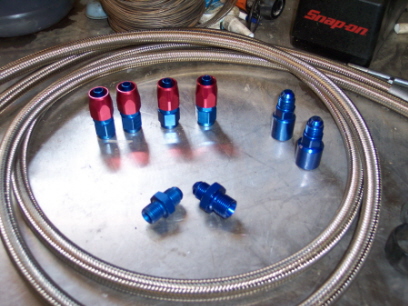
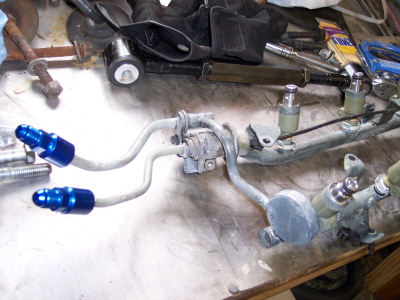
Now for the questions, I need to know what size threads and or what fittings I can use to connect the existing fuel lines to the fuel rail. These are Russell fittings that are an exact fit for the Z34. They are actually for an LT1, LT4, LS1. 3/8" pressure side part #640860 & fuel fitting LT1 # 640850 Also how are you guy's replacing the vacum line on the regulator? I sprayed the rail with brake cleaner and it turned white'ish
I need to connect the fittings above to these ones below on the Fiero(87GT) so who can tell me what size I will need? Thanks for all the info you all provided so far , lets get some more on the road!
IP: Logged
10:54 PM
Jun 26th, 2005
crzyone Member
Posts: 3571 From: Alberta, Canada Registered: Dec 2000
Thanks for the info Crzyone, I will look at some compression fittings this week.
I still need to know what everyone has been doing with the vacum line from the fuel pressure regulator.
Also I would rather just have my harness made by someone who has already done it and knows what they are doing. In other threads I read about member "Erik" doing harness, any of you used one made by him?
IP: Logged
04:09 AM
crzyone Member
Posts: 3571 From: Alberta, Canada Registered: Dec 2000
My harness was made by Erik, I recomend him 100%. The money was worth not having the headach of doing it myself. Erik's harness is completely plug and play.
Thanks Crzyone, I just heard from "Erik" and I will send him my harness tomorrow. I will have everything ready for when he returns the harnes. I whent to get a new MAP sensor today but it didnt have the right connection on it. I need the round part that connects right to the plenum, and the MAP connects to that part. I never had one so thats the best I can explainn it. Anyone know where I can get one or what its called? Thanks
IP: Logged
09:14 PM
Erik Member
Posts: 5625 From: Des Moines, Iowa Registered: Jul 2002
Thanks Crzyone, I just heard from "Erik" and I will send him my harness tomorrow. I will have everything ready for when he returns the harnes. I whent to get a new MAP sensor today but it didnt have the right connection on it. I need the round part that connects right to the plenum, and the MAP connects to that part. I never had one so thats the best I can explainn it. Anyone know where I can get one or what its called? Thanks
Hey Travis sorry I somehow missed your thread You dont have to have the MAP sensor plenum mount if you just make a plate to cover the hole with a few ports drilled on it to feed the MAP, fuel pressure regulator and the canister purge solenoid . That way you can relocated your MAP to another spot especially if you have rear deck clearance problems which can happen with the MAP mount on the stock port on the DOHC plenum on the notchback decklid. The fastbacks dont have this problem as far as I have heard. A good spot for the MAP is where the power steering pump used to be or you can located it where the dogbone bolt goes through under the plastic cover on that passenger side strut tower.
[This message has been edited by Erik (edited 06-27-2005).]
How did you strip the grey paint/powder coat or whatever it is that covers the intake etc. prior to polishing? In particular all the nooks and crannies? I have just started to do mine and would like to hear how you did yours.
Thanks Nolan
IP: Logged
11:45 PM
Jun 30th, 2005
t76racer Member
Posts: 233 From: Salt lake, Utah, Salt Lake Registered: Nov 2004
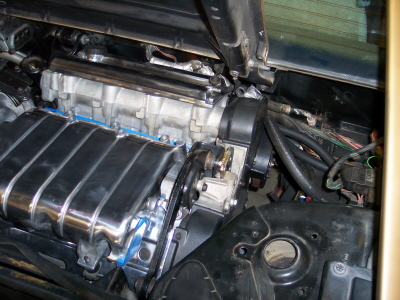
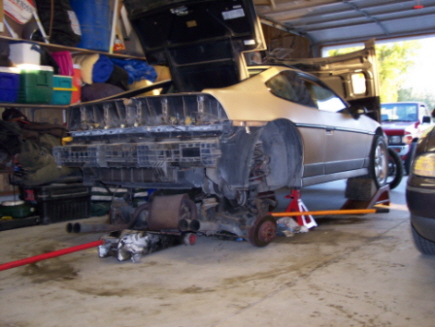
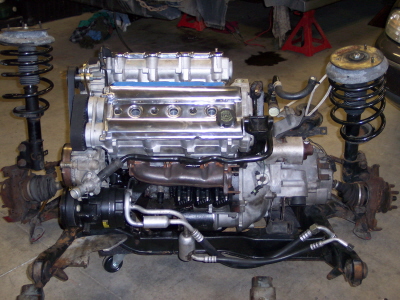
Hey guy's, I forgot the camera today, but I got the motor in the car. I tell yah it sure is easier on the lift. I will take some pics tomorrow, it looks really good in there! There is actually more room than I thought. I bent the lift hook (the one that everyone uses for the dogbone) I think the chain was too short, and bent it inwards. I sent "Erik" my harness today so the race is on! I want toget it all done before he returns it. He is very knowledgable and with out his help I would probably take 2 more months to get this going.
Fatmerk .. I am using the bolts that came off the original Fiero flywheel.
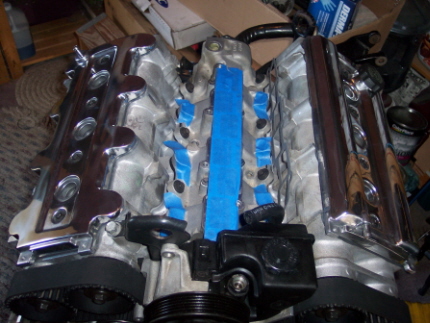
Sourmug .. I use a finish sander and plain sand paper. I start with 80 grit and work my way down to 240 grit before I start to polish. If I had it to do all over again I would just have it sand blasted. Then I use a cotton buff wheel on a table grinder. Starting with "black" Emery, and finishing with "red" Rouge. It is very hard to get in all the little nooks and crannies! I also use a flap wheel and assorted attachments on a Dremel to get at those places. I am actually not done with the plenum yet it is hard, and I plan on talking Francis T or a company called Ross Machine Racing, into making a new plenum. I will finish it totally when I get everything else done as I have already scratched the valve covers getting the motor in the car. Check out this website for a free booklet on polishing, www.Caswellplating.com they also sell all the attachments to get in those hard to reach spots. Dont learn the hard way, make sure you sand really good and flat, and finish with fine grit. Any low spots or "divits" will just get more noticeable as you polish. Have fun.
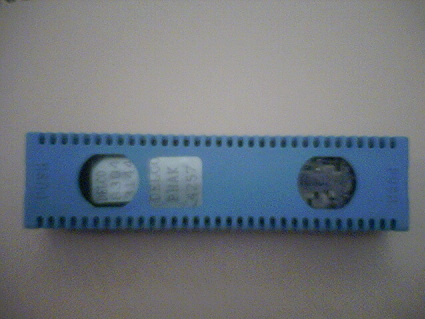
Jeez, I almost lost my own thread! I will post some pics just to keep this thread on the boards. Here is the block off plate that I made to delete the EGR. I have the EPROM burnt to eliminate it from Darth. (killer prices and fast service, thanks Darth!) I am waiting for Erik to be done with the wiring harness, (also a great price and great person). I am not done polishing this piece it is a pain in the *ss! Gotta go watch the fireworks now.
IP: Logged
11:18 PM
Jul 6th, 2005
crzyone Member
Posts: 3571 From: Alberta, Canada Registered: Dec 2000
keep it up! hopefully I am not too too far behind you...... if you can; post anything that is a puzzler..... that is the stuff that will help others (yeah and me too!) the most.
Good thread! gp
IP: Logged
07:57 AM
Jul 7th, 2005
t76racer Member
Posts: 233 From: Salt lake, Utah, Salt Lake Registered: Nov 2004
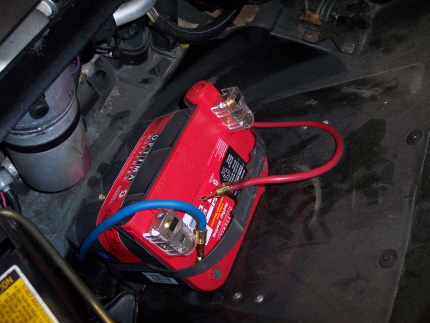
Of course the battery needs to be placed up front. I am getting ahead of myself, see I bought an Optima so it doesnt have to be mounted flat. Well in the next round when I order the "poly" mounts I will also get me one of those battery boxes, for the spare tire well. I would like peoples input on why no one uses the "torque" strut and existing mounts on the 2.8 block and the cradle? (They fit the 3.4 also) I am working on using these existing mounts to either except an aftermarket strut( like from Tien) or "fabing up" another adjustable link to fit the mounts. Let me know what you guy's think, I will post some pics tomorrow of what I have done. Thanks Travis.
IP: Logged
01:43 AM
crzyone Member
Posts: 3571 From: Alberta, Canada Registered: Dec 2000
I used the stock front mount and a dogbone on the engine. That torque strut is really just a dampener and doesn't offer much support. You seem to be moving along fairly quickly, should have it on the road in no time. 3/4 of the time spent on my swap was waiting for parts.
Torque strut? Dog bone? I am looking at that too for mine and the thoughts I have on it are to consider where the dogbone is located in relation to the engine mounts on the stock 3.4 and where is 'good' to connect to the 3.4 as well (solid/rigid/strong).
I did a little thread on the difference between the stock Z34 (and trans) mounts and the stock fiero mounts and they are virtually a mirror image of each other; about as different as they could be. So dogbone placement should be considered.
I note that the stock Z34 dogbone is located more or less above the trans. The trans has a single mount under it, but it is two bolts with some space between and a BIG rubber pad that actually supports the trans case itself (not like the fiero setup at all) At the other end (behind the harmonic balancer) the engine is VERY securely mounted on both sides with directly opposed mounts (which is important). This helps prevent twisting (which you really don't want!)
Personally I am not happy with the stock fiero front engine mount; it seems very 'floppy' and I am sure that it offers only vertical support to the weight. It will provide NO lateral strength or support at all. (To me it is a 'pogo stick'.......) I KNOW that a number of guys are using it and there are only a few reports about problems with mounts, but they range from split or separated engine mounts to broken engine parts so it might be worth a look at least at this stage. Anyway that is my little issue is all.
In my swap I duplicated the Z34 engine mounts on the fiero cradle (I am keeping the 284 trans) so as a result, I am thinking of putting the dogbone in the stock Z34 place. If so I will reinforce the trunk wall AND add some struts ie to the front corners of the firewall similar to strut tower braces.
The other thing is to make sure you connect the dogbone to something REALLY solid (on the engine). This might be harder than you think due to all the 'head stuff' that is the entire top of the engine on the Z34. There is limited opportunity to connect to ANYthing on it so it is a bit fussy. The one spot I see is the engine lifting hook brace near the pwr str pump. It is solidly connected so it could have something welded to it to attach a dogbone. This should be close to the stock fiero placement. Some stuff for you to consider maybe.
IP: Logged
09:21 AM
Jul 8th, 2005
t76racer Member
Posts: 233 From: Salt lake, Utah, Salt Lake Registered: Nov 2004
Allright got my fuel lines made today! I didnt get anything else done because "braided line is a pain in my thumb to work on! I really wanted to get the dogbone finished today. I am using the stock bracket on the motor along with with the torque strut brackets. I have already finished the main dogbone( an adjustable threaded link with poly bushings). What I want to to with the strut brackets is to use another theaded (adjustable) link to mount a more solid link in that area. Instaed of the strut. Think "small doge bone" type mount, just vertical. If I dont find this suitable I will use the mount in that spot like the z34 uses. I am also going to use another on the trunk side in the Fiero location. I am just afraid of breaking something there, like Crzyone did. (I think it was Crzyone, if not sorry). The one that broke the front cover where the lift strap mounts? But that is the only one that I have read about breaking. Anyone else have a failure in this area?
fiero308, thanks for your input, your other thread is the one that got me thinking about other ways to add mounts. I agree the stock motor mount alows alot of lateral tilt, do the poly replacements also allow this?
crzyone, I wish I could move alot faster, but work gets in the way, I need a new job. If I could get a new job sleeping I would be the best at it! Seriously the Boss would love me!
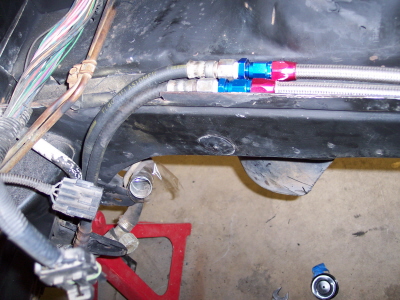
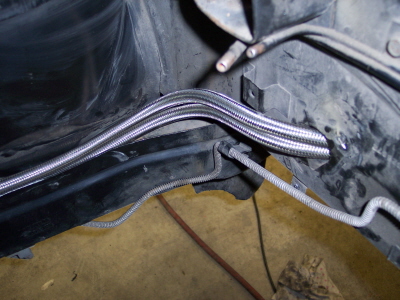
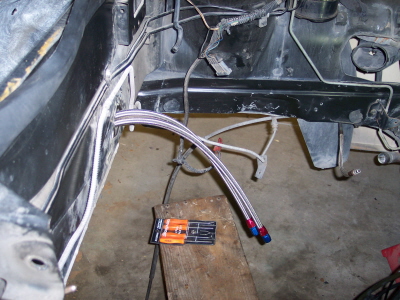
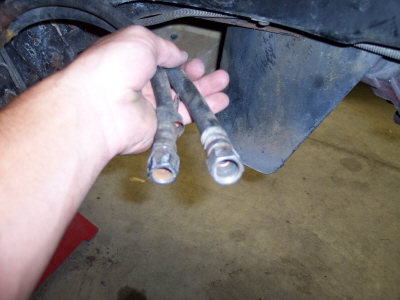
Ok, here go's: I found the fittings to adapt the stock Fiero fuel lines to a more common JIC fitting. They are from Russell. You need one 14mm x 1.5 Flare adaptor pn# 670520 and one 16mm x 1.5 pn#670530 the ones in the middle. I am running them in the "rail" back to the old cooling duct, in one side and out the other. Now I think instead of taking the bend into the first duct, I will run them under the trunk shelf drill them into the trunk and route them on top of the trunk shelf. So that they cant be seen until they come back in the second duct. What can you guy's tell me about the fan? Should I just take it out? Does it still do any good? Any good uses for it? That's all for today.
the fuel line info is great; the adapters - they connect to the stock fiero fuel lines 'sort of near' the stock battery box location? And the other fittings you have I assume will connect to the stock Z34 lines or are you doing something else there? I am guessing they are also metric of course.... the lightbulb isn't going on for me with "JIC" fittings........???
If you don't mind, how much was all that 'purdy' stuff? SS looks so nice, doesn't it!!! Someone else found aluminum fuel line that they say was rated for (ie?) 125 psi or so -for fuel injection (I was surprised; thought it had to be steel!) - did you look at that stuff?
I think the cooling fan is a bandaid that they DID discontinue for '88........ looks like it was to try to compensate for a REALLY lousy EGR/distributor/exhaust crossover setup....... so I can't imagine what you would use it for. Are you going to remote mount your coil packs a bit? I am thinking of putting them in the airstream 'somewhere' if possible. Where are you putting the ECM? After reading the Ogre's cave (pretty sure that is where I saw it) I am now rethinking putting it in the stock fiero location - (Heating issues) and am now thinking of the stock battery location where it could get some air from a functional right side scoop (wouldn't hurt the engine compartment temps either). (My right side 'scoop' is already open and will be easy to use, so it is an option for me)
Looking good! wish I could keep putting in the time on mine; there is still a MOUNTAIN to climb out there : ( ......... I'm surprised the neighbours aren't complaining about it blocking the view of the sun LOL Keep it up; you'll be hearing that 3.4 soon! signed greenwithenvy
EDIT: I see you DID do other fittings on your fuel rail etc: "...These are Russell fittings that are an exact fit for the Z34. They are actually for an LT1, LT4, LS1. 3/8" pressure side part #640860 & fuel fitting LT1 # 640850..." is this stuff metric or inches or what, do you know? I would expect it is all 'north american metric'..... but want to be sure when it comes to pumping 45psi gas at a hot engine........ !!!
why did you do that, exactly? My local parts guy tells me I can get all kinds of 'adapter' or 'repair' hoses that will use the original type connections. Just appearances? (which they DO have...) did you have to cut off the end of the tubing to put these on? (guessing yes) and if so then they are a compression fitting. Just checking. I think they will be visible; that is nice stuff!
[This message has been edited by fiero308 (edited 07-08-2005).]
IP: Logged
06:44 AM
crzyone Member
Posts: 3571 From: Alberta, Canada Registered: Dec 2000
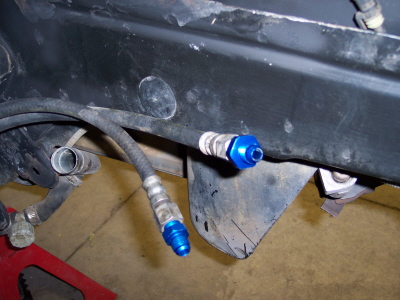
fiero308, I did not have to cut anything. The fittings for the z34 fuel rail are a direct plug in affair. They have push on clips inder the "collar" and rubber o-rings inside. The adaptors for the existing Fiero fuel lines are metric on the car side. The hoses and other fuel fittings sold by Russel and Earls use a different threaded end and are called JIC, or a flared JIC, apparently it is the indusrty standard. I dont know what it means maybe someone can explain, but they cant screw into the Fiero lines without the adaptors. The reason I used all these is 1- I didn't want to cut anything, and keep it all plug n play 2- you got me, they look good. I figure that I am doing this for performance, so I might as well use performance hose. Anyways her is a pic of just the metric adaptors on the fiero fuel lines.
IP: Logged
09:04 AM
86GT3.4DOHC Member
Posts: 10007 From: Marion Ohio Registered: Apr 2004
For those looking for the best fuel line setup, keep your eyes open at the junkyard, out of the 6 or so engines Ive seen, I found one that had threaded fuel lines. They plug into the rail just like the ones you always see, but they're about 6" long and have threaded ends just like the stock fiero lines, and will thread right in once you move the feul lines to the drivers side
How did you disassemble the guts in the throttle body? I am about to start polishing and would like strip everything off. I removed the two scews from the butterfly as well as the nut beneath the tps but it doesn't want to come apart. Is there something that I missed?
IP: Logged
06:25 PM
Jul 10th, 2005
t76racer Member
Posts: 233 From: Salt lake, Utah, Salt Lake Registered: Nov 2004
Fatmerk, PM me as to which bearings you are after I have my invoice from the machine shop with about 4-5 different Clevite pn#'s.
Sourmug, I havent finished the plenum and I have not taken the "gut's" out of it I just taped all the orifices closed. I am not done with all the nooks and crannies. Someone did get an answer to this exact question in another thread though, can't remember which one though.
Now for the update:
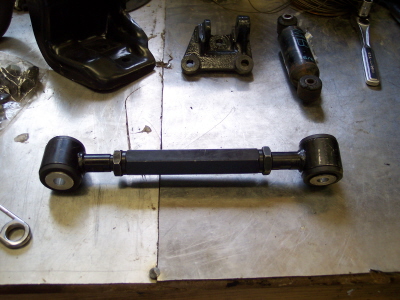
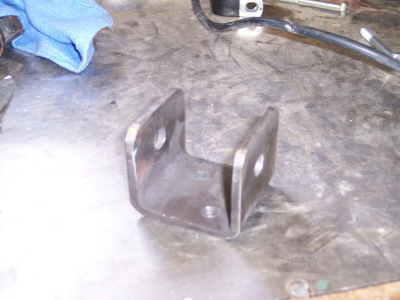
I have followed everyones threads up until now. I wanted to use the stock mounting points as much as I can. So here I finally do something different. I found this adjustable link at a local company. It has "poly" bushings, and threaded ends, so all I have to do to adjust the length is twist it and lock the nuts. Its close to the same width of the z34 "dogbone" bracket. I then made a "bracket" for the other side. I originally wanted to get some bolts through this bracket. The metal on this cross piece is two parts, the bottom being the thickest. It would be a royal pain to get the nuts on the back of the bolts so I just decided to weld it on. My reasoning is that the same piece this is welded to, the cradle mounting brackets are also welded to. I think that if it is strong enough for the cradle then it should hold. My first time welding wire feed, give me a break. Here it is finished. Twisting the main body actually lifts or lowers the motor, or actually tilts it back or forward. I am not sure what the best position is yet but, any advice would be apreciated. I do plan on using atleast 2 more mounts, I already have one almost done.
IP: Logged
11:10 PM
Jul 12th, 2005
t76racer Member
Posts: 233 From: Salt lake, Utah, Salt Lake Registered: Nov 2004
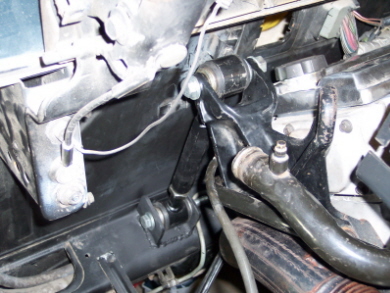
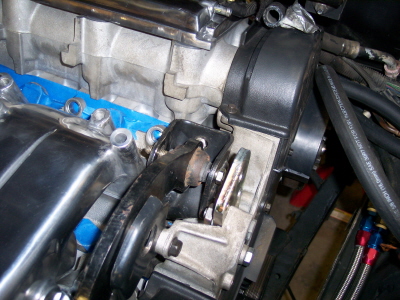
Here is a pic of the "torque strut" mounted to the z34 motor and the cradle in the stock brackets. I am looking into another aftermarket strut with a higher performance rate. Or I might just make another adjustable link like the one above just smaller. No comments yet? Well I think the next "dogbone" will be pretty unique. Anyways here are a couple more pics, the first is where my fuel lines will end up, and I might have taken to much of the hinge off.
IP: Logged
01:44 AM
Deabionni Member
Posts: 4086 From: Kalkaska, MI Registered: Mar 2004
The adjustable link for the motor mount is a great idea. Where did you buy the link? How much did you pay for it? Do you have a part number, etc. for it? Great thread. Keep up the good work.
Rick
IP: Logged
01:54 AM
t76racer Member
Posts: 233 From: Salt lake, Utah, Salt Lake Registered: Nov 2004
ricksmastermix, The link was something I just found, on the shelf of a frieght wholeseller in town. It did'nt have a package. The bushings say "SPC" and that is a company that makes adjustable suspension pieces, which is what this is. I dont really know though who makes them. You can get some just like this one at most race shops. I paid $10.00 Thanks for the comments.
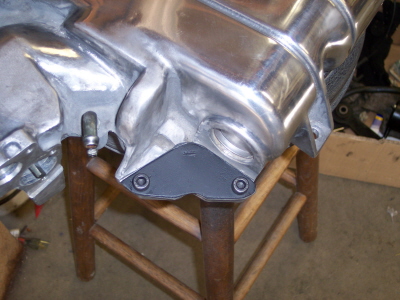
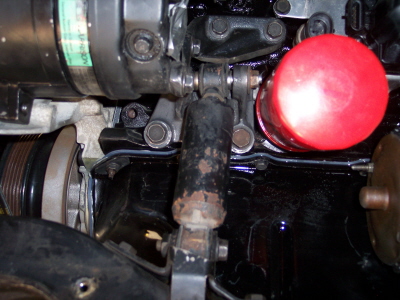
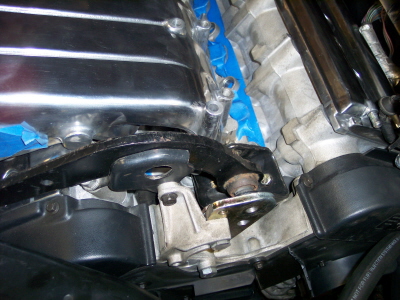
Now, I though I was on a roll with the "dogbones" I actually trimmed the Fiero dogbone bracket, and bent it to fit the 3.4.
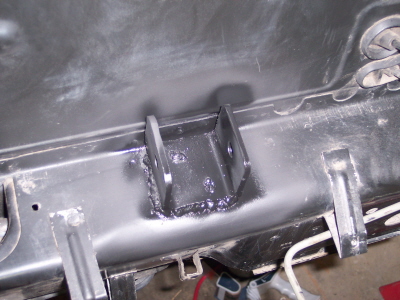
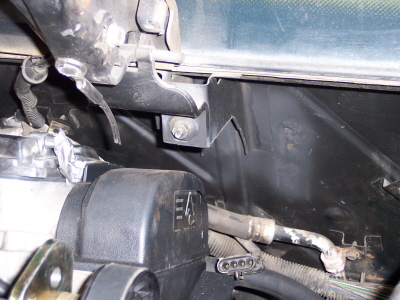
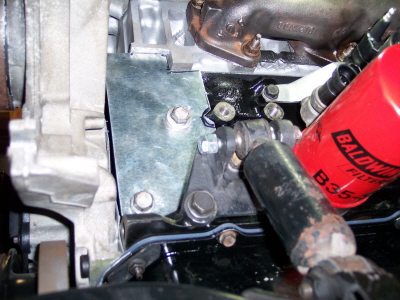
If you look closely you can see that it doesnt mount to the lift strap or the power steering brackets at all. It actually takes a bend into the valley, where it ataches to the fiero bracket. The bracket itself snakes under the lower intake manifold and bolts to 2 bolts ontop of the block. I am making another support for the bracket that will secure it from the back, which will take the brunt of the force. The support for the back of the bracket is giong to run through the space in between the front cam cover and the head. The support will be secured by two big bolt holes on the block behind the ac compressor. This is a pic of where the bracket will be bolted. It is just the template that I used to cut the metal, but I didnt bring my camera to take a pic of the finished plate. The top left corner of the template is actually covering most of the gap that the support is going to go through to connect to the dogbone bracket.


 You dont have to have the MAP sensor plenum mount if you just make a plate to cover the hole with a few ports drilled on it to feed the MAP, fuel pressure regulator and the canister purge solenoid . That way you can relocated your MAP to another spot especially if you have rear deck clearance problems which can happen with the MAP mount on the stock port on the DOHC plenum on the notchback decklid. The fastbacks dont have this problem as far as I have heard. A good spot for the MAP is where the power steering pump used to be or you can located it where the dogbone bolt goes through under the plastic cover on that passenger side strut tower.