Hello all! I've been floating here a while trying to figure out what I wanted to do with my little 88 Formula. The 2.8 decided enough was enough a while back and the poor car has been dead in the driveway. If you don't want to read all the pointless chat about how I came to this idea, skip to the technical section below!
Some history on this might give someone deciding what swap to do a little help. I own a company called KBS Turbo which we make turbo kits and sell turbochargers and related parts. I just completed an L36 Grand Prix kit and this seemed like a logical extension. So I started building an engine with an L67 rotating assembly with performance cam and L36 top end. I planned on using the Getrag and a fairly large turbocharger. I ultimately decided against it because it seems there are quite a few L36/L67 swaps out there. For good reason too! Some of the Grand Prix guys I know here in town have their cars pushing the 11s. Take about 1000lbs of that and you have a killer machine.
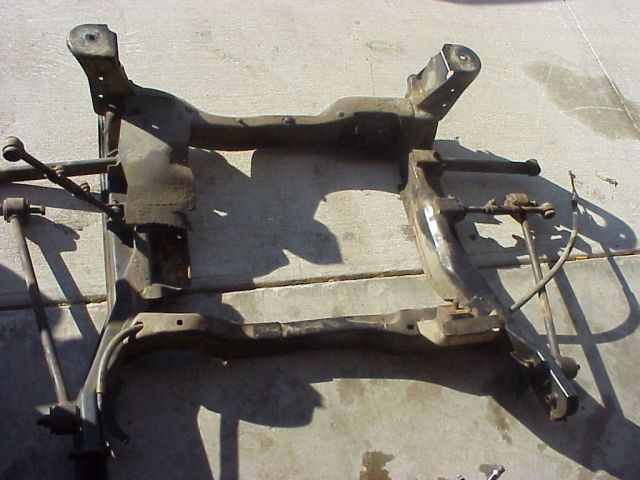
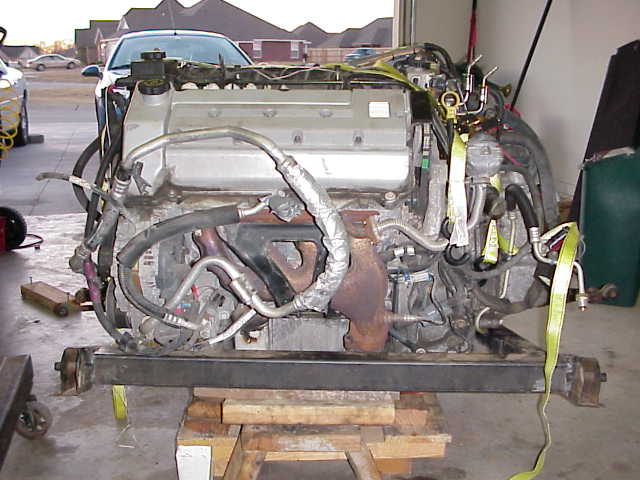
However, I became fascinated by the Northstar swap. They are very unique engines and I've never messed with one before. So I decided that was the way to go for me and I picked one up a couple weeks ago. Being quite busy I hadn't done much with the Northstar Getrag swap which is probably a good thing. I picked up the completely assembled engine cradle from a 01 Cadillac Deville. Engine, transmission, axles, suspension, brakes, PCM, fuse box, everything attached to that cradle for 1500 bucks and my old 2.8! Couldn't pass on a deal like that! They even threw in the tape/cd player from the original car because that radio will only work with that PCM he said but that will be another project.
So I now have 2 northstars (98, 01; I'll be selling the 98 at some point). Interestingly enough, the 01 and the 98 seem quite different. I decided to use the 4T80E and try to make up for the weight somewhere else. This car will be used for a lot of drag racing as well as some auto-x and some road racing so I think the 4T80E will be best suited to my application although I don't really like autos. Also, this engine will get a little turbo boost as well once everything gets lined out.
In any case, I thought I would run a little thread detailing the swap; what I did, why I did it. Of course I'm always open to suggestion however there are many threads debating the merits of this solution or that. The solutions listed in here will be my own twisted mind and the twisted minds of those wanting input on the technical aspect of the swap.
I feel fortunate to have the original cradle to compare to as I mod the Fiero's cradle. Finally........
Technical Section
To start off, I've already removed the engine/transaxle from the Cadillac's cradle as well as removed the cradle from the Fiero. I�ve listed the details of the cradle removal below. I�m also going to give everyone an idea of what I have to work with so you can compare you own facilities when considering if you attempt this swap with no kit.
Tools/Equipment/Fabrication Experience
For tools, I have a Lincoln 110v weldpak with the MIG conversion. I plan on buying an oxy/ac torch shortly. I have an air compressor with a very weak 3/8in impact and a 3/8 air ratchet. Both came with the compressor (craftsman baby!). I see more air tools being added to the collection as this project progresses! I have a good assortment of hand tools but not "complete" by any means. More than anything, these tools are the "buy as you need 'em" items. I've got most the common items like a couple electric drills, a grinder with a fine and course wheel, a large vise, and the trusty 'ol sawsall! My lifesaving Dremal Tool will be by my side the whole way! I borrowed a good sized cherry picker for this endeavor. A good supply of liquid wrench of other penetrating oil is a must.
Fabrication skills are really a moot point as I believe most motivated people can tackle jobs like this given the correct resources and information. Any one person is going to require more help in some areas and less in others. Your own previous experience and comfort in doing a project like this will ultimately determine your ability to complete it. I have an engineering back ground and have built quite a few automotive related items. I've designed and built a number of turbocharger kits. I'm fairly experienced with electronics, reading schematics, pinouts, ECT. However I've never built a bridge or anything on the Space Shuttle!
88 Cradle removal:
As I've seen some threads about this, I'll give a quick run down of how *I* did it. Basically, I disconnected the wires from the PCM and pushed them through the firewall. Disconnected the wiring harness just behind the battery as well as the fuel lines, shift and select cables, removed the slave, and disconnected the A/C lines at the compressor. Had the compressor had any R12 in it, I would have just removed the compressor from the engine. But it was dry and I plan to use the caddy's compressor anyway so unhooked it. I removed the deck lid and put the two front tires on ramps.
My neighbor, who is a welder, loaned me a large and very stout cart he keeps his large MIG on. It's really just 4 pieces of angled steel and 4 large castors. I jacked the car up, supported the frame with jack stands and used the jack to support the read cradle. I removed the two rear vertical bolts and used the jack to lower the rear of the cradle down to the cart. When secure, I moved to the front where I repeated the operation on the two front horizontal bolts.
With the cradle resting on the cart, I moved the cherry picker to the back of the car. I've read some debate on this but I did it anyway; I used the hook loop for the deck lid to lift from. I've done this 3 times with no problems so far. I expanded the boom and the legs out as far as possible to allow it to fit under the cradle and around the cart. I lifted, and lifted and lifted and finally for it high enough to clear the engine. I used the two rear tires laying flat, a board across them and two large jacks stands to support the car while lifted this high. I secured the car, being very careful to stay clear of it and removed the cherry picker. I pulled the cart and cradle out from under the car, replaced the cherry picker, lowered the car and secured it. I won't go into disassembling the either of the cradles as it's pretty straight forward from there.
Expected Technical Hurdles:
PCM - I expect problems from the VATS. I believe the 01s had Passkey III which uses inductive coupling to pull a code from an embedded chip on the key vs. a resistor pellet on the earlier systems. I might be coming into access for an editor to remove the VATS code, more on this later. All of the above is hearsay so please correct me if I'm wrong on this.
Wiring - Since the wiring harness is very complete, and I have the original fuse box with the fuses, that limits the amount of splicing I will be doing (I think). I found the connector that appears to route into the interior of the caddy so it will be there that I splice the original Fiero harness into the caddys harness. I think everything going inside the car is in that connector. I still don't have a wiring diagram for this car so I'm not sure. More on this later.
Cradle modifications - This looks to be pretty straight forward. I have all the original caddy mounts and simply put, all I have to do it modify the Fiero cradle, referencing the caddy cradle, measure and test fit. Of course in practice it will be more complicated but hopefully not terribly so.
Suspension modifications - The main issue with the 88 is the strut towers were moved inboard by .75in reducing the available space by 1.5in. At this point I am expecting to modify the strut towers to let the engine fit and go to coil-overs which is what I planned to do anyway. I've seen Held has a conversion kit with the stock struts for around 200-300 with springs and I've seen the related parts minus the springs going for around 30 dollars a side. I will most likely construct my own coil-overs.
Fuel system - I'm still out on this but I'll either adapt a high flow aftermarket pump from a vette or f-body or sump the fuel tank and run an aeromotive pump. I've read quite a bit about replacing the V6 lines with 4 cyl lines but I plan to modify what I have. I have some GM quick disconnects that fit this engine's fuel rail and I will modify those along with the stock fuel lines and run some steel braided or solid lines where I want them. Personal preference, no real technical reason to do it this way other than I plan to run larger fuel lines now so I don't have to later.
Axles - Vote is still out on this one. I haven't seen much definitive information regarding this with the 4T80E. The track width on the 01 Deville is 3.2in wider than the 88 Formula. I am honestly not sure how they measure track width but rough measuring last night makes it appear the hub to hub width is too wide with the stock Deville. I'm going to wait until I get the engine placed in the cradle before I worry about this to much.
In anycase, I'll be shooting some pics and posting them as I go through this process so someone doing a similar build might be able to bypass some of the stumbling blocks I know are coming!
[This message has been edited by caddyrocket (edited 11-18-2003).]
IP: Logged
11:55 AM
PFF
System Bot
ryan.hess Member
Posts: 20784 From: Orlando, FL Registered: Dec 2002
I think you�ll find that because you have to use custom axles anyway you might just as well move the engine leftward in order to clear your strut tower. It�ll save you a lot of work. Because you are using the auto the total width of the motor and transmission will be less than using the Getrag (which fits anyway).
Good luck with that computer. I think the best solution is to give that thing to someone that knows what they are doing and have them de-solder the (non-programmable) chip and solder in something that will allow you to pull out your programmable one. But don�t forget to extract the code first. Extract the information you need then cut out the old chip, then remove the soldered pins one at a time in order to minimize the heat damage. Then you can dump the code back onto the new chip and modify it. Or should I say modify the code then dump it onto your new chip.
But I don�t really know what I�m talking about. The computer information I do have comes from a friend that is fully capable of doing any modifications necessary. Unfortunately he has little time for such things and has put me on hold until he has more time.
Aaron
.
IP: Logged
02:44 PM
Will Member
Posts: 14303 From: Where you least expect me Registered: Jun 2000
Originally posted by caddyrocket: I picked up the completely assembled engine cradle from a 01 Cadillac Deville. Engine, transmission, axles, suspension, brakes, PCM, fuse box, everything attached to that cradle for 1500 bucks and my old 2.8!
So I now have 2 northstars (98, 01; I'll be selling the 98 at some point). Interestingly enough, the 01 and the 98 seem quite different. I decided to use the 4T80E and try to make up for the weight somewhere else. This car will be used for a lot of drag racing as well as some auto-x and some road racing so I think the 4T80E will be best suited to my application although I don't really like autos. Also, this engine will get a little turbo boost as well once everything gets lined out.
The N* was changed dramatically in MY2K. The computer is entirely different, the crank position sensors were changed, roller cams, per cylinder ignition coils, etc. The change in crank sensors and ignition means that the MY2K engines will no longer work well with the aftermarket controllers that worked with the earlier engines. There are aftermarket controllers that will work with the MY2K engines, but I haven't seen anyone use them yet.
quote
But it was dry and I plan to use the caddy's compressor anyway so unhooked it.
The Caddy compressor does not have a high pressure cut out switch built into it. This means that you'll have to wire one in. I T'd mine into the high side pressure port in the front compartment when I did my R134 conversion. The Caddy system uses a pressure transducer, and no pressure switches at all.
quote
Expected Technical Hurdles:
PCM - I expect problems from the VATS. I believe the 01s had Passkey III which uses inductive coupling to pull a code from an embedded chip on the key vs. a resistor pellet on the earlier systems. I might be coming into access for an editor to remove the VATS code, more on this later. All of the above is hearsay so please correct me if I'm wrong on this.
I think you'll have a LOT more problems with the computer than just VATS. The computer talks to traction control, ABS, climate control, air bag control, even OnStar module, and will complain if these modules are not present. Cadillac factory electronics have the highest level of integration of any GM system, and have always been difficult to use outside the original chassis.
quote
Wiring - Since the wiring harness is very complete, and I have the original fuse box with the fuses, that limits the amount of splicing I will be doing (I think). I found the connector that appears to route into the interior of the caddy so it will be there that I splice the original Fiero harness into the caddys harness. I think everything going inside the car is in that connector. I still don't have a wiring diagram for this car so I'm not sure. More on this later.
1) Get yourself wiring diagrams for BOTH chassis: www.helminc.com 2) How easy it is depends on how well you want it to integrate with the Fiero chassis. If you just want to cut a hole in the trunk and put the Caddy computer there in roughly the same relationship to the engine as it was in the Caddy chassis, then rewiring will be minimal. If you want it to seamlessly blend with the Fiero chassis as though the factory made it that way, then figure about 40 man hours of work, as EVERY wire in the Caddy harness will have to be lengthened or shortened.
quote
Cradle modifications - Of course in practice it will be more complicated but hopefully not terribly so.
It's always more complicated in practice. Remember Occam's Razor.
quote
Suspension modifications - The main issue with the 88 is the strut towers were moved inboard by .75in reducing the available space by 1.5in. At this point I am expecting to modify the strut towers to let the engine fit and go to coil-overs which is what I planned to do anyway.
If you're using the Caddy auto, then you'll probably need custom axles anyway. You might want to talk to Design 1 (www.design1systems.com) about axles. If you have custom axles made, then you may as well have them made to locate the engine so that you don't need to carve strut towers.
quote
Fuel system - I'm still out on this but I'll either adapt a high flow aftermarket pump from a vette or f-body or sump the fuel tank and run an aeromotive pump. I've read quite a bit about replacing the V6 lines with 4 cyl lines but I plan to modify what I have. I have some GM quick disconnects that fit this engine's fuel rail and I will modify those along with the stock fuel lines and run some steel braided or solid lines where I want them.
I don't understand the desire to do twice the work that's necessary. A '95 fuel rail and later 4 cylinder Fiero fuel lines work flawlessly together. Just cut off the stock Fiero fuel line fittings, plug in the after market fittings and put the whole thing together. No muss, no fuss. You don't need -12 fuel line, even if you double the engine's HP. For my first attempt I hacked up the stock fuel rail... and quite frankly it looked like crap and was a very inelegan solution. the stock fuel rail is a very nice piece and works very well as a unit. Even has an adjustable pressure regulator from the factory. Do the MY2K+ N*'s have a returnless fuel system?
quote
Axles...
See above.
------------------ '87 Fiero GT: Northstar, Getrag, TGP wheels, rear sway bar, rod end links, bushings, etc. '90 Pontiac 6000 SE AWD: Leaking ABS unit fixed, load levelling rear suspension fixed, still slow
IP: Logged
08:23 PM
Tom Slick Member
Posts: 4342 From: Alvarado, TX Registered: May 2003
The N* was changed dramatically in MY2K. The computer is entirely different, the crank position sensors were changed, roller cams, per cylinder ignition coils, etc. The change in crank sensors and ignition means that the MY2K engines will no longer work well with the aftermarket controllers that worked with the earlier engines. There are aftermarket controllers that will work with the MY2K engines, but I haven't seen anyone use them yet.
All of the above seems like a good reason a good reason to use the 2k+ engine. I think it will be a technical challange but one that we can overcome.
quote
Originally posted by Will:
The Caddy compressor does not have a high pressure cut out switch built into it. This means that you'll have to wire one in. I T'd mine into the high side pressure port in the front compartment when I did my R134 conversion. The Caddy system uses a pressure transducer, and no pressure switches at all.
That's wild because I was looking over alldata and sware I remember seeing a pinout for a pressure switch. There is a sensor in one of the lines but I'll have to look it over to see. I could be wrong.
quote
Originally posted by Will:
I think you'll have a LOT more problems with the computer than just VATS. The computer talks to traction control, ABS, climate control, air bag control, even OnStar module, and will complain if these modules are not present. Cadillac factory electronics have the highest level of integration of any GM system, and have always been difficult to use outside the original chassis.
I was reading up a bit on the serial data used on this. It looks for a heartbeat every two seconds from these moduals but few of them will change the driveability of the car. For example the car won't go into limp home mode if it doesn't see the cell phone or on-star but it will set a code. At this point that is livable. However, I might have access to an editor as soon as Friday. If I get that, I will remove the modules that we aren't using. Crossing fingers here.
Also, looking some of these things over, it seems there is atleast a goofy possibility you could run this engine with an LS1 computer that had been modified as many of the basic systems are the same. However I will have to research the position sensor issue. Wouldn't that be convienent?!
quote
Originally posted by Will:
1) Get yourself wiring diagrams for BOTH chassis: www.helminc.com 2) How easy it is depends on how well you want it to integrate with the Fiero chassis. If you just want to cut a hole in the trunk and put the Caddy computer there in roughly the same relationship to the engine as it was in the Caddy chassis, then rewiring will be minimal. If you want it to seamlessly blend with the Fiero chassis as though the factory made it that way, then figure about 40 man hours of work, as EVERY wire in the Caddy harness will have to be lengthened or shortened.
Hey, thanks for the site. I'll check it out! I've got all the schematics and pinouts from alldata today. It has enough length on the wiring harness to put the PCM in one of two places; the factory location (haven't checked fit under the glove box) or where the original air filter was located. I do not plan to route the induction through this point so that's not a big deal. I'm not really interested in making the car look like it came from the factory with a northstar. However all of my work is very clean. It will be something I'm proud to show when it's finished. However if we have to modify wire length, that's no big deal. I've done that several times to relocate different devices on the cars I've built turbo kits for.
quote
Originally posted by Will:
If you're using the Caddy auto, then you'll probably need custom axles anyway. You might want to talk to Design 1 (www.design1systems.com) about axles. If you have custom axles made, then you may as well have them made to locate the engine so that you don't need to carve strut towers.
The axles aren't going to be a big deal I don't think. I ran it by a few friends in the business who build such things. I think we can pull it off and your right, if we are going to build axles, why not move the engine over!
quote
Originally posted by Will:
I don't understand the desire to do twice the work that's necessary. A '95 fuel rail and later 4 cylinder Fiero fuel lines work flawlessly together. Just cut off the stock Fiero fuel line fittings, plug in the after market fittings and put the whole thing together. No muss, no fuss. You don't need -12 fuel line, even if you double the engine's HP. For my first attempt I hacked up the stock fuel rail... and quite frankly it looked like crap and was a very inelegan solution. the stock fuel rail is a very nice piece and works very well as a unit. Even has an adjustable pressure regulator from the factory. Do the MY2K+ N*'s have a returnless fuel system?
Actually it's 1/2 the work. I don't have to swap the stock lines and I already have a set of quick disconnects that work. Thinking about it, all I have to do is build some steel braided lines and use the disconnects I already have. The fuel rail and original fuel lines will remain untouched. Fortunately the 01 I have has both feed and return lines so it will be a snap. The sump idea was something to prepare for a future massively powerful engine if this project retains my interest after completion.
I promised everyone pics tonight but my wifes car had an encounter with a hail storm so I got to try to work some of the dings out. pita.....
Will, I do have one question for you. Strangely it's wondering about answers to questions like this that keep one going...
How does that northstar sound?
[This message has been edited by caddyrocket (edited 11-18-2003).]
More progress underway WITH some pics although the pics suck.
First some good news! It looks like we are going to be able to edit the PCM and remove the unrequired functionality. I'll know more on this in a couple weeks.
Cradle mods - So far, I've done a lot of measuring and leveling. I removed the front cross brace and the stock V6 engine mount from the I leveled the engine/trans onto some 2x4s and shims. It is high enough to move the cradle around it and I've got the engine/trans in the position want it. I am going to just some 2x3 steel stock and weld it inplace. I'll detail exactly how far forward we have to come but it will be somewhere between the control arm mount and the front cradle mount bolt tube if I'm lucky. I will get some better pics tomorrow.
Engine mounts - I am going to retain the stock Cadillac engine mount locations though I am going to fabricate with solid or poly mounts. There are two and they are mounts fore and aft of the engine. The rear is a two bolt peice while the front uses a single large bolt. The stock peices are very flexile which is fine for a Cadillac but not the best for a performance application or the tight spaces.
Ran out of steam typing this. I am gonig to build the cradle tomorrow so I'll give everyone some pics and measurements.
More work done! I still haven't taken the time to edit and post up the pics of the cradle hack. One interesting thing I've found about the 88 and possible previous cradles is their open construction allows them to collect all manner of rocks, dirt and sand inside them. I removed about 5 lbs of sand and rocks from the cradle!
Cradle mods:
Tonight I sized up the cradle around the engine/trans. Sorry I didn't get a pic of this. I cut down a peice of 2.5sq tubing with a 3/16th wall. That's about 3x as thick as the original cradles walls. Over kill and added weight I know but the added strength combine with the fact that I already had that material on hand were the deciding factors.
Because the location of this front cross brace moves it to a location that will enclose the forward mounting point for the control arms, I had to cut about 3 inches out of the bottom of the new cross brace to allow installation of the front control arm bolt in it factory position. This is less than the total length of the bolt but you can slide the bolt up into the cradle then pull it foward through the hole and put a wrench on it.
Sorry about the small updates and lack of pics so far. I've been super tired and working a lot but I've got a long weekend ahead so I'll get the pics edited and posted online!
Happy Thanksgiving!
IP: Logged
11:43 PM
Nov 27th, 2003
TaurusThug Member
Posts: 4271 From: Simpsonville, SC Registered: Aug 2003
Originally posted by caddyrocket: One interesting thing I've found about the 88 and possible previous cradles is their open construction allows them to collect all manner of rocks, dirt and sand inside them. I removed about 5 lbs of sand and rocks from the cradle!
Not the first time... won't be the last.
quote
Because the location of this front cross brace moves it to a location that will enclose the forward mounting point for the control arms, I had to cut about 3 inches out of the bottom of the new cross brace to allow installation of the front control arm bolt in it factory position.
You mean the forward mount for the trailing arm?
------------------ '87 Fiero GT: Northstar, Getrag, TGP wheels, rear sway bar, rod end links, bushings, etc. '90 Pontiac 6000 SE AWD: Leaking ABS unit fixed, load levelling rear suspension fixed, still slow
IP: Logged
09:34 AM
Rickady88GT Member
Posts: 10657 From: Central CA Registered: Dec 2002
Does the N* need more room than this? The new cross member is welded just behind the big bolt for the long trailing arm. And the stock 3.5 mount lines up great.
Probably not. Though I thought about it a bit over thanks giving and I think I will fill the openings with an expanding foam and coat over it to prevent crap from getting inside the cradle. Couldn't hurt.
quote
Originally posted by Will:
You mean the forward mount for the trailing arm?
Trailing arm, yes. On most of the other cars I've owned, they were called lower control arms or something similar. I had forgotten the text book name for it.
Does the N* need more room than this? The new cross member is welded just behind the big bolt for the long trailing arm. And the stock 3.5 mount lines up great.
It really just depends on the mounting scheme. I am going to use the stock 4.6 mounting points and it lines up well there. Sinse I have all the original mounts on this measured up the original caddy cradle, and positioned the engine in the cradle, measured and checked it.
IP: Logged
07:43 PM
Rickady88GT Member
Posts: 10657 From: Central CA Registered: Dec 2002
How will you mount your parking brake? I put all the mounting points in the same exact location as it was on the stock 88 by fabricating custom mounts.
How will you mount your parking brake? I put all the mounting points in the same exact location as it was on the stock 88 by fabricating custom mounts.
I was thinking along the same lines except mounting the cables outside the forward cross member. I don't think this will pose an exposure risk sinse the original cross member was exposed to the bottom anyway. I might make a small sheild for the connections on it.
I have been treating the e-brake as a clean up item because it seems like it will be of the least technically challenging items but those are the ones that bite you. But sinse you mentioned it, I am going to slide the newly modified cradle under the car today and take some pics and measurements and I might attack that issue now. Thanks!
Finally got some pics sized up and hosted. I also made a bunch of progress on the cradle engine mount locations. I have a few pics but nothing of the completed work from this weekend. I'll get some tonight and post them up tomorrow.
So far I've added a die grinder a week ago and a cut off tool yesterday. To anyone with a compressor and a desire to do this project, let me offer one peice of advice. OWN a cut off tool. The sawsall rocks but I feel like I've been beaten with a chain after using it for during a 12 hour build fest.
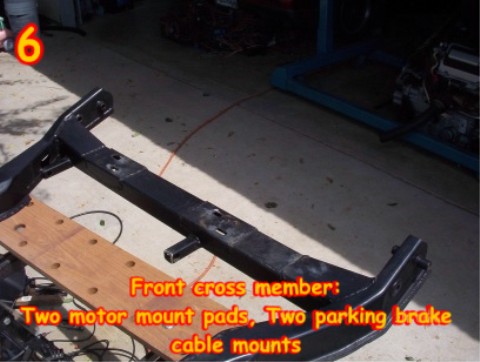
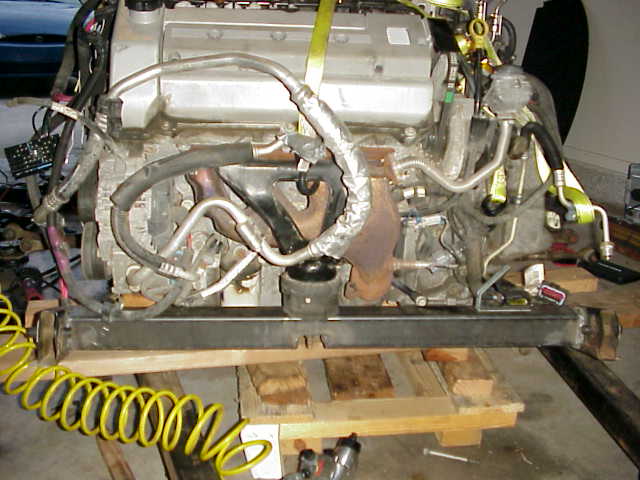
Here is a pic of the cradle with almost everything removed. Not much to say about it.
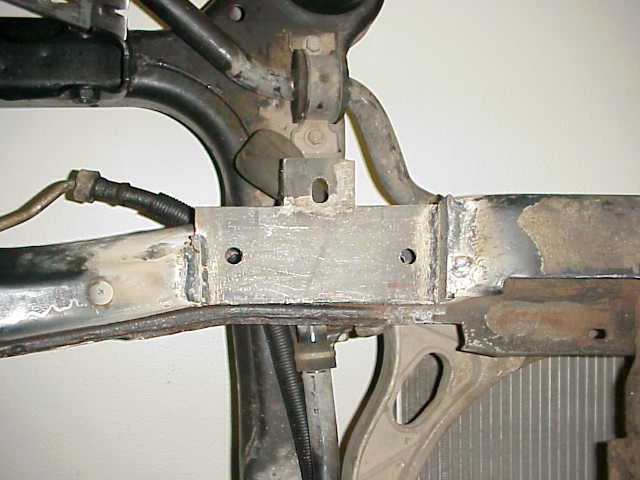
Here is a pic of the engine cradle with the front cross member rememoved. I did this with a sawsall. The cuts left some material behind but it turned out fairly clean.
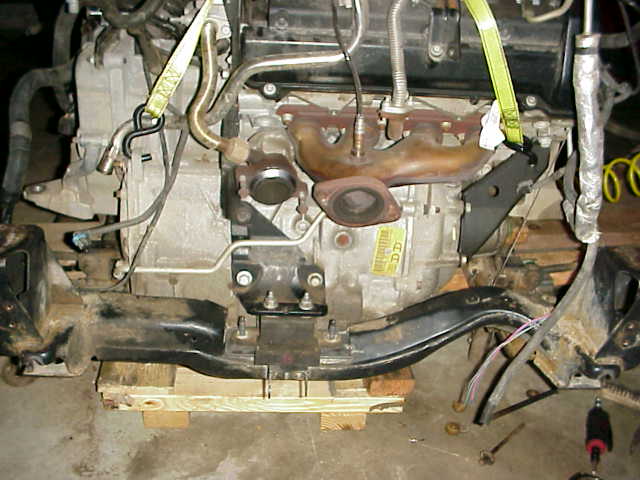
The pic below is with the new front cross member welded in place. To establish the location, I leveled the engine, placed the cradle around the engine (easy with no fron cross member), leveled it and measured and checked distances. I used the original caddy cradle to check measurements and mounting schemes against as well. The key point was lining up the axle center line for both axles directly in line with the original centerlines. To do this, I reinstalled the stock transaxle and suspention peices and established the center line to be 1.25in behind the rear side of the "toe link" mount.(Will help me out on the name as I didn't look it up before hand). Removing all of this and now had two points of reference on axle location. As mentioned above, sinse we are making custom axles, I located the engine to the farthest left on the cradle. I was worried about balance at first but we are talking about 1/2in or less of movement there. Balance turned out well.
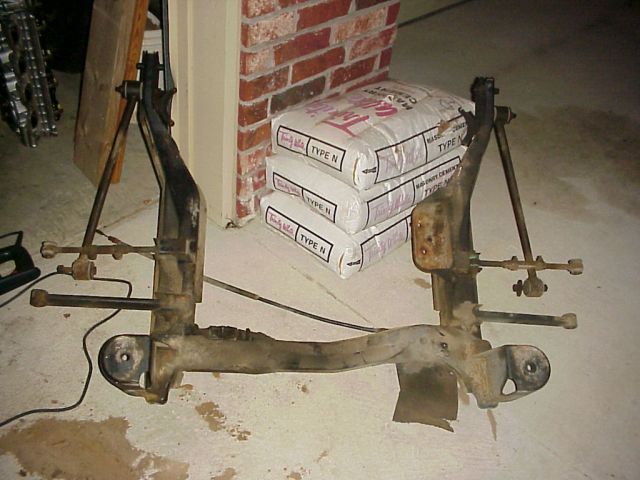
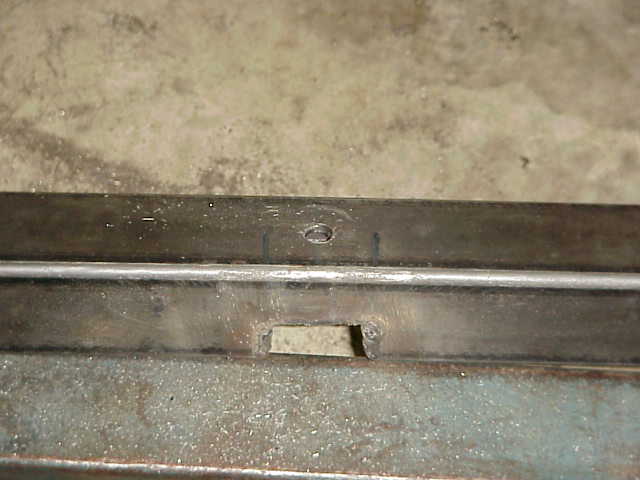
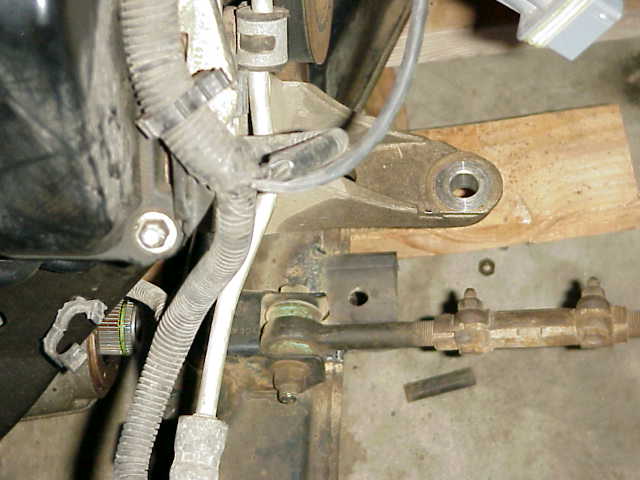
Here is a shot of the bottom of the new front cross member. I shows the access point of the forward trailing arm mount points. I welded around both the inside and the outside of the joint. The material is 3/16 stock so there is plenty of meat there but I was wanting to take a break from the sawsall and I enjoy welding.
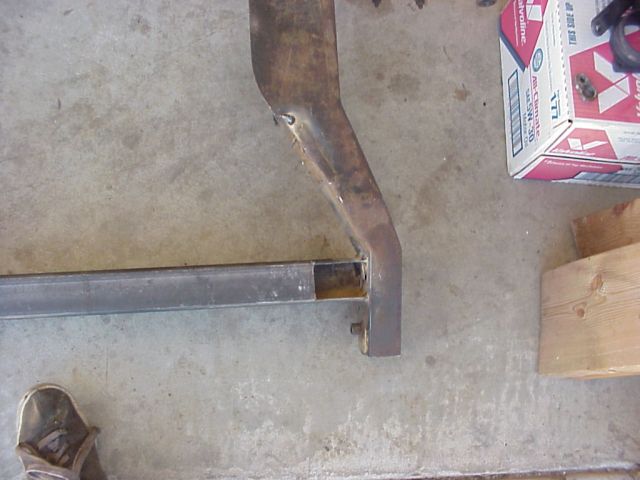
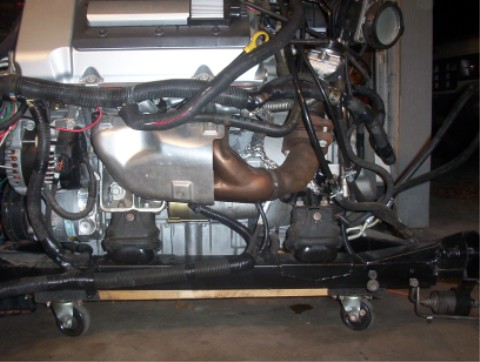
Here is a pic of the engine loosing fit around the cradle. I shot a pic to give everyone a rough idea of what was going on. This is the front of the engine cradle. Unfortunately I don't have the forward mount installed so it's hard to get an idea of how it's all mounting together. The bracket you see wrapped around the exhaust manifold is the point where the engine mount connects to the engine.
This is point where I notched the front cross member for the mount. The bolt from the stock mount was too short to go all the way through so I cut the notch out, inverted it, turned it 90* and welded it back inplace. This should give plenty of support in this area.
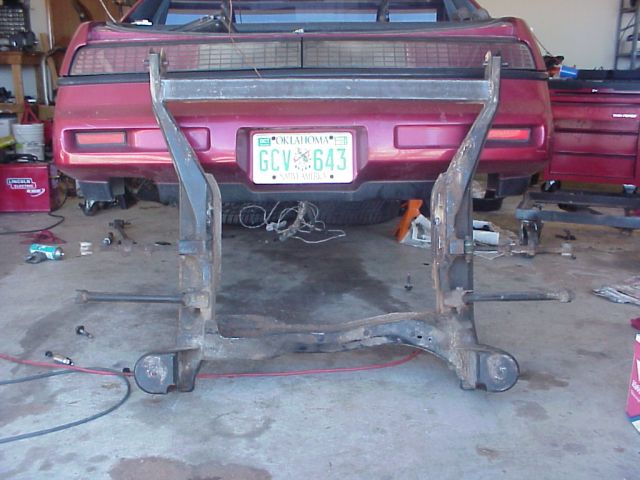
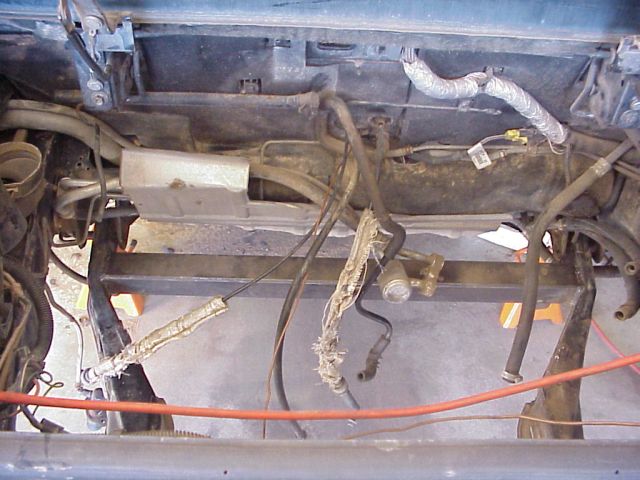
Here is a pic of the cradle mounted in the car. This allowed me a chance to take some measurements and get an overall idea of how I need to secure everything.
Hopefully I will get the mounts finished tonight and get the engine installed and test fit to the car. Then I will pull the engine back off, weld support tubes into the cradle mount points and call that part of the project done!
[This message has been edited by caddyrocket (edited 12-01-2003).]
[This message has been edited by caddyrocket (edited 12-01-2003).]
Needing a break I only spent an hour on the car last night. I only took a couple not very detailed pics this morning on my way out of the house. I finished drilling and sloting the rear engine mount and installed the mount onto the cradle. I lowered the engine onto the cradle and everything appears to line up well.
Below is a pic of the front engine mount positioned on the new forward cross member. Rickady88GT, you can see why I mounted the it farther forward than you did.
Here is the rear engine mount. When designing this, I leveled both the engine and cradle and positioned the engine as low in the cradle as possible to lower the center of gravity even if just a little.
One thing that took me an extra 5 minutes was leveling the engine once installed. While I don't know Cadillacs name for these cast aluminum brackets, there are two brackets that protrude from either side of the engine. I hadn't given them much thought until I installed the engine on the cradle for the first time. The engine/transaxle assembly isn't balanced across engine mounts so the assembly leaned toward the passenger side. It was then that is became painfully obvious what those unused brackets where for! There appear to be no points on the Cadillac cradle for these to mount to and which means they probably mounted to the front subframe in the original car. Thankfully the engine isn't off balance much as it take very little force to push the engine up and level it. I am going to make something similar to a sway bar link for this purpose. The pic below is the bracket I welded to the cradle for the passenger side link. This will allow me to level the engine on the cradle with little effort.
IP: Logged
10:07 AM
Fiero STS Member
Posts: 2045 From: Wyoming, MN. usa Registered: Nov 2001
Got the engine cradle rolled under the car and test fit tonight. Everything lines up well. I forgot to remove the stock dog bone mount and it looks like I am going to have to remove that peice of steel that runs between the passanger side of the dog bone mount and the strut tower. Once that's gone, it will clear the strut tower with plenty of room to spare. I'll knock that out tomorrow if it's not tooooo cold out there. That and some minor tweeks and it should sit right in there!
I didn't get any pics tonight because there really isn't much to see. when I finish all the engine bay mods, I'll snap some pics and post them up.
Oh yeah, I invested in a propane heater. Works wonders!
IP: Logged
10:47 PM
Rickady88GT Member
Posts: 10657 From: Central CA Registered: Dec 2002
OK I see why the N* needs more room now. There is nothing between the S* oil pan and front cross member. But the N* looks like it has a few things in there.
IP: Logged
11:09 PM
Dec 3rd, 2003
Will Member
Posts: 14303 From: Where you least expect me Registered: Jun 2000
Got the engine cradle rolled under the car and test fit tonight. Everything lines up well. I forgot to remove the stock dog bone mount and it looks like I am going to have to remove that peice of steel that runs between the passanger side of the dog bone mount and the strut tower. Once that's gone, it will clear the strut tower with plenty of room to spare. I'll knock that out tomorrow if it's not tooooo cold out there. That and some minor tweeks and it should sit right in there!
There's a second set of holes in the cam cover that will let you mount the coil pack to the left about 4". Requires reworking the harness... but what doesn't? That should give you room to not have to cut much off the dogbone mount. In retrospect, I should have done this, as I think even with 4 mounts the engine needs a damper to transition from off-throttle to on-throttle and vice versa smoothly. The dogbone mount is a great place to install one as it has a lot of leverage with which to work.
------------------ '87 Fiero GT: Northstar, Getrag, TGP wheels, rear sway bar, rod end links, bushings, etc. '90 Pontiac 6000 SE AWD: Leaking ABS unit fixed, load levelling rear suspension fixed, still slow
There's a second set of holes in the cam cover that will let you mount the coil pack to the left about 4". Requires reworking the harness... but what doesn't? That should give you room to not have to cut much off the dogbone mount. In retrospect, I should have done this, as I think even with 4 mounts the engine needs a damper to transition from off-throttle to on-throttle and vice versa smoothly. The dogbone mount is a great place to install one as it has a lot of leverage with which to work.
Sinse mine has the coil per cylinder setup, thankfully I won't have to modify that part of the harness. It's actually the cam cover that will interfear with the dog bone mount. I do agree with you on the dog bone issue. I haven't decided how I want to incorporate the "other two" engine mounts into the grand scheme of things yet but I had planned on building a system to limit the movement of the engine under hard acceleration.
Hopefully, I will be able to get the engine completely installed into the car and the cradle bolted in place. Then I'll deal with the other two mounts and the dog bone all at once!
I've also began investigating the axle phase of the project. It looks like the way to go is to modify the stock caddy axle length as needed and use the Pontiac 6000 upright (hub carrier?). Fiero STS, I just read in a searched out thread that you used the auto. What did you do for axles?
[This message has been edited by caddyrocket (edited 12-03-2003).]
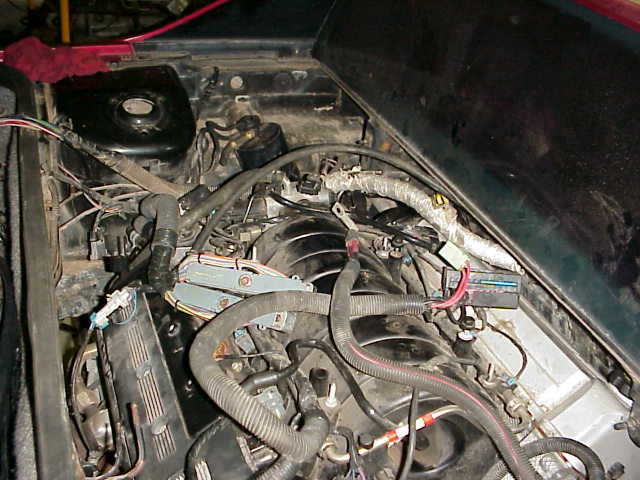
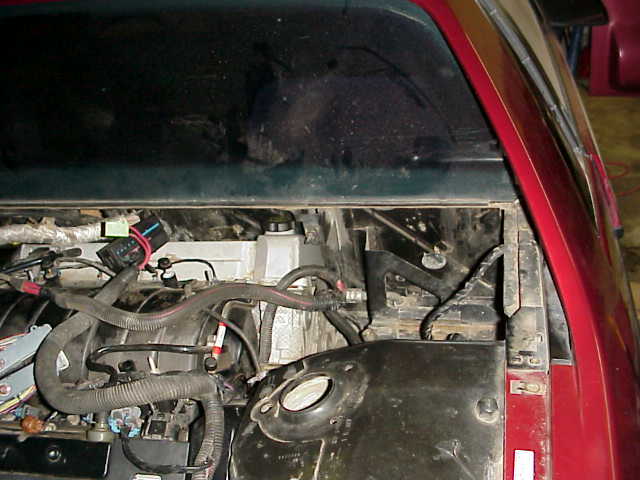
Just a quick update from lastnight. I cleared out the dogbone mounting area, removed the interfering firewall heatsheild mounts, cut down the decklid mount and test fit the engine. the body wiring harness caused some pain as did the firewall itself. The cover for the waterpump pully slightly touches the firewall but it's enough to cause a problem. The forward engine mount bracket misses the protruding firewall by 1/4in. I'm going to do some finish up the little things shortly and I'll shoot some pics so it's all documented.
Sorry for the late reply. I haven't done any earth chattering work over the last couple weeks. I finished clearing and checking the engine bay. This was just a bunch of, install the engine, check clearence, remove the engine, modify, repeat. I could give all the pics in the world of this but chose not to because everyone is going to have a slightly different installation design which will present different challanges. There isn't much "what did you do about this" because if it hit something, you have to move either the engine or whatever it's hitting. Easy eh? It's time consuming but I've been slacking anyway. I installed the engine and was finally happy with the fit and decided I wanted to lower the engine in the cradle some more. I've been wanting to use solid motor mounts but I thought the stock mounts would save time, and they would. But lowering the engine will improve center of gravity just a little bit and it will give me more room to install the turbochargers.
I removed the stock engine mounts and started making testing some different drop distances and seeing what I would need to modify or move to lower the engine. Ultimately I found about an inch all the way around would be good. This brings the heaviest single peice of the car that much lower to the ground and gives me a little better clearence all around the engine bay. Now I will have to make four motor mounts instead of just two. I will have to clearence the new front cradle cross member to make some room for the A/C compressor but the interference is minimal and I just like to have plenty of room around everythign. No biggie.
I've decided to use a pair of twin T3/T04E instead of the T72 I was using on my Camaro. To be honest, it's as much the cool factor of saying "twin turbo" as it is to reduce trunk interference (the T72 is wider overall that the hybrid). Being a kit builder, I've found that a well matched large single is no different that a well match set of smaller twins. It's just which combination gives you the best overall efficency. But this car is going to be used to promote my company anyway and people just eat up the term "twin turbo". I've got one of the turbos I will be using and was doing some test fits trying to get an idea of where I need to be on it. It looks promising to use the stock manifolds and cross over pipe with minimal modifications. I will probably cut the crossover pipe back, weld a bend to lower the outlet (which will lower the turbo tied to that pipe). I will use the stock rear manifold and just modify it with the correct flange and angle to clear the other turbocharger and it's plumbing. Oil feed will just be a T off the oil pressure sender which I have to change anyway to use the pressure gauges vs the caddy's idiot light. Return will be facilitated via a scavange pump returning the oil to the valve cover. This way I can keep the oil pan intact. Otherwise I would have to mount the turbochargers higher to clear the transmission which wraps around the pan and would make it difficult to plumb a return line and would require greater trunk modification.
One new technical challenge I've forced myself to consider is the added weight of the 4T80E to the cars overall weight and the added turbo weight behind the rear axle centerline. Added weight between the wheels makes less overall difference than added weight behind or in front of the wheels. Somewhere I am going to have to move the weight up front to maintain some balance. I had considered locating the battery infront of the front wheels but I have a saftey concern with that and chose to put it in the typical location under the tire. I will probably address this later if I decide to road race it. I might add some weight to the front to balance the car out for carving corners and remove it for drag racing where a lite front end it better anyway.
[This message has been edited by caddyrocket (edited 12-19-2003).]
IP: Logged
11:11 AM
Will Member
Posts: 14303 From: Where you least expect me Registered: Jun 2000
I belive Olds Auroras have a gauge sender that threads in place of the Caddy pressure switch. Clears the mount bracket and everything.
------------------ '87 Fiero GT: Northstar, Getrag, TGP wheels, rear sway bar, rod end links, bushings, etc. '90 Pontiac 6000 SE AWD: Leaking ABS unit fixed, load levelling rear suspension fixed, still slow
Everyone interested in using a newer OBDII computer, PCMFORLESS (www.pcmforless.com) is working on getting setup to edit that PCM and remove the crap you don't want and modify the stuff you do! Bryan @PCMforless mentioned there has been some interest in this already (between N* transplant guys and caddy owners wanting to use a supercharger system that is coming out). Just a quick heads up!
IP: Logged
05:31 PM
Dec 20th, 2003
NINJAX Member
Posts: 109 From: Colorado Springs, Colorado, USA Registered: May 2003
OK i got a couple of questions for eveybody. ive been reading a lot about all the engine swaps. We found a Northstar. My qestion is, it has 80,000 miles. the guy wants a grand for just the motor. the caddy has been in a frontal collision. looks like it didnt get into the motor. except the harmonic balancer is damaged. Is it worth it to persue. My second questions is that when people refer to the north star they are refering to the 4.6. And the 4.9 is not a northstar but made by caddilac? please correct me if im wrong we had quite the debaite yesterday. thanks for any replys.
IP: Logged
02:30 PM
PFF
System Bot
wcapman Member
Posts: 208 From: Gulfport, MS USA Registered: Dec 2001
The 4.9 is a pushrod engine. The 4.6 is 4OHCs. World of difference.
80K is getting up there but it is not uncomon for these engines to go 150k. Caddy originally didn't even recomend a tune up until 100k. But these aren't super engines. Oil seals still leak, etc.
If the harmonic balancer is damaged there could be internal damage to the motor. A hit hard enough to damage a harmonic balancer probably deformed at least the front bearing and maybe the thrust bearking, depending on the direction of the hit. Personally I would steer clear of that one.
IP: Logged
09:47 PM
Dec 21st, 2003
RCR Member
Posts: 4453 From: Shelby Twp Mi Registered: Sep 2002
Quick question for you guys: My dad is doing a Aurora conversion for an '88, unfortunately, the car is 200 miles away at the moment. What he needs to know is, How wide is the '88 cradle? He's trying to figure out how he's going to mount the engine, so the cradle width is kind of important.
Thanx for any info...
Bob
IP: Logged
12:19 PM
aaronrus Member
Posts: 870 From: bradenton, FL USA Registered: Nov 2003
my advice, just from personal experienec, and also other mechanics aroudn town.. the Northstar engines really are not all that they are cracked up to be... sure they have great power and fuel efficiency to boot, BUT, i swear that for the number of northstar engines that are out on the street, a MUCH larger percentage of them have head gasket problems as opposed to say, a 3800. i see very few 3800 engines in hear for major work like that.. and i see probbaly 4 a month on the northstar engines, easy, if not more.. just last week, a guy came in with a 2000 seville touring coupe, with 16,000 miles on it, and water leaked past the head gasket, into the cylinder, hydro-locked the piston into the cylinder wall, and the conencting rod snapped instantly in half, and completely destroyed both sides of the crank case where it was.. AND, ive talked to other guys from other shops, same thing, northstars are notorious for problems like this.. i'm not saying that yours is gonna have them, and im sure i'll get spammed and people will argue with me for no particular reason, other than to prove me wrong with no real evidence to back them up... but lets look at it this way, theres a reason that Cadillac is replacing the northstar engiens in soem of there new caddy's with LS1 V8 engines.... stay away fro the DOHC european type motors, stick with OHV pushrod power.. its tried and true.. put a 3800 Supercharged engien in it..with stock internals, and a simple aftermarket Supercharger pulley, and a '94 or '95 ecm reprogrammed properly, you can EASILY have 330 HP and about 380 ft lbs of torque... and the engine is just more reliable, just my two cents. OHH and.. further more.. the tranny for a 3800 is gonna be MUCH easier to adapt to the fiero cradle than a northstar tranny.. it requires ZERO cradle modifications, just needs poly mounts.
[This message has been edited by aaronrus (edited 12-21-2003).]
IP: Logged
09:11 PM
GTDude Member
Posts: 9056 From: Keysville, Virginia, USA Registered: Nov 2001
I'm not to try to cause controvercy, but it seems to me that the 3800SC is a much easier swap...........and much cheaper. Most of the electrical probs that the *N has are not an issue with the 3800SC.
I must also say that I've ridden in 3 *N swaps. I was impressed with none.
I've also ridden in 2 3800SC swaps and been amazed and elated. I think either swap would be VERY VERY KEWL.....but the 3800SC.....FELT......much more power. To each his own and please don't take this the wrong way....it's only one person opinion.
Phil
------------------ 87 FIERO GT 2.8 5spd
If you found my advice helpful, please take the time to give me a positive rating. Thanks
Guys please do me a favor and allow me to stick with the intent of the thread. There are tons of them debating the merits or lack their of for just about any motor swap out there. The point of this thread is to detail my swap, how I did certain things, and to put some more real world install info out there for people who choose the northstar swap.
I did a few more things this weekend although I didn't get as much done on it as I wanted to. Typical for the holidays isn't it?
I finished the front engine mount. I used a peice of the same 2.5in square stock I used to make the front cradle cross member from. The bracket the stock engine mount bolts to has an angle to it, as does the top of the engine mount. To build this, I made a cut through one of the corners of the square stock and bent what would become the top of the new point out to match the angle. I bolted the forward mount to the engine and cradle to check the exact angle and tacked tacked in peice of some scrap in place to fill the gap. I ran 4 beads, 2 at the top and two at the bottom of the gap and filler. It should be more than enough to support the weight. I will use some rubberized coating on all the mounts to prevent the noise from the metal/metal contact.
Here is a pic of the final test fit in the car. It turned out pretty crappy. The picture seems to be distorted. In anycase here it is. Not much to say about it.
Here is a pic of the passenger side decklid mount. I hacked much more off of it than I needed to unfortunately. That will create some extra work but I'm going to attack the decklid mounts tonight perhaps. I plan on taking the lower section I removed and welding it in on a horizontal plane vs the orignial vertical plane. I will modify the hinge approprately and call it a day. That should give plenty of structure and support. I'll likely use a decklid strut later.
Finally, here is a pick of the rear engine mount cradle modifications I did. This was pretty straight forward. When I had intented to use the stock Caddy engine mounts, I carved out this section of the cradle and after leveling and measuring the engine and cradle together. Here it shows where I've boxed in area. I will be boxing in the area where the original getrag tranny mount resided. That should give it a more strength whether it's needed or not.
I had hoped to finish the cradle and get everything permanantly mounted in the car before Christmas but that isn't going to happen. I've still got to attack the cooling, fuel, and A/C plumbing, clearence the cradle for the A/C compressor, finish the belt routing, finish the decklid mount, and handle some of the misc electrical work that won't be accessable once the cradle is installed. Not looking good for a Christmas deadline .
Happy Holidays!
IP: Logged
11:36 AM
ltlfrari Member
Posts: 5356 From: Wake Forest,NC,USA Registered: Jan 2002
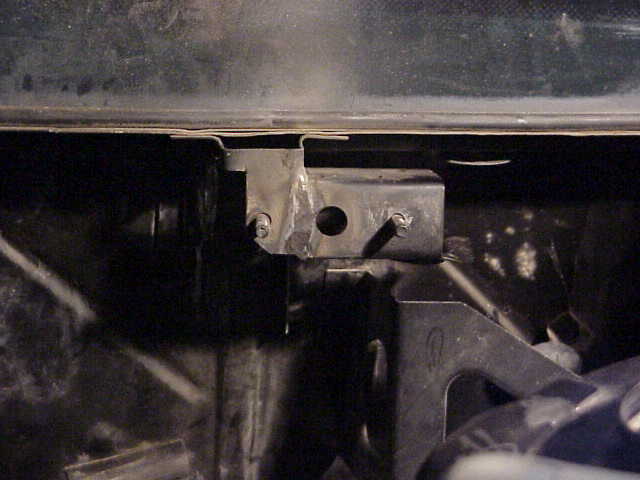
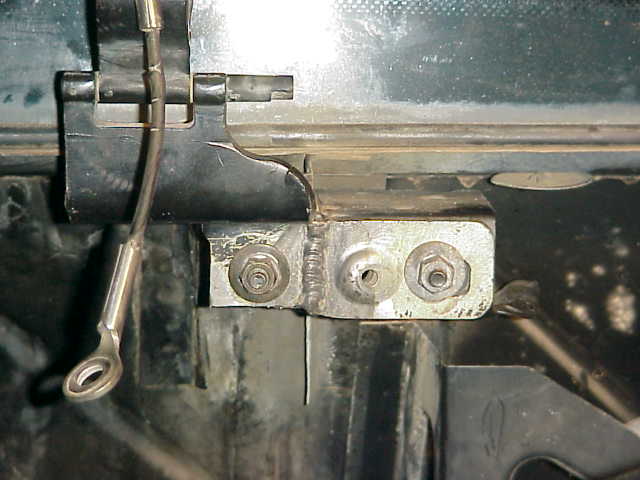
Put an hour in on the car tonight. Holiday insanity is in full swing here so it's difficult to find time but I got the passenger side decklid mount complete. Here are a few pics of the hinge and mount modifications.
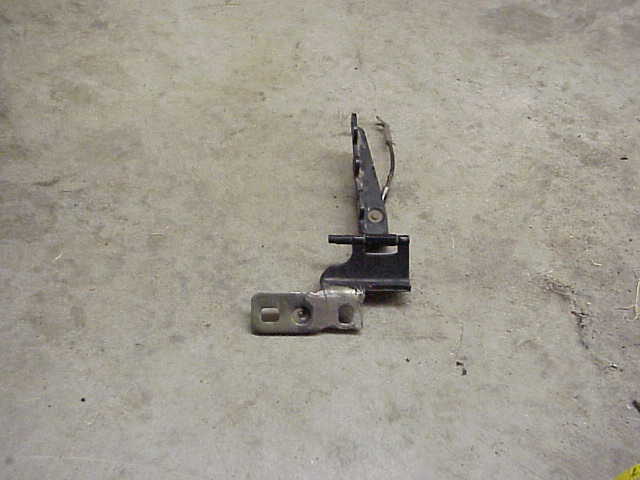
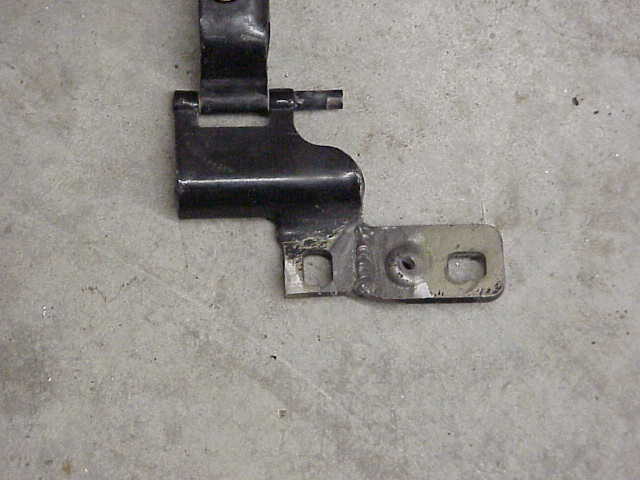
Here is the hinge mount. Basicly all I did was cut the bottom section of the hinge mount off about 3/8in below the top bolt. I cut some of the back off which allowed me plenty of space to fit the lower bolt which was to become the right hand bolt. Then I squared it up and welded the remainder of what was cut out to the side of the bolt. I've left it loose for now incase I need to tweak the whole mount but once I'm completely satisfied with the install, I'll take the new right hand bolt section to the firewall to give it a little structure. I really don't think these need much reenforcement as they aren't going to see much stress but it will make things more solid which is never a bad thing.
Below is the modified hinge. Modified in somewhat the same manner as the mount, I measured and cut off the bottom section and welded in onto the side. What looks like a little crack on the top of ground area is just the remainder of the weld that was ground down to it could mount flush.
This is the front side of the new hinge.
Here is the hinge installed on the mount. I measured between the two bolts on the decklid itself and it measures about 27.75 inches. This new passenger side hinge will have no problem mounting the decklid even and level.
This was a pretty easy part of the project but it turned out well and I'm happy with it. The mechanical fabrication peice of this is showing some light at the end of the tunnle finally. The electrical peice coming up next is going to be a pleasent PITA for sure.
[This message has been edited by caddyrocket (edited 12-22-2003).]


 It's time consuming but I've been slacking anyway. I installed the engine and was finally happy with the fit and decided I wanted to lower the engine in the cradle some more. I've been wanting to use solid motor mounts but I thought the stock mounts would save time, and they would. But lowering the engine will improve center of gravity just a little bit and it will give me more room to install the turbochargers.