Pennock's Fiero Forum
  Technical Discussion & Questions - Archive
  taking my gauge cluster apart, anyone need pics? (Page 1)

T H I S   I S   A N   A R C H I V E D   T O P I C
  

Email This Page to Someone! | Printable Version

This topic is 2 pages long:  1   2 
Previous Page | Next Page
taking my gauge cluster apart, anyone need pics? by buddycraigg
Started on: 01-26-2004 08:34 PM
Replies: 60
Last post by: buddycraigg on 04-07-2004 01:07 PM
buddycraigg
Member
Posts: 13588
From: kansas city, mo
Registered: Jul 2002


Feedback score: (5)
Leave feedback


Total ratings: 478
Rate this member

Report this Post01-26-2004 08:34 PM Click Here to See the Profile for buddycraiggSend a Private Message to buddycraiggDirect Link to This Post
i'm changein from orange to green. so while it's apart dose any one want pics of stuff?

(yes i really do spend too much time with my new camera)

IP: Logged
PFF
System Bot
84se-Stock
Member
Posts: 430
From: Bridgewater, Nova Scotia
Registered: May 2003


Feedback score: N/A
Leave feedback

Rate this member

Report this Post01-26-2004 08:39 PM Click Here to See the Profile for 84se-StockSend a Private Message to 84se-StockDirect Link to This Post
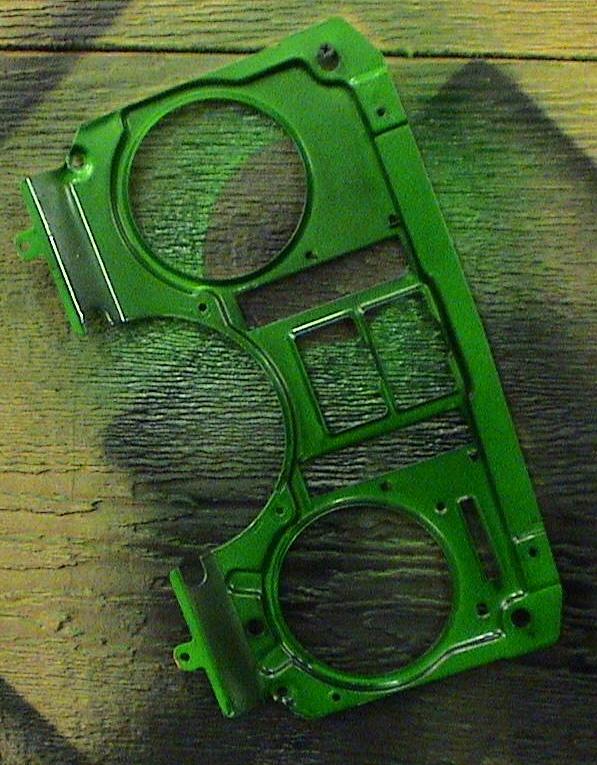
Just a quick questions for you. I'm in the process of making my gauges light up blue and when I take apart my cluster the inside is painted the brightest neon orange I have ever seen. Is your's the same? I've seen a few pictures floating around here of clusters apart but haven't seen one painted the same as mine. No wander it's so orange. Mine's backlite by the way...


:EDIT: for poor grammar

[This message has been edited by 84se-Stock (edited 01-26-2004).]

IP: Logged
buddycraigg
Member
Posts: 13588
From: kansas city, mo
Registered: Jul 2002


Feedback score: (5)
Leave feedback


Total ratings: 478
Rate this member

Report this Post01-26-2004 09:18 PM Click Here to See the Profile for buddycraiggSend a Private Message to buddycraiggDirect Link to This Post
they are all orange.

and chris did his in blue also

IP: Logged
ka4nkf
Member
Posts: 3702
From: New Port Richey, FL USA
Registered: May 99


Feedback score: N/A
Leave feedback


Total ratings: 148
Rate this member

Report this Post01-26-2004 11:05 PM Click Here to See the Profile for ka4nkfSend a Private Message to ka4nkfDirect Link to This Post
Buddy, you might want to try some of this cleaner while you have it out.
BORG-WARNER brand CL85 Contact Enhancer. this stuff is supposed to be the best cleaner for contacts, relays and computer boards. I went to Oriellys but they did not have it, but I think the boy did not know what I was talking about.
Don
IP: Logged
buddycraigg
Member
Posts: 13588
From: kansas city, mo
Registered: Jul 2002


Feedback score: (5)
Leave feedback


Total ratings: 478
Rate this member

Report this Post01-26-2004 11:29 PM Click Here to See the Profile for buddycraiggSend a Private Message to buddycraiggDirect Link to This Post
i must be old...
i believe the way to clean contacts are with a points file and emery cloth.
but thanks for the tip

[This message has been edited by buddycraigg (edited 01-26-2004).]

IP: Logged
ka4nkf
Member
Posts: 3702
From: New Port Richey, FL USA
Registered: May 99


Feedback score: N/A
Leave feedback


Total ratings: 148
Rate this member

Report this Post01-27-2004 12:32 AM Click Here to See the Profile for ka4nkfSend a Private Message to ka4nkfDirect Link to This Post
I did mention computer boards and I think this is what you will find in your gauge cluster. those little copper connections do get dirty. like on the light bulbs.
Don
IP: Logged
2point5fiero
Member
Posts: 564
From: Albuquerque
Registered: Sep 2003


Feedback score: N/A
Leave feedback

Rate this member

Report this Post01-27-2004 02:30 AM Click Here to See the Profile for 2point5fieroSend a Private Message to 2point5fieroDirect Link to This Post
I WAS GOING TO DO THE SAME MOD! PICS PLEASE!

------------------
G Mo

IP: Logged
buddycraigg
Member
Posts: 13588
From: kansas city, mo
Registered: Jul 2002


Feedback score: (5)
Leave feedback


Total ratings: 478
Rate this member

Report this Post01-27-2004 12:23 PM Click Here to See the Profile for buddycraiggSend a Private Message to buddycraiggDirect Link to This Post
i'll put some up when i get home tonight, i do like the way it looks but i have to use a brighter paint.
i tried to find some floresent (sp?) green at oreilly's on the way home, but couldn't and thought i would be able to get away with what i used.
the speedo and tach are ok, but the temp and gas is too dark for my liking.
IP: Logged
buddycraigg
Member
Posts: 13588
From: kansas city, mo
Registered: Jul 2002


Feedback score: (5)
Leave feedback


Total ratings: 478
Rate this member

Report this Post01-27-2004 10:45 PM Click Here to See the Profile for buddycraiggSend a Private Message to buddycraiggDirect Link to This Post

buddycraigg

13588 posts
Member since Jul 2002
ok some one asked for a step by step...
1

EEEK

it's late and i want to spend some time with the ol lady,

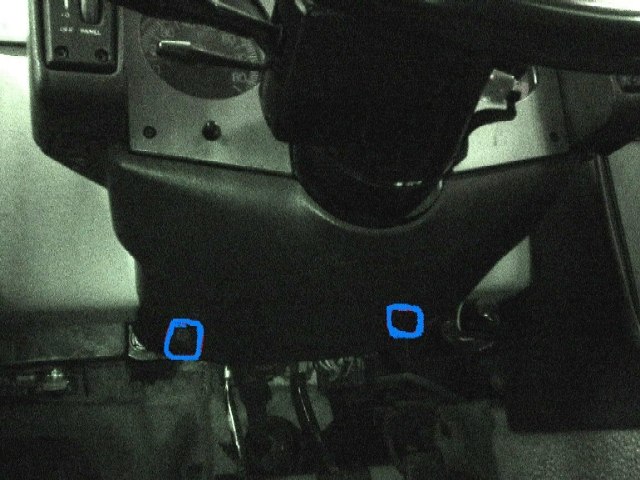
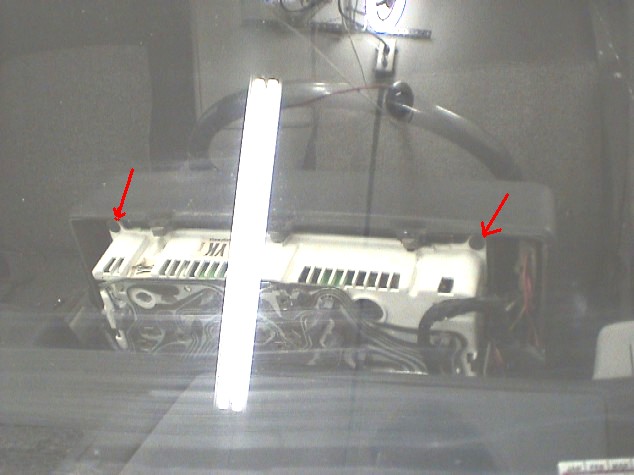
i'll edit pics and add text tomorrow from work.
;;;
I like to start at the top cowling of the gauge pod.
There are (5) #15 torx screws, once they are up out of the recessed hole you can get them with a 7mm socket. I do this so I don’t keep bumping the windshield with the torx driver.

and (2) 7mm screws that you have to get to from the bottom, one on each side.

lift the upper section of the pod up and away.
*** the sides that had the two bottom screws will want to hang up on wires, so be careful.

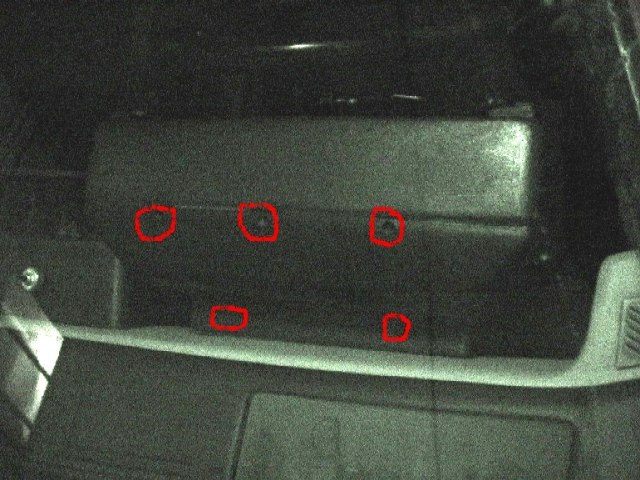
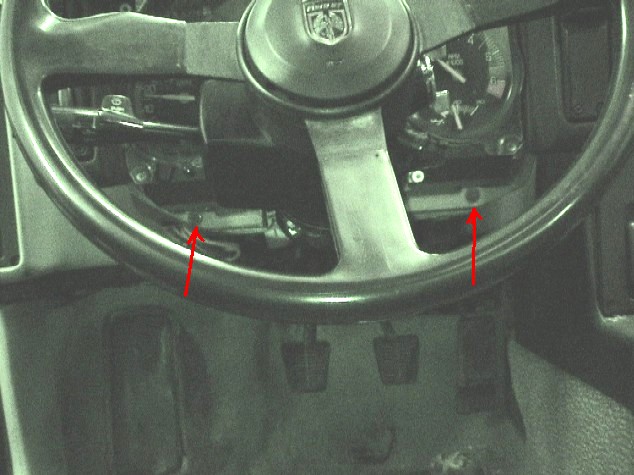
Now remove (4) 7mm screws from the bottom cowling.
These two,

and one on each side

*** support it with your hand, as it will want to fall with only one screw left in it and you don’t want to crack anything.

[This message has been edited by buddycraigg (edited 01-28-2004).]

IP: Logged
buddycraigg
Member
Posts: 13588
From: kansas city, mo
Registered: Jul 2002


Feedback score: (5)
Leave feedback


Total ratings: 478
Rate this member

Report this Post01-27-2004 10:45 PM Click Here to See the Profile for buddycraiggSend a Private Message to buddycraiggDirect Link to This Post

buddycraigg

13588 posts
Member since Jul 2002
unplug three connectors,
the one on the bottom has a release clip that's hard to see.

[This message has been edited by buddycraigg (edited 01-28-2004).]

IP: Logged
buddycraigg
Member
Posts: 13588
From: kansas city, mo
Registered: Jul 2002


Feedback score: (5)
Leave feedback


Total ratings: 478
Rate this member

Report this Post01-27-2004 10:47 PM Click Here to See the Profile for buddycraiggSend a Private Message to buddycraiggDirect Link to This Post

buddycraigg

13588 posts
Member since Jul 2002
3
take out these (2) 7mm screws out on the back.

take out (2) 7mm screws under the gauges

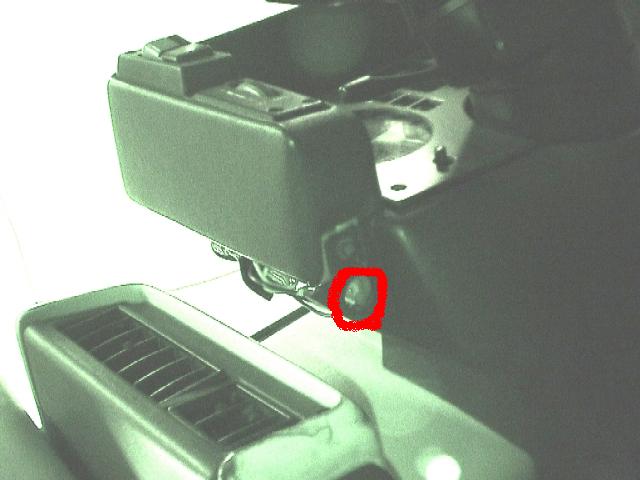
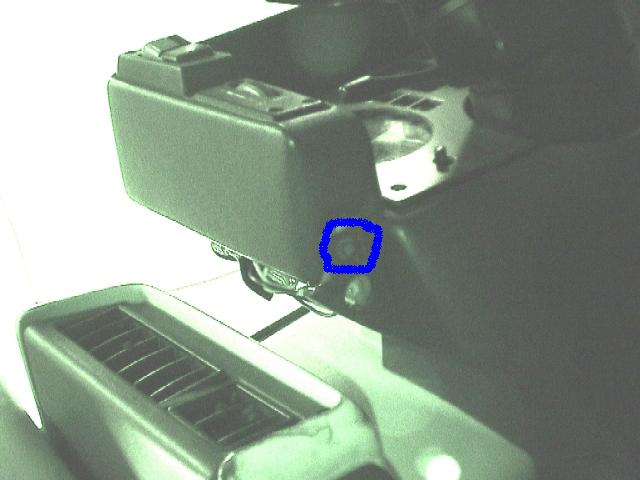
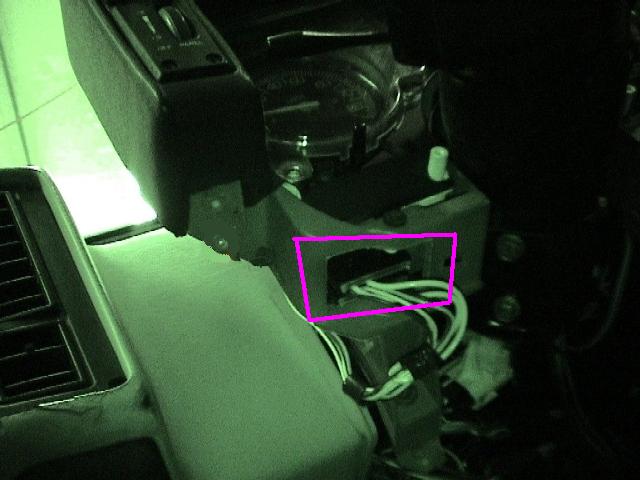
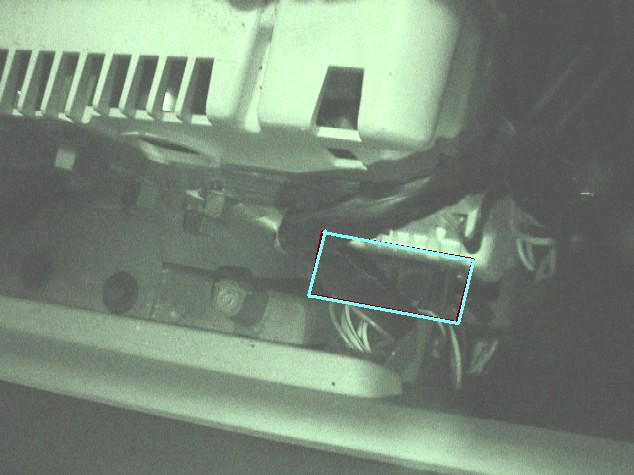
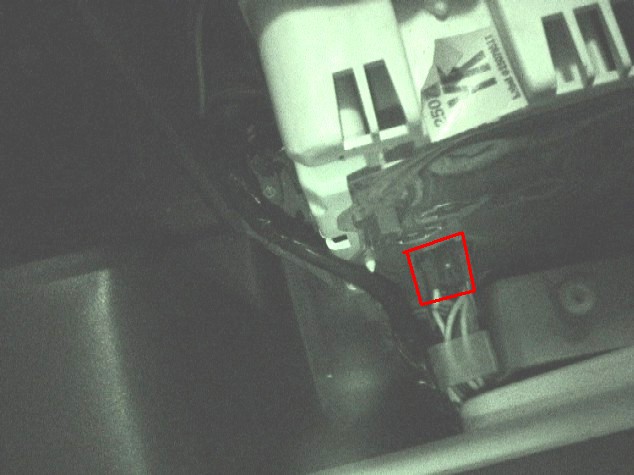
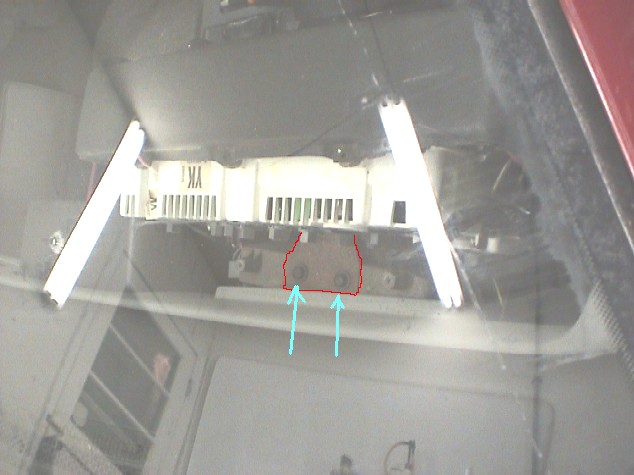
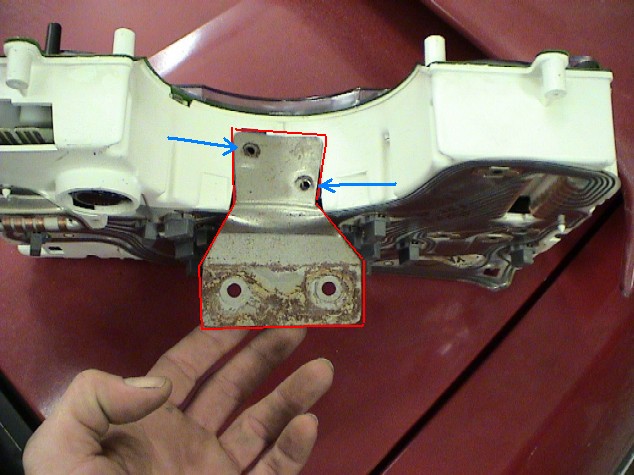
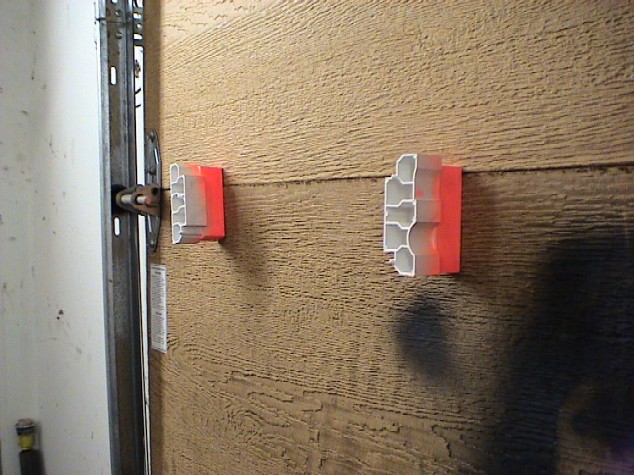
take out (2) 10mm screws on the bracket outlined in red

take out (2) 10mm screws on the bottom of the pod

the pod will now pull towards you so you have the room to remove the gauge cluster.

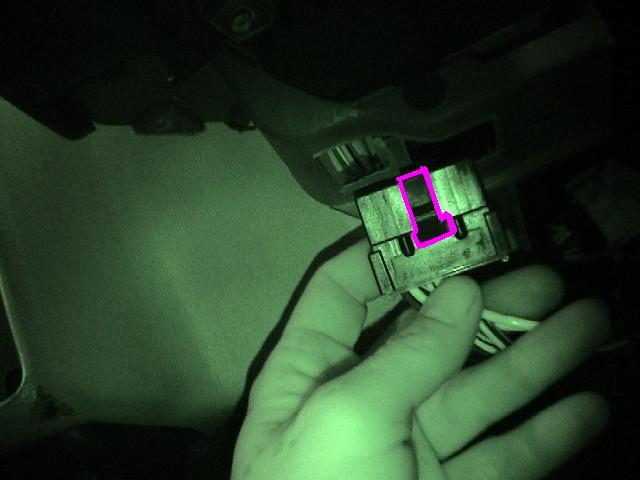
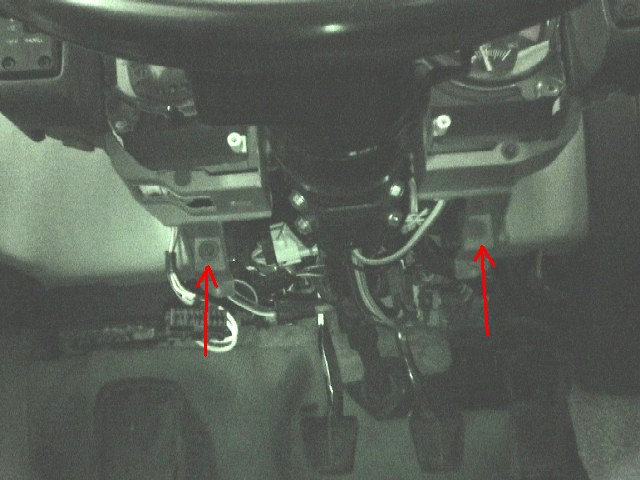
now take these 2 screws out and throw them away.
you'll still put the bracket back in place, but the gauges will be a lot easier to remove and install the next time.

[This message has been edited by buddycraigg (edited 01-28-2004).]

IP: Logged
PFF
System Bot
buddycraigg
Member
Posts: 13588
From: kansas city, mo
Registered: Jul 2002


Feedback score: (5)
Leave feedback


Total ratings: 478
Rate this member

Report this Post01-27-2004 10:50 PM Click Here to See the Profile for buddycraiggSend a Private Message to buddycraiggDirect Link to This Post

buddycraigg

13588 posts
Member since Jul 2002
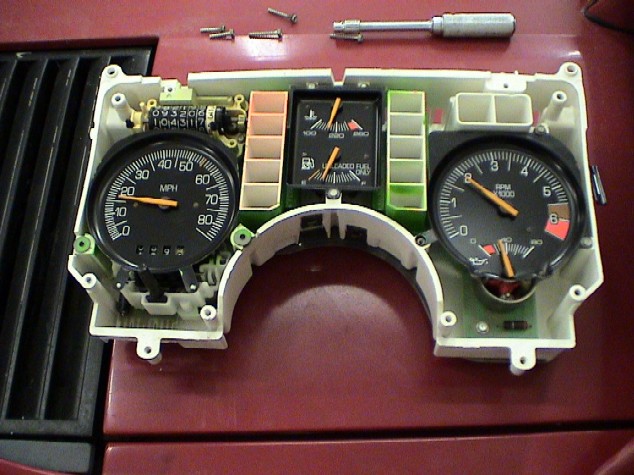
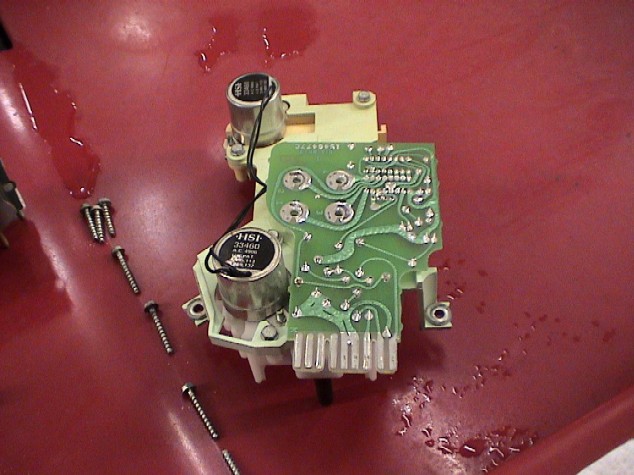
remove these screws, i think that they are actually 5.5mm but a 7/32 worked for me.
*** they are different lenghts, pay attention where each goes.
also if you are only wanting to remove the clear lens for whatever, you do not have to take out the screw on the far left.

remove the black cover.
the speedo lifts out easily and will some times stick to the black cover.
they are seperate and the speedo always falls at the worst possible moment as if it wanted to break something
the speedo just lifts straight out.

remove (2) 7/32 screws
pull the center gauge cluster with a steady hand straight up.

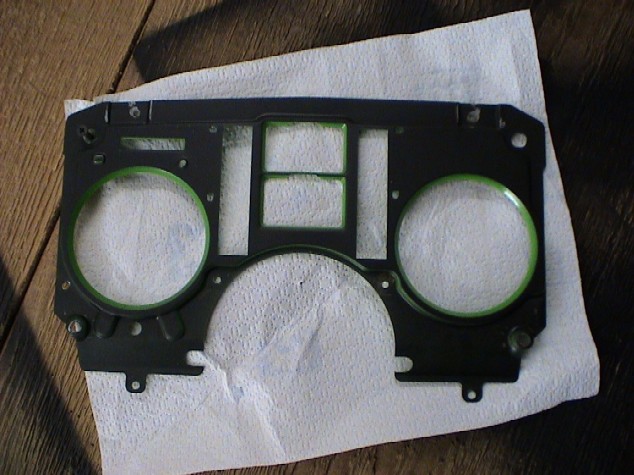
now you can remove the two idiot light shrouds

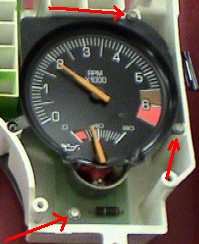
this is as far as you need to go,
but if you some reason you need to remove the tach, it pulls up just like the center gauges
after you remove (2) 7/32 screws

ERROR, do not touch the screw on the bottom, it screws through the circuit board and then pushes in to a contact. you DO NOT want to mess with this one. (this must be why i reread my own posts)

[This message has been edited by buddycraigg (edited 02-02-2004).]

IP: Logged
buddycraigg
Member
Posts: 13588
From: kansas city, mo
Registered: Jul 2002


Feedback score: (5)
Leave feedback


Total ratings: 478
Rate this member

Report this Post01-27-2004 10:51 PM Click Here to See the Profile for buddycraiggSend a Private Message to buddycraiggDirect Link to This Post

buddycraigg

13588 posts
Member since Jul 2002
5
almost ready to paint...

remove (4) 8mm nuts and spring washer from the studs that go to the speedo motor and lift the circuit board and plastic off of the speedo gauge.

be sure to remove the over lays for the idiot lights.

[This message has been edited by buddycraigg (edited 01-28-2004).]

IP: Logged
buddycraigg
Member
Posts: 13588
From: kansas city, mo
Registered: Jul 2002


Feedback score: (5)
Leave feedback


Total ratings: 478
Rate this member

Report this Post01-27-2004 10:52 PM Click Here to See the Profile for buddycraiggSend a Private Message to buddycraiggDirect Link to This Post

buddycraigg

13588 posts
Member since Jul 2002
when i painted the face plate i got over spray on the front of it, in the ring around the speedo and tach. so i had to repaint the front black.

[This message has been edited by buddycraigg (edited 01-28-2004).]

IP: Logged
buddycraigg
Member
Posts: 13588
From: kansas city, mo
Registered: Jul 2002


Feedback score: (5)
Leave feedback


Total ratings: 478
Rate this member

Report this Post01-27-2004 10:52 PM Click Here to See the Profile for buddycraiggSend a Private Message to buddycraiggDirect Link to This Post

buddycraigg

13588 posts
Member since Jul 2002
all done with the paint,
now i just have to put it back together

[This message has been edited by buddycraigg (edited 01-28-2004).]

IP: Logged
buddycraigg
Member
Posts: 13588
From: kansas city, mo
Registered: Jul 2002


Feedback score: (5)
Leave feedback


Total ratings: 478
Rate this member

Report this Post01-27-2004 10:54 PM Click Here to See the Profile for buddycraiggSend a Private Message to buddycraiggDirect Link to This Post

buddycraigg

13588 posts
Member since Jul 2002
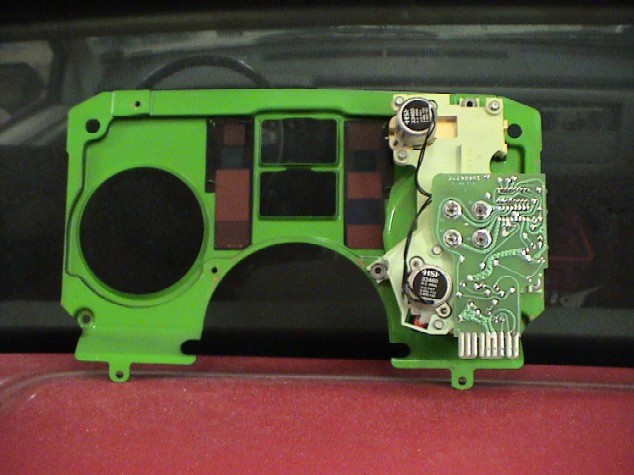
8
i tried the brightest green i could find and a florescent green.
with the normal paint the gauges looked white and the center gauges were almost impossible to see.

with the florescent paint, the speedo and tach look green and are almost as bright as what i want. the tach looks great, but the speedo is a little too dim at 55 and up.

the center gauges are at least readable now but it takes a second or two after looking at the road for my eyes to adjust and be able to see them. i push my luck with my gas gauge all the time, i've driven with the needle BELOW the E line before. i couldn't perfectly see the line tonight.

ultimately i like the color scheme, but it's not bright enough, there is colored "chrome" paint at the parts store, i guess i'll try that next. other wise i'll repaint it white and use green LEDs.

[This message has been edited by buddycraigg (edited 01-28-2004).]

IP: Logged
ManiMack
Member
Posts: 895
From: Toronto
Registered: Apr 2003


Feedback score: N/A
Leave feedback

Rate this member

Report this Post01-28-2004 01:51 PM Click Here to See the Profile for ManiMackSend a Private Message to ManiMackDirect Link to This Post
You have no idea how much time this is gonna save me. Thanks a bunch buddy.

Edit... I was able to take off the clear cover without totally removing the gauge cluster. This saved my some time because I was just taking mine out to fix my speedo.

[This message has been edited by ManiMack (edited 01-28-2004).]

IP: Logged
84se-Stock
Member
Posts: 430
From: Bridgewater, Nova Scotia
Registered: May 2003


Feedback score: N/A
Leave feedback

Rate this member

Report this Post01-28-2004 02:13 PM Click Here to See the Profile for 84se-StockSend a Private Message to 84se-StockDirect Link to This Post
Excellent writeup...I'ld give you a + if I hadn't already. This is a great alternative to going out and buying gauge kits. What type of paint did you finally end up going with and what was the total cost of this modification. Also would be interested in a before and after pic of the gauges lit up. Once again, great thread. I'll also post pics of my blue conversion hopefully this weekend.
IP: Logged
ManiMack
Member
Posts: 895
From: Toronto
Registered: Apr 2003


Feedback score: N/A
Leave feedback

Rate this member

Report this Post01-28-2004 05:01 PM Click Here to See the Profile for ManiMackSend a Private Message to ManiMackDirect Link to This Post
Whats it look like with the green now? Did it change it from red?
IP: Logged
buddycraigg
Member
Posts: 13588
From: kansas city, mo
Registered: Jul 2002


Feedback score: (5)
Leave feedback


Total ratings: 478
Rate this member

Report this Post01-28-2004 06:57 PM Click Here to See the Profile for buddycraiggSend a Private Message to buddycraiggDirect Link to This Post
 
quote
Originally posted by ManiMack:

Whats it look like with the green now? Did it change it from red?

with the first paint i tried, it looked more white than green. AND the center gauges were too dark.

and i'm about to drive home from work (it's dark here) so i'll tell you how the new paint worked.

------------------
Buddy - there are two "G"s in my name
Ling = 84SE-350-N2O-Poly-Mr.Mike seats-Sequential turn signals-short shifter
Julia C = 85GT stock (mostly)
KCFOG
got a broken stud?
car doesn't crank over?

IP: Logged
riddik
Junior Member
Posts: 8
From:
Registered: Jan 2004


Feedback score: N/A
Leave feedback

Rate this member

Report this Post01-28-2004 07:26 PM Click Here to See the Profile for riddikSend a Private Message to riddikDirect Link to This Post
what do you change or paint to change the color of the gages from the boring old red?
IP: Logged
PFF
System Bot
84se-Stock
Member
Posts: 430
From: Bridgewater, Nova Scotia
Registered: May 2003


Feedback score: N/A
Leave feedback

Rate this member

Report this Post01-28-2004 07:34 PM Click Here to See the Profile for 84se-StockSend a Private Message to 84se-StockDirect Link to This Post
When you take apart the gauge cluster you will see alot of pieces painted a bright orange. Those will all have to be painted your desired color. Another way of doing it would be to paint those pieces with a nice reflective paint and then buy bright bulbs which are the color you want to achieve. What buddycraigg did was just paint the orange pieces green and I believe he used the stock bulbs. Either way should create about the same effect. I believe when I tackle mine this weekend I'm going to try painted the orange pieces bright blue and then replace the stock bulbs with the brightest blue bulbs I can find. Hopefully by doing this it will give a might brighter, more visible color. Still waiting for before and after pics if you have them.

[This message has been edited by 84se-Stock (edited 01-28-2004).]

IP: Logged
buddycraigg
Member
Posts: 13588
From: kansas city, mo
Registered: Jul 2002


Feedback score: (5)
Leave feedback


Total ratings: 478
Rate this member

Report this Post01-28-2004 08:09 PM Click Here to See the Profile for buddycraiggSend a Private Message to buddycraiggDirect Link to This Post
 
quote
Originally posted by 84se-Stock:
Still waiting for before and after pics if you have them.

i dont know if my camera will do that without going in to infrared mode. but i'll try

IP: Logged
84se-Stock
Member
Posts: 430
From: Bridgewater, Nova Scotia
Registered: May 2003


Feedback score: N/A
Leave feedback

Rate this member

Report this Post01-29-2004 02:14 PM Click Here to See the Profile for 84se-StockSend a Private Message to 84se-StockDirect Link to This Post
Don't bother with the pics if it's going to be a hassle...just curious as to how they looked on the way home last night.
IP: Logged
doublec4
Member
Posts: 8289
From: Oakville, Ontario, Canada
Registered: Jun 2003


Feedback score:    (20)
Leave feedback


Total ratings: 150
Rate this member

Report this Post01-29-2004 02:57 PM Click Here to See the Profile for doublec4Send a Private Message to doublec4Direct Link to This Post
I just wanted to thank you in this thread for the write-up, because it looked like I gave credit to somebody else in a different thread of mine. I was just thanking ManiMack for finding this one for me. I knew you wrote it up, don't worry

------------------
1986 Fiero SE

IP: Logged
buddycraigg
Member
Posts: 13588
From: kansas city, mo
Registered: Jul 2002


Feedback score: (5)
Leave feedback


Total ratings: 478
Rate this member

Report this Post01-29-2004 03:55 PM Click Here to See the Profile for buddycraiggSend a Private Message to buddycraiggDirect Link to This Post
 
quote
Originally posted by doublec4:

I just wanted to thank you in this thread for the write-up, because it looked like I gave credit to somebody else in a different thread of mine. I was just thanking ManiMack for finding this one for me. I knew you wrote it up, don't worry


i wasn't upset.

i was teasing more than anything

[This message has been edited by buddycraigg (edited 01-29-2004).]

IP: Logged
Bradbitz11
Member
Posts: 1826
From: Kawkawlin, MI
Registered: Dec 2002


Feedback score: N/A
Leave feedback


Total ratings: 65
Rate this member

Report this Post01-29-2004 08:29 PM Click Here to See the Profile for Bradbitz11Send a Private Message to Bradbitz11Direct Link to This Post
Thanks! I could never figure out what to unscrew other than "everything" ...

------------------

86 GT -- All Options except Performance Sound

IP: Logged
buddycraigg
Member
Posts: 13588
From: kansas city, mo
Registered: Jul 2002


Feedback score: (5)
Leave feedback


Total ratings: 478
Rate this member

Report this Post01-30-2004 01:58 AM Click Here to See the Profile for buddycraiggSend a Private Message to buddycraiggDirect Link to This Post
that green "thingie" still freaks me out for some reason.

i'ts very disturbing.

IP: Logged
84se-Stock
Member
Posts: 430
From: Bridgewater, Nova Scotia
Registered: May 2003


Feedback score: N/A
Leave feedback

Rate this member

Report this Post01-31-2004 09:21 AM Click Here to See the Profile for 84se-StockSend a Private Message to 84se-StockDirect Link to This Post
Well I finally finished my gauge conversion yesterday afternoon and wouldn't you know it my camera quit on me in the process. I do however have it working again and will take a picture of the finished project tonight on the way home. I took a slightly different approach than buddycraigg when doing to color conversion. Instead of painting the orange pieces the desired color and still using the clear bulbs I bought 6 bright blue bulbs (intended for off-road use only) and put them where the stock gauge bulbs were. Now I had to do something about the orange piece. As luck would have it while I was on my usual payday walkaround through Canadian Tire (CTC for you Ontario folk) I stumbled across a chrome interior paint. I painted the orange pieces with the "chrome" paint to make them more reflective and put everything back together. I couldn't wait until night to see the results so we covered the windows with blankets and shop towels and hoped in. At first it wasn't anything special but that night when I got in it to drive around town it was a nice bright blue.

Also while I had the cluster apart I ripped out that damn "shift" light. Stand by for pictures within the next few days.

IP: Logged
buddycraigg
Member
Posts: 13588
From: kansas city, mo
Registered: Jul 2002


Feedback score: (5)
Leave feedback


Total ratings: 478
Rate this member

Report this Post02-01-2004 07:47 AM Click Here to See the Profile for buddycraiggSend a Private Message to buddycraiggDirect Link to This Post
was it bright enough for you?

i'm going to have to redo mine differntly as it's too dark, and will try the chrome paint if you think it is bright enough.

------------------
Buddy - there are two "G"s in my name
Ling = 84SE-350-N2O-Poly-Mr.Mike seats-Sequential turn signals-short shifter
Julia C = 85GT stock (mostly)
KCFOG
got a broken stud?
car doesn't crank over?

IP: Logged
84se-Stock
Member
Posts: 430
From: Bridgewater, Nova Scotia
Registered: May 2003


Feedback score: N/A
Leave feedback

Rate this member

Report this Post02-01-2004 04:45 PM Click Here to See the Profile for 84se-StockSend a Private Message to 84se-StockDirect Link to This Post
It wasn't as bright as the stock gauges and isn't a overly vibrant blue as I had hoped. I need to take it apart and do some fine also and maybe try some brighter bulbs and a little blue paint on the back of the housing. It looks awesome though. Unfortunetly when I went to take a picture of them last night my camera died out again. Once I find out what's wrong with it I'll post some pics to show what it looks like. All in all I do like it alot better than the stock color though...I also find it a lot easier on the eyes at night. For those of you who may be wondering the price my conversion cost me a total of $20 canadian and took about an hour and a half to do.

p.s. I noticed the same problem you had with my temp/gas gauges...still trying to think of a good solution to brighten them up a little.

IP: Logged
PFF
System Bot
84se-Stock
Member
Posts: 430
From: Bridgewater, Nova Scotia
Registered: May 2003


Feedback score: N/A
Leave feedback

Rate this member

Report this Post02-01-2004 04:46 PM Click Here to See the Profile for 84se-StockSend a Private Message to 84se-StockDirect Link to This Post

84se-Stock

430 posts
Member since May 2003
 
quote
Originally posted by buddycraigg:

i'm going to have to redo mine differntly as it's too dark, and will try the chrome paint if you think it is bright enough.

Maybe try chroming the inside of the housing itself and leave the green pieces green...might add a little to the reflectiveness of it

IP: Logged
riddik
Junior Member
Posts: 8
From:
Registered: Jan 2004


Feedback score: N/A
Leave feedback

Rate this member

Report this Post02-02-2004 09:22 PM Click Here to See the Profile for riddikSend a Private Message to riddikDirect Link to This Post
thanks a whole lot for this thread, i wasnt completly sure how to get my speedometer out to put in my 195 mph speedo in. Only one problem now that i put in my speedometer my dome lights stay on. any clue whats up with that?
IP: Logged
buddycraigg
Member
Posts: 13588
From: kansas city, mo
Registered: Jul 2002


Feedback score: (5)
Leave feedback


Total ratings: 478
Rate this member

Report this Post02-02-2004 10:15 PM Click Here to See the Profile for buddycraiggSend a Private Message to buddycraiggDirect Link to This Post
glad to help.

you didn't happen to bump your dash light dimmer / roller?
my girlfriend did that in Julia once and had to call me to ask why the dome light didn't go out when she pushed the button on the roof.


and 84se-Stock, i picked up some green chrome paint tonight, lets see what happens.
but i have a few small write ups in the works, adding more to my headlight thread, and one about saving the trunk relase switch.
------------------
Buddy - there are two "G"s in my name
Ling = 84SE-350-N2O-Poly-Mr.Mike seats-Sequential turn signals-short shifter
Julia C = 85GT stock (mostly)
KCFOG

[This message has been edited by buddycraigg (edited 02-02-2004).]

IP: Logged
riddik
Junior Member
Posts: 8
From:
Registered: Jan 2004


Feedback score: N/A
Leave feedback

Rate this member

Report this Post02-02-2004 10:26 PM Click Here to See the Profile for riddikSend a Private Message to riddikDirect Link to This Post
i did check the roller and it wasnt on so im not sure what else it could be. i may have a short somewhere.
IP: Logged
Streak
Member
Posts: 74
From: Waterloo ON, Canada
Registered: Mar 2003


Feedback score: N/A
Leave feedback

Rate this member

Report this Post02-02-2004 11:20 PM Click Here to See the Profile for StreakClick Here to visit Streak's HomePageSend a Private Message to StreakDirect Link to This Post
You need some circular cold cathode lamps. Some of the computer modders use them to light up fans, I'm not sure that you could get them in the right size but they'd be far brighter than hoping you can reflect enough light off the back of a painted surface.... Of course now that I've said that I can't find them anywhere on the net, except for some that you'd have to hack off a computer fan... Common sizes tend to be 80mm 92mm and 120mm.

Here's one but its attached to a fan...
http://www.sidewindercomputers.com/sidewindercomputers/suicblccfan.html

IP: Logged
buddycraigg
Member
Posts: 13588
From: kansas city, mo
Registered: Jul 2002


Feedback score: (5)
Leave feedback


Total ratings: 478
Rate this member

Report this Post02-02-2004 11:25 PM Click Here to See the Profile for buddycraiggSend a Private Message to buddycraiggDirect Link to This Post
 
quote
Originally posted by Streak:

they'd be far brighter than hoping you can reflect enough light off the back of a painted surface....

ture, but GM has been reflecting light off of a painted surface for, oh, say 70 years, so i think i'll keep going this direction.

but they would be very cool, probalby too bright.

IP: Logged
2point5fiero
Member
Posts: 564
From: Albuquerque
Registered: Sep 2003


Feedback score: N/A
Leave feedback

Rate this member

Report this Post02-03-2004 01:45 AM Click Here to See the Profile for 2point5fieroSend a Private Message to 2point5fieroDirect Link to This Post
buddycraig- how about some pics of it at night now? Do you think if the back was painted chrome it would make the green lights nice and bright?

------------------
G Mo

Quote from Street&Strip

 
quote
I think I've drove people crazy talking about Fieros over here. I'm like a travelling evangelist trying to convert people
IP: Logged
buddycraigg
Member
Posts: 13588
From: kansas city, mo
Registered: Jul 2002


Feedback score: (5)
Leave feedback


Total ratings: 478
Rate this member

Report this Post02-03-2004 03:04 AM Click Here to See the Profile for buddycraiggSend a Private Message to buddycraiggDirect Link to This Post
 
quote
Originally posted by 2point5fiero:

buddycraig- how about some pics of it at night now? Do you think if the back was painted chrome it would make the green lights nice and bright?


FIRST, there are two "G"s in my last name
say it with me...
buddy
craigg

SECOND, i'll be getting pics and / or my final results of the chrome green paint up soon, i have jury duty tomorrow. so i am sure i will be itchin' to get out to the garage as soon as i get home.

IP: Logged
buddycraigg
Member
Posts: 13588
From: kansas city, mo
Registered: Jul 2002


Feedback score: (5)
Leave feedback


Total ratings: 478
Rate this member

Report this Post02-04-2004 01:50 AM Click Here to See the Profile for buddycraiggSend a Private Message to buddycraiggDirect Link to This Post
well after painting this with the green chrome paint and it got darker, i read the directions and you are suppose to use a base coat for the chrome first.
so far i'm about 20 bucks in to it and still can't read my center gauges.
IP: Logged
Previous Page | Next Page

This topic is 2 pages long:  1   2 


All times are ET (US)

T H I S   I S   A N   A R C H I V E D   T O P I C
  

Contact Us | Back To Main Page

Advertizing on PFF | Fiero Parts Vendors
PFF Merchandise | Fiero Gallery | Ogre's Cave
Real-Time Chat | Fiero Related Auctions on eBay


Copyright (c) 1999, C. Pennock