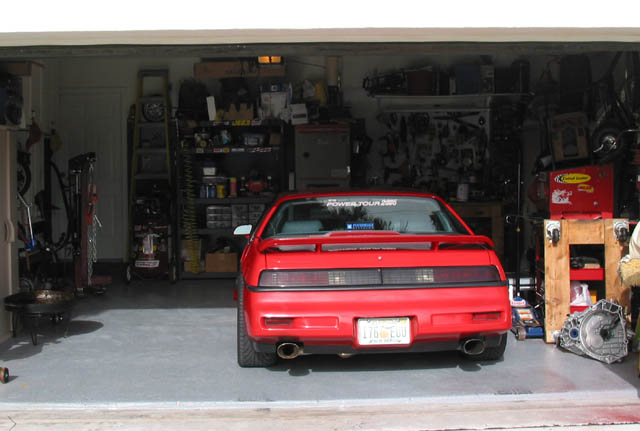
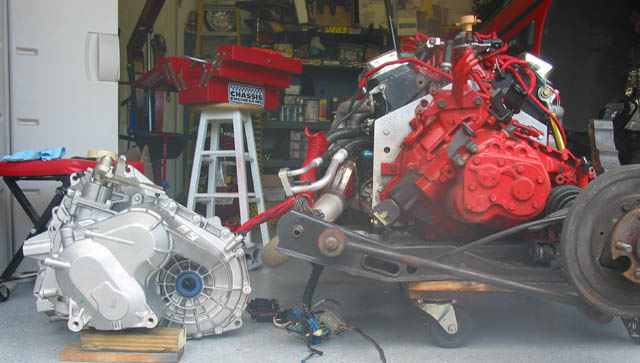
It is that time again. After two years with my current setup I wanted more. Sounds familiar? Well, since I did my original swap I knew later on I would upgrade it with real nice parts. I could have wait but I have been buying some bargain parts here and there (intake) and the whole thing was triggered by an unexpected clutch failure (https://www.fiero.nl/forum/Forum2/HTML/077269.html) and an unusual great deal at Ebay for a brand new G6 trany. So the car goes into the operating room and down goes the cradle. My TPI setup consisted of a flat top piston roller block with stock heads and intake and a Crane HR-276-2S-12 cam. It put 236rwhp and 344rwtq. The key upgraded parts that will go in now are these; - 52mm TB - Ported upper plenum )by Corvette Plenums) - AS&M big runners - Edelbrock base - AFR new Eliminator 180cc heads - GMPP 1.6 full roller rockers - Comp. Cams new XFI 268 cam And of course for drive train the new F40 6 speed trany using Archie kit. Goal is to have some more power but not a drag car. I dirve this car very often so I want it to be enjoyable to drive without glitches and fuss nor lopy racing idle. For that goal I'm sure the new trany will be a big part (smooth shifts!). So here I will try to show you my journey and experience getting the F40 in. At then end after tuning I will dyno the car and see how much better powerwise it will be. Hope you like it
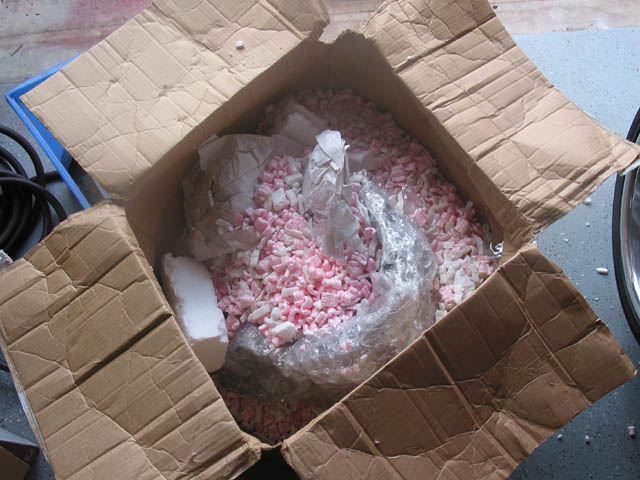
Some of the upgrades. Can you beleive that someone could ship a trany in a box full of plastic popcorn?? I can't beleive the only damage was a cracked speedo connector
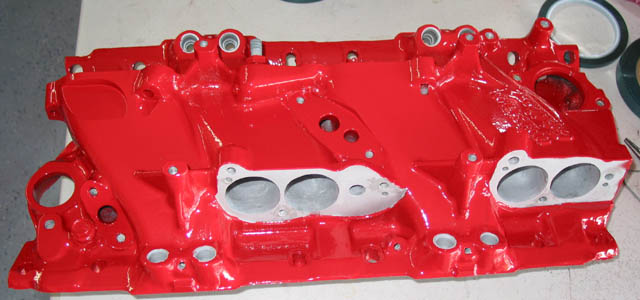
Here is more detail why these TPI parts are much better. This is the plenum. It was ported by Corvette Plenums. Awesome job they do. You can see how the TB rea and runners are opened up to the max.
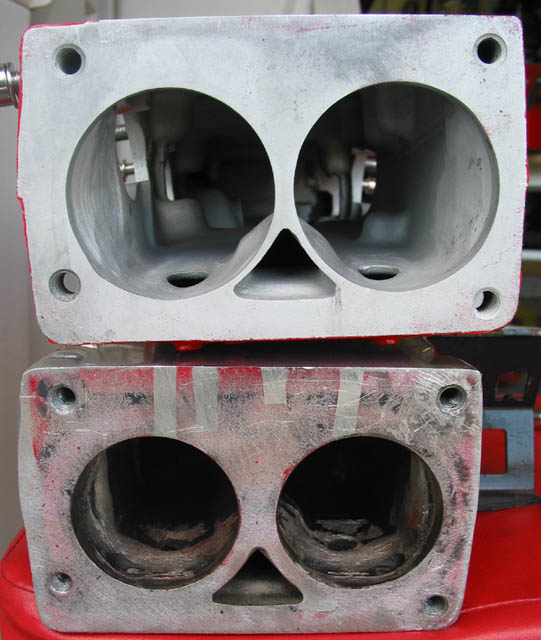
These is a comparison of the AS&M runners to the stock units. These are the highest flowing runners you can get for a stock TPI look.
The caliper shows the stock runners diameter.
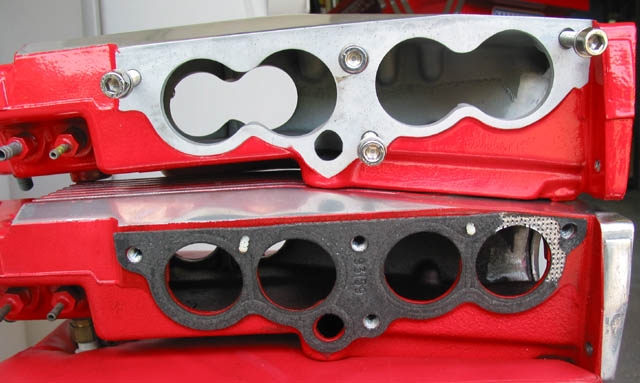
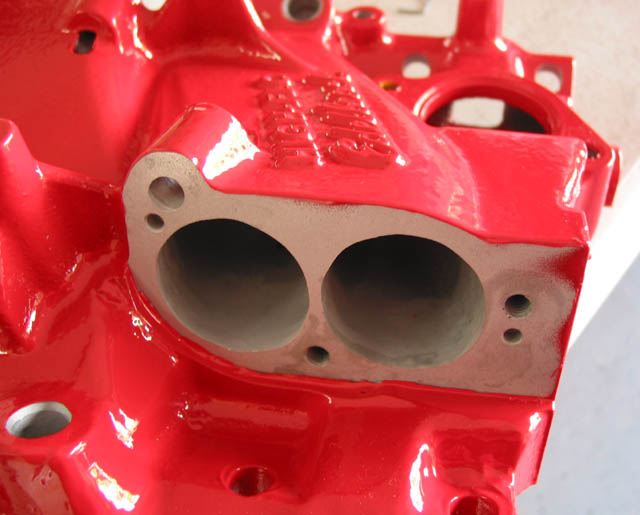
These is the Edelbrock base ported to match the runners.
[This message has been edited by Alex4mula (edited 10-07-2006).]
On my old Corvette, I added the BigMouth intake base, aftermarket semi-siamesed runners and ported the plenum to match (pretty much like yours) and on a stock iron head engine, the car picked up 2/10's in the quarter. I am very interested to see what kind of numbers you will put down with the new parts.
Alex, good luck with the re-fresh and remember check everything at least twice, especially the engine work, it can be frustrating and expensive when it goes wrong as I know only to well. I did pick-up my rebuilt engine this week but due to time and the coming of winter I don't expect to get it back together until spring. So I will just enjoy your build up, and look forward to the dyno run at the end, what sort of numbers are you hoping for ?
------------------ 84SE, aero body, 5 speed and a 350 V8
mafv8; I hear you. I saw your very sad experience. I don't trust myself so I'm taking the heads,valvetrain and cam to be installed at my machine shop to be sure everything is ok. They degree the cam, ensure valve geometry is perfect after head shave and also shave the intake to ensure correct ftness.
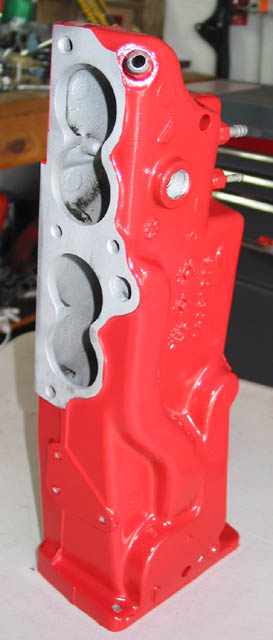
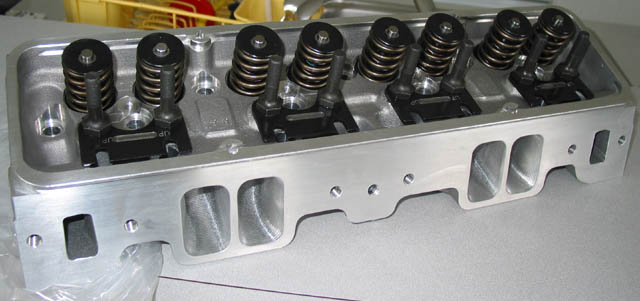
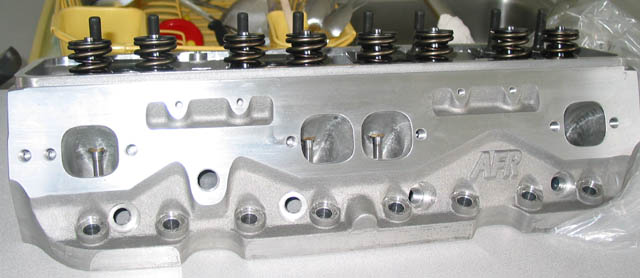
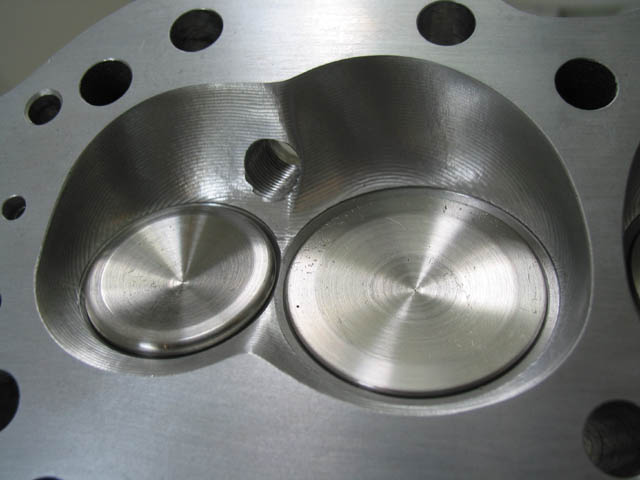
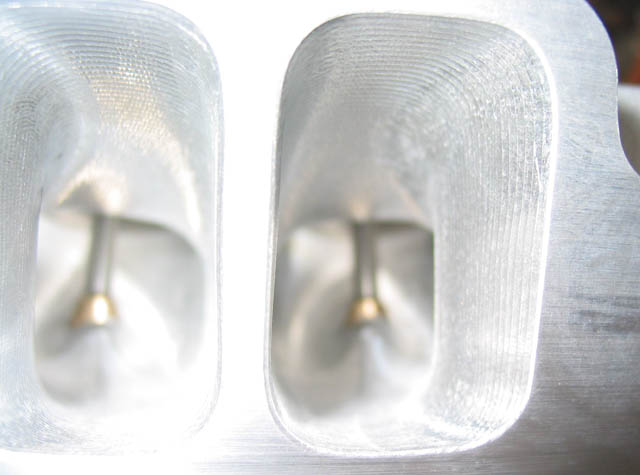
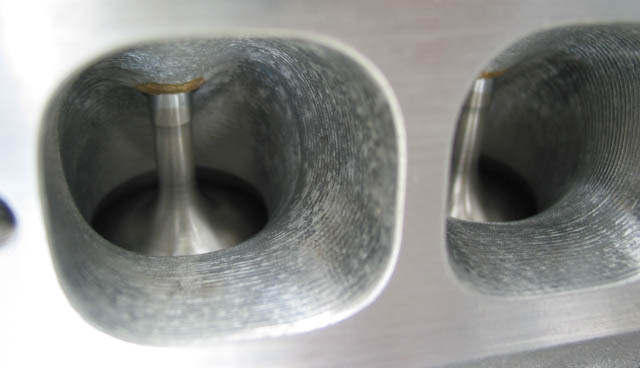
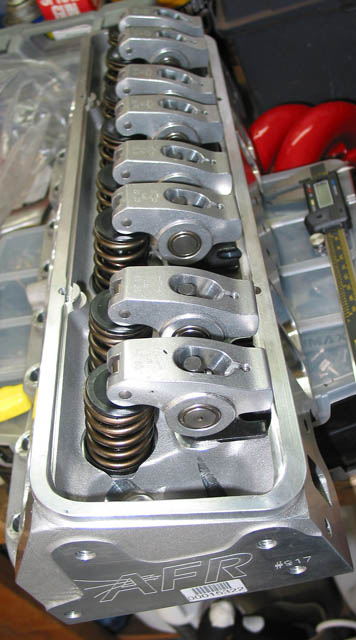
Here are the power centerpiece of this refresh. These are the new design AFR Eliminator heads. 180cc with 75cc chambers but will be milled to get a 10:1 compression ratio. These puppies flow over 260 CFM maintaining great low speed velocity for good torque low end. CNC ported chambers and ports with springs for up to .600 lift. Also these new design use LSx type 8mm valves and springs for less weight
I'm a machininst by trade and I would have been proud to claim those heads as work done by me those things are exquisite!!! I hope that this build up will greatly increase the fun potential of your lil beast.....almost got kicked out of a junkyard today cause one of the guy's was mocking me when I asked him about a decent 4.9L to put in my lil 87 notchie....but thats a different story....good luck with all the mods and please post all the pics you can take without taking from build time....also why the F40 tranny i've heard that 1st was way too short and that it was a very notchie tranny? but reguardless I hope you enjoy!!
I am no machinist and I agree these are a work of art too. Too bad my wife doesn't let me have them in our living room
quote
Originally posted by Reise: ..also why the F40 tranny i've heard that 1st was way too short and that it was a very notchie tranny? but reguardless I hope you enjoy!! Laters
Brian
The F40 because is brand new and because it has 6 speed. Good for gas milage at Power Tour I heard about the short 1st in the Getrag and I don't agree unless you use the car for drag racing all the time so I guess it can't be worst on this one.
Archie; The video instructions have been great and very clear. I like the detail of the intermadiate shaft install. What I'm not sure is if I missed where to put each cable at the trany side. I'm not there yet (nor close to it) but hope to get soon
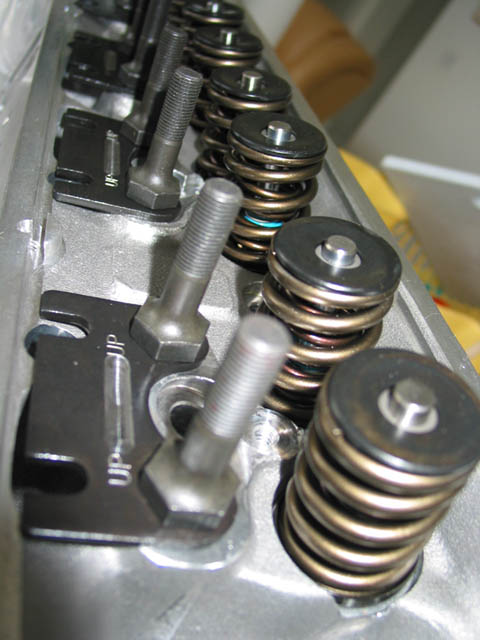
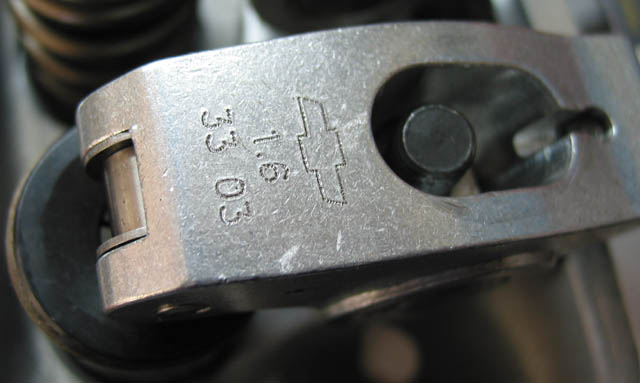
Here are the GMPP roller rockers that will go in. Lift with these will be .570/.565 I/E
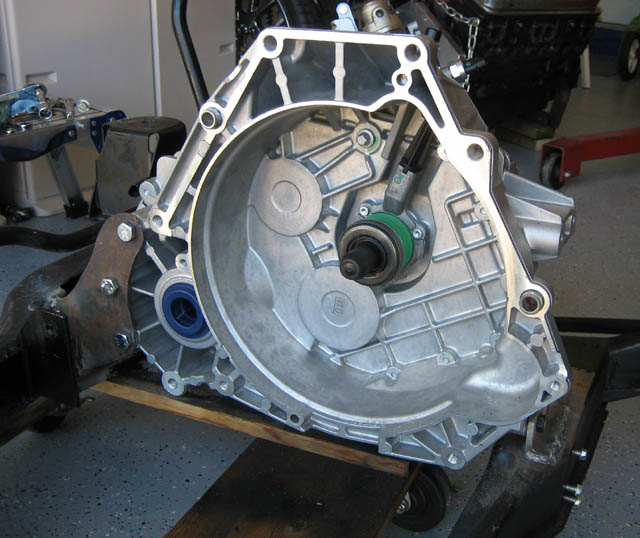
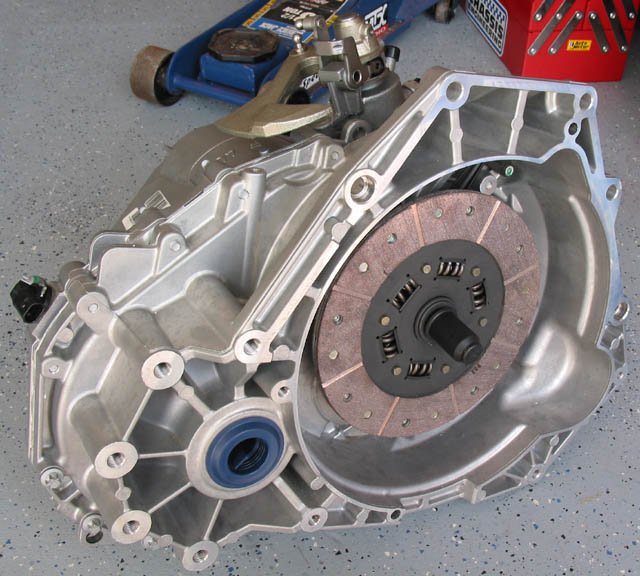
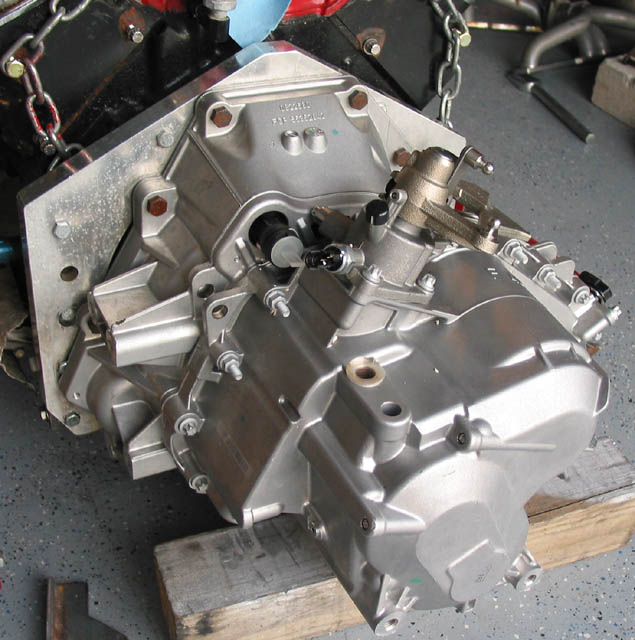
Let's get started with this trany install. This is a comparison of the two from behind. As you can se F40 goes much lower and a little higher.
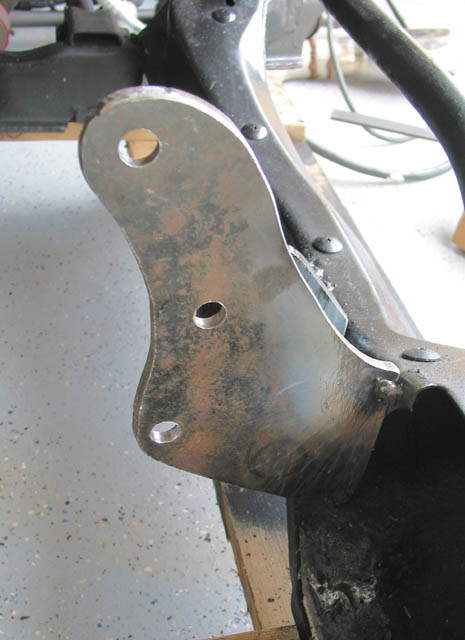
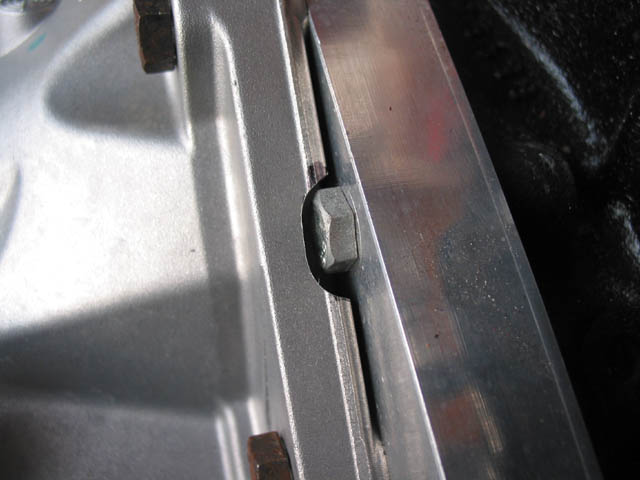
On an SBC (at least with Archie kit) the first thing you need to do to bolt it up is grind the area next to the top right and bottom left adapter plate bolts as show below. Of curse not needed in a 2.8/3.8/4.9.
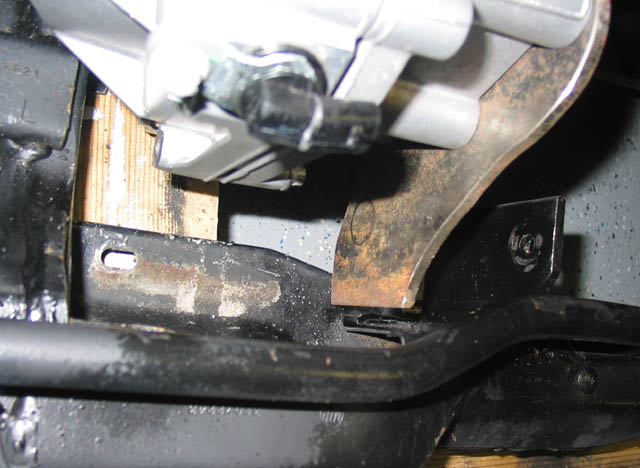
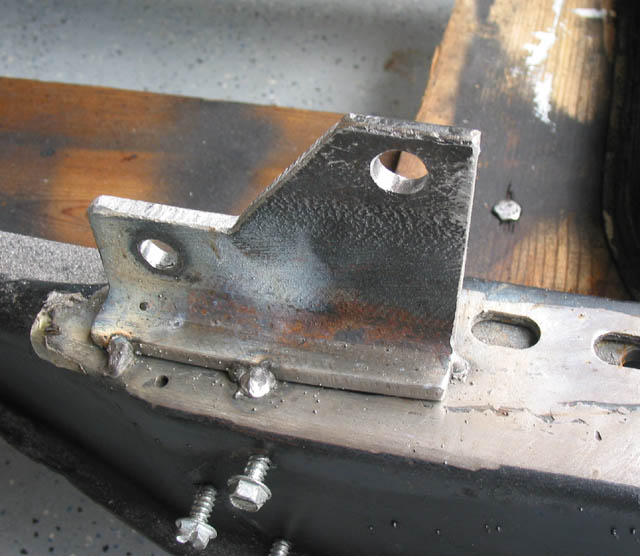
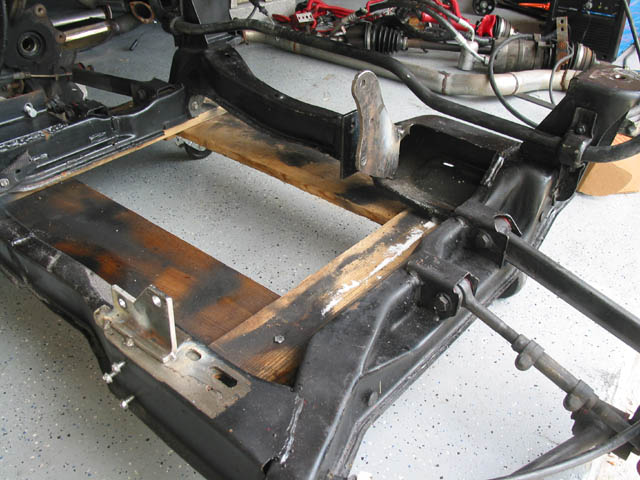
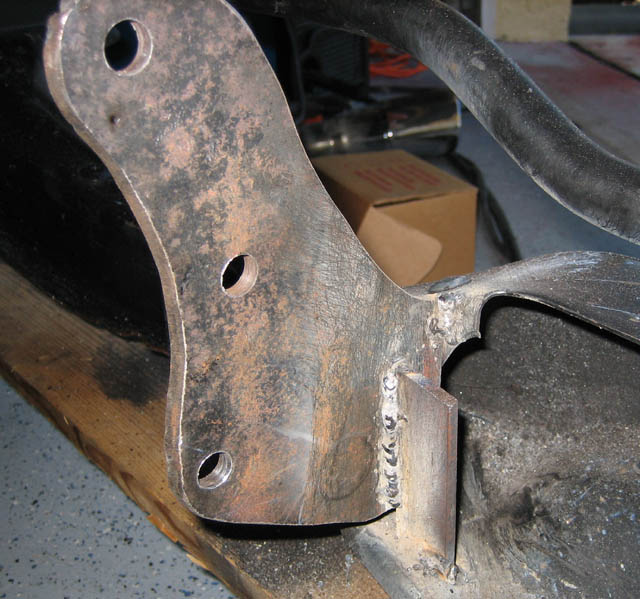
Here is my first install to get the trany mounts aligned and welded.
Why not just countersink the adapter plate so you dont have to notch the tranny case? You could make the hole large enough to get a socket in, and it would be perfect.
Why not just countersink the adapter plate so you dont have to notch the tranny case? You could make the hole large enough to get a socket in, and it would be perfect.
What he's doing in this buildup is retrofitting the 6 speed to a V-8 car that has been assembled for a few years. He bought the adapter plate with the non-counterbored holes a few years ago. There was no reason to C'Bore those 2 holes until the 6 speed was installed as they didn't interfere with any of the original Fiero stick shift transmissions. The adapter plates that are currently in production all have these 2 holes C'bored.
With a Fiero Getrag this was not a problem, but on the new 6 speed there is an extra reinforcement wall in the Bellhousing. Check out the picture of the 6 speed showing the wall that would be equivalent to the Getrag case & then a 2nd wall that the 6 speed has.So guys doing a retrofit of the 6 speed into an existing V-8 car would need to either C'Bore those 2 holes on their old adapter plate or put a small notch in the extra wall on the transmission.
Archie
[This message has been edited by Archie (edited 10-08-2006).]
What he's doing in this buildup is retrofitting the 6 speed to a V-8 car that has been assembled for a few years. He bought the adapter plate with the non-counterbored holes a few years ago. There was no reason to C'Bore those 2 holes until the 6 speed was installed as they didn't interfere with any of the original Fiero stick shift transmissions. The adapter plates that are currently in production all have these 2 holes C'bored.
With a Fiero Getrag this was not a problem, but on the new 6 speed there is an extra reinforcement wall in the Bellhousing. Check out the picture of the 6 speed showing the wall that would be equivalent to the Getrag case & then a 2nd wall that the 6 speed has.So guys doing a retrofit of the 6 speed into an existing V-8 car would need to either C'Bore those 2 holes on their old adapter plate or put a small notch in the extra wall on the transmission.
Archie
Archie, glad to hear the new ones have the counterbore, And I understand he is using a pre f40 design adapter, But I dont understand why he didnt modify his adapter plate, rather than cut the bell housing. Its not very hard.
Archie, glad to hear the new ones have the counterbore, And I understand he is using a pre f40 design adapter, But I dont understand why he didnt modify his adapter plate, rather than cut the bell housing. Its not very hard.
Four reasons; 1st is too late. Done already. 2nd it was easier & faster to do the little notches to the trany. 3rd I don't have the counterssink equipment to do it and 4th it was cheaper
FieroWannaBe; Archie designed the kit to use the same V8 kit flywheel. An extra adapter is used.
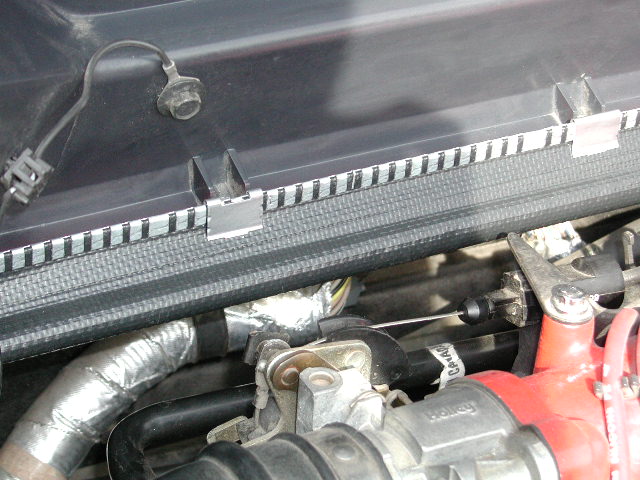
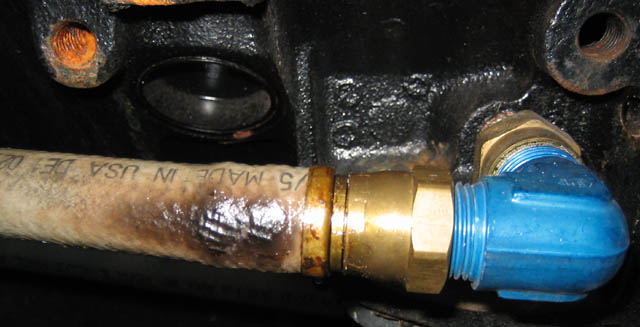
Little problems found during uninstall. I hate oil. It should be like alcohol that evaporates quickly. But no. A little leak and a big mess starts to collect I had this leak on top of the starter for a long time. Now I know the source(s). Main one I think is the bolt holding the oil relo adapter. You can see the big drop there. Then the hose connectors seem to have a small one too. I may change to braided line here as also my exhaust is burning the hose. My design flaws...
Four reasons; 1st is too late. Done already. 2nd it was easier & faster to do the little notches to the trany. 3rd I don't have the counterssink equipment to do it and 4th it was cheaper
FieroWannaBe; Archie designed the kit to use the same V8 kit flywheel. An extra adapter is used.
so it uses a offset friction plate that attatches to the flywheel?
[This message has been edited by FieroWannaBe (edited 10-09-2006).]
That's wierd, I just noticed it says it requires Centerforce clutch assembly. That's BS, I guess they just want more business. The Spec Clutch works just fine on mine.
------------------ Carlos A. Martinez 1988 Formula 5-speed, ZZ4 V8 www.txfieros.com
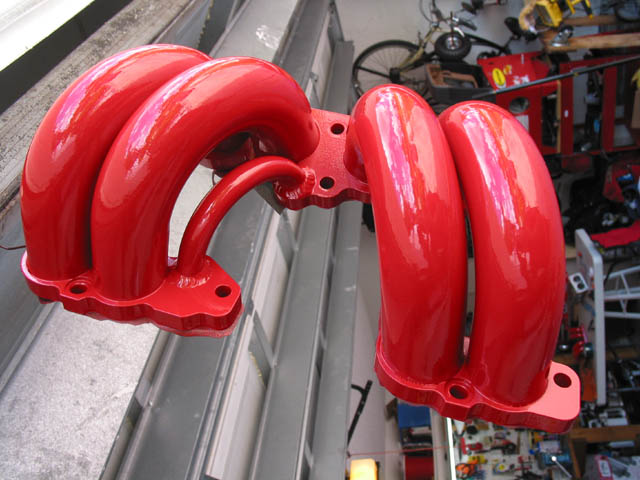
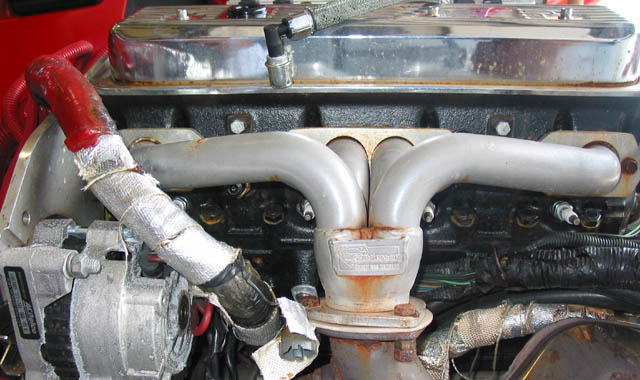
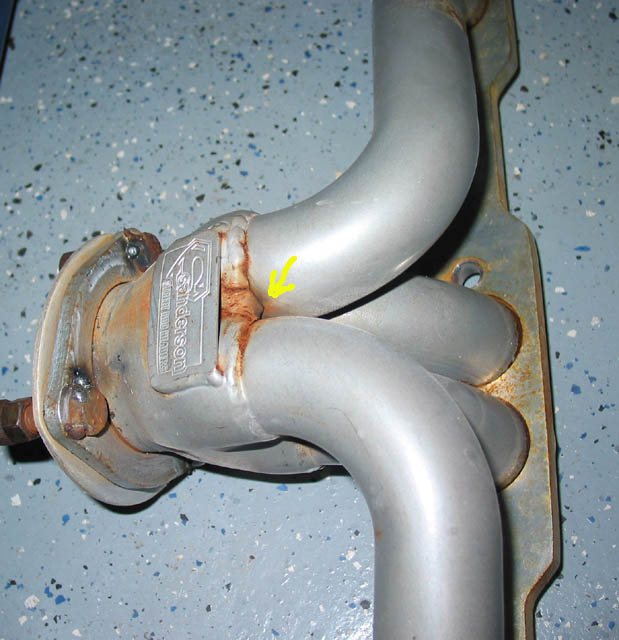
Another annoying problem to correct. Common to daily driver SBCs I guess. These headers fit great but the quality is not so good. Rusted ceramic coated? Isn't that supposed to avoid that? Oh well. I need to try to design soemthing to catch rain water in the front. It gets on top of the alternator, valve covers and headers and all failed due to that. I sent this set to Sanderson for repair. Main issue was the rich condition it caused as the crack was on top of the O2 sensor. Not a problem in carbed engines. More to come soon.
[This message has been edited by Alex4mula (edited 10-10-2006).]
Hey Alex did you know that you don't need to run pushrod guideplates with the rockers your using?
I just checked this thread and noticed that your rockers have guides on the roller tip to keep the rocker centered over the valvestem. Not sure if you'll have any adverse effects by running both.
------------------ HARDCORE SBC CRONIE AND PROUD OF IT ! GOT TQ ?
Hey Alex did you know that you don't need to run pushrod guideplates with the rockers your using?
I just checked this thread and noticed that your rockers have guides on the roller tip to keep the rocker centered over the valvestem. Not sure if you'll have any adverse effects by running both.
Consulted that already. I'm using these rockers because I had them (got them cheap). Need the guides because on these heads the valves are much thinner than regular SBC heads valves and the guided rocker width is too big. So basically they are acting as regular rockers in this application. They are not installed yet. I'm taking the engine this week to the machine shop for them to do the long block.
To avoid some WATER related problems before I put my V8 back in a couple weeks back I made out of galvanized steel a plate that attaches to the two extra holes next to where my alternator mounts on the Archie Alternator mount. I cut and bent it and screwed it in place. It covers all the top of the alternator and causes any water to fall either behind or in front of it, and not INTO the alternator.
Also, to address the valve cover, exh. manifold on the V6 and this could be applied to the V8 too, I got some vinyl at a fabric shop, I used silicone to attach it to the very narrow lip on the side of the decklid that faces the glass, and then siliconed it to the metal under the window. this would cause any water to fall on either side of the manifold. In the V8's case some water might fall on the alternator since it is right under the hinge where I had the vinyl stop. But if you have a shield for your alternator too then you'd be covered there too. On the driver side water would fall in the empty space in front of the transmission, no problems there. Believe it or not the vinyle never melted. It would get soft but never melted and I had it like that until I had to remove the lid to do the V8 conversion. I need to get some new vinyl and redo this.
Another idea that I'm going to try first is to get some thick weatherstripping and attach it to the glass all the way from side to side. It needs to be thick enough to be snug when the lid closes and when the vents on each side are pressed in. This would give a real clean stock look. To take this a step further you can put some weatherstripping on the inside of the vents (most importantly the vent on the passenger side) where it meets the lid that runs right on top of the TPI intake if you have this. If all this is done right, most all water will fall into the vents, or in the space right above the shock tower that has no sensitive stuff around it. When I put my V8 back in I invested in a full set of ARP stainless bolts for the intake manifold and valve covers. I got some nice stainless ones for the TPI intake too on Ebay.
------------------ Carlos A. Martinez 1988 Formula 5-speed, ZZ4 V8 www.txfieros.com
TxFieros: Do you have pictures of any of that? That would be nice. I was thinking about building some channel running side to side to catch water, specially when you poen a wet decklid. Also a separate one like you did for the alternator. All my bolts are SS. I got the nice TPI set at Ebay too.
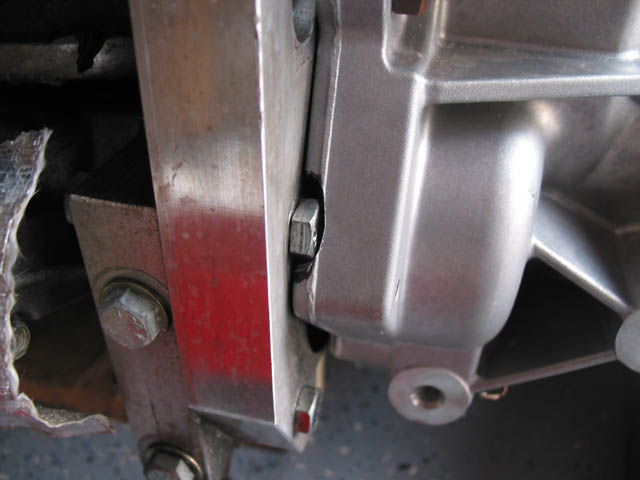
So here was my first issue installing the trany mounts. I measured from the cradle to the oil pan before unbolting the old setup. It was about 10.25". When I bolted the front mount and moked up the whole thing got this. Looks like the mount is short but it is not. The distance from the oil pan to the cradle now was 1/4"+ bigger The front cradle mount is welded and I didn't remove the front engine mount. I have no clue how this happened. It is like the front mount got tilted 3-4 degrees.
Anyway, I just was able to locate it in the right place and then tacked the mounts. All measurements are fine but the front engine mount is tilted a little. I may leave it like that.
I don't have pictures but if you like I can maybe take some pictures and edit some arrows and text in to describe what I did. Right now I just have the decklid with the factory flap I got a junked 86 GT, that does nothing but deflect water a bit further forward, but does nothing when opening the lid. Let me know, and I'll help you any way I can.
That vinyl thing worked great. I never got another drop of water on that side of the engine ever again. Water would fall on the crossover pipe bolts going down to the cat, and on the compressor on the other side with the V6, so it was all good.
------------------ Carlos A. Martinez 1988 Formula 5-speed, ZZ4 V8 www.txfieros.com
Seems like a slick looking upgrade. Although, on my car there is no place to "slip" it in under the glass. There is a tiny gap between the glass and metal and it is full of window goo used to seal the window, and it's really hard. I guess another option would be to just silicone it to the metal under the window. It would do the same thing. Let me know if you get a reply.
BTW, took my Fiero out for it's first spin after getting it all back together again. The engine is really smooth now, and the LT4 HOT Cam sounds great, not that it didn't before, but now the ZZ4 doesn't vibrate.
------------------ Carlos A. Martinez 1988 Formula 5-speed, ZZ4 V8 www.txfieros.com
[This message has been edited by TxFieros (edited 10-11-2006).]
Consulted that already. I'm using these rockers because I had them (got them cheap). Need the guides because on these heads the valves are much thinner than regular SBC heads valves and the guided rocker width is too big.
Oh ok
------------------ HARDCORE SBC CRONIE AND PROUD OF IT ! GOT TQ ?


 I had this leak on top of the starter for a long time. Now I know the source(s). Main one I think is the bolt holding the oil relo adapter. You can see the big drop there. Then the hose connectors seem to have a small one too. I may change to braided line here as also my exhaust is burning the hose. My design flaws...
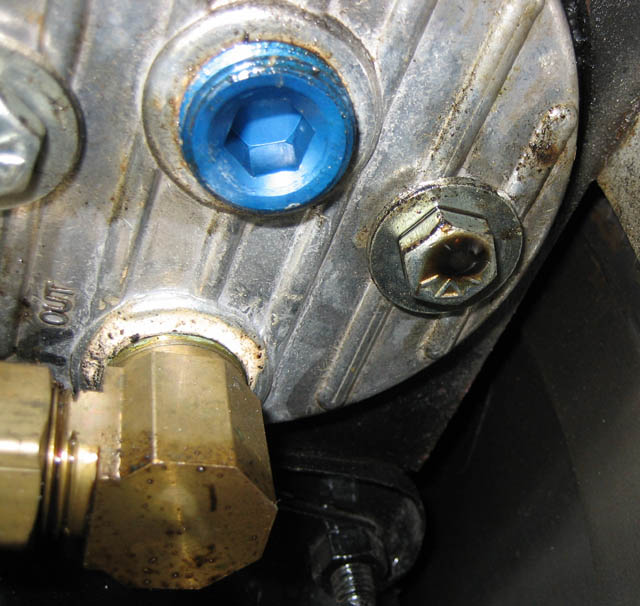


 The front cradle mount is welded and I didn't remove the front engine mount. I have no clue how this happened. It is like the front mount got tilted 3-4 degrees.