I have been putting off doing a build thread til I got a ways into it but now that its cold and snowy I figured this would be a good time to start it and maybe give me some more motivation and guidance along the way. So here it goes.
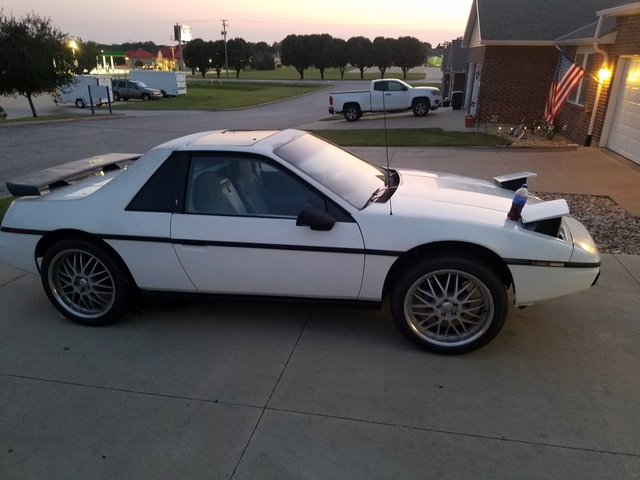
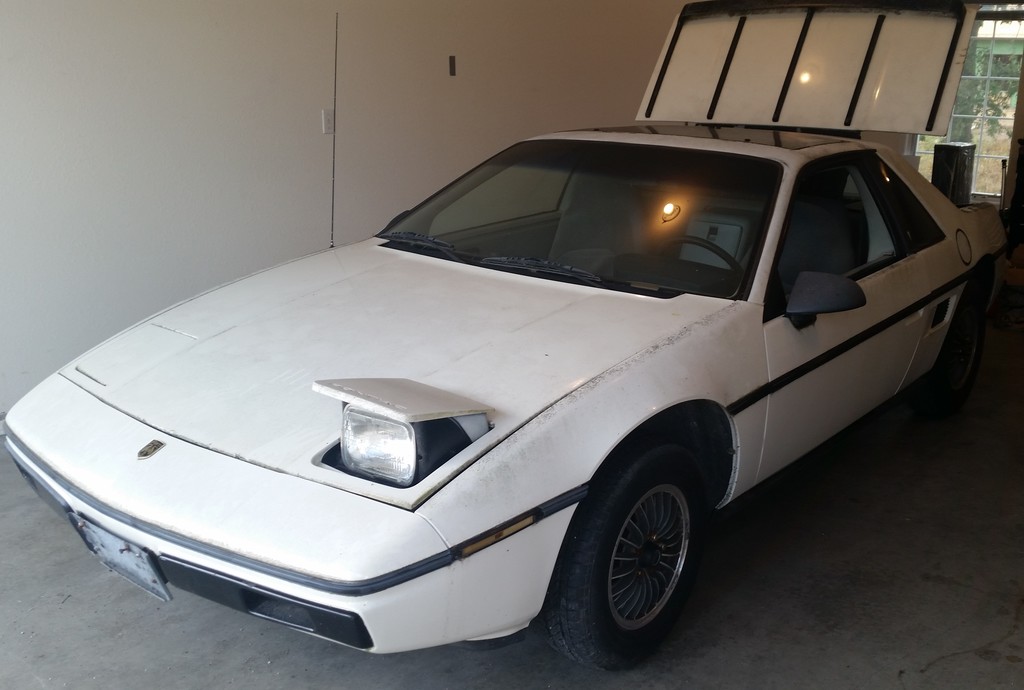
I originally was wanting to buy a car to build for a 24 Hour of LeMons race but for a few reasons, some rules related and partially because I don't want to put money towards a roll cage and other safety gear right now going to cancel or at least postpone that and focus on getting the car driving. I bought this 84 about 5 months ago for $500 , about 110K miles, ran but had a problem with the clutch not disengaging which I later discovered was cause by something sticking and causing the master cylinder rod to bend when the previous owner was jamming on the pedal. This kept us from being able to drive it on to the trailer but luckily there was a hill on the driveway to the shop and we were able to sketchily roll it onto the trailer and somehow not ramp it into my truck bed. The kid I bought it from was still somewhat attached to it but had moved out to college and parents wanted it gone. Here she is the day after i got her home (Wow my garage was clean).
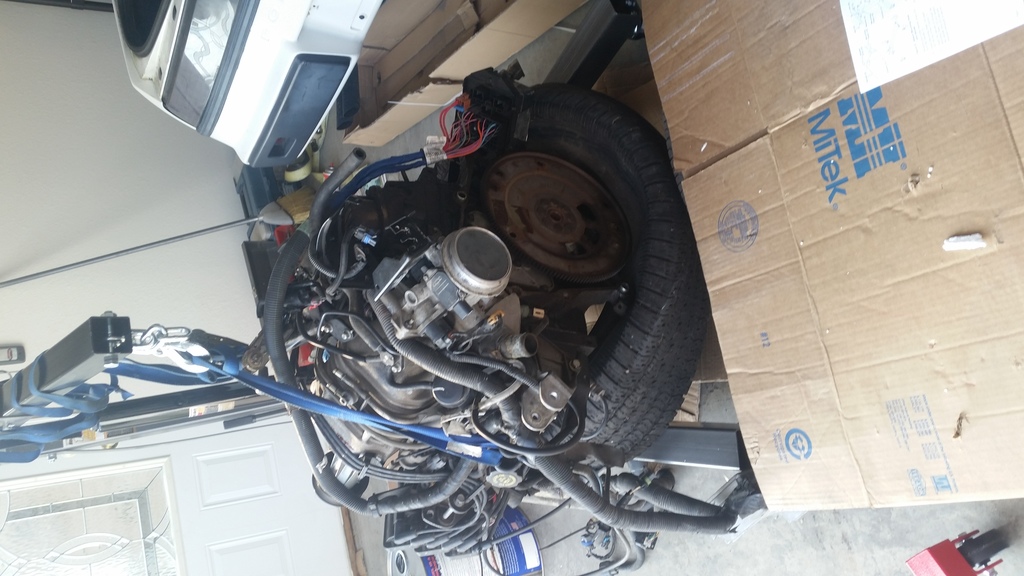
A new clutch master cylinder, some bleeding and some messing with the IAC later I drove it around the block a few times. I quickly realized most or all of the shocks were blown and that I need some more horses. Skip ahead a few months and I had this sitting in my garage.
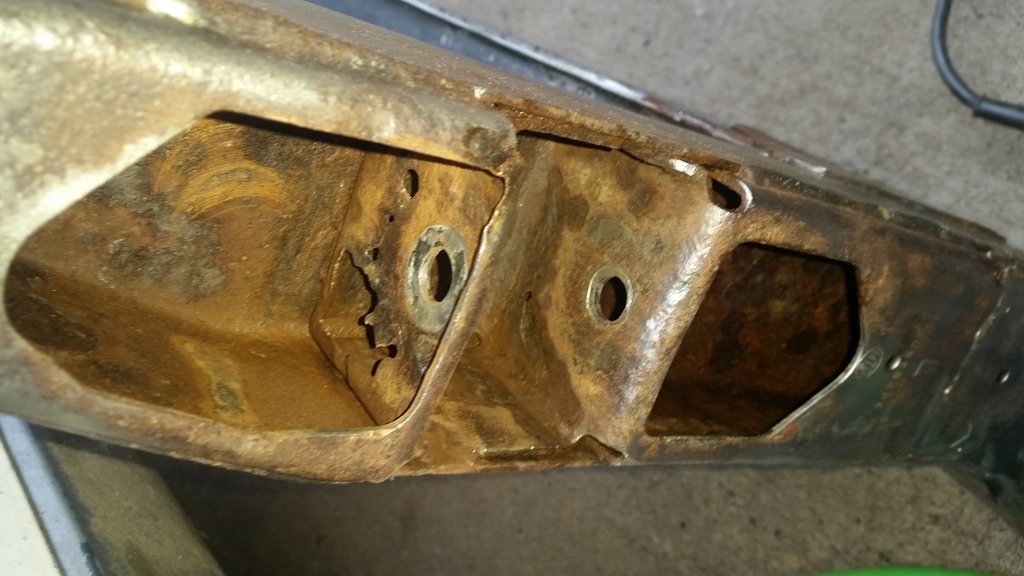
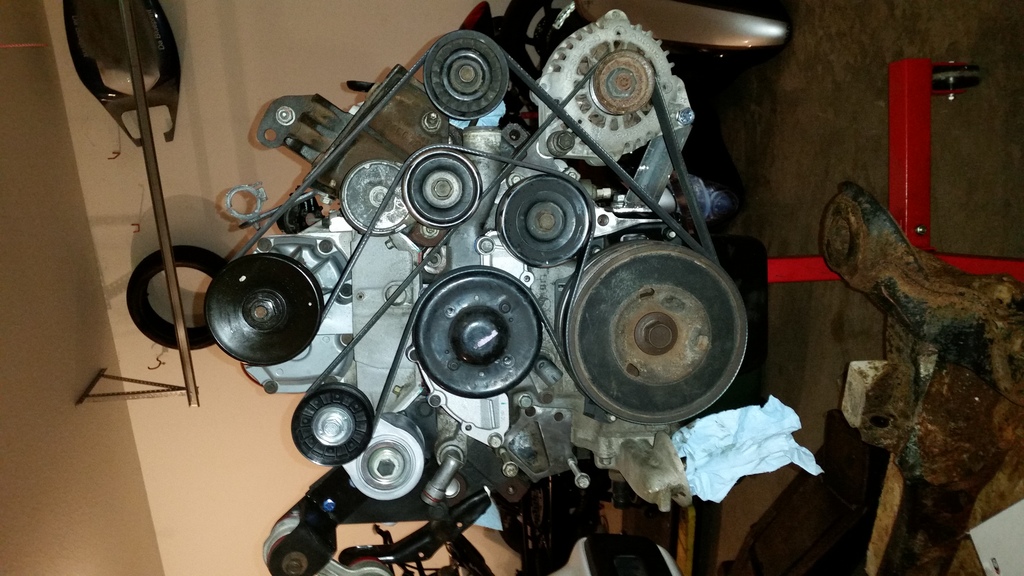
Fresh out of a 2002 Buick Regal, complete with wiring harness and ecu. Took a few bottles of degreaser and some scrubbing but i got her cleaned up and replaced all the gaskets besides the head gaskets. As far as I know those weren't blown and not upping the power for now so fingers crossed. I pulled the engine and cradle and started to see the rust was worse than just what I could see in the engine bay as can be expected for a 35 year old car in the Rust Belt. Also not pictured is the rusted through drivers side rear frame rail (part of the reason I probably won't make this a lemons car.)
------------------ "America is all about speed, hot nasty bad-ass speed" - Eleanor Roosevelt
Kansas State University Grad
[This message has been edited by BadNewsBrendan (edited 12-08-2018).]
I have "fixed" some of the issues already, will post more about them shortly. I'm writing up another post but the image resizing is taking me a bit of time. The odds of me finding a rust free fiero near me are slim to none and wouldn't be within the price range i want to pay for it. I am planning on going through all the structural and suspension parts and checking the integrity.
[This message has been edited by BadNewsBrendan (edited 12-08-2018).]
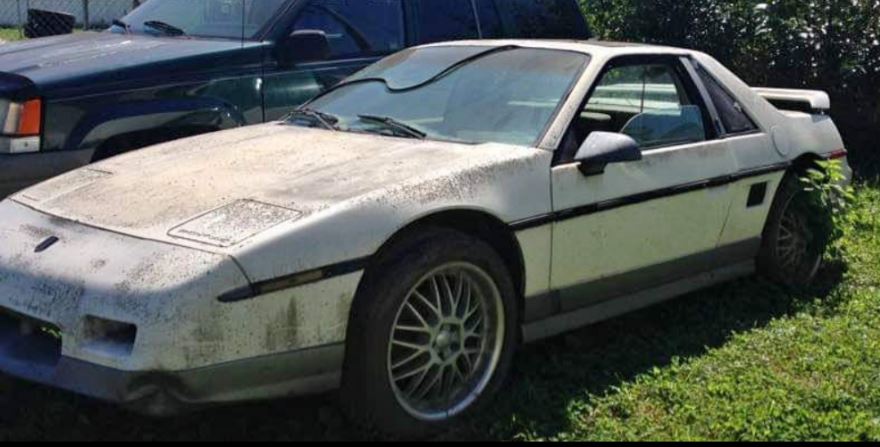
Meanwhile it came to my attention through some posts talking with you fine people that the 84 muncie 4 speed won't handle the bigger engine and I started looking around for a later year 4 speed. Enter the 85 already partially 3800 swapped mouse nest I found just 10 blocks away from me.
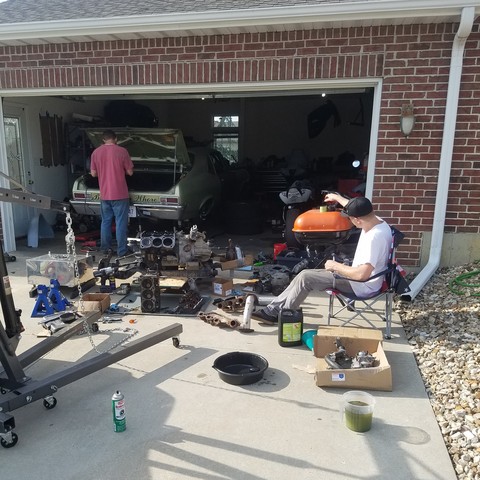
Unfortunately the car was stored with the window down, no seats, interior growing and had a family of dead mice in it. The cradle didn't have rust deeper than the surface so I decided I would swap them out. Dropped the cradle, engine, rear suspension in the driveway with more than a few glares from the neighbors. I probably shouldn't have done this alone but I am still alive I guess. Can't get PIP to work all of a sudden so will add pictures later. I stripped the other stuff i thought i might need from the 85 including the 17 inch wheels and the spoiler and got rid of it. Will be cleaning up the cradle tomorrow a painting that, the alternator bracket that I made and some other brackets in a makeshift paint booth I in my garage. Will add more later but its 1:30am and I need to get some sleep.
[This message has been edited by BadNewsBrendan (edited 12-08-2018).]
I already sold it and it didn't have a title. Whats different about the suspension and wiring harness? The car was "rescued" from a field and then moved to an alley where it probably set for another 10 years before I bought it. I doubt there was much left of the wiring harness after seeing what the mice had done to it.
85 has similar but slightly better suspension. Tighter turning radius, relocated rear toe link mounts. 84 chassis-side wiring is not as friendly for swapping, 85 and up is much easier.
Thanks for the info. I will be sticking with the 84 however. Hopefully I can get my mechanic friends to help me with the wiring when I get to that point. Am also open to suggestions for names for the car, my latest idea was Super Sloth.... haha
So an update, I made an alternator bracket. Since I'm not keeping the AC I decided to put the alternator where the compressor was instead of having to run an idler pulley and also buy the lower alternator bracket that people usually use on the other side. Hoping I can get it straight enough with a couple washers and shouldn't be crooked since it sits flush with the engine block where it mounts at one point. Here is what it looks like with the belts on.
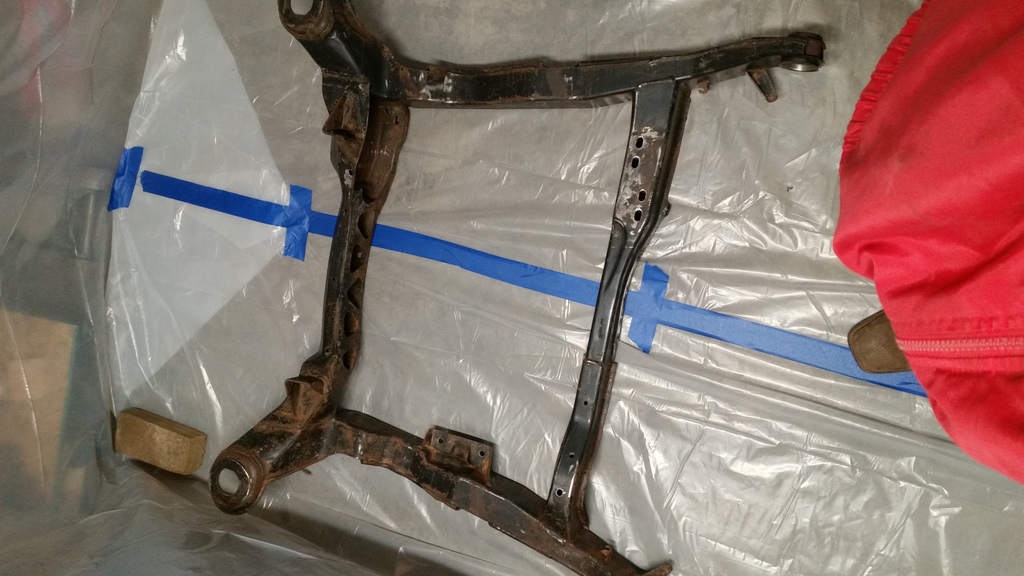
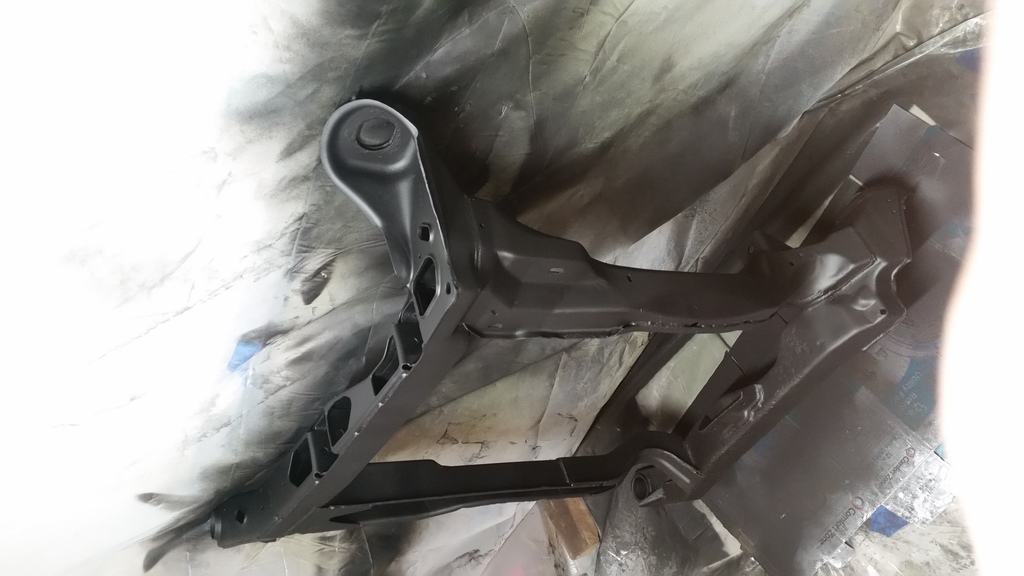
I also cleaned up the engine cradle, set up a paint booth in my garage sprayed it with VHT rust converter (not sure how well that stuff works) and primed and painted it along with some brackets and the mounting hardware for the cradle. Hindsight 20/20 I would have gotten a bigger fan for ventilation The first picture is of before I cleaned it up. Would have been nice to have a sand blaster but I have loans to pay off haha.
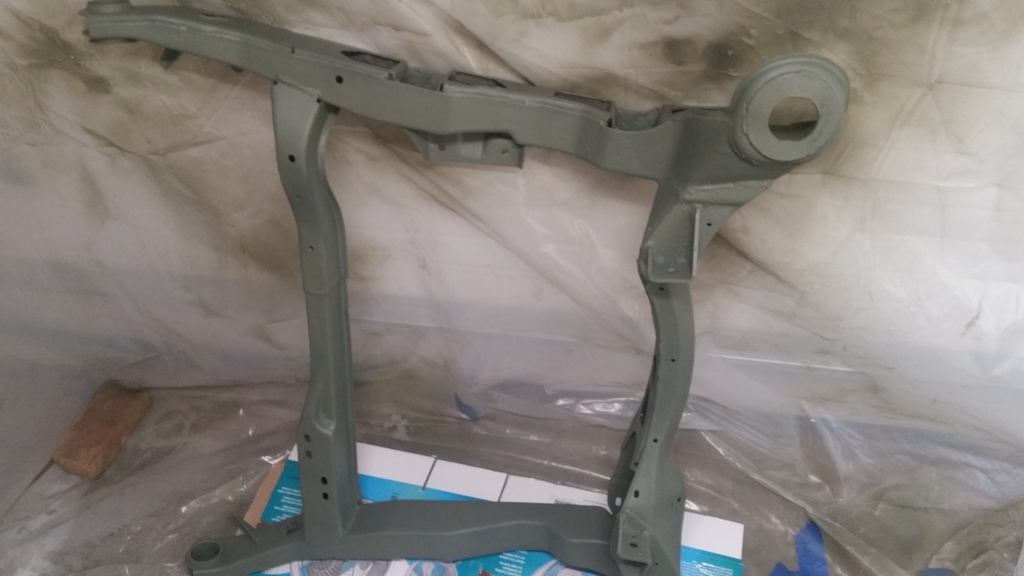
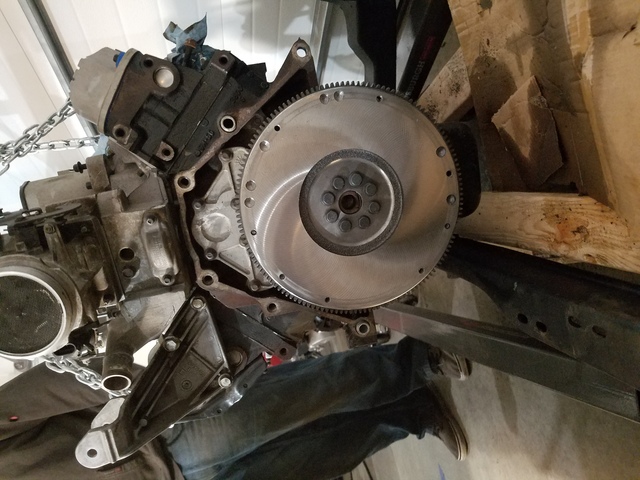
This was just after the first coat and I put a few more on. Not much of a painter but i figure it should keep the rust at bay. Next step will be to get the Camaro (or was it a Firebird?) flywheel machined and balanced. Hope the local auto machine shop will do it. Then its time to shell out for a clutch kit.... haven't looked into options much yet but let me know if anyone has good suggestions. Not sure if I mentioned this before but I'm using the 85 Muncie.
[This message has been edited by BadNewsBrendan (edited 12-17-2018).]
Looks good! I like that you are doing your own thing with what you have and making it work. Keep it up!! Can't wait to see what you do with this car. I love the wheels
------------------ Aaron H 1986 Fiero GT 2.8- A dream car of mine since childhood- Stock now, but looking for creative options to upgrade this wonderful car
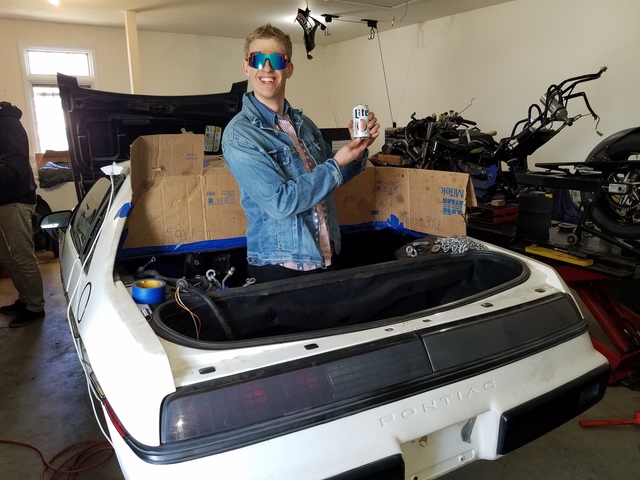
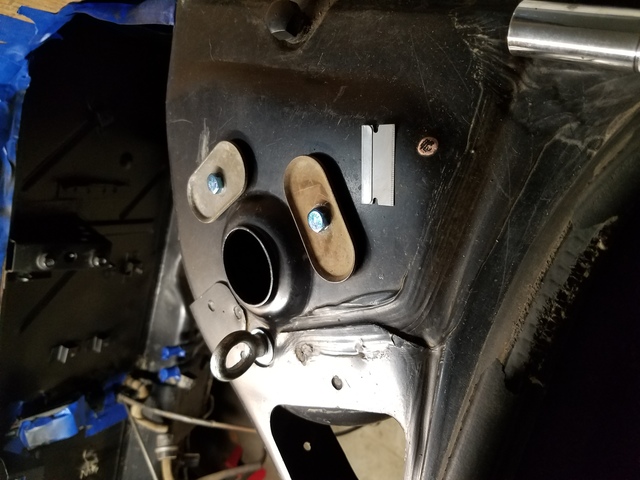
Finally getting around to updating this. Thank you Phlebmaster! First i just wanted to post a picture of the obligatory standing in the engine bay pose. Had to change out of the shop clothes and put on something a little classier! I also cut out or sanded down some rust spots in the engine bay and sprayed rust converter and some rustolieum in the engine bay. (sorry if some of the pictures are sideways, I didn't want to put even more time into editing them to fix it.)
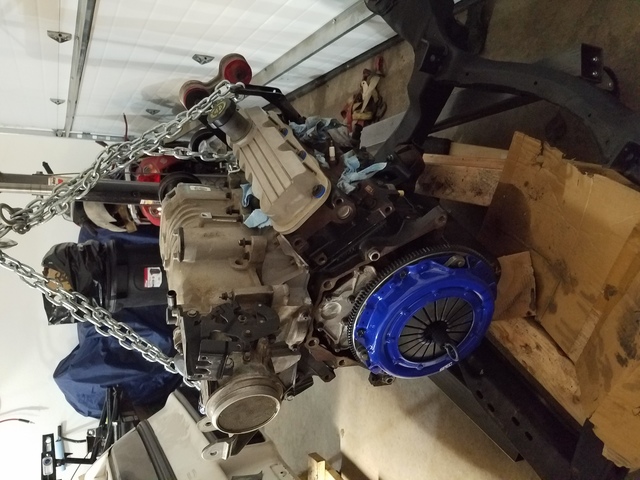
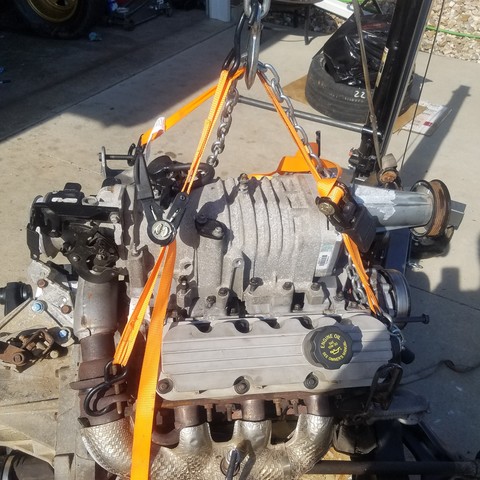
I made the alternator mount to put it where the power steering pump went on the stock engine. It is maybe a little closer than i would like to the exhaust manifold but i have the heat shield on it and hopefully it doesn't melt... I bought a flywheel from Fierorog and got it mounted up to the crank. It looks great by the way and everything mounted up well. It is a good amount cheaper than the machine shop would have costed me to get a flywheel machined and balanced. Also bought the tensioner pulley/ dogbone mount from Rog to use a while back and am very happy with both purchases. Thank you Rog! Used the GM OEM flywheel bolts. Decided to go with a 6 puck stage 3 clutch from SPEC Clutch. It was a good bit cheaper than the stage 2 and hopefully it is still driveable on the street! Here is a picture with the clutch and flywheel installed.
I used the "strut hat plates" and a couple eye bolts to lift the car for the engine install.
After putting the car down on the jack stands and 2 by 4 to roll the engine/ cradle under we discovered that we needed to go up just another quarter inch... we put a floor jack and a 6 by 4 under one side of the car to give us the extra quarter inch but probably not the safest method. I welded 1 inch pieces of steel to the weld nuts for the rear cradle bolts to keep them from spinning. Obviously had to cut them out to get to them. Used black poly cradle mounts for all the bushings. One Chariots of Fire theme later and we got the car lowered on to the cradle without any snags.
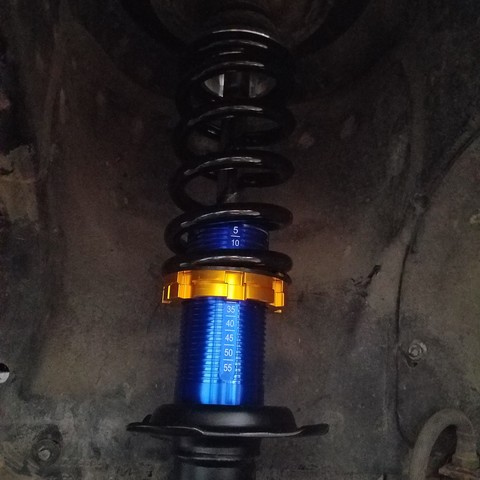
Have been trying to get the sleeves off my used "custom" coil overs to put on the new struts with no avail. Might go to the torch later to heat the sleeves up and hope they expand. If anyone has some better suggestions let me know! Have some new trans mounts, rear camber adjust bolts, new slave and master clutch cylinders, and a DW 200 fuel pump coming in the mail. Now all I have to do is wiring harness, fuel lines, injectors, rear suspension, shift cables, intake tubing, air filter, spark plugs, exhaust, cooling, tires and reprogram the ecu. Shouldn't be too much work.... okay might have it done before summer starts at best
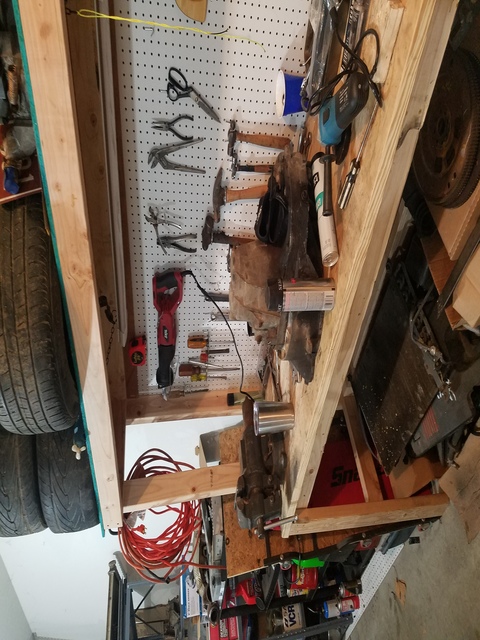
Also i built this work bench to help store my tools and work on because my grandfather gave me all his tools that his father gave to him!
Got a lot of stuff done since last time I updated this. Should be ready to chooch in a week or so and driving soon! Can't wait to daily it to work.
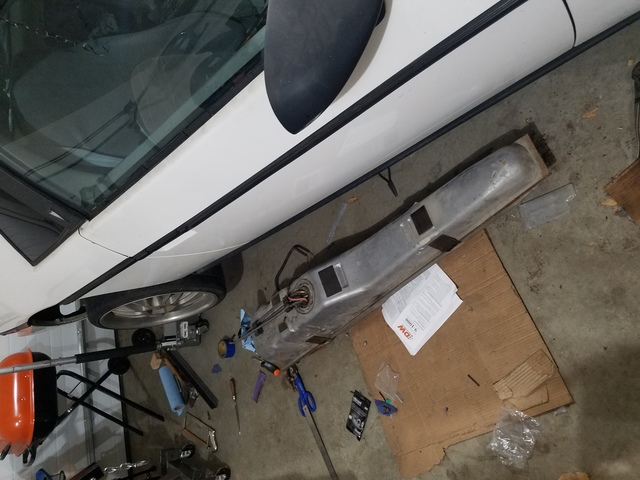
Gas tank out, DW200 fuel pump in.
$20 ebay coil overs and new stock struts from rock auto. Will see how they do. Still need to cut the spring perch for wheel clearance.
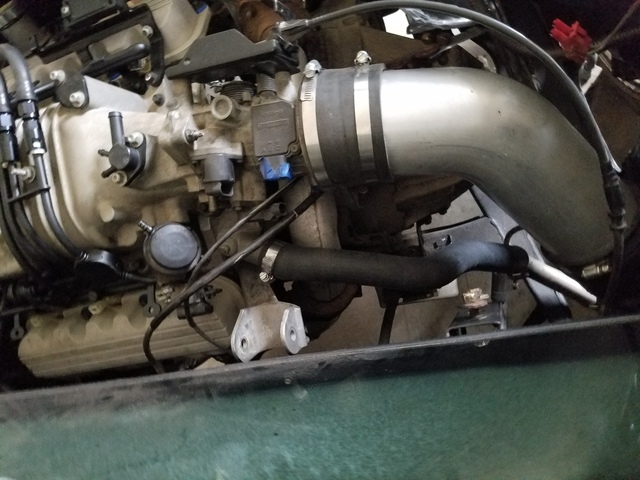
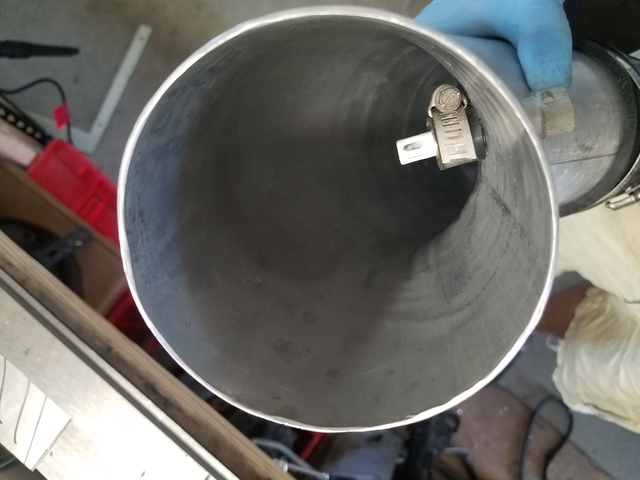
Intake. Still need to put the IAT in it.
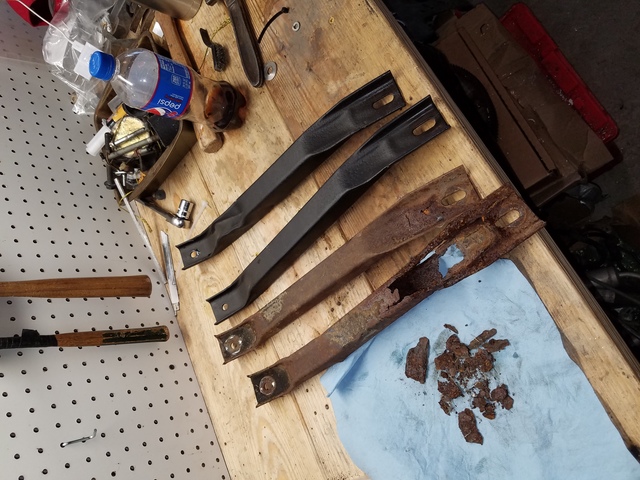
Old Trans mounts replaced. They were a little saggy lol.
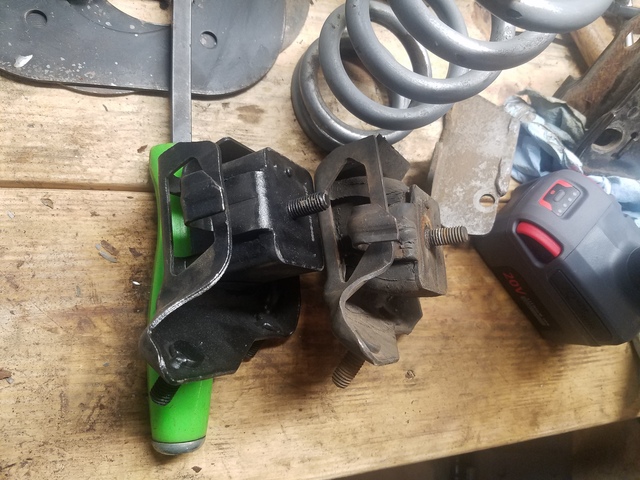
Replaced these front brackets with some that I repainted from the old parts car. One was only hanging on by a hair. Yay rust belt.
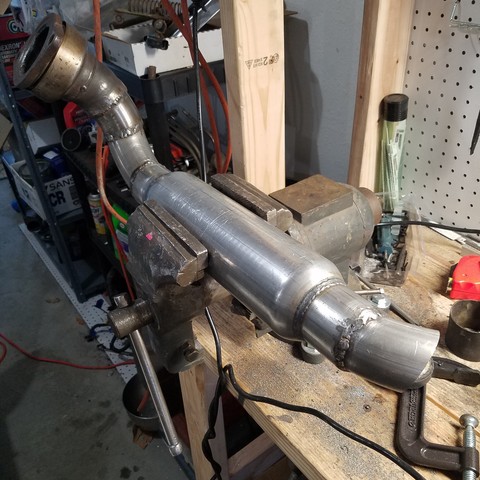
Welded up a basic muffler. Wanted to have it at least a little quieter for the first start so I can hear any bad noises in the engine. Don't look closely at my welds, just learning to weld. It shouldn't leak though at least. Hope it isn't too obnoxious sounding.
Ran fuel lines with quick disconects to the fuel rail. Installed injectors and fuel rail.
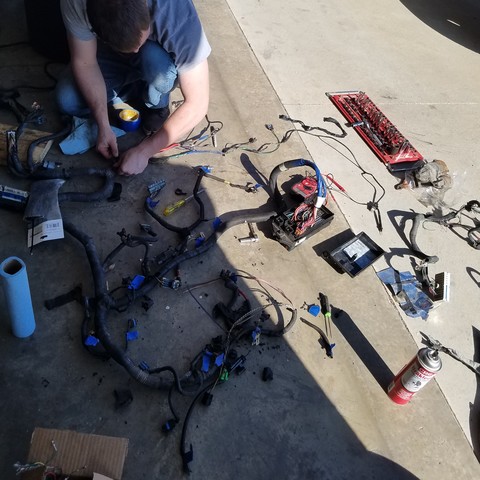
Started on harness. Depinned and removed the wires and connectors to the auto trans, egr, and evap solenoid. (Roommate helped a lot with this.) Plugged most of it in and shouldn't have to extend anything. Maybe just the connector going to the coil packs. Waiting on loom to show up.
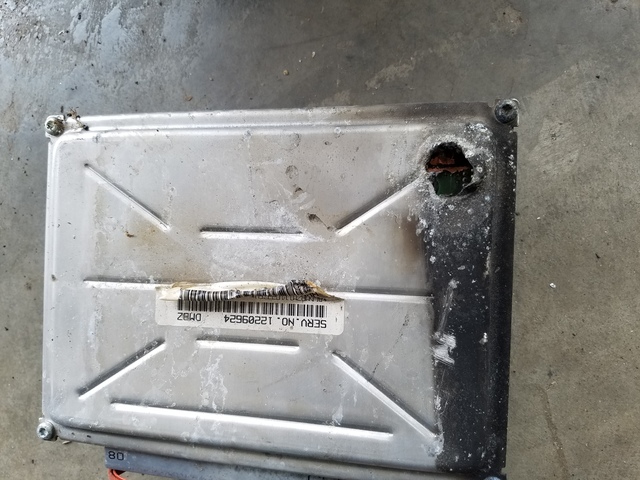
There were a few connectors cut that I spliced in replacements from the spare harness. Also discovered that the ECU with that harness had a hole melted in it.... When we were depinning the 3800 ecu connectors we found that there wasn't pin and wire coming out of the serial output for OBD 2 connector. Anyone have some ideas why that might be? Ordered an odb 2 connector online and will wire that up and hopefully we can figure out how to get around VATS and all of that stuff with HPTuners in order to start it. Roommate has used it before and has the software but I have no clue how that stuff works. Should be a good learning experience. Will post pictures of the engine bay once the harness is in. Mounted the coil packs on the passenger side strut tower as well but don't have a picture of that at the moment.
[This message has been edited by BadNewsBrendan (edited 04-23-2019).]
Thanks dudes! Really love the community here and checking the forum here while I'm slacking at work for 15 minutes is always a highlight of my day. Love seeing other people building fieros and there's always people quick to help eachother out.
I still haven't figured out why the pins and wiring for the ODB2 connector would be missing and haven't found any wires that would have gone to it. If anyone has some thoughts on this I would appreciate it. Going to use some pins from the spare harness and wire a connector up so we can turn vats off. Going to mount the new odb2 connector next to the cigarette lighter so it will be easy to tune on the go hopefully.
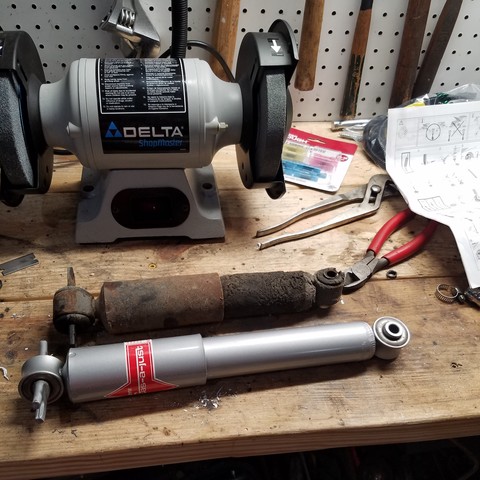
I changed the front shocks tonight. Just the weight of the shock was enough to extend it when holding it form one end so those have definitely been blown for a while.
Heres the ECU that came with the spare engine. Looks like a hole melted through it and that makes me very curious as to what might have happened to the car with my spare engine.....
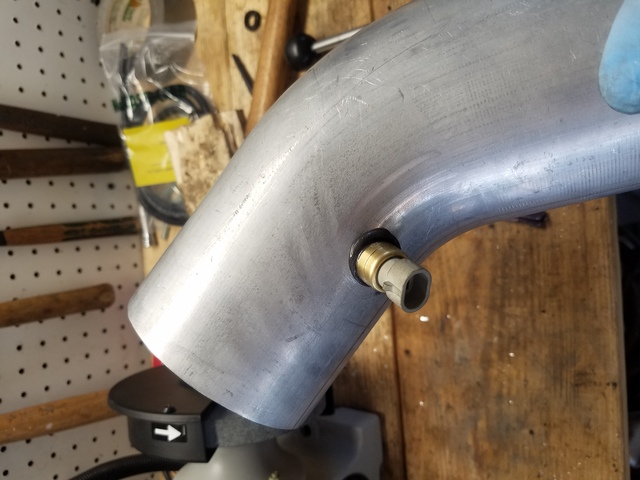
Put the IAT sensor in. I hose clamped a hose on the inside of it to hold it in and RTV'd around it to seal it. Probably not up to OEM spec but shouldn't be a problem.
I bought some crappy walmart tires for $260 for the set. Will give me a chance to get stuff aligned/ used to driving it with 3 times the power and do some big smokey burnouts until i buy some nicer, grippier tires. Here is the link https://www.walmart.com/ip/...5-4518-95W/824659655
Very close to getting it running and then driving shortly after! Might cry the first time i hear it run. Seems like its been forever since I started this swap, especially since its the most common swap out there for fieros. Don't think I could have gotten more value than the around 4K i have spent on this car. The amount of entertainment and having a goal to work towards in my free time has already been worth that and I'm sure the enjoyment in driving it will only increase that value tenfold. I'm sure there will be more things to fix and upgrade once i get it driving. When I first bought this fiero my mom told me a story about her friend in college that looked like a cali boy with long blond hair that brought his yellow fiero out to the lake with the spare tire removed and the fronk filled with ice and beer. Don't think i could ever paint a car yellow but the fact that my mom might find some joy and nostalgia in riding in a fiero makes me even more motivated to get this thing finished (told her it might be hard to drive with a stage 3 clutch and she let me know that shes been driving manuals her whole life and dont ever think she can't drive one ))) . The threads of people fixing up the fiero that their father drove or similar stories also really make me want to call my family and tell them i love them. The amount of memories that cars and especially fieros create really is astounding and inspiring.
[This message has been edited by BadNewsBrendan (edited 05-08-2019).]
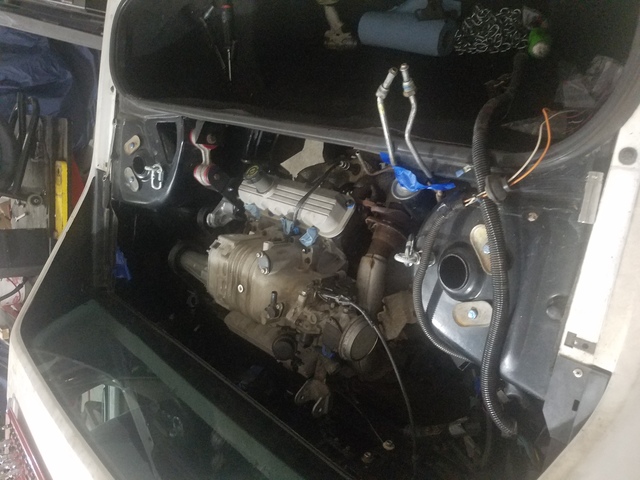
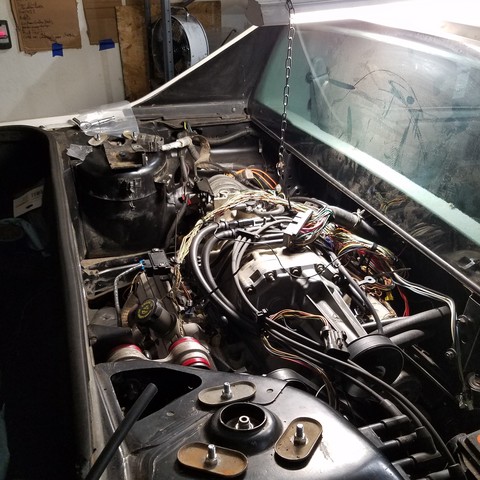
Also forgot to post a picture of the engine bay with the wiring harness in. Bought loom from mcmaster for once i get it started and conformed all the wiring is where i want it. Cheers.
That motor is going to be sucking some air in for sure. I would definitely make sure you install that AIT properly. At least I would would if it were me. The wiring looks good so far. That's a hard part to look clean.
Drove the car twice and decided it was good to go for a long adventure. Packed up the camping gear and a bunch of tools and headed out to go watch the Illinois Gambler 500. Was a 200 mile round trip. On the way out we started losing the radio and then turn signals so stopped to check it out and then it wouldn't start and battery was at 9 volts. Figured the junkyard alternator was bad but it was a bad crimp on the wire from the starter to the alternator. Push started her down the on ramp and was good to go for the rest of the 200 mile trip with no issues.
Now for the bad news. I was driving it around checking out the flooded mississippi river and started to hear a knock. Drove it back home keeping it at low rpm. Oil pressure seemed a little low at 25- 30 psi but wasn't sure if thats what it usually was at at low rpm. After talking to a few people I am pretty sure its a rod knock. May do a little more investigating but going to start cleaning up and doing new gaskets on the spare engine. Glad it made it on the long trip but I wish I would have gotten to drive it around some more before having to tear it apart again
Listen at the oil pan with a rubber hose while the engine is running. That should tell you if you have a rod knock. If you suspect that is the problem, drop the pan and start jiggling the connecting rods. If you feel up an down looseness there the issue. If the crank journal is not scored and measures within spec (and not out of round) you can sometimes get away with just replacing that bearing. That's really not the right way to do it but if you look on You Tube its been done before with good results.
------------------ " THE BLACK PARALYZER" -87GT 3800SC Series III engine, custom ZZP /Frozen Boost Intercooler setup, 3.4" Pulley, Northstar TB, LS1 MAF, 3" Spintech/Hedman Exhaust, P-log Manifold, Autolite 104's, MSD wires, Custom CAI, 4T65eHD w. custom axles, Champion Radiator, S10 Brake Booster, HP Tuners VCM Suite. "THE COLUSSUS" 87GT - ALL OUT 3.4L Turbocharged engine, Garrett Hybrid Turbo, MSD ign., modified TH125H " ON THE LOOSE WITHOUT THE JUICE "
Thanks for the tips. May just throw some thick oil I'm it and run it around town til it dies while I get the spare ready to go. Luckily there seems to be a few of these engines on Facebook market place for cheap always popping up.
Anyone know if its possible to get the oil pan off the 3800 with it in the fiero still? Looks like it will be tight to get it around the pickup without it hitting the cradle.
Anyone know if its possible to get the oil pan off the 3800 with it in the fiero still? Looks like it will be tight to get it around the pickup without it hitting the cradle.
Not sure but it looks like you can. In the worse case remove the dog bone, unbolt the engine mount and jack up the engine slightly (if you need extra clearance). On the 2.8L a smal piece of 2 x 4 is used under the harmonic balancer to hold the engine up about an inch or two.
------------------ " THE BLACK PARALYZER" -87GT 3800SC Series III engine, custom ZZP /Frozen Boost Intercooler setup, 3.4" Pulley, Northstar TB, LS1 MAF, 3" Spintech/Hedman Exhaust, P-log Manifold, Autolite 104's, MSD wires, Custom CAI, 4T65eHD w. custom axles, Champion Radiator, S10 Brake Booster, HP Tuners VCM Suite. "THE COLUSSUS" 87GT - ALL OUT 3.4L Turbocharged engine, Garrett Hybrid Turbo, MSD ign., modified TH125H " ON THE LOOSE WITHOUT THE JUICE "
Tonight Tetanus earned her name. This engine should have been sent to the scrap yard but instead I power washed it at a car wash with the heads off, threw the heads off the other engine and some $6 rock auto head gaskets on her and its back to life (for now).
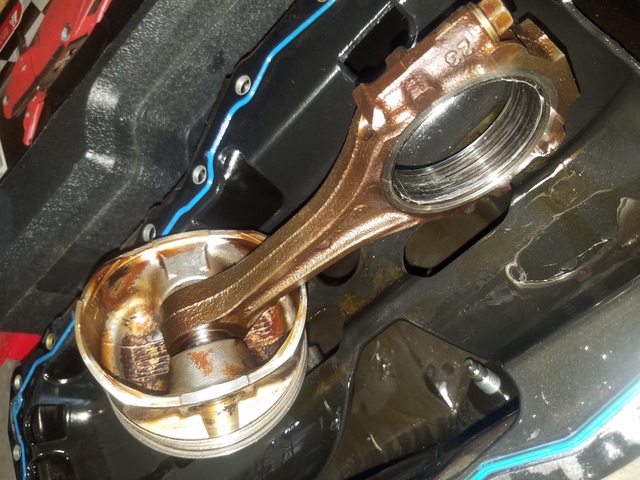
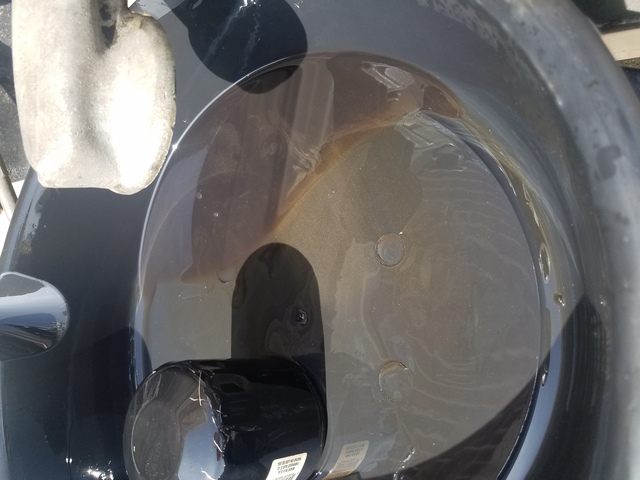
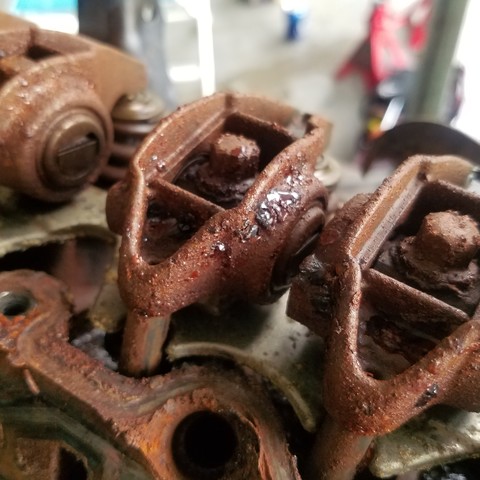
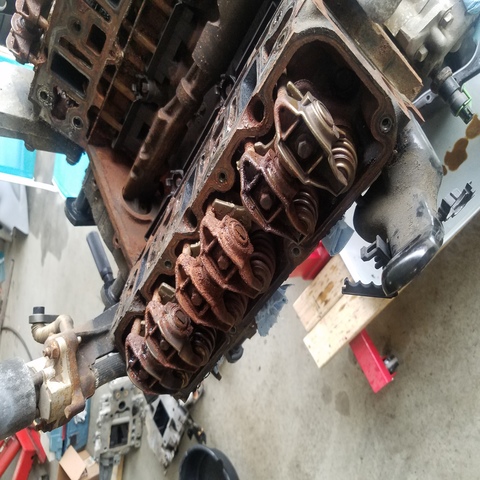
But first heres the gold I mined from the engine with the knock.
Spare engine pics.
There was also some rust on the counter weights of the crank and what looked to be mold possibly. The cylinder walls and pistons all looked good however so took it to the car wash and got some well deserved weird looks from passerby's.
Scavenged lifters and heads, valve covers, LIM gaskets, water pump, timing chain from the other engine. Cleaned up the push rods from this engine, despite being a little rusty they were a lot less warn on the ends than the ones from the old engine. Also put the supercharger from this engine back on it because the teflon coating on the rotors looked a lot better and wasn't missing in large sections. Seems too be making more boost from map sensor readings. Had to do this swap in the driveway due to the other 2 projects going on in the garage. (Both are much faster than my fiero). Used ratchets to level the engine and get it mounted to the trans and cradle. Psh who needs an engine leveler. Me. I definitely needed one. It took me over 2 hours in the 95 degree sun. Also blew out a caster on the cart trying to roll the cradle back under the car. Will never do another drive way engine swap. At least not on a Fiero.
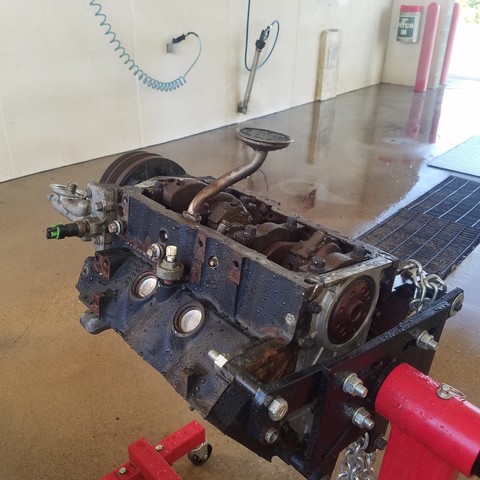
Got it all back in the car and started up tonight. Started right up. Let it idle for a few minutes with engine flush. Drained the oil and changed the filter again and the oil was pretty orange from the remaining rust. Bled the coolant but by that time it was already 11 pm and the neighbors had probably had enough of our noise between my roommate testing the boost controller and two step on his bike and me with my straight through muffler so I called it a night. Can't wait to drive in around on Independence Day blaring Free Bird.
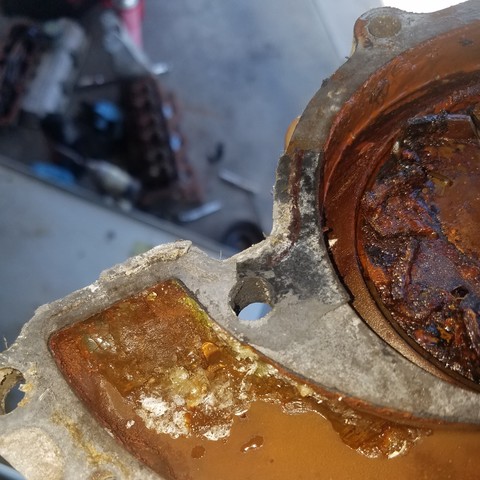
Took it out tonight and drove it maybe 30 miles. Started losing power and oil pressure. Heard a knock, limped it home. Leaked oil around the front of an engine. Was a about a quart and a half low. Oil is metallic and dark. Probably shelled another engine. Might be done with these engines or even this car. Probably me doing something wrong, not sure but for how much work I've put into this with no reward I'm probably done.
[This message has been edited by BadNewsBrendan (edited 07-04-2019).]
Might be done with these engines or even this car. Probably me doing something wrong, not sure but for how much work I've put into this with no reward I'm probably done.
Sorry to hear this. I think everyone has a "flat spot" when rebuilding and/or restoring project cars. Just take a look at the number of years some of these build threads have been going… I know I did between 2012 and 2015 (getting it put back together and roadworthy) and again from 2016 to 2017 (lots of niggling electrical/electronic issues. But I came back and I overcame the problems. Today, my car gives me alot of pleasure and I'm proud to say I built it myself - with the help and support that you find on this type of forum! Take a break by all means, but don't give up! Good luck. Rafe
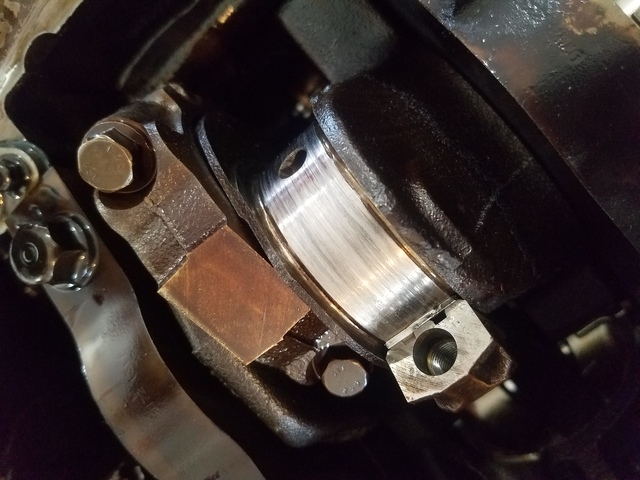
Took the oil pan off of the original engine I had in. Cylinder 1 was the cylinder that spun a bearing. Considering buying a refurbished crankshaft that comes with oversized bearings and putting it in the block that I have and swapping one of the good rods over from the engine that is currently in the car. This way I would at least know what is in the bottom end instead of buying a used engine and having the same thing happen a third time. I'm still not sure why the second engine leaked. Would guess the front main seal but i just replaced that. Continuing to buy new gaskets every time and all of the torque to yield bolts is starting to get expensive though.
I know how discouraged you feel. Step away, take a deep breath, and come back when you are ready. *I* of ALL people know what you are going through. My car fought me to the point of impossibility! 3 engine swaps, and still not able to drive it. I was about to scrap the whole thing so many, many times. If you have the time, and a LOT of it, you can read about what I am tanking about in my build thread. My 3800 woes start on page 13 of that thread.
You have done a great job so far, and, like they say, the third time is the charm Good luck!
I skimmed through it but that is a LOT of problems to read through. Your pain does make mine hurt a little less though Thanks for that.
Hopefully I can find the time and motivation to get it running again. I don't think I will try to pull another 2 week driveway engine replacement though lol. Your car looks awesome by the way! Hope you have seen the end of your problems for a while.
I think I figured out why the second engine spun a bearing. https://www.youtube.com/watch?v=c1iiGkj1c8w this is right where the oil leaked and I did get high into the rpm's a couple times seeing what it would do pulling on to the highway. Have any of you 3800 guys experienced this or done this modification?
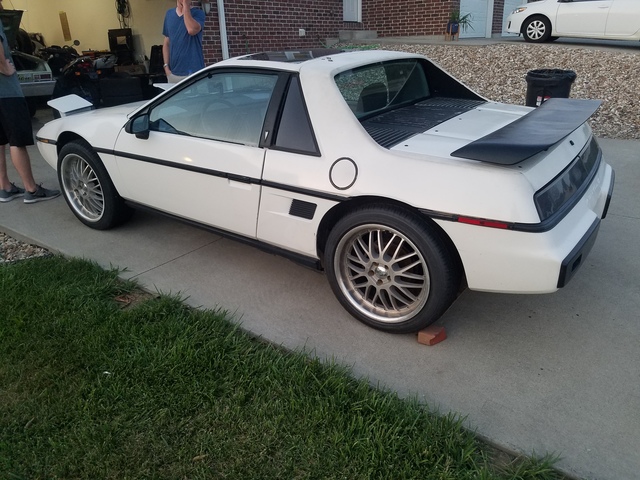
Made brackets to mount the spoiler from the old parts car as a fun project and to give me some motivation.
Did a below average job of painting with spray paint so I don't know how long it will last but I like it and looks a lot better than the scratched and scuffed up original white paint. Found the rod that was knocking on the first engine.
New crank, bearings, push rods, rings, and a dingle berry are on the way. Going to swap in a piston and rod from the other engine. Hopefully I can take the time and get it rebuilt correctly so that it lasts a little longer than a few hundred miles.
[This message has been edited by BadNewsBrendan (edited 07-24-2019).]
Pulled the second engine out this weekend. It has spun rod bearings 1, 3, and 5 and 6 looked like it would have been the next to go. Bearings look like they had gotten pitted from the engine sitting for a long time with moisture in it I would assume. Kept one of the pistons to use when i rebuild one. Started honing the first engine with a ball hone and noticed one of the cylinders had a couple vertical gouges. Going to get the other block on the stand and hope it looks better. Soaked the pistons in diesel to loosen up the carbon build up and cleaned them up with a brush and carb cleaner.
3800s on PFF have some sort of reputation of being hard for the tinkerer to rebuild without disaster striking... something about them being more tricky than say a small-block chevy.
Buying "good used" is the typical suggested path for 3800s.
Have also read the same thing on the 3800 forums however I am 0/2 on that strategy so far. Its very difficult at least in this area to find any for sale that have less than 150,000 miles, most are 200k plus. When a lot of people were doing these swaps back in the day it was probably a lot easier to find lower mile engines. Scrap yards are asking $800 for these high miles engines. On craigslist or FB market like I bought the first 2 engines its similar pricing and if the engine is already pulled then you never know how many miles are on them plus gas money to drive and pick it up only adds on. Was told the first engine i bought had around 100k but looked more like over 200k. Have been searching for engines on craigslist, fb market place, car-part, and local salvage yards for probably 6 months now with nothing too promising. The nearest pick n pull is 2.5 hours away and could go that route but thats a lot of work and who knows what you are going to get. The rebuild parts were somewhat cheap at least. I am trying to be thorough and plastigage everything, check ring gaps, etc and hope I will get lucky. If it lasts 20k miles then i think it will have been worth it. If it blows up then at least I learned a lot and can move on to something else.


 and got rid of it. Will be cleaning up the cradle tomorrow a painting that, the alternator bracket that I made and some other brackets in a makeshift paint booth I in my garage. Will add more later but its 1:30am and I need to get some sleep.
 The first picture is of before I cleaned it up. Would have been nice to have a sand blaster but I have loans to pay off haha.
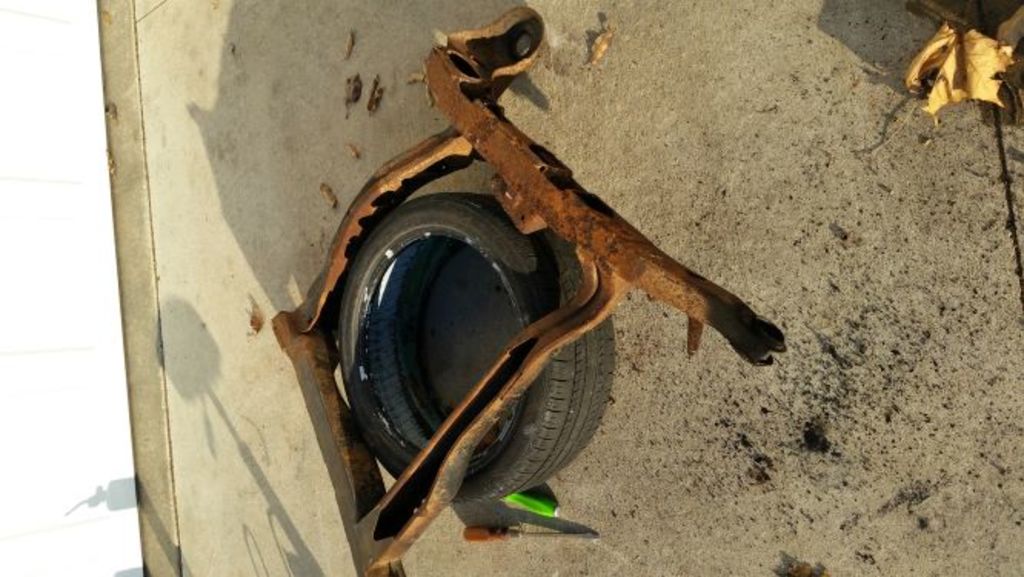


 Good luck!
 Thanks for that.