So the GT needs a new fuel pump. I can get one through Python for ~$40. Is there a lower priced pump out there that anyone knows of? Has anyone used a Python pump?
Also, I think I might have to replace it in the parking lot where the car's at right now. Since I'll be a few miles from home, I need to have all the necessary tools with me! Anybody have a list of parts needed to drop the tank and install the pump? I'm sure I'm forgetting something...
Your going to need to drop the tank its right under the car under the center console area. I used an ebay pump in my 86 the last time i had to replace it and it work'ed very well. its deffenetley somthing you would get noticed doing in a parking lot so i would try and get it home. Are you sure its not the relay or fuse?
[This message has been edited by pontiackid86 (edited 04-09-2010).]
IP: Logged
02:13 PM
css9450 Member
Posts: 5423 From: Glen Ellyn, Illinois, USA Registered: Nov 2002
I asked about fuel pumps here on the forum back in 2003 and was told "Use the AC Delco; DON'T buy aftermarket."
So that's what I used. Considering the one I was replacing was aftermarket, it made sense. The AC Delco has worked ever since. It was something like $77.
IP: Logged
02:53 PM
Kitskaboodle Member
Posts: 2988 From: San Jose, Ca. Registered: Nov 2004
Python huh? What is their reputation for quality? I would suggest getting a known good brand since this job takes several hours.
I got a Bosch at Rockauto.com very inexpensively. I would also suggest you take a close look at the 3 main hoses that come off the tank. If they're show any type of dryness, swelling or even the smallest cracks, replace them!
Tools? A headlight flashlight works great in that confined area behind the tank when you have to hook all those hoses back up.
Oh...and dont forget to put them tank pads back in! Otherwise, it will drive you bonkers!
Kit
[This message has been edited by Kitskaboodle (edited 04-09-2010).]
IP: Logged
03:16 PM
olejoedad Member
Posts: 18025 From: Clarendon Twp., MI Registered: May 2004
13MM deepwell and rachet 1/4" and 5/16" nut driver Hammer and brass punch Jack and jackstands prybar to help remove the fill and vent hoses from tank end
[This message has been edited by olejoedad (edited 04-09-2010).]
I just did mine after 24 years. The ACDelco comes with all of the internals (wiring, sock, hose stub and a tank o-ring.) It's worth the money. If the pump will still run, disconnect the pressure line and run it into a can. Power the pump at the ALDL connector and empty the tank as much as you can. While it's out, drain as much of the crap out of there as possible. Be nice to the pump/sender/float mechanism as you take it out.
If you see sparkles in the sock or bottom of the tank, the lining is coming off and you might need to reseal the inside. A little bit is ok, but a lot is something to correct.
It's not hard but takes about an hour.
[This message has been edited by TK (edited 04-09-2010).]
IP: Logged
07:05 PM
Apr 10th, 2010
Dave E Bouy Member
Posts: 1465 From: Kettle Point Ontario Canada Registered: Sep 2004
I replaced mine last year with an AIRTECH pump from Advance Auto therefor Iam replacing it again this year. No more cheap crap so I bought an Edelbrock pump. Oddly enough when I opened the Edelbrock box the pump was stamped Walbro.
Okay, I'm getting just a tad bit confused by this.
Up above, in the original post, we have a fellow suggesting that he's going to change the fuel pump in a parking lot. This doesn't sound all that odd to me, given that I've heard of plenty of people changing fuel pumps on the side of the road in other cars. And, I've also seen elsewhere on the site the following advice:
quote
Originally posted by Dennis LaGrua:
You will need to get the car up about two feet in order to drop the tank. There are only three things to disconnect and the tank comes down, connector (yellow plug near firewall), hoses (vent, return and fuel line), and the brackets under the tank (three) . You will need to drain the tank before dropping it down. If your fuel pump is toast the tank can be emptied by either a siphon or an inline fuel pump. Even a amateur can get this job done in about 2 hours.
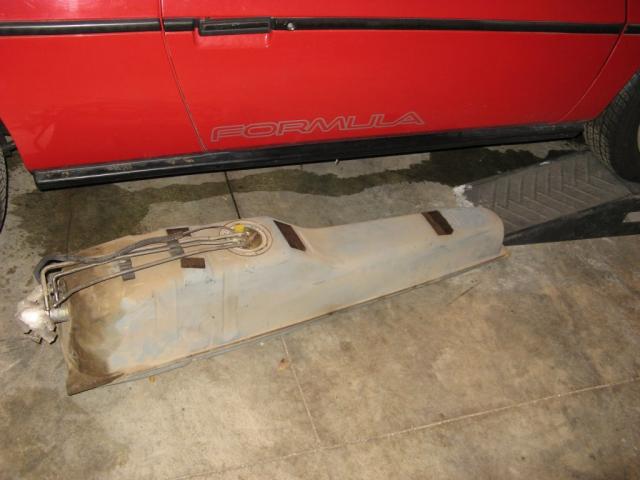
Now this business about doing it in a parking lot and that an amateur can get it done in about 2 hours sounds awesome. (The dealer wants to charge 3 hours labor and the shop down the street wants 2.5 - that's an interesting clue.) However, this business about needing to get the car up about two feet? What? Really? Typical jack stands are 17 inches (I know they come bigger, but people buy bigger for...Fieros???) Is this really the case? 2 feet? If so, the following photograph intrigues me:
That sure looks nice to me. I don't own any jack stands and I'm not sure that I want to pay $80 (plus shipping) to get 4 17" stands (the price of labor at the shops starts looking a bit more attractive).
Also, the factory service manual and Chilton both reference a little gizmo called "spanner wrench J-24187". Now there's an interesting little gizmo...just the kind of thing that we all have stashed in the back of our kitchen "junk drawers" (not!). I couldn't find one at a parts store, but I found one on eBay for $15 (used). On a scale of 0-100%, just how necessary is this thing?
Basically, what I'd like to know from service manuals and repair guides is this:
1) All tools needed 2) All parts, gaskets, etc. needed. 3) Anything else that ought to be checked and replaced at the same time - and instructions for doing so. (For example, should the tank be cleaned? Should the fuel level guage sending units be cleaned or replaced? Anything?) Neither manual is helpful in this area. 4) Safety check procedures. The first thing I did, before actually performing any kind of diagnosis, was change the fuel filter in hopes that a clogged filter was my problem. It amazes me that this thing just screws on, no thread tape or gaskets or anything, just metal against metal. It seems to me like this is just asking for a gas leak. I guess not, but it's funny that neither manual makes any kind of cautionary statement about checking your work.
Can anyone shed any additional light on the fuel pump changing procedure, with the above in mind? Based upon things I've read in this thread, I'm thinking of buying this AC DELCO fuel pump. However, it seems odd that the pump is the only thing pictured when, this other pump shows so much more (and costs less, too). Do I need to buy all of that other stuff separately? What is that stuff?
Considering all of the fuel pump threads on this site, it'd probably be nice for future visitors to have a complete description somewhere - maybe this thread could be the place.
IP: Logged
10:23 PM
katatak Member
Posts: 7136 From: Omaha, NE USA Registered: Apr 2008
13MM deepwell and rachet 1/4" and 5/16" nut driver Hammer and brass punch Jack and jackstands prybar to help remove the fill and vent hoses from tank end
If you have a set of ramps, it makes it a litlte easier (for the wide body folks like me) to get the front tires on the ramps then raise the rear on the stands. You need enough room to get to the center of the car. 13mm removes 4 bolts on the crossmember/plate and the 2 strap bolts that hold the tank in place. Remove all the hoses at the rear of the tank before you take the tank loose. If they are the originals, don't be surprized if the hoses get torn up while removing them - you may need to replace some or all. My standard practice is to replace them all if I do not know the car's history. Also disconncet the 3 wire plug on the firewall just above the AC compressor. You do not need a special "spanner" wrench to get the pump out. Use the hammer and brass punch and tap the locking ring in a counter clockwise direction. Your new pump should come with all the pieces and parts for the pump swap.
Look at the 3 wires closely - I have found a few that were pinched and were worn through the insulation. As stated above, don't forget to put the pads back in place when you stuff it back in.
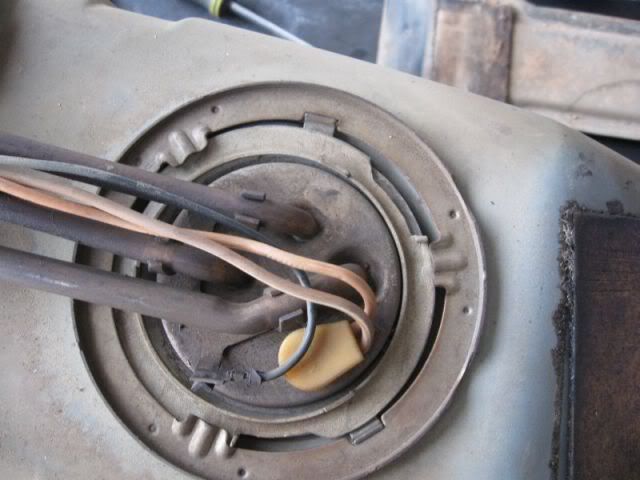
Locking ring on top of tank - access to the sending unit and the pump:
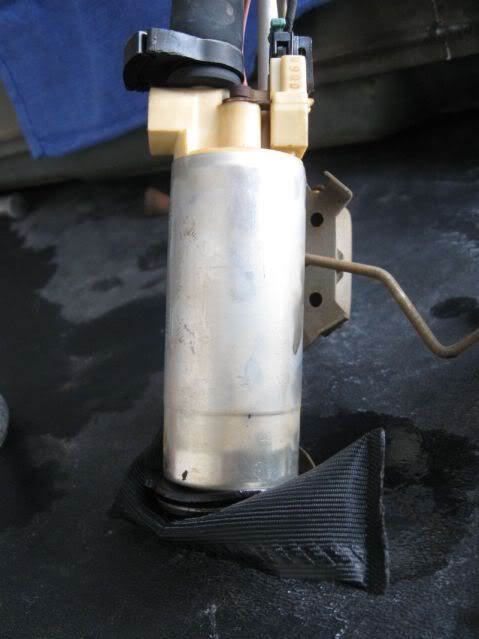
Pump:
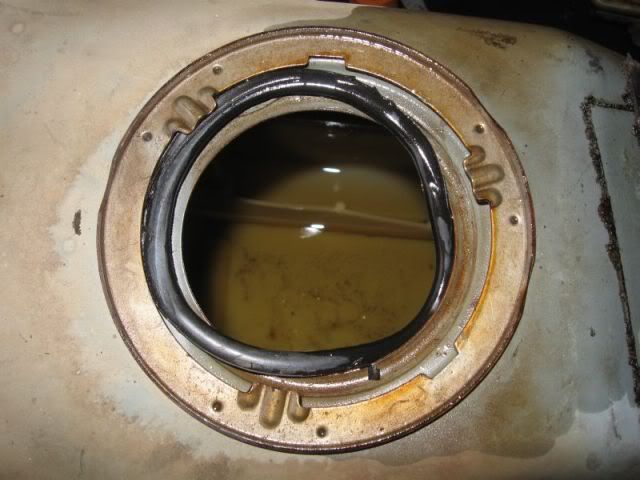
Be sure that when you reinstall, the O Ring is set correctly - the PO on this car did not get it right and it had a pretty bad fuel leak!
As for your parts, get them from RockAuto.com. Do a search online for a discount code and you should be able to find one pretty easy for 5% off. RockAuto generally has the best prices on parts, and the best variety.
You'll want their AC Delco pump for about $68 I think and you'll need a strainer for about $5. The AC pump should come with all the wires and gaskets and whatnot that you would need. Should be all you need, unless you need other parts then you might as well get them while you're having parts shipped anyway.
[This message has been edited by Alibi (edited 07-08-2010).]
There's a couple of nice responses. Thanks. (Pictures = good.)
Supposedly a two hour job - I just spent 20 minutes trying (and failing) to get a siphon hose down into the gas to drain off some of the (completely full) tank before starting. Sadly, I'm thinking that I don't get to deduct this from my total. (The Chilton manual gives direct instructions, step 3: "Drain all the fuel from the tank using a suction pump." So much for that.)
I suppose I'll just buy that AC DELCO fuel pump and hope for the best. It seems odd to me that some pumps would have so many more parts than others (seen my links in my post above).
I need to make a list - this seems as good of a place as any. I'll just come back and edit it as I go along, since this is going to take a few days (if I want the AC DELCO part, I'll have to wait for UPS).
1) Disconnect negative battery terminal. 2) Get the front wheels of the car up onto ramps. 3) Buy one of these. Set the rear of the car on the included stands. 4) Disconnect the wiring from the tank (easier said than done, according to a thread above). 5) Remove ground wire retaining screw from under the body (whatever "under the body" means - I'm getting this from Chilton). 6) Disconnect all hoses and filler neck from tank (hey, this sounds like a great time to siphon the thing!) 7) Support the tank with the included jack and remove the retaining strap nuts. 8) Lower the tank enough to disconnect the fuel sending unit wires (and, I assume, disconnect them? C'mon, Chilton, hire a competent technical writer). 9) Disconnect the fuel line, vapor line, and return line. 10) Having destroyed these hoses in the removal process, take them to the parts shop to get them replaced. 11) Listen in horror as the attendant explains that they are not replaceable. 12) Curse God. 13) Remove tank from vehicle, pour all available gas over the top of my head and light match. 14) If #13 is survived, remove the fuel guage/pump retaining ring by turning the cam lock ring counter-clockwise using a hammer and "brass punch". Expect sparks to be generated in the process, the remaining fuel vapor to ignite, and an additional week in hospital. 15) Remove the guage unit and pump. 16) Find out of there's a proper method of washing and painting the tank. Then do so. 17) Complete a new list for the installation process.
[This message has been edited by OuroborosNS (edited 07-08-2010).]
IP: Logged
09:54 PM
PFF
System Bot
Jul 9th, 2010
jokerb90 Member
Posts: 366 From: Nederland, TX Registered: Nov 2008
10) Having destroyed these hoses in the removal process, take them to the parts shop to get them replaced. 11) Listen in horror as the attendant explains that they are not replaceable. 12) Curse God. 13) Remove tank from vehicle, pour all available gas over the top of my head and light match. 14) If #13 is survived, remove the fuel guage/pump retaining ring by turning the cam lock ring counter-clockwise using a hammer and "brass punch". Expect sparks to be generated in the process, the remaining fuel vapor to ignite, and an additional week in hospital. 15) Remove the guage unit and pump. 16) Find out of there's a proper method of washing and painting the tank. Then do so. 17) Complete a new list for the installation process. [/COLOR]
too funny, I really like #13 this isn't that bad of a job, you can do it. I would add large channel lock pliers to your list of tools, they help with breaking the hoses free, they tend to get rather stuck.... #11 -- the hoses are replaceable, and not too hard to source, just make sure you get the right hose, its different for the four cyl vs. the 6 ( the six needs higher psi hose) #14 -- brass punch.... hmmm, I don't have one, but have done this before....just don't spark -- I have used a wooden wire brush as a punch -- if you can get wood to spark then you are better than me, and in a pinch I have used a screwdriver with the end covered with electrical tape. By all means, a brass punch is best, but....
And as far as draining the tank, well fuel pumps always go when the tank is at least 3/4 full ( damn Murphy) -- you don't have to drain it to drop it -- it will be heaver and messier -- just don't light up a smoke while you are doing this....
Good luck, mike
[This message has been edited by jokerb90 (edited 07-09-2010).]
When I turn the key, I don't hear the fuel pump - but, within 2 seconds, I hear a little "click" at the location of the fuel pump, which I assume to be the sound the broken pump makes when the relay cuts its power. Also, when I connect the cigarette lighter's power wire to port G on the ALDL, I also hear a "click" (but it's much louder) and the pump does not run. It is from this information that I have decided that the pump is bad.
What I'd like to do, though, is unplug the relay and connect a couple of the wires leading to the relay together in order to send power to the pump. Does anyone know which wires to connect? It's kind-of a mute point, because I'm already $175 into this (jack stands, other tools, parts), but I'm still curious.
Also, I read in another thread that connecting port G to the lighter's power causes the pump to run backwards. Is that true? I vaguely remember, a few days ago, reading somewhere that if the pump is working correctly, then port G actually becomes hot. Is that true?
quote
Originally posted by Alibi: As for your parts, get them from RockAuto.com. Do a search online for a discount code and you should be able to find one pretty easy for 5% off. RockAuto generally has the best prices on parts, and the best variety.
You'll want their AC Delco pump for about $68 I think and you'll need a strainer for about $5. The AC pump should come with all the wires and gaskets and whatnot that you would need. Should be all you need, unless you need other parts then you might as well get them while you're having parts shipped anyway.
Great info! I ordered the pump, a gasket, and the fuel tank O-ring seal. (I'm guessing the latter two were unnecessary - they're probably included with the pump - but, since, put together, they totaled less than $2, it seemed a prudent purchase to make just in case). Total cost for all three $59 and change (including shipping). But then I went through about 12 coupon codes that I found online, per your suggestion, and finally got 5% ($2.52) removed. That - total with shipping - was about the price of just the cheap pumps themselves elsewhere!
Thanks!
quote
Originally posted by jokerb90:
And as far as draining the tank, well fuel pumps always go when the tank is at least 3/4 full ( damn Murphy) -- you don't have to drain it to drop it -- it will be heaver and messier -- just don't light up a smoke while you are doing this....
Mine is a strange and annoying story. I'd just re-hooked up the switch to the trunk light / deck ajar indicator in the trunk a few days earlier. It had been disconnected by the previous owner (about 2 decades ago!) because the switch wasn't reaching the lid anymore, so it wouldn't shut off (I haven't quite figured out why that is yet). I used some very thick double stick tape-ish insulating material to create a pad (about an inch thick) which I stuck to the top of the deck lid which made it possible for the switch to work when the lid was shut. Well, unfortunately, the switch managed to squish a dent into the material I'd stuck to the lid, a dent which was enough to prevent the switch from opening when the lid was shut. (I'm only going into this because maybe, just maybe, some of you have had this problem as well and have a solution.) Overnight, then, the trunk light drained my battery. So, I'm standing there waiting for my battery to get a surface charge from being hooked via jumper cables to another car, and while I was at it, I decided to pour some 2 year old gas from a 5 gallon container into my 3/4ths full tank. (I thought that getting rid of this gas slowly by mixing with nearly full tanks was the best way to go.) And, as luck would have it, THAT was when the flippin' fuel pump decided that it was never going to work again.
Anyway, I think draining the tank will be very easy if the first thing I do is disconnect the filler neck from the tank and put the siphon hose into the tank right there, rather than attempting to put the hose down the filler neck. I expect to be able to drain the whole darned thing (well, maybe a quart left over).
IP: Logged
01:37 PM
ltlfrari Member
Posts: 5356 From: Wake Forest,NC,USA Registered: Jan 2002
Let me add my 2 cents worth to the lifting the car up bit.
I have some 6 ton jack stands that are taller than regular ones. These let me lift the rear of the car up pretty high. With the rear up, I can 'just' get my body under the car (6 ft 5"" and 260 lbs so a big guy) and reach the forward tank strap. It's a sod of a job but I can get to it. It's a lot easier the second time because the nuts are no longer rusted to the t bolts for the straps!
Putting the front end up on ramps helps but it's still tight under there. If you put the front on ramps, also add some additional safety like another set of stands or some blocks of wood 'just in case' the ramps fail! I usually put additional support under the back end as well just in case an axle stand fails. Better safe than sorry (or dead).
As for dropping the tank, My 88 has an expansion tank, 85 does not so on the 88 there is a line going to the expansion tank. It's a sod to get he rubber hose off it because of where it is up on top and behind the tank but if you don;t get it off and drop the tank it will bend the hard line into the tank, or worse crack the joint where it goes into the tank. I think it's actually easier to disconnect it in the engine bay and feed it through the hole than trying to get at that one under the car.
AS for siphoning the tank, a hose down the filler really does not work. There's a baffle right inside the filler spout in the tank that pretty much stops any sort of tube dead in it's tracks. Even with the tank out it's hard to just tip the tank and get fuel out of the filler or breather tube because of the baffles in the tank. I've found that when dropping the tank, it helps to support it with a jack and a block of wood and let the weight of the fuel in the tank actually help to drop it out. Once it's out, empty it as best you can so that it's a lot lighter when going in.
Interesting post. I'm not sure that I understand what you're talking about when you say "baffles". Maybe you're referring to something like vertical planes inside the tank to help prevent sloshing?
As to the ramps: have ramps ever failed anyone? Ever, I mean, in history? I ask in this hyperbolic fashion because it is the function of ramps to hold up cars while you are underneath them (is it not?). It seems a bit odd to doubt them. I'm far more concerned about the jack stands, considering that it is easy to imagine them tipping.
What is an "axle stand", by the way? Are you suggesting that the jack stands at the rear should be under an axle? I've definitely been wondering where to put the stands, but I hadn't much considered doing that.
Come to think of it, I don't even know where to put the jack when lifting the car up on the stands. The only place I've ever put the jack before is in the notch below the door on the side.
For those who may wish to offer year related advice: my car is an '84.
[This message has been edited by OuroborosNS (edited 07-09-2010).]
IP: Logged
05:30 PM
jokerb90 Member
Posts: 366 From: Nederland, TX Registered: Nov 2008
Interesting post. I'm not sure that I understand what you're talking about when you say "baffles". Maybe you're referring to something like vertical planes inside the tank to help prevent sloshing?
Come to think of it, I don't even know where to put the jack when lifting the car up on the stands. The only place I've ever put the jack before is in the notch below the door on the side.
For those who may wish to offer year related advice: my car is an '84.
yes the baffles do as you described, when my tank was dropped I tried to tip it towards the filler tube to drain it -- didn't work so well -- I wound up draining it out of where the pump drops in.
As far as where to put the jack, the cradle will work (the metal frame around the engine) -- just make sure you find a solid place to jack from, the coolant tubes are expensive to replace.