I will be doing a pic by pic auto to isuzu 5 speed conversion and my progress on the conversion..... So far I got all the parts I need excluding the flywheel for the 4.9 and clutch
Im right now in the process of cleaning all the parts I collected up.... And alot of the brackets mounts ect will be striped and either primered and painted or powder coated my ricers yellow color
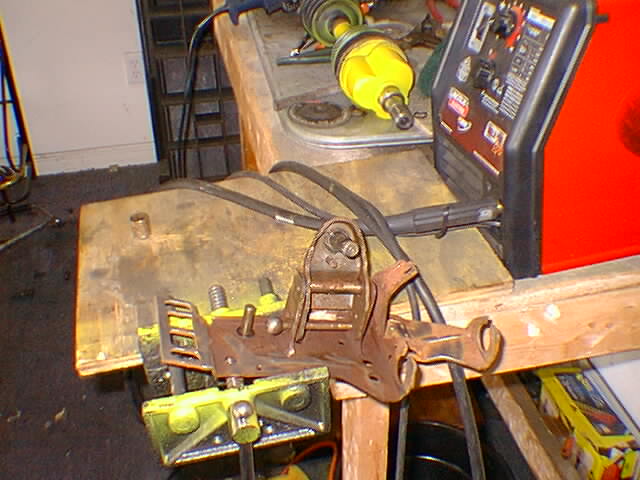
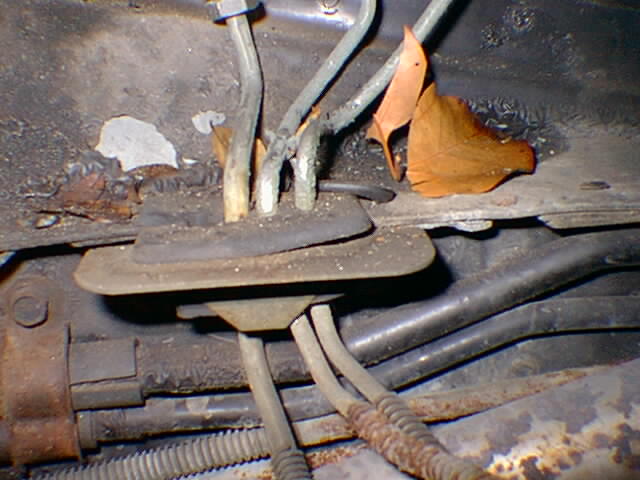
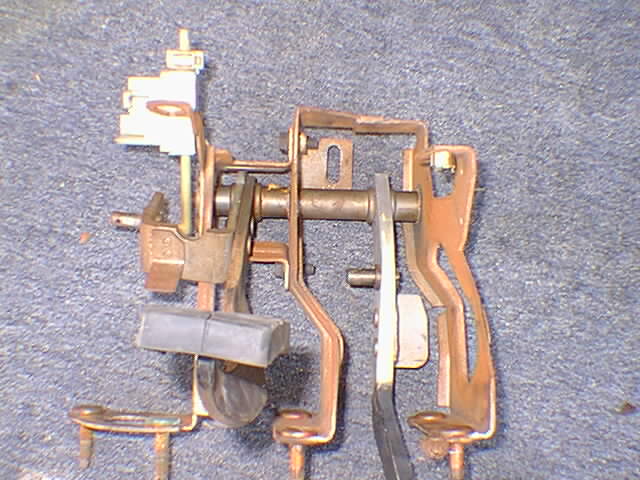
I had all the parts due to having a donor car... Unfortantly the donor car was missing the clutch pedal assembly... So I had to run to the junkyard to pull one.... I learned alot on this pull I did not have to pull the whole assembly but I did and it was a pain but you do not need all of this that is in the pic
This whole bracket has 2 screws on teh side and a bolt in the middle to the pedals all you need is the pedals and the bracket for the clutch pedal and master cylinder..... All auto main brackets (the thing that bolts down the brake booster) has the screw holes for the clutch pedal and master cylinder mount.
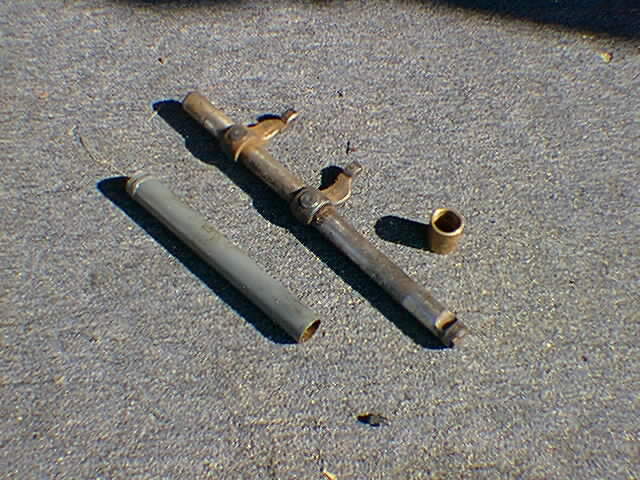
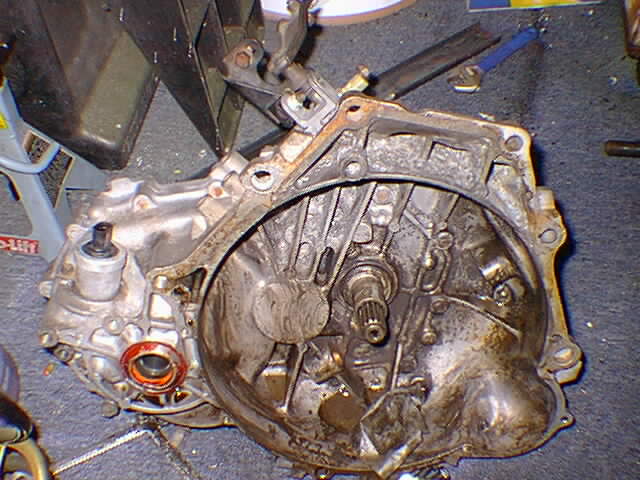
This tranny had sat some time and with the isuzu the clutch fork bushings and fork likes to develope rust and at times actually sieze up. This Is a must on a isuzu..... Check the condition of the clutch fork after you remove it and see if the rust is pitted..... It so then replace.... Mine cleaned up good with 1500grit sand paper... I even got the bushing cleaned up.
Thanks to rodney's tool I was able to remove this with ease.... Note if your replacing the bottom bushing with the bearing or new bushing there's a small whole were you can take a punch and hammer and hit very lightly till the bushing folds or breaks...then it can be took out easy.... This is important to pound the hole with a punch lightly because if you whack it it can lead to the tranny case cracking.
Another good thing to do Is polish the bushing for the throwout bearing with some fine sandpaper also... This I believe will make your clutch happy and make easier clutch engagement..... Replacing or polishing the bushings and greezing will extend the life of the fiero clutch master and slave cylinder.
More to come later
[This message has been edited by 86fieroEarl (edited 09-18-2004).]
IP: Logged
10:16 AM
PFF
System Bot
doublec4 Member
Posts: 8289 From: Oakville, Ontario, Canada Registered: Jun 2003
PLEASE document this thread with a ton of pictures with a step by step process! I absolutely hate my auto and a 5spd isuzu would be perfect. Something like this would be an awesome reference for me as well as many others who won't do the swap because they aren't 100% confident that they can do it.
More updates... Today I really didn't do much but strip, Paint and notch the tranny for the 4.9 starter.
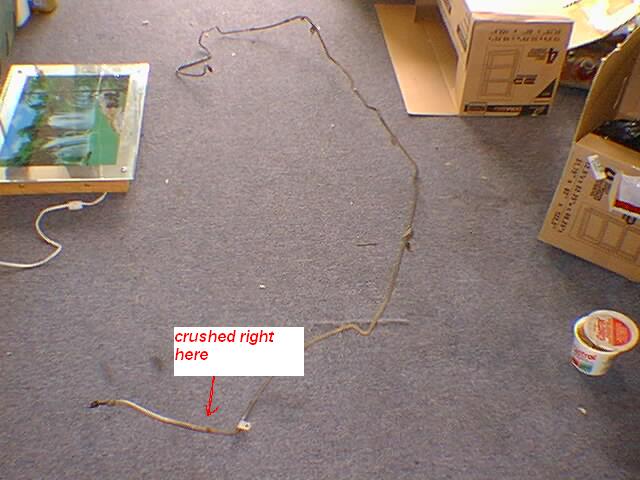
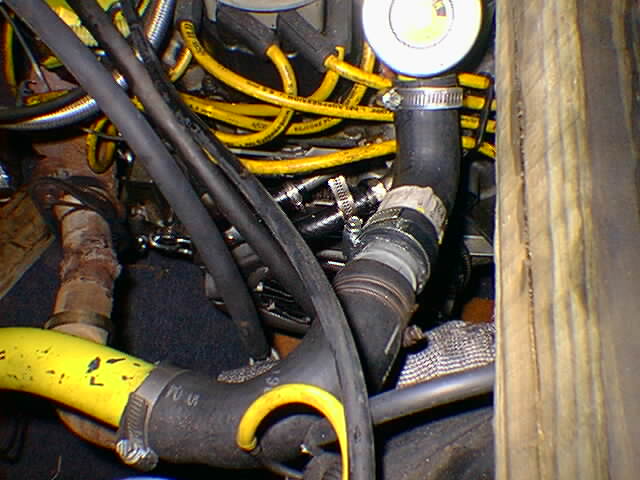
I might have to replace the hydrolic clutch line because the one I got off the parts car has a nasty crushed kink in it Has anyone ever had to patch one up? Im either going to purchase a new one or try to fix this one. Basically.... This goes in the place that I will be removing the auto cooler lines.... The mounting holes are already there.... Dont be fooled from the looks of this in the pic.... It's quite easy to install by removing the spare tire pad and running it under the car. Don't mind the arrow in the pic below it's not crushed in that area but it is crushed in a area.
In the stages of replacing some of the bushings in the shifter assembly. And driver side axle is all done. The shifter assembly is tooken apart on the desk.
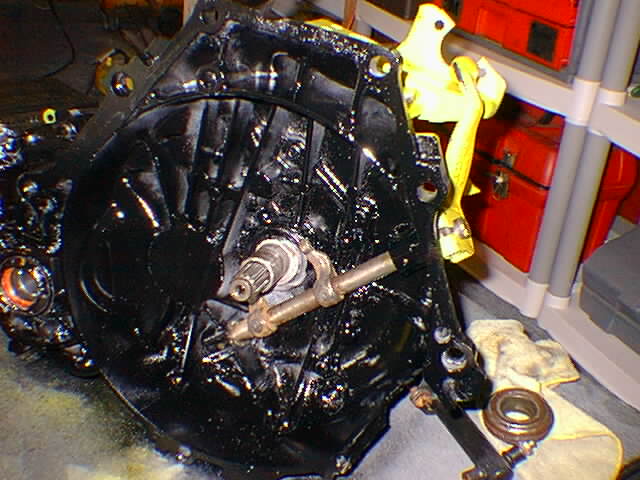
I cleaned the tranny up and primer and painted... I also Greesed the bushings to protect them from rust and installed the clutch fork.... The clutch fork moves freely now... Should be easy on the foot when I engage the clutch
[This message has been edited by 86fieroEarl (edited 09-20-2004).]
IP: Logged
12:08 PM
86fieroEarl Member
Posts: 2203 From: Orlando, FL Registered: Jun 2002
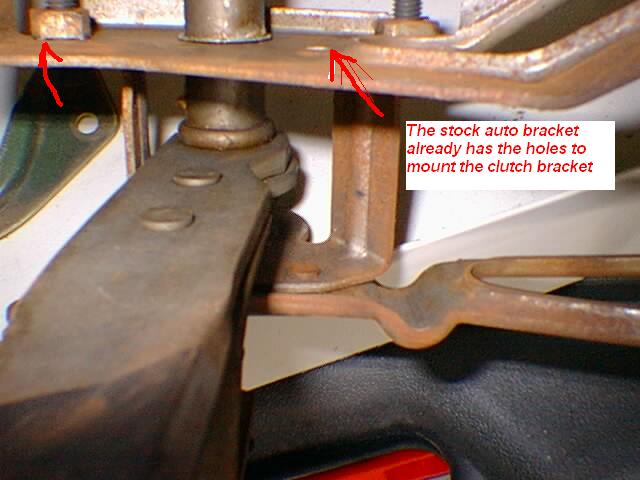
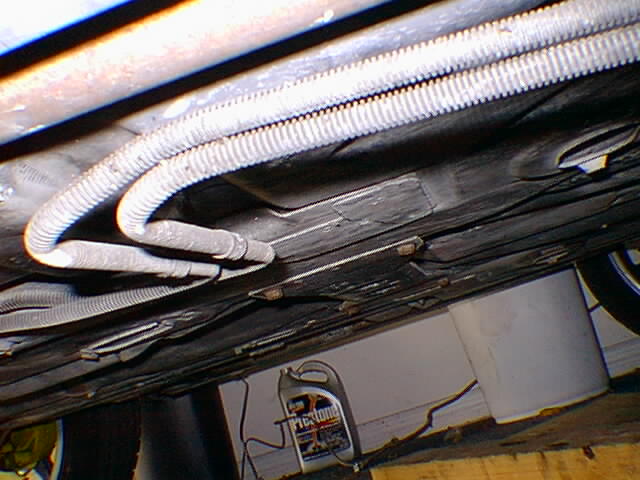
Car is ready to be tooken apart for the 100000 Th time... Here's a pic of were the mastercylinder will mount.
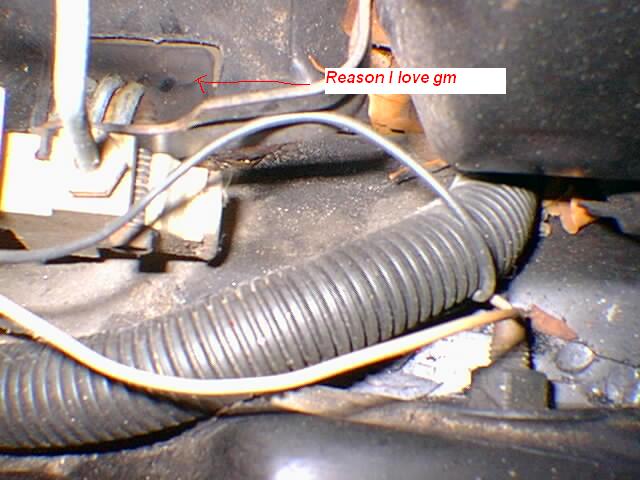
Nice how gm left the 4th hole in the rubber mount for the hydrolic clutch line
I don't have to pull the whole mastercylinder after all Gm left the holes in the auto bracket quite nicely. I will be still taking out the auto brake pedal and replacing with the stick pedal..... I still cant figure out why did GM but the bolt for the pedals in backwardass. Im flipping mine around when I remove it... Makes a easier removal.
[This message has been edited by 86fieroEarl (edited 09-20-2004).]
IP: Logged
12:13 PM
86fieroEarl Member
Posts: 2203 From: Orlando, FL Registered: Jun 2002
Yeah, actually, that switch is a good thing, cause IHRA drag strips will fail your tech inspection if your car can start and the clutch is out, even if the gear shifter is in neutral.
So definitely wire that switch to the thing. You need it.
IP: Logged
04:03 AM
Sep 28th, 2004
Golden86 Member
Posts: 1191 From: Glen Ellyn IL Registered: Jan 2004
Havent really been doing much until I get the rest of my parts I still need a flywheel and im going to still need to order a new hydrolic line..... Right now I just got finished cutting my shifter down to make it a short shifter.... And I still need to die the threads in I finally finished the wire harness for the carbed 4.9 I will have more progress pics tommorrow. I will lay out all the stuff you need for the conversion.
And the new steel pedal is on order... I heard that the stock clutch pedal is prone to bending.
[This message has been edited by 86fieroEarl (edited 09-28-2004).]
IP: Logged
09:18 AM
Sep 30th, 2004
86fieroEarl Member
Posts: 2203 From: Orlando, FL Registered: Jun 2002
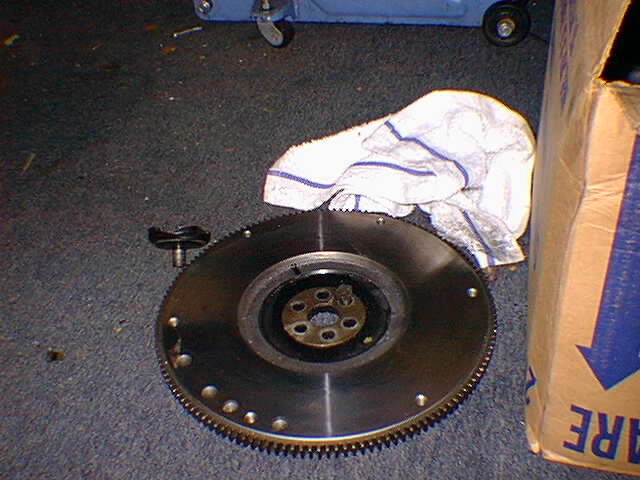
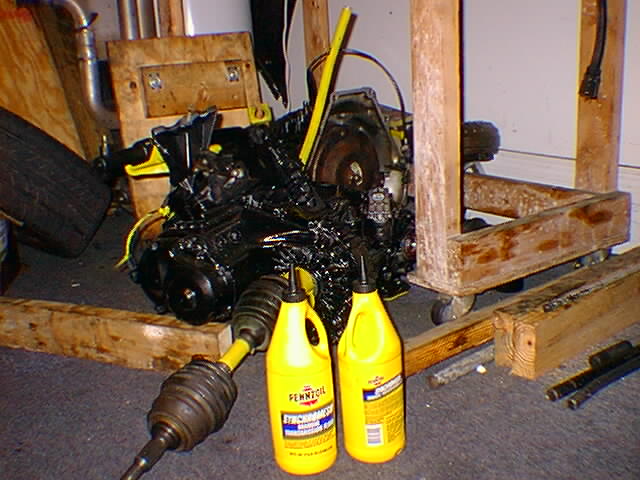
Welp got all my parts together the only thing im missing is the surround consol for the shifter.... And im all together replacing the master cylinder and slave cylinder.... Slave cylinder is in the pic but not the master cyclinder but here is most of the parts needed for a conversion.... So far the price was $250 for parts car and $20 for the clutch pedal assembly... In both deals I got some extra stuff also With the parts car I got a pair of clean notchtail lights no cracks or fading... With the pedal assembly I saw a lonely decklid laying beside one of the fieros and it had the recall weather strip with it's clips and in good condition... Needless to say the guy let me have it for free. The clutch, friction plate, TO bearing,Hydrolic line and slave and master cylinder im going to replace with new. Flywheel is a might replace also because I still need to get one machined to fit the 4.9.
And I don't remember the year on the parts car but what do I look for on the flywheel to see if it is externally balanced or neut balanced ?
[This message has been edited by 86fieroEarl (edited 09-30-2004).]
IP: Logged
10:06 AM
PFF
System Bot
Oct 8th, 2004
Golden86 Member
Posts: 1191 From: Glen Ellyn IL Registered: Jan 2004
I also thank you for doing this. I am planning on doing this beginning of next year but didnt really know where and how to start. keep up the good work.
------------------ 86 Pontiac Fiero SE aka "Dark Pegasus"
IP: Logged
03:30 PM
Oct 10th, 2004
sonic50 Member
Posts: 3873 From: All over the USA Registered: Aug 2004
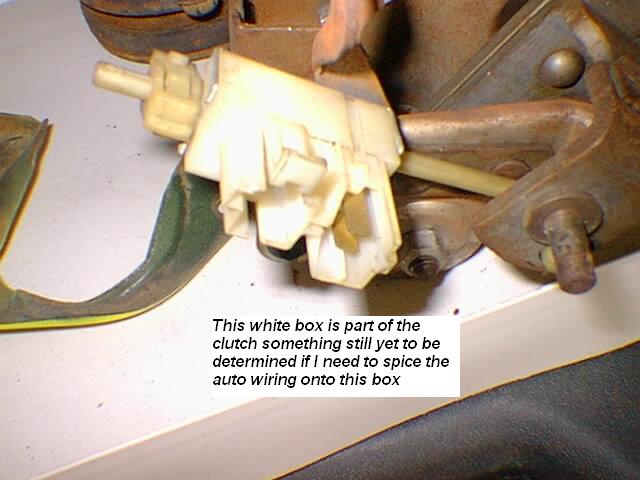
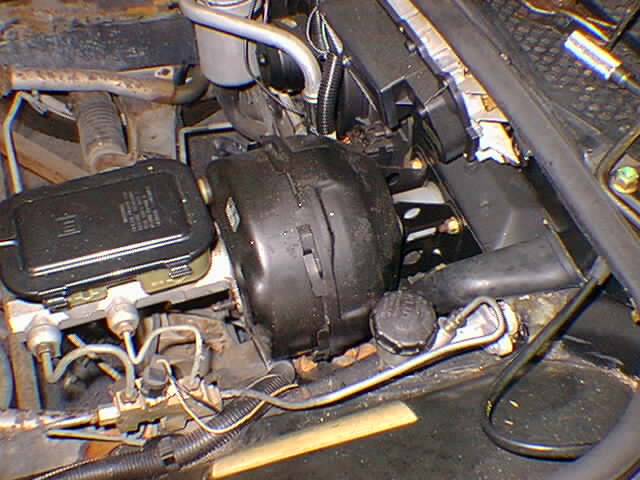
This white box on the clutch assembly still has me boggled.
Just a note.... Make sure you get the engine harness from donor car.... Everything seems to be basically plug and play.
I just replaced the stock clutch pedal with the Fiero Store Steel pedal. It was a pain in the arse. Especially trying to remove the spring. But I accendtly broke that start switch. I was trying to pinch the grabbers to pull it back out the hole it is retained it and that part broke off.
Is this part available at part stores? I don't mind wiring it out, but somebody saying that the drag strip will fail you. Might as well put a new one in.
I would recomend that you get the steel clutch pedal from the Fiero store. And replace it now, before you put it in.
More update on the swap.... Sorry about the delay, Had a few hindering problems that kept me from touching my car.... But back on track, Today I went through the stages of pulling the old tranny and caddy flexplate, MTA did my flywheel and it fits and looks perfect. I had to hit the yard for another hydrolic line, I have became a pro at pulling the hydrolic lines.... There really not that hard to pull. If you remove the spare tire wheel console then the rest is easy.
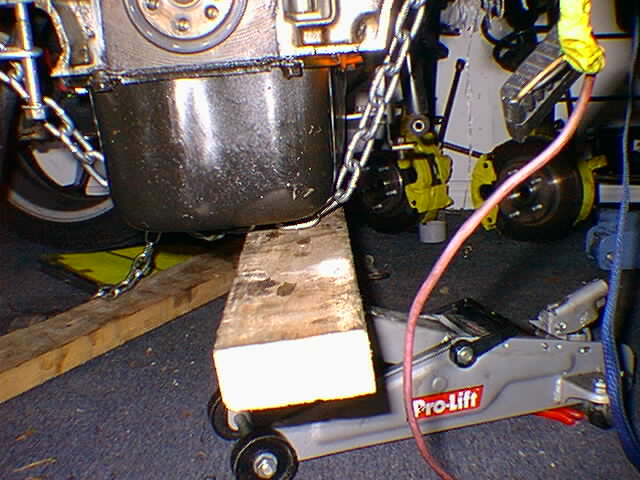
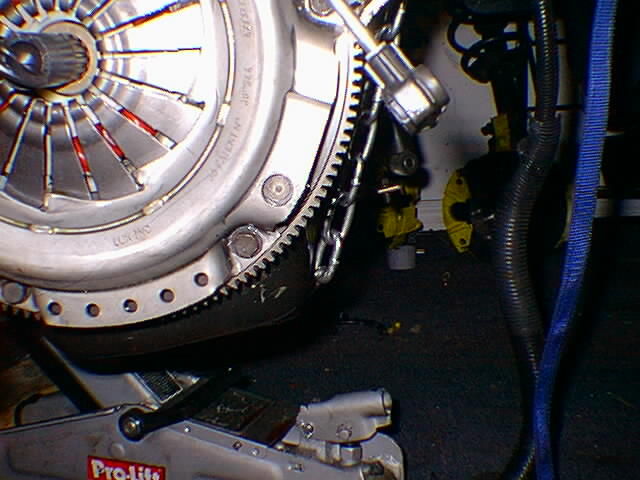
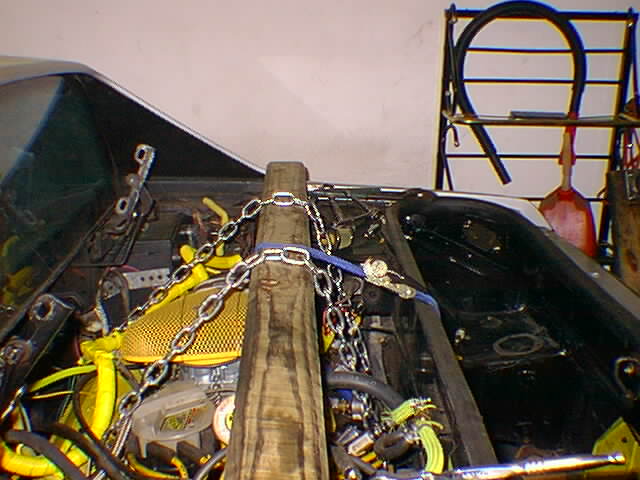
A few pics of the engine chained up..... I did not want to drop the whole engine so I did it this way.
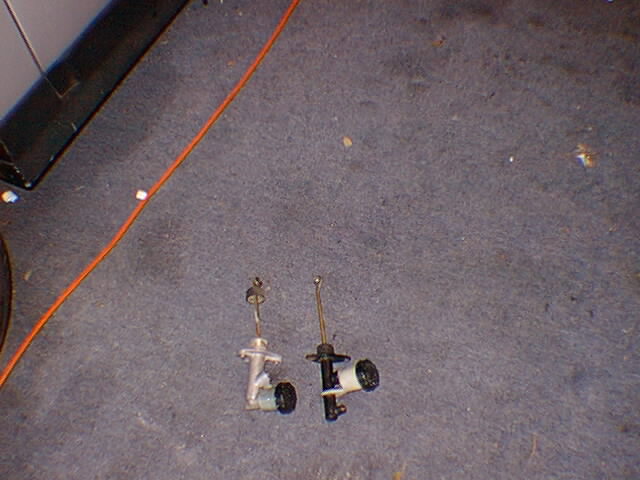
Im going to be rebuilding one of these units, I have the 1st generation and the 2nd generation master cylinder, The slave cylinder is brandnew. Witch one of these when rebuild will not give me any problems for awhile ?
I bought the fierostore clutch pedal... Altho the steel and alluminum one is in good condition I wanted to go with the steel to avoid any future problems. My flywheel bolts should be here tommorrow and I will beable to attach the flywheel and clutch, and connect the 5speed tranny. I think I will be doing the pedal assembly as well.
------------------
[This message has been edited by 86fieroEarl (edited 10-25-2004).]
IP: Logged
07:17 PM
jscott1 Member
Posts: 21676 From: Houston, TX , USA Registered: Dec 2001
Earl while working on that 4.9 conversion I discoverd a potential problem that can cause your engine to jam with the newer flywheels like yours send me a pm or call me on the cell so I can explain to avoid running into this headache.
IP: Logged
10:58 AM
86fieroEarl Member
Posts: 2203 From: Orlando, FL Registered: Jun 2002
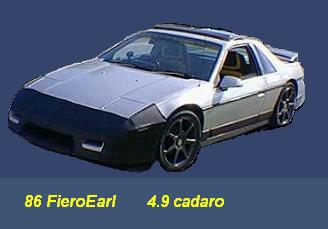
Welp today I finished my hydrolic line, The first thing I had to do is remove the 2 ac cooler lines
After removing them, I had to take the spare tire console out and unbolt the plat that holds the lines. You Will have to remove this if you ever dream in getting the hydrolic clutch line in.
IP: Logged
03:39 PM
86fieroEarl Member
Posts: 2203 From: Orlando, FL Registered: Jun 2002
Everything was a direct bolt on the lines used the old tranny cooler lines mounted holes And everything bolted it nice and easy, Tomorrow, I will be doing the shifter console and clutch pedal assemble, Im still waiting on the fiero store's steel clutch pedal to arrive, But defaintly I will be doing the shifter assembly.
In all A auto to stick conversion takes about 2 to 3 days with 1 person, But im working on my car and doing other things so it takes me longer
If anyone needs any other shots of the hydrolic setup.... Like closer shots just say so.
[This message has been edited by 86fieroEarl (edited 10-26-2004).]
IP: Logged
03:43 PM
PFF
System Bot
Oct 27th, 2004
86fieroEarl Member
Posts: 2203 From: Orlando, FL Registered: Jun 2002
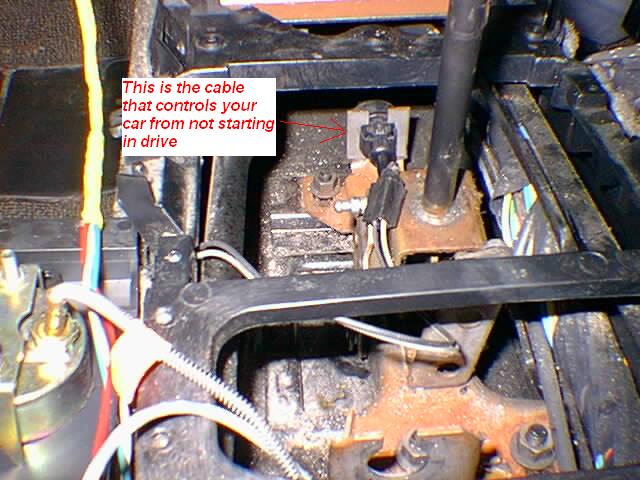
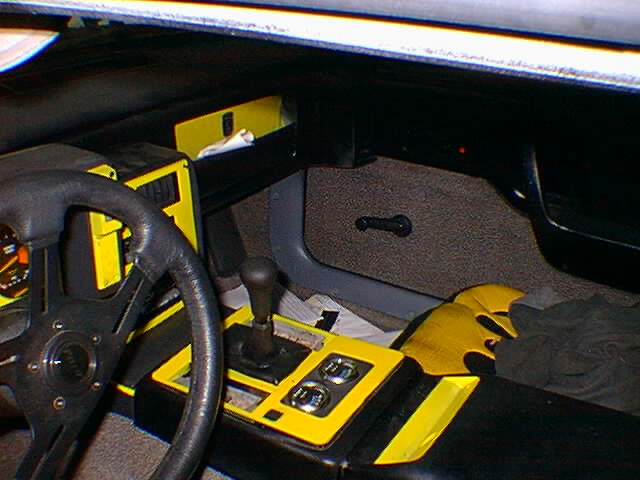
Alright decided to do the shifter assembly and start the clutch pedal assembly today, I started out with taking the center piece out of the fiero so I could get to the shifter bolts, On the auto shifter assembly you have another wire attached to the assembly, That wire keeps your car from starting in drive, The connector part on mine was disconnected for some odd ball reason, Now I know why my car would love to start in drive all the time.
On all fieros if you take off the ECM mounting bracket you have gasket like thingies plugging 2 holes one is a clossed gasket and the other is for the auto shifter, once you remove the c clap and eclipe from the auto shifting wire you can slid it right out, There's no drilling nessecery to get the stick shifting cables in, It is also a good Idea to lube the cables for easy shifting, What the heck there out so there way more easy to lube before you put the stick cables in. One hole is bigger then the other so it's very hard mixing the 2 shifting wires up. and putting them in the wrong hole.
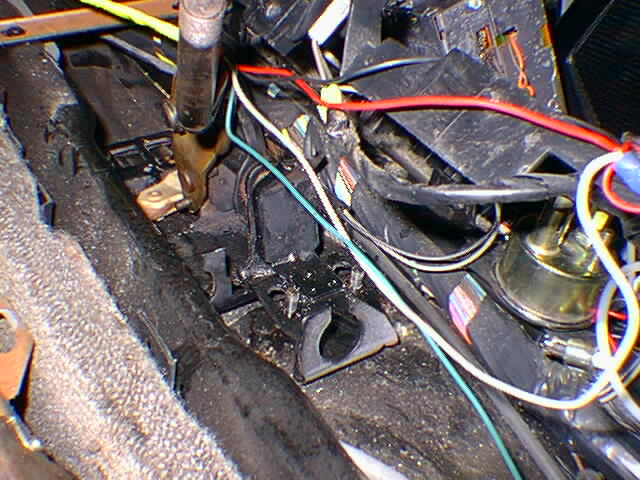
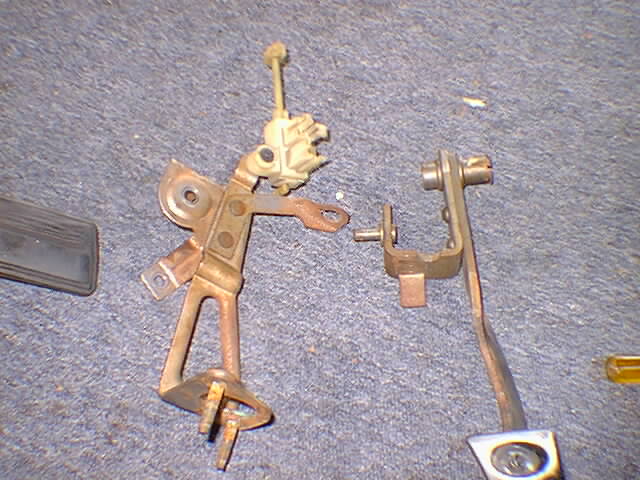
Here's a pic of the stick shifter assembly mounted.... Yes the auto shifting assembly and the stick shifting assembly is interchangable, Everything is apart so the photo is kind of messy. I did find about 3 bucks in change down in here.
[This message has been edited by 86fieroEarl (edited 10-27-2004).]
IP: Logged
11:49 AM
86fieroEarl Member
Posts: 2203 From: Orlando, FL Registered: Jun 2002
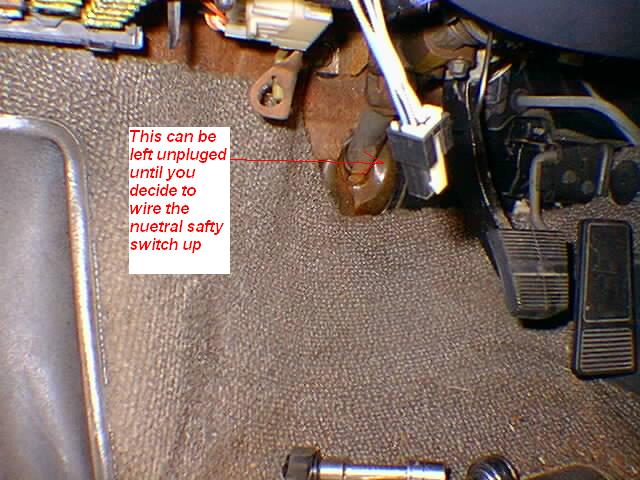
Alright, Went to start the clutch pedal assembly and also found my nuetral safty switch for the auto unconnected, The connecter does not match the connector on the stickshift pedal assemblies switch, But you can leave this unhooked until you one day decide to wire it up. I know the sticks connector has 2 wires, The automatic's connector has more than 2 wires.
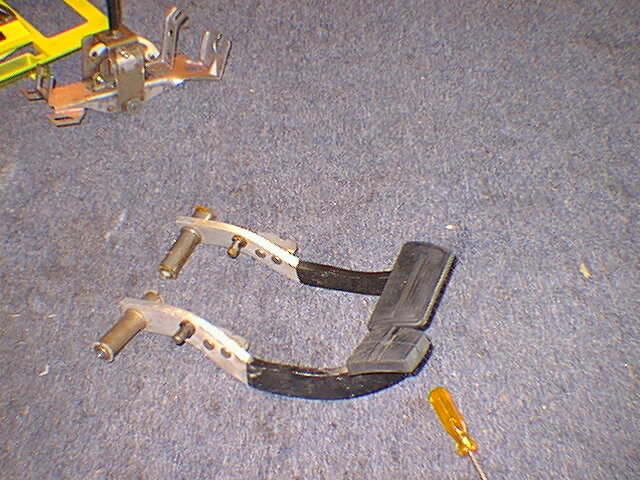
The brake pedal on the stickshift is much smaller then the automatic's brake pedal, I heard you can convert to stick and keep the huge automatic pedal, But I decided to swap them out since I had a stickshift brake pedal.
Now all I have to do is change out the engine wire harness to the stick ones and install the stickshift tranny So far this swap is straight forward and easy, I think the hardest part of the swap was pulling the automatic tranny, The hydrolic line was a breeze, Clutch pedal is easy soo far the shifter was super easy.... It took alot of taking apart to do it but was only time consuming.
This bracket is to mount the clutch master cylinder and stickshift clutch pedal, The clutch pedal, Brake pedal, Bolt and bracket is all you need to convert to stick, You do not have to pull out the parts car's brake mastercylinder and steering assembly and ect, For a stick conversion.
More pics to come later... When I start putting everything back together, If anyone has any questions or need better pics or closer pics about the conversion don't be afraid to ask.
------------------
[This message has been edited by 86fieroEarl (edited 10-27-2004).]
IP: Logged
11:57 AM
Fierokid87 Member
Posts: 4954 From: N. Ridgeville, Ohio, USA Registered: Jan 2001
Ah the memories of doing the auto to manual swap. looking good so far. If you want to use your clutch saftey switch you will need to use the manaul innterior harness as well as the engine. Thats what i did anyway.
------------------
[This message has been edited by Fierokid87 (edited 12-07-2004).]
that looks like the cruise control plug rather than the neutral safety plug.
You could be correct, I figured it was the safty switch because this connects to a connector that is on some type of cable that was attached to the auto shifter assembly, The sticks don't have it but the auto's do.
When I followed the cable it went directly to that connector, I will take a pic of it later.
IP: Logged
02:19 PM
86fieroEarl Member
Posts: 2203 From: Orlando, FL Registered: Jun 2002
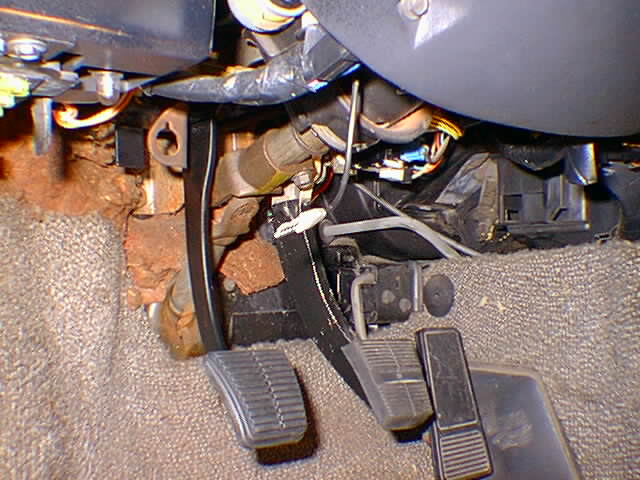
Alright just got finished with the pedal assembly, I installed the fiero store's steel pedal.... I must amit this part was kind of fustrating and hard but never or less I completed the pedal part of the stick conversion. The wire hanging down connected to the black connecter in on of my earlier post.
Finished pic
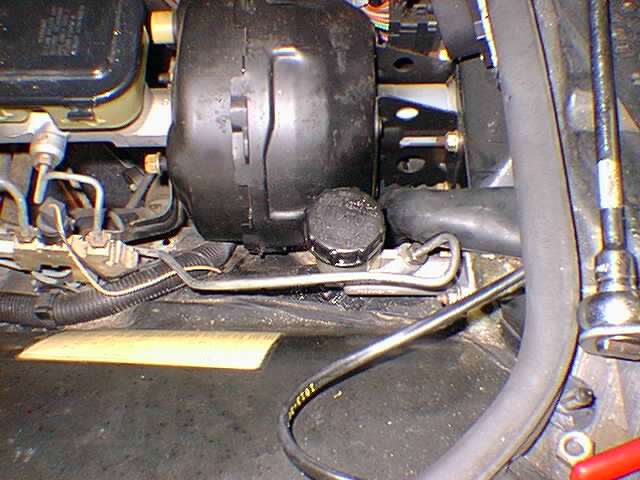
A pic of the mastercylinder bolted down
[This message has been edited by 86fieroEarl (edited 10-27-2004).]
IP: Logged
05:43 PM
Oct 28th, 2004
86fieroEarl Member
Posts: 2203 From: Orlando, FL Registered: Jun 2002
Today I had to pull a different shift cable from the junkyard because one of them was kind of sticking, About that wire I mentioned in the pics, Is not the nuetral safty switch so margaritaz was correct..... Thanks for the heads up margaritaz. after looking at some of the stick cars in the yard, The nuetral safty wire would be a purple one with 1 connector I believe.... I will snap a pic of it later.....
More to come
IP: Logged
11:41 AM
86fieroEarl Member
Posts: 2203 From: Orlando, FL Registered: Jun 2002
Welp today I got my shifting cables hooked up and the clutch installed I also have the tranny ready to go back in... I had to get new output and input shaft seals and the clutch fork shaft seal, I almost forgot to install the clutch fork shaft seal. I also lubricated both shifting cables and they move sooo freely.
Here's a pic of the cables installed.... And it looks like my homemade crossover will clear the cables just fine... I will still be taking the crossover out to wirewheel and clean it up.
Clutch installed.... This was my first clutch install, I made sure the clutch itself was in the right way.... It also had a stamp on it telling me what side faces the flywheel....I put the thread lock on the flywheel bolts and pressure plate bolts, I would hate for those to come lose when driving
Here's a pic of the tranny ready to go in the car.... Unfortantly Im waiting on my izusu throw out bearing to arrive, It will be here saturday, The Throw out bearing for the clutch I bought did not fit because I wanted the 6cyl version for the 4.9, I also got some manuel tranny gear oil... syncromesh or something it's called... $5bucks a quart
So far the only things I have left to do is install the manuel engine wire harness I got off the parts car.... My setup is a carburated 4.9 so I have to do some cutting of some wires that I won't need
Earl,Bob Umberger has decided to swap his 85 2.8 and 4speed manual for a 3800sc and automatic4T65E.Maybe you guys could swap some parts.He's also going to be selling his 2.8 v6 and 4speed with 80000 miles on it.It's a good solid engine and 4 speed.I'm going to install the 3800sc for him.Don
------------------ Too Far 60' - 1.568 sec 1/4 mi - 11.647 sec mph - 114.55
IP: Logged
08:53 PM
PFF
System Bot
Oct 31st, 2004
86fieroEarl Member
Posts: 2203 From: Orlando, FL Registered: Jun 2002
Today I got the tranny hooked onto the engine and the shifting cables hooked up.... I also bleed the master and slave cylinder..... Im not affraid to say that I messed up a bunch of times on this step I thought it was like bleeding the brake systems in cars, Needless to say my bleeding the clutch got worst and worst till I went to archies site on how to bleed the clutch system. I also removed about 1/4 inches of that rod on the slave cylinder, For some reason after pushing it all the way in the slave cylinder still did not want to mount into the holes.
The car shifts into every gear easy EVEN REVERSE..... And the clutch is darn easy to push in feels nice.
I don't have to drop the stinking engine because im a lazy bast@rd
And Don Kraus, I will try to get in touch with bob to see how far he is on his swap.
------------------
[This message has been edited by 86fieroEarl (edited 10-31-2004).]
IP: Logged
02:27 PM
Nov 2nd, 2004
86fieroEarl Member
Posts: 2203 From: Orlando, FL Registered: Jun 2002
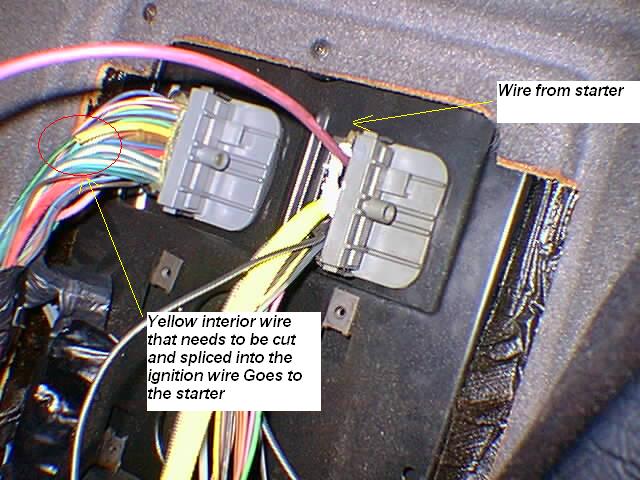
Ok got the starter switch problem solved, If your using the engine wire harness for the stick you will have to splice the purple starter wire energize wire from the engine harness and splice it to the yellow ignition wire, See the pin outs on the interior harness for the auto is different then the ones on the stick.... So if your not changing the interior harness and keeping the automatic interior harness then you will have to spice a wire. The cut wire that is circled you tap up and leave disconnected the other end you splice into the starter harness.
------------------
[This message has been edited by 86fieroEarl (edited 11-02-2004).]
where exactly is the other end of that yellow wire spliced into? im doing the same swap, except to a 3.2 instead of 4.9. i have all the parts installed, just need to figure out the wiring situation i have now....im using all the automatic harnesses, so know i need to splice and jump a few of the ignition wires to get it to work right.
otherwise, great post, + for you
IP: Logged
01:00 PM
Nov 4th, 2004
86fieroEarl Member
Posts: 2203 From: Orlando, FL Registered: Jun 2002
where exactly is the other end of that yellow wire spliced into? im doing the same swap, except to a 3.2 instead of 4.9. i have all the parts installed, just need to figure out the wiring situation i have now....im using all the automatic harnesses, so know i need to splice and jump a few of the ignition wires to get it to work right.
otherwise, great post, + for you
If your using the automatic engine harness (recommended) The you will only have to splice the yellow and purple wire at the shiftselect box ... it's a black box on the auto trans. Since your probally using the engine auto harness aND auto interior harness all you have to do is splice those 2 wires.
I had to do mine the way in the pic because I only swaped the auto engine wire harness with the stickshift engine wire harness and kept the auto interior harness.... My only benifit from going with the stick wire harness is really noughting, My old auto engine wire harness was missing alot of connectors like ac ect and this one had it.
IP: Logged
01:03 PM
Pyrthian Member
Posts: 29569 From: Detroit, MI Registered: Jul 2002
where exactly is the other end of that yellow wire spliced into? im doing the same swap, except to a 3.2 instead of 4.9. i have all the parts installed, just need to figure out the wiring situation i have now....im using all the automatic harnesses, so know i need to splice and jump a few of the ignition wires to get it to work right.
otherwise, great post, + for you
I did an auto to manual swap also, and for the yellow wire (park/neutral saftey switch), I just jumped the wires on the actual connector itself. its the connector that used to goto to the trans with 5/6 terminals on it - jump a wire from the yellow terminal to the purple terminal. if I ever actually hook up the clutch saftey switch, I plan on running the wires all the way back to the same spot.
IP: Logged
01:45 PM
m0sh_man Member
Posts: 8460 From: south charleston WV 25309 Registered: Feb 2002
He finished this conversion already. I don't know if he is going to post more pictures. He did a real good job I personaly rode in his car this weekend and it is an awsome ride. Its got me wanting a 4.9 for my Fiero now


 Has anyone ever had to patch one up? Im either going to purchase a new one or try to fix this one. Basically.... This goes in the place that I will be removing the auto cooler lines.... The mounting holes are already there.... Dont be fooled from the looks of this in the pic.... It's quite easy to install by removing the spare tire pad and running it under the car. Don't mind the arrow in the pic below it's not crushed in that area but it is crushed in a area.