Pennock's Fiero Forum
  Technical Discussion & Questions - Archive
  hood scoop - how do you cut the top layer off

T H I S   I S   A N   A R C H I V E D   T O P I C
  

Email This Page to Someone! | Printable Version


hood scoop - how do you cut the top layer off by qwikgta
Started on: 04-18-2011 11:01 PM
Replies: 38
Last post by: BMTFIERO on 02-04-2012 03:41 PM
qwikgta
Member
Posts: 4671
From: Virginia Beach, VA
Registered: Jan 2001


Feedback score:    (21)
Leave feedback


Total ratings: 84
Rate this member

Report this Post04-18-2011 11:01 PM Click Here to See the Profile for qwikgtaSend a Private Message to qwikgtaDirect Link to This Post
OK, so I have read through about a dozen or so threads with diff ideas for hood scoops. I still can't decide on a "cowl induction" style or a "angel vent" style, but the question I have is that with each one, a portion of the top layer of the hood needs cutting off, leaving the bottom "substructure" intact. I have read the threads, but I can not figure out how the he** you all did it. So I am asking. How do you cut the top layer off and leave the bottom "substructure" in one piece.

Thanks in advance.

rob

------------------


88 Coupe, CJB T-TOP, LS376 and a GT clip
http://www.youtube.com/watch?v=QAH9yjw6XR0

[This message has been edited by qwikgta (edited 04-19-2011).]

IP: Logged
PFF
System Bot
IMSA GT
Member
Posts: 10680
From: California
Registered: Aug 2007


Feedback score:    (8)
Leave feedback


Total ratings: 253
Rate this member

Report this Post04-18-2011 11:06 PM Click Here to See the Profile for IMSA GTSend a Private Message to IMSA GTDirect Link to This Post
Either a Dremel tool to just cut below the skin and then remove it or a rotozip. The skin simply peels off of the substructure.

[This message has been edited by IMSA GT (edited 04-18-2011).]

IP: Logged
Tha Driver
Member
Posts: 4559
From: S.E. USA
Registered: Sep 2006


Feedback score:    (46)
Leave feedback


Total ratings: 204
Rate this member

Report this Post04-18-2011 11:15 PM Click Here to See the Profile for Tha DriverClick Here to visit Tha Driver's HomePageSend a Private Message to Tha DriverDirect Link to This Post
It's "Angel Vent".
I use a die grinder with a thin cutoff blade (3"). Some folks call them "ziz wheels".
I've started working on the "new & improved" Angel Vent that you don't have to cut the front sheetmetal for. Will probably be a couple weeks before I'm ready to pull the mold.
~ Paul
aka "Tha Driver"
IP: Logged
katatak
Member
Posts: 7136
From: Omaha, NE USA
Registered: Apr 2008


Feedback score:    (8)
Leave feedback


Total ratings: 82
Rate this member

Report this Post04-18-2011 11:36 PM Click Here to See the Profile for katatakSend a Private Message to katatakDirect Link to This Post
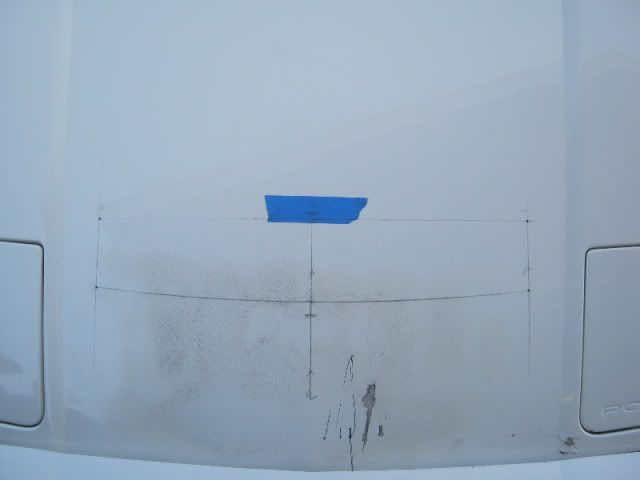
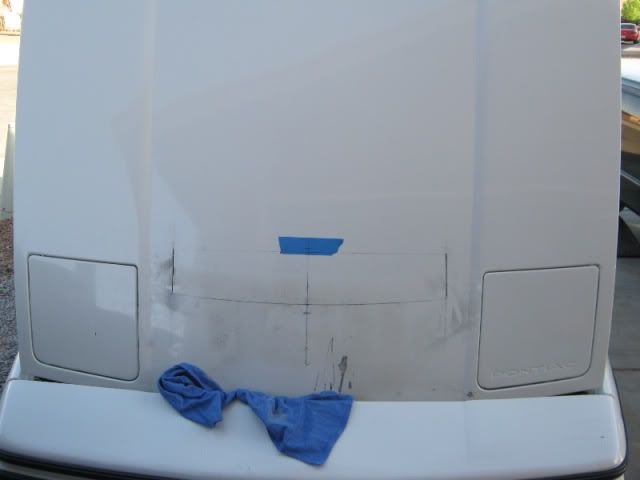
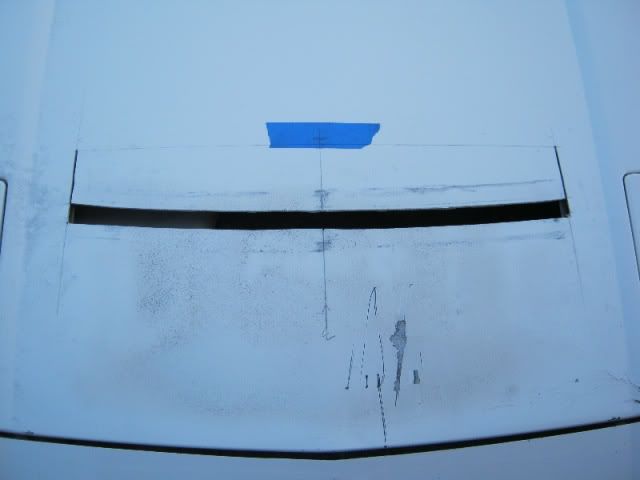
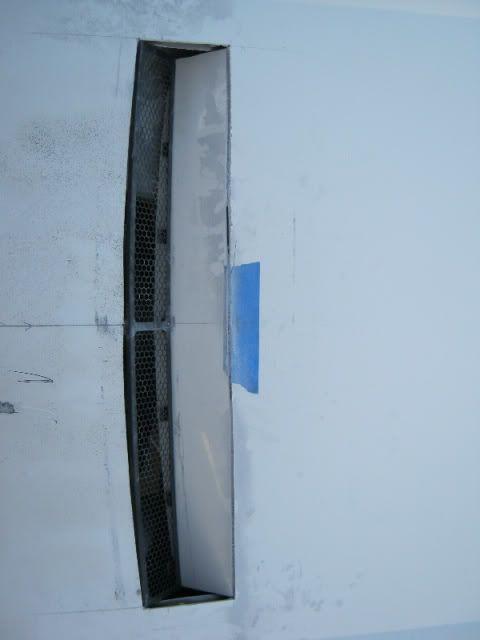
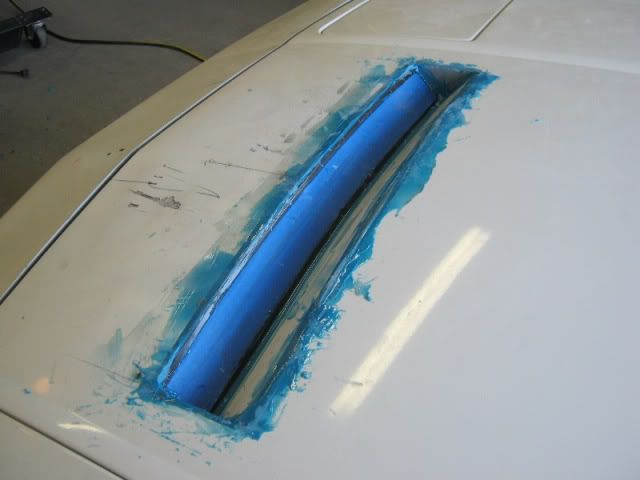
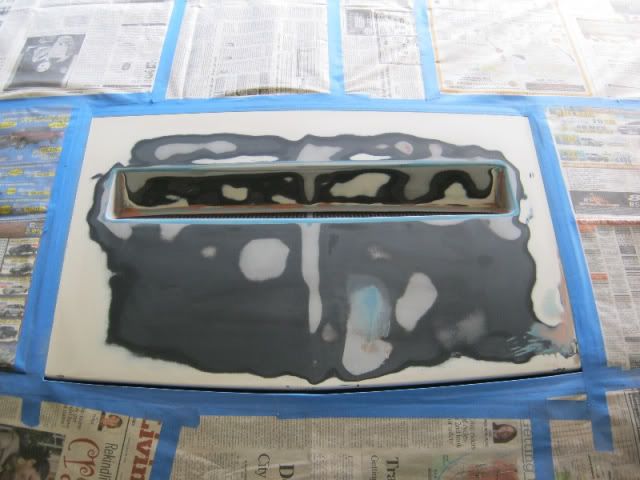
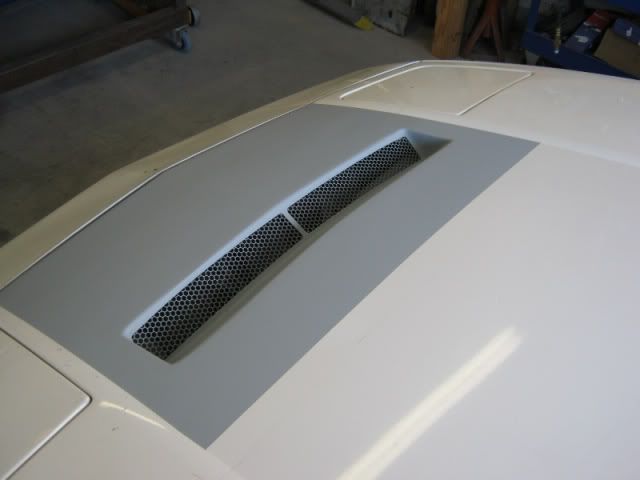
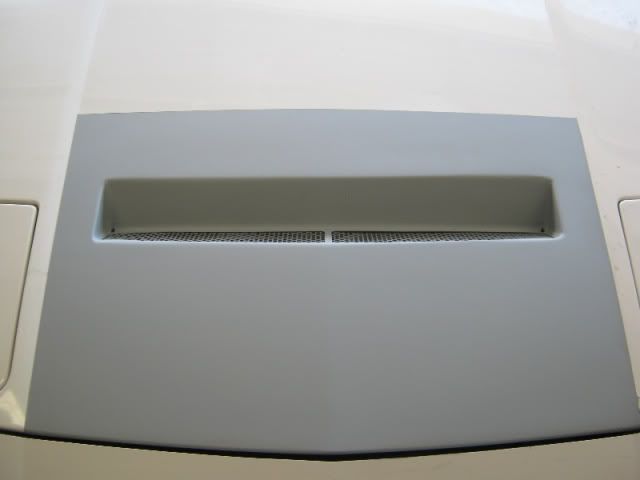
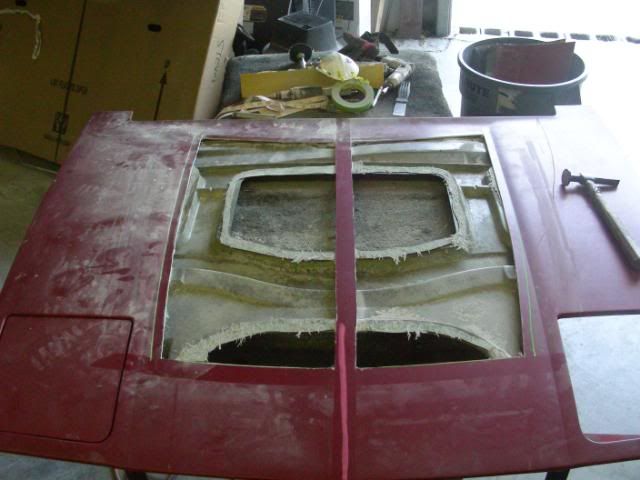
I used a 4" cutt off disk on my angle grinder to cut the sides and front slot for my sccop. I "scored" the back edge so I could "fold" the outer skin down into the hood to create the new bottom of the scoop. I had to remove some of the reinforcement webbing on the underside to be able to fold the outer skin down. Then I set the piece I used for the "vent" in place then used some pieces of the reinforcement part I cut out to fill the sides, used the 2 part panel stuff to mold it all together. Took about 4 hours total. I have a little "finish" work to do but I think it turned out pretty good.

Layed it out:


Made my cuts:


And worked it out:


IP: Logged
Patrick
Member
Posts: 38694
From: Vancouver, British Columbia, Canada
Registered: Apr 99


Feedback score: (1)
Leave feedback


Total ratings: 466
Rate this member

Report this Post04-19-2011 03:36 AM Click Here to See the Profile for PatrickSend a Private Message to PatrickDirect Link to This Post
 
quote
Originally posted by qwikgta:

How do you cut the top layer off and leave the bottom "substructure" in one piece.


That's me using an angle grinder/cutting wheel for the first time. Notice the limited depth of the cut.


A whole bunch of pictures (and a couple of videos) of my hood vent installation can be found Here.

[This message has been edited by Patrick (edited 04-19-2011).]

IP: Logged
TXGOOD
Member
Posts: 5410
From: Austin, Texas
Registered: Feb 2006


Feedback score:    (58)
Leave feedback


Total ratings: 87
Rate this member

Report this Post04-19-2011 07:24 AM Click Here to See the Profile for TXGOODClick Here to visit TXGOOD's HomePageSend a Private Message to TXGOODDirect Link to This Post
Pat, that`s a great idea.
That is a screen for the defroster vent isn`t it.
Mike
IP: Logged
infinitewill
Member
Posts: 2345
From: Overland Park, KS U.S.A.
Registered: Mar 2009


Feedback score:    (55)
Leave feedback


Total ratings: 85
Rate this member

Report this Post04-19-2011 09:42 AM Click Here to See the Profile for infinitewillSend a Private Message to infinitewillDirect Link to This Post
 
quote
Originally posted by katatak:


This is a brilliant idea!
IP: Logged
qwikgta
Member
Posts: 4671
From: Virginia Beach, VA
Registered: Jan 2001


Feedback score:    (21)
Leave feedback


Total ratings: 84
Rate this member

Report this Post04-19-2011 11:23 AM Click Here to See the Profile for qwikgtaSend a Private Message to qwikgtaDirect Link to This Post
Thanks guys. I think I get it. I just didn't know how difficult it is/was to seperate the two glued parts. I tried to do this to the front of my hood, when I installed the Turbo Sunbird vents and I could not seperate the two halves. It was glued very well and I broke two router bits.

I think I get it now.

Rob

[This message has been edited by qwikgta (edited 04-19-2011).]

IP: Logged
qwikgta
Member
Posts: 4671
From: Virginia Beach, VA
Registered: Jan 2001


Feedback score:    (21)
Leave feedback


Total ratings: 84
Rate this member

Report this Post04-19-2011 11:26 AM Click Here to See the Profile for qwikgtaSend a Private Message to qwikgtaDirect Link to This Post

qwikgta

4671 posts
Member since Jan 2001
 
quote
Originally posted by Tha Driver:

I've started working on the "new & improved" Angel Vent that you don't have to cut the front sheetmetal for. Will probably be a couple weeks before I'm ready to pull the mold.
~ Paul
aka "Tha Driver"


Paul,
As you know I'm down to two choices, your design or an "off the shelf" Cowl Induction scoop. I would love to see what you have going on with this one. I do not want to cut into my trunk area, and that has been the biggest issue. If I was good with doing it, I'd already have pulled the trigger and purchased one of your other scoops. Please keep me in mind when this is done.

Rob

[This message has been edited by qwikgta (edited 04-19-2011).]

IP: Logged
katatak
Member
Posts: 7136
From: Omaha, NE USA
Registered: Apr 2008


Feedback score:    (8)
Leave feedback


Total ratings: 82
Rate this member

Report this Post04-19-2011 01:40 PM Click Here to See the Profile for katatakSend a Private Message to katatakDirect Link to This Post
 
quote
Originally posted by TXGOOD:

Pat, that`s a great idea.
That is a screen for the defroster vent isn`t it.
Mike


Thanks - yes it is a Defrost vent from the dash - not completely my idea - originally was just going to be a "flush" mount but we had to make it more difficult.
IP: Logged
katatak
Member
Posts: 7136
From: Omaha, NE USA
Registered: Apr 2008


Feedback score:    (8)
Leave feedback


Total ratings: 82
Rate this member

Report this Post04-19-2011 01:43 PM Click Here to See the Profile for katatakSend a Private Message to katatakDirect Link to This Post

katatak

7136 posts
Member since Apr 2008
 
quote
Originally posted by infinitewill:


This is a brilliant idea!


Thanks Will! I think it "fits" the Fiero plus it is a Fiero part! It started as an idea from Rick 88 - he suggested a "flush" mount of the defroster vent. After a lot of head scratching and beer drinking, this is the way it came out. I'm pretty happy with the results.
IP: Logged
PFF
System Bot
Tha Driver
Member
Posts: 4559
From: S.E. USA
Registered: Sep 2006


Feedback score:    (46)
Leave feedback


Total ratings: 204
Rate this member

Report this Post04-19-2011 02:46 PM Click Here to See the Profile for Tha DriverClick Here to visit Tha Driver's HomePageSend a Private Message to Tha DriverDirect Link to This Post
 
quote
Originally posted by qwikgta:


Paul,
As you know I'm down to two choices, your design or an "off the shelf" Cowl Induction scoop. I would love to see what you have going on with this one. I do not want to cut into my trunk area, and that has been the biggest issue. If I was good with doing it, I'd already have pulled the trigger and purchased one of your other scoops. Please keep me in mind when this is done.

Rob


Rob,
I'll get some photos of it up soon. Right now I'm working on it, making fender vents & the louvered GT decklid pieces, doing some repair & mods on a Lotus Elise, an engine swap (3.4), bumpers for a BMW (fiberglass conversions E30 type for E21), & I have the two cars that I painted that I still have to sand & buff. So there's plenty of time to finish out the hood vent.
~ Paul
aka "Tha Driver"
IP: Logged
rogergarrison
Member
Posts: 49601
From: A Western Caribbean Island/ Columbus, Ohio
Registered: Apr 99


Feedback score: N/A
Leave feedback


Total ratings: 551
Rate this member

Report this Post04-19-2011 02:53 PM Click Here to See the Profile for rogergarrisonSend a Private Message to rogergarrisonDirect Link to This Post
Katatak, your hood looks very good. I only have one thing to mention. I dont like primering a 'square' around a repaired or modified panel. I always back sand it far enough to just spray it. When you leave a line like that, its nearly impossible to get out. While you may block it and it feels perfect, most times after the paint is cured, if its out in the sun, that line will show in the paint. I painted used semi cabs for a truck dealer and we chemically stripped the whole aluminum cab to bare metal. After the paint cured in the right light, you could still read the lettering on the doors. Even with tape pinstripes, when theyre removed and even block sanded, they can show back up in new paint. Darker the color the more evident they are.
IP: Logged
qwikgta
Member
Posts: 4671
From: Virginia Beach, VA
Registered: Jan 2001


Feedback score:    (21)
Leave feedback


Total ratings: 84
Rate this member

Report this Post04-19-2011 03:26 PM Click Here to See the Profile for qwikgtaSend a Private Message to qwikgtaDirect Link to This Post
OK, so now that I have some folks looking at this thread, I have another question. I was looking at relocating my coolant overflow tank in case I chose to do the recessed scoop. I walked the Junkyard looking at other makes/models overflow tanks and after looking at 100's of cars never really found what I liked. Now I did find a tank at Summit/Jegs that I liked and may chose it, but for those who have done this, were did you all put the tank? did you mount it lower or did you relocate into the spare tire well? I was looking at putting one under the passenger headlight. I would have to cut some sheetmetal to do it, but its close to the radiator cap and would be using 'dead" space anyway. Lets see some pics/ideas.

Rob

------------------


88 Coupe, CJB T-TOP, LS376 and a GT clip
http://www.youtube.com/watch?v=QAH9yjw6XR0

IP: Logged
FFIEROFRED
Member
Posts: 751
From: GULFPORT, MS
Registered: May 2008


Feedback score: N/A
Leave feedback

Rate this member

Report this Post04-19-2011 10:15 PM Click Here to See the Profile for FFIEROFREDSend a Private Message to FFIEROFREDDirect Link to This Post
on youtube I have a vid on putting a 83 Z/28 hood scoop in to a fiero. I am "fierofred" on youtube. It fits, it clears every thing, and i have the 83 Z/28 engine in the back. looks like it could be stock.
IP: Logged
katatak
Member
Posts: 7136
From: Omaha, NE USA
Registered: Apr 2008


Feedback score:    (8)
Leave feedback


Total ratings: 82
Rate this member

Report this Post04-19-2011 10:37 PM Click Here to See the Profile for katatakSend a Private Message to katatakDirect Link to This Post
 
quote
Originally posted by rogergarrison:

Katatak, your hood looks very good. I only have one thing to mention. I dont like primering a 'square' around a repaired or modified panel. I always back sand it far enough to just spray it. When you leave a line like that, its nearly impossible to get out. While you may block it and it feels perfect, most times after the paint is cured, if its out in the sun, that line will show in the paint. I painted used semi cabs for a truck dealer and we chemically stripped the whole aluminum cab to bare metal. After the paint cured in the right light, you could still read the lettering on the doors. Even with tape pinstripes, when theyre removed and even block sanded, they can show back up in new paint. Darker the color the more evident they are.


Thanks for the tips Roger. I will keep that in mind next time. Before I paint the hood, I will most likely sand that layer of primer off - it was mainly to protect the 2 part panel adhexive from UV light until I can get it completed. .

Qwik - I apologize for the hijack!

I like the idea of under the head light. I have seen a few decen looking - polished aluminum ones on Ebay too! I was worried that I would have to relocate mine but it clears the tank by about 1/4".
IP: Logged
jaredmurray88
Member
Posts: 1153
From: wellersburg pa
Registered: Mar 2011


Feedback score: (3)
Leave feedback

Rate this member

Report this Post04-19-2011 11:11 PM Click Here to See the Profile for jaredmurray88Send a Private Message to jaredmurray88Direct Link to This Post
hey katak what did you use for that grill on the hood?
IP: Logged
katatak
Member
Posts: 7136
From: Omaha, NE USA
Registered: Apr 2008


Feedback score:    (8)
Leave feedback


Total ratings: 82
Rate this member

Report this Post04-19-2011 11:36 PM Click Here to See the Profile for katatakSend a Private Message to katatakDirect Link to This Post
 
quote
Originally posted by jaredmurray88:

hey katak what did you use for that grill on the hood?


Its the defrost vent from the Fiero Dash.
IP: Logged
BMTFIERO
Member
Posts: 1187
From: Beaumont, TX
Registered: Dec 2007


Feedback score:    (18)
Leave feedback

Rate this member

Report this Post04-20-2011 12:40 PM Click Here to See the Profile for BMTFIEROSend a Private Message to BMTFIERODirect Link to This Post
 
quote
Originally posted by Tha Driver:

. . . I've started working on the "new & improved" Angel Vent that you don't have to cut the front sheetmetal for. Will probably be a couple weeks before I'm ready to pull the mold.
~ Paul
aka "Tha Driver"


Well come on already!
IP: Logged
Tha Driver
Member
Posts: 4559
From: S.E. USA
Registered: Sep 2006


Feedback score:    (46)
Leave feedback


Total ratings: 204
Rate this member

Report this Post04-20-2011 03:18 PM Click Here to See the Profile for Tha DriverClick Here to visit Tha Driver's HomePageSend a Private Message to Tha DriverDirect Link to This Post
 
quote
Originally posted by BMTFIERO:


Well come on already!


The current state at this junction is it's in the process of coming on, all but not quite ready.
~ Paul
aka "Tha Driver"
IP: Logged
Francis T
Member
Posts: 6620
From: spotsylvania va. usa
Registered: Oct 2003


Feedback score: (1)
Leave feedback


Total ratings: 119
Rate this member

Report this Post04-20-2011 04:06 PM Click Here to See the Profile for Francis TClick Here to visit Francis T's HomePageSend a Private Message to Francis TDirect Link to This Post
aaayu[ 3" wiz works great, just go real slow and gently as it cut it like it's butter.

------------------
[IMG]


trueleo.com
RSpiderII@aol.com

IP: Logged
PFF
System Bot
BMTFIERO
Member
Posts: 1187
From: Beaumont, TX
Registered: Dec 2007


Feedback score:    (18)
Leave feedback

Rate this member

Report this Post04-20-2011 05:01 PM Click Here to See the Profile for BMTFIEROSend a Private Message to BMTFIERODirect Link to This Post
 
quote
Originally posted by Tha Driver:


The current state at this junction is it's in the process of coming on, all but not quite ready.
~ Paul
aka "Tha Driver"


OK??

[This message has been edited by BMTFIERO (edited 04-20-2011).]

IP: Logged
Finally_Mine_86_GT
Member
Posts: 4809
From: Hyde Park, New York
Registered: Sep 2006


Feedback score: (1)
Leave feedback


Total ratings: 99
Rate this member

Report this Post04-20-2011 05:11 PM Click Here to See the Profile for Finally_Mine_86_GTSend a Private Message to Finally_Mine_86_GTDirect Link to This Post
I would also like to know how to do this!


From Here

Or even separate the two levels completely without damaging it beyond repair.

Is this what your trying to do?
IP: Logged
Khw
Member
Posts: 11139
From: South Weber, UT. U.S.A.
Registered: Jun 2008


Feedback score: (1)
Leave feedback


Total ratings: 134
Rate this member

Report this Post04-20-2011 07:31 PM Click Here to See the Profile for KhwSend a Private Message to KhwDirect Link to This Post
 
quote
Originally posted by IMSA GT:

Either a Dremel tool to just cut below the skin and then remove it or a rotozip. The skin simply peels off of the substructure.


Rotozip ( well a genric knock off ) is what I used.

IP: Logged
Tha Driver
Member
Posts: 4559
From: S.E. USA
Registered: Sep 2006


Feedback score:    (46)
Leave feedback


Total ratings: 204
Rate this member

Report this Post04-20-2011 08:10 PM Click Here to See the Profile for Tha DriverClick Here to visit Tha Driver's HomePageSend a Private Message to Tha DriverDirect Link to This Post
 
quote
Originally posted by Finally_Mine_86_GT:
Or even separate the two levels completely without damaging it beyond repair.


You can use a gasket scraper type chisel to separate the two structures. They're not stuck together that well. You just have to be careful in some places where it's hard to get the chisel in.
~ Paul
aka "Tha Driver"
IP: Logged
Tha Driver
Member
Posts: 4559
From: S.E. USA
Registered: Sep 2006


Feedback score:    (46)
Leave feedback


Total ratings: 204
Rate this member

Report this Post04-21-2011 04:28 AM Click Here to See the Profile for Tha DriverClick Here to visit Tha Driver's HomePageSend a Private Message to Tha DriverDirect Link to This Post
Just uploaded images of the new prototype Angel Vent Hood Scoop Version 2.0. (the one you don't have to cut the sheetmetal for).
http://angelonearth.net/customfiberglass.html
~ Paul
aka "Tha Driver"
IP: Logged
cptsnoopy
Member
Posts: 2587
From: phoenix, AZ, USA
Registered: Jul 2003


Feedback score:    (8)
Leave feedback


Total ratings: 60
Rate this member

Report this Post04-22-2011 03:52 AM Click Here to See the Profile for cptsnoopySend a Private Message to cptsnoopyDirect Link to This Post
 
quote
Originally posted by Tha Driver:

Just uploaded images of the new prototype Angel Vent Hood Scoop Version 2.0. (the one you don't have to cut the sheetmetal for).
http://angelonearth.net/customfiberglass.html
~ Paul
aka "Tha Driver"


Looks promising!

Charlie

IP: Logged
bulldog85043
Member
Posts: 403
From: Phoenix, AZ USA
Registered: Jan 2009


Feedback score: (1)
Leave feedback

Rate this member

Report this Post04-25-2011 07:46 PM Click Here to See the Profile for bulldog85043Send a Private Message to bulldog85043Direct Link to This Post
 
quote
Originally posted by Tha Driver:

Just uploaded images of the new prototype Angel Vent Hood Scoop Version 2.0. (the one you don't have to cut the sheetmetal for).
http://angelonearth.net/customfiberglass.html
~ Paul
aka "Tha Driver"


So does the opening dip down into the radiator area or down into the cargo area?
IP: Logged
Tha Driver
Member
Posts: 4559
From: S.E. USA
Registered: Sep 2006


Feedback score:    (46)
Leave feedback


Total ratings: 204
Rate this member

Report this Post04-25-2011 08:27 PM Click Here to See the Profile for Tha DriverClick Here to visit Tha Driver's HomePageSend a Private Message to Tha DriverDirect Link to This Post
 
quote
Originally posted by bulldog85043:


So does the opening dip down into the radiator area or down into the cargo area?


The radiator area to vent the air so it doesn't build up pressure & lift the front of the car - & so the headlight covers don't pop up when you meet a big truck on a two-lane.
~ Paul
aka "Tha Driver"
IP: Logged
BMTFIERO
Member
Posts: 1187
From: Beaumont, TX
Registered: Dec 2007


Feedback score:    (18)
Leave feedback

Rate this member

Report this Post06-13-2011 10:59 PM Click Here to See the Profile for BMTFIEROSend a Private Message to BMTFIERODirect Link to This Post
.

[This message has been edited by BMTFIERO (edited 06-13-2011).]

IP: Logged
BMTFIERO
Member
Posts: 1187
From: Beaumont, TX
Registered: Dec 2007


Feedback score:    (18)
Leave feedback

Rate this member

Report this Post07-05-2011 03:21 PM Click Here to See the Profile for BMTFIEROSend a Private Message to BMTFIERODirect Link to This Post
.

[This message has been edited by BMTFIERO (edited 07-05-2011).]

IP: Logged
PFF
System Bot
BMTFIERO
Member
Posts: 1187
From: Beaumont, TX
Registered: Dec 2007


Feedback score:    (18)
Leave feedback

Rate this member

Report this Post01-26-2012 01:20 AM Click Here to See the Profile for BMTFIEROSend a Private Message to BMTFIERODirect Link to This Post
Bump

[This message has been edited by BMTFIERO (edited 01-26-2012).]

IP: Logged
ILVMYGT
Member
Posts: 405
From: Port Orchard, Washington
Registered: Jun 2003


Feedback score: (1)
Leave feedback

Rate this member

Report this Post01-27-2012 07:54 PM Click Here to See the Profile for ILVMYGTSend a Private Message to ILVMYGTDirect Link to This Post
I started cutting my hood with a die grinder and a 3 inch cut off blade. After the first past I switch to a Oscillating saw with a 3 inch semi circular saw blade. I found that it was easier to control then the air driven die grinder. It also makes a very fine line.

After you mark the place you want to cut make look on the underside of the hood to see if there are areas that need to be separated from the inside frame. Where possible those areas and block them apart with some shim material.

Frank

------------------
88 GT 5 Speed Black with gray interior
3800 SCII Swap In Progress.

IT RUNS!!
IT'S QUICK!!

"Real integrity is doing the right thing, knowing that nobody's going to know whether you did it or not."

IP: Logged
qwikgta
Member
Posts: 4671
From: Virginia Beach, VA
Registered: Jan 2001


Feedback score:    (21)
Leave feedback


Total ratings: 84
Rate this member

Report this Post01-27-2012 09:18 PM Click Here to See the Profile for qwikgtaSend a Private Message to qwikgtaDirect Link to This Post
wow, blast from the past. yea, I asked this question, and then went out and did it, it was easy. Here is my other thread about it.

https://www.fiero.nl/forum/Forum1/HTML/086123.html


Rob
IP: Logged
JimmyS
Member
Posts: 4666
From: Lehigh Acres, Florida
Registered: Apr 2006


Feedback score:    (31)
Leave feedback


Total ratings: 124
Rate this member

Report this Post01-28-2012 07:27 PM Click Here to See the Profile for JimmySClick Here to visit JimmyS's HomePageSend a Private Message to JimmySDirect Link to This Post
Just so you know... with my cowl inducted hood scoop you do not have to de-skin your hood at all.

[This message has been edited by JimmyS (edited 01-28-2012).]

IP: Logged
redraif
Member
Posts: 1460
From: GA
Registered: May 2005


Feedback score: (1)
Leave feedback

Rate this member

Report this Post01-29-2012 03:26 PM Click Here to See the Profile for redraifSend a Private Message to redraifDirect Link to This Post
 
quote
Originally posted by qwikgta:

OK, so I have read through about a dozen or so threads with diff ideas for hood scoops. I still can't decide on a "cowl induction" style or a "angel vent" style
rob


This is my dilemma.... cowl or extractor style.... Jimmys cowl or the stm extractor scoop... or maybe a combo.... would love soulcrushers design, BUT I don't want to cut my spare tire wall.
 
quote
Originally posted by Finally_Mine_86_GT:

I would also like to know how to do this!


From Here

Or even separate the two levels completely without damaging it beyond repair.

Is this what your trying to do?


Hence the combo idea.... ugh!

So which way did you go? And why?

------------------
1984 Indy Fiero SE Pace Car Replica #770
"SE" Stormtrooper Edition
Rescued, resuscitated and reversibly modified! (I'm so not done yet!)

Poly all round & Black Drag DR-34s
Frt: 225/45 on 18x8 (47 offset w/ 8-9mm spacer) 1.5 coils cut off 1984 WS6 springs
Rear: 265/35 on 18x8.5 (45 offset) Coil-overs w/ 10 inch 300lb springs & 7 inch sleeve

Everything is the previous owners fault!

[This message has been edited by redraif (edited 01-29-2012).]

IP: Logged
qwikgta
Member
Posts: 4671
From: Virginia Beach, VA
Registered: Jan 2001


Feedback score:    (21)
Leave feedback


Total ratings: 84
Rate this member

Report this Post01-29-2012 06:33 PM Click Here to See the Profile for qwikgtaSend a Private Message to qwikgtaDirect Link to This Post
 
quote
Originally posted by redraif:


So which way did you go? And why?


build thread is thee links up from this.

I feel that a cowl goes great with a car that has ground effects, kind of gives it balance. With mine being a coupe, I just don't think a cowl would work, so I went with an angel vent.

Rob
IP: Logged
BMTFIERO
Member
Posts: 1187
From: Beaumont, TX
Registered: Dec 2007


Feedback score:    (18)
Leave feedback

Rate this member

Report this Post01-31-2012 06:15 AM Click Here to See the Profile for BMTFIEROSend a Private Message to BMTFIERODirect Link to This Post
.

[This message has been edited by BMTFIERO (edited 01-31-2012).]

IP: Logged
BMTFIERO
Member
Posts: 1187
From: Beaumont, TX
Registered: Dec 2007


Feedback score:    (18)
Leave feedback

Rate this member

Report this Post02-04-2012 03:41 PM Click Here to See the Profile for BMTFIEROSend a Private Message to BMTFIERODirect Link to This Post
I have no ideal why I keep coming back to this thread when I auto-log in!!!!

[This message has been edited by BMTFIERO (edited 02-04-2012).]

IP: Logged


All times are ET (US)

T H I S   I S   A N   A R C H I V E D   T O P I C
  

Contact Us | Back To Main Page

Advertizing on PFF | Fiero Parts Vendors
PFF Merchandise | Fiero Gallery
Real-Time Chat | Fiero Related Auctions on eBay


Copyright (c) 1999, C. Pennock