Hey all. I'm new here - kinda, sorta, half-assed. That is to say I've been reading posts on PFF for years now but I've only just finally registered as a user, so no more closet-case Fiero loving for me. I am probably the one that was giving you that creepy feeling that someone was always watching, the unknown entity that left drool on you hood and face prints on your windows. I still do that, even though I bought a Fiero late last spring. It's probably got something to do with the fact that I still haven't driven a Fiero(unless parking one counts) or even taken a ride in one! Even so, they've been my favourite car since about the time they came out and I've been trying to get my hands on one since I was 17. So ten years later, I finally buy one...and what do I go and do? I immediately start tearing it apart!
So, anyway, I thought I'd start a thread about what I have done, what I'm doing and where I'm hoping to take my project Fiero.
Here's what $300 got me: (Well, $499 after a long tow and transfer of ownership) An '86 SE, 2.8L/4Spd. Not bad for the price, if you ask me.
It was pretty enough to look at, though it had high miles and had been sitting for 4 years. I saved it from the junkyard, most likely. The guy selling it was selling it as a parts car, thinking someone would want it for the motor. It did run, at least, after he had had a mechanic friend work on it a few times. A new fuel pump, clutch master and a bit of minor work and he got it running, but the "owner" gave up when the mechanic told him it needed a clutch slave cylinder too and how much more it would cost him. So he put it up on a local classified website for what he owed his mechanic. After a few weeks, he dropped it down a hundred bucks, to what I paid for it. I happily took it off his hands, seeing as it was a V6, stick and it was at least running. Then I spent a few days getting it transferred into my name. The car wasn't owned by the guy who sold it to me. A friend of his who moved back east left it to him when he moved, but the paperwork wasn't all in order and the guy had never transfered it over into his own name. SHH! Don't tell my wife...It was a bit of a gamble, but after some legwork, I got it transfered into my name. Well, it wasn't all that bad, really, but seeing as I hadn't looked into it beforehand, it certainly seemed like it. I finally owned a Fiero! :-)
Skip forwards to today...I'm finally ready to shove this into the back of the little beast: In case you paid no attention to the title of the thread, it's a 3400 SFI mated to the 4 speed that came with my Fiero and mounted on it's engine cradle.
It came out of this: A 1999 Alero. It also cost me only $300! Not bad, not bad. That's a lot of useful parts, for the price.
I found it on the same local classified website. These guys moved here from back east, meaning they had to have the car pass a provincial inspection. It failed -- it needed new brakes all around, and probably a few other minor things. Apparently it wasn't worth it to them, so they too were selling it for parts. I was knocking on the front of my tow-truck driver's door 5 minutes after I heard it running (smooth and powerful!). He was busy getting over from a hangover (pfft), but he sent one of his boys over to pick it up. So late this spring, I had a donor engine (and a thousand other parts, for that matter)!
So, yeah. That's what this is all about. I've plenty more to share that's happened along the way, and plenty more to come. New stuff will be slow in coming, mind you, seeing as I am now a first-time father. I took 8 months off work, thinkign I would get my Fiero done in my spare time. Spare time? With a new baby in the house?! HA! Now that I'm back at work, I have even less time to work on it (I find myself sneaking off downstairs to work on it for 20 minutes when she's taking a nap). My last project took me 3 years to do, so this oen should be ready for my mid-life crisis. That sounds like the perfect time to start driving a little red sports car to me! I'm sure I'll have plenty of questions along the way -- hopefully someone here will have the answers. Hopefully others will take interest in my project too!
Bye for now!
IP: Logged
12:45 PM
PFF
System Bot
Stubby79 Member
Posts: 7064 From: GFY county, FY. Registered: Aug 2008
So, hey, first question. The few other people who've done a 3400 swap have used 5 speed getrag transmissions, so I can't find anything specific for my issue. There's not quite enough room to mount the shifter cable bracket back on the transmission - the crossover pipe heatshield is in the way. I only need about quarter of an inch. I don't want to notch the heat shield, only to find it still won't fit. Any suggestions? Maybe other swaps using the 4 speed that have a crossover pipe in the same place have ideas.
IP: Logged
11:19 PM
Aug 9th, 2008
Stubby79 Member
Posts: 7064 From: GFY county, FY. Registered: Aug 2008
No answers yet? Oh well, guess I was being hopeful. I could always eliminate the crossover pipe, but then I'd need to double my exhaust components, and the whole point of this is doing it on an extremely tight budget. That's probably why the lack of interest. Maybe if I had said something about swueezing a Mercedes V12 into the back of a fiero, it would have caught some interest. Nevermind that, most people around here look at me oddly when I say I'm working on a Fiero anyway. Anyone else get much static when people learn you have a Fiero?
So, anyway. Back to spring '07. Here's what I had to work with.
Plenty of surface rust, but nothing actually rotten through. Has me still wondering to this day if the factory didn't bother to paint half of the suspension parts. Poor overly neglected Fiero. Well, it's getting plenty of TLC these days.
It didn't take much to get her started. Dropped a fresh battery and spark plugs in and cranked it over and after a few tries she grumbled to life. She wasn't firing on all cylinders - sounded like a sticky lifter, but that cleared up after running an engine flush through it(for three times as long as the bottle recommended, I might add). After that, I decided it was entirely too noisy for just holes somewhere in the exhaust system, so I went looking for the source of the noise. A short piece of hose comes in ever so useful. The noise was coming from the exahust manifolds, where they mated with the heads. Note the black gap where the manifold bolts up. Wait a minute, it would need a bolt to do that!
This is on the firewall side. The photo was what allowed me to notice the lack of a bolt on this side too. I probed in both holes, only to find the bolt had broken off in the head. Ah, crap. The heads are going to have to come off....there's no way I'm going to try and get those bolts out in such confined spaces.
I started tearing down the top of the engine and ran into this: A good 1/4" of caked-on, carbonized oil. No wonder that lifter was sticking. It was turning into a real $#^* show all of a sudden. I delved farther, only to decide the poor old engine was worn out. The camsahft certainly was. It was time to reassess the situation. Either I had to rebuild the engine, or I had to do an engine swap. I put the Fiero project on the back burner for a couple of months and spent my free time finishing off my other project. I'll include a couple of pics, in case anyone is interested.
I changed this ugly, rusting beast:
Into this:
Alright, enough for now. It's bed time!
[This message has been edited by Stubby79 (edited 08-09-2008).]
IP: Logged
02:31 PM
mafv8 Member
Posts: 559 From: Northville, Michigan, USA Registered: Aug 2001
I've been watching too, when I did my 3400 I used a 5speed and there was no clearance issues so I can't really be of any help to you. If you are keeping the stock pcm and components I would recommend pcmforless for your tuning. Alvin did a really good job getting my 3400 to run with the 5speed.
IP: Logged
04:46 PM
Aug 10th, 2008
Stubby79 Member
Posts: 7064 From: GFY county, FY. Registered: Aug 2008
keep going with your buildup reports, its always interesting watching a Fiero come back to life.
Thanks, that's all the encouragement I need.
quote
Originally posted by joshua riedl:
I've been watching too, when I did my 3400 I used a 5speed and there was no clearance issues so I can't really be of any help to you. If you are keeping the stock pcm and components I would recommend pcmforless for your tuning. Alvin did a really good job getting my 3400 to run with the 5speed.
I might take the heat shield off and wrap it with header wrap instead, but I know when I go to unbolt it those bolts are almost gauranteed to be siezed in there and they're going to break. IOW, once it comes off, it's staying off, so I'm avoiding doing it so far. Yes, I intend on keeping the stock PCM - I want an OBD2 computer so I can use my little scan tool to read codes and the "live data". That and I'd rather not give up the SFI if I don't have to. And thanks for the suggestion - I followed your thread to their website a year or so back. I've been in contact with GmTuners/Sinister Performance and he can disable the Auto Trans programming and change the VSS settings down to the 4000 or so pulses per mile the Fiero manual trans puts out. That way I still have the programming to run the Alero's instrument cluster. Did you have any issues with the VSS? I'm still not sure if the PCM will accept the 12V/Ground pulses of the Fiero VSS in place of the magnetic (and probably much higher voltage) pulses from the 4T45E transmission.
IP: Logged
02:28 AM
joshua riedl Member
Posts: 1426 From: watertown wi USA Registered: Jan 2004
I only had the vss hooked up to the speedometer. He did something to the pcm where every time I pushed in the clutch it would blip the throttle automatically. Never had a problem with stalling unless I was engine braking and pushed in the clutch. I just didn't engine brake. I don't see why my pcm wouldn't have worked with the stock gauges though, most go through the bcm anyway from what I remember.
IP: Logged
02:47 AM
Stubby79 Member
Posts: 7064 From: GFY county, FY. Registered: Aug 2008
I only had the vss hooked up to the speedometer. He did something to the pcm where every time I pushed in the clutch it would blip the throttle automatically. Never had a problem with stalling unless I was engine braking and pushed in the clutch. I just didn't engine brake. I don't see why my pcm wouldn't have worked with the stock gauges though, most go through the bcm anyway from what I remember.
I can't rememebr exactly what your PCM was out of ('01 Alero, or was that someone else?), but from what I've read up on mine, the BCM communicates to the cluster through serial data(which is then decoded and sent to the gauges), not striaght from the BCM into each gauge. Otherwise this would be a peice of cake. ;-) I have considered trying to see if I could take the VSS signal straight to the speedo gauge (most speedos still seem to appreciate 4000ppm) and letting the BCM run the rest of the gauges, but then I have a very inacurate odometer reading, even if I could get it to work. It's a moot point if I have to send the PCM off for reprogramming anyway.
IP: Logged
03:11 AM
joshua riedl Member
Posts: 1426 From: watertown wi USA Registered: Jan 2004
You're way more adventurous than me. I just used the stock gauges and didn't worry about any of that stuff. I rode in a 2.8 4speed the other week though and this 3400 being such a torquie motor should be a nice combination. I did use an alero computer and grand am engine. No particular reason that's just what they gave me.
IP: Logged
03:19 AM
Stubby79 Member
Posts: 7064 From: GFY county, FY. Registered: Aug 2008
You're way more adventurous than me. I just used the stock gauges and didn't worry about any of that stuff. I rode in a 2.8 4speed the other week though and this 3400 being such a torquie motor should be a nice combination. I did use an alero computer and grand am engine. No particular reason that's just what they gave me.
Where did you locate your PCM and how did you go about the wiring? Without modifying the Alero wiring harness completely, the PCM will end up in the trunk(not the end of the world) but I count 16 different wires going from the engine harness into the fuse box that I would have to rewire one way or another. I'm hoping there's enough slack in most of the wires to let me put the BCM in the stock location on the Fiero, but I'm not holding my breath on it.
IP: Logged
03:35 AM
joshua riedl Member
Posts: 1426 From: watertown wi USA Registered: Jan 2004
I would have to check when I get home to see if I took notes but if you get a pinout of the c203 and c500 connectors you just match up the power sources on the engine harness to the fiero plugs. For example the c203 has 2 pins for injectors. Use one to power your 3400 injectors, upgrade the fuse, and now you have a spare pin to use for the heated O2 sensor. Just keep an eye on the fuse amps and match them up. As far as locating a harness I used car-part.com and the PCM I got from a local salvage yard. I also put the pcm in the trunk. I did have it running with the bcm and ignition switch but it was cluttered and ugly and pcmforless really came through for me that's why I try to plug them when I can.
IP: Logged
03:43 AM
PFF
System Bot
Stubby79 Member
Posts: 7064 From: GFY county, FY. Registered: Aug 2008
It's 6 in the morning and I just crawled in from downstairs after spending about 4 hours working on my Fiero. I should probably be continuing my write-up from where I left off, so for now let's just say that I got the shifter bracket to fit(more or less), re-routed the heater hoses/pipes and then shoved the engine/cradle back into the back end of the Fiero. I needed the dang thing to stop taking up most of the space in my shed so it's not such a pain in the a ss getting my scooter in and out.
Anyways, lets go back to November. Well, actually, let's clarify something: It was late August last year when I bought the Fiero. It did not impress my 6 and a half month pregnant wife that I chose this point to go and buy an old car to fix up. My point of view was that if I didn't do it before baby was born, the money I had been scrounging together for a project Fiero would end up dissapering into the black hole of child raising. When she gave me a hard time about it, I pointed out that baby's new stroller cost as much as my Fiero did. :P (a $300 stroller? @#$%!!! I'm glad I didn't pay for that) I had actually sold my old motorcycle for said Fiero funds. I spent most of the rest of these funds on a couple of big boxes of parts for it. $200 got me 4 new drilled rotors, Raybestos' blue box brake pads for the front and rear, and Gabriel VST Gasryder front shocks/rear struts. Including about $50 worth of shipping! Oy, talk about cheap. I'll have to take some pictures some day. I still haven't put any of said parts on the car.
Getting off topic. after the discovery of how bad off the engine was at the end of November, I put the project on hold. Baby was takign up almost all my time. I started looking into engine rebuild kits, found some good prices and all...but for the money, I expected to get more out of the engine than just returning it to stock form. I started keeping an eye out for an engine donor while I continued to hum and haw over the prospet of rebuilding the 2.8l.
I stumbled upon the Alero in late March this year. This time I made sure there was no sludge buildup inside the rocker covers first. Here's what was under the hood:
I didn't actually do much work over the next couple of weeks - I used my desire to start working on the Fiero/Alero to push myself into finishing my scooter. Good timing, too, as gas prices have since gone up about 30 cents a litre. Then I got back to the fiero. It didn't take long at all to disconnect everything, build a dolly and drag this out from under the car:
It did, however, require buying a big floor jack from Costco for $65. That was one of my best tool purchases in a while. The other is the big blue thing sitting in the background of this pic:
I highly recommend one for anyone who does their own car work. It's saved me hours and hours of struggling so far, and they're very affordable these days. Well, actually, its the tools that plug into it that are useful. This thing just makes a lot of noise! I wouldn't have been able to get one of the cradle bolts out without it. Even with an impact gun, I still had to hot-wrench that particular bolt out.
Enough for now. It's difficult keeping a baby out of trouble or to watch Speed channel while at the computer. I'll get into the Alero and prepping of everything in my next post.
IP: Logged
10:56 AM
Aug 13th, 2008
Stubby79 Member
Posts: 7064 From: GFY county, FY. Registered: Aug 2008
Alright. So...The Alero. Not too much to say here, really. Seeing as I don't have an engine hoist, I took the Alero engine out in pretty much the same manner as the Fiero's: I disconnected everything and dropped the engine cradle on to my home-made dolly. The main difference being that instead of lifting the front end of the Alero up 3 feet to slide the engine out, I just cut the front bumper rebar off and rolled it straight out. It's going to the junk-yard anyway, so who cares?
Meanwhile, when I tired of disconnecting and labelling everything from the Alero, I had to get everything off the Fiero's cradle.
Kick the old block aside...
And get this dirty thing cleaned up.
This is the Trans all degreased/pressure washed/scrubbed and then licked with paint:
I've been using Home Depot's knockoff of Royal Purple for degreasing. It's not aluminum friendly, but that doesn't really matter when you're going to paint it anyway. You know when the alcaline degreaser has dissolved all the oil because the aluminum starts turning black. For the price of two cans of engine degreaser, I got a gallon of the Royal Purple knock-off. I wouldn't use it on an engine that wasn't getting refinshed though! Combined with a pressure washer and things come out real clean. As to paint, I used a can of Aluminum engine enamel, to make sure it's going to be able to stand up to heat and chemicals.
As you can tell from the above pictures, the cradle needed some TLC too. Seeing as it has all sorts of contours and recesses, I went out and bought a cheap sand-blast kit and two bags of play-sand. I love how well sandblasting takes off rust and everything else, taking it down to a dull silver/grey of the steel itself in no time. However, my silly little compressor could only keep up with the sandblaster for about 15 seconds at a time, so while it was refilling I alternated with my coordless palm sander. No pics, but I hit the cradle with a coat of rust killing paint, followed by black enamel and, in the recesses/hollows, with undercoating. That should keep it rust free for years! Didn't bother with pics, mind you.
I "won" a new clutch kit off ebay for all of $25, plus shipping. I thought the old one was getting rather close to the rivets:
But the new one didn't have too much more meat on it, really. It was worth paying for the kit though, for the new bearing and the clutch alignment tool, and I've always got a spare clutch if I burn the new one out.
Now that I think back to it, I have a correction to make. I dropped the Alero's sub-frame without the engine on it. I left that dangling by the motor/trans mounts, which happen to be at either end and connected directly to the Alero's main frame. Then I slid the Fiero's finished sub-frame, with engine mounts attached under the Alero's engine, and bolted the mounts to the engine. It wasn't quite that simple, since I had to notch one mount to fit the oil pan, and I had to hold the cradle up while trying to thread the bolts, but it worked out. A 2x4 held up the transmission side when I rolled the lot out from under the Alero.
Seperating the automatic transmission from the 3400 took a bit of muscle, though not quite as much fun as mating the Fiero's 4-speed up to the 3400. For a flywheel, I used one from a '01 4-cylinder Sunfire. I was rather surprised to find they're still using the same flywheel after all these years, and on 4 cylidner engines to boot. This one, of course, is neutrally balanced, unlike the one from the Fiero. The $40 from the junkyard was cheaper than having a machine shop alter the original, and the "new" flywheel was pristine. Getting the Fiero trans to mate with the 3400 - by myself, with only a plain old floor jack as an aide - was a test, even with the clutch aligned properly - I balanced the transmission on a board, on top of the jack, lined up the dowls and threaded a couple of extra long bolts through to get it started. I swapped those out for the right length bolts after. Oy. I think I get points for creativity at least, the way I get some things done...
'nuff for now. Next post will be getting the 3400 ready to go into the Fiero.
IP: Logged
11:58 AM
Aug 17th, 2008
Stubby79 Member
Posts: 7064 From: GFY county, FY. Registered: Aug 2008
So; The cradle and trans have been refinished by this point and the engine and trans have been mated on said cradle. The next thing to do was remove the accessories I didn't need off the engine and degrease it all over again, getting all those hard to get areas you can't get at with the engine in the car. The "3400 SFI" on the top of the intake plenum had to go, seeing as it was facing backwards, so I ground most of it off then finished it off with a sander and smoothed out the rest of the top while I was at it. I figured it would be easier to add the word "FIERO" or some such to it later, if it were smooth. Then off came everything attached to the intake plenum and the rocker covers, so it could all be sanded down with fine sandpaper and painted. I used Metaltech's anodized paint on it, starting with a base metallic coat:
and then the blue:
I like blue. The body will be blue one day too, if it kills me. I also sanded down the exhaust manifold heat shields and hit them with VHT's 1500� ceramic paint, the block with gloss black engine enamel and all bare aluminum with a thin coat of the base metallic. Here's the final results of the paint before and after bolting everything back on:
Then it was about time I got around to changing the spark plugs.
Hmm...aren't they supposed to have a fine tipped electrode? Dang tips had all burnt off and the gap was half again what it should have been. I replaced 'em with NGK TR55GP's (if I remember right) after going on GrandAmGT.Com and seeing what plugs they preffered in this engine. And, of course, new plugs should have new, low-resistance 8.5mm spark plug wires that stand out and make everything come together. Here's the final results:
A keen eye will notice that I took the picture after I put the belt on. I added an idler pulley to make up for the lack of power steering pump and shaved the engine mount bracket(which I intend on using) to give clearance (hopefully enough!) for the belt. If I'm not getting enough friction to drive the water pump properly, I'll eliminate the idler by the alternator to give me slack and move the other idler even farther above the water pump. As to getting a belt that fit, I ran a fabric tape measure (you know, the ones seamstresses use) around all the pulleys in the route the belt would take to get the length, looked up the Gates part number for the Alero and changed the digits around for the closest one to my measurement. IE Part number K060868 - 87 & 3/8" changes into K060625, 62 & 5/8"(assuming I remember my measurement properly). Anyway, the fit was perfect and it seemed a whole hell of a lot easier than trying different belts from different vehicles and hoping they fit. I didnt take any pics of my engine before, but it was routed like so:
And this is how I routed it:
More later...
IP: Logged
11:21 AM
LZeppelin513 Member
Posts: 761 From: Lake Stevens, Washington Registered: Aug 2003
Unbelievable!! Thats exactly what the inside of my 87' gt looks like. My 2.8 is going on a stand and a 3.8sc is going in its place. I know a guy here that did an 04' 3400 out of a same car, but he was running an auto. If I can get ahold of him I'll get some intel for you.
IP: Logged
10:01 PM
Aug 23rd, 2008
Stubby79 Member
Posts: 7064 From: GFY county, FY. Registered: Aug 2008
Unbelievable!! Thats exactly what the inside of my 87' gt looks like. My 2.8 is going on a stand and a 3.8sc is going in its place. I know a guy here that did an 04' 3400 out of a same car, but he was running an auto. If I can get ahold of him I'll get some intel for you.
Pretty ugly inside, aren't they? I wonder if it's a long-term issue with the earlier 60� GM engines -- I took the valve covers off a '91 3.1L in a tempest a couple of years ago, and the insides were the same. Looks like they could have benefitted from more oil flow. Who knows? Maybe someone else on here will enlighten us.
IP: Logged
11:25 AM
Stubby79 Member
Posts: 7064 From: GFY county, FY. Registered: Aug 2008
I've been lazy about this continuation post, probably because I didn't get anything much done on it last weekend. I probably won't this weekend either, but wife and babe are going to visit family early next week...I predict ten days consisting of little sleep and lots of Fiero.
Getting on with it. I had a couple of other things to the engine before mounting it back in my SE. First of all, I wanted that shifter bracket mounted up again. Just FYI for anyone else who might do this: the crossover pipe is widest right where the corner of the bracket wants to be. Of course. They couldn't have put that flexing part just an inch farther down, could they? I ended up notching both the corner of the bracket and the heat shield to get it to fit, like so:
There's little chance I can mount the inner cable in there, but at least I won't be trying to make the bracket fit flush after the engine is in the Fiero. That would be a serious test of one's patience...I must have had that heat shield off three times to get the notch just right and the bracket just as many. I didn't want to take off any more metal than I had to.
The second thing to do was also for making the engine work with it's new application. If you look closely near where the EGR pipe connects to the exhaust manifold, you'll notice the pipes/hookups for the heater hoses are on the wrong side of the engine to easily connect to the Fiero's heater hoses. And, up above on the intake plenum, the brake booster vacuum port is too. Well, actually, one of the heater hoses on the original V6 comes out on this side too - there's a pipe running down the side of the engine bay for it - but I won't be using it for the heater hose. First, I removed a 4" or so section of the pipe that runs from the water pump, through/past the throttle body and out to the heater hoses, thus:
I will run the heater hoses to either side of this pipe, one inlet and one outlet. This puts the heater hoses on the right side of the engine, near where they need to be, rather than running hose all the way around the engine bay twice. And for the other end of the pipe where it use to come out, I did a rough mock-up. I'll get a proper U bend later for it:
This will loop the coolant back in to the lower intake manifold or wherever it returns to. All i've done is re-arranged the order of the flow. Instead of going from the water pump, through the throttle body and then into the heater hoses before returning to the lower manifold, now it runs through the heater hoses before going into the throttle body. I don't forsee any issue with this, unless I try driving it in -40� weather. Yeah, right.
That was about it for things I felt I needed to do to the engine before mounting it all in the Fiero. But, not wanting to do it half-assed, the engine bay needed some TLC. Or a lot of TLC. I stripped it of all the vaccum lines, cansiter, hoses, wiring harness and heat shields. Well, actually, I did this all before finishing prepping the engine, but hey. I also stripped out the old fiberglass insulation, except on the firewall. With everything out, I degreased the hell out of it, cut the dogbone mount metal out completely(won't be using a dogbone, thank you very much) as if it were never there, cut out what was left of the battery tray and sanded down the rusty spots. Then it all got a coat of rust-killing/converting paint before being painted with iron-grey engine paint. Afraid I don't yet have any pictures of the results, but I like that dark metallic grey. Oh, there was one other thing that had to go:
The ugly heat-protecting coverings on the shifter cables. It would stand out against the clean paint of the engine and the engine bay; I cut it off.
I'm not sure if everyone else is cutting theirs off and just leaving it like that, but wherever my cables come close to a source of heat, I intend on wrapping the cable in header-wrap. I'll roll it length-wise into a tube/sheath around the cable and clamp it in place with the same stainless steel ties that come with the header wrap. That should do the job, look good and not cost much of anything (esp compared to replacing the cables altogether just to get that heat wrap).
That was the last thing I did before dragging the engine/trans/cradle out of my shed and getting it ready to mount:
I had to jack the back end of the chassis up another 6" or so higher than I had originally to get the 2.8l out, seeing as I had no heads of intake on the original engine when I did it, let alone an alternator that sits another inch or two higher than even that. I'm not going to go into how I managed it with just one floor jack and a set of jack stands because I don't want anyone else to try it that way. Someone wouldn't be careful enough and would end up squished under the car when something shifted. Needless to say that I was beyond careful when I did it. I was very patient and careful lowering the chassis down to meet the cradle:
Over all, it didn't take long to get the cradle bolts in. Some day will replace the mounts with poly or even solid mount it, but not just now. Reclaiming my work space in my shed takes pripority over that! When it came to small tweaks to get the front cradle bolts in, I put my other - tiny - floor jack under that corner of the cradle to lift or lower it until the bolt went through. Once they were both in, I jacked up the back end of the cradle and the rear bolts just twisted right in without a fight. Oh, I anti-siezed them first, so I won't have any issues next time they come out. They were pretty stuck in there originally. Here's the engine in the bay:
Silly me. I had remembered to remvoe the dogbone mounting metal before putting the engine in, but I hadn't notched the deck-lid or even left it open while I was mounting it all in. I heard a bit of a crunch as I tightened up those rear cradle bolts. I didn't have any time to do much about it, so I releived the pressure a bit by removing two of the hinge bolts on the decklid before calling it a night at 6 in the morning. Mounting the engine/trans/cradle back in to the Fiero took less than an hour, even with my unothodox methods. The deck lid sat like this until the next evening, when I notched it:
BTW, the alternator only needed about half an inch to make it clear the deck-lid...it was the engine lifting bracket, a little further up, that was really holding it up.
This is pretty much where my project is sitting right now. I'm working on the rear suspension and hooking up all the hoses and such next. Plenty left to do, plenty left to enjoy.
[This message has been edited by Stubby79 (edited 08-23-2008).]
I enjoy watching these guys that have a really nice shop with great tools, huge resources, and tremendous knowledge and skill turn out nearly stock looking swaps. I really admire their work.
But, I find that a build thread like yours, using minimal tools, limited space, but a huge helping of ingenuity and inventiveness to be the most interesting. Keep up the good work!
------------------ ____________________________________________ "Of all the things I have lost during my lifetime, I miss my mind the most."
IP: Logged
02:45 PM
Stubby79 Member
Posts: 7064 From: GFY county, FY. Registered: Aug 2008
I enjoy watching these guys that have a really nice shop with great tools, huge resources, and tremendous knowledge and skill turn out nearly stock looking swaps. I really admire their work.
But, I find that a build thread like yours, using minimal tools, limited space, but a huge helping of ingenuity and inventiveness to be the most interesting. Keep up the good work!
Thanks, I'll do my best!
Give me access to their shop, tools and resources and I'll do even better!
IP: Logged
04:30 PM
87_special Member
Posts: 266 From: San Diego, CA Registered: Oct 2006
It looks great man. Good job on the install and getting past all the little modifications needed. You're belt routing can be much simpler than you have it right now, but whatever. I guess as long as it is working for you.
I actually used an old 3400 tensioner and hacked it up and attached it to a piece of 1/4" aluminum sheet. I then swapped the pulley for a ribbed one instead of the smooth. I'll attach a few pics. My car has a slightly modded 3100 w/4t60E running the OBD1 7730 ecm and Ostrich from Moates.net for tuning.
Gates Radiator hose Part #22342 is a perfect fit for the water-pump to RH coolant pipe.
Good luck with it man. You're doing great work so far. Just wondering why you don't think you need a dog bone. Unless you are solid mounted, you need one. I thought my engine mounts were stiff enough until I heard the alt. hitting the decklid under hard acceleration.
-Joseph
IP: Logged
06:24 PM
PFF
System Bot
Aug 24th, 2008
Stubby79 Member
Posts: 7064 From: GFY county, FY. Registered: Aug 2008
It looks great man. Good job on the install and getting past all the little modifications needed. You're belt routing can be much simpler than you have it right now, but whatever. I guess as long as it is working for you.
I actually used an old 3400 tensioner and hacked it up and attached it to a piece of 1/4" aluminum sheet. I then swapped the pulley for a ribbed one instead of the smooth. I'll attach a few pics. My car has a slightly modded 3100 w/4t60E running the OBD1 7730 ecm and Ostrich from Moates.net for tuning.
Gates Radiator hose Part #22342 is a perfect fit for the water-pump to RH coolant pipe.
Good luck with it man. You're doing great work so far. Just wondering why you don't think you need a dog bone. Unless you are solid mounted, you need one. I thought my engine mounts were stiff enough until I heard the alt. hitting the decklid under hard acceleration.
-Joseph
Thanks for the compliment and the part number on that hose, that'll save me some bother. I can address why I routed my belt the way I did and why I don't need a dog bone. You can see in this picture of my belt routing two things: No A/C compressor on the bottom right for the belt to go around (looks like you have A/C or an idler in your pic) and right in the middle, you can see the engine mount bracket.
I'm planning on using this bracket and the engine mount that goes with it from the Alero, meaning I kept a similar belt routing to how it was originally, to make sure the belt clears this bracket/mount. This is what the mount looks like on the Alero: (right between the P/S pump and the coolant overflow bottle, partially hidden under the cruise servo)
In this picture, you can see how the bracket on the engine lines up fairly well with the frame rail in the Fiero's engine bay. I just need to weld a bracket to the rail to hold the engine mount.
That's the theory, anyway. Assuming it fits, that should keep the engine from moving better than a dogbone would.
IP: Logged
12:59 AM
Aug 28th, 2008
Stubby79 Member
Posts: 7064 From: GFY county, FY. Registered: Aug 2008
I've been making progress the past two mornings, after work. Slow progress, but progress. I hate rust. That's probably why I am happy when I finish sandblasting a part -- you'd never think that it could come out so clean. I love it. I took some pics, of course.
Sandblasting in progress:
A closer shot, half blasted. You can see the bare metal on the right vs the rust scale on the left.
Next is a final clean/degreasing so it'll take the paint properly:
Accelerated drying; that CV shaft was brown with rust and grease when I started. No, it's not painted, yet. Inner tie rod didn't get sandblasted. Maybe it should...hmm.
Painting parts with rust converter/preventer:
Gotta wait 24 hours before I can top coat those parts. No biggie...I ran out of sand anyway, so there's still a couple of parts left to be blasted. That'll have to wait until tomorrow. I'll post some final painted pics and some before/after comparison shots next time.
IP: Logged
03:35 PM
Sep 1st, 2008
Stubby79 Member
Posts: 7064 From: GFY county, FY. Registered: Aug 2008
Past due for an update. I havent much to share from what I've been doing, just more painting, sanding and blasting of those rear suspension parts. Wow, it takes forever, especially when you have to wait a day between layers of dissimilar paint. I'm ending up with three layers on most parts...Rust killer(acts as a primer), color coat and for added layer of protection, I hit them with engine clear coat. The last is fast-drying, at least.
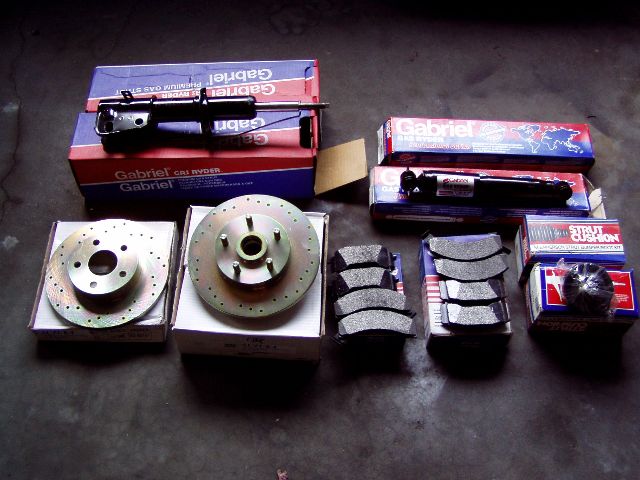
Since I don't have much to show you in the progress department, I thought I would finally get around to posting pics of my affordable parts goodies. Here's what all of $200 can get you to your door, if you try:
Top: Gabriel VST struts & shocks. ($18 ea x4) Bottom: Cadmium coated drilled front and rear hub/rotors. ($60 for the set) (Made in Canada...what the? expected cheap stuff from China) Raybestos Front & Rear Premium brake pads. ($18 x2 sets) Strut boots. ($5 x2) Shipping: ~$22. (Free shipping on the rotors!)
They might not be racing parts, but I'll bet they're 10x better than OEM. The VST shocks will greatly improve handling, and I just about put myself through the windshield on my daily driver when I put in Raybestos premium pads. Proof that you don't need to throw a lot of $$ at your car to make it better!
IP: Logged
07:39 AM
Stubby79 Member
Posts: 7064 From: GFY county, FY. Registered: Aug 2008
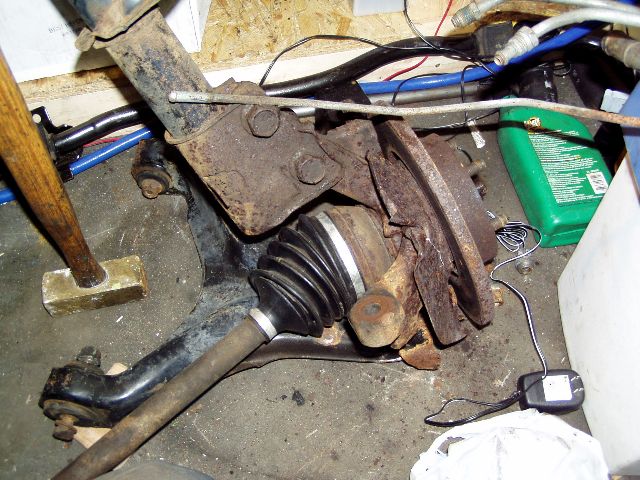
Here's a query/curiosity for you guys out there, seeing as I'm working on my rear suspension and all. Everything that wears appears to be original; ie the ball joints are rivited in, the CV boots and the rubber bushings are all date-stamped with '85 or '86, and so I assume the tie rods are original too...and they're all in good, even pristine condition! Not even the finest hairline crack on the CV boots, the ball joints have no play in them, the bushings looks brand new. So the question is: did they build parts a lot better back then, or what? Even the 23 year old struts appear to be original and still work! Sheesh.
[This message has been edited by Stubby79 (edited 09-01-2008).]
Here's a query/curiosity for you guys out there, seeing as I'm working on my rear suspension and all. Everything that wears appears to be original; ie the ball joints are rivited in, the CV boots and the rubber bushings are all date-stamped with '85 or '86, and so I assume the tie rods are original too...and they're all in good, even pristine condition! Not even the finest hairline crack on the CV boots, the ball joints have no play in them, the bushings looks brand new. So the question is: did they build parts a lot better back then, or what? Even the 23 year old struts appear to be original and still work! Sheesh.
Those parts don't see anywhere near the action on the rear of the vehicle that they would on the front. As far as movement it is all vertical as opposed to a combination of vertical and extreme horizontal when the steering wheel is turned which stretches the bellows in the CV boots and causes more friction over a larger area in the joints and tie rods.
IP: Logged
08:49 AM
Sep 2nd, 2008
Stubby79 Member
Posts: 7064 From: GFY county, FY. Registered: Aug 2008
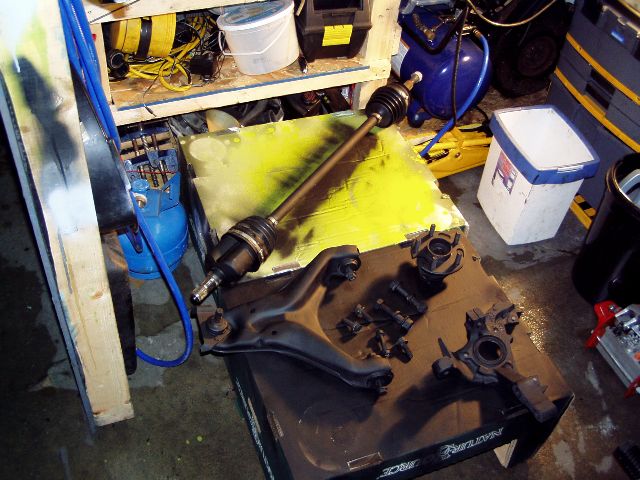
Well, it took me all day yesterday (well, about 8 hrs of it anyway), but I managed to get all the right side suspension/axles sanded/sandblasted. Why'd it take so long? well, look what I had to start with:
Changed into something like this: (the ones in the middle)
Soon after, like this:
And this is what they'll look like, as soon as I can top coat 'em:
Well, hey, it was a pain in the ass, but at least I'll never have to do it again. Now I can start putting everything back together and finish reclaiming my shed. I've already cleaned up the mess of rust and grease on the floor. Eww.
Edit/PS: Note the 3lb, long-handled brass hammer in the first pic. I had to absolutely wail on the strut/knuckle boltsto knock them out. One word people: antiseize! Use it!
[This message has been edited by Stubby79 (edited 09-02-2008).]
IP: Logged
02:59 PM
whodeanie Member
Posts: 3819 From: woodstock,Ga.,USA Registered: Jan 2008
looking good so far. you are using the motor out of an Alero? how many miles are on it? just watch the intake gasket my wife has the same car and at about 80k it started leaking and GM said it was a common thing with them but not a recall. Dammit! so I had to pay for it.
IP: Logged
03:08 PM
Stubby79 Member
Posts: 7064 From: GFY county, FY. Registered: Aug 2008
looking good so far. you are using the motor out of an Alero? how many miles are on it? just watch the intake gasket my wife has the same car and at about 80k it started leaking and GM said it was a common thing with them but not a recall. Dammit! so I had to pay for it.
yup, out of an Alero. Mileage is just a bit past what your wife's was at when the gasket blew. I might be in for a nasty surprise on my first drive. I'm not too worried about it. If it goes, it goes. The price of the intake gasket kit has gone down over the past couple of years, thankfully. The mileage is a bit high, but the engine is pristine inside - I've had a look under the valve covers and had the oil pan off to reseal it. Mucho improvement over the old 2.8
IP: Logged
03:39 PM
Sep 3rd, 2008
whodeanie Member
Posts: 3819 From: woodstock,Ga.,USA Registered: Jan 2008
Time for a quick update. Ok, past time, seeing as I didn't touch the Fiero last weekend. I only had a couple of hours in the wee hours of the night to do anything, but progress is progress, however little.
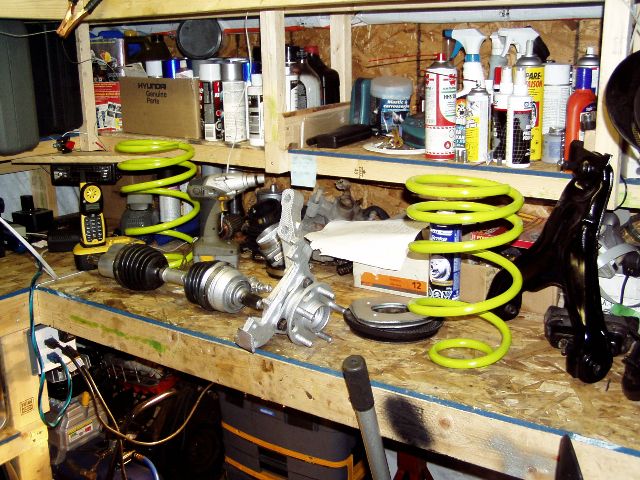
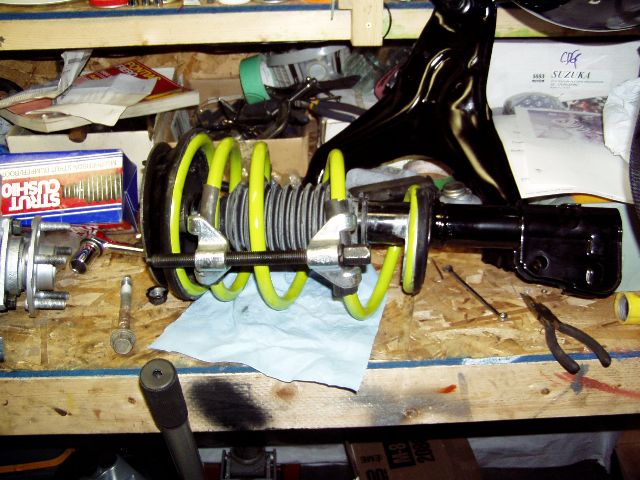
Strut/spring reassembly in progress:
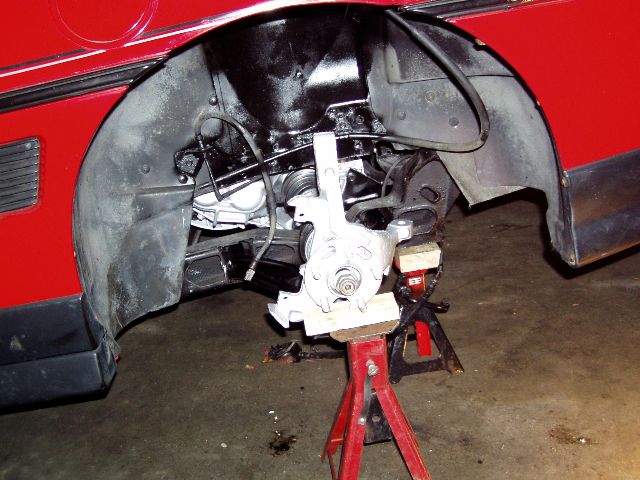
Rear suspension starting to go back together:
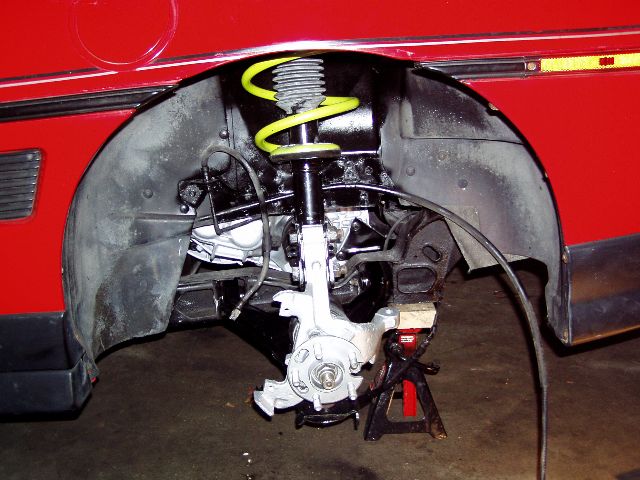
Spring/Strut back in:
Took longer than I expected, between a distinct lack of strut/spring reassembly order images and makign sure to slather everything that could rust with anti-sieze. I found an old photo of the rear suspension when it was complete, and that told me how it had to be assembled. I rather like the new boot/dust shield I put on the strut. It's strapped at the bottom, so there's really no way for water/dirt to get inside at the shaft. Its probably a good idea for a daily driver, but I think it might be more important for a car that's probably going to be a summer/weekender only. One might also note the rubber hose I put around the spring to protect the paint from the spring compressors (Someone was worried about damaging their fresh powercoating in another thread, so here's your answer to that problem). I ran short on time (by maybe 15 minutes) to get the tie rod back in, as I wanted to clean out all the old grease in it in case any sand got in it when being blasted. I should get it all done tonight, and the other side should only take half as long. And I wasn't too impressed with the tip/end of the strut shaft from Gabriel. It only has two flat sizes (rather than six), so it could only be held with a 7mm open ended wrench to stop it turning while I was trying to torque the nut down to 66 ft/lbs. Of course an open-ended wrench that small won't hold on past, say, 30 ft/lbs, so i gave up and put a pair of vice grips on it instead. They're not much interested in this whole buisiness of slipping.
IP: Logged
11:14 AM
PFF
System Bot
Sep 15th, 2008
Stubby79 Member
Posts: 7064 From: GFY county, FY. Registered: Aug 2008
Got the passenger side in this morning, in half the time it took to do the driver's side. Also cleaned out the tie rod end of it's ancient grease(though I ran out of grease in my gun after pushing out all the old grease with new-- oh, no! How will I afford an $2 grease cartridge?). I took pictures, but I'll post 'em later, seeing as I locked my camera up in my "shop" and didn't want to go back for it.
Hmm, I should go read that "home alignment" thread and see how close I can get it, now that it's completely out of whack.
IP: Logged
09:51 AM
Sep 19th, 2008
LZeppelin513 Member
Posts: 761 From: Lake Stevens, Washington Registered: Aug 2003
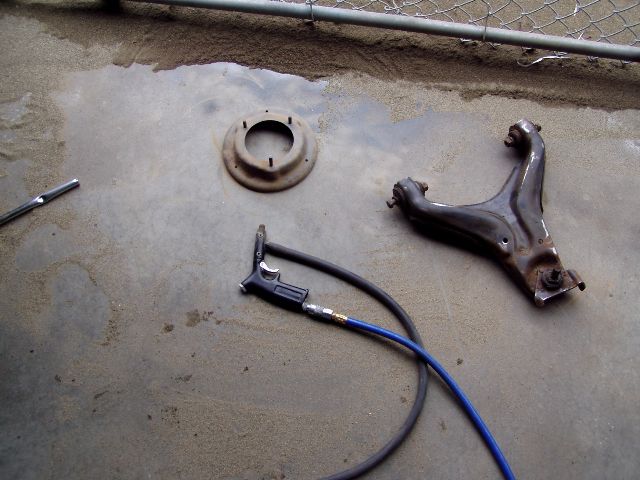
No real progress to report on the mount, other than holding the alero's mount in place and happily noting that I don't have to make any room for it. I just need to build a bracket for it to attach it to the frame rail beside the engine. I'll get to it(and keep you posted) when I'm not working on it at 3 in the morning and can actually make some noise(cutting, grinding and welding) without bothering the neighbours. You can sort of see the mount laying on my bench just behind the control arm on the right side of this pic:
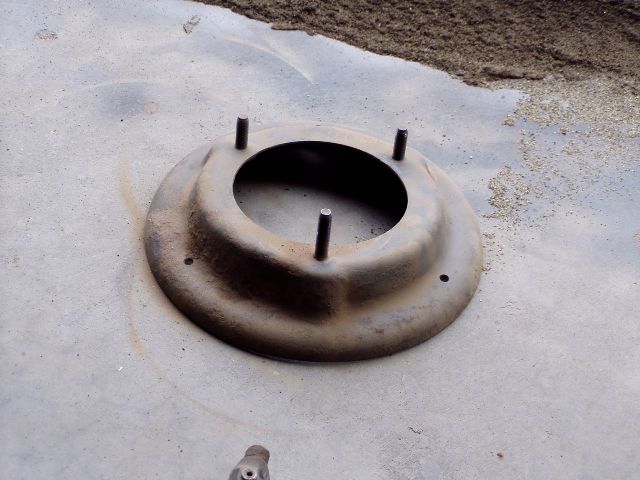
What the heck, here it is close-up:
It's about 6" long, 2" wide and 4" tall, with two large bolt/studs sticking out of the top of it, two bolt holes on the bottom, and a large chunk of rubber in-between. A 4"x6" aluminum plate goes across from the bracket on the side of the engine, over the studs. So all I need is to build a bracket to go from the frame rail to the bolt holes on the bottom of the mount and it's done. An oversized chunk of angle-iron would do the job, if I felt like being crude.
I'll take some pics soon with it hanging off the side of the engine so you can see what I mean.
[This message has been edited by Stubby79 (edited 09-19-2008).]
IP: Logged
03:35 PM
LZeppelin513 Member
Posts: 761 From: Lake Stevens, Washington Registered: Aug 2003
Nice work, on the engine swap! I noticed that you didn't swap the valve covers. Is there a reason for that? The oil cap looks like the same one that is on the 3800's. If it is, the 3800's have a little extension, that the cap sits on. It might help, when it comes time to change the oil.
IP: Logged
09:58 PM
Stubby79 Member
Posts: 7064 From: GFY county, FY. Registered: Aug 2008
So will you just weld your bracket to hold the mount on the frame there next to the battery? Thanks for the responce
Exactly! Good luck getting your own 3400 to hold still!
quote
Originally posted by RumbleB:
Nice work, on the engine swap! I noticed that you didn't swap the valve covers. Is there a reason for that? The oil cap looks like the same one that is on the 3800's. If it is, the 3800's have a little extension, that the cap sits on. It might help, when it comes time to change the oil.
No reason. I didn't expect it to cause much issue having it hiding back near the window, and I would have had to move the coil packs and maybe other stuff too. I rather like the tidy look of the engine lay out. Thanks for the tip about the oil cap extension. I'll consider that if I find it bothersome in any way(though the right shaped funnel should solve that easily enough).
Thanks for your interest/feedback, guys!
IP: Logged
11:03 PM
Jan 15th, 2009
Stubby79 Member
Posts: 7064 From: GFY county, FY. Registered: Aug 2008
Damn, I got to get back in here more often, another 3400 build that I didn't know about. Seems like more and more people are doing them.
Here's a pic of my upper mount
We cut most of the dog bone support of the trunk wall and re-inforced one side where my upper support bolts to. Bad thing is it's solid mounted but it works for now. I would like to create a support that would bolt up to the 3400's original front mount and brace it to the back wall or even the strut tower column. Pete (PBJT) did something like this on Thecage's 3800SC swap and works great.
When I was looking at how to make an idler pulley in place of the P/S pump, I found out that one of my roller blade bearing was the exact size of the pulleys hole, so I tried bolting it on like that but it was just a little off, so I brought the bearing to a friend (machinist) and asked him to make the exact asme thing out of metal but 1/8 longer. VOILA I've never had an issue wih it. Think I can find the pic of it now though My belt routing is set up pretty much like the 3.1L motors, and belt is cheap, as for part number, I can't tell it off the top of my head but I found it by asking for a blet for my old 90 6000LE, it was just too short, so the next number up was the right size (last digit was a 5 instead of a 0)


 I've plenty more to share that's happened along the way, and plenty more to come. New stuff will be slow in coming, mind you, seeing as I am now a first-time father. I took 8 months off work, thinkign I would get my Fiero done in my spare time. Spare time? With a new baby in the house?! HA! Now that I'm back at work, I have even less time to work on it (I find myself sneaking off downstairs to work on it for 20 minutes when she's taking a nap). My last project took me 3 years to do, so this oen should be ready for my mid-life crisis. That sounds like the perfect time to start driving a little red sports car to me!


 My belt routing is set up pretty much like the 3.1L motors, and belt is cheap, as for part number, I can't tell it off the top of my head but I found it by asking for a blet for my old 90 6000LE, it was just too short, so the next number up was the right size (last digit was a 5 instead of a 0)

