 
     |
| 84-87 Rear Caliper rebuild (Page 1/3) |

|
Dodgerunner
|
DEC 15, 10:05 PM
|
|
Ok to continue from the Front brake post: http://www.fiero.nl/forum/Forum9/HTML/000036.html
Have completed the Rear's and am ready to fill and purge and check and see if the rebuilds work.
But first a little info for you all.
I will not go into the pins and pin guides since they are the same as the front post. But I'll say again, if your putting in new pads, clean and lude the pin bores with lots of brake grease.
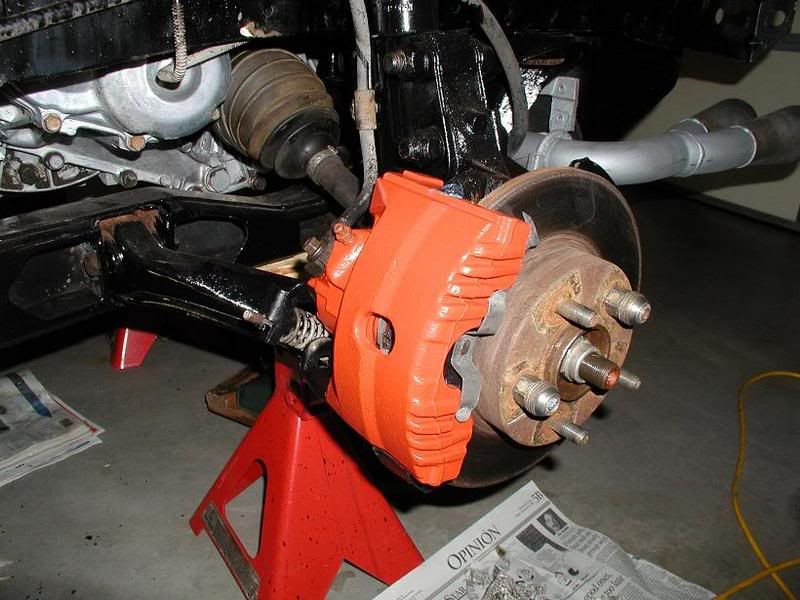
First the rear caliper break down.
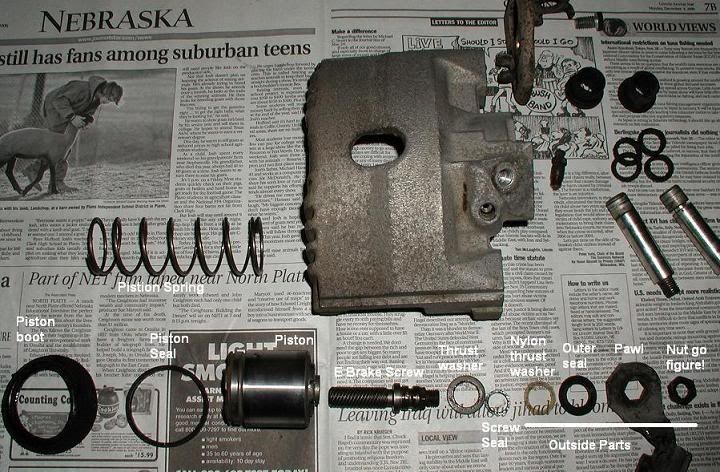
The large spring goes inside the pistion and assist the ebrake funtion.
The pistion is the interesting part and is the key to the ebrake.
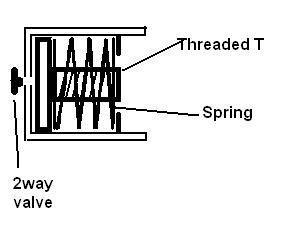
The inside of the piston contains a top hat shaped threaded section for the screw which is spring loaded. This acts like a slip clutch so that the screw will adjust as the pads wear. When you use the brakes the ebrake screw does not move but the pistion will. As it moves out it would want to turn on the screw but can't since the pistion is locked into the pad by the two pins. (That's why it's important to have the pistion turned for the pad pins fit the pistion holes) Instead the threaded T in the piston is pulled away for for the inside face of the piston compressing the spring (NOT the large piston spring in the pic above) that tries to keep it pressed against the piston face. This reduces the friction holding it in place and allows it to turn on the screw as it returns to it's place against the piston face. So if all works right your ebrake should stay in adjustment.
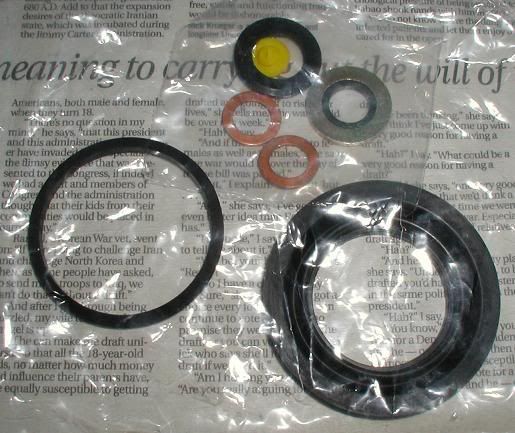
Here are the parts that come in the rebuild kits.
Note: The screw seal is just setting inside the thrust washer.
Since the pistion is metal and (in my case good shape) I did not have to do anything to the pistion. I did polish the bore a little as it was not machined as nice as the fronts where.
There are three key places that caliper will leak from.
The first of course is the pistion seal.
The second is the screw shaft seal.
The third is the two way valve in the face of the pistion. More on this later.
When I looked at the hole where the screw passes thru the rear of the caliper I notice the hole was not very smooth except in the very inside edge.
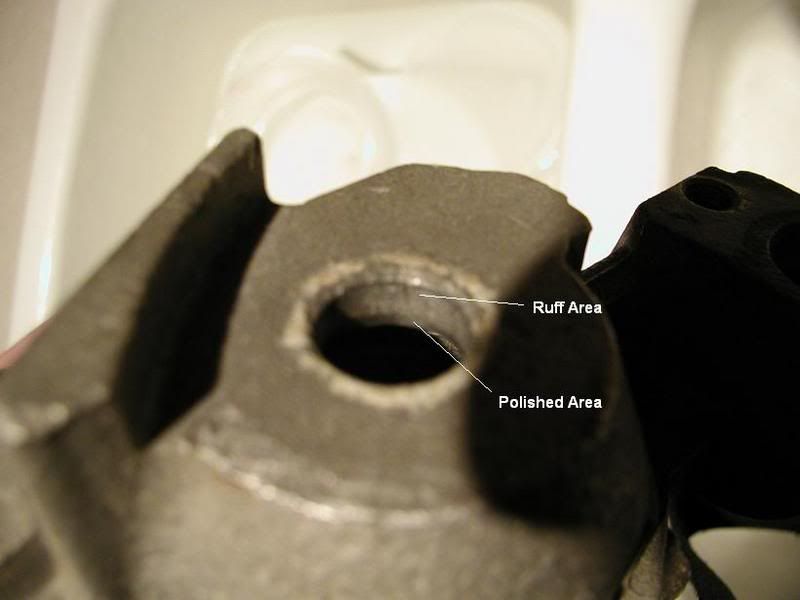
Found it interesting that when you put the screw into the hole the seal does not ride in the polish area but about in the middle of the ruffer area. I polished the hole more and hopfully will allow the seal to work better. (or make it leak more will see)
Now the two way valve.
In the face of the pistion behind the pad is a very soft small botton that presses into a hole in the pistion. Took me a bit to figure out what this might be for. Here is my idea, maybe someone will correct me if I'm wrong.
As I described above the threaded T part inside the piston has to move in and out a small amount as it adjust. when it does it has to pull away from the inside face of the piston. Since the pistion is full of brake fluid as it pulls away there would be a suction formed that would fight the pistion moving out. the small button would allow the suction to be broke as it flexes in. A small amount of brake fluid would then be between the face and the T. The button would flex outward a little as the fluid works it's way around the T back into cyl. On one of the calipers this button had become rock hard and most of it was broke off. Fluid had been leaking from the hole for sometime. You can see the yellow botton in the parts bag.
The process is basically take it apart, clean it up and put it back together with the new parts. Getting the pistion back in is a little more of a trick due to the large spring that goes inside the piston. I installed the piston by hand far enough to get a small piece of wood between the piston and the outside edge of the caliper. Then used a bar clamp to press the piston back in. You place a socket over the hole the screw has to come out as you press it in. After I had the piston started I ended up putting the pawl onto the screw and working back and forth between pressing the piston in and working the screw in.
Total cost $3.50ea.
Well there you have it. Hope it all works.
|
|
|
|
Hudini
|
DEC 15, 10:51 PM
|
|
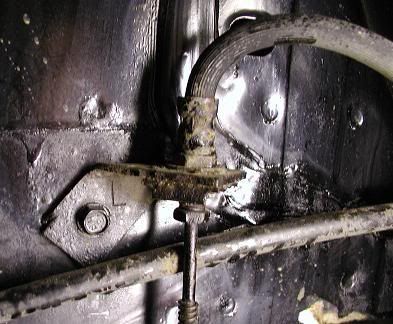
Could you post a pic of the hard metal line where it connects to the rubber brake line? It is just above the last pic you posted. The bracket on mine is missing so I just want an idea of what I need to fabricate to work.
|
|
|
|
Dodgerunner
|
DEC 15, 11:09 PM
|
|
An snap of the fingers and a flick of the wrist presto chango.
It's just a straight piece bend at a cross angle. Simple.
There is a little cut to the left of the bolt so that it can be bent to fit a hole so the bracket will not rotote.
 [This message has been edited by Dodgerunner (edited 12-15-2006).]
|
|
|
|
Hudini
|
DEC 15, 11:23 PM
|
|
Ahh, thanks. I'm doing the beretta upgrade now so I'll take care of it while I'm in there.
You test those brakes yet?
+ for you.[This message has been edited by Hudini (edited 12-15-2006).]
|
|
|
|
Dodgerunner
|
DEC 15, 11:29 PM
|
|
Will fill and purge tomorrow.
Won't be able to road test for a bit yet. Have to put a rebuild kit in the clutch slave and build an adaptor for the shift cables.
(didn't want to use the 4cyl. izzy cables)
Hope one more week will do it. Then it will probably dump snow.
|
|
|
|
Dodgerunner
|
DEC 16, 06:09 PM
|
|
The brake system is completed.
Filled with new brake fluid bled all four corners and have a full peddle.
No leaks anywhere. Sat and held the brakes on for 5 min. with no leaks.
Not bad for less than $10 and several hours, but that included painting.
|
|
|
|
02SOMFormula
|
DEC 16, 08:21 PM
|
|
| quote | Originally posted by Dodgerunner:
The brake system is completed.
Filled with new brake fluid bled all four corners and have a full peddle.
No leaks anywhere. Sat and held the brakes on for 5 min. with no leaks.
Not bad for less than $10 and several hours, but that included painting.
|
|
How do they feel? I'm curious to see if the stock brakes are better after a rebuild!
|
|
|
|
mgbringo
|
DEC 16, 09:45 PM
|
|
I recently bought rebuilt calipers and put in new pads in the rear. I am going to put in new pads in the front next.
The brakes stop the car much better now after just doing the rears. I had to step pretty hard on them before. Now it is just normal pressure that is needed. My pads were still OK but needed to be replaced. I assume it will be even better stopping power when I replace the front pads.
|
|
|
|
racer37
|
AUG 20, 06:20 AM
|
|
|
Great write up. I am trying to do this right now, but I have some questions. My rear pistons do not have a hole in them for the little yellow plug. I did notice a bleeder hole in the side of the pistin. (84 model). Was there a change in the design after 84? And how does the dust boot fit on the piston? Does it go in the outermost groove or closer to the smooth part of the piston? Thanks for everyone's help, Scott
|
|
|
|
Dodgerunner
|
AUG 20, 08:36 AM
|
|
Have not seen 84 calipers so can't answer that question, but guess it would work to bleed the inside of the piston with a small hole like that.
On the seal, yes it goes in the outermost groove. The inner one is for the piston seal.
Oh and by the way... 6K on the brake rebuild and still working great nary a leak......[This message has been edited by Dodgerunner (edited 08-20-2007).]
|
|
|
