
 
     |
| How to remove outer door panel, with pics (Page 1/3) |

|
fierohoho
|
OCT 31, 02:14 PM
|
|
|
As I recently replaced my dew wipe I had the door apart so I took a ton of pics. What I offer here is for the new Fiero owners who want to do the work themselves. I welcome any comments from others to help cover any mistakes I make or to offer an easier way for the beginer to do this. The pics are from my '84 with power windows, locks and mirrors. I have another thread you can find by doing a search for "How to remove inner door panels, with pics." At this point I will assume you have the inner door panel off. First remove the rubber end caps from the frame, two philips screws on the back one and three philips screws on the front. They are glued down with a small amount of sealant but peel up easily.  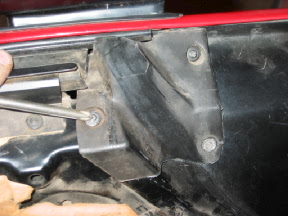 Next remove the inner window seal, it's held in place with six philips head screws. 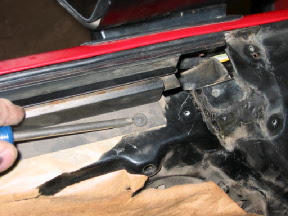 Next remove the two 10mm nuts that hold the mirror in place, a little liquid wrench or WD-40 on the nuts will help, an open end box wrench works best, don't worry if you drop the nuts inside the door you can retrieve them soon anyway. Note how the power mirror wiring harness (or the manual control cable) is routed behind the window guide, make sure when reinstalling these they are in the same location so as not to interfere with the windows operation . 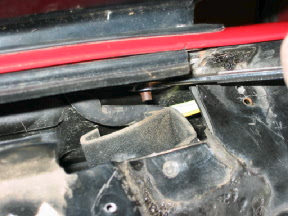 Now unplug the wiring for the mirror and take the mirror off, if you have a manual mirror you will have to fish the whole control cable out but it's not too hard. 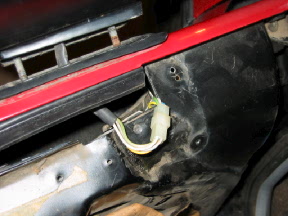 [This message has been edited by fierohoho (edited 11-01-2002).]
|
|
|
|
fierohoho
|
OCT 31, 02:28 PM
|
|
|
Now remove the seven plastic looking screws that holds the door skin edges. There are four at the rear and three at the front.  On the '84 they are philips head screws, '85-'88 are torx bit screws. If they strip out it's not the end of the world just a pain. I have found if you use a razor blade (be careful) you can shave the top of the plastic off to expose the actual metal screw holes and use them. Here is a pic of both the philips and torx intact and with the tops shaved off. 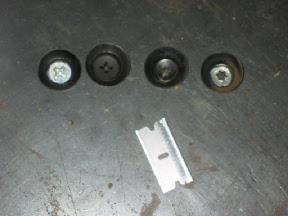 Now remove the moulding strip, start at the front and using a small flat blade screwdriver pry at the top corner of the moulding while pushing up on the bottom of the moulding, the top edge should come away from the door, then push down to disengage the bottom from the clip. 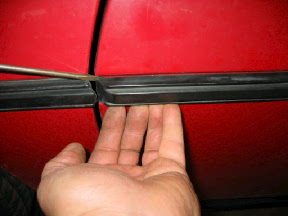 Now move down a little and again pushing up pull the top edge of the moulding away from the next clip. 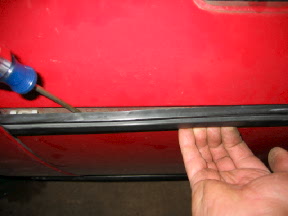 There are a total of four clips five if you count the front one. When all are loose you will find a small christmas tree type push fastener holds the back end under the door handle, pop it loose with a small flatblade screwdriver and the moulding is off. 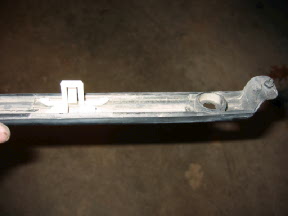 [This message has been edited by fierohoho (edited 10-31-2002).] [This message has been edited by fierohoho (edited 11-01-2002).]
|
|
|
|
fierohoho
|
OCT 31, 02:41 PM
|
|
|
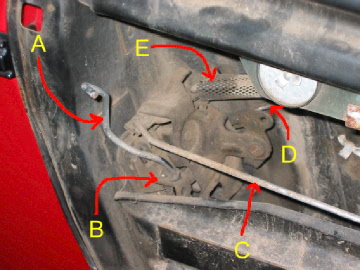
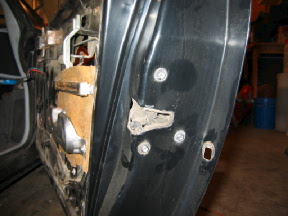
Now remove the front moulding clip using a 7mm socket or nut driver and then the rear 7mm screw near the key lock. 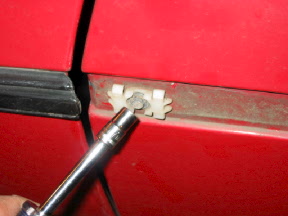 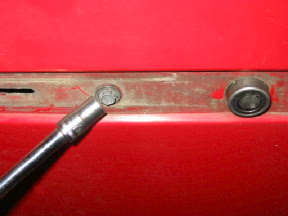 This is a pic of one of the four moulding clips, to remove them from the door use a small flat blade screwdriver to lightly push down on the little tab in the center that goes into the door while pulling out on the clip, a needle nose pliers helps here. Do not be suprised if the little tab breaks, I usually break half of them when I do it, not a big deal, just buy some new ones. This is also a good pic to show what you are pushing up against to release the moulding from the clip.  Now go to the bottom edge of the door and you will find four plastic rivets, use a small punch to punch the center out, you will then be able to pop the rivet out using a flat blade screwdriver or side cutters. Here's a pic of a removed rivet too. 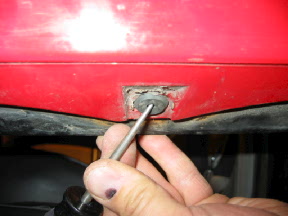 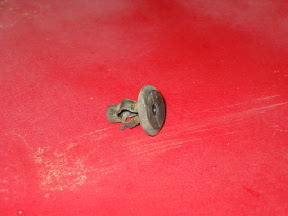 [This message has been edited by fierohoho (edited 11-01-2002).] [This message has been edited by fierohoho (edited 12-04-2002).]
|
|
|
|
fierohoho
|
OCT 31, 02:58 PM
|
|
|
On the '84 door the top edge is held to the door frame with three christmas tree fasteners, '85-'88 have a lip molded in the door skin that hooks over an edge on the frame. Pull the '84 skin away from the door frame at the top and the fasteners will come loose. On '85- '88 door skins pull the bottom of the door away from the frame slightly and lift the skin up to disengage the skin from the frame. 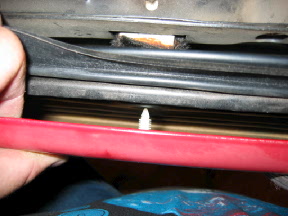 At this point the only thing holding the skin to the frame is the lock rod and door handle rod. Remove the clip that holds the rod to the lock cylinder.  The rod that goes from the door handle to the latch mechanism just sits in a hole and will come loose when you slide the skin up and away from the frame, or you can undo the plastic clip that holds the rod to the door handle. 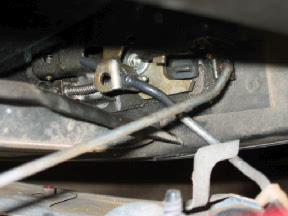 That's it for the door skin removal, the dew wipe is now easy access, you can get to all but two of the screws which sit behind the window glass. These can be removed with a tool that Rodney Dickman sells or you can use a needle nose vise grips like I did to turn the screws in from the outside. 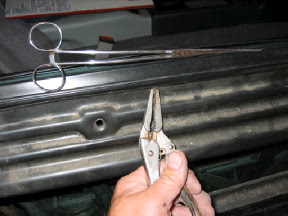 As you can see from the pic I used an old forceps to hold the screw in place when I reinstalled it, I used the vise grips to tighten the screw from the outside, as this is a self tapping screw there is a little bit of the end to grab without trashing the screws threads. [This message has been edited by fierohoho (edited 10-31-2002).]
|
|
|
|
fierohoho
|
OCT 31, 03:17 PM
|
|
|
If you are in this far and have power locks that don't work or you have to hit the button several times here's an easy fix I have done on four doors. Remove the rods from the latch mechanism and the three torx bolts that hold the latch to the frame.
  Clean all the old dust and grease off the latch with whatever it takes and then regrease the whole thing using a spray grease that will stay on and not run off. I used a spray grease that gels up shortly after it's sprayed on. Reinstall the latch and hook the rods back up. I have not done anything to the lock solenoid (it's really a lock motor) and have had excellent results. Good luck and Wrench On Dudes! HoHo [This message has been edited by fierohoho (edited 10-31-2002).]
|
|
|
|
Daniel87GT
|
OCT 31, 04:30 PM
|
|
|
Tech tip: When removing the outer molding you can reach through from the inside of the door and release the clips if the window is up. My clips were pretty stiff from age and would probably have broken if I had tried prying them off from the outside. On my 87 GT there was a metal piece in the way of me getting to the outside of the screws directly. Basically, it didn't get me anything to pull the outer skin off. It was a lot of work and I didn't have any replacement rivets for the bottom of the door. Tech tip: once you're commited to changing the dew wipes go ahead and cut away the majority of it. It will make it easier to get at the screws with Rodney's tool. I had the problem where the tool wouldn't fully engage the screw because the dew wipe was too stiff. It worked fine after I cut most of the dew wipe off, right down the crease.
|
|
|
|
JD86GT350
|
OCT 31, 07:38 PM
|
|
|
wow, great instructions with good pics! It might be worthwhile to mention that you don't need to remove the outer door skin to replace the dew wipes though. ------------------

|
|
|
|
Dennis LaGrua
|
OCT 31, 08:20 PM
|
|
|
|
|
fierohoho
|
OCT 31, 10:20 PM
|
|
| quote | Originally posted by JD86GT350:
wow, great instructions with good pics!It might be worthwhile to mention that you don't need to remove the outer door skin to replace the dew wipes though. |
|
Thanks, You are right, it is not necessary to remove the door skin to do the dew wipes, I replaced mine when I had the door apart and threw in the info on how I did it in response to an e-mail I got about this and my other post about removing the inner door panel.
|
|

|
2farnorth
|
NOV 01, 06:31 AM
|
|
|
Outstanding post. Very well done. Thanks. Dave
|
|
|
|