
 
     |
| Distributor replacement with pictures and tips for a V-6 (Page 11/12) |

|
mgiusto
|
APR 26, 10:57 AM
|
|
| quote | Originally posted by jetman:
Totally blind installation with distributor already out of engine.
Rotate the crankshaft so the fat timing mark on harmonic balancer is on the timing tab.
Note where the #1 plug wire post is on the cap and mark with white-out on the body of the distributor exactly where that is. Remove the cap.
Install distributor with the rotor pointing at your white-out mark indicating #1 post and put the distributor cap back on. (note that the rotor is point exactly where the #1 plug wire post will be when we put the cap back on.)
The engine runs without stalling or anything but it sounds really different. It's a lower pitch rumble now.
Try starting the car. If it doesn’t catch fire then you may be 180* off on the base timing so get the fat timing mark on the timing tab like before. Remove the distributor and crank the harmonic balancer around exactly one full turn (360*), and then re-install the distributor with the rotor pointing at the #1 mark on the distributor. Put the cap back on and start the car.
Warm up the car then shut off, ground your ADL and restart.
Set timing with an induction timing light.
Remember that your crankshaft makes two revolutions for every revolution of the distributor, that’s why you may be at Top Dead Center (TDC) for either #1 or #4 cylinder with the fat mark lined up on the timing tab. Some folks will pull the #1 plug out, put their finger over the hole and when it blows off, you’re at TDC for #1 cylinder.
Some folks will rock the car in 2nd gear to rotate the engine on manual shift trans to get the harmonic balancer fat mark to line up on the timing tab. I’ve done that myself, beware of getting your skull slammed by the deck lid, ask me how many stars you’ll see. I have also used a long wrench and or a socket on the main bolt on the balancer. Whatever works for you.
I think that’s it for a blind installation of a distributor. 
|
|
EDIT: All is fine. I had a few complaints about the engine sound but it wound up being because I had the ADL jumper in on the first start. I removed it and the car sounded fine. I'm hopeful that after getting a timing light all will be perfect with this new distributor. Thanks to everyone for the help!!! Especially Jettman, whose post above help me tremendously with a step by step guide on starting from nothing...[This message has been edited by mgiusto (edited 04-26-2009).]
|
|
|
|
GlassParking_Lot
|
APR 27, 05:15 PM
|
|
|
I love you guys. ya'll are so awesome. You guys are defanently the shapest mechanics I have ever come acrossed on the internet. That post that you replied to me with is going to solve so many of my problems. i finally know why the car has never ran right. the firing order has never been correct. You guys are seriously awesome.
|
|
|
|
GlassParking_Lot
|
APR 29, 02:58 AM
|
|
|
Well, Its done. My 86 fiero gt is now perfectly in time and purrs like a kitten. Thank you, thank you, thank you.
|
|
|
|
Edaw 0
|
AUG 17, 12:49 PM
|
|
Thank you, thank you thank you!
Now I know what it's like to leave a light without flooring it.
|
|
|
|
DLCLK87GT
|
AUG 17, 02:01 PM
|
|
|
I never knew the trick about using the coil wire. can't wait to get home and try it.
|
|
|
|
Brucepts
|
AUG 17, 04:21 PM
|
|
Thanks for this post used the info in my own install which I undertook past weekend and ended up with this;
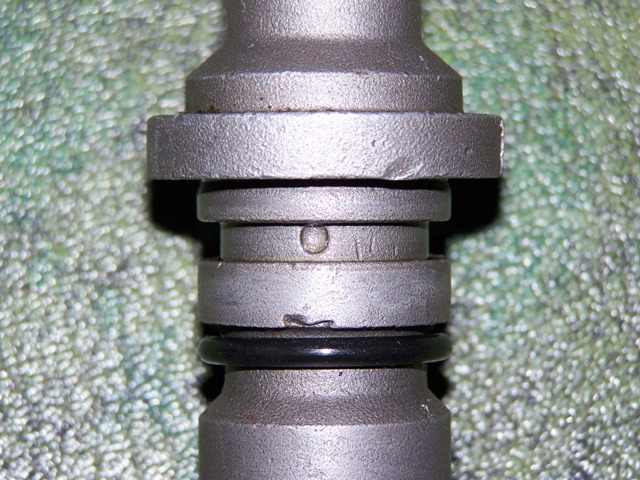
(O-ring moved to show groove) Leaked like you would not believe till I found out why, took the o-ring off to change it thinking it might be cut and found this dimple in the o-ring groove. Oil was pushing behind o-ring and up this dimple and out.
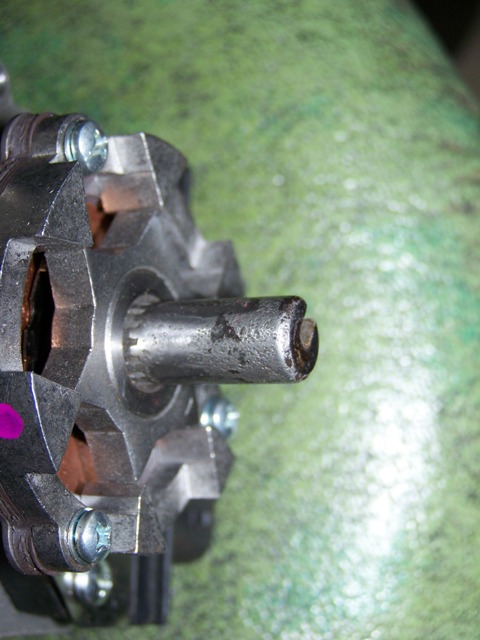
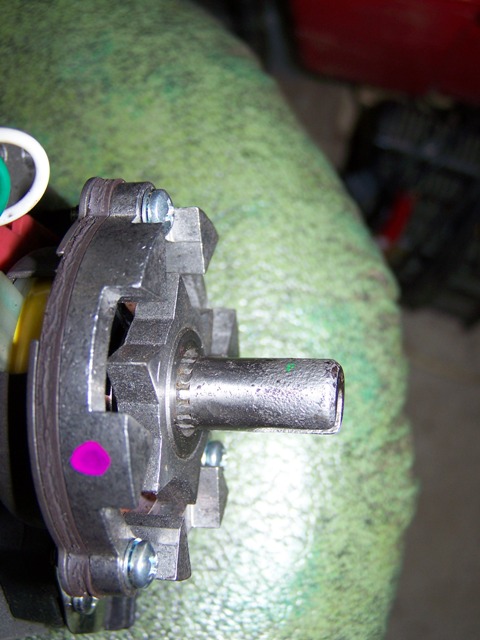
My original distributor had end play so while I had it out I compared to this "new" remanufactured one and found my trigger wheel had moved up the spline after 97000 miles so I tapped it back down to tighten up the end play.
I had also noticed when I installed my rotor on the "new" distributor that it felt loose so I measures the shaft and it was undersized from the old one, you can see the grind marks in the pics;
Installed my old one after checking everything out and installing new o-ring and took the "new" one back to NAPA today for a refund! NAPA guy didn't even question it, must not be the first time?
Needless to say I'm now an expert on distributor removal/install after doing it 5-6 times. (had the timing off a tooth one way or the other so had to pull it a time or two extra and the other times were to find the leak)
Anyone want to guess how many times I had to pickup the clamp and bolt off the floor??
|
|
|
|
pontiackid86
|
NOV 13, 12:18 AM
|
|
|
This thread is vey helpful in the rebuilding of my motor but i have one question. I have bumped the cylinders a few times since i removed my distributer. What should i do about replacing it and retiming it?
|
|
|
|
jetman
|
NOV 13, 08:54 AM
|
|
| quote | Originally posted by pontiackid86:
This thread is vey helpful in the rebuilding of my motor but i have one question. I have bumped the cylinders a few times since i removed my distributer. What should i do about replacing it and retiming it? |
|
You need to find Top Dead Center (TDC) for # 1 piston. Rotate the harmonic ballancer so the fat timing mark is aligned up on the timing tab, then set your distributor. You will be at either # 1 or #4 TDC, go from there. If you have your intake off and can see the lifters, TDC #1 is where the both valves are closed when the fat mark is on the timing tab. A little more detail here....
http://www.fiero.nl/forum/F...ML/079386-3.html#p99
|
|
|
|
countach711
|
MAR 08, 10:40 AM
|
|
|
I think it might help clarify that the coil trick works because you don't see cylinders 2,3,5,6 firing because they are doing so at 1/3 increments around the balancer. So if you are standing above it holding the timing light, the lower 1/3 marks would pretty much be out of your vision and you will only see 1 & 4 firing around the 10 degree mark (hopefully). Someone correct me if I'm worng, but I beleive that's right.
|
|
|
|
jetman
|
SEP 09, 12:24 PM
|
|
Here is an excellent question that I was asked by one of our forum members. 
| quote | | Your post on distributor replacement is awesome! After reading through it a couple of times, I had some questions. What is the purpose of grounding out the ADL with a paper clip? What is ADL? Is this required every time the timing is checked? Thanks again! |
|
Thanks for the compliment.
Yes, you must ground out the ADL to set the engine distributor base timing.
The ADL is the computer diagnostic connector that lives behind the ciggy butt cover. Grounding out the ADL puts the computer into "service" mode so that the computer does not adjust the timing on it's own. With the engine off, the paperclip is inserted into the ADL, then start the car and adjust the distributor base timing which is 10* before top dead center. It's as simple as that.
If you didn't ground out the ADL which puts the computer into service mode, you'll never be able to set the distributor base timing as the computer will be constantly making adjustments on it's own.
You also ground out the ADL whenever you check the engine codes but in that case, you don't start the engine, rather just turn the key to the engine on position and watch the "service engine soon" light (check wallet light) flash the codes at you.
Back in the old days, we didn't have engine management computers, setting the distributor timing was all we had to do. Now a days, the computer makes adjustments constantly so grounding the ADL temporarily stops the computer from making adjustments allowing you to set the distributor base timing properly.
Thanks for the excellent question, this is what makes the forum so great. As you can tell by my ratings bar, I "positively" help out in any way I can for the benefit of all my fellow Fiero forum members as they have for me in the past.[This message has been edited by jetman (edited 09-09-2012).]
|
|
|
|