|
| Distributor replacement with pictures and tips for a V-6 (Page 10/12) |

|
NashvilleFiero
|
JUN 13, 04:08 PM
|
|
I was amazed at how many problems I ran into / caused into with my distributor along the way.
Here goes:
1. Broken/hidden 2 wire connection to module (this was really hard to diagnose)
2. White wire from coil got crimped in and shorted between cap and base of dist (can't see back there)
3. Somehow the old rotor went back on the new dist. (wobbled on shaft, made engine miss)
4. Cleaned first rusted distributor with PB Blaster DOH! (it's magnetic !)
5. Blue screws at new cap base were too long, hit intake stud, making it seem like the dist endpoint (I think this may trip up a lot of us)
This thread helped my straighten a lot of mistakes that I made : )
Not quite out of the woods yet...: )
|
|
|
|
jetman
|
APR 24, 07:05 PM
|
|
Here is a quick bump for the spring tune up season. 
|
|
|
|
mgiusto
|
APR 24, 07:41 PM
|
|
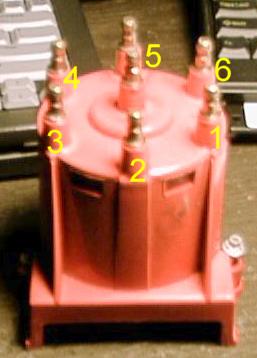
| quote | Originally posted by jetman:
If the engine is running you're very close, 180* off and it would only backfire. You can be off several teeth, that's why you can rotate the distributor housing. If you're running but badly, double check your wiring sequence as you may have a couple of plug wires crossed or cracked a spark plug upon installation.
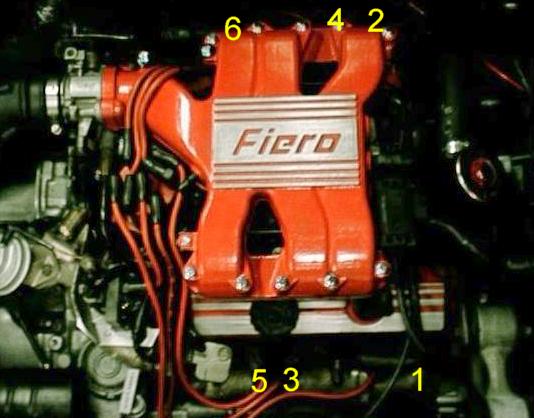
I thought that I would repost a couple of nice diagrams of plug wire routing.
Pictures worth a thousand words,,,, 
 |
|
OK My 88 Fiero GT is different than this in regards to the distributor cap diagram you have there. When my cap is on the distributor, the flat edge is located at about 7:30 o'clock if you are looking at it from back of the trunk and my #3 plug is where you have #2. This is how my car has always been. Has it been wrong all this time or is the location of where the cap is determine where #1 would start??? With my distributor cap in the location it is now, (flat edge at 7:30 o'clock) the #2 plug is located at 6 o'clock when looking at the cap from behind the trunk.[This message has been edited by mgiusto (edited 04-24-2009).]
|
|
|
|
jetman
|
APR 24, 09:02 PM
|
|
Generally speaking, you like to install the distributor so the rotor is pointing at your #1 post on the distributor cap and work from there. Sometimes mechanics don't get that right when they're re-installing the distributor so they "correct" by moving the plug wires one post forward or back to compensate for where the rotor is pointing at top dead center. This usually causes confusion later when someone like you or me tries to install a new distributor.
Get to top dead center on #1 cylinder, fat groove on harmonic ballancer, install distributor so rotor will be facing the #1 post on the cap, go from there.
|
|
|
|
buddycraigg
|
APR 24, 09:31 PM
|
|
| quote | Originally posted by jetman:
Get to top dead center on #1 cylinder, fat groove on harmonic ballancer, install distributor so rotor will be facing the #1 post on the cap, go from there. |
|
just a reminder that the fat groove lines up with the pointer when #1 AND #4 are at TDC.
that is all
|
|
|
|
mgiusto
|
APR 25, 11:05 AM
|
|
| quote | Originally posted by buddycraigg:
just a reminder that the fat groove lines up with the pointer when #1 AND #4 are at TDC.
that is all |
|
Line fat groove up with 10 * on the pointer? Can I do it this way blind without having to take the #1 plug out and check for compression? I am just one person doing this job and I am rotating the crankshaft from below the car.
Buddy great video! I was at aloss on how to paint the big groove and the 10 * marker from up abvove though. I found it so much easier doing this from below the car. with the right-rear tire off.
|
|

|
mgiusto
|
APR 25, 03:37 PM
|
|
While waiting for a reply to my previous message, I went ahead and lined up the fat groove on the crankshaft pulley with the 10 degree mark on the pointer, then I removed my distributor cap and took a pic to show where the rotor is.

Notice that the rotor is located at the #4 location if the distributor cap were on. Do I now lift the distributor out and turn and put back in so it lines up with where position #1 would be as shown in my pic? When I took out the old distributor, the rotor was facing between #4 and #5 location.
Below is another pic with the distributor cap on.

|
|

|
Patrick
|
APR 25, 03:48 PM
|
|
| quote | Originally posted by mgiusto:
Notice that the rotor is located at the #4 location if the distributor cap were on. Do I now lift the distributor out and turn and put back in so it lines up with where position #1 would be as shown in my pic?
|
|
Only if piston #1 is actually at TDC. You won't know until you follow the instructions for finding TDC of #1.Yes, you've got the timing marks lined up, but at that position it could be for either cylinder #1 or #4.
I found the easiest way to rotate the crankshaft was to remove the passenger side rear wheel, unhook and drop the flexible side-skirt a bit, and then put a socket on the end of the crankshaft with a long extension. In doing so, I was able to stand beside the car and observe the timing mark on the balancer while I reached around and turned the crankshaft with a ratchet.[This message has been edited by Patrick (edited 04-25-2009).]
|
|
|
|
GlassParking_Lot
|
APR 25, 04:41 PM
|
|
|
Hey, I know this is a bad thing, but what if you did'ent marking the place of the old distributor and just put the new one in ? lol sorry. Can anyone help me ? All my friends are calling me an idiot. lol
|
|

|
jetman
|
APR 25, 10:49 PM
|
|
|
|
|