
 
     |
| A 3.4 DOHC Build then... F40 Turbo (Page 56/57) |

|
elitopr
|
JUL 11, 07:46 PM
|
|
|
|
|
ericjon262
|
JUL 12, 10:57 PM
|
|
| quote | Originally posted by mr_corean:
I might be talking out my ass here, but could you put some sort of a purge valve like our fuel pressure valve? Then you could just run a hose to that into a bucket and purge it until only liquid and no gases were coming from the line. I'm guessing that's the high point in the lines right? |
|
kind of already exists, the radiator cap should provide this function for gasses in the radiator, and *most* engines made past the late 80's/early 90's have bleed valves installed at the high points in the system. with my car, I went a step further, and installed a small tank in the recirculation line that goes from the thermostat housing, back to the water pump. the tank provides for a high point fill in the engine compartment, and has enough volume to allow the velocity of coolant in the tank to lower, and allow gas bubbles to collect there instead of going back into the engine where heat transfer would be effected. I also installed a bleed valve on the tank to allow the gasses to be vented when the system has pressure.
there's pictures of my setup on RFT, and until I find a suitable replacement for photobucket, I won't have them posted elsewhere.
http://phpbb.realfierotech....4510f5475412#p153537------------------
"I am not what you so glibly call to be a civilized man. I have broken with society for reasons which I alone am able to appreciate. I am therefore not subject to it's stupid laws, and I ask you to never allude to them in my presence again."
"The day I tried to live, I stole a thousand beggars' change and gave it to the rich."
http://www.fiero.nl/forum/Forum2/HTML/119122.html
|
|
|
|
Fierobsessed
|
DEC 04, 11:42 PM
|
|
Apologies for the radio silence as of late. Just haven't been working on it or for that matter fixing the little issues till now.
I finally got around to doing some work on my car.
I pulled the cradle, pulled the transmission and replaced the synchros. Which as it turns out, they don't appear to be bad. The clutch may have been causing all of my issues with shifting. So... I'll keep the old synchros in a safe place in case they are needed in the future. I got a different brand pressure plate that seems like its a MUCH better donor than the sachs/Spec. style setup. Its a Exedy GMC502. These have positive release clips that physically PULL the pressure plate off the clutch disk when disengaged as opposed to relying on weak spring pressure to do the retention. I took this pressure plate and moved its pressure angle significantly. I had to add new metal to the plate to machine down. I also modified my press to become a pressure plate dyno by adding a pressure gage. It was fascinating to see how changing the pressure angles effected the clamping force.
Second and even more important task was to work on the cooling system again. I popped out the water pump to make sure it wasn't having any issues. That checked out perfect. So I ordered some fittings and pipe and what not and started changing the layout of the fuel lines and coolant lines near the the turbo. It all needs to change. I'll come back and update this with more pics and details later. But I'm feeling good about this project again.
|
|
|
|
Rickady88GT
|
DEC 06, 12:07 AM
|
|
|
That is cool stuff. I would love to have my own mill and lathe.
|
|
|
|
Fierobsessed
|
DEC 09, 07:51 AM
|
|
Ok, back at it. Engine out! It's a bit dirty. Mostly Dusty, but I found a small oil leak from the breather fitting too. Seems like things stayed in order for the most part.
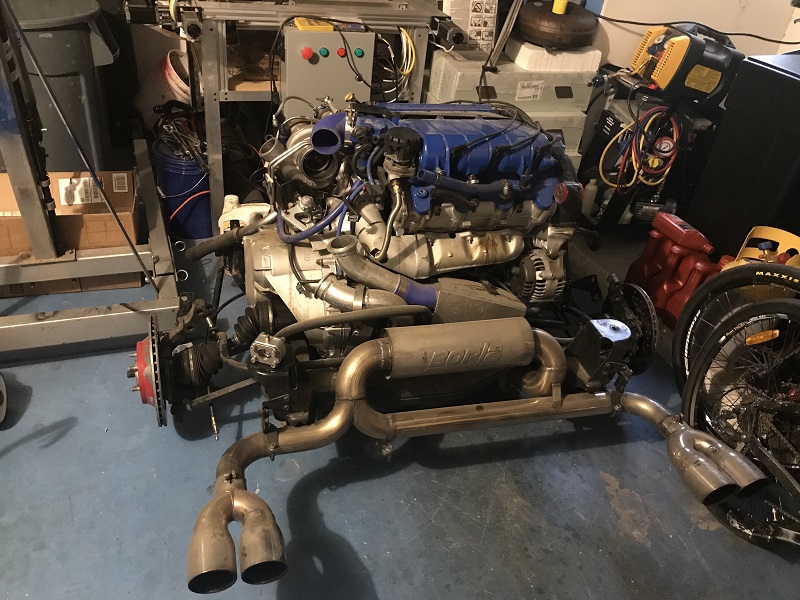
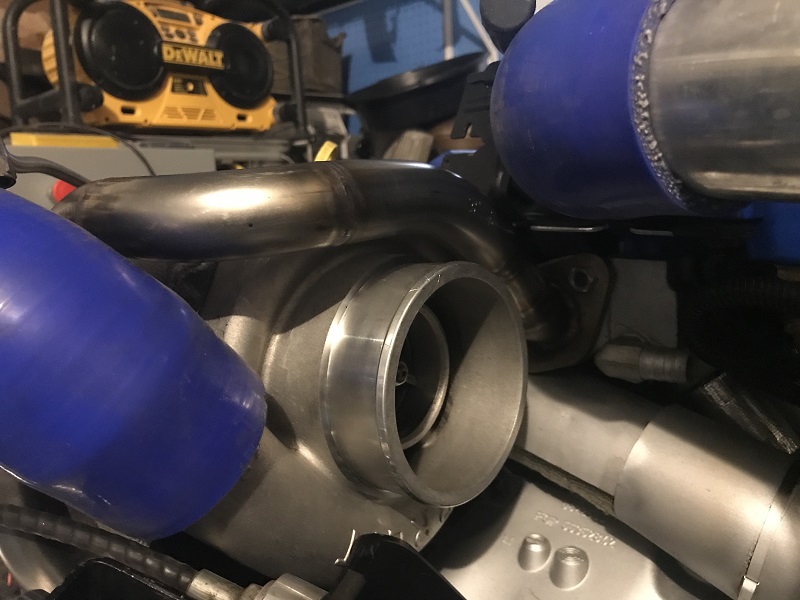
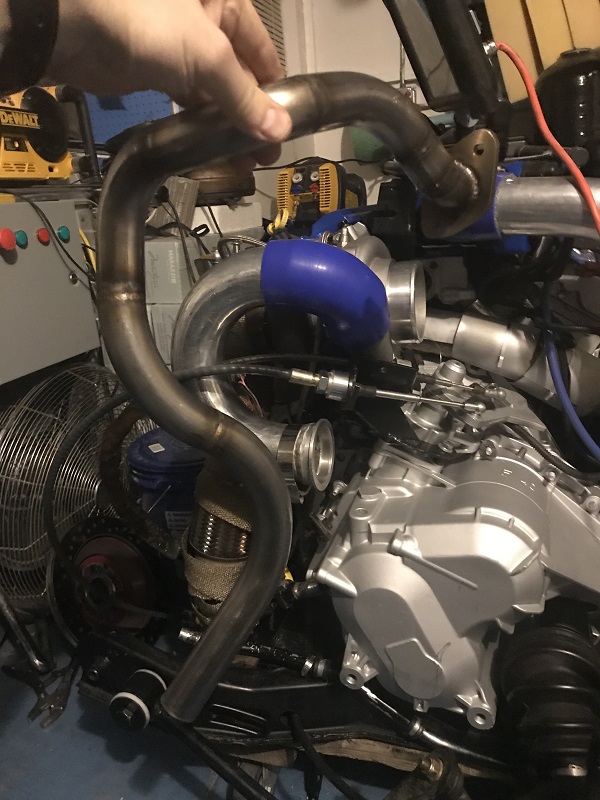
Started taking it apart. I removed the turbo, and there it is. I believe the coolant drain is the design mistake I made that is causing the overheating. More on that later.
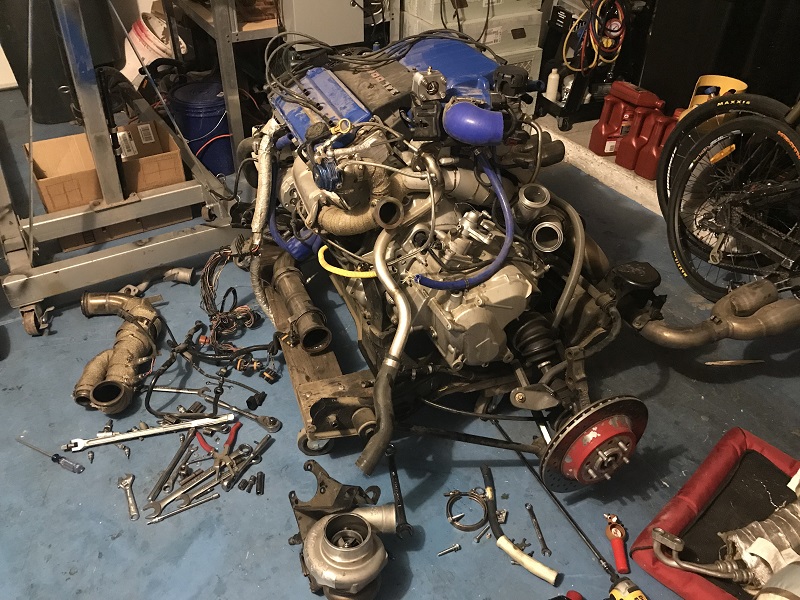
The first items on the list of tasks, Clutch and flywheel replacement, pressure plate modifications (Round 2!) and replacing the synchro's. (Which in hindsight, didn't seem to be bad.)
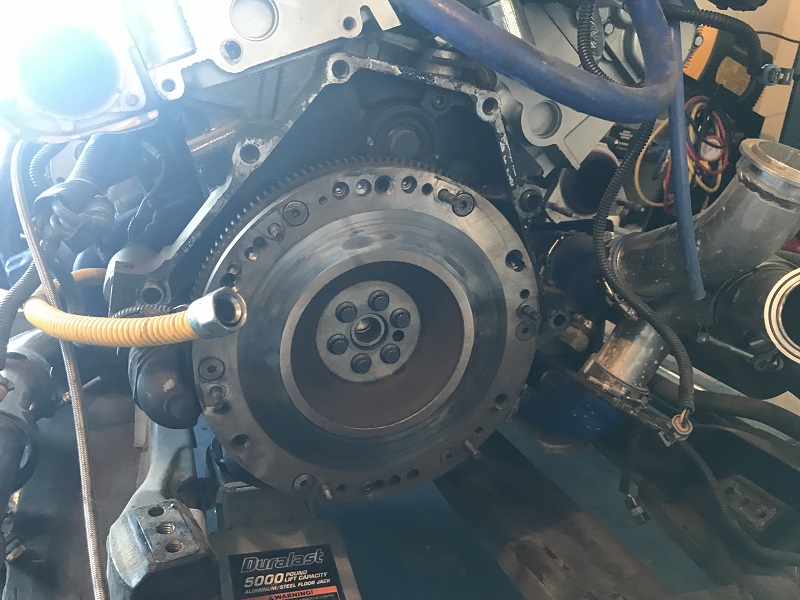
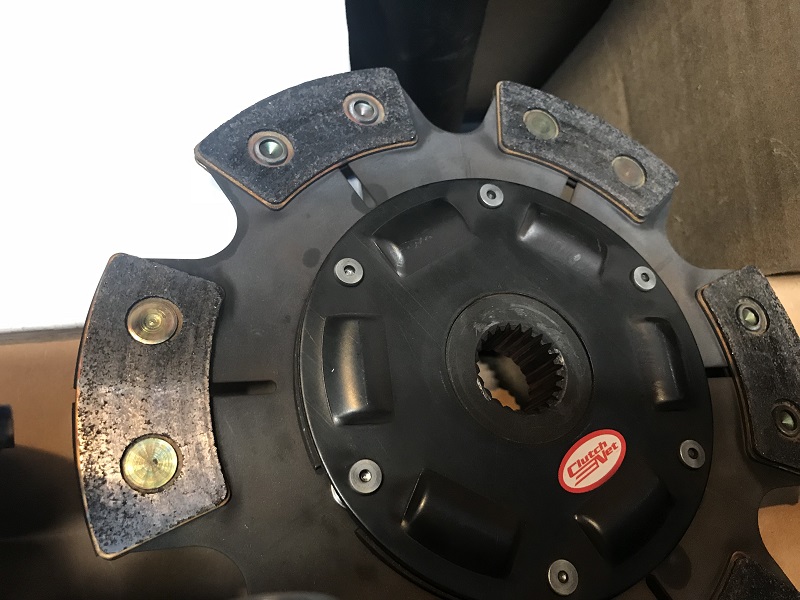
Pulled the transmission and clutch. Honestly, for it slipping at well over 400 HP (I assume) It actually doesn't look too bad. Just a little bit of heat checking on the flywheel and pressure plate, Some material was worn off of both surfaces. Sintered clutch disks are known to wear the opposing surfaces. The disk is flawless, no material lost there.
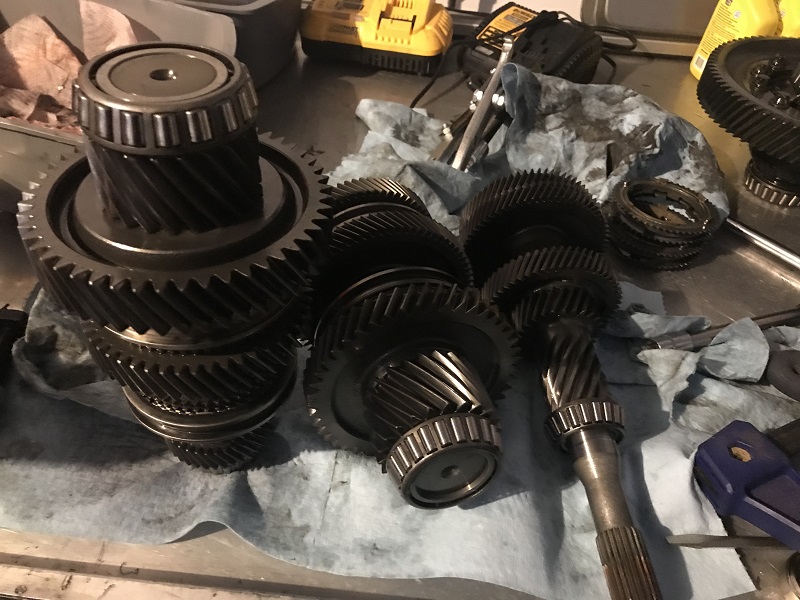
I had a lot of trouble shifting with the F40. So I cracked open the F40 transmission. I changed the synchro's on gears 1-4. It was actually surprisingly easy to work on this transmission. Splitting the case was just as easy as pulling the shift shaft assembly and removing all the case bolts. INCLUDING THE ONE IN THE BELLHOUSING. This was almost a tragedy story.
Once the case was split, all I had to do was use a gear puller on the outer most gears on the mid shafts, and that forced the bearings off, then it was just a matter of removing the parts, and a couple of snap rings and change the synchros.
Part numbers for the synchros, in case you ever need them
55351580 3rd, 4th, Reverse
55351579 1st, 2nd.
24451752 5th, 6th.
Oddly enough, you can use the 1st and 2nd synchros in 3rd and 4th. Just omit the inner friction, and reuse the original cone. The outer two rings are the same. I suppose with a little creativity with a welder and a lathe, you could possibly convert the 3-4 synchros to triple cone.
I only took one pic of the parts out of the transmission because I was busy doing the work.
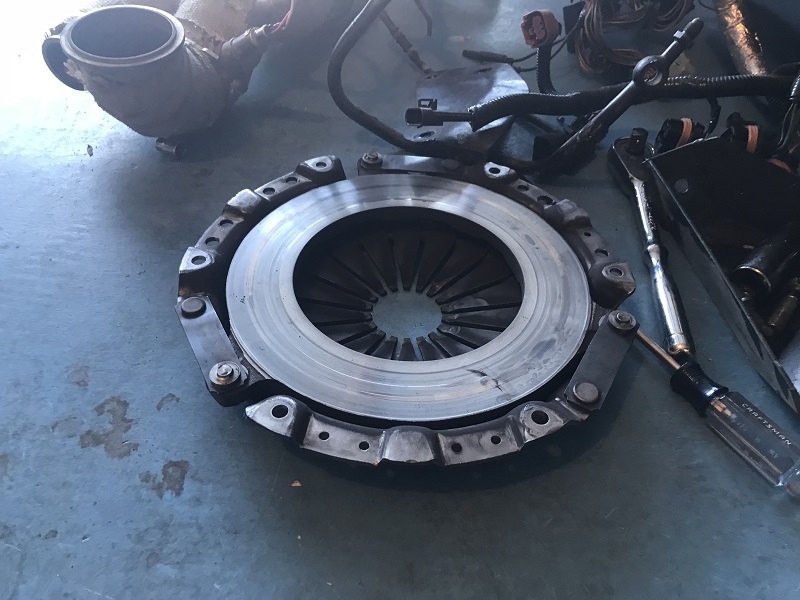
New clutch stuff!
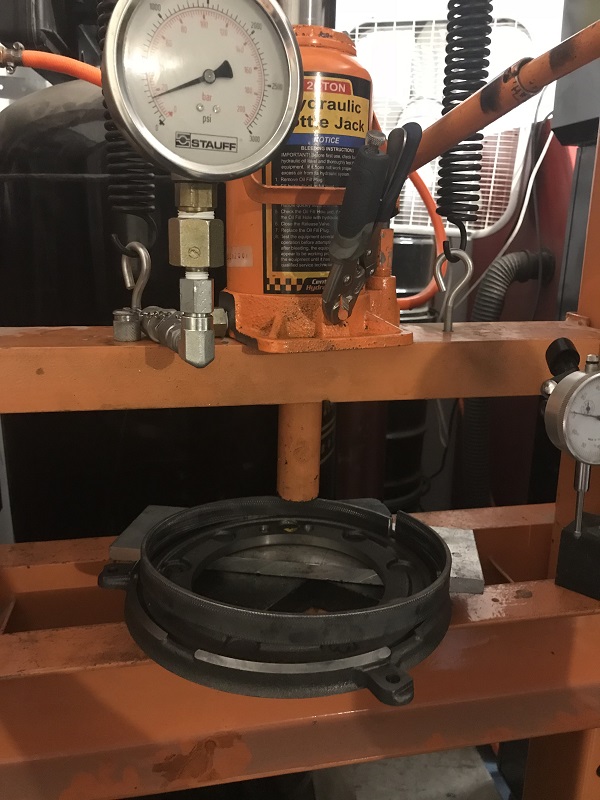
I modified my Horrible Freight shop press to add a pressure gage. Now, I have the ability to measure clamping force on pressure plates.
I bought a new donor pressure plate, A Exedy GMC502. I really REALLY like this pressure plate. The positive release clips though change the game for me. It was a design weakness in the other pressure plates I've messed with. Including the Spec SCC883.
Pressure plate tests. I used my press to apply pressure to the pressure plate. I used a dial indicator to measure the distance that the pressure plate was being moved by the press. I recorded the pressure at 0.010" increments, starting at first contact.
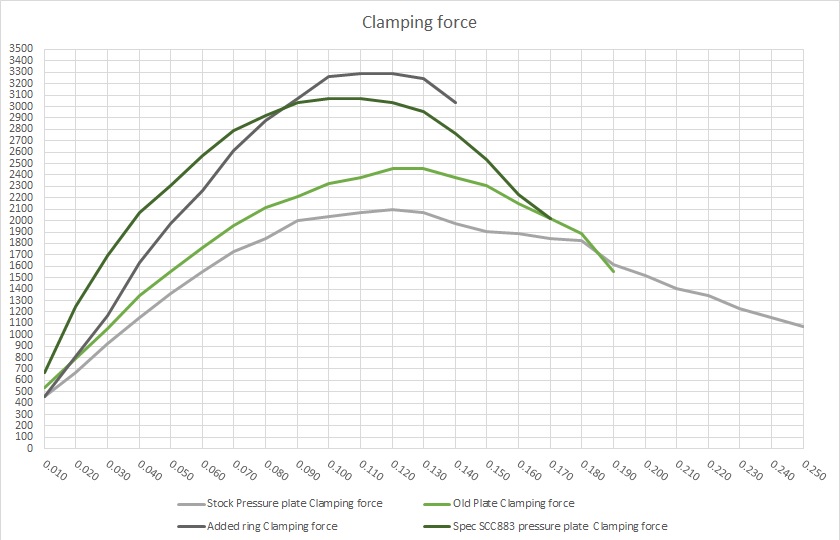
The first one I tested is the unmodified Exedy GMC502. You can see that peak clamp pressure was achieved at 0.120" of compression. Peak clamp pressure was 2094 lbs. The pressure curve is really wide, still producing 1076 lbs at 0.250" of compression, Probably could have traveled a little more, but I didn't see the point in doing that.
The second one I tested was the one I just removed from the car. It's the one I modified here: http://www.fiero.nl/forum/F...L/000143-7.html#p253
I really didn't make as much of a clamping improvement as I thought that I did. It peaked at 2459 between 0.120" and 0.130" compression. Not bad. The useful range of compression was shortened up slightly. In testing though, I hit a point right at 0.190" where the spring plate actually inverted and nearly all clamping force is lost completely. The spring's fingers were pointing considerably downward. They would have contacted the clutch disk if there was one installed.
Third test was the newly modified Exedy pressure plate. It had an astounding 3285 lbs of clamp between 0.110" and 0.120" of compression. But, the spring inverted after 0.140" So there is very little range on this plate. Obviously, this plate will be very sensitive to the thickness of the disk, or to wear.
The fourth test was the Spec SCC883. Which also has a very high clamp load, peaking at 3074 between 0.100" and 0.110". It appears based on the data that I may have mis measured the compression distance by about 0.010". This pressure plate actually still has a decent usable range before it inverted after 0.170".
One thing I noted, was that all of these pressure plates peaked clamp load when the spring fingers are about flush or just proud of the surface of the cover plate. This is how I now figure out exactly how to modify the pressure plates now. I also try to slightly overshoot the compression point that peak pressure is produced so that it wears into the peak pressure before it starts to slowly lose clamp load.
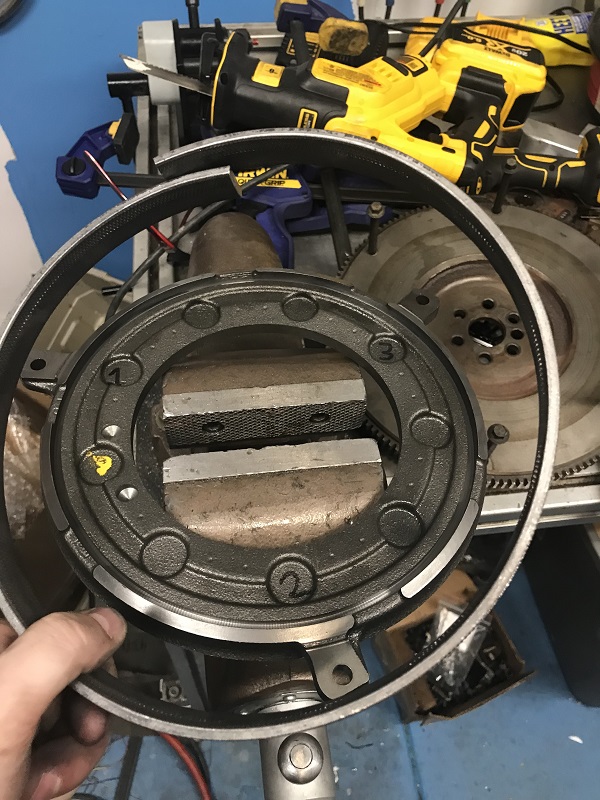
Heres a stock pressure plate, and the new one that is about half way through its modification. You can see that I machined a groove into the disk so that I could insert new metal.
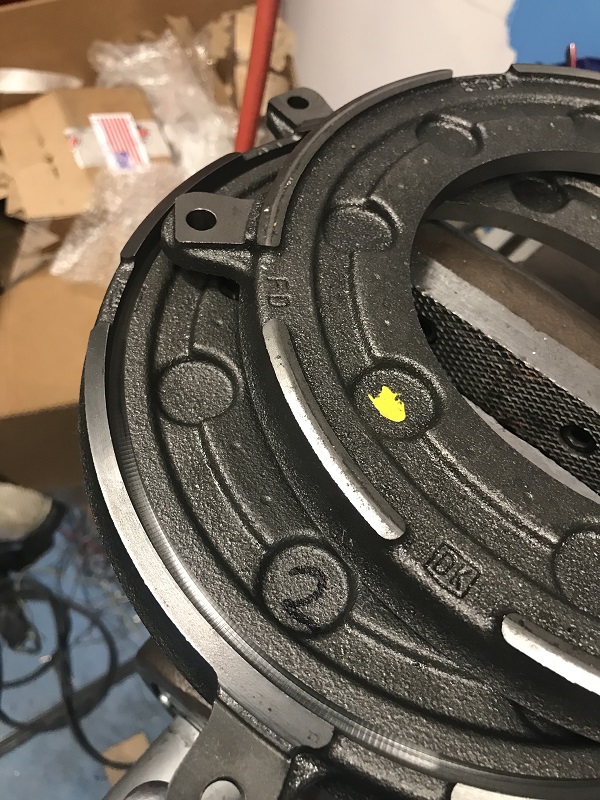
I used a "Ring roller" from Harbor Freight to roll a piece of 3/16" steel to about the diameter of the grove I machined.
I used my press to force the ring into the groove. Its a press fit. You can also see my pressure gage that I used to measure the pressure plates.
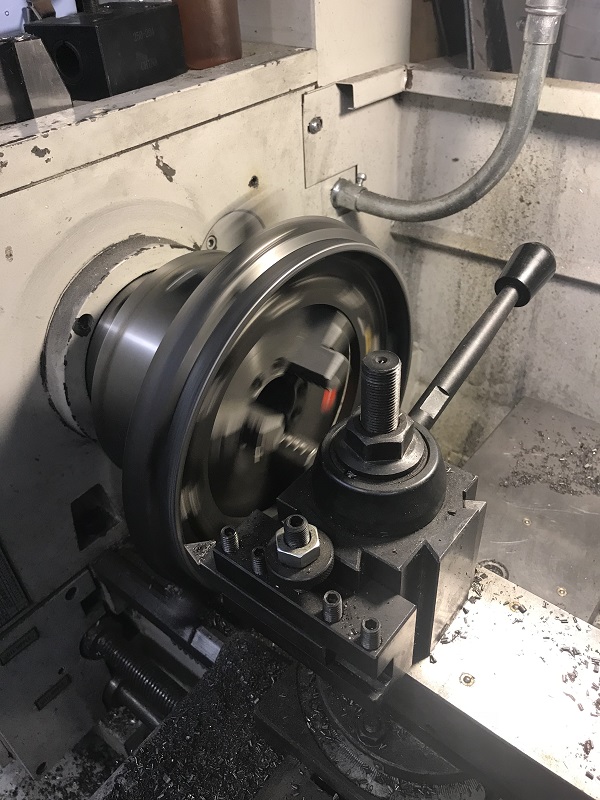
Machining the metal into the correct angle and height.
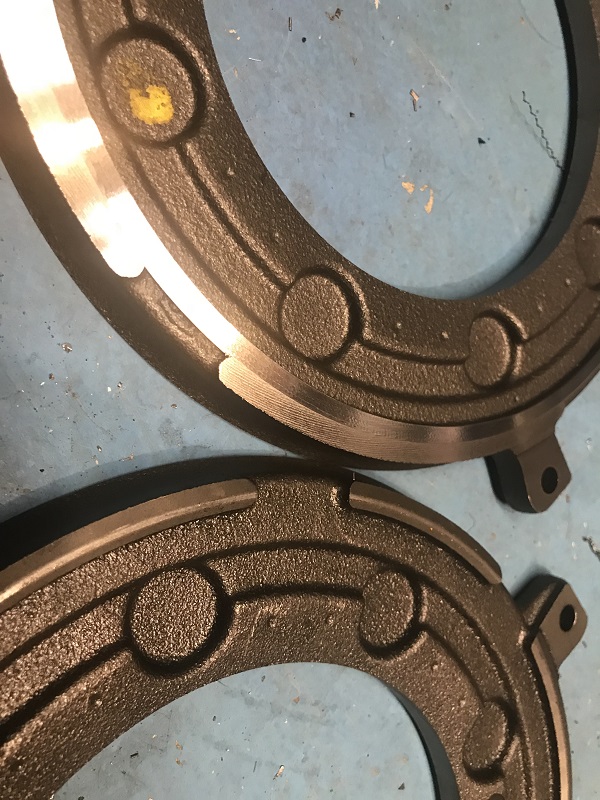
Final result. Original vs modded.
Once I had that all sorted out, I put the new flywheel and clutch in, gave the transmission paint a once over, and installed it. It was also time to give the cradle and engine a quick bath. Simple green and a soft brush goes a long way.
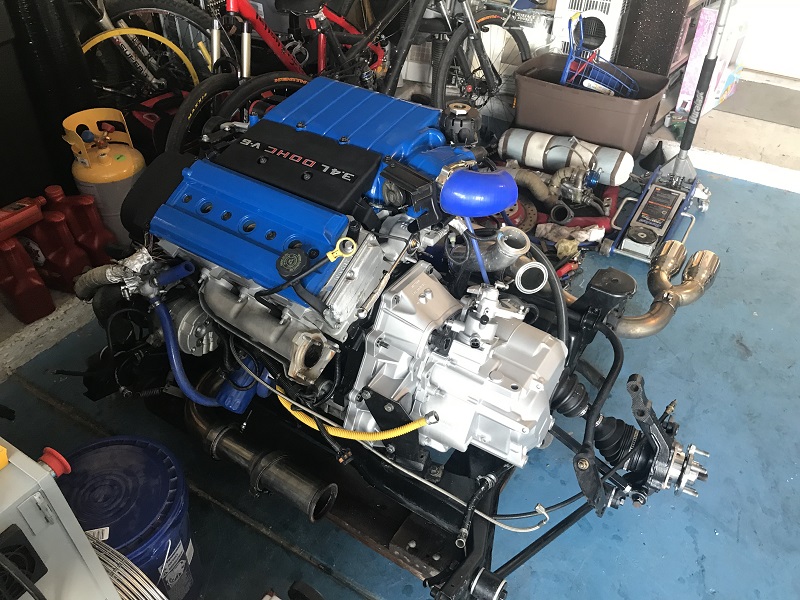
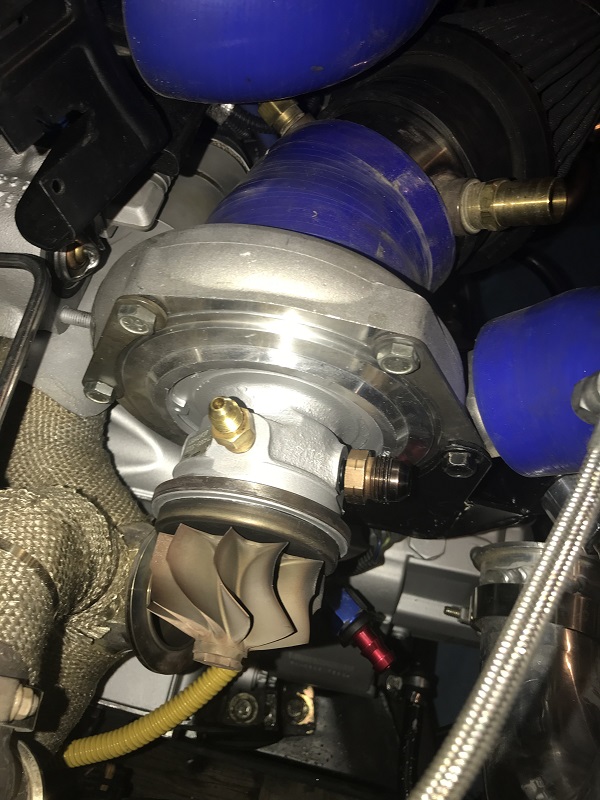
I also cleaned up the turbo. The cast iron CHRA rusted up pretty bad. Looks nice now.
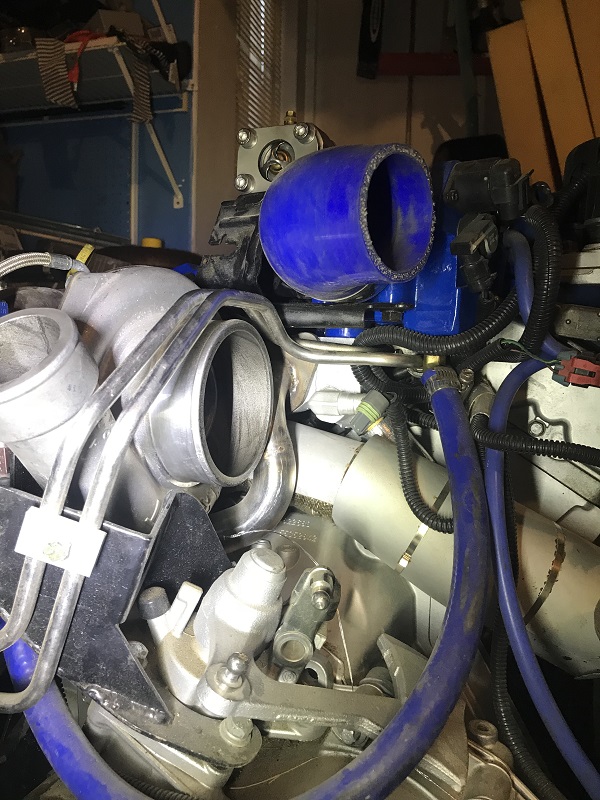
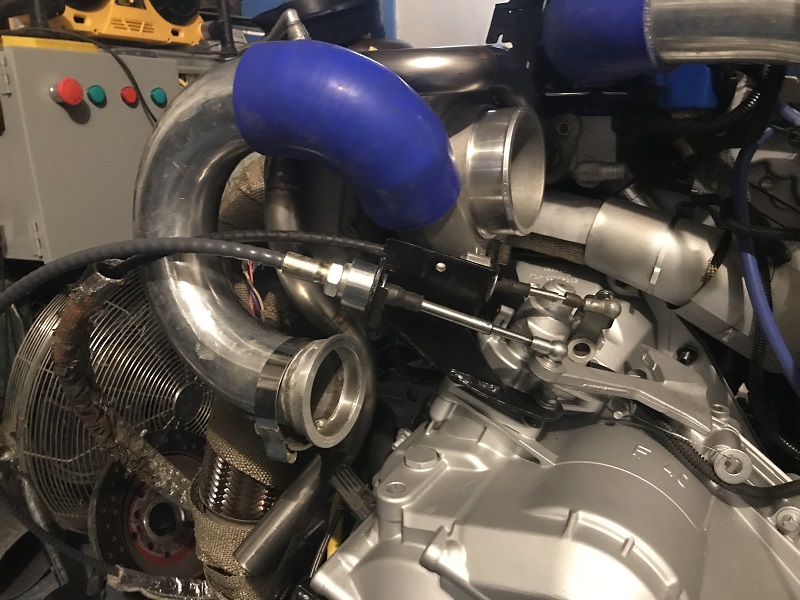
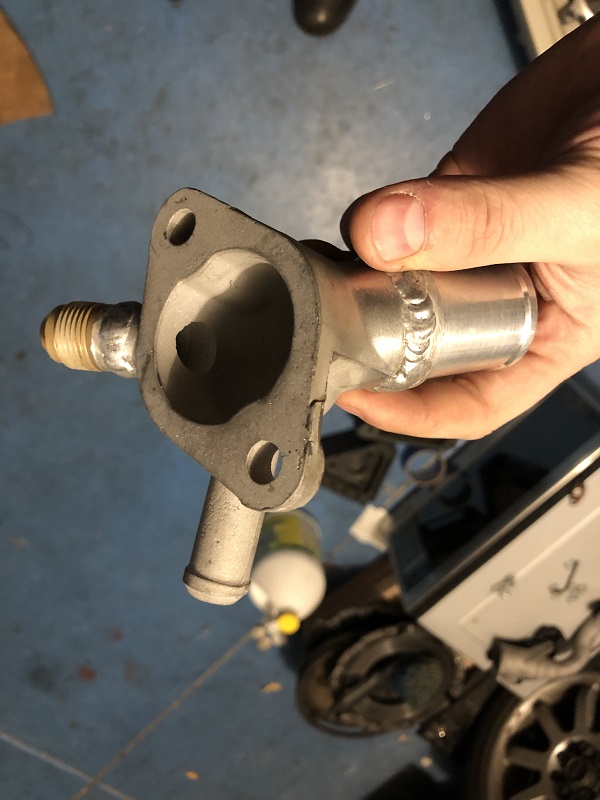
Now, I have to deal with the coolant return pipe debacle. I screwed up when I routed it downward, which at the time seemed like the obvious choice for routing. But while what I did was mostly functional, It did however drain from a point that wasn't absolutely the highest point in the coolant system. I believe that this caused any vapor that would invariably be produced in the engine to go to the high point, and not migrate to the radiator like its supposed to. So as I drove more and more, the water level in the engine would continue to be pushed down by the growing bubble, causing a progressive overheating situation that took almost 30-40 minutes to occur. The solution to this problem would be to route the return pipe upwards, then migrate it down to where it needs to go. I also want to add a bleed/fill port.
Having the pipe going up first would ensure that any coolant leaving the engine must flood the engine all the way to the top before trickling down the return pipe. This is how it works on the original Fiero's cooling system. I also blocked off the throttle body coolant line. I was using it to feed the turbo, but now Iv'e teed off the heater core feed line to feed the turbo, and that returns to the inlet of the water pump. If any bubbles show up here, they will flush back to the engine, then up to the return pipe. This change was done to have the turbo receive its water from a point that is guaranteed to be flooded. The throttle body coolant feed is a high point not guaranteed to be flooded at all.
So, before:
And, after:
Added the fill/bleed port.

So I had another problem to deal with, The water pump inlet (discontinued part) had a bit of a corrosion problem where the hoses meet it. I previously smeared RTV over the pitting and got away with it.
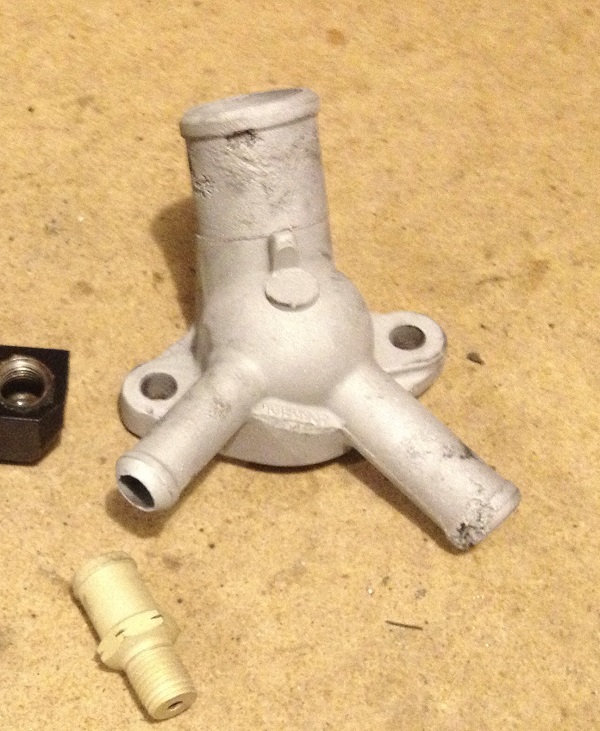
But I decided to fix this issue and also add a better turbo water return.
Cut off the old, destroyed barbs
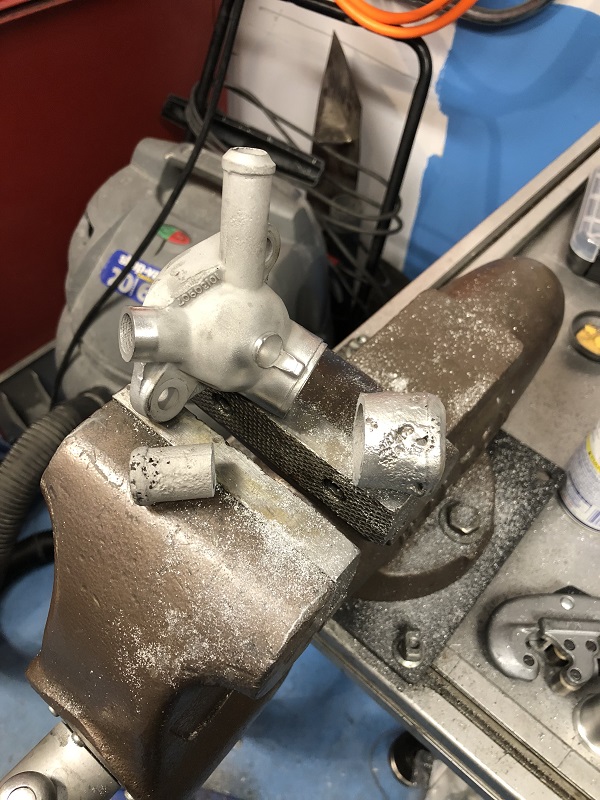
Made a new barb on the lathe, and recycled an AN fitting I used to have on the turbo.
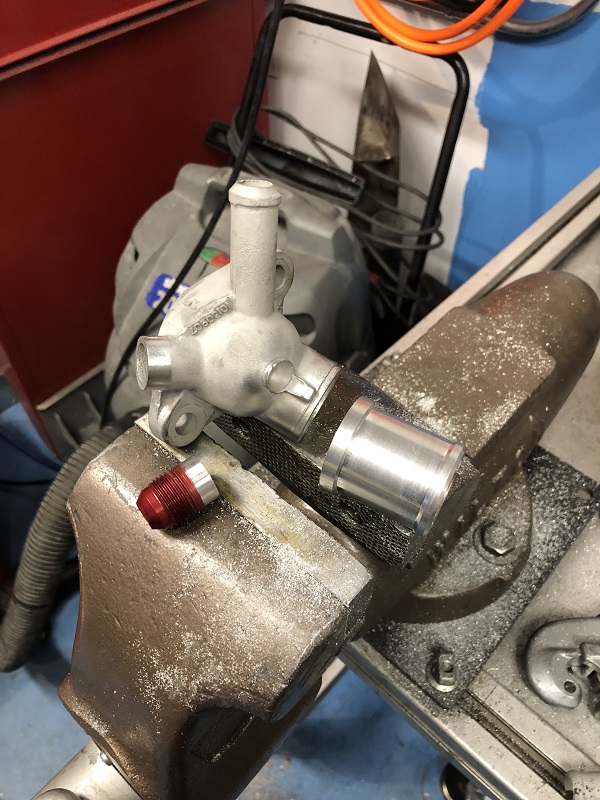
Welded them on.
Honestly, It's the first time I've had any luck attempting to weld cast aluminum. I cooked it with a torch before attempting to TIG weld it and I didn't run into too much porosity as I had previously when welding cast aluminum. It's certainly not my prettiest work, but its effective.
That's all for now, but I still have a few things to do before I shove this engine back in. One thing I am doing next is sound proofing the engine bay. It's just too damn loud in the car. I also want to try to make some changes that will help with shifting. I think the bend at the firewall was too aggressive.[This message has been edited by Fierobsessed (edited 12-09-2017).]
|
|
|
|
yamahasrx700
|
DEC 09, 10:33 AM
|
|
|
Your work is awesome and the way you attack issues is inspirational. Great job.
|
|
|
|
Irrationable
|
APR 11, 11:56 AM
|
|
|
|
|
robymon
|
JUL 05, 03:57 AM
|
|
|
I'm also curious. What happened to your project?
|
|
|
|
ericjon262
|
OCT 29, 01:18 AM
|
|
|
you ever put this through it's paces? ------------------
"I am not what you so glibly call to be a civilized man. I have broken with society for reasons which I alone am able to appreciate. I am therefore not subject to it's stupid laws, and I ask you to never allude to them in my presence again."
"The day I tried to live, I stole a thousand beggars' change and gave it to the rich."
http://www.fiero.nl/forum/Forum2/HTML/119122.html
|
|
|
|
La fiera
|
DEC 05, 01:00 PM
|
|
Just got rading this thread and man, you are a very talented individual, very Impressive!! Can't wait to see more!!!
Best wishes!
Rei
|
|
|
|