|
| Blooze Own: An F355 Six Speed N* Build Thread (Page 44/126) |

|
5150fauxarri
|
SEP 01, 08:51 PM
|
|
|
Wow is all I can say! Bloozberry thank you soooooo much for your thread. I have learned an amazing amount of info just from reading your story. As for me I'm in the middle of building an f355 with a n*. Sounds familliar right. My car was started by Bob Nielsen= former publisher of the Fiero News. He had health problems and unfortunately couldnt finish. Its built on an 88 formula. The best part is the N* that he purchaced in 96 from an eldorado that was totalled leaving the dealership. I also only live about 20min door to door from alan at chrfab so help is nearby. He wanted the engine bad since it has no wear and tear. It's has a rebuilt getrag 5spd with centerforce cluch and custom flywheel. Basiclly he was building the car the right way and has all top of the line parts. Anyway I just wanted to say thanks for the inspiration.
|
|
|
|
Bloozberry
|
SEP 02, 02:30 PM
|
|
|
Thanks 5150fauxarri, and welcome to the forum. Sounds like our projects have a lot in common so we may be able to benefit from each other's experience. So is your car running at this time? You should start a thread in Tech Discussion and document as much about your car as possible (with pictures) so that others may be able to glean ideas from your car about things like exhaust routing, engine management, flywheel design, etc.
|
|
|
|
5150fauxarri
|
SEP 03, 12:52 AM
|
|
|
Hey Blooz. Unfortunatelly I'm affraid I dont have the time to post everything like you do. On top of that I'm really computer illiterate which is why I don't have a picture next to my name and it took me a week to figure out how to make the right e-mail just to be on this sight. I have 3 kids who take up a lot of my time so I'm lucky just to get out and work on my car let alone write about it. Anyway about the car. My stock subframe was in perfect shape so a new front cross bar was put in place and except the trans mount(still stock possition) the rest was then cut out. The engine has been in and out at least 10 times working on proper fitment but I'm at the point where I'm going to have to weld up my mounts. This monday(labor day here) all my mounts well be done and I will be moving on from there. Anyway I will try to get some computer skills to help out people to learn from my(novice) mistakes.
|
|
|
|
Bloozberry
|
SEP 09, 07:08 PM
|
|
Finally some progress to show... (I know, I know, it's been a while). This latest update may disappoint some though since it's not about shiny parts  Instead it’s about more drawings… I've finally completed the '88 front cross member drawing, less all the goodies that attach to it. I wished it could have been a quick and dirty affair, but the reality is that it took 48 hours of labor to measure and enter into electronic format. (I must be the world's slowest drafts-person.) Instead it’s about more drawings… I've finally completed the '88 front cross member drawing, less all the goodies that attach to it. I wished it could have been a quick and dirty affair, but the reality is that it took 48 hours of labor to measure and enter into electronic format. (I must be the world's slowest drafts-person.)
Much of the difficulty comes from trying to establish a reference line or plane from which to measure all other points out there in 3-space. Just when you think you've got some complex curve finally figured out in two views, something goes all hairy in the third view so it's back to the drawing board... literally.
One thing that threw me for a while until I could get it figured out was that there is a measurement error in the '88 Service Manual on page 3J-6 and 3J-8. These pages refer to the underbody frame alignment specs. Although the cross member itself isn’t covered, these pages do provide some information about the mounting points for it, so it was a logical place to get a few initial reference measurements for my drawings. Here’s one of the pages in question (the other page just lists the numbers and includes the same fault):

Unfortunately in figure 5, the vertical measurement for point C* is wrong. After checking and re-checking several times, then consulting with an earlier year service manual (an ’86), it seems that GM just imported these schematics directly from the ’84 – ’87 Service Manual and modified the numbers to suit the '88… but forgot at least one of them.  In fact I know this is what they did because the 3D drawing of the space frame on the previous page isn’t that of an ’88 at all in the ’88 SM. Anyway, on with the show. In fact I know this is what they did because the 3D drawing of the space frame on the previous page isn’t that of an ’88 at all in the ’88 SM. Anyway, on with the show.
Here is the overall 3-view drawing of the front cross member (note that the scale is 1 square = 10mm). The red line is an arbitrary vertical plane I chose through the center of the middle section of the cross member to aid in taking measurements. The horizontal reference plane is the top surface of the main central mounting location of the cross member where four bolts pass through it (two per side):

Because of the size limitations for pictures posted in PiP, I chopped up the 3-view drawing into each of the three views separately to get a bit more detail visible. Here’s the Top View, where most of the pertinent measurements for the whole cross member are shown:

Here is the Rear View, plus a sectioned view of the steering rack mount. One important thing to note is that the cross member is completely symmetrical from left to right, with the exception of an alignment pin on the LH side, mid mount location. I found it curious that GM would have only installed a single alignment pin for the whole thing 

And lastly, here’s the LH side view of the cross member. The notable feature from this view is the angle of the upper control arm mount, namely 5 degrees. If you’re not sure why this important, it’ll become clearer once I get around to analyzing the front geometry.

Next up: the control arms… stay tuned.
(Edited to update all four crossmember drawings)[This message has been edited by Bloozberry (edited 11-11-2011).]
|
|
|
|
fieroguru
|
SEP 09, 09:10 PM
|
|
|
Blooze, you rock! I'd give you a + per drawing if I could.
|
|
|
|
RCR
|
SEP 11, 06:24 PM
|
|
Those are great, Blooze.
Bob
|
|
|
|
Fiero2m8
|
SEP 12, 11:29 PM
|
|
|
|
|
BlackGT Codde
|
SEP 20, 12:08 AM
|
|
| quote | Originally posted by Bloozberry:
A few odds and sods for this post: I bead blasted the harmonic damper to get it nice and clean for paint when I noticed something interesting:

Anyone recognize the symbol? It sure looks like the Briggs and Stratton logo to me. I wonder why that would be stamped into the damper. Hmmmm… are there any 32 valve lawn mowers out there that I’m not aware of? |
|
um actually yes you hit the nail on the head, general motors, ford (especially the svt and racing development), and chrystler , all use briggs and stratton for a lot of engine building,
as do many other auto manufacturers, your cars are built by the same people who built your lawn mower. if you can believe that.
it is actually true, i have seen this logo and more detail on a ford 5.4 DOHC mustang cobra engine crankshaft. also seen the B&S logo on many pistons
http://www.strattec.com/main.html here is their home page, (after supposed split)(i believe is still with briggs very strongly)
http://www.strattec.com/oem_customers.html
------------------

1985 gt notchie auto (pic)| 3800 SFI N/A coming soon
1986 se notchie standard 4spd | for sale after 3800 swap[This message has been edited by BlackGT Codde (edited 09-20-2011).]
|
|
|
|
Bloozberry
|
SEP 20, 10:09 PM
|
|
<Edit ON>: Where are my manners... thanks for the feedback Fieroguru, RCR (Bob), and Fiero2m8. It's nice to know some people stayed tuned in! For BlackGT Codde: I was thinking either Briggs or Harley Davidson  Ever noticed how the two logos are almost the same? <Edit OFF> Ever noticed how the two logos are almost the same? <Edit OFF>
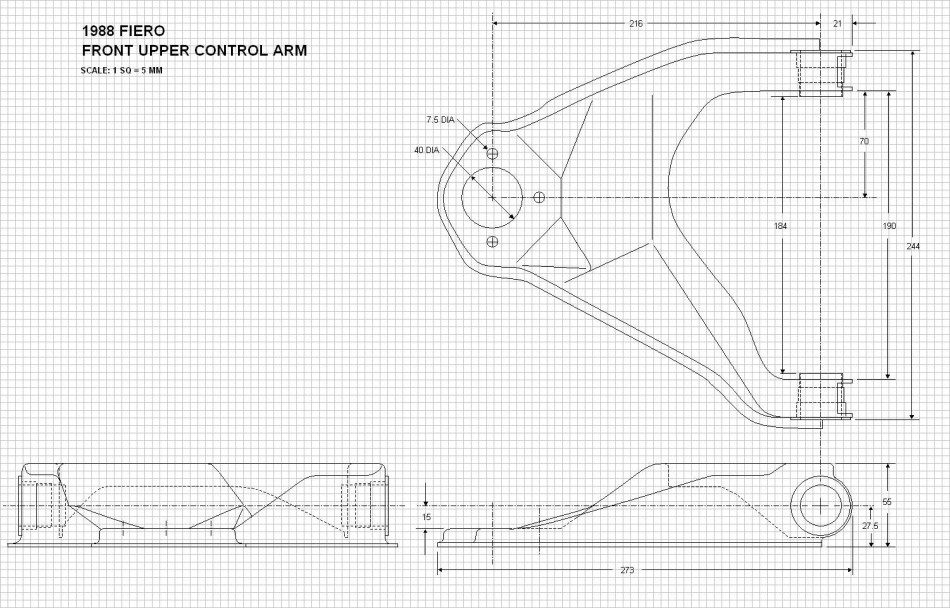
Anyways, another quick update: Progress has been a bit slow but here's the upper control arm. The end-view sure is busy! I couldn't really add it to the front cross member just yet because it sits at an angle to the floor as seen both from the side and rear view of the cross member. I know what the angle is from the side view (5 deg) but from the rear view I don't know what it is just yet. I'll need to draw the lower control arm and set it parallel to the ground, then draw both ball joints and the knuckle before the upper control arm angle can be determined. I guess I should have started with the lower control arm eh? (<--- Canadianism).
Hopefully the lower control arm won't take as long... the rainier the weather, the more I stay inside, the faster things get done.
 [This message has been edited by Bloozberry (edited 09-20-2011).]
|
|
|
|
5150fauxarri
|
SEP 27, 10:59 PM
|
|
Ha! The reason my progect goes so slow is since I'm in sunny southern California I'm allways outside (with the honey-do list of corse)!!!!
|
|
|
|