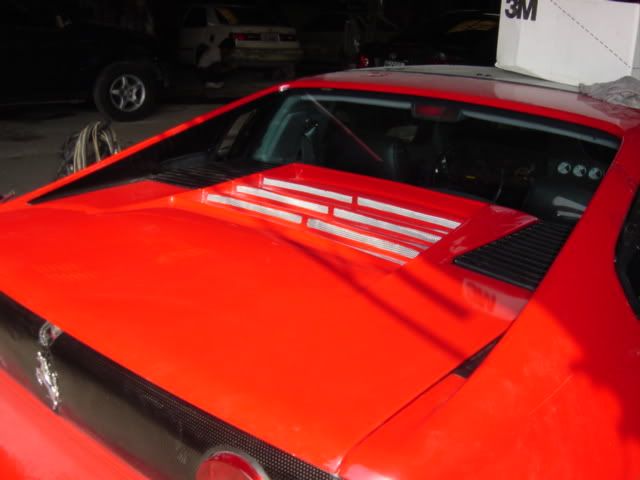
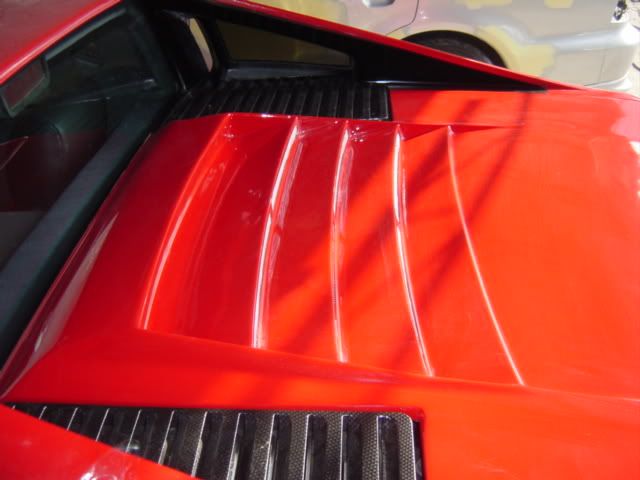
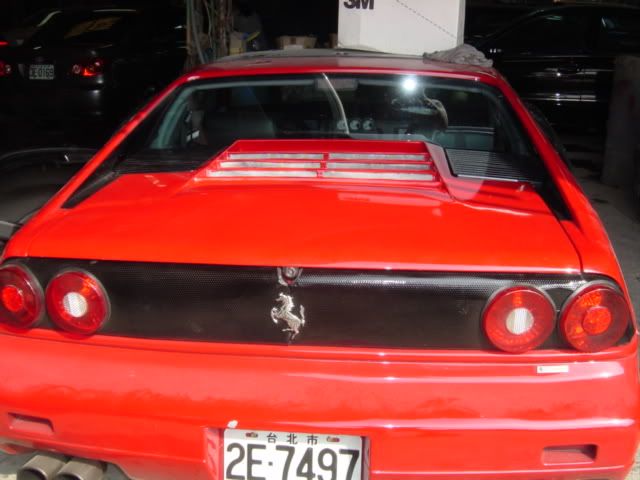
Sourmug's Decklid Vent Build ** 56K Warning!!** (Page 1/69)
Sourmug MAR 12, 03:40 AM

Hi :

I have come a fairways on my decklid vent build and thought that I would share it all with you. This modification is definitely not for the faint of heart as the decklid has to be cut up pretty extensively to fit the new piece, but the pictures will speak for themselves. I have no prior experience in bodywork and have never attempted anything like this before. the only other project that I have done with fiberglass is my battery box in this thread : http://www.fiero.nl/forum/A...050818-2-062364.html
My purpose for this thread is to encourage people who are not confident about doing this on their own. Hey, if I can do it so can you! Anyways, on with the information:

I purchased the fiberglass piece from gdjetski (AKA Golden) as can be seen in this thread:
http://www.fiero.nl/forum/Forum4/HTML/029074.html

The price seemed reasonable and I must admit that he shipped the piece quickly. When I picked up the piece from the post office I was concerned because the packaging was extensively damaged, so much so that Canada Customs attached a form indicating that they had to repair the packaging. When I got it home and unwrapped it this is what I found:


Needless to say, I was quite disappointed. I contacted gdjetski and he had indicated that he had never had a vent arrive in such poor condition and he refunded $60.00 of the original $100.00 amount, he could have just as easily blown me off but he seems to be an honest person. Afterwords I asked if he had any pictures or instruction on how to install the vent and he sent me a number of pictures. It was interesting to notice that in one of the pictures he sent the vent shown also had cracks as seen in this picture:


I think that these vents vents have a structural weakness at the edges and I would suspect that most of them will arrive with some sort of damage. Just a warning to those of you who may be interested in doing this as well.

[This message has been edited by Sourmug (edited 05-08-2007).]

Sourmug MAR 12, 03:49 AM
To continue:

My decklid also has some small structural cracks as seen below which seem to be at stress points:


I wanted to repair them and asked for suggestions in this thread:
http://www.fiero.nl/forum/Forum2/HTML/068479.html
Thanks to all who responded.

[This message has been edited by Sourmug (edited 05-08-2007).]

Sourmug MAR 12, 04:32 AM
Additionally I wanted to move the wing back 2" on the decklid. I had seen some threads where people had done this and I liked the look. I drew a line thought the centers of the existing bolt holes at each wing support location and marked out for new holes 2" to-wards the rear. I then used a brad-point drill bit so that the bit would not shift while I started drilling:


As can be seen, the new front bolt hole is too close to the bulkhead to allow for a nut and washer. The rear hole now sits so that it penetrates two layers of fiberglass that have about a 1" air gap between them. It is important to me that this looks like something that came from the factory, or at-least as close as I am able so I also cut out notches at the front of the bulkhead as well as larger holes at the rear hole that would allow for nuts and washers. These holes and notches were then finished with plastic tubing that was cut to size and bonded with Corvette Panel Adhesive. The tubing was then trimmed to final size once bonded:


While this was being done I also tackled the structural cracks. I first ground out the cracks a small amount using a Dremel tool and cutting disk. Once that was done I flexed the decklid so that the cracks would "open" up and applied Corvette Panel Adhesive to both sides. The decklid was allowed to return to normal shape so that the cracks would close up and adhere together. Excess adhesive was removed to create a more or less flat surface.

Here are a before and after shot:


[This message has been edited by Sourmug (edited 05-08-2007).]

Sourmug MAR 12, 04:44 AM
To further reinforce the cracks the surface of the bulkhead was sanded so that the paint was removed. It is very important that the paint be removed and that the surface has a slightly rough finish so that the fiberglass will adhere firmly. I made a template of the surface and used it to cut out fibreglass matting. The cut woven fiberglass fabric (not the random strand mat) was applied:

Once set this had filler applied to is and it was sanded smooth.

Once this was complete I then began the test fitting of the decklid vent:


The rear portion of the vent overlapped the new wing bolt holes and so it was trimmed down using and jigsaw:


That's it for tonight, I'll post some more tommorrow.
Nolan

[This message has been edited by Sourmug (edited 05-08-2007).]

3800superfast MAR 12, 08:04 AM
Cool, Looks like your going for it----Thanks for taking the time to post pics--this has me wanting to do something different to mine---I saw something similar to this years ago--it was on ebay--a guy in Korea or somewhere like that was selling them, he had a great pic of the finished product--looked really nice. Keep `em ` coming........
88GTFormula MAR 12, 09:17 AM
whats gdjetski's contact info ? and was it packed pourly or what do you think caused all the damage to the piece..?

I attempted making a mold for this a year or so ago and the mold wasa flop, i've been debating on trying to make a new mold...

LMK his contact information...

~Tim

88GTFormula MAR 12, 09:23 AM
heres a few images he gave me back a year or so ago...
This images is larger than 100K. Click to view.
Sourmug MAR 12, 12:00 PM
Hi:

gdjetski can be reached at gdjetski@pchome.com.tw

The packaging was REALLY flimsy cardboard that had absolutely no rigidity at all. The piece was given no support and of course cracked at the locations shown above. The crack locations are areas that are not rigid or reinforced enough on their own to withstand the flexing that occurred during transit. Again, I suspect that most of the vents delivered will have some cracking unless he changes the way he packages them. Additionally the piece is quite thin and could use an extra layer or two of matting.

Back to the information:

With the vent taped the decklid I traced out its outline onto the decklid. Once that was done it was removed and holes were drilled at the corners to allow me to start cutting the top of the lid with jigsaw. Here I am removing the lid and thinking I must be crazy, I mean either this is going to work or I'm going to ruin a perfectly good decklid:

And here is my trusty shop assistant Cedric:


So taking a deep breath I began to cut, a little bit here and a little bit there


I should also point out that there is a wiring harness for the decklid release that runs from the front of the decklid to the rear bulkhead through the passenger side decklid support. Care needs to be taken to not damage this harness during the cutting process.

I had also cut the openings for the vents prior to bonding as the piece was smaller and easier to maneuver than the entire decklid. It turns out that I had to re-cut the openings but more on that later

[This message has been edited by Sourmug (edited 05-08-2007).]

Sourmug MAR 12, 12:25 PM
I continued to check the fit, mark and cut until the vent fit snugly in place. The "sawtooth" cut into the support members as seen above was intended to match the sawtooth shape of the vent. I got it reasonably close but it took a number of test fits to get it to work and in some areas I did take out more material that what was actually required. Hear are some shots of the underside:


Once I was satisfied with the fit, I bonded the vent to the decklid again using the Corvette Panel Adhesive. I used a number of clamps, screws, heavy objects, basically everything but the kitchen sink to hold the vent in place. The fiberglass vent is not and exact fit, close but not exact, and it is a bit if effort to get is to fit properly.


I'm sure that those of you who are more experienced at this than I am are shaking their heads but hey it worked!

I forgot to mention that I ground out some of the top layer of fiberglass where the two long "tabs" shapes that I had cut the trailing edges of the vent into would sit. This was done to have a more flush installation that would require less filler later. I also reinforced the back of the cracked areas with fiberglass matting prior to bonding.

Here it is with the clamps, screws and weights removed and some initial sanding done:


[This message has been edited by Sourmug (edited 05-08-2007).]

Sourmug MAR 12, 12:50 PM


In the last picture you can see that when I was grinding for the tabs I actually cut thorough the decklid in a few spots. I was not too concerned as I was going to be fiberglassing the underside anyways.

Part of the challenge of this mod is where the cut lines are located. The trailing edge requires a cut through a panel that would be fully visible with the decklid open.
Here is a picture that gdjetski sent to me:

You can see a cutline that runs across the width of the decklid part way between the rear bulkhead and the middle bulkhead. This line also extends into the two outside panels. I used a strip that was cut from the decklid during the fitting phase and adhered to to the vent and the decklid to provide support to the trailing edge of the vent. Once this was done and the vent was bonded I layed in fiberglass mat to reinforce the panels that had been cut and to make a uniform surface over the underside of the panels:


The panels were then filled using a non clog filler, smoothed, filled smoothed etc, etc until the surface was uniform. Fiberglass was also applied to the saw tooth portion of the vent to adhere it to the inside support rails of the decklid:


[This message has been edited by Sourmug (edited 05-08-2007).]