
 
     |
| My interior build... (Page 9/20) |

|
RCR
|
SEP 04, 06:06 PM
|
|
Hello again,
This will be a real short update, as my camera is loaded with wedding pictures (not mine) so I have not taken any yet...But, what I've done has gotten me excited because I can see the light at the end of the tunnel. I've concentrated on the door panel and I made good progress. I've started finish sanding the outer portion in prep for final finish. I've also finished the door latch. I still need to do the manualk lock lever, but at least now I can open the door from the inside. <dinner break>...
OK, I'm back and own page 3...
I setup my latch a little differently than Roy (MrFixit), Jonathon (Jscott), and Nolan (Sourmug). On all of those, the handles were done prior to or while the panel layout was done, in escence, the door layout was built around the handle. I went a different route, as usual. I layed out the panel, with the handle in what I think is a good spot, built the panel, then tried to get the handle to work. Fortuneately, it worked out ok. It took me all day to do it, but I think this will work good and allows me to do the panel design without compromise. (Not saying that the other guys compromised, but if I would have mounted the handle first, I felt I would have to compromise something to get it to work and look right.)
The other thing I did was mold a light into the end of the armrest. I was trying to figure out how to cap the cutoff end when the thought of a light came to me. So I scrounged a bit and came up with the liscense plate lamps off the car I just scrapped. Almost a perfect fit into the end. A little foam and glasswork, and Voila.


This picture also shows the finish coat of Bondo I'm using. I guess it's relatively new, at least to me. It's a Bondo brand Profesional Gold. They might be taking a stab at the Rage Gold products. Seems to work well, very smooth and creamy. I'll continue to use it, at least until I try Rage Gold.
Another thing I wanted to show was the completed subwoofer, sitting in the car.

And here's a preliminary view of what it looks like together:

In this photo, I'm reshaping the portion of the panel that mates up to the speaker pod and the bottom of the dash.
I'll finish the update when I get the next batch of pics in....
Bob[This message has been edited by RCR (edited 09-04-2006).]
|
|
|
|
RCR
|
SEP 08, 09:06 PM
|
|
Since I had the door apart, I tried Rickady88Gt's flush-mount speaker info. http://www.fiero.nl/forum/Forum2/HTML/071981.html
By re-clocking the motor on the window regulator, one can free up some space in the door to clear a large speaker magnet. It was actually pretty easy thanx to his directions. It took about 2 hours, including tiome to BBQ some chicken. 
I had a couple of slight differences. I didn't quite clock mine as high as his:

I'll probably go higher on the other side, unless it causes problems with the stops. I did npt have problems with the stops on this side. I mearly clearanced the front one to clear the end of the motor. ....OK, I re-read his thread about the bumpstop. I didn't think about clearance to the speaker, since I don't have a speaker in there yet. I'll update if I need to modify it more. Here's a pic of what I did:

And a blurry one through the window to show clearance to the motor:

This shot shows the amount of metal that is clear to be removed for the speaker:

This one came up in another thread concerning clearance to the parking brake handle. I'm not posting this there, since this is heavily modified, but I have a good inch between the handle and the door pocket.

And the last shows the door together (minus the switches):

Bob
|
|
|
|
topcat
|
SEP 08, 10:39 PM
|
|
That looks really , really, REALLY nice. I wish I had just a small portion of the talent in fiberglassing that I see in this thread as well as some other threads on the forum.
Great job.
|
|
|
|
GonsaiPK
|
SEP 09, 01:30 AM
|
|
|
Wow, by far the best Firebird door panel I have ever seen! Keep up the good work!
|
|

|
motoracer838
|
SEP 09, 10:43 AM
|
|
Careful, thats going to look so good that people might think that it came that way. Thats looking really good keep up the good work.
Cheers Beers n Gearz. Joe
|
|
|
|
RCR
|
SEP 09, 06:03 PM
|
|
Thanx Guys...I did some detail work today. I made the mounts for the armrest, and I setup the speaker. I cutout the hole in the door, mounted and test fit the speaker, and clearanced the front window stop. I had to take about 1/4" off the end of the stop. Lots of clearance and it still works fine. I also cut-down and rebent the lock rod, so that works now. Lastly, I pulled the door latch mechanism out, cleaned it, and re-installed it. If the weather remains rainy, I'll get back to finish and maybe get to doing the center piece. Joann Fabric, here I come.
Bob
|
|

|
Sourmug
|
SEP 10, 02:08 AM
|
|
Bob:
Your door panel look fabulous, just like it belongs there! Nice work as usual.
Nolan
|
|
|
|
RCR
|
SEP 15, 12:09 PM
|
|
This is the newest toy to add to the build:
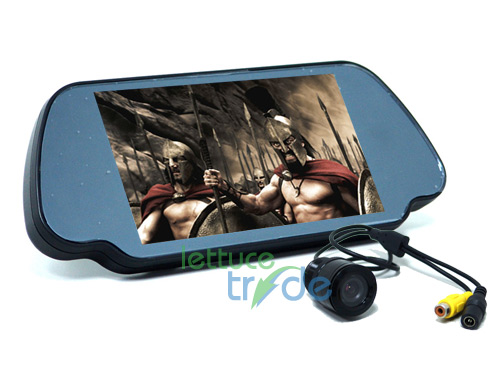
It's a rear view monitor (7"TFT Sharp LCD) with back-up camera. I'll use it to replace the rearview mirror and integrate it into the headliner some how. I should be getting it in a few days. I'll add updates on the install once I get it in.
Bob
|
|
|
|
Fiero1Fan
|
SEP 15, 12:28 PM
|
|
|
Glad to see you're making good progress on your interior again. Looking real good.
|
|
|
|
mrfixit58
|
SEP 15, 02:54 PM
|
|
|
Fantastic job!!! So far it's the best door panels that I've seen. I really like the way you've integrated the firebird speaker pod/map pocket. I was going to go that route too but the project was taking so long that I scrapped the idea and simplified my design. I also like your armrest lights. Rather than keeping them clear, have you thought of inserting a red lens behind the clear lens (more of a safety design)? I installed lights in the hollow cavity under my armrest so it illuminates the ground when you open the door. Keep up the nice work.
|
|
|
|