|
| Northstar rebuild: Will style (Page 75/119) |

|
FieroWannaBe
|
JAN 22, 05:47 PM
|
|
Cool find, I've been keeping my eye out for a cooler like that. Thanks for posting.
I am also interested in your anti-dive brackets. I remember reading about your idea a while back. I have some ideas of my own to try on my chump car. I'm interested to see how yours looks when complete. I need to get around to plugging some dimensions into the Lotus Suspension Analyzer program. (If you have any, I can run them for you)[This message has been edited by FieroWannaBe (edited 01-22-2013).]
|
|
|
|
Will
|
JAN 23, 10:47 AM
|
|
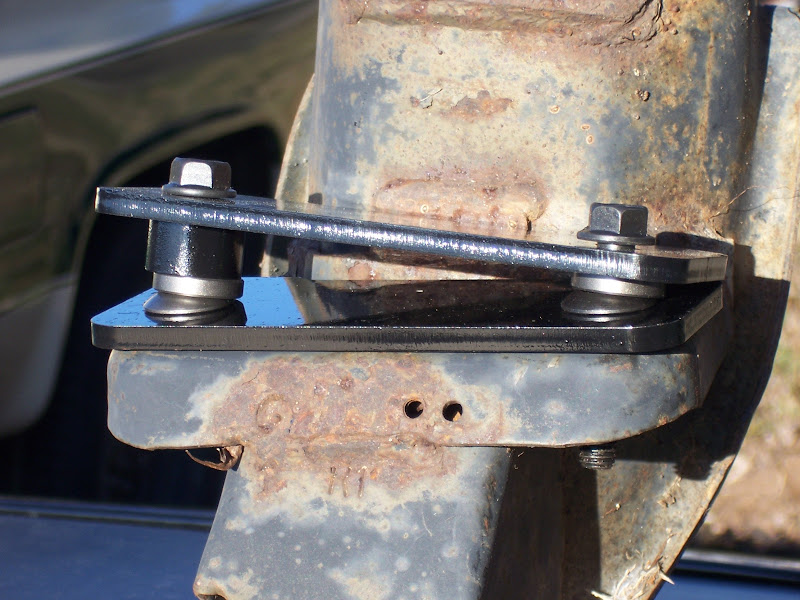
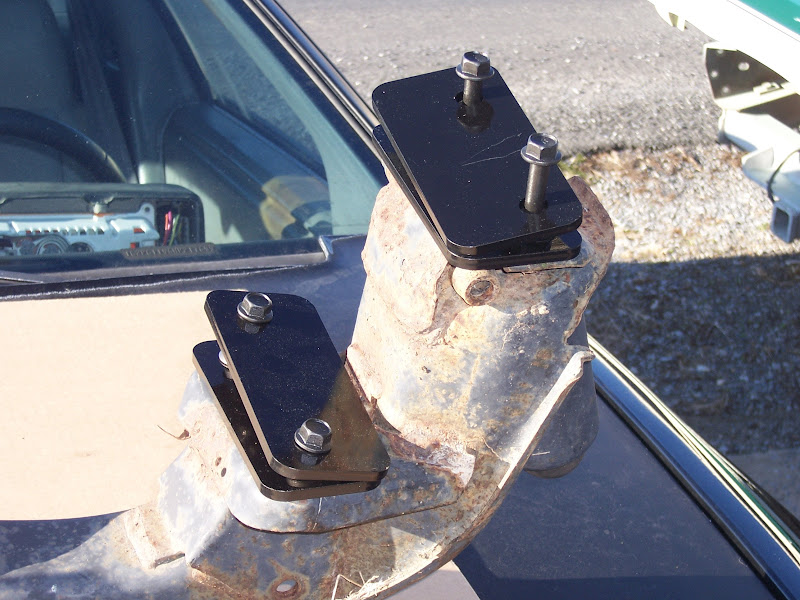
What I have on the shelf ready to install are:
-Upper and lower reinforcement plates which will be placed directly against the body and crossmember.
-Spherical washer pairs which will take up the angle difference. These will go above the lower reinforcement plate on the crossmember and below the crossmember itself.
-Spacers. The spacers are a different thickness at each of the four mount locations per side. They will go between the spherical washer pair and the upper reinforcement plate.
The spacers are cut to give me a 1.092 lowering of the axle CL relative to the body (yes, this will raise the front end of the car by just over 1"). This makes the spacer thickness at the rear crossmember mount location zero. That doesn't mean that mount point is directly against the body... There will still be both upper and lower reinforcement plates and a spherical washer pair between the rear crossmember mount points and the body.
Edit: A picture is worth 1000 words, so I'll post when I get everything set up and organized.[This message has been edited by Will (edited 01-23-2013).]
|
|
|
|
Will
|
JAN 23, 11:31 AM
|
|
|
|
|
Will
|
FEB 04, 12:40 PM
|
|
The Mule is back on the road as of last night. As I was burping the cooling system yesterday, I didn't really have a good way to judge heater performance. This morning is was about 20 degrees out, and I started to get heat about 1/3 of the way to the point where I previously started to feel heat... so the heater pipe reroute is a success.
I also redid the thermostat hose. The old configuration was a CarQuest 20982 hose with a 1.5" nipple 3" long connecting it to a generic 45 degree 1.5" hose elbow. That was reduced to 1.25 for the cross-cradle pipe with a hose reducer bushing. There was a 17" flex hose from the cross-cradle pipe to the right coolant pipe.
The new configuration is a 1.5 x 1.25 flex hose 20" long from the thermostat housing to the cross-cradle pipe and a 20" 1.25" flex hose from the cross-cradle pipe to the coolant pipe. So I eliminated two clamped connections and a reducer bushing.
|
|
|
|
Will
|
FEB 16, 05:16 PM
|
|
|

|
fierogt28
|
FEB 16, 05:45 PM
|
|
| quote | Originally posted by Will:
Where in the FSM is the caliper bracket to steering knuckle bolt torque?
I found this post: http://www.fiero.nl/forum/F.../HTML/109048.html#p7
Which says it's 83 ftlbs. That's reasonable, as that's a 12mm bolt... but I can't find it in the manual. |
|
Will, I checked in my 86 FSM and the torque calls for 21-34 ft/lbs. (3C-2 front suspension)
I also checked in the fiero Haynes manual. The "caliper mounting bolts" are 40 ft/lbs. For "caliper mounting knuckle assembly bolt" is 35ft/lbs.
Hope this helps, but I assume you talking about the 2 caliper bolts that mount to the steering knuckle, right? (The Torx style bolts size T-50)------------------
fierogt28
88 GT, Loaded, 5-speed.
88 GT, 5-speed. All original.
|
|
|
|
Will
|
FEB 16, 06:01 PM
|
|
No, the '84-'87 front caliper bolts to a cast bracket which bolts to the knuckle. The bolts from the bracket to the knuckle are the ones I want.
|
|

|
fierogt28
|
FEB 16, 07:36 PM
|
|
| quote | Originally posted by Will:
No, the '84-'87 front caliper bolts to a cast bracket which bolts to the knuckle. The bolts from the bracket to the knuckle are the ones I want. |
|
Will, I'm lost. Is this a stock 84-87 set-up?? There's not like 20 bolts in that area.
Post a pic of your set-up or a FSM diagram.
Thanks,------------------
fierogt28
88 GT, Loaded, 5-speed.
88 GT, 5-speed. All original.
|
|
|
|
Will
|
FEB 19, 10:26 AM
|
|
| quote | Originally posted by fierogt28:
Will, I checked in my 86 FSM and the torque calls for 21-34 ft/lbs. (3C-2 front suspension)
I also checked in the fiero Haynes manual. The "caliper mounting bolts" are 40 ft/lbs. For "caliper mounting knuckle assembly bolt" is 35ft/lbs.
Hope this helps, but I assume you talking about the 2 caliper bolts that mount to the steering knuckle, right? (The Torx style bolts size T-50)
|
|
The listing on 3C-2 is for the caliper to bracket bolts (the T-50 Torx bolts). I'm looking for the bracket to knuckle bolts.
I believe I had seen the 35 ftlbs number previously, BUT I think I tightened these bolts to that number before and they backed off. This time I tightened to 83 ftlbs per the post I linked above... We'll see what happens. Note that once the photos load, the screen is no longer on post #7... look at post #7 for info on the front brakes.[This message has been edited by Will (edited 02-19-2013).]
|
|
|
|
Will
|
FEB 19, 12:06 PM
|
|
|
|
|