 
     |
| My 88 Formula Interior Redesign (Page 7/87) |

|
katatak
|
NOV 15, 09:04 PM
|
|
I finally got my feeble mind around what you are doing with the plug. It makes perfect sense to me now. After I read your post and Khw's post, I went back and looked at your first concept pic and the light bulb came on. You need to work harder - I was expceting more progress today! Just kidding. I'm just impatient.
Pat
|
|
|
|
Australian
|
NOV 16, 03:24 AM
|
|
|
Well done although i have done a fair bit of fibreglass work now but i am just not neat and tidy like you i make a mess then shape it you have done very well it looks good with quaility work congrats i am sure your proud of it and will enjoy your labor each drive.
|
|
|
|
Sofa King
|
NOV 16, 12:27 PM
|
|
| quote | Originally posted by Australian:
Well done although i have done a fair bit of fibreglass work now but i am just not neat and tidy like you i make a mess then shape it you have done very well it looks good with quaility work congrats i am sure your proud of it and will enjoy your labor each drive. |
|
Thanks for the kind words. My years of building models conditioned me into getting it done right.
I'm going to try to cut the lid tonight...
|
|
|
|
Sofa King
|
NOV 16, 06:24 PM
|
|
Hi all
no movement on the console this evening. Too much to do. I hope to have some major progress tomorrow
|
|

|
87GT2M6
|
NOV 16, 06:39 PM
|
|
| quote | Originally posted by Sofa King:
Hi all
no movement on the console this evening. Too much to do. I hope to have some major progress tomorrow |
|
Can't wait to see the progress, so far excellent job!
|
|
|
|
MileHighFiero
|
NOV 16, 08:01 PM
|
|
|
I will be looking forward to this build
|
|
|
|
maryjane
|
NOV 16, 08:41 PM
|
|
I see some really clean and interesting lines in these pics. They keep the essence of the original design while improving on the asthetics and function imo. Being on dialup, I haven't seen them all yet (pics) but will try to little by little.
One of the things I have come to almost disdain, are the 2 outside a/c vents next to the doors. Has anyone ever just whacked them off about 80%, leaving enough fabric to fold back under and making the vents more of a flush mount--maybe a 1-2" protrusion instead of sticking so far out where your knees hit them?
|
|
|
|
katatak
|
NOV 16, 09:12 PM
|
|
| quote | Originally posted by maryjane:
I see some really clean and interesting lines in these pics. They keep the essence of the original design while improving on the asthetics and function imo. Being on dialup, I haven't seen them all yet (pics) but will try to little by little.
One of the things I have come to almost disdain, are the 2 outside a/c vents next to the doors. Has anyone ever just whacked them off about 80%, leaving enough fabric to fold back under and making the vents more of a flush mount--maybe a 1-2" protrusion instead of sticking so far out where your knees hit them? |
|
That's an interesting idea. I was looking at that very same thing the other day when I was working on my dash. I was wondering what the dash would look like if it were flush all the way across - cut the vents off flush then do a little glass work to mold it in, texture and paint. Then add some other style AC vents in each corner. It's a good thing I have a spare dash that the vents are beat up on. I'll have to give it a try. Just to see aht it would look like. Great - another project!
|
|
|
|
Sofa King
|
NOV 17, 07:29 AM
|
|
You guys are on to something original. My only issue is the driver side would not be getting a a direct blast of cold / hot air from the vents. If you push the vent all the way to the dash, you would wind up hitting the steering wheel and part of the gauge cluster...
Just a thought, but I like where you guys are headed. Are you seriously going to start chopping the dash?
|
|
|
|
Sofa King
|
NOV 17, 08:23 AM
|
|
Hi All,
OK. I think you guys are going to hate me... I was drinking a lot last night when I got to throwing up and then I started thinking about the console... Not really, but I was thinking...
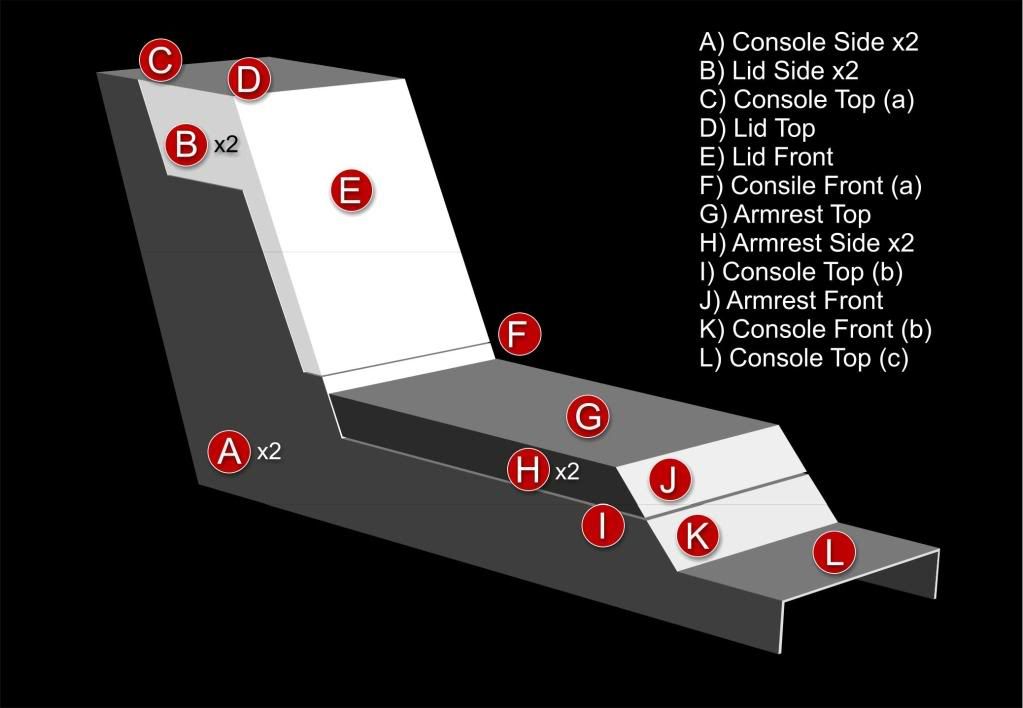
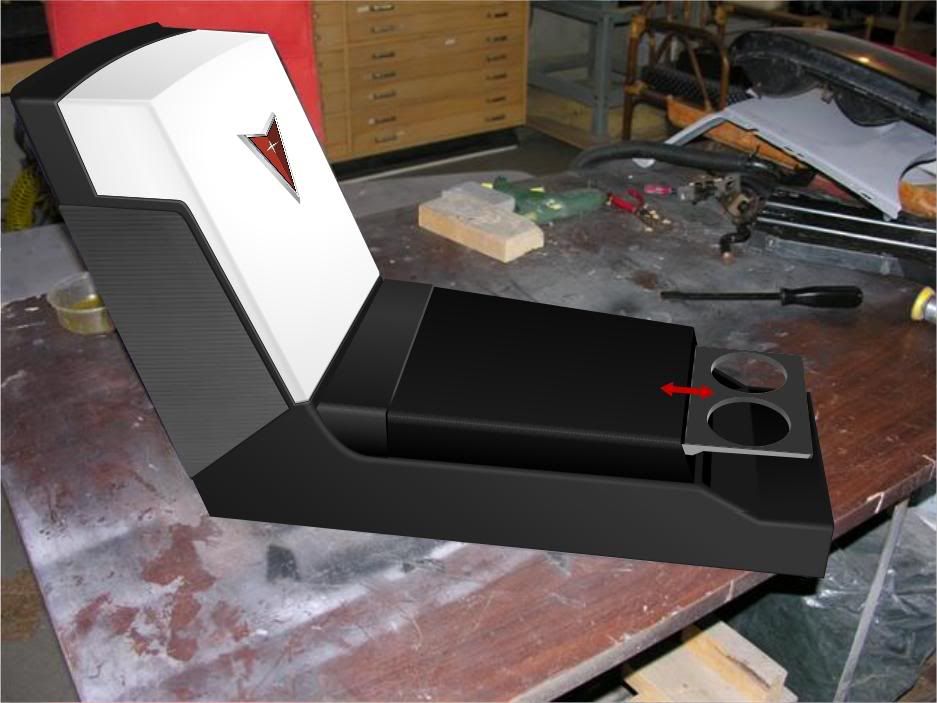
I might start over. I've been reading through several posts, to include this post, (the Miura build post is one of my favorites) and I was looking, in detail, how Archie built all his dash pieces and thinking about the advice many of you have given me - which is greatly appreciated. When Archie built the interior pieces to his project they were all single pieces of fiberglass that were glassed together creating a single structure. My method was to glass over the entire console in a single swoop. While this is easier, it leaves room for uneven sides and it's getting bulky. Building the console piece by piece guarantees each side is a near perfect mirror image and is very light.
If I rebuild the console it will consist of 15 basic pieces - not including the glovebox. I have enough supplies to do the job and it wouldn't take but half a day to create all the pieces necessary to rebuild the basic console. It's just a thought. What do you think?
Basic structure rebuild (3D image)
Concept image with cupholder
Like I said, it's just a thought. If I do go ahead with the rebuild, and this is kinda funny... how do I properly attach separate pieces of fiberglass to each other without using too much glass or body filler? Does anybody have any suggestions?
Just had a thought... I was reading through the Miura build when Archie mentioned hot glue. Maybe hot glue could be used to temporarily hold the pieces in place? HMMMM... that might work.[This message has been edited by Sofa King (edited 11-17-2009).]
|
|
|
