|
| Northstar rebuild: Will style (Page 67/119) |

|
Will
|
JUL 03, 05:37 PM
|
|
|
|
|
Will
|
JUL 17, 08:19 AM
|
|
Figured out my link problems above.
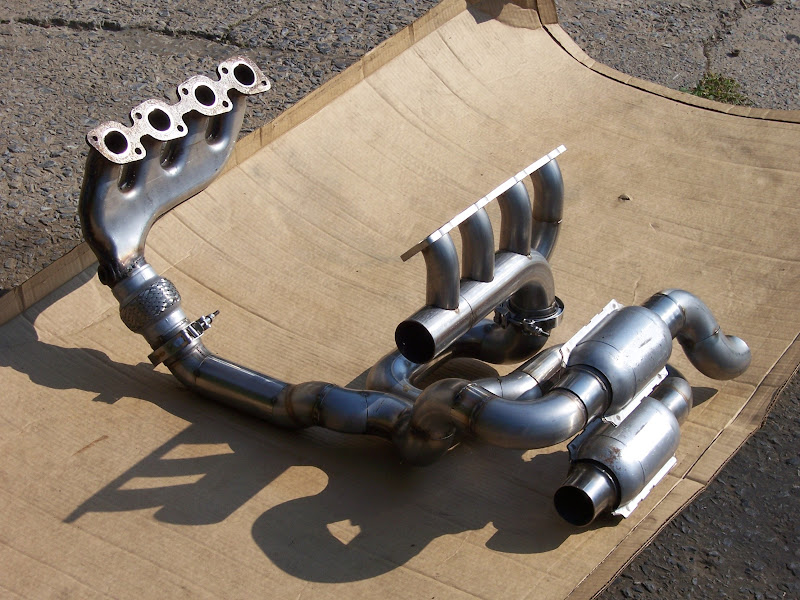
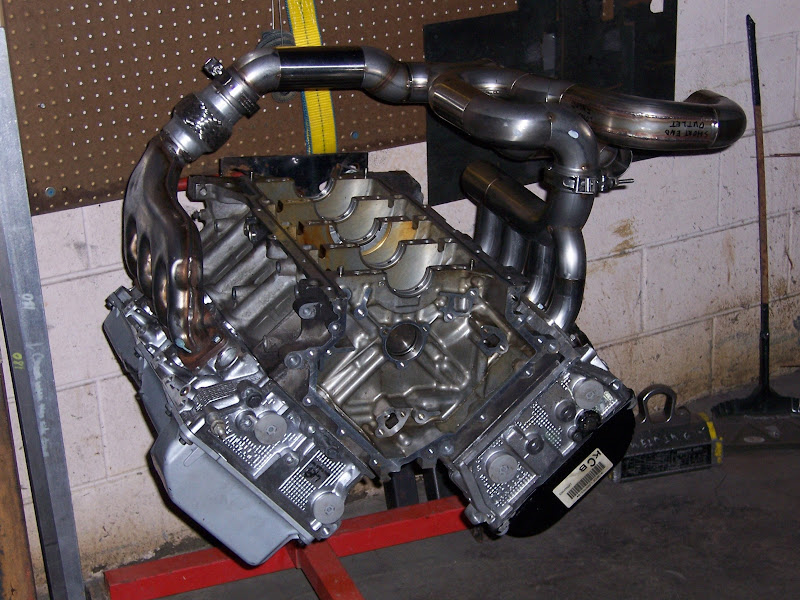
Here's the exhaust mocked up for final welding:
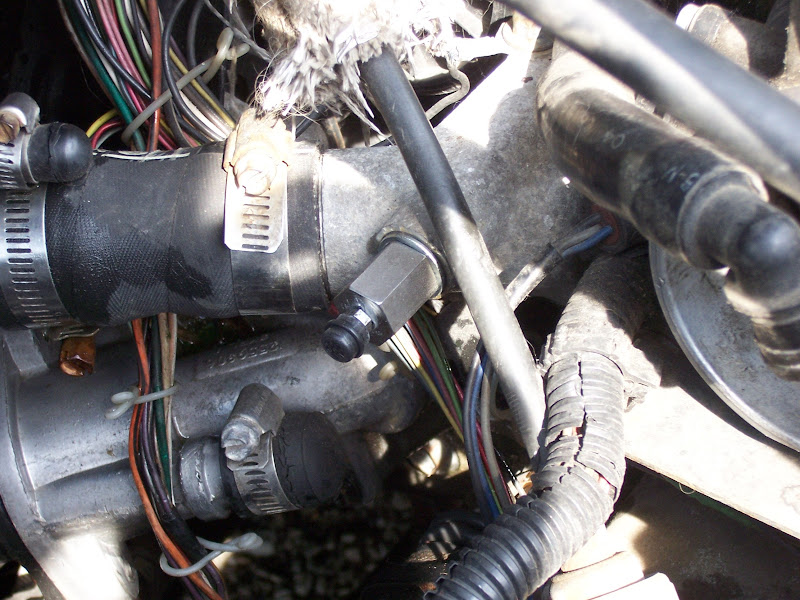
Also put together a coolant bleed fitting to address the Achilles' heel of the cooling system.
|
|
|
|
Bloozberry
|
JUL 17, 09:36 AM
|
|
Oooooo... me likes the exhaust system... 
Couple of questions though:
1. On the side where you fabricated the header from tubing (rear bank), would it have been possible to use a second OEM front bank manifold? Did you even consider it, and if you did, did you drop the idea because the collector angle was wrong or did you simply not have an extra front OEM front manifold at your disposal?
2. From the pictures, it's hard to tell if your front and rear bank pipes are siamesed (crossed-over) at the point they meet, or whether they are just really close to each other.
3. Are you planning to use a muffler or are you going to let the cats do double duty for noise attenuation as well? (They do muffle noise by about 75%)
|
|
|
|
Will
|
JUL 17, 10:45 AM
|
|
| quote | Originally posted by Bloozberry:
Oooooo... me likes the exhaust system...
Couple of questions though:
1. On the side where you fabricated the header from tubing (rear bank), would it have been possible to use a second OEM front bank manifold? Did you even consider it, and if you did, did you drop the idea because the collector angle was wrong or did you simply not have an extra front OEM front manifold at your disposal?
2. From the pictures, it's hard to tell if your front and rear bank pipes are siamesed (crossed-over) at the point they meet, or whether they are just really close to each other.
3. Are you planning to use a muffler or are you going to let the cats do double duty for noise attenuation as well? (They do muffle noise by about 75%)
|
|
It's a nice system... Over $1000 in parts. Custom waterjet cut 3/8" flange for the fabricated manifold. 304 Stainless 2.5" tubing. All the bends except the manifold log are built from donuts. The system uses FOUR donuts and less than 36" of straight tubing. It fits WITHOUT cutting the trunk. Also note that the leg going from the X to the lower catalyst has one oval section bend in it... I had to do that for clearance to the stock pass-under in the rear cradle rail.
The OE front manifold was not workable in the rear. I tried cutting up an extra dual wall manifold in multiple ways and couldn't get anything satisfactory.
There's an X-pipe in the system. It's actually equally distant from each "collector" in pipe length.
I'm planning to have a company (probably SpinTech) build a pair of custom mufflers to use the volume between the rear impact beam and wheel well liner outboard of the frame rail. Until those get built, I'll be running tails off the cats.[This message has been edited by Will (edited 07-17-2012).]
|
|
|
|
1988holleyformula
|
JUL 17, 01:33 PM
|
|
| quote | Originally posted by Will:
I am Jack's underutilized sense of accomplishment.
|
|
Most of this thread is WAY over my head in terms of technicality, but that exhaust setup looks great.
Can't wait to see it installed in the engine bay!
|
|
|
|
fieroguru
|
JUL 18, 11:00 PM
|
|
Looks good!

Am I overlooking a v-band connection? From what I am seeing, the pipes that lead into the cats, the DS one goes over the cradle and the PS on under with both sides welded at the X and the cats stacked in the rear. How does this setup slide around the rear cradle crossmember?
|
|
|
|
Jefrysuko
|
JUL 18, 11:28 PM
|
|
|
Looks like the cats are a slip fit
|
|
|
|
Will
|
JUL 19, 07:30 AM
|
|
|
Yes, the cat connections are slip-fit and will get conventional clamps.
|
|
|
|
Will
|
JUL 21, 10:00 PM
|
|
Fired it up for the first time in months today.
I replaced the ignition module in the coil pack with a NOS Delco unit I bought on ebay. There was no heat sink compound between the module and the baseplate... Not sure why. I used electrically conductive heat sink compound from Galco on it when I reassembled. The torque spec for the 4mm bolts that secure the coils and module to the base plate is 30 inlbs.
Since it had sat for months, I poured a cap full of ATF into each cylinder. That sat for a couple of hours as I got everything back together. I left the coil pack power connector unplugged and cranked it until the starter was hot several times and did not build any oil pressure. I plugged the coil pack power in, fired the engine and had oil pressure within 1 second. Weird.
I left the cats off so that it could burn off the ATF and blow out any junk that had accumulated in the ports, manifolds and pipes. It was loud, but didn't quite sound the same... I guess I'll see what the X-pipe does when I actually drive it.
It still had the ignition drops. The next thing I'll hit up will be the crank sensors.
The clutch hyds need to be either bled or replaced... I guess I'll bleed them tomorrow and then determine if they need to be replaced. The master cylinder is a fairly new steel unit.
Friday afternoon the welder finished up the V-band flanges and making welding the tabe to the X-pipe which will pick up a tab on the manifold end-cap to help support the X-pipe. There will be one on the other run also, but I need to figure out exactly what it will look like. Now that I have the tab and the V-band to locate the X-pipe relative to the rear manifold, I can remove both in order to do more work on them. This is relatively easy. Removing the front manifold is a giant pain in the ass. The extremely tight packaging of *EVERYTHING* around the front manifold is one of the reasons I kept the stock manifold and didn't try to fab one for the front... just yet.
|
|
|
|
IXSLR8
|
JUL 22, 02:15 AM
|
|
|
|
|