
 
     |
| JohnWPB 1986 GT Fastback worklog (Page 66/71) |

|
mrfred8
|
JUN 02, 09:48 AM
|
|
|
Wow, you made it into the "construction zone" very cool. Congrats!
|
|
|
|
Pete Matos
|
JUN 03, 09:20 PM
|
|
Sweet I like that tank liner stuff.... Nice also that you are in the Construction zone! Congrats man
------------------
"May the grins begin when you turn the key and hear the engine roar over your shoulder" ......Gall57 (slightly modified LOL)
Pete Matos
A&N Precision Machine
CNC Machining and prototyping
Port St.Lucie, Florida
A&N Precision Machine on Facebook!
|
|
|
|
JohnWPB
|
JUN 05, 10:09 PM
|
|
Interesting.... My build thread has been moved to the Construction Zone..... I never even asked Cliff to move it. I only noticed it, as I followed a bookmark to my thread to post an update. I tried to hit "Reply" and panicked as it said the thread has been closed!!! Luckily I noticed the text just below the last post that is a link to where the thread was moved to. Sure would be nice if Pennock's was like other forums, and when a page is moved it just forwards to the correct page automatically, instead of first going to a CLOSED THREAD.
I am sorry for the delay in responding, With the thread moved, I never got email notice that there were any replies in the thread.
As for being used on plastic..... the POR-15 page does not mention anything about plastic specifically on their site anywhere. I did some research before I bought it however, and did find some information on this website discussing it:
"we were doing some coating in some doors and were using a plastic Coke bottle to put the POR-15 Black Paint into so I coated the entire inside of the plastic Coke bottle let it dry for several days and then put gas with the 10% ethanol into the bottle and have been letting it soak for about 4 months now and the POR-15 is holding tight and you can even flex the plastic bottle and it is still holding tight."
This seemed pretty good to me, and gave it a shot.
When I got the fuel pump in the tank, I filled it up to about half a tank. I put the fuel line in a plastic bottle, and kicked on the key. The gas has never been cleaner coming out of this tank!

Just an FYI, Anyone that is subscribed to this thread, you need to unsubscribe from the closed one in General chat, and Subscribe to the one here in the Construction zone. The other thread looks "normal" but you can not post in it. You also need to do this to receive email notifications of new posts here.[This message has been edited by JohnWPB (edited 06-05-2016).]
|
|
|
|
TXOPIE
|
JUN 06, 10:04 AM
|
|
|
Congratulations on moving over to "construction zone" !
|
|
|
|
JohnWPB
|
JUN 10, 11:23 PM
|
|
Ok a few small updates..... I decided to use the Fiero thermostat housing on the 3800. The bolt holes ALMOST line up with the 3800 thermostat housing. I had to drill the holes a tiny bit bigger in the Fiero housing so it would fit. The rest was a matter of capping off the 3/4" line and the small pipe. I may take a second Fiero one in the future and really di it right, cutting and welding it and such, but for now, this works.
Next was the transmission selector. It is made from a 25th century metal discovered by Captain Picard himself on an away mission! Damn that is hard steel! I tried 3 different drill bits, and a high speed electric drill, and I could barely see where I scratched the paint off! I took it to a machine shop, and they were able to drill the hole I needed to put the pin in to connect the shift cable to.
Lastly, I purchased a cable nut, and cut the throttle cable to the correct length, and attatched it so it looks like a stock setup. I will get pictures when there is some light to work with.
On a final note, I tested the fuel pressure at the rail, and I was pushing between 95 and 100 PSI ! ! ! ! ! Posting a question in Technical chat, it appears that I need a fuell pressure regulator set up. Yea! One MORE thing to make / fabricate! ! ! I had done quite a bit of research in prep for this swap, and this is the first I have seen this. Hopefully it will help someone else reading here looking for swap info in the future.
The info below is from Darth Fiero, and is from THIS THREAD, the second post in the thread.
_________________________________________________________
Originally posted by Darth Fiero
Are you saying you have a stainless steel 3800 fuel rail? If so, that is a returnless fuel rail and it does not have a fuel pressure regulator in it. You will need one in the system somewhere.
Here's a picture of what I did:
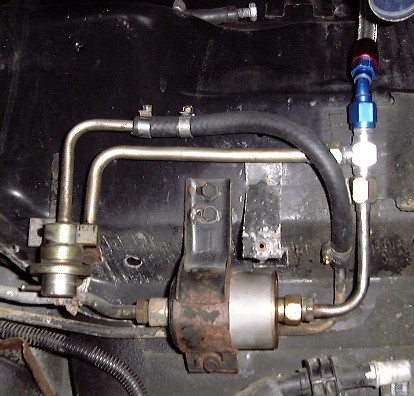
Basically, I cut the fuel pressure regulator off a stock L67 (3800 Series 2 SC) fuel rail and used an AN flaring tool (37 deg flares) to flare the 3/8 line coming out of the regulator (after sliding the -6 AN tube nut and tube sleeve on) and connected that to a -6 AN steel TEE fitting. I flared the fuel supply line coming out of the stock Fiero fuel filter and put a nut and tube sleeve on it as well to connect to the bottom feed of the TEE. I then put a 45 deg -6 AN swivel hose end on the AN braided hose I was using down at the TEE. The return line coming out of the fuel pressure regulator is 5/16" and can be connected to the 5/16" return line going back to the Fiero gas tank via clamped on fuel injection spec rubber hose you can get at any auto parts store.
At the fuel rail, you'll need a -6AN male to 3/8" push-connect EFI fitting so you have something to connect the other braided -6 AN hose end to.
You can get all of these parts at Summit Racing Equipment. Below is the list and qty of each item you'll need:
2x -6 AN tube nut (steel)
2x -6 AN tube sleeve (steel)
1x -6 AN male TEE (steel)
1x -6 AN 45deg swivel hose end (aluminum)
1x -6 AN straight hose end (aluminum)
1x -6 AN male to 3/8" EFI push/quick connect (aluminum)
About 3 foot or so of -6 AN braided hose (if you mount your fuel pressure regulator near the stock Fiero V6 fuel filter location)
1x L67 (3800 Series 2 SC) fuel rail and regulator
SPECIAL TOOLS NEEDED:
37 deg AN flaring tool
Tubing bender
Tubing cutter
Pneumatic cut-off wheel (to cut the braided AN hose to length with - apply electrical tape to braided line before cutting; then make sure you clean out the hose well after cutting to prevent debris for entering the fuel system)
-ryan
[This message has been edited by JohnWPB (edited 06-10-2016).]
|
|
|
|
Alex4mula
|
JUN 11, 10:37 AM
|
|
My similar setup using a fuel line from a seller here. Forgot his name. Don't forget the vacuum line.

|
|
|
|
Alex4mula
|
JUN 21, 01:15 PM
|
|
|
|
|
zmcdonal
|
JUN 21, 01:50 PM
|
|
| quote | Originally posted by Alex4mula:
My similar setup using a fuel line from a seller here. Forgot his name. Don't forget the vacuum line.
|
|
I don't want to hi-jack John's thread but I was looking at how my fuel pressure regulator is setup by the previous owner on my 3800 and noticed that my vacuum line is in fact missing. Where does that vacuum line need to go to? And what purpose does it serve? I have been running my swap without it for ~5,000 miles with no noticeable issues.
|
|
|
|
Alex4mula
|
JUN 21, 11:29 PM
|
|
| quote | Originally posted by zmcdonal:
I don't want to hi-jack John's thread but I was looking at how my fuel pressure regulator is setup by the previous owner on my 3800 and noticed that my vacuum line is in fact missing. Where does that vacuum line need to go to? And what purpose does it serve? I have been running my swap without it for ~5,000 miles with no noticeable issues. |
|
Needs to be connected to an engine vacuum source. Otherwise it will not control fuel pressure according to engine loads as related to vacuum state.[This message has been edited by Alex4mula (edited 06-21-2016).]
|
|
|
|
JohnWPB
|
JUN 22, 11:34 PM
|
|
Sorry, not much to report on lately. I have taken a break for a week or so. The next step is to get the car towed to an exhaust shop. I just need to do a little research on a good place, that will take the muffler and parts that I have and create the exhaust system.
Next is the fuel pressure regulator, again, a bit of research, and get the parts I need to construct it. Thanks for the vacuum line tips, as I would have not known to do that.
I have spent the past week cleaning up, putting all tools back in their proper place, and such. The past 2 weeks was a mechanical whirlwind, and everything was a MESS! Nice to have things back in order again!
|
|
|
|
