
 
     |
| Trinten's SBC/F23 build - The work has begun! (Page 62/76) |

|
La fiera
|
MAY 08, 09:17 PM
|
|
|
Hey Vince, what's supporting the weight of the turbocharger? Is Mike doing any bracketry to prevent it to crack the exhaust once it gets hot and brittle and the bouncing of driving takes a toll on it? Haven't seen any corrugated or "expanding" part to make up for the heat expansion and growth on the exhaust.
|
|
|
|
Trinten
|
MAY 08, 11:02 PM
|
|
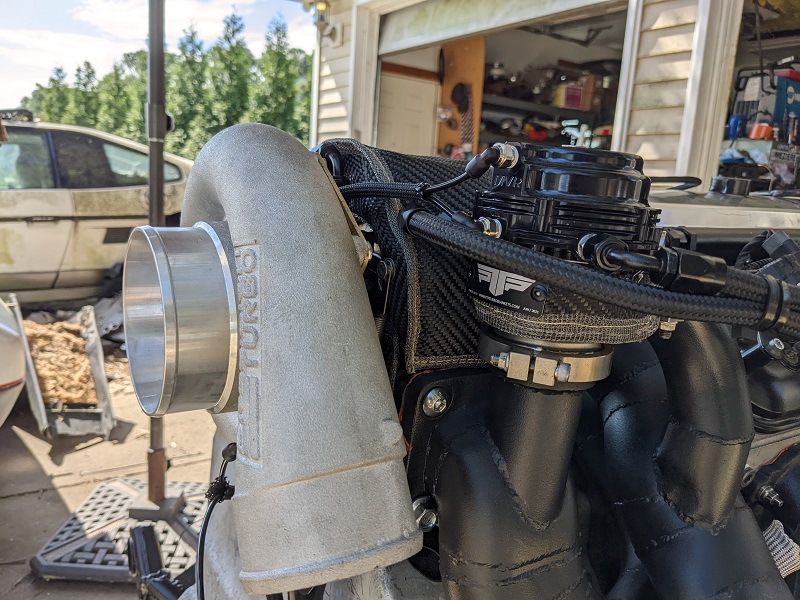
In an earlier picture you can see the 'perch' for the turbo, which also has the drain tube (the black thing sitting near the top of the transmission's valve body cover):
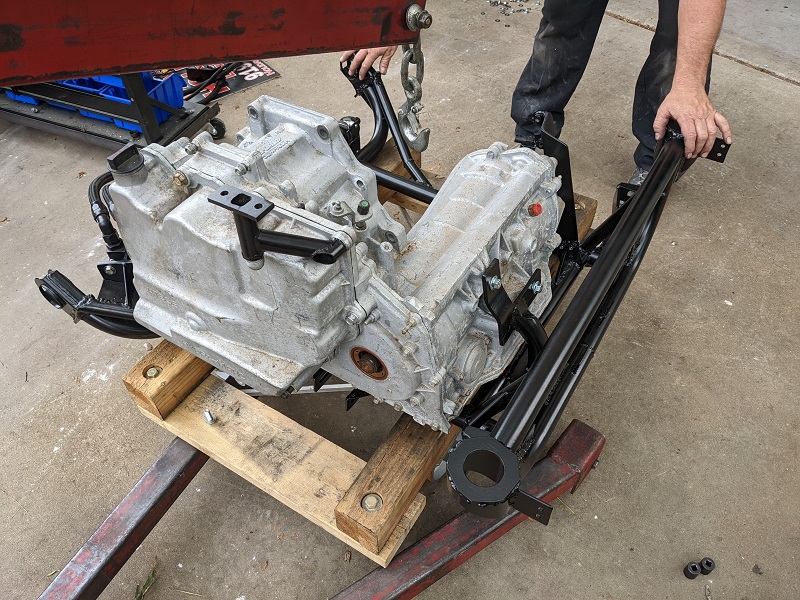
When we were doing the assembly today he was explaining that he had put it together so some parts were under a 'spring load', and when they heat up, it'll move to a relaxed position. If he had it a neutral position to start, the heat would make it expand in a more unpredictable way.
He's done the same method on his streetable track car, and hasn't had any issues with anything cracking from thermal expansion. I had asked him about those 'flexible joints' last year when we started mapping out the exhaust, and he gave me his various reasons for not liking or using them.
So we'll see how it goes. If anything fails, we'll improve it. 
|
|
|
|
La fiera
|
MAY 11, 08:18 PM
|
|
|
|
|
Trinten
|
MAY 30, 11:46 PM
|
|
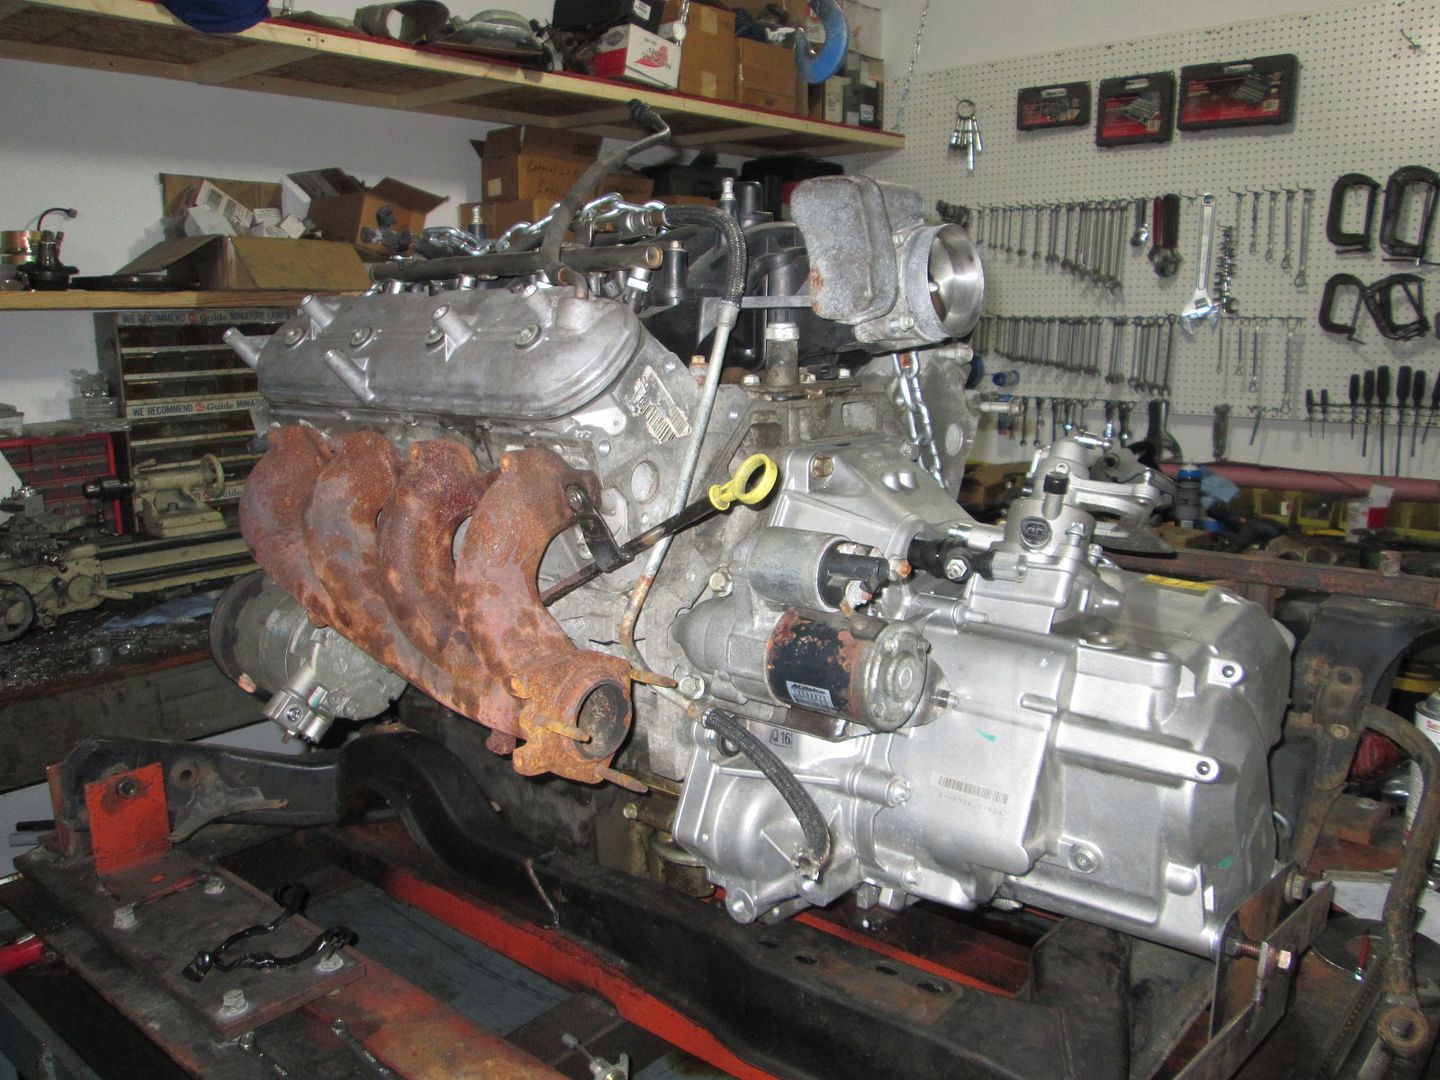
The last few weeks have been something of a blur with work and personal life. There has been progress on the car, though some things aren't finished, and I'd rather try to wait till they are done and post about it all together (like cleaning up the bulkhead and getting on FieroGuru's cool decklid hinges he put on my last Fiero).
So for today, we'll just touch up on some quick stuff.
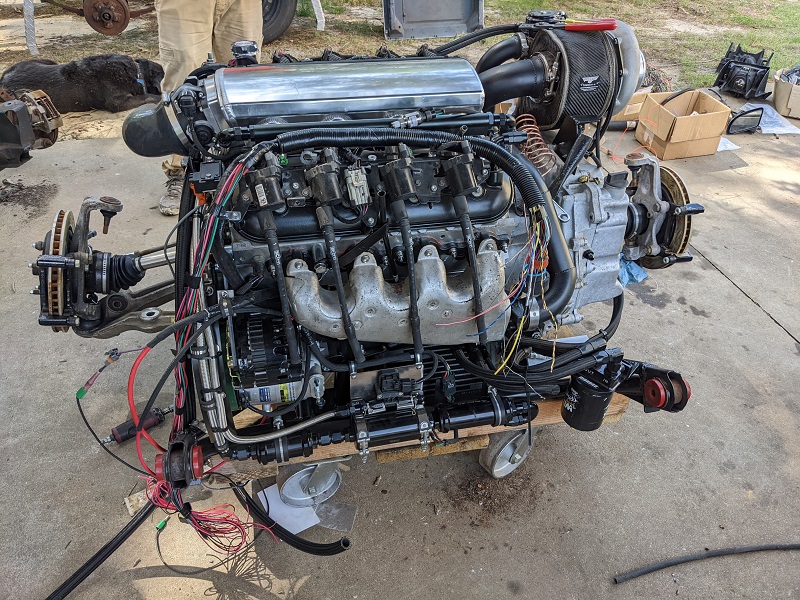
The turbo and waste gate are mounted to the exhaust setup!
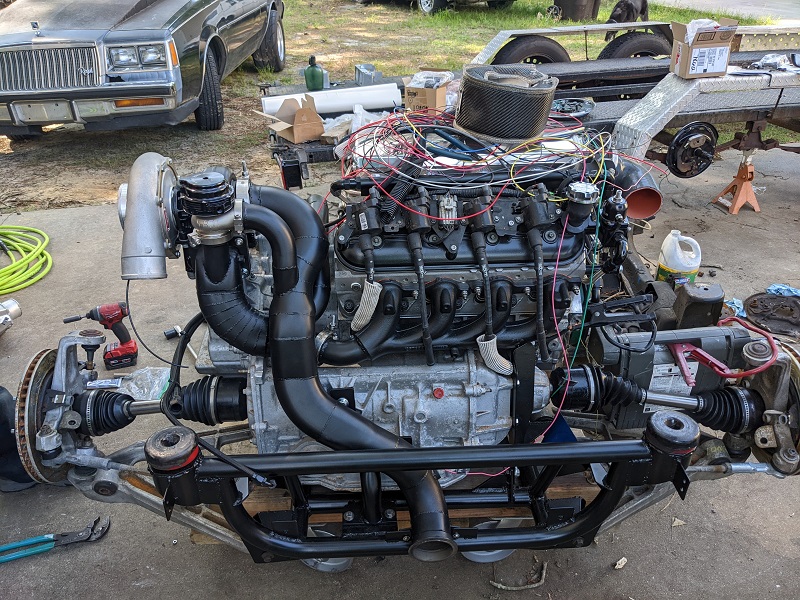
And I picked up some very well reviewed and rated (and probably a little gimicky) volcanic super-spiffy turbo blankets. And they had one for the waste gate. So I got it. Because why not?
When Mike was mounting the waste gate, he's now taking a closer look at it (versus before when they was just taking it out of the box for measurements/placing to fabricate) and he says to me "You bought a water cooled waste gate?"
To which I reply with a humorously indignant tone "No. You bought a water cooled waste gate. Remember the original TIAL one I bought was too big, so you bought this one."
He conceded the point and says it won't be an issue to plumb in using the "Steam vents", he had just never seen the point of water cooled waste gates and in most cases when normal waste gates have failed (outside of age/use) it was due to config/install issues. So I have a few more -4 AN fittings and hose coming so he can do that.
As mentioned I'll do a focused post on the engine bay prep later, but in related news, we discovered both of the trunks plastic rain-guiding "d-plates" are cracked up pretty badly. One side was exacerbated by Mike when he was getting out of the engine bay and put his hand there (on top of the weatherstrip), and we heard the crack.
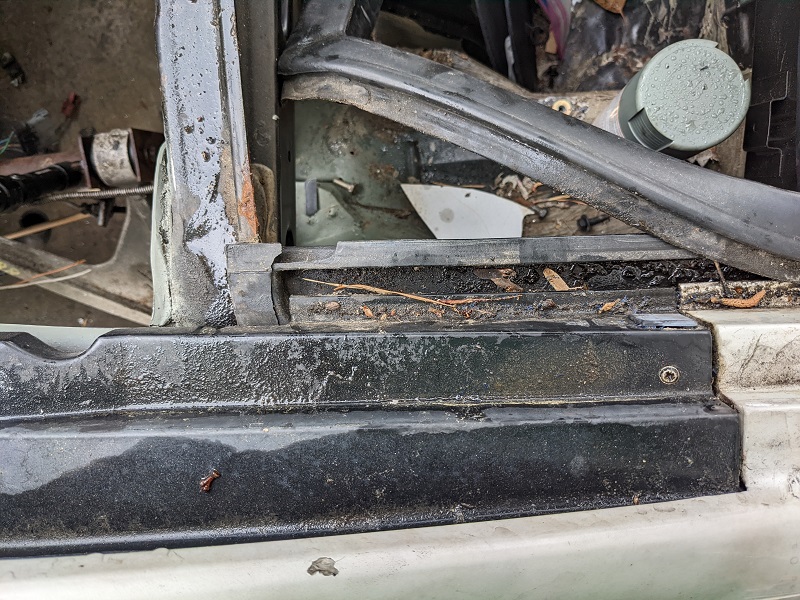
So I'm trying to hunt down undamaged ones. And hopefully someone is making repops out of better materials.
Oh, for any eagle eyed viewers, yes the spark plugs are back out, hence the wires dangling there. Mike wanted to spin the engine while it was out of the car to get the oil to start moving through and make sure there were no leaks to address. Much easier to fix before we put it in.
This did lead to him having an 'ah-ha' moment, going back to Brandon Furches videos on putting the 4T80 with the LS4, and one part of the transmission that he ground out a fairly deep pocket. Mike had done a smaller pocket there, not realizing what it was for (either Brandon wasn't explicit, or just the lapse in time from between when they were originally married together, and we got the spiffy Moroso oil pan and starter. So the bendix can't engage with the flexplate, it smacks the transmission.
Mike isn't comfortable with having his cherry picker holding up everything (engine, trans, cradle, suspension), since it would be at it's furthest/weakest point on the picker and he'd be under it. So this will be addressed once the cradle is in the car and he can get to that area without my cradle-skid obstructing him.
[This message has been edited by Trinten (edited 03-26-2023).]
|
|
|
|
Will
|
JUN 03, 11:00 AM
|
|
| quote | Originally posted by Trinten:
And I picked up some very well reviewed and rated (and probably a little gimicky) volcanic super-spiffy turbo blankets. And they had one for the waste gate. So I got it. Because why not?
|
|
Is that really where it goes on the wastegate, though? 
|
|
|
|
Trinten
|
JUN 03, 11:10 AM
|
|
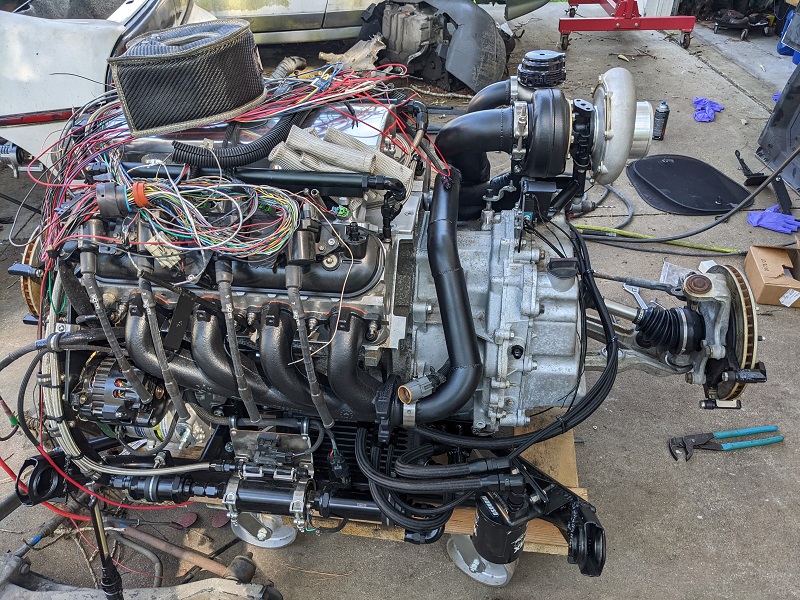
Honestly... I don't know. In hindsight it makes sense that it would be wrapped around the bottom. I did that part. The "directions" had no pictures and just said "use wire to secure blanket, watch for pointy metal bits!"
I thought it went on that way because the blanket has a 'badge' on there for the company, and placed in this way it's orientated right. I figured they wouldn't set it up to be upside down.
I'll fix that this weekend. Thanks for the catch Will (I'm sure by now Mike has seen it and will make a joke).[This message has been edited by Trinten (edited 06-03-2022).]
|
|
|
|
shemdogg
|
JUN 05, 12:03 PM
|
|
That motor/trans/cradle/turbo piping combo is a work of art man, wow! Beautiful for sure, cant wait to see it done. Bet u feel the same lol
Shem[This message has been edited by shemdogg (edited 06-05-2022).]
|
|
|
|
Trinten
|
JUN 05, 06:12 PM
|
|
*Cue dramatic music!*
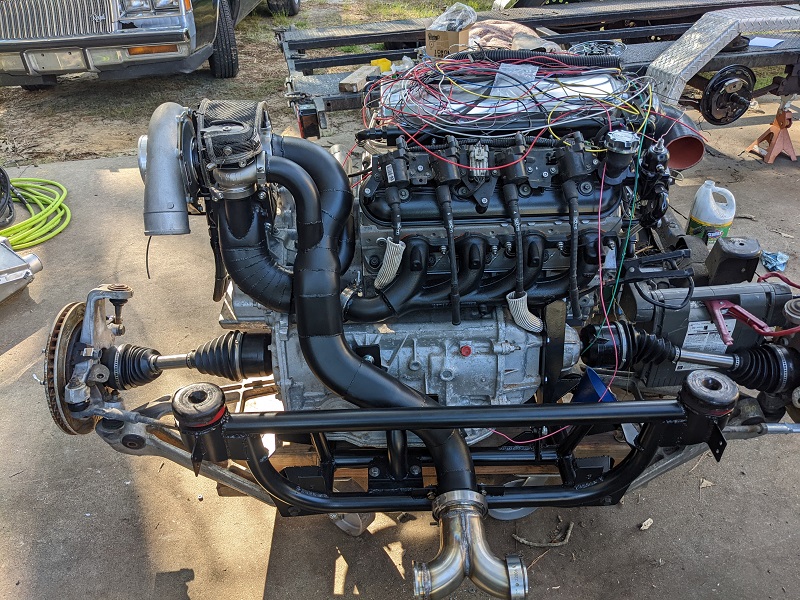
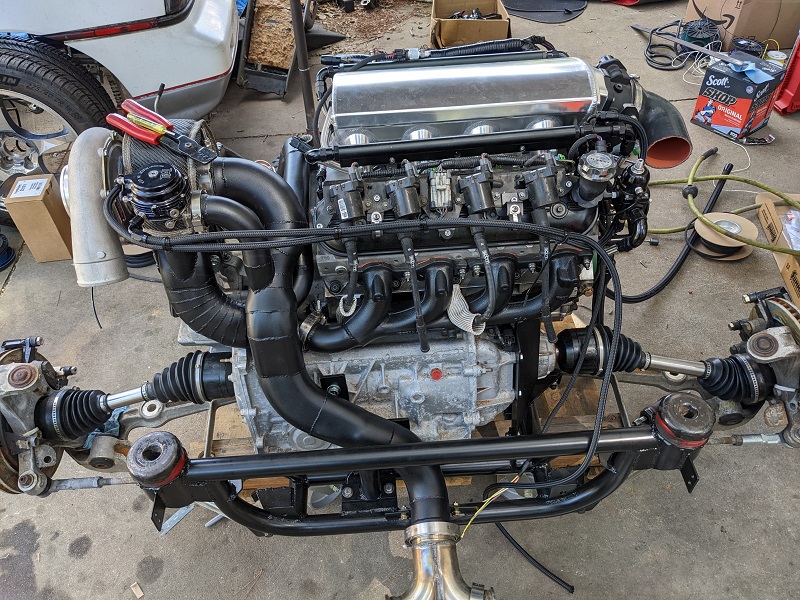
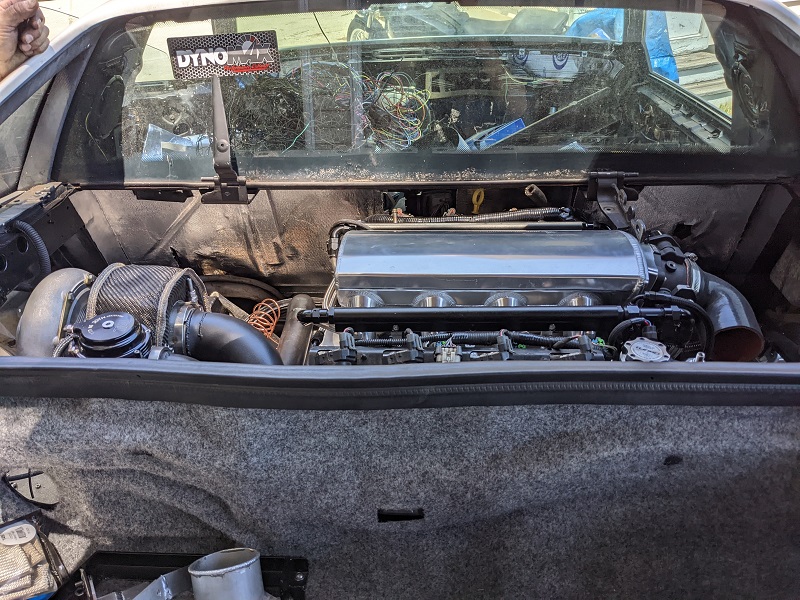
The engine is back in the car!
*fanfare!*
Shemdogg, thank you! Mike put a lot of work into it. He wanted something functional, servicable (as much as possible), and durable. I wanted to make sure heat was minimized, and things looked good without interfering with the first three priorities.
Not without a few hiccups, of course. The first is I need to order another set of cradle bolts. The ones we used work but we know they aren't (all) the right ones, because the size of the hex heads changed from side to side.
Also, somewhere along the way we lost the metal bushings that go inside the poly of the bushings in the front. mike had some others laying around that we used as temps, but they are not the right length (a little too short).
If anyone knows the specifics (material, wall thickness, I.D., exact length), I can hopefully get another set from McMaster Carr or something. Worst case, I buy another set of poly bushings, and put the new poly on the shelf for now.
Mike still has a little welding to do on removable frame rails, where the upper control arms bolt on. For now we paint-bombed it just so it looks better than it did last year at Carlisle. We'll wire-wheel off the paint, finish the welding, and the powdercoating company will meda-blast it before the coating goes on.
Here it is, ready to go in!
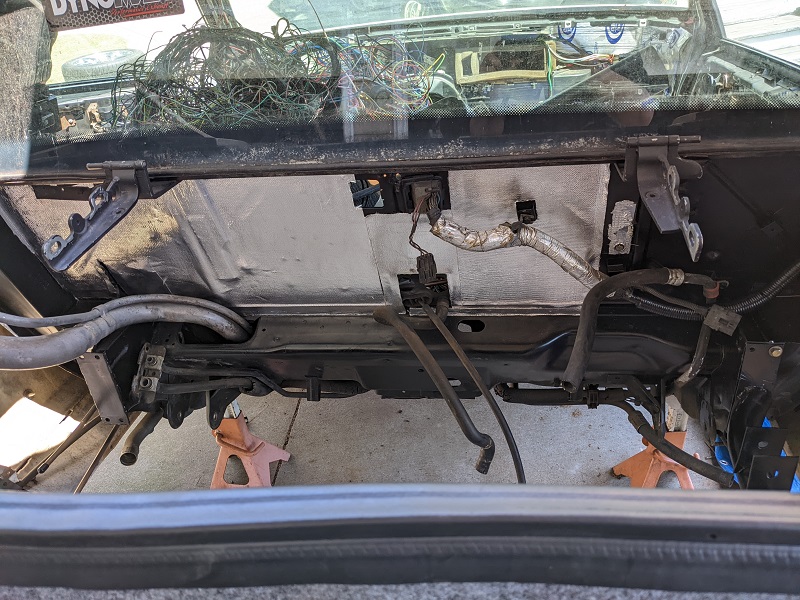
We had to finish installing FieroGuru's hood hinge on the passenger side, and then we finished putting in the Thermo-Tec material on the bulkhead. I got a picture before we finished with the hinge and material, but we were in such a hurry to get the engine in today (Mike had other obligations), I didn't take a picture afterwards.
As Will called out, I had the wastegate blanket on wrong. when I got there I asked Mike for the "weird locking tool to clip wires while spinning them" and he says "what for?" and I say "So I can fix this turbo blanket." "I was wondering when you were going to figure that out." "I didn't, Will told me." he laughed. We fixed it.
Putting the body back down on the engine was very slow going, a lot to watch, as as the body moved down in an arc, we would need to stop and wiggle my skid around a bit to make sure things stayed aligned and didn't hit.
Thankfully, the only thing we had to do was unscrew the AN lines that run coolant to the wastegate. Mike has a solution, I need to reach out to Tial and see if they make a 90 degree fitting for that. The part that screws into the body of the wastegate appears to be proprietary.
We also knew the oil dipstick was going to be an issue. I need to look through FieroGuru's thread to see how he dealt with this. Where it is now, it is literally unusable. We knew this could happen.

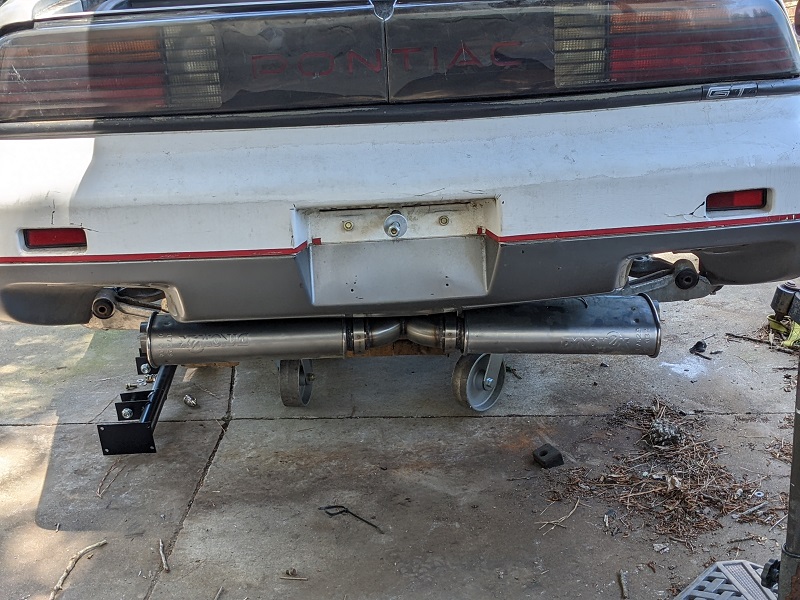
Lastly, the mufflers are visible under the car from just a few feet back. We knew this would be a case, too. The back of the car is still up, the car is resting on the engine skid. The nice part with the v-band setup is that if I don't like these mufflers, popping them off, getting some new bands, new mufflers, Mike does some welding, and they are back on!
With the "y" pipe they are out a little further to the sides than we hoped, Mike said he can still do up some nice tips for them.
Unfortunately it won't be running for Carlisle, we still have hours of wiring to do, need to finish running hoses (and fabricating connections for them in places). Plus gas tank fabrication.
Eagle eyed people may notice the spark plugs aren't in right now. Mike wants to spin the engine by just the starter to cycle the oil through. Having the plugs out will make it less stress on the starter (effectively no compression). It will also let us get an idea of how tough it may be to change plugs in the future.
We aren't doing it out of the car because we need to modify a pocket so the starter bendix engages the flywheel, and the cradle skid is preventing that.
[This message has been edited by Trinten (edited 03-26-2023).]
|
|
|
|
fieroguru
|
JUN 05, 09:16 PM
|
|
| quote | Originally posted by Trinten:
We also knew the oil dipstick was going to be an issue. I need to look through Fiero-Guru's thread to see how he dealt with this. Where it is now, it is literally unusable. We knew this could happen.
|
|
Looking good Vince!
Stock routing:
Cut the stock bracket/tab off, rotate the stock dipstick to the driver side (some slight bending required). Once it is in position, modify the old bracket/tab for the new location and tack weld it into place.

|
|
|
|
Trinten
|
JUN 05, 09:20 PM
|
|
Thank you! And thank you for replying back to my email so expeditiously. As always, I am grateful your willingness to help and completeness of information. You will never need to pay for a meal or a drink if I'm around.
|
|
|
|