
 
     |
| Northstar rebuild: Will style (Page 61/119) |

|
Will
|
OCT 03, 11:05 AM
|
|
I still have the break-in oil and dissolved assembly lube in the engine. Sometime soon I'm going to need to change that out (all 7 quarts of it), clean out the Pure Power oil filter and use the 2nd half of my 5 gallon bucket of Shell Rotella T CI-4 10W30.
Cometic has recommended that I retorque the head studs following the initial thermal cycles. Joy. I *think* I can do that with the cradle fully bolted for the rear bank and only have to drop the rear of the cradle (with weight on wheels) to do the front bank. I think.[This message has been edited by Will (edited 10-04-2010).]
|
|
|
|
Will
|
OCT 03, 11:32 AM
|
|
Disconnect C203; Probe both sides of pins B & L (ALDL pin G should have same readings as engine side of C203-L)
DVM indicates:
C203-B body side to ground: OPEN (expected)
C203-L body side to ground: 3.1 Ohm (expected; Fuel Pump motor)
C203-B engine side to ground: -6 Ohm (Yes, MINUS six ohms)
C203-L engine side to ground: 40 k-Ohm (undesirable but harmless)
Step next:
DISCONNECT NEGATIVE BATTERY CABLE YOU IDIOT
Disconnect Fuel Pump Relay and reprobe body side of B & L
C203-B engine side to ground: 0.2 Ohm (Ground fault)
C203-L engine side to ground: 40 k-Ohm
Step after:
Disconnect oil pressure sender and reprobe
C203-B engine side to ground: OPEN
C203-L engine side to ground: 40 k-Ohm
Then:
Reinstall fuel pump relay
C203-B engine side to ground: 3.5 Ohm
C203-L engine side to ground: 40 k-Ohm
Huh?:
Disconnect fuel pump relay
C203-B engine side to ground: 10 Ohm (also reflected on Fuel Pump Relay pin D)
C203-L engine side to ground: 40 k-Ohm
Meter indicates relay has correct continuity and isolation.
Assume: Relay is ok and reading going from 3.5 Ohm to 10 Ohm is the result of manipulating harness with wiring fault.
Great. I have a serious wiring fault on ckt 440.[This message has been edited by Will (edited 10-03-2010).]
|
|
|
|
Bloozberry
|
OCT 03, 11:48 AM
|
|
| quote | Originally posted by Will:
Cometic has recommended that I retorque the head studs following the initial thermal cycles. |
|
How do you plan to do that? Loosen them all back off and start with the four step process all over again (22 lbft/60*/60*/60*)? That could get fun... NOT!
|
|
|
|
Will
|
OCT 03, 11:56 AM
|
|
| quote | Originally posted by Bloozberry:
How do you plan to do that? Loosen them all back off and start with the four step process all over again (22 lbft/60*/60*/60*)? That could get fun... NOT! |
|
On Alan Johnson's recommendation, I torqued the studs to 70 ftlbs. With plenty of ARP moly assembly lube under the nuts and on the upper threads, that should be fine. To retorque, I'll just break them loose one at a time and bring them back up to 70 ftlbs. I'll probably add a little more assembly lube to the nuts.
The GM torque sequence does not apply to MLS gaskets because they don't compress the same as GM's composition head gaskets do.[This message has been edited by Will (edited 10-03-2010).]
|
|
|
|
Bloozberry
|
OCT 03, 03:50 PM
|
|
Well that should be a lot easier. I can't imagine trying to use the angle meter successfully on the front head bolts with it facing the other way. You'd need a mirror and then lefty-loosey-righty-tighty gets all jumbled up. 
|
|

|
30+mpg
|
OCT 04, 08:43 PM
|
|
I though retorque meant to torque the bolts in sequence to the recommended final spec to take up any slack due to streching, not to loosen & retighten. That how I did Fiat & Lancia heads.
Congrats on getting it running. When was the previous time under power, 7 years ago?
|
|
|
|
Bloozberry
|
OCT 04, 09:39 PM
|
|
| quote | Originally posted by 30+mpg:
I though retorque meant to torque the bolts in sequence to the recommended final spec to take up any slack due to streching, not to loosen & retighten. |
|
That's how it's done on many engines, but the standard Northstar head bolt tightening sequence goes like this:
First tighten all bolts to 22 lbft, then go over them a second time at the same torque setting
Second, turn each bolt (in the proper sequence) an additional 60 degrees;
Third, turn each bolt again an additional 60 degrees; and
Finally, turn each bolt yet again an additional 60 degrees.
So in the end, you're not torquing to a value you can set on your torque wrench, but rather a specific number of degrees of rotation after the nominal 22 lbft is achieved. This makes retorquing the head bolts not as straight forward as just dialing up the wrench and retightening them to the original torque value. With the exception of Will's case, retorquing the headbolts on a typical Northstar would involve loosening them all, and running through the entire sequence all over again.
|
|
|
|
Will
|
OCT 04, 09:54 PM
|
|
| quote | Originally posted by 30+mpg:
I though retorque meant to torque the bolts in sequence to the recommended final spec to take up any slack due to streching, not to loosen & retighten. That how I did Fiat & Lancia heads.
|
|
A head bolt shouldn't permanently deform. However, since those are Italian cars and Ducati had to develop desmodromic valve actuation because they couldn't get good spring steel...
Loosening the bolt first is the best practice. Because the coefficient of moving friction is lower than the coefficient of static friction... if the bolt/nut is turning when the torque wrench clicks, then less of the torque is mitigated by friction and more is applied to pulling the bolt/stud (and sealing the head gasket).
|
|
|
|
Will
|
OCT 09, 09:17 PM
|
|
I was at the junk yard *ALL* day today getting parts for the Eagle, so I didn't get the wiring problem sorted.
However, I *DID* find an '87 4 cyl 5 speed in the crush row that had *beautiful* grey leather seats, probably Mister Mike's seat covers, and in *excellent* condition. The yard gave me the seats for free with all the other stuff my dad and I bought. Sweet.
Although I didn't get The Mule going, I did grab a Dana 44 with 3.54 gears for my '85 AMC Eagle wagon.
|
|
|
|
Will
|
OCT 24, 10:19 AM
|
|
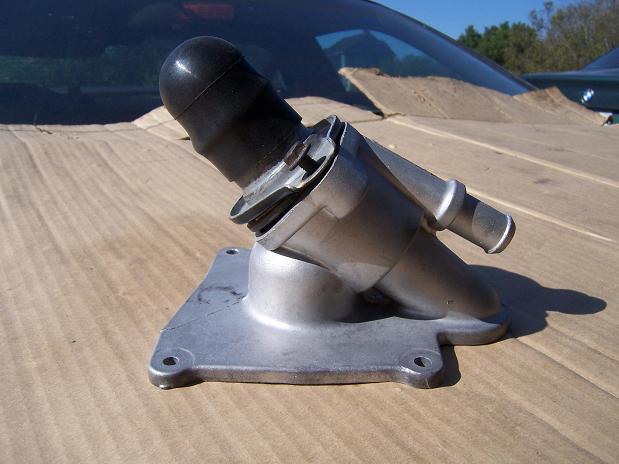
This is my pressure test plate for Northstar thermostat housings

This is a Northstar thermostat housing with the hose connection capped off
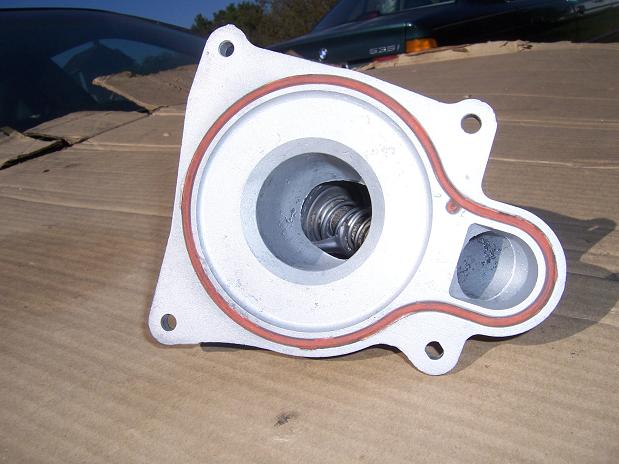
This is the inside of the T-stat housing. The center hole goes to the waterpump inlet. The waterpump pushes water into the block. The water returns from the heads to the water manifold and can go to the heater core, the radiator or back to the offset opening in this picture.
-If it goes to the heater core, it comes back to the smaller uncapped connection in the picture above, goes around the thermostat and straight into the waterpump inlet.
-If it goes to the radiator, it comes back to the capped connection in the picture above and is metered by the thermostat into the waterpump inlet
-If it goes straight back to the thermostat housing, it goes through the recirculation valve portion of the thermostat and back into the waterpump inlet.
-If the thermostat is closed, then the pressure at the offset inlet below lifts the recirculation valve (which is only spring loaded, not temp controlled) and goes back into the waterpump
-If the thermostat is open, then the water coming back from the radiator can go through the T-stat to the waterpump inlet. Since there is less recirculation flow from the engine, there is less pressure holding the recirc valve open and the spring force closes it.
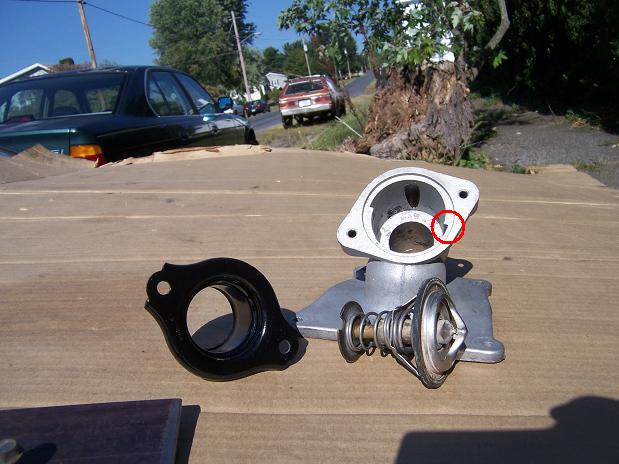
This is the disassembled t-stat housing. The red circle highlights a feature of the housing that requires preferential orientation of the T-stat itself
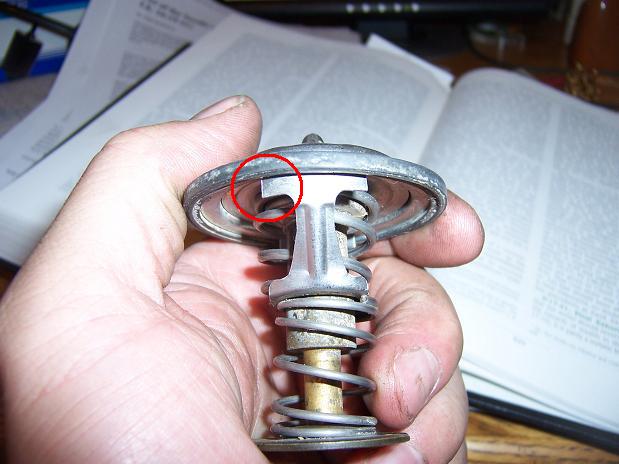
This is the Northstar thermostat. The red circle highlights the part of the T-stat that interacts with the highlighted feature of the housing to require a preferential orientation. WTF? Why, GM, why?
 [This message has been edited by Will (edited 10-24-2010).]
|
|
|
|