 
     |
| The Miura project begins (Page 60/84) |

|
Sofa King
|
MAY 03, 08:38 AM
|
|
WOW! Great progress! The "knock offs" look fantastic! Can't wait to see the interior finally come together.
Keep up the amazing work!
|
|

|
whodeanie
|
MAY 04, 08:25 PM
|
|
Nice work as always guys  I can't wait to come up for the Dells and stop by so I can see this car in person. I can't wait to come up for the Dells and stop by so I can see this car in person.
D.
|
|
|
|
Archie
|
MAY 07, 10:04 PM
|
|
Gonna try to bring this thread up to date tonight.....
During the last few weeks we've been working in a lot of areas of this car.
My post a few days ago talked about a few of them.
This post is about making the grills on the top of the front clip.
In making the grills for the top of the nose, there are several things to consider..
The back line of the openings are straight & the 2 pins that hold the grills together are parallel to the back line of the opening.
The front line of the opening is at an angle to the back line & is slightly curved.
The breakout line near the front of the slats is parallel to the front line of the opening.
This is what we're trying to duplicate....
.JPG)
.JPG)
.JPG)
We made these out of 1/8" x 1.5" 6061 aluninium bar stock. We needed 27 slats for each side & no 2 of them are exactly the same shape so a CNC made part was out of the question. It would be imposible to make them one at a time so I made them in a block of 27 at a time. Because different features of each part are based on different locations on the part, I needed to use 2 sets of locating (tooling holes). One set of the holes are also going to be the holes that hold them together when assembled. Those holes are the holes we will machine the back end of the parts from. The 2nd set of holes are off the part (will be cut off before the parts are finished) & will be used for cutting all shape of the front of the part & the location of the breakout on the top of the part. There will be one shift of the parts to make the front end of the parts follow the curve of the front line of the opening in the front clip.
The tooling I have for mt Bridgeport is limitedl so this is how I had to do them.
_1.JPG)
.JPG)
.JPG)
.JPG)
.JPG)
.JPG)
.JPG)
.JPG)
.JPG)
.JPG)
.JPG)
.........
|
|
|
|
Archie
|
MAY 07, 10:18 PM
|
|
.JPG)
1st test fit, notice the tooling tab still sticking up.
.JPG)
.JPG)
.JPG)
These are put together will threaded rod using .437" aluminium spacers that the customer found on the internet.
.JPG)
.JPG)
.JPG)
Because the surface of the fiberglass, in the windows where these will mount, is uneven, we made mounting pads for the corners of each grill.
.JPG)
.JPG)
.JPG)
When mounted they look pretty good.....
.JPG)
.JPG)
.JPG)
.JPG)
.JPG)
.JPG)
Next week these grills will go out for a Satin black powdercoating.
Archie
|
|

|
Jim88GT
|
MAY 07, 10:49 PM
|
|
Nicely done!
Jim 
|
|
|
|
Archie
|
MAY 07, 10:52 PM
|
|
More stuff that we've been up to.....
At some point after re-assembling the headlight, we noticed that one of the old plastic headlight coversm had a crac in it.
.JPG)
.JPG)
I looked all over the Internet & couldn't find a replacement lense. So we decided to make our own. We used the old cover to make a mold & with body filler & sanding, Rob & Kris came up with this ....
.JPG)
With heat they tried to get the plastic to lkay down in the fixture. it was ok, but to get the plastic to lay down into the form they added a vacuum feature to the form.
.JPG)
.JPG)
.JPG)
Then the question was what to use to create a vacuum...
.JPG)
A hose....
_1.JPG)
& a Fiero power brake booster hose.....
.JPG)
Good thing it was a high performance V-8 Fiero because the vacuum sucked the vacuum right down into the form.
The cover turned out so nice we made several of them....
.JPG)
.JPG)
.JPG)
.JPG)
.JPG)
Archie
|
|
|
|
Archie
|
MAY 07, 11:33 PM
|
|
Even more stuff finished this week.....
Earlier in this trhread we showed the seats for the car. they are theplastic racing seats that you can buy from several suppliers. We trial fitted them and build a mounting system for them & the customer had them upholstered.
When he was here several weeks agoto check the car out, we had him try the seats on for size. It was decided to try to modify the seats & mounting system even farther to maximize the headroom.
.JPG)
Rather than experiment with the seats that had already been upholstered, we bought another plastic seat to experiment with.
This week Kris got a chance to do that.
.JPG)
.JPG)
And he made a new mounting plate that would use the same sliders that we had originally used...
.JPG)
.JPG)
.JPG)
.JPG)
We trial fitted it & it looked like we had gained about another 3/4". Once the mods were approved by the customer, we finialized the mounts & they looked like this before painting...
.JPG)
.JPG)
Then we set out to modify the good seats.
.JPG)
.JPG)
Then with the painted mounts on them....
.JPG)
.JPG)
.JPG)
You can compare the seat location in this picture to the 1st pic in this post.
.JPG)
Archie
|
|
|
|
katatak
|
MAY 07, 11:53 PM
|
|
This is a great pic - a Miura - made in America!
.JPG)
Pat
P.S. I love the enginuity and skill that you and your guys show us with every post. The headlight cover is brilliant! If you can't find it, build it - no matter what it is. Absoulutely amazing Archie![This message has been edited by katatak (edited 05-08-2010).]
|
|
|
|
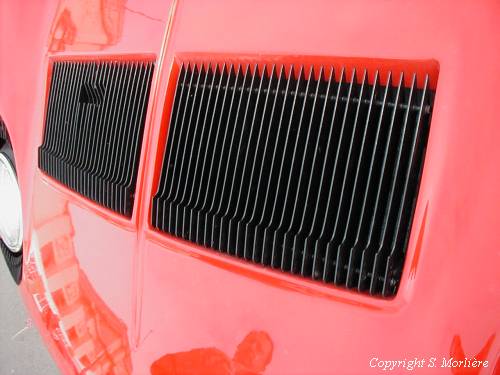
Archie
|
MAY 08, 12:01 AM
|
|
We also have been working on a few other things.....
Billit Aluminium mounts for the front clip struts.
.JPG)
.JPG)
Final sanding, primer & installation of the rear louvers...
.JPG)
.JPG)
.JPG)
Mounting of the outside mirrors...
.JPG)
_1.JPG)
_1.JPG)
The mounts for the rear clip struts have been powdercoated....
.JPG)
.JPG)
.JPG)
Insulation installed in the trunk area.
.JPG)
Upholster is done on the panel behind the seats...
.JPG)
.JPG)
There we go, finally caught up.
Archie
|
|

|
motoracer838
|
MAY 08, 11:10 AM
|
|
|
|
