
 
     |
| IMSA widebody installation - Russ style (Page 6/56) |

|
Russ544
|
OCT 01, 11:27 PM
|
|
CHAPTER 9
Today I pulled off the door skin, as several tasks were easier to accomplish with it removed. One task was to repair the lower hinge. I had cleverly taken a lower hinge off a parts car several days ago and taken it to work with me so I could fabricate a new detent roller on my lathe, and replace the hinge pins. Except for the mental trauma of dealing with that dang spring, I was really proud of the way it came out, and sure that I was saving a bunch of weekend time by doing it this way.......... Do you know the saying about "the best layed plans"? Much to my disgust, I discovered today that the bolt holes on a lower hinge from an 84 don't line up with those from an 88  . One of these days I swear I'm gona' pour a can of gas on that damn 84 and burn it to the ground wile throwing rocks at it and chanting "burn baby burn" . One of these days I swear I'm gona' pour a can of gas on that damn 84 and burn it to the ground wile throwing rocks at it and chanting "burn baby burn"  .... anyway.... I was able to remove the new pin I made from the 84 hinge and install it in the 88, so it wasn't a total loss. .... anyway.... I was able to remove the new pin I made from the 84 hinge and install it in the 88, so it wasn't a total loss.
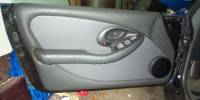
This car will be going from black to white, so having the skins off provided a good opportunity to sand and paint the doors edges and other hard to mask areas. The outer door handle and the little piece of trim behind it need to be installed with the skin off, so it's a good time to remove the round trim and install ribbed after painting behind those areas as well.

As I mentioned last weekend, I had quite a time getting the drivers side lower Gfx to fit to my satisfaction. Unfortunately I didn't take a decent photo of the problem area, but what it was, was that the ends of the lower Gfx piece didn't mate up with the corresponding areas of the front or rear fenders very well. Now this was in no way the fault of the way Sage made the parts, as he just pulls parts from the molds he has to work with. My guess is that IRM knew that these areas would need some grinding anyway, due to variations in each car, so they weren't too concerned with fit and finish on those points. Each car is a little different, and the length needs to be adjusted to get correct door/fender gaps. Unfortunately nobody told Sage or myself about this, so by the time the ends were ground down enough to get the door gaps reasonable, and the parts themselves mating up properly, it was necessary to grind almost clear through the ends in several places, which left them too weak to support the mounting hardware. I added 4 layers of glass mat to the inside of each end of mine, and I think Sage will be building future parts thicker in this area now that we know what to expect. After being built up inside, riv-nuts can be installed in each end to secure them to the fenders. Pop rivets will also be used in the flange under the car, and in the top, similar to the stock Fiero parts.
Sage offered to build me new Gfx pieces at no cost to me, but I figure that these things are just part of the "guinea pig clause" in my contract for this project  . That's the main reason I got the good guy deal from Doug on this kit. this is the first IMSA out of these molds in many years, so we all expected there would be some problems to solve along the way. . That's the main reason I got the good guy deal from Doug on this kit. this is the first IMSA out of these molds in many years, so we all expected there would be some problems to solve along the way.
We didn't know about the lower Gfx issue at the onset, but we did know that something needed to be done for upper Gfx pieces.
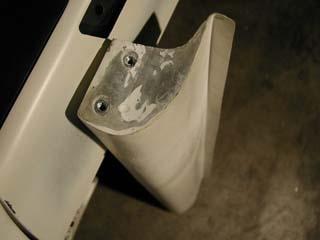
At one time IRM made these kits with full fiberglass door skins with the Gfx molded in similar to the fenders, but for some reason they decided to begin using stock door skins and add the IMSA Gfx to them. the problem is,... however they accomplished that task is apparently lost under the dust of time, as no provision for attaching them was provided to Doug or Sage with the rest of the IRM molds. Once again Sage came to the rescue with a truly excellent solution. by using the stock GT/SE Gfx trim retaining strip and adding a return on the back of the IRM trim, a simple and effective method to retain the top of the trim was created. for the bottom Sage simply added several inches of glass so it will now reach under the door skin where it's attached into the bottom of the door via pop rivets.
Now all I have to do tomorrow is just what I did today........ except on the passenger side  . .[This message has been edited by Russ544 (edited 07-08-2009).]
|
|

|
mrfixit58
|
OCT 02, 10:00 AM
|
|
|
Ver nice job. I've always loved the IMSA look. One question... since the round rib is molded into the fender and quarter panels, are you planning on molding the trim on the doors to match? Keep up the great work,
------------------
Roy double-click on this link to follow my interior build-up http://www.fiero.nl/forum/Forum1/HTML/023174.html Blue 87 GT w/ 4th generation Firebird interior.
Suncoast Fieros
Judged "Best Custom Interior" at the 20th Anniversary Show @ Pontiac, Mich - 7/2003
Judged "Best Custom Interior" at the 8th Annual Fiero Fun Weekend @ Daytona - 3/2004
|
|
|
|
Russ544
|
OCT 02, 12:54 PM
|
|
| quote | | Originally posted by mrfixit58: Ver nice job. I've always loved the IMSA look. One question... since the round rib is molded into the fender and quarter panels, are you planning on molding the trim on the doors to match? Keep up the great work,
|
|
One of the first questions I ask Sage when we were discussing the door skin situation was "how will I match the look of the trim on the door to the molded-in trim on the rest of the car?" The conclusion was that there are a couple of ways to make a more perfect match if a person wants to. You could permanently attach the door trim and fill in the gap on each side of it; or scribe a groove along the sides of the molded in trim to make it look like a separate piece; or lay a pinstripe with a slight contrast on either side of the trim to simulate a gap. Now that I've actually seen the parts in person I have to agree with Sage on this one however. from 5 feet away you don't notice the difference in the real and "fake" trim anyway, so I most likely won't alter it at all. I do plan to paint all the trim black however.
All the molded on trim on the IMSA is of the ribbed style btw, even on the fastback body style I believe. I personally prefer the ribbed trim anyway, but if you wanted the round it wouldn't be to hard to fill in the grooves in the ribbed IMSA molding to creat your own round trim. The beauty of fiberglass is that you can pretty much creat anything you want to with it. Cheers,
Russ
|
|
|
|
Russ544
|
OCT 02, 06:02 PM
|
|
BONUS ROUND:
Today is a rerun of yesterday in the IMSA garage, with the exception that it's happening on the opposite side of the car, so I'll throw this in instead.
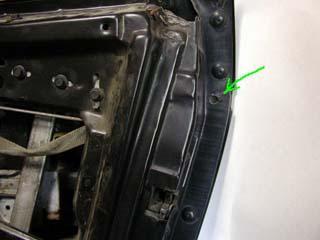
The door trim is easily removed, with the exception of the little piece behind the door handle. that one piece is retained by a single screw that goes in from the back side of the door skin. To get to it you can remove the door skin........ or simply drill a small hole (note green arrow) in the door to access the phillips head screw.[This message has been edited by Russ544 (edited 07-08-2009).]
|
|
|
|
Russ544
|
OCT 03, 11:39 PM
|
|
CHAPTER 10
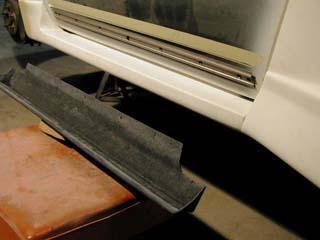
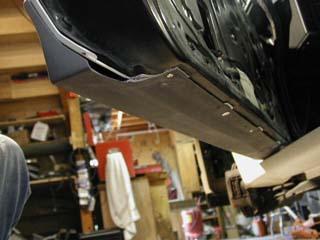
It's been a productive weekend . Both doors were gutted, sanded and edge painted, Gfx trim installed and the drivers door lower hinge repaired. As I mentioned the other day, Sage came up with a really clever solution to mounting the Gfx on the door skins, which are now installed as well. This is what it looks like from the bottom with a couple of the rivets installed.
It works great Tedd. plenty of room under the door for them without hitting the lower Gfx or door sill.
Even though this is a "race inspired" car, some concessions had to be made for street legality, such as installing side marker lights, license plate mounting, and rear license plate lights. Those parts were confiscated from a parts car and holes drilled and riv-nuts installed for there future installation after the car gets painted. Holes were drilled to receive the rear reflectors as well.
It was time to clean my shop and regroup by late Sunday, so wile the car was outside it received a good BonAmi water and scotch pad scrubbing to remove any remaining mold release, greasy fingerprints and other stray crud.
I still need to finalize a rear decklid, which needs a bit more air cleaner clearance and hot air extraction, but I can see a day when paint will be sprayed before too much longer .
A machinist friend of mine will be making some steel wheel adaptors for me. I gave up on finding the style wheels I wanted with the correct backspacing, width, diameter, etc., so I'm converting to a more common Chev 5 x 4.75 bolt pattern. I wouldn't trust those aluminum wheel adaptors as far as I could throw one, but these steel ones will be super strong.
Now I need to go back to work so I can relax for a few days
<til next weekend>,
Russ[This message has been edited by Russ544 (edited 07-08-2009).]
|
|
|
|
Sage
|
OCT 04, 12:18 AM
|
|
|
That is looking fantastic Russ! Glad the door strips worked out, I DID have some doubt, not having installed any myself, but knew that if they COULD work, you WOULD make them work, nice job. Can't tell you how gratifying it is to see this thing come together. There was never any doubt about your being able to do it in my mind, but it's still very satisfying to see it happening. Am really enjoying your installments and look forward to the next chapter as soon as I'm done viewing the last one for the 7th time!  Your trials and tribulations will be of immense value in building the next kit, and hopefully avoiding some of the same pitfalls for the next builder of an IMSA wide body. Thanks for that too! Your trials and tribulations will be of immense value in building the next kit, and hopefully avoiding some of the same pitfalls for the next builder of an IMSA wide body. Thanks for that too! Keep up the great work and thanks for taking it easy on me for the idiosyncrasies of the kit that I really had no control over. You are doing a fantastic job, as was anticipated. Thanks for doing this thread too, I'm sure from some of the other responses, I'm not the only one getting into it. Have a good one!
|
|
|
|
Blacktree
|
OCT 04, 12:26 AM
|
|
|
This thread ROCKS! I've always liked the IMSA widebodies. And Russ is doing a fantastic install job.
|
|
|
|
fierogt4e
|
OCT 04, 10:25 PM
|
|
Russ your attention to details and to the fit of the kit has inspired me to take another look at the fit of my GT/4E (modified IMSA) to see if I can use some of your tips to make it better.I check your thread every day. You mention that you may do something for �hot air extraction�. I refer to the �scoops� on my rear deck as air extractors. They also move the wing up and back to get it into a cleaner air stream and reduce air from the engine compartment from corrupting it. (I think) It mite not be your �cup of tee� but check it out.
.
 ------------------
Sincerely
George
www.switch-tray.com
|
|
|
|
boristheblade
|
OCT 04, 11:31 PM
|
|
Very nice George, I like.
It looks like it hasn't been getting any attention lately though .
|
|
|
|
Russ544
|
OCT 04, 11:58 PM
|
|
Hey Geroge,
The rear decklid vents/wing stands you made are defiantly unusual. I like it ! I would have never thought of doing it that way but I imagine it works quite well by getting the vents back far enough to get back into the airflow where they can create some vacuum.
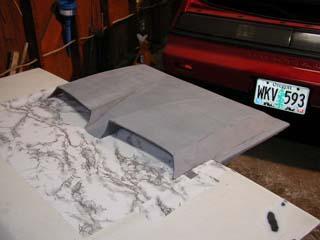
I do already have a plan for mine however. In fact you may find that by the time I mention a specific portion of my project I've most likely been thinking about it for quite some time. I tend to do most of my "development work" in my head, with quite a bit of detail, before making any mention of it . About a year ago, when I was working on my sbc project, I built a plug and a mold for rear decklid "scoops" that would bolt onto an 84 style decklid in place of the vent section. My idea was to develop a system that any novice could just bolt on without any glass work involved. I was never totally satisfied with the shape, so it kind of got put on the back burner......... until now. I did pull one scoop from my mold and install it on my sbc project, but it still needs some reshaping to satisfy my vision of what it should look like. I don't have a decent photo of the finished and painted product but here's the raw part as it came out of the mold, sitting on an 84 decklid.
Part of that same sbc project involved making a fairly elaborate fan system to pump cool air into the engine compartment.

It does work excellent on that car, but I'm beginning to think along the lines of not using a fan, but rather just opening up the side IMSA vents and running flexable ducts back into the engine compartment. perhaps even utilizing a sealed cool air box surrounding the carb, but that part isn't fully "developed" yet .
So was your Widebody made by IRM? What engine are you running in it?....... interesting exhaust system
Cheers,
Russ[This message has been edited by Russ544 (edited 07-08-2009).]
|
|
|
|